

Getting kids involved in cookie decorating makes for an easy activity around Halloween. These recipes use simple ingredients and steps that work for little hands. You will find a mix of cookie bases with decoration ideas that suit different ages. Each one includes tips to keep the process straightforward at home. Pick the ones that fit your time and supplies.
Helpful Tips Before You Start
These tips keep the focus on fun while making the process easier for kids.
Bake Cookies Ahead
Prepare and bake the cookies the day before decorating. This removes wait times and lets kids jump straight into the fun part.
Set Up Small Stations
Place icing, sprinkles, and candies in separate small bowls around the table. Kids can reach supplies without crowding or spilling large containers.
Use Squeeze Bottles
Fill squeeze bottles with thinned icing instead of piping bags. Kids gain better control and make fewer messes with this simple swap.
Keep Designs Simple
Choose cookie shapes like pumpkins or ghosts that need only a few details. Simple outlines help younger kids finish their cookies without frustration.
Ghostly Vanilla Sugar Cookies with Royal Icing Eyes
These ghost-shaped sugar cookies give kids a simple way to join in the decorating. The vanilla flavor comes through clearly in the buttery dough, and the finished cookies have a light snap at the edges with a soft center.
The royal icing eyes are quick to pipe and dry firm, so the cookies stack well for parties or lunchboxes. Kids can focus on placing the eyes without needing advanced decorating skills.

Serves 4 people.
Ingredients
- 1 1/2 cups all-purpose flour
- 1/2 teaspoon baking powder
- 1/4 teaspoon salt
- 1/2 cup unsalted butter, softened
- 2/3 cup granulated sugar
- 1 large egg
- 1 1/2 teaspoons vanilla extract
- 1 1/4 cups powdered sugar
- 2 tablespoons milk
- 1/4 teaspoon meringue powder
- Black gel food coloring
Instructions
- Heat the oven to 350 degrees and line a baking sheet with parchment paper. Whisk the flour, baking powder, and salt in a bowl.
- In a second bowl, beat the butter and granulated sugar until light and fluffy. Add the egg and 1 teaspoon vanilla extract, then mix until combined.
- Stir the dry ingredients into the wet mixture until a soft dough forms. Roll the dough between two sheets of parchment to 1/4-inch thickness.
- Cut out ghost shapes with a cookie cutter and place them on the prepared sheet. Bake for 8 to 10 minutes until the edges are lightly golden. Cool completely on a wire rack.
- While the cookies cool, stir together the powdered sugar, milk, meringue powder, and remaining 1/2 teaspoon vanilla extract until smooth. Divide a small portion into a separate bowl and tint it black with gel food coloring.
- Pipe white icing onto each cookie to form two oval eyes. Add a small black dot to each eye with the tinted icing. Let the icing set before moving the cookies.
Extra Tips
Roll the dough between parchment so it does not stick and keeps an even thickness. If the icing feels too thick for piping fine lines, add milk one drop at a time. Store finished cookies in a single layer in an airtight container at room temperature for up to three days.Course: Dessert Cuisine: American Equipment: Mixing Bowl, Baking Sheet, Rolling Pin, Ghost-shaped Cookie Cutter, Piping Bag
Jack-O’-Lantern Pumpkin Spice Cut-Out Cookies
These cookies give kids a simple way to join in the fun on Halloween. The dough rolls out easily and holds its shape, so little hands can help cut and then decorate the faces once the cookies cool. The result is a lightly spiced treat with a soft center and crisp edges.
Pumpkin puree keeps the cookies tender while the warm spices add familiar fall flavor. After baking, a quick icing turns each cookie into a jack-o’-lantern ready for decorating.

Serves 4 people.
Ingredients
- 1 1/2 cups all-purpose flour
- 1/2 cup canned pumpkin puree
- 1/4 cup unsalted butter, softened
- 1/3 cup granulated sugar
- 1 teaspoon pumpkin pie spice
- 1/2 teaspoon baking powder
- 1 large egg
- 1 teaspoon vanilla extract
- 1 cup powdered sugar
- 2 tablespoons milk
- Orange food coloring
- Black food coloring
Instructions
- Heat the oven to 350 degrees and line a baking sheet with parchment paper.
- In a mixing bowl, beat the softened butter and granulated sugar until smooth.
- Add the pumpkin puree, egg, and vanilla extract, then mix until combined.
- Stir in the flour, pumpkin pie spice, and baking powder until a soft dough forms.
- Roll the dough between two sheets of parchment to about 1/4 inch thick.
- Cut out shapes with a pumpkin or round cookie cutter and place them on the baking sheet.
- Bake for 10 to 12 minutes until the edges are lightly golden, then let the cookies cool completely on a wire rack.
- In a small bowl, stir the powdered sugar and milk together until smooth, then divide the icing into two bowls.
- Tint one bowl orange and the other black with the food coloring.
- Spread orange icing over each cooled cookie and use the black icing to draw jack-o’-lantern faces.
Extra Tips
Chill the dough for 20 minutes if it feels too soft to cut cleanly. Use a small piping bag or zip-top bag with a tiny corner snipped off for neat face details. Store finished cookies in a single layer in an airtight container so the icing stays intact.Course: Dessert Cuisine: American Equipment: Mixing Bowl, Baking Sheet, Rolling Pin, Cookie Cutters, Wire Rack
Dark Chocolate Bat Cookies with Orange Drizzle
These dark chocolate bat cookies give kids a simple way to join in on Halloween baking. The shapes come out easily with a cutter, and the orange drizzle lets everyone add their own spooky touch without much fuss.
The cookies bake up crisp with a solid cocoa flavor that balances the sweet orange topping. They fit well for an afternoon activity or a small gathering where children can focus on decorating.

Serves 4 people.
Ingredients
- 1 1/4 cups all-purpose flour
- 1/3 cup dark cocoa powder
- 1/2 cup unsalted butter, softened
- 1/2 cup granulated sugar
- 1 large egg
- 1 teaspoon vanilla extract
- 1/4 teaspoon salt
- 1 cup powdered sugar
- 3 tablespoons fresh orange juice
- Orange food coloring
Instructions
- Mix the flour, cocoa powder, and salt in a bowl until evenly combined. Set the bowl aside.
- In a second bowl, beat the softened butter and granulated sugar until the mixture looks light and fluffy. Add the egg and vanilla extract, then beat again until smooth.
- Stir the dry ingredients into the butter mixture a little at a time until a soft dough forms. Wrap the dough and chill it for 30 minutes.
- Heat the oven to 350 degrees and line a baking sheet with parchment paper. Roll the dough out on a lightly floured surface to about 1/4 inch thick.
- Cut bat shapes with a cookie cutter and place them on the prepared sheet. Bake for 10 to 12 minutes, then move the cookies to a wire rack to cool completely.
- Stir the powdered sugar, orange juice, and a few drops of orange food coloring together until the mixture reaches a drizzle consistency. Use a spoon or piping bag to add the orange drizzle over the cooled cookies.
Extra Tips
Chill the dough fully so the bat shapes hold sharp edges during baking. If the drizzle thickens while you work, add a drop more orange juice to loosen it. Store cooled cookies in a single layer in an airtight container to keep the drizzle from smearing.Course: Dessert Cuisine: American Equipment: Mixing Bowl, Baking Sheet, Cookie Cutter, Wire Rack
Candy Corn Sprinkle Sugar Cookies
These cookies give kids a simple way to join in the decorating fun without needing fancy tools. The sugar cookie base stays soft in the center with crisp edges, while candy corn pieces add chewy spots and sprinkles bring crunch and color. They work well for an afternoon Halloween activity or as a quick treat to pack in lunchboxes.
The finished cookies taste sweet and buttery with bursts of vanilla. The candy corn softens slightly during baking, and the sprinkles stay visible on top for a festive look.

Serves 4 people.
Ingredients
- 1 cup all-purpose flour
- 1/2 teaspoon baking powder
- 1/4 teaspoon salt
- 1/2 cup unsalted butter, softened
- 1/2 cup granulated sugar
- 1 large egg
- 1 teaspoon vanilla extract
- 1/4 cup candy corn, chopped
- 2 tablespoons orange and yellow sprinkles
Instructions
- Heat the oven to 350 degrees F and line a baking sheet with parchment paper.
- Stir the flour, baking powder, and salt together in a bowl.
- In a second bowl, beat the butter and sugar until smooth and light.
- Add the egg and vanilla to the butter mixture and mix until combined.
- Pour the dry ingredients into the wet ingredients and stir until a soft dough forms.
- Fold the chopped candy corn into the dough.
- Scoop rounded tablespoons of dough onto the baking sheet and flatten each slightly with your palm.
- Press sprinkles gently onto the top of each cookie.
- Bake for 10 to 12 minutes until the edges turn light golden.
- Let the cookies cool on the sheet for 5 minutes before moving them to a rack.
Extra Tips
Press the candy corn pieces in firmly so they stay put after baking. If the dough feels too soft to handle, chill it for 15 minutes. Store cooled cookies in an airtight container at room temperature for up to three days.Course: Dessert Cuisine: American Equipment: Mixing Bowl, Baking Sheet, Oven
Green Monster Face Matcha Cookies
These cookies use matcha to create a bright green base that kids can turn into monster faces. They suit a Halloween afternoon activity where children add the final details after baking. The flavor balances mild earthiness with buttery sweetness and a crisp texture.

Serves 4 people.
Ingredients
- 1 1/4 cups all-purpose flour
- 1/2 cup unsalted butter, softened
- 1/2 cup granulated sugar
- 1 large egg
- 2 tablespoons matcha powder
- 1 teaspoon vanilla extract
- 1/2 teaspoon baking powder
- 1/4 teaspoon salt
- 1/4 cup candy eyes
- 2 tablespoons chocolate chips
Instructions
- Preheat the oven to 350 degrees Fahrenheit and line a baking sheet with parchment paper.
- Cream the butter and sugar together in a mixing bowl until light and fluffy.
- Beat in the egg and vanilla extract until fully combined.
- In a separate bowl, whisk the flour, matcha powder, baking powder, and salt.
- Gradually add the dry mixture to the wet ingredients and stir until a dough forms.
- Scoop tablespoon-sized portions of dough, roll into balls, and place on the baking sheet. Flatten each ball slightly with your hand.
- Bake for 10 to 12 minutes until the edges are set. Cool completely on the baking sheet.
- Press candy eyes and chocolate chips into the cooled cookies to form monster faces.
Extra Tips
Press the chocolate chips point-side down to create simple mouths, and vary the number of candy eyes for different monster looks. The matcha dough holds its shape well during baking, so kids can focus on creative decorating without the cookies spreading too much. Keep leftovers in an airtight container at room temperature for up to three days to maintain crisp edges.Course: Dessert Cuisine: American Equipment: Mixing Bowl, Baking Sheet, Whisk
Witch Hat Shortbread Cookies with Purple Icing
These witch hat shortbread cookies give kids a simple way to join in on Halloween baking. The dough comes together quickly with basic pantry items, and the purple icing lets everyone add their own touch at the end. They work well for an afternoon activity or as a treat to share at a small gathering.
The finished cookies have a crisp, buttery shortbread base that holds its shape after baking. The icing sets with a light sweetness that complements the cookie without overpowering it.

Serves 4 people.
Ingredients
- 1 cup all-purpose flour
- ½ cup unsalted butter, softened
- ¼ cup granulated sugar
- 1 teaspoon vanilla extract
- 1 cup powdered sugar
- 3 tablespoons milk
- ½ teaspoon purple food coloring
Instructions
- Heat the oven to 350 degrees and line a baking sheet with parchment paper.
- In a mixing bowl, beat the softened butter and granulated sugar until smooth. Stir in the vanilla extract.
- Add the flour and mix until a soft dough forms. Divide the dough into four equal pieces and shape each piece into a simple witch hat form on the baking sheet.
- Bake for 12 to 14 minutes until the edges turn lightly golden. Remove from the oven and let the cookies cool completely on the baking sheet.
- While the cookies cool, whisk the powdered sugar, milk, and purple food coloring in a small bowl until the icing reaches a smooth, spreadable consistency.
- Spread or pipe the purple icing over each cooled cookie. Allow the icing to set before serving.
Extra Tips
Shape the dough hats with a slight brim at the base so the purple icing has a clear area to cover. If the icing feels too thick after mixing, add milk one teaspoon at a time until it spreads easily. Store any leftovers in an airtight container at room temperature for up to two days.Course: Dessert Cuisine: American Equipment: Mixing Bowl, Baking Sheet, Oven
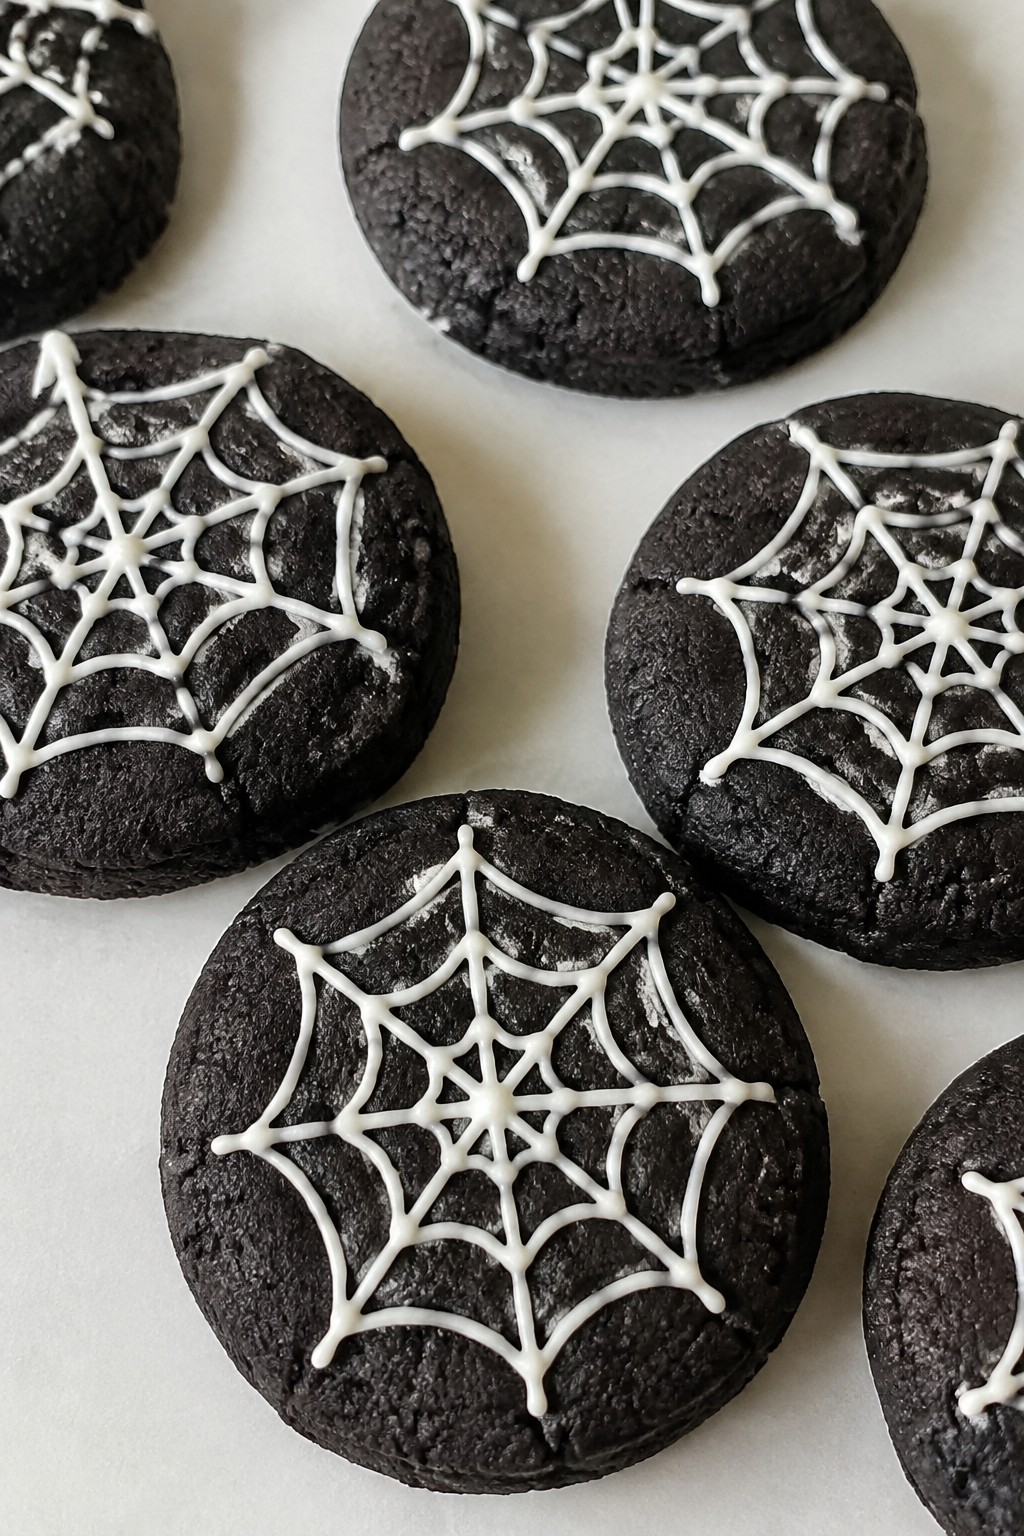
Spiderweb Black Cocoa Cookies
These cookies give kids a simple canvas for drawing spiderwebs with white icing. The black cocoa creates a dark base that shows off the design, and the chocolate flavor stays mild enough for young palates. They work well for an afternoon baking session before a Halloween party.
The finished cookies have a crisp edge and a soft center. Black cocoa keeps the color deep without needing extra dye, and the icing sets firm so the webs stay neat during transport.
Serves 4 people.
Ingredients
- 1 cup all-purpose flour
- 1/4 cup black cocoa powder
- 1/2 cup unsalted butter, softened
- 1/2 cup granulated sugar
- 1 large egg
- 1 teaspoon vanilla extract
- 1/2 teaspoon baking soda
- 1/4 teaspoon salt
- 1 cup powdered sugar
- 2 tablespoons milk
Instructions
- Heat the oven to 350 degrees and line a baking sheet with parchment paper.
- In a mixing bowl, beat the softened butter and granulated sugar until light and creamy.
- Add the egg and vanilla extract, then mix until combined.
- In a second bowl, whisk together the flour, black cocoa powder, baking soda, and salt.
- Slowly add the dry ingredients to the butter mixture and stir until a dough forms.
- Scoop tablespoon-sized portions of dough, roll them into balls, and place them on the baking sheet.
- Flatten each ball slightly with your palm and bake for 10 minutes.
- Let the cookies cool on the sheet for 5 minutes, then move them to a wire rack to cool completely.
- In a small bowl, stir the powdered sugar and milk together until smooth.
- Spoon the icing into a piping bag or zip-top bag with one corner snipped off.
- Pipe thin lines from the center of each cookie outward, then connect the lines with curved strokes to form a web.
Extra Tips
Make the icing a little thicker if you want sharper lines that hold their shape better on the dark surface. Store cooled cookies in an airtight container at room temperature for up to three days. If the dough feels too soft to roll, chill it for 15 minutes before shaping.Course: Dessert Cuisine: American Equipment: Mixing Bowl, Baking Sheet, Piping Bag
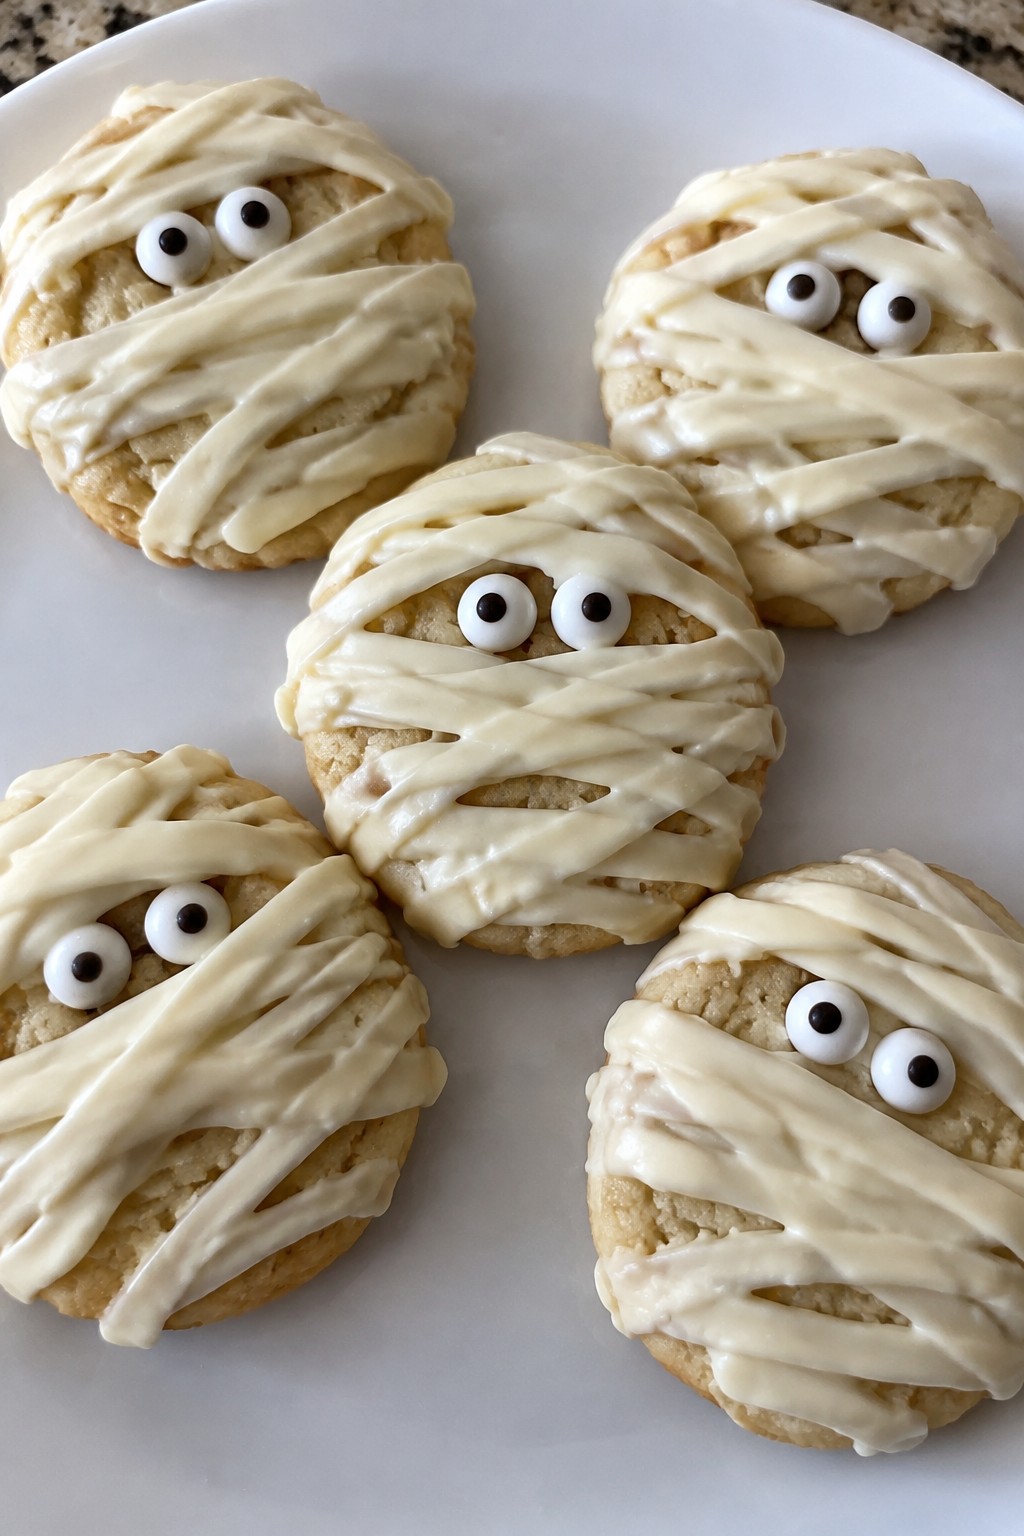
Mummy-Wrapped Vanilla Cookies with Candy Eyes
These cookies give kids a simple way to join in on Halloween prep. The vanilla base bakes up crisp and mild, then gets covered in white chocolate strips that look like bandages. Candy eyes peek out from the wrapping for a fun finish that still tastes like a classic sweet treat.
The recipe works well for an afternoon activity or a small party tray. Each cookie stays light in flavor so the white chocolate adds just enough richness without overpowering the vanilla.
Serves 4 people.
Ingredients
- 1 cup all-purpose flour
- 1/2 cup unsalted butter, softened
- 1/4 cup granulated sugar
- 1 teaspoon vanilla extract
- 1/4 teaspoon baking powder
- 1/4 teaspoon salt
- 1 cup white chocolate chips
- 12 candy eyes
Instructions
- Heat the oven to 350 degrees and line a baking sheet with parchment paper.
- In a mixing bowl, beat the softened butter and sugar until smooth.
- Stir in the vanilla extract, then add the flour, baking powder, and salt. Mix until a soft dough forms.
- Roll the dough into eight small balls and place them on the baking sheet. Flatten each one slightly with your palm.
- Bake for 10 to 12 minutes until the edges turn light golden. Let the cookies cool completely on the sheet.
- Melt the white chocolate chips in a microwave-safe bowl in 20-second bursts, stirring between each until smooth.
- Spoon the melted chocolate into a small zip-top bag, snip a tiny corner, and pipe thin lines across each cookie to create a wrapped look.
- While the chocolate is still soft, press two candy eyes onto each cookie.
Extra Tips
Pipe the chocolate lines quickly after melting so they stay thin and even. If the chocolate thickens, warm it for a few seconds more. Store cooled cookies in an airtight container at room temperature for up to three days to keep the chocolate from softening.Course: Dessert Cuisine: American Equipment: Mixing Bowl, Baking Sheet, Microwave-Safe Bowl
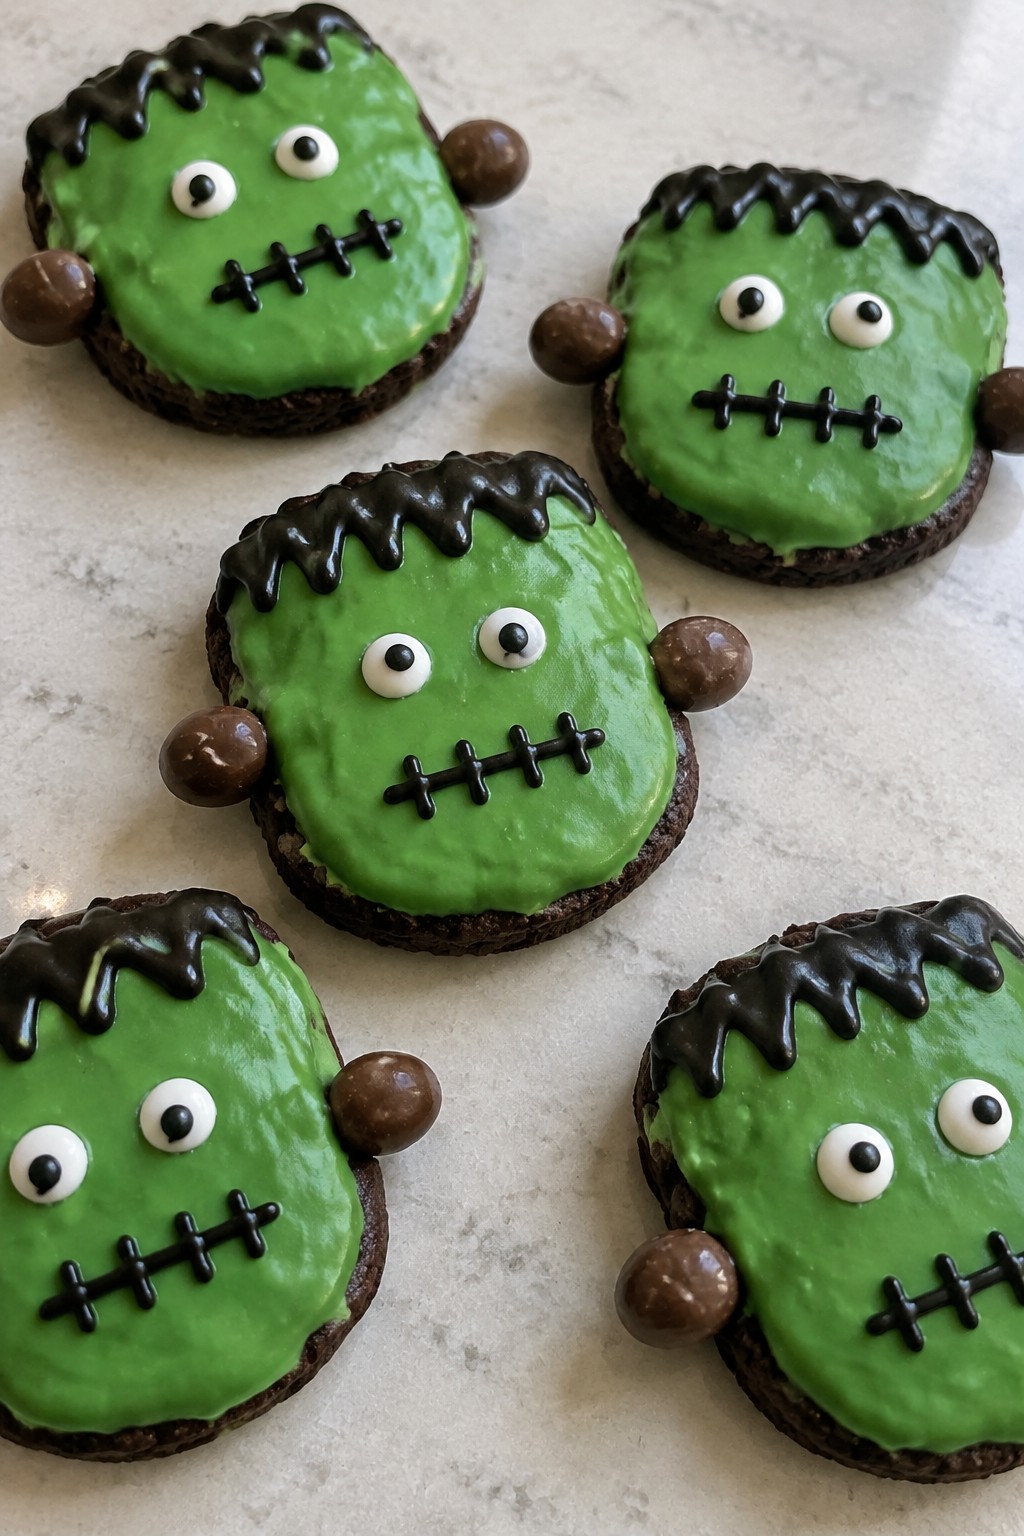
Frankenstein Brownie Cookies with Bolt Details
These brownie cookies give kids a fun way to create Frankenstein faces with green icing and simple bolt accents. They work well for an afternoon baking session before a Halloween party or as a hands-on treat to serve at home. The cookies have a chewy center and crisp edges with a deep chocolate taste that pairs nicely with the sweet topping.
Serves 4 people.
Ingredients
- 1/2 cup unsalted butter, melted
- 1 cup granulated sugar
- 2 large eggs
- 1 teaspoon vanilla extract
- 1/3 cup unsweetened cocoa powder
- 3/4 cup all-purpose flour
- 1/4 teaspoon salt
- 1/4 teaspoon baking powder
- 1 cup green candy melts
- 8 small chocolate-covered almonds
- Black icing in a tube
Instructions
- Preheat the oven to 350 degrees and line a baking sheet with parchment paper.
- In a mixing bowl, stir together the melted butter and sugar until smooth.
- Add the eggs and vanilla extract, then mix until fully combined.
- Stir in the cocoa powder, flour, salt, and baking powder until a thick dough forms.
- Scoop the dough into four equal portions and place them on the baking sheet, spacing them apart.
- Bake for 12 minutes until the edges look set. Let the cookies cool completely on the sheet.
- Melt the green candy melts in a microwave-safe bowl in 20-second bursts, stirring between each until smooth.
- Spread the melted candy melts over each cooled cookie to form the face.
- Use the black icing tube to draw hair, eyes, and a mouth on the green surface.
- Press two chocolate-covered almonds into the sides of each cookie to create the bolt details.
Extra Tips
Melt the candy melts just until liquid to avoid a thin layer that runs off the edges. The chocolate-covered almonds stay in place best when pressed in while the green coating is still warm. Store any leftovers in an airtight container at room temperature for up to two days.Course: Dessert Cuisine: American Equipment: Mixing Bowl, Baking Sheet, Microwave-safe bowl
Skeleton Bone Sugar Cookies with Icing Details
These cookies give kids a hands-on way to create Halloween treats that look like real skeleton bones. The simple sugar cookie dough holds its shape well during baking, and the icing lets everyone add fine details like joints and cracks. The finished cookies taste like classic sweet sugar cookies with a light crunch on the edges.
They work well for an afternoon baking session before a party or as a quiet activity on a rainy day. The texture stays tender inside with a slight snap, and the icing adds a smooth sweetness that pairs nicely with the plain cookie.

Serves 4 people.
Ingredients
- 1 1/2 cups all-purpose flour
- 1/2 cup unsalted butter, softened
- 1/2 cup granulated sugar
- 1 large egg
- 1 teaspoon vanilla extract
- 1/2 teaspoon baking powder
- 1/4 teaspoon salt
- 1 cup powdered sugar
- 2 tablespoons milk
- Black food coloring
Instructions
- Heat the oven to 350 degrees and line a baking sheet with parchment paper.
- In a mixing bowl, beat the softened butter and granulated sugar until light and fluffy.
- Add the egg and vanilla extract, then mix until combined.
- Stir in the flour, baking powder, and salt until a soft dough forms.
- Divide the dough into 12 equal pieces. Roll each piece into a short log and pinch the ends to create a bone shape.
- Place the shaped dough on the baking sheet and bake for 10 to 12 minutes until the edges turn lightly golden.
- Remove the cookies from the oven and let them cool completely on the sheet.
- In a clean bowl, whisk the powdered sugar and milk until smooth to make the icing base.
- Place a small portion of the icing in a separate bowl and stir in black food coloring to create a dark color for details.
- Use a piping bag with a fine tip to pipe white icing lines along each cookie to look like bones, then add black icing accents for joints and cracks.
Extra Tips
Shape the dough logs slightly thicker in the middle and thinner at the ends for a more realistic bone look. If the icing feels too thick for piping fine lines, add a few drops of milk at a time until it flows smoothly. Store cooled cookies in an airtight container at room temperature for up to three days to keep the icing from softening.Course: Dessert Cuisine: American Equipment: Mixing Bowl, Baking Sheet, Piping Bag
Black Cat Chocolate Cookies with Whisker Sprinkles
These black cat chocolate cookies make a simple Halloween activity that kids can join at the decorating stage. The dark cocoa base gives them a rich chocolate taste and a soft chewy bite once baked. They fit well as a quick project before a school party or neighborhood gathering.
The finished cookies look like little black cats with eyes and whiskers on top. Kids can help place the candy eyes and add the sprinkles without needing any special skills.

Serves 4 people.
Ingredients
- 1 cup all-purpose flour
- 1/2 cup black cocoa powder
- 1/2 teaspoon baking soda
- 1/4 teaspoon salt
- 1/2 cup unsalted butter, softened
- 3/4 cup granulated sugar
- 1 large egg
- 1 teaspoon vanilla extract
- 1 cup black candy melts
- 8 candy eyes
- 2 tablespoons whisker sprinkles
Instructions
- Heat the oven to 350 degrees and line a baking sheet with parchment paper.
- Stir together the flour, black cocoa powder, baking soda, and salt in a bowl.
- In a second bowl, beat the softened butter and sugar until light. Add the egg and vanilla and mix until smooth.
- Combine the dry ingredients with the wet mixture to form a dough. Roll the dough into a log, wrap it, and chill for 30 minutes.
- Slice the chilled dough into 8 rounds and place them on the baking sheet. Bake for 10 minutes, then let the cookies cool completely.
- Melt the black candy melts in the microwave in short bursts. Spread a thin layer over each cooled cookie.
- Press two candy eyes onto each cookie while the coating is still soft. Add whisker sprinkles around the eyes to form the cat whiskers.
Extra Tips
Chill the dough longer if your kitchen is warm so the cookies hold their round shape. Use a small spoon to control how much candy melt goes on each cookie and avoid drips. Store leftovers in an airtight container at room temperature for up to three days.Course: Dessert Cuisine: American Equipment: Mixing Bowl, Baking Sheet, Microwave
Owl Face Decorated Ginger Cookies
These owl face ginger cookies bring a fun Halloween twist that kids enjoy making. The spiced base pairs with sweet icing and simple candy details to create playful faces. They work well for an afternoon baking session or a small party activity. The cookies turn out crisp on the edges with a soft center and warm ginger flavor.

Serves 4 people.
Ingredients
- 1 1/2 cups all-purpose flour
- 1 teaspoon ground ginger
- 1/2 teaspoon ground cinnamon
- 1/4 teaspoon baking soda
- 1/4 teaspoon salt
- 1/4 cup unsalted butter, softened
- 1/4 cup brown sugar
- 2 tablespoons molasses
- 1 large egg
- 1 cup powdered sugar
- 2 tablespoons milk
- 16 chocolate chips
- 4 candy corns
Instructions
- Heat the oven to 350 degrees and line a baking sheet with parchment paper.
- In a mixing bowl, stir together the flour, ground ginger, cinnamon, baking soda, and salt.
- In a second bowl, cream the butter and brown sugar until smooth. Add the molasses and egg, then mix well.
- Combine the wet and dry mixtures to form a dough. Roll it out to about 1/4 inch thick on a lightly floured surface.
- Cut the dough into eight circles and place them on the baking sheet. Bake for 10 minutes, then let the cookies cool completely.
- Stir the powdered sugar and milk together in a small bowl until the icing reaches a spreadable consistency.
- Spread a thin layer of icing on each cooled cookie. Press two chocolate chips into the icing for eyes and add one candy corn below them for the beak.
Extra Tips
Let the cookies cool fully before icing so the decorations stay in place. Use a small spoon to control the icing amount and avoid drips on the owl faces. Store leftovers in an airtight container at room temperature for up to three days. Kids can help press on the chocolate chips and candy corns once the icing is spread.Course: Dessert Cuisine: American Equipment: Mixing Bowl, Baking Sheet, Oven
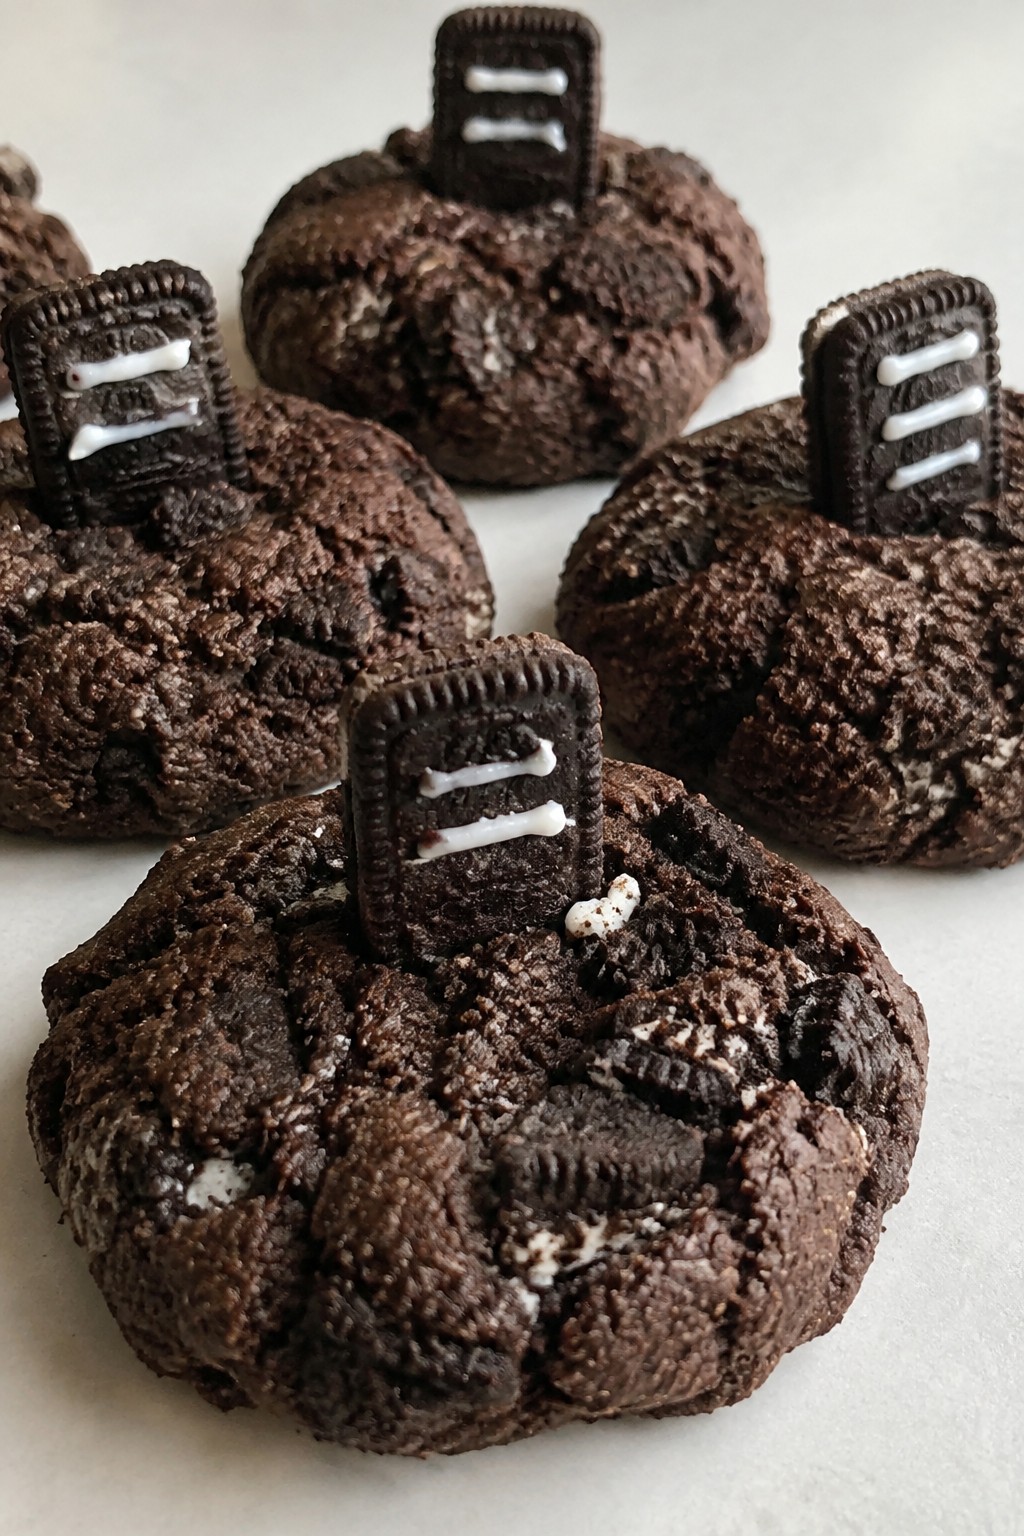
Graveyard Dirt Cookies with Cookie Tombstones
These cookies give kids a hands-on Halloween project with chocolate dough that bakes up dark and crumbly. The crushed cookies mixed into the dough create a dirt-like look and texture, while small rectangular cookies stand upright as edible tombstones. The result is a mildly sweet, cocoa-forward treat that holds up well for decorating at parties or after-school activities.
The recipe keeps the process simple so children can help roll dough, press in the tombstones, and pipe a few icing lines without needing advanced skills.
Serves 4 people.
Ingredients
- 1 1/2 cups all-purpose flour
- 1/2 cup unsweetened cocoa powder
- 1/2 teaspoon baking soda
- 1/4 teaspoon salt
- 1/2 cup unsalted butter, softened
- 3/4 cup granulated sugar
- 1 large egg
- 1 teaspoon vanilla extract
- 1 cup crushed chocolate sandwich cookies
- 4 small rectangular cookies
- 1/2 cup powdered sugar
- 2 tablespoons milk
Instructions
- Heat the oven to 350 degrees and line a baking sheet with parchment paper.
- Whisk the flour, cocoa powder, baking soda, and salt in a medium bowl.
- In a separate bowl, beat the butter and granulated sugar until smooth, then mix in the egg and vanilla.
- Stir the dry ingredients into the wet mixture until a dough forms. Fold in 3/4 cup of the crushed chocolate sandwich cookies.
- Scoop the dough into 8 portions and place them on the baking sheet. Press the 4 rectangular cookies upright into four of the dough portions to form tombstones.
- Bake for 10 to 12 minutes until the edges are set. Cool the cookies on the sheet for 5 minutes, then move them to a wire rack.
- Stir the powdered sugar and milk together until smooth. Pipe or spread a small amount of icing on each tombstone cookie to create simple lettering or lines.
- Sprinkle the remaining crushed chocolate sandwich cookies over the tops of the round cookies before serving.
Extra Tips
Use the crushed cookies both inside the dough and on top for consistent color and crunch. If the icing seems too thick, add milk one teaspoon at a time until it pipes easily. Store cooled cookies in an airtight container at room temperature for up to three days.Course: Dessert Cuisine: American Equipment: Mixing Bowls, Baking Sheet, Electric Mixer
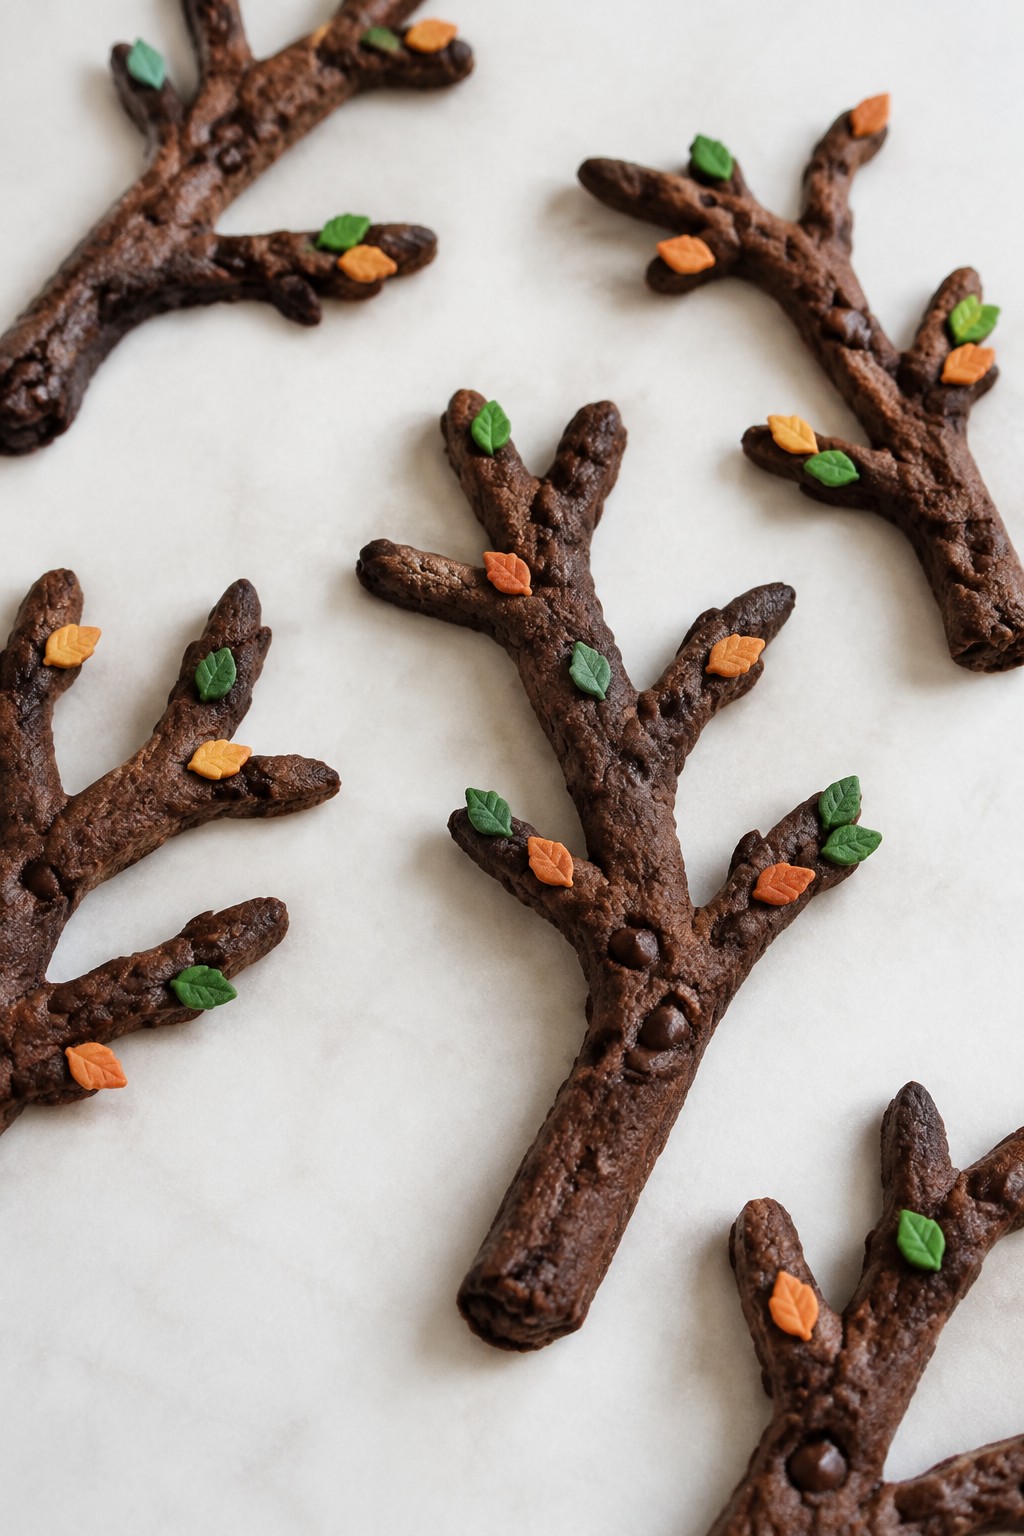
Haunted Tree Branch Cookies with Leaf Sprinkles
These cookies give kids a simple way to create edible tree branches that fit right into a Halloween theme. The dough is easy to shape by hand or with a piping bag, and the leaf sprinkles add a quick finishing touch that feels festive without extra fuss.
The base tastes like a mild chocolate sugar cookie with a crisp edge and tender center. They work well for an afternoon baking activity or as a make-ahead treat for a small gathering.
Serves 4 people.
Ingredients
- 1 cup all-purpose flour
- 1/2 cup unsalted butter, softened
- 1/4 cup granulated sugar
- 1 large egg yolk
- 1 teaspoon vanilla extract
- 2 tablespoons cocoa powder
- 1/2 cup dark chocolate chips
- 2 tablespoons leaf-shaped sprinkles
Instructions
- Heat the oven to 350 degrees and line a baking sheet with parchment paper.
- In a mixing bowl, beat the softened butter and sugar until smooth. Add the egg yolk and vanilla extract, then stir until combined.
- Mix in the flour and cocoa powder until a soft dough forms.
- Spoon the dough into a piping bag fitted with a medium round tip. Pipe short, Y-shaped branches onto the baking sheet, spacing them apart.
- Bake for 10 to 12 minutes until the edges are set. Let the cookies cool completely on the sheet.
- Melt the dark chocolate chips in a small bowl in the microwave, stirring every 20 seconds until smooth.
- Drizzle or lightly dip the cooled branches in the melted chocolate. While the chocolate is still soft, scatter the leaf sprinkles over the top.
Extra Tips
Work with small batches of melted chocolate so it stays at the right consistency for drizzling. If the sprinkles slide off, wait 30 seconds after drizzling so the chocolate thickens slightly. Store leftovers in an airtight container at room temperature for up to three days.Course: Dessert Cuisine: American Equipment: Mixing Bowl, Baking Sheet, Piping Bag
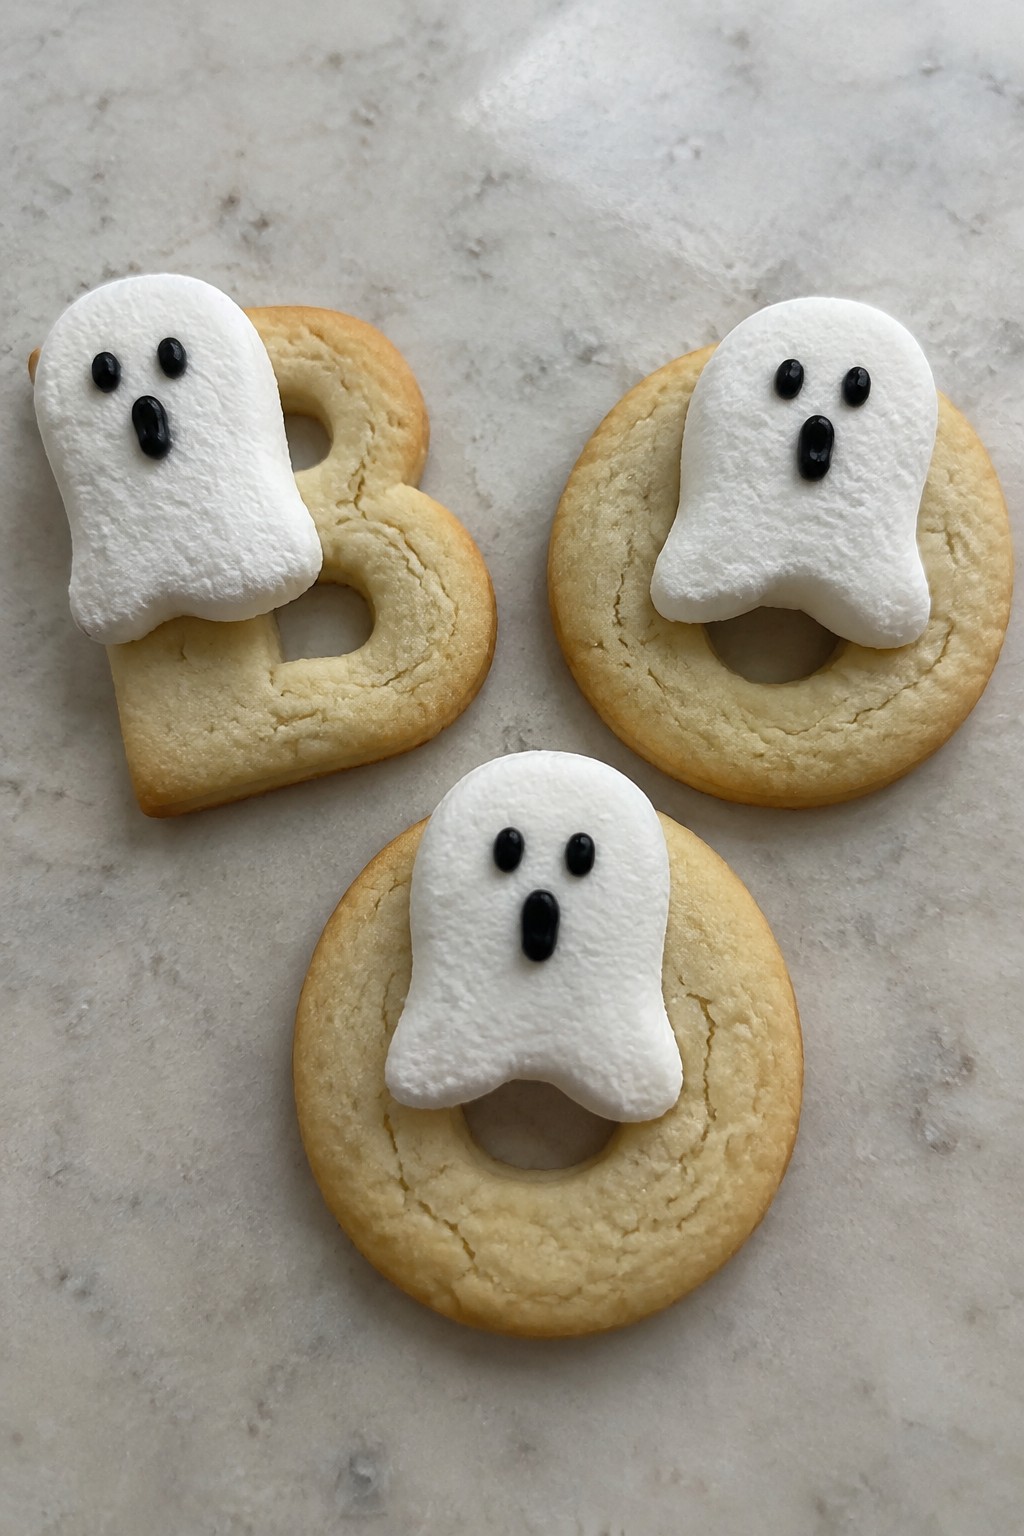
Boo Letter Sugar Cookies with Marshmallow Ghosts
These cookies give kids a simple way to form the word "boo" with letter cutters and top each one with a marshmallow ghost. The activity works well for small groups or family nights because the steps stay straightforward and hands-on.
The finished cookies taste like classic vanilla sugar cookies with a soft bite. The marshmallows on top stay chewy and give each cookie a playful finish that holds up for a day or two.
Serves 4 people.
Ingredients
- 1 1/2 cups all-purpose flour
- 1/2 teaspoon baking powder
- 1/4 teaspoon salt
- 1/2 cup unsalted butter, softened
- 1/2 cup granulated sugar
- 1 large egg
- 1 teaspoon vanilla extract
- 1 cup powdered sugar
- 2 tablespoons milk
- 12 large marshmallows
- Black gel food coloring
Instructions
- Whisk the flour, baking powder, and salt in a bowl and set aside.
- In a second bowl, beat the butter and granulated sugar until light. Add the egg and vanilla extract and mix until smooth.
- Stir the dry mixture into the wet mixture until a dough forms. Wrap the dough and chill it for 30 minutes.
- Heat the oven to 350°F. Roll the dough to 1/4-inch thickness on a lightly floured surface and cut out letter shapes.
- Place the cutouts on a baking sheet and bake for 8 to 10 minutes until the edges turn lightly golden. Cool completely on a wire rack.
- Stir the powdered sugar and milk together until the icing reaches a spreadable consistency.
- Use a small amount of icing to attach one marshmallow to each cookie. Draw simple ghost faces on the marshmallows with black gel food coloring.
Extra Tips
Let kids draw their own ghost faces with the gel so each cookie looks different. Keep the cookies in a single layer in an airtight container so the marshmallows stay soft and do not stick together.Course: Dessert Cuisine: American Equipment: Mixing Bowl, Baking Sheet, Cookie Cutters
