

Halloween calls for simple treats that kids can help with. Rice Krispie treats work well because they need few ingredients and set up fast. I tested these 12 versions over the past couple of years and kept the ones that held up best. Each recipe uses basic pantry items and gives clear steps for shaping and decorating. You can pick the ones that match what you already have on hand.
Helpful Tips Before You Start
These tips will help your Halloween Rice Krispie treats come out colorful and easy to shape.
Melt Marshmallows on Low Heat
Stir the butter and marshmallows over low heat until just smooth. High heat makes the treats too firm once they cool.
Use Gel Food Coloring
Add gel colors right after the marshmallows melt for bright orange, green, or purple tones. Liquid food coloring can make the mixture too sticky.
Grease Your Hands and Tools
Coat your hands, spatula, and cookie cutters with butter or oil before shaping. This keeps the mixture from sticking while you form ghosts or pumpkins.
Press Mixture into a Pan First
Spread the warm cereal into a greased pan and let it cool slightly before cutting shapes. This gives cleaner edges for Halloween designs.
Add Decorations While Warm
Press on candy eyes or sprinkles right after cutting the treats. They stick best before the cereal fully sets.
Ghost-Shaped Rice Krispie Treats with White Chocolate Dip
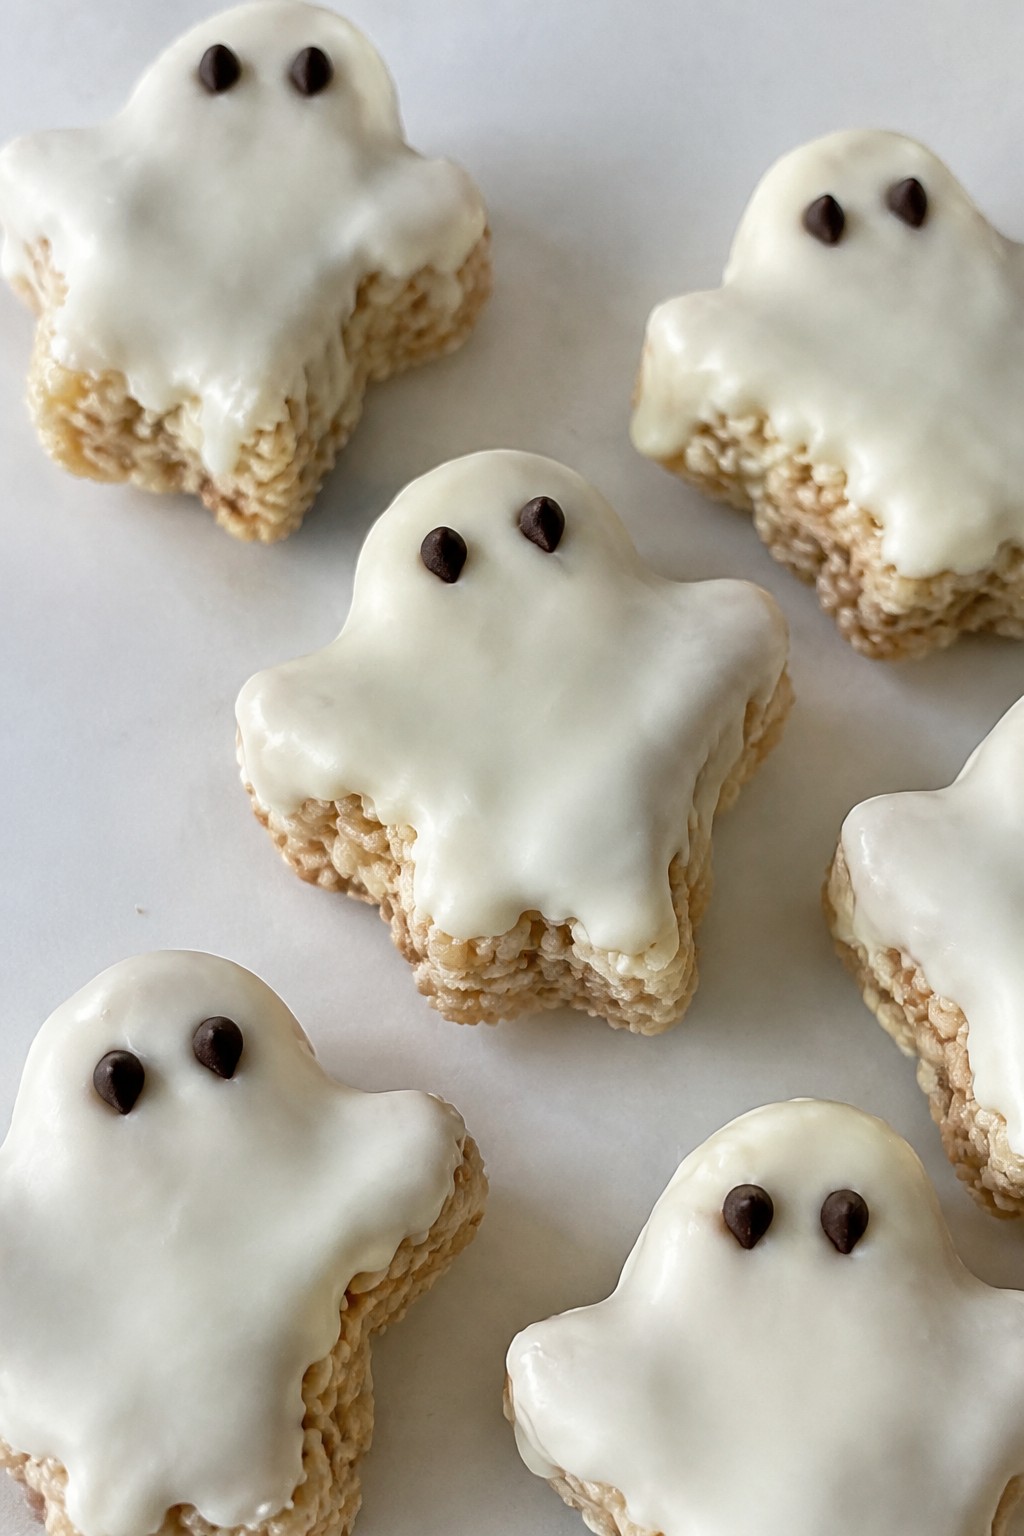
These ghost-shaped treats bring a simple Halloween twist to a classic snack. Kids enjoy helping cut out the shapes, and the white chocolate dip adds a creamy contrast to the crisp cereal base. They work well for parties or an easy after-school activity.
The texture stays light and chewy with a sweet finish from the dip. The mini chocolate chips create quick eyes without extra tools.
Serves 4 people.
Ingredients
- 2 tablespoons unsalted butter
- 2 cups mini marshmallows
- 3 cups Rice Krispies cereal
- 1 cup white chocolate chips
- 2 tablespoons mini chocolate chips
Instructions
- Melt the butter in a large saucepan over low heat. Add the mini marshmallows and stir until fully melted and smooth.
- Remove the pan from heat. Stir in the Rice Krispies cereal until evenly coated.
- Press the mixture into a greased 8×8 inch pan and let it cool for 15 minutes. Use a ghost-shaped cookie cutter to cut out four treats.
- Place the white chocolate chips in a microwave-safe bowl. Heat in 20-second intervals, stirring between each, until melted and smooth.
- Dip the bottom of each ghost treat into the melted white chocolate. Add two mini chocolate chips to each treat as eyes while the chocolate is still soft. Let the chocolate set for a few minutes before serving.
Extra Tips
Press the mixture firmly into the pan so the ghost shapes hold together after cutting. If the white chocolate thickens while dipping, warm it briefly in the microwave to loosen it again. Store leftovers in an airtight container at room temperature for up to two days.Course: Dessert Cuisine: American Equipment: Large saucepan, Microwave-safe bowl, 8×8 inch pan, Ghost-shaped cookie cutter
Pumpkin-Shaped Rice Krispie Treats Rolled in Orange Sugar
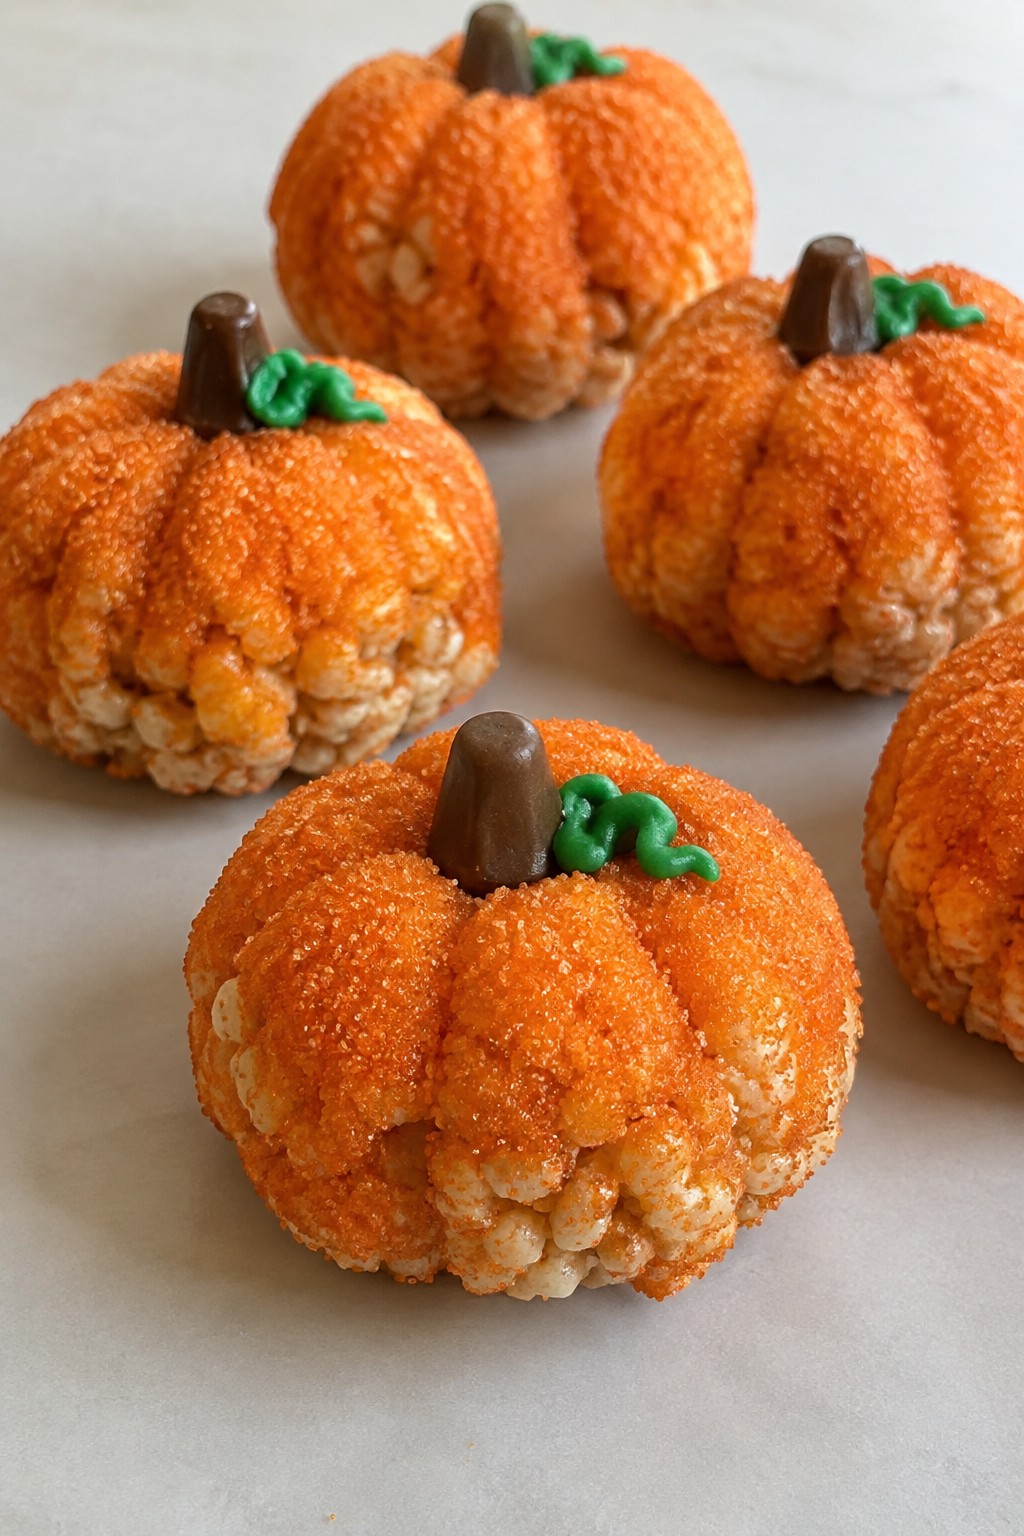
These treats bring a bright pop of color to any Halloween spread. The classic chewy cereal base gets shaped into small pumpkins and coated in orange sugar for a festive finish that feels playful without much extra work. They hold up well at room temperature, making them easy to pack for parties or school events.
The flavor stays simple and familiar, with a light crunch from the cereal and a sweet, slightly sandy coating from the colored sugar. The shapes come together quickly once the mixture cools enough to handle, so kids can help with the rolling step.
Serves 4 people.
Ingredients
- 3 tablespoons unsalted butter
- 10 ounces mini marshmallows
- 6 cups Rice Krispies cereal
- 1 teaspoon vanilla extract
- 1/2 cup granulated sugar
- 6 drops orange food coloring
Instructions
- Melt the butter in a large saucepan over medium heat. Add the mini marshmallows and stir until fully melted and smooth.
- Remove the pan from heat and stir in the vanilla extract. Add the Rice Krispies cereal and mix until the cereal is evenly coated.
- Let the mixture cool for 5 minutes until it is safe to handle. Lightly butter your hands and shape the mixture into 8 small pumpkin forms.
- Place the granulated sugar in a small bowl and stir in the orange food coloring until the color is evenly distributed.
- Roll each shaped treat in the orange sugar until fully coated on all sides. Set the treats on a sheet of wax paper to firm up.
Extra Tips
Work with lightly buttered hands when shaping to prevent sticking, and press gently so the treats keep their rounded pumpkin look. If the mixture cools too much to shape, warm it briefly over low heat for 20 seconds. Store any leftovers in an airtight container at room temperature for up to two days.
Course: Dessert Cuisine: American Equipment: Large saucepan, Mixing bowl, Baking sheetSpiderweb Rice Krispie Treat Bars with Dark Chocolate Drizzle
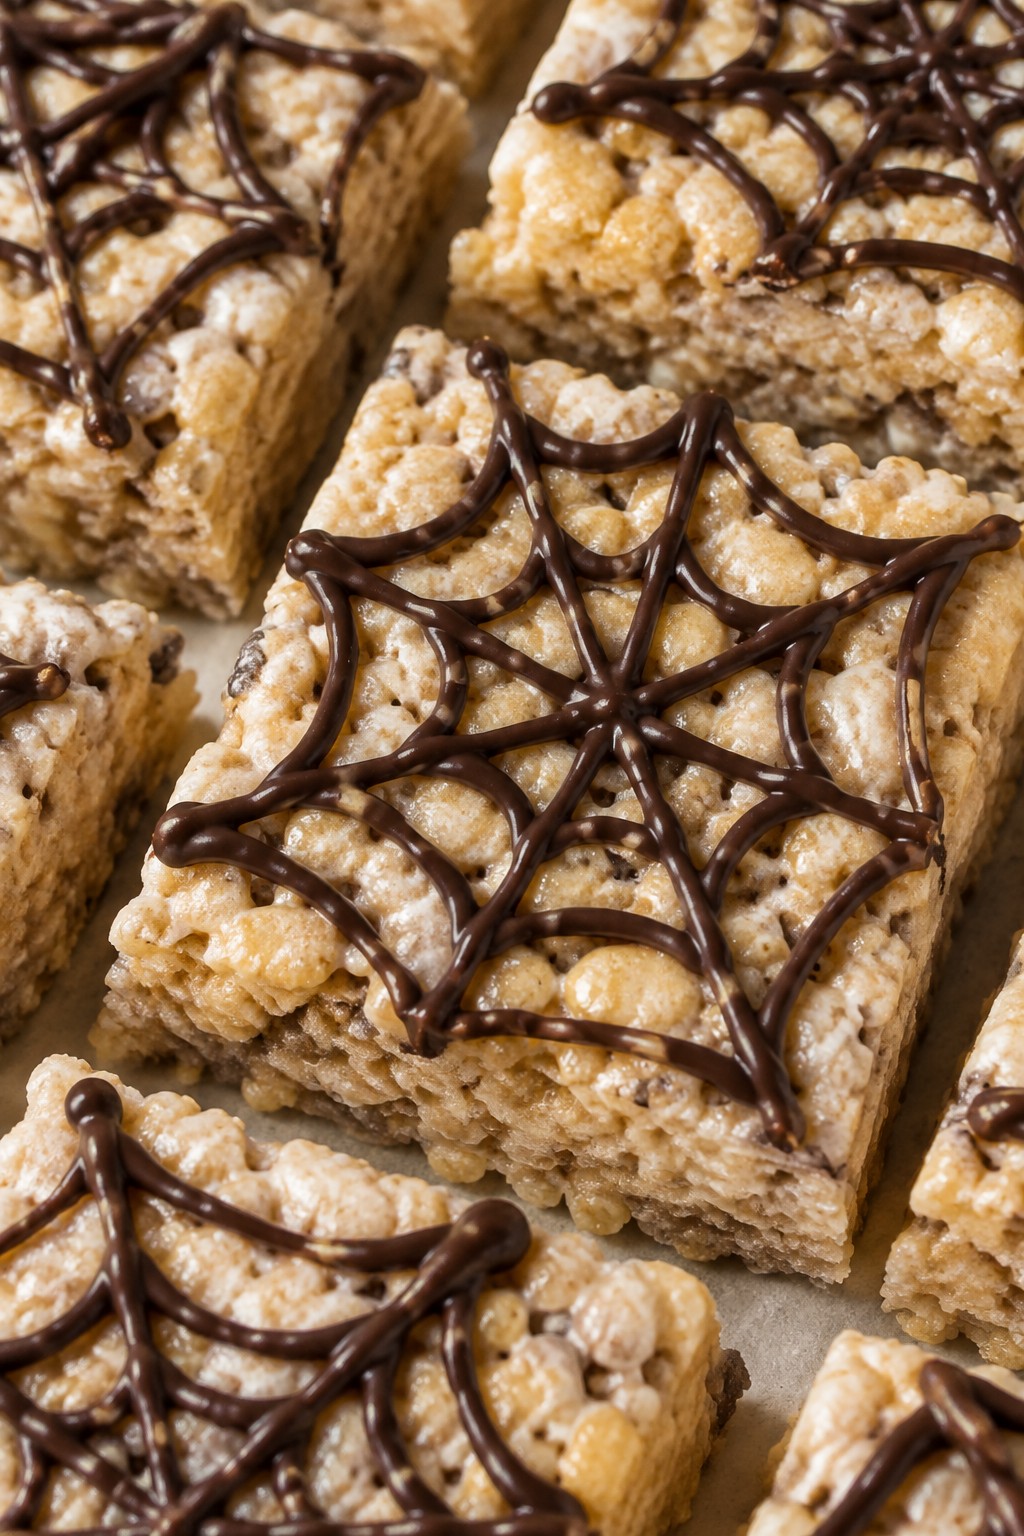
These bars bring a simple Halloween twist to a classic treat. The chewy marshmallow base pairs with a rich dark chocolate drizzle that forms a spiderweb pattern on top. They work well for small gatherings or as a quick make-ahead snack for October parties.
The texture stays soft inside with a slight snap from the cereal. The dark chocolate adds a bittersweet note that balances the sweetness without overpowering it.
Serves 4 people.
Ingredients
- 2 tablespoons unsalted butter
- 2 cups mini marshmallows
- 3 cups Rice Krispies cereal
- 1/2 cup dark chocolate chips
Instructions
- Melt the butter in a saucepan over medium heat. Add the mini marshmallows and stir until fully melted and smooth.
- Remove the pan from heat and quickly stir in the Rice Krispies cereal until evenly coated. Press the mixture firmly into a lined 8×8 pan and let it cool for 20 minutes.
- Place the dark chocolate chips in a microwave-safe bowl and heat in 20-second bursts, stirring between each, until melted and smooth. Transfer the melted chocolate to a small zip-top bag, snip off one corner, and pipe thin lines across the cooled bars in a spiderweb pattern. Let the chocolate set before slicing.
Extra Tips
Pipe the chocolate while the bars are still slightly warm for better adhesion, but wait until they firm up to avoid smearing the web lines. Store leftovers in an airtight container at room temperature for up to two days to keep the cereal crisp.Course: Dessert Cuisine: American Equipment: Saucepan, Mixing Bowl, 8×8 Baking Pan, Microwave-Safe Bowl
Monster Eyeball Rice Krispie Pops on Sticks
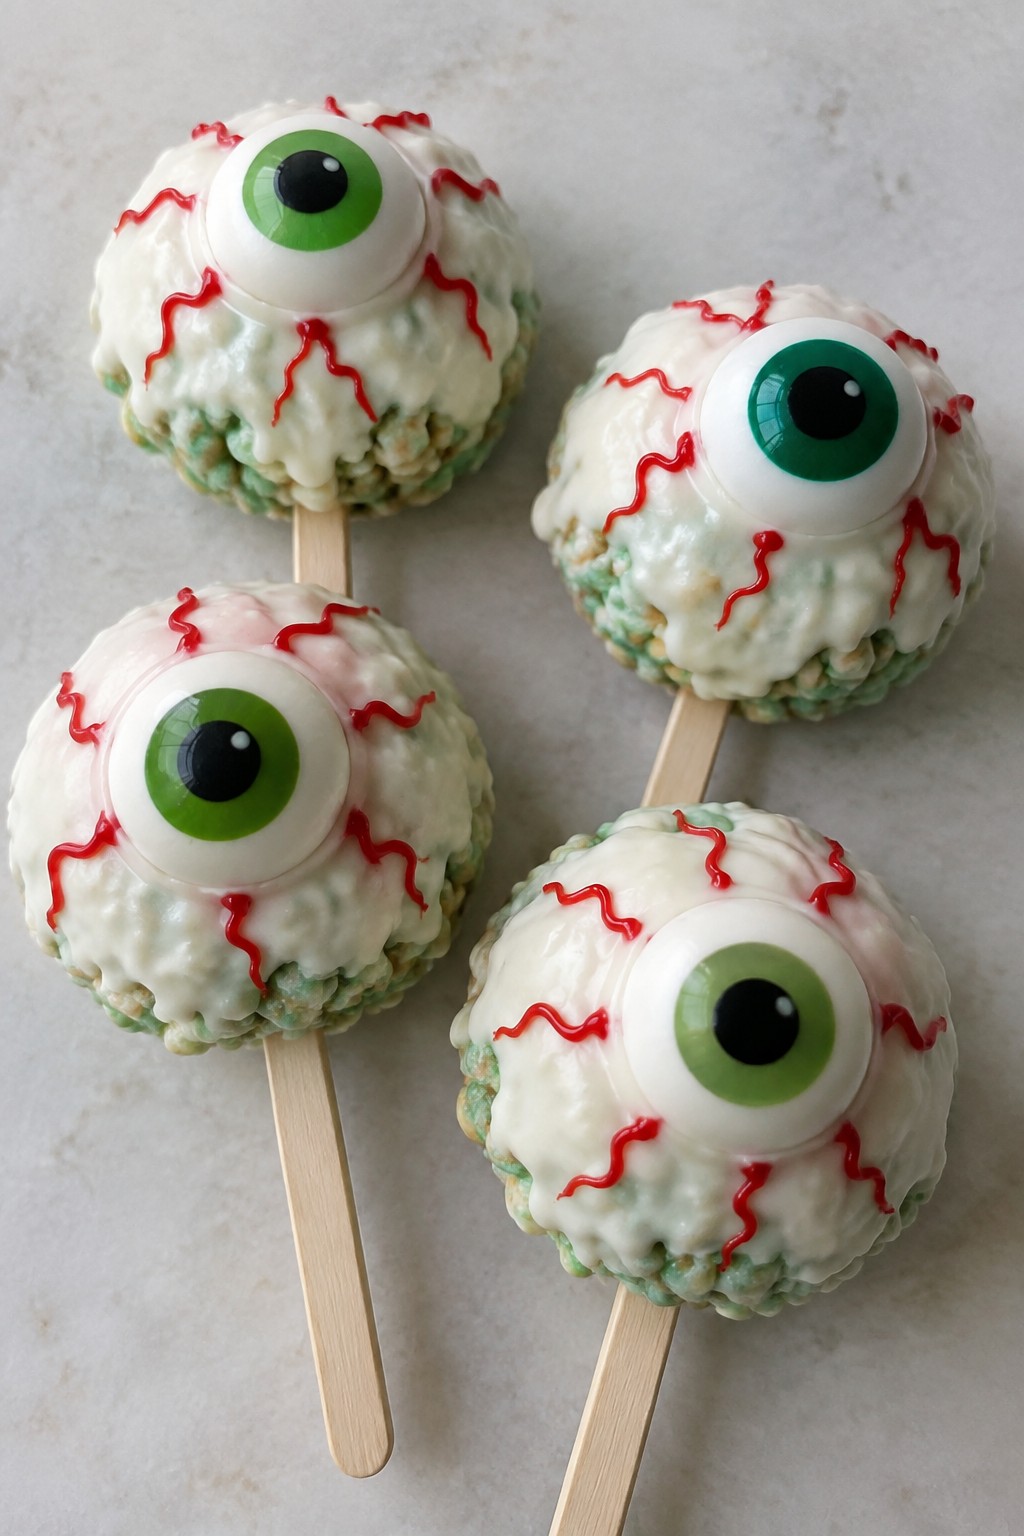
These pops turn classic Rice Krispie treats into a simple Halloween project that kids can help shape. The green centers give them a playful monster look while the white coating and single candy eye keep the eyeball theme clear. They hold up well at room temperature, making them easy to pack for school parties or hand out at neighborhood events.
The finished treats stay chewy in the center with a light snap from the cereal and a smooth outer shell. The stick makes them neat to eat without sticky fingers.
Serves 4 people.
Ingredients
- 3 tablespoons unsalted butter
- 4 cups mini marshmallows
- Green food coloring
- 6 cups Rice Krispies cereal
- 4 popsicle sticks
- 1 cup white candy melts
- 4 large candy eyeballs
- Red gel icing
Instructions
- Melt the butter in a large pot over medium heat. Add the mini marshmallows and stir until fully melted and smooth.
- Remove the pot from the heat and stir in several drops of green food coloring until the mixture reaches the shade you want.
- Pour in the Rice Krispies cereal and stir until every piece is coated. Let the mixture cool for two minutes so it is safe to handle.
- Scoop out four equal portions and shape each into a round ball. Insert one popsicle stick into the center of each ball and place the pops on a parchment-lined baking sheet.
- Melt the white candy melts in a microwave-safe bowl in 30-second bursts, stirring between each burst until smooth. Dip or spoon the coating over each pop, leaving a small green circle exposed at the top.
- Press one candy eyeball into the center of the white coating on each pop. Use the red gel icing to draw short lines around the eyeball for veins. Let the coating set at room temperature before serving.
Extra Tips
Shape the cereal mixture while it is still warm but not hot, or the pops will not hold a clean round form. If the coating thickens while you work, warm it for five seconds to loosen it again. Store finished pops in a single layer in an airtight container at room temperature for up to three days.Course: Dessert Cuisine: American Equipment: Large pot, Wooden spoon, Baking sheet, Microwave-safe bowl
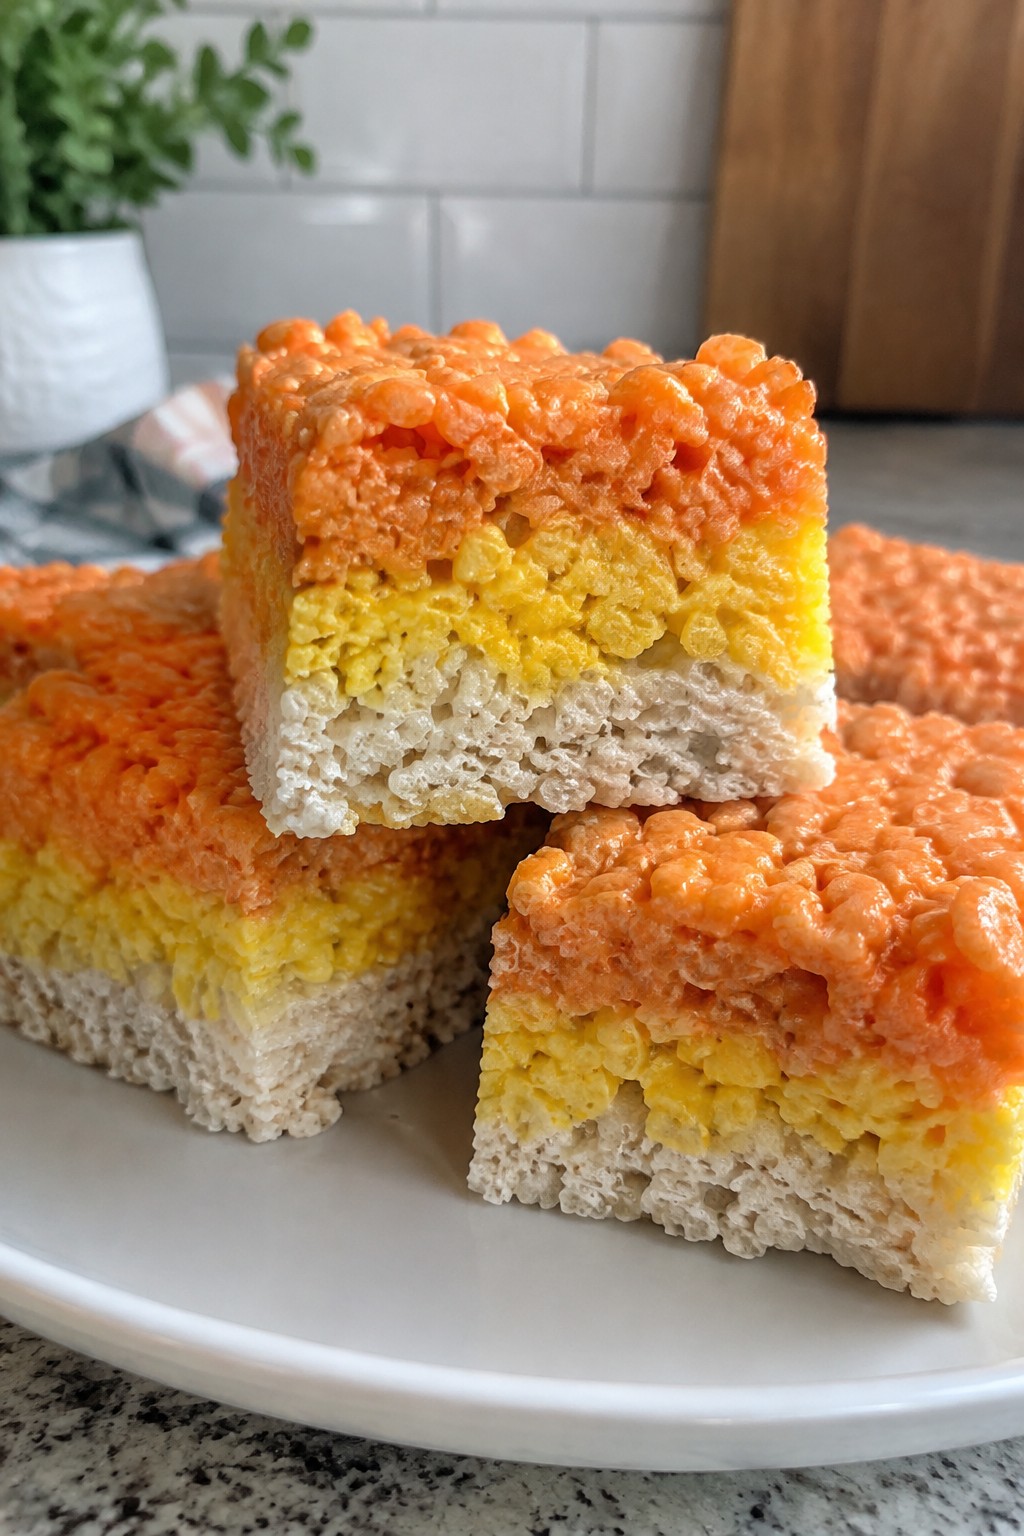
Layered Candy Corn Rice Krispie Treat Squares
These squares stack three colored layers to copy the look of classic candy corn. The result gives a fun Halloween detail while keeping the familiar chewy and crispy texture of a Rice Krispie treat.
They work well for lunchbox surprises or a quick party tray. The colors stay distinct once the layers set, so each bite shows the full candy corn pattern.
Serves 4 people.
Ingredients
- 4 tablespoons unsalted butter
- 5 1/2 cups mini marshmallows
- 6 cups Rice Krispies cereal
- Yellow food coloring
- Orange food coloring
Instructions
- Line an 8×8 inch pan with parchment paper and set it aside.
- Melt the butter in a large saucepan over low heat. Add the marshmallows and stir until fully melted and smooth.
- Remove the pan from heat. Divide the marshmallow mixture evenly into three bowls.
- Stir yellow food coloring into the first bowl until the color is even. Stir orange food coloring into the second bowl until the color is even. Leave the third bowl plain.
- Add 2 cups of Rice Krispies cereal to the yellow bowl and stir until coated. Press this mixture into the bottom of the prepared pan.
- Add 2 cups of Rice Krispies cereal to the orange bowl and stir until coated. Press this layer gently on top of the yellow layer.
- Add the remaining 2 cups of Rice Krispies cereal to the plain bowl and stir until coated. Press this layer on top of the orange layer.
- Let the pan cool at room temperature for one hour. Cut into squares once set.
Extra Tips
Press each layer firmly with a spatula or wax paper so the colors stay separate and the squares hold together when cut. Gel food coloring gives brighter shades without adding extra liquid that can make the mixture sticky.Course: Dessert Cuisine: American Equipment: Large saucepan, Mixing bowls, 8×8 pan, Spatula
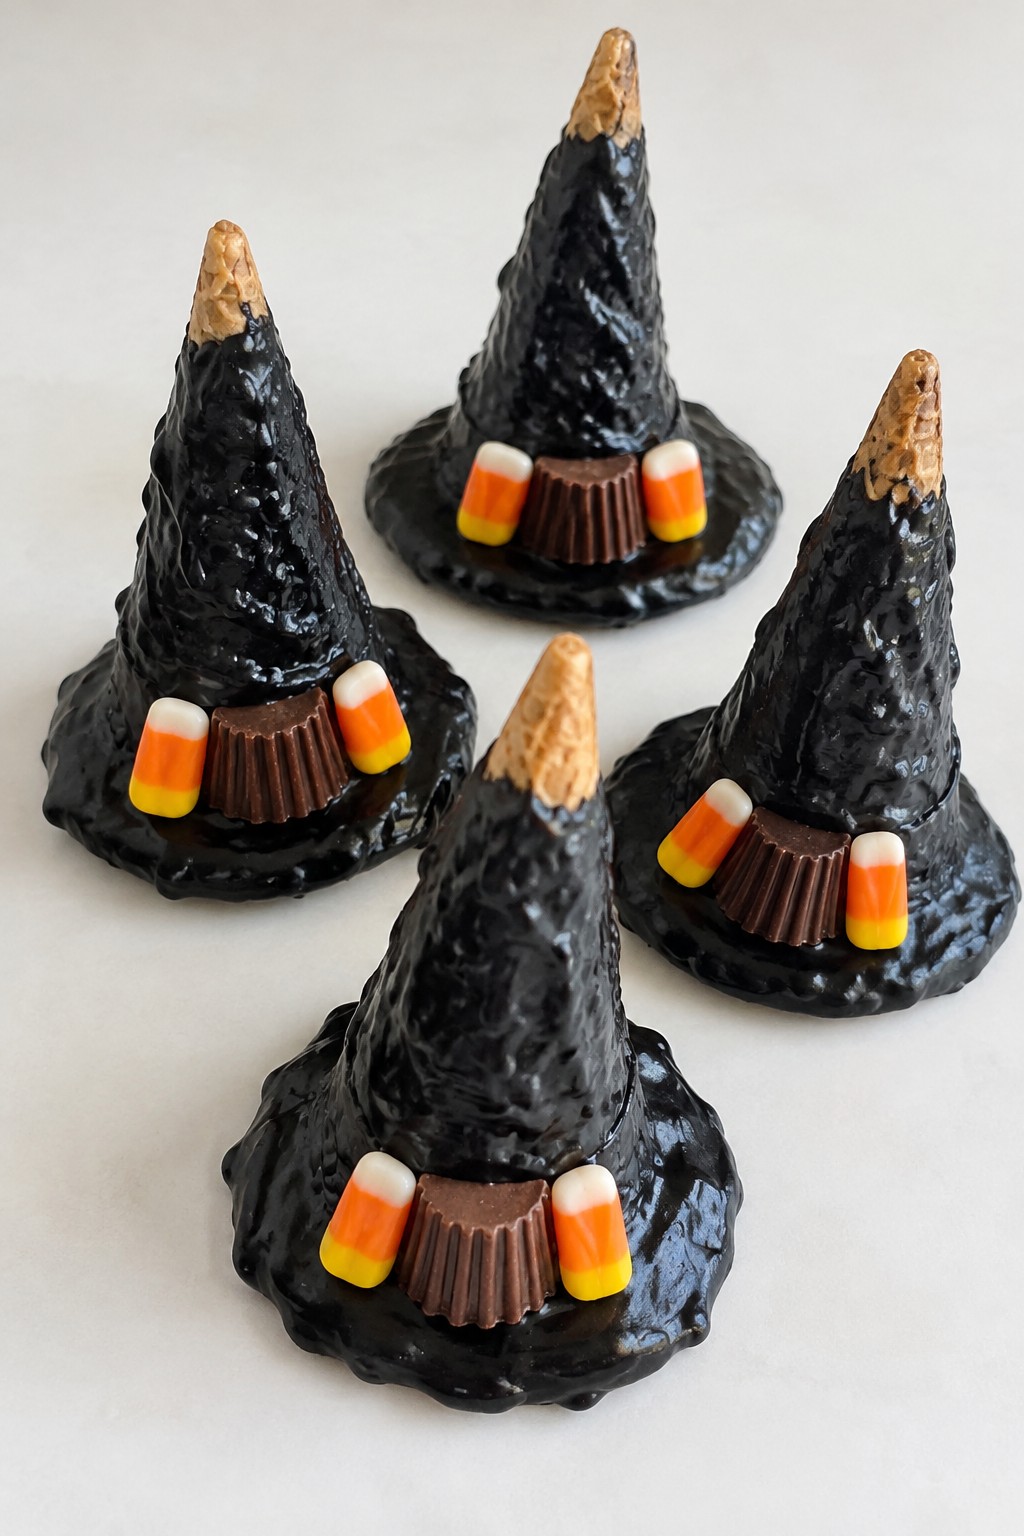
Witch Hat Rice Krispie Treat Cones with Candy Toppers
These cones give the classic Rice Krispie treat a Halloween twist by shaping the mixture into pointed witch hats. They suit a kids’ party table or an easy make-at-home project when you want something festive without much fuss. The base stays chewy and crisp while the candy coating and toppers add a sweet finish.
Serves 4 people.
Ingredients
- 4 sugar cones
- 3 tablespoons butter
- 10 ounces mini marshmallows
- 3 cups Rice Krispies cereal
- ½ cup black candy melts
- ¼ cup assorted candy toppers (candy corn and chocolate pieces work well)
Instructions
- Line a baking sheet with parchment paper and set the sugar cones upright on it.
- Melt the butter in a large saucepan over low heat. Add the mini marshmallows and stir until fully melted and smooth.
- Remove the pan from heat and quickly stir in the Rice Krispies cereal until evenly coated.
- While the mixture is still warm, press portions around each sugar cone to form a tall, pointed hat shape. Let the cones cool and set for 10 minutes.
- Melt the black candy melts in a microwave-safe bowl in 30-second bursts, stirring between each until smooth.
- Drizzle or brush the melted candy melts over the tops of the shaped hats and immediately press on the candy toppers.
Extra Tips
Work quickly when shaping the warm cereal mixture so the hats hold their points. If the mixture starts to stiffen, warm it briefly over low heat to make it easier to mold again. Store any leftovers in an airtight container at room temperature for up to two days to keep the cereal crisp.Course: Dessert Cuisine: American Equipment: Large saucepan, Baking sheet, Microwave-safe bowl
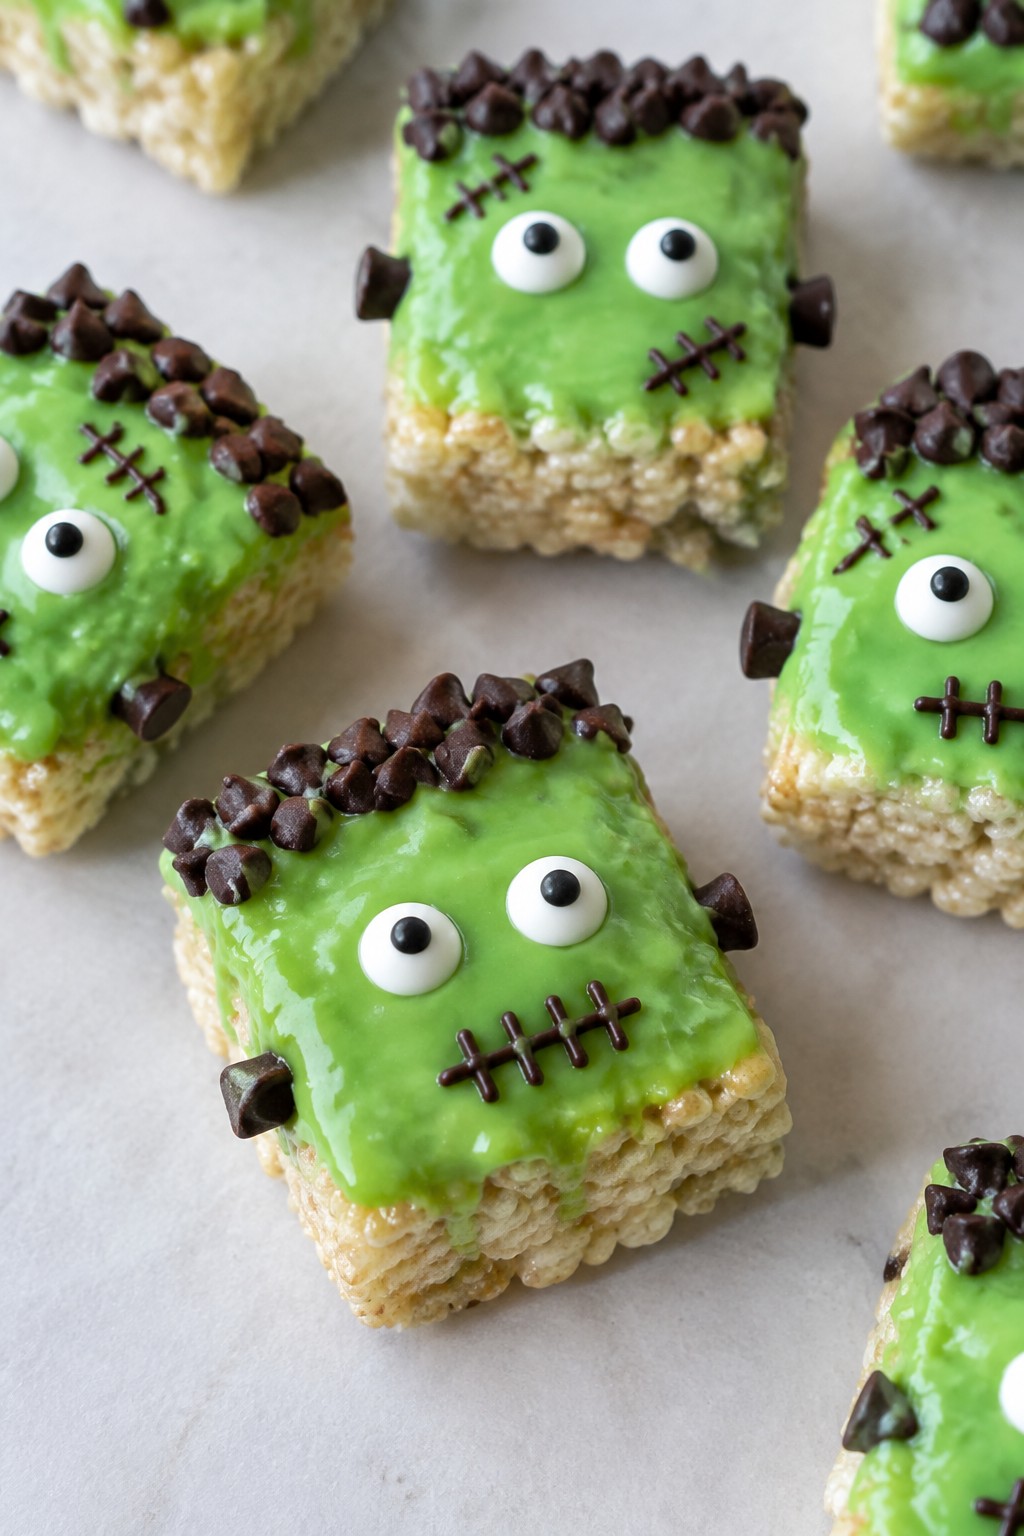
Frankenstein Rice Krispie Treat Faces with Green Glaze
These treats turn classic Rice Krispie squares into playful Frankenstein faces. The green glaze gives them a bright, bold look that stands out on a Halloween table. They have a chewy center with a crisp cereal texture and a light, sweet coating on top.
The faces come together with simple add-ons like candy eyes and chocolate details. They work well for kids parties or as a quick make-ahead snack for October gatherings. The flavor stays mild and sweet with a bit of crunch from the cereal.
Serves 4 people.
Ingredients
- 3 cups Rice Krispies cereal
- 10 ounces mini marshmallows
- 3 tablespoons unsalted butter
- 1 cup powdered sugar
- 2 tablespoons milk
- Green food coloring
- 8 candy eyes
- 2 tablespoons semisweet chocolate chips
Instructions
- Melt the butter in a large saucepan over low heat. Add the mini marshmallows and stir until fully melted and smooth. Mix in several drops of green food coloring until the mixture turns a bright green shade.
- Remove the pan from heat and stir in the Rice Krispies cereal until evenly coated. Press the mixture into a greased 8×8 inch pan and let it cool for 20 minutes. Cut into 4 rectangles.
- Whisk the powdered sugar and milk in a small bowl until smooth. Add green food coloring until the glaze reaches the desired shade. Spread the glaze over each rectangle.
- Melt the chocolate chips in a microwave-safe bowl in 20-second bursts. Use a toothpick to draw hair lines and mouth stitches on the glazed treats. Press two candy eyes onto each face while the glaze is still soft.
Extra Tips
Let the glaze set for 10 minutes before adding the chocolate details so the eyes stay in place. If the treats feel too sticky when cutting, lightly grease your knife. Store leftovers in an airtight container at room temperature for up to two days to keep the glaze from softening.Course: Dessert Cuisine: American Equipment: Large saucepan, Mixing bowl, 8×8 inch pan, Microwave-safe bowl
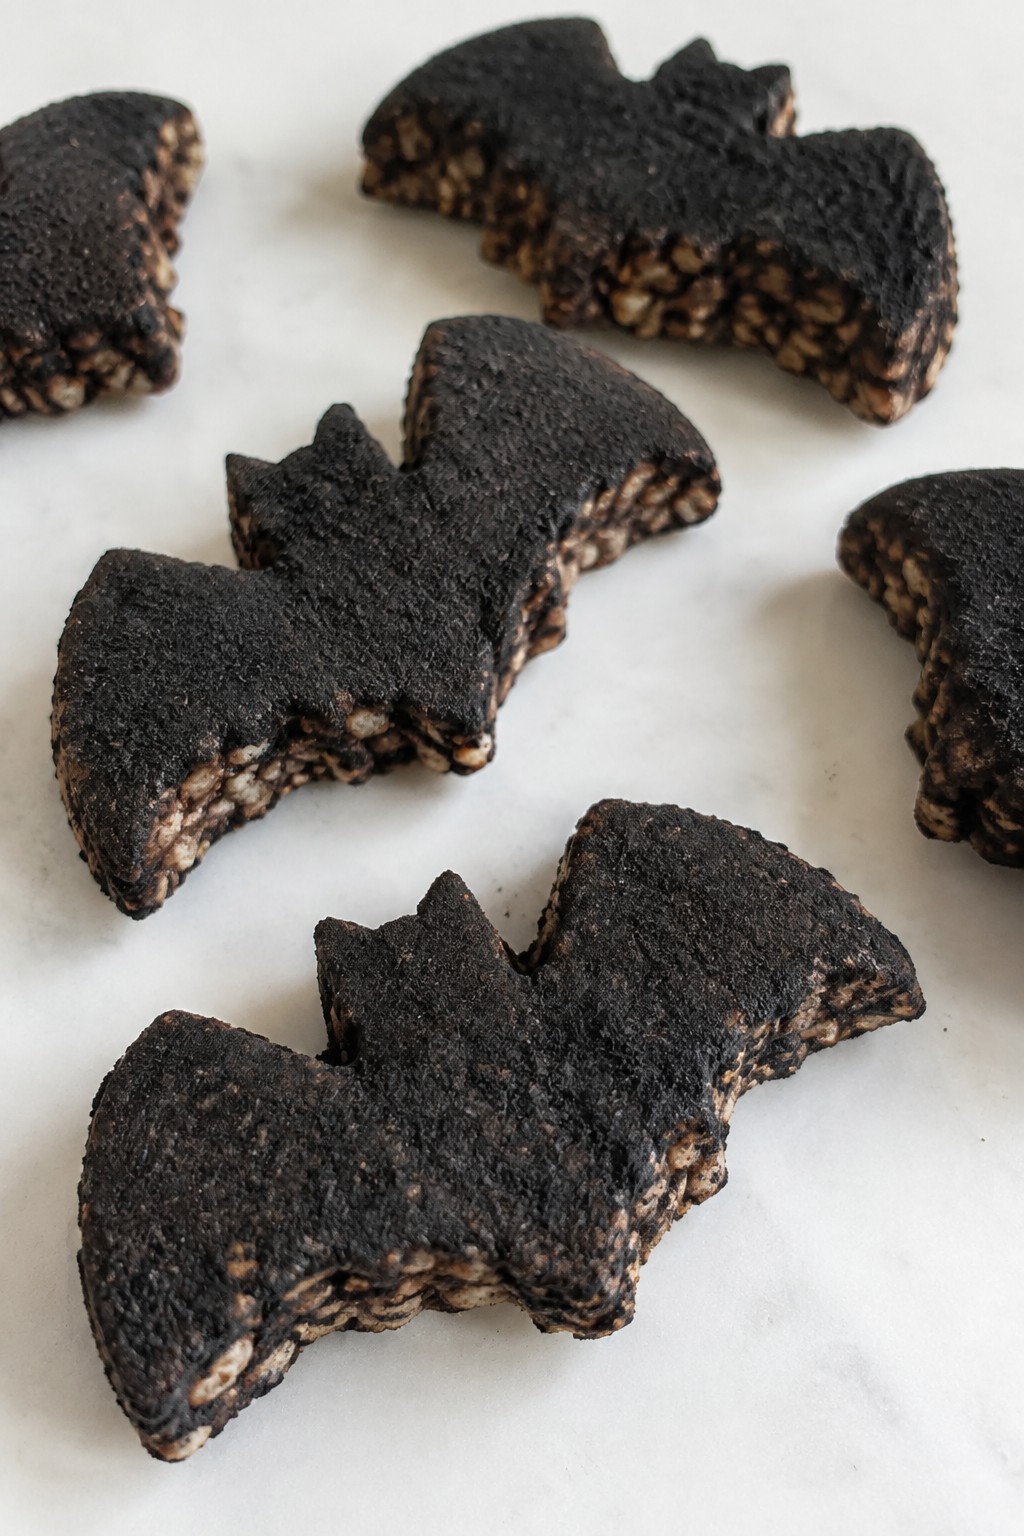
Bat-Shaped Rice Krispie Treats Coated in Black Cocoa
These treats bring a dark twist to the classic cereal snack. The black cocoa gives them a rich, slightly bitter edge that balances the sweetness of the marshmallows. They work well for Halloween parties or as a quick project with kids who want something a bit spooky.
The finished bars stay chewy inside with a crisp outer layer from the cocoa coating. Shaping them by hand or with a cutter keeps the bat theme simple while the dark color stands out on a snack table.
Serves 4 people.
Ingredients
- 3 tablespoons unsalted butter
- 4 cups mini marshmallows
- 3 cups Rice Krispies cereal
- 1/2 cup black cocoa powder
- 2 tablespoons coconut oil
Instructions
- Melt the butter in a large saucepan over low heat. Add the mini marshmallows and stir until fully melted and smooth.
- Remove the pan from heat and quickly stir in the Rice Krispies cereal until evenly coated. Let the mixture cool for two minutes so it is safe to handle.
- Lightly grease your hands and shape the mixture into four bat forms. Place them on a parchment-lined tray.
- Combine the black cocoa powder and coconut oil in a small bowl until it forms a thick paste. Spread or brush the paste over the top and sides of each bat.
- Let the coated bats set at room temperature for 20 minutes before serving.
Extra Tips
Press the mixture firmly when shaping to keep the bats from crumbling. If the cocoa coating feels too thick, warm it slightly for easier spreading. Store leftovers in an airtight container at room temperature for up to two days.Course: Dessert Cuisine: American Equipment: Large saucepan, mixing bowl, parchment paper, baking sheet
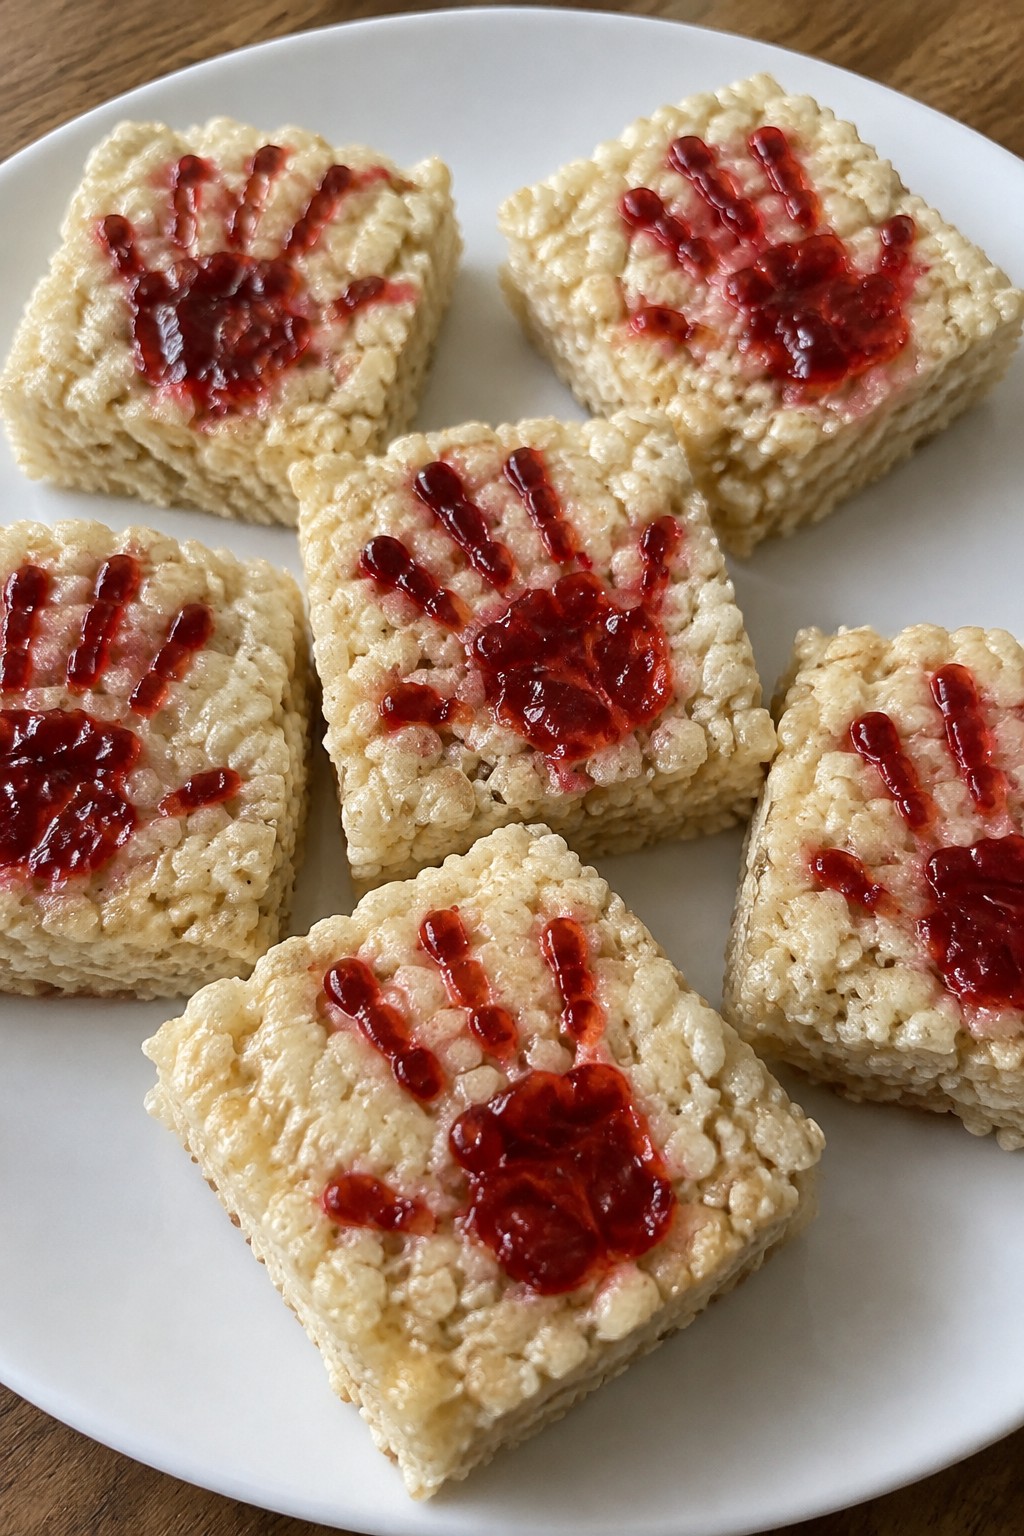
Bloody Handprint Rice Krispie Treats with Red Candy Gel
These bloody handprint Rice Krispie treats give the classic marshmallow snack a clear Halloween twist. The red candy gel creates a striking handprint effect that looks like it just left a mark. Each piece stays chewy with a sweet, simple flavor that works for both kids and adults.
They fit well at a party table or as a quick project before trick-or-treating. The process stays straightforward, and the finished treats hold their shape once cooled.
Serves 4 people.
Ingredients
- 3 tablespoons butter
- 4 cups mini marshmallows
- 5 cups Rice Krispies cereal
- 1/4 cup red candy gel
Instructions
- Grease an 8×8 baking pan and set it aside.
- Melt the butter in a large saucepan over medium heat.
- Add the mini marshmallows and stir until they melt into a smooth mixture.
- Remove the pan from heat and stir in the Rice Krispies cereal until evenly coated.
- Press the mixture firmly into the prepared pan and let it cool for 20 minutes.
- Cut the cooled slab into four equal squares.
- Press the palm and fingers of your hand gently into the top of each square to form a print.
- Fill each handprint with about 1 tablespoon of red candy gel, letting it pool in the grooves.
Extra Tips
Press the hand firmly but evenly so the print stays clear without cracking the treat. Use a light hand when spreading the gel so it stays inside the print and does not run over the edges. Store leftovers in a single layer inside an airtight container at room temperature for up to two days.Course: Dessert Cuisine: American Equipment: Large saucepan, Mixing spoon, 8×8 baking pan
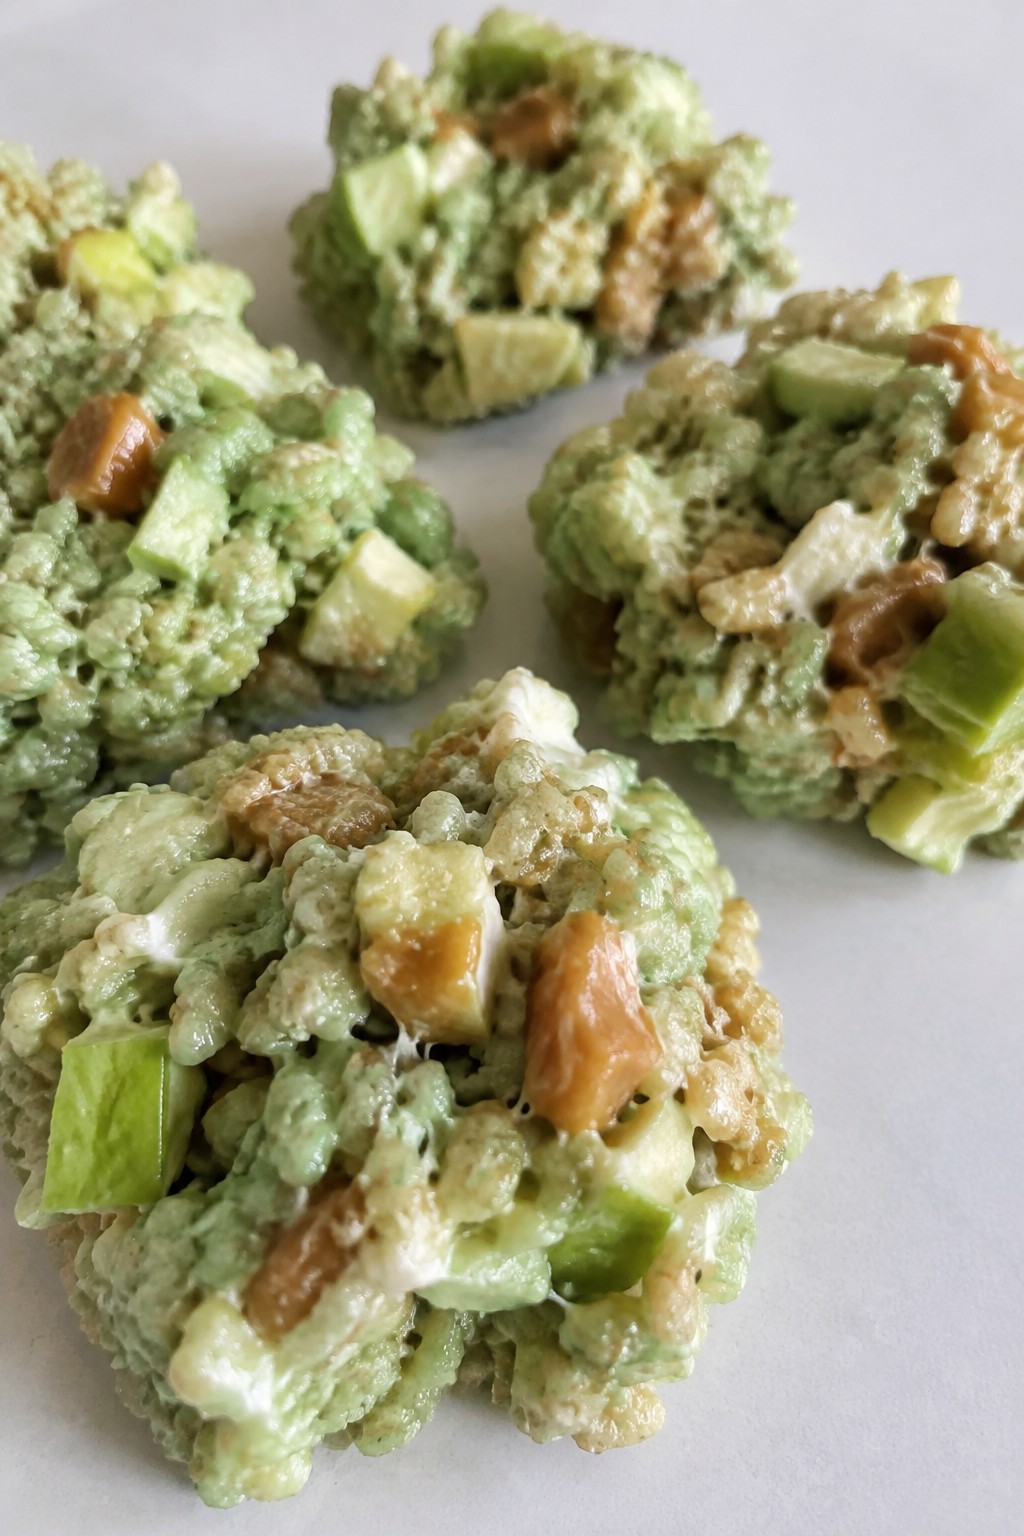
Caramel Apple Rice Krispie Treat Clusters with Green Apple Bits
These clusters bring together gooey marshmallow cereal with tart green apple pieces and chewy caramel for a fall-inspired treat. They work well for Halloween parties or quick after-school snacks because the flavors echo classic caramel apples without the mess. Each bite offers a mix of crispy cereal, soft caramel, and bright apple bits that keep the texture interesting.
Serves 4 people.
Ingredients
- 3 cups Rice Krispies cereal
- 3 cups mini marshmallows
- 3 tablespoons butter
- 1/2 cup chopped dried green apple bits
- 1/3 cup caramel bits
- 1/2 teaspoon vanilla extract
- 2 to 3 drops green food coloring
Instructions
- Line a baking sheet with parchment paper and set it aside.
- Melt the butter in a large saucepan over medium heat. Add the mini marshmallows and stir until fully melted and smooth.
- Remove the pan from heat. Stir in the vanilla extract and green food coloring until the mixture turns a light green shade.
- Add the Rice Krispies cereal, chopped dried green apple bits, and caramel bits to the marshmallow mixture. Stir quickly until everything is evenly coated.
- Drop spoonfuls of the mixture onto the prepared baking sheet to form small clusters. Let them cool at room temperature until firm.
Extra Tips
Press the clusters lightly with the back of a spoon while they are still warm if you want flatter shapes for easier stacking on a platter. Store leftovers in an airtight container at room temperature for up to two days to keep the cereal crisp. If the caramel bits feel too firm, warm them briefly in the microwave for a few seconds before stirring them in so they soften into the mix.Course: Snack Cuisine: American Equipment: Large saucepan, Baking sheet, Parchment paper, Spoon
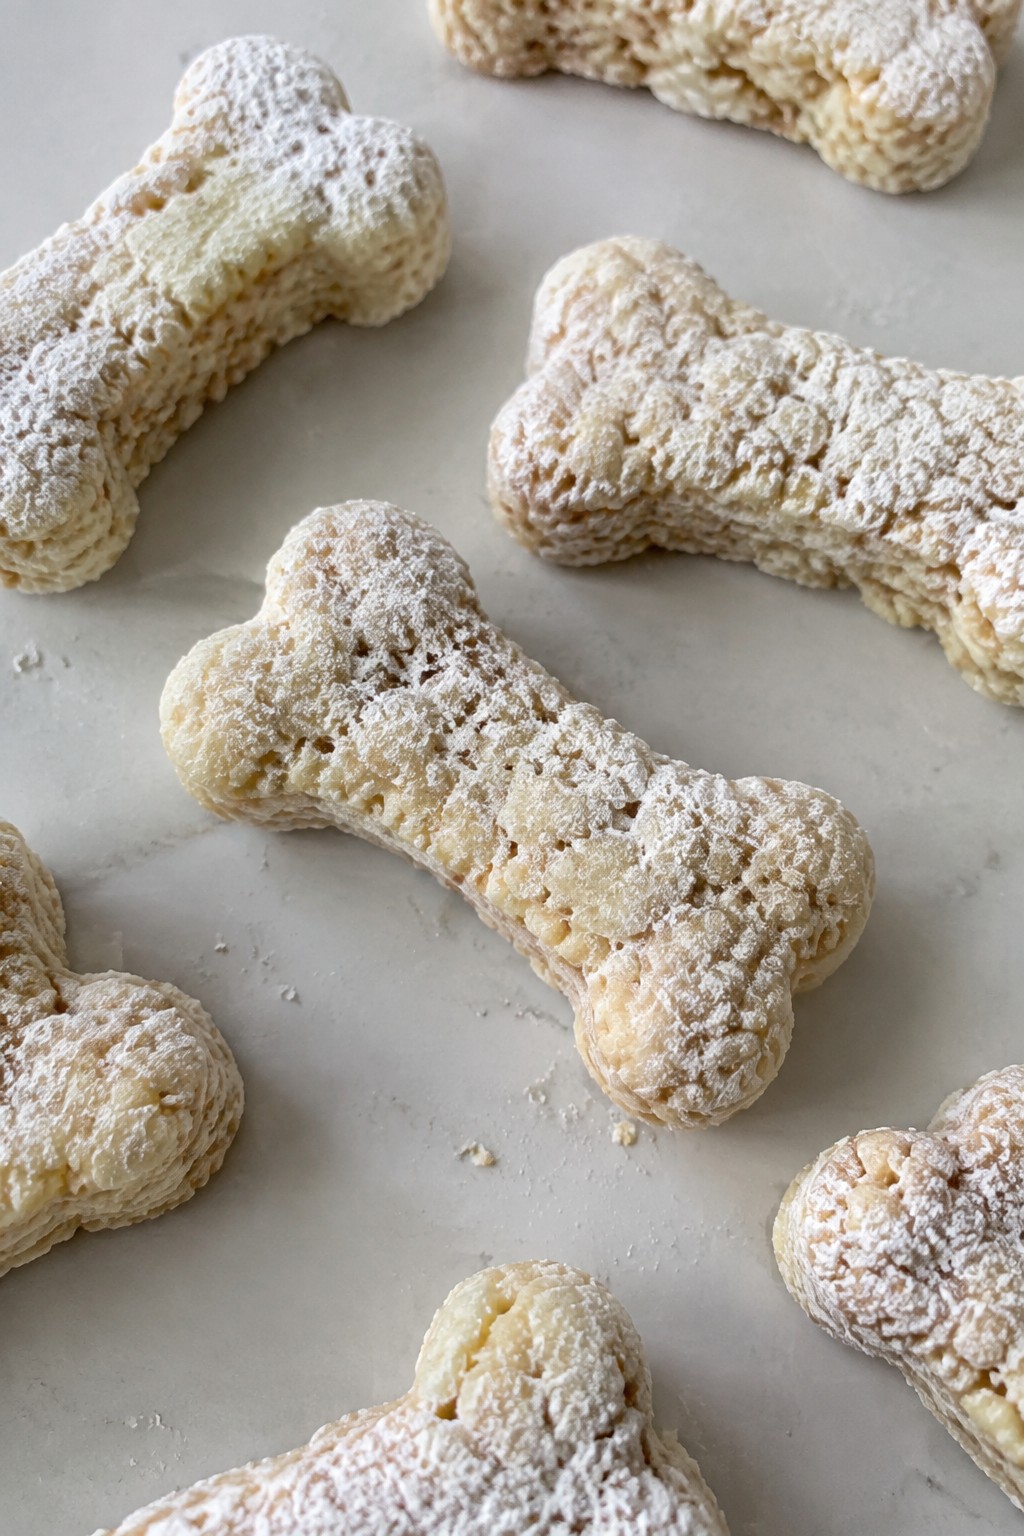
Skeleton Bone Rice Krispie Treats Dusted in Powdered Sugar
These treats bring a spooky touch to any Halloween gathering. Shaped like bones and coated in powdered sugar, they look like something from a haunted kitchen without much extra work. They suit after-school snacks, party platters, or simple weekend baking with kids.
The texture stays classic with a crisp cereal base and chewy marshmallow center. The powdered sugar adds a light, sweet finish that mimics dusty old bones.
Serves 4 people.
Ingredients
- 3 tablespoons unsalted butter
- 3 cups mini marshmallows
- 3 cups Rice Krispies cereal
- 1/2 cup powdered sugar
Instructions
- Line a baking sheet with parchment paper and set it aside.
- Melt the butter in a large saucepan over low heat.
- Add the mini marshmallows and stir until fully melted and smooth.
- Remove the pan from heat and quickly stir in the Rice Krispies cereal until evenly coated.
- Let the mixture cool for one minute, then divide into four portions. Shape each portion into a long bone by forming a thick center with two rounded ends.
- Place the shaped bones on the prepared baking sheet and let them set for 15 minutes.
- Dust each bone generously with powdered sugar before serving.
Extra Tips
Shape the bones while the mixture is still warm but not hot to avoid burning your hands. If the cereal sticks, lightly butter your fingers. Store leftovers in an airtight container at room temperature for up to two days. The powdered sugar may absorb over time, so add a fresh dusting right before serving.Course: Snack Cuisine: American Equipment: Large saucepan, baking sheet, parchment paper, mixing spoon
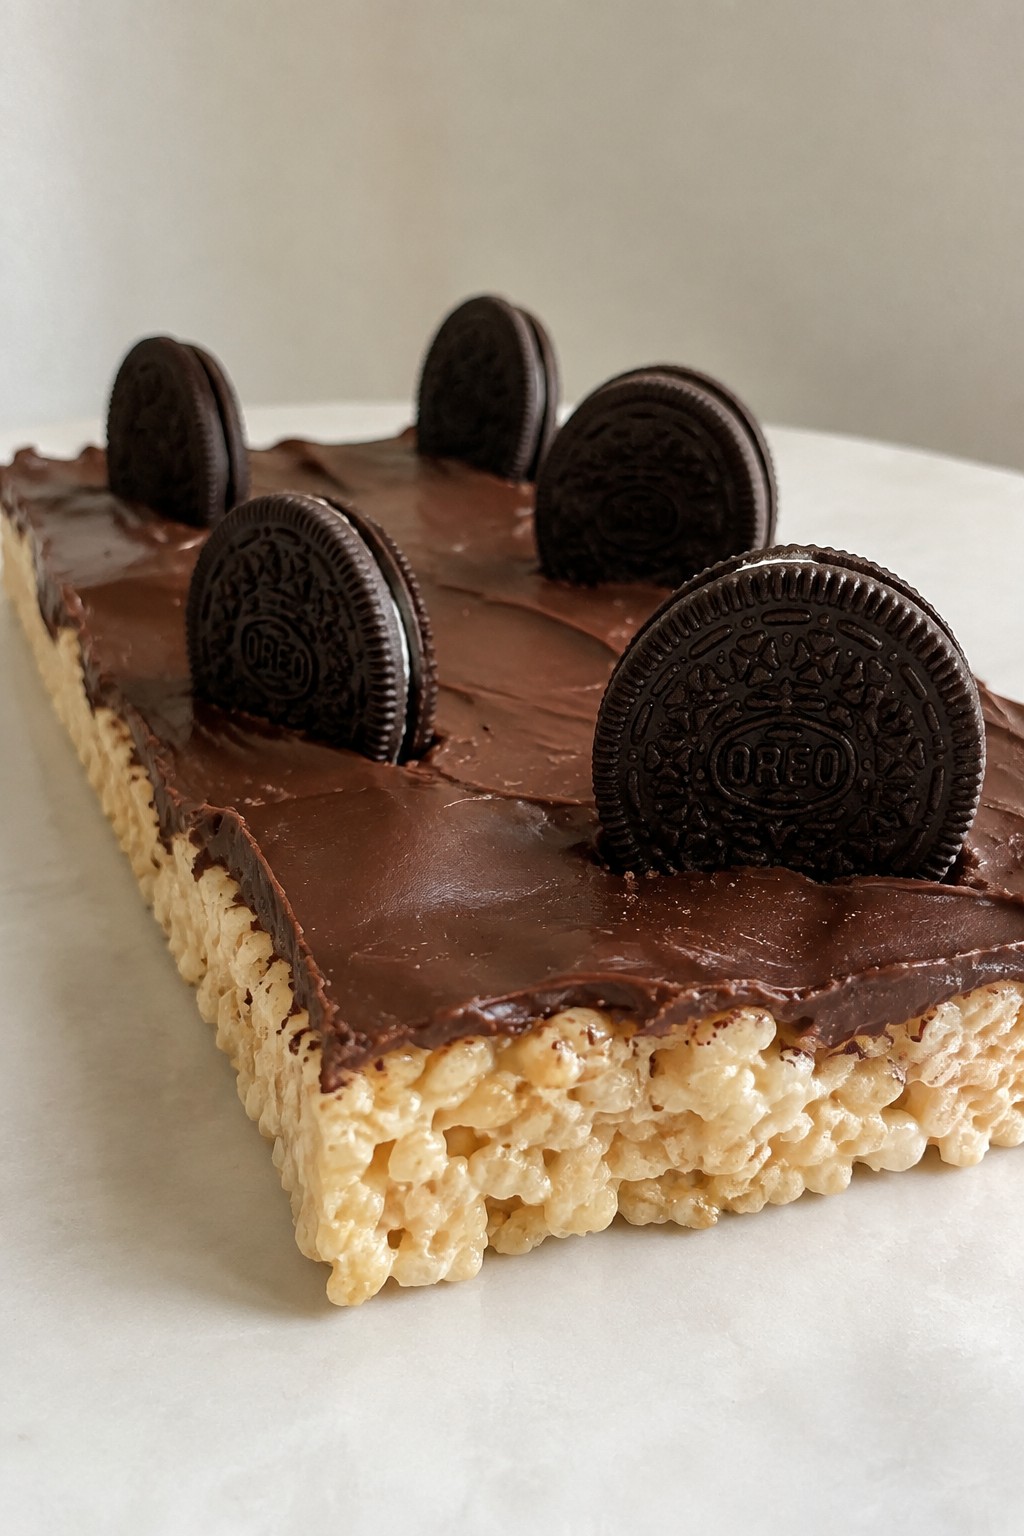
Graveyard Rice Krispie Treat Bark with Cookie Tombstones
This bark turns classic Rice Krispie treats into a thin, shareable slab that looks like a miniature graveyard. The chocolate layer on top gives it a crisp snap, while the upright cookies stand in as edible tombstones. It works well for Halloween parties or as a quick dessert that travels easily.
Serves 4 people.
Ingredients
- 3 cups Rice Krispies cereal
- 10 ounces mini marshmallows
- 3 tablespoons unsalted butter
- 1 1/2 cups semisweet chocolate chips
- 6 chocolate sandwich cookies
Instructions
- Line a baking sheet with parchment paper and set it aside.
- In a large saucepan over medium heat, melt the butter. Add the mini marshmallows and stir until completely smooth.
- Remove the pan from the heat and quickly stir in the Rice Krispies cereal until evenly coated.
- Press the mixture into an even layer about half an inch thick on the prepared baking sheet. Let it cool for 10 minutes.
- Melt the chocolate chips in the microwave in 30-second bursts, stirring between each, until smooth. Spread the melted chocolate over the cooled Rice Krispie layer.
- While the chocolate is still soft, press the chocolate sandwich cookies upright into the surface to resemble tombstones. Let the bark set at room temperature until the chocolate firms.
Extra Tips
Break each cookie in half before inserting it so the tombstones stand at different heights. If the chocolate starts to set before all the cookies are placed, warm it gently for a few seconds to soften again. Store any leftovers in an airtight container at room temperature for up to two days.Course: Dessert Cuisine: American Equipment: Large saucepan, Baking sheet, Microwave-safe bowl
