
I remember the excitement and nerves of hosting Christmas dinner for the first time. The main course had to be perfect, and I soon discovered the beauty of simple, savory recipes. Think rosemary-scented prime rib or a honey mustard ham that promises to impress. It’s all about festive flavors made easy. Ready to find your new holiday favorite? Let me show you these show-stopping options!
Herb-Crusted Prime Rib Roast
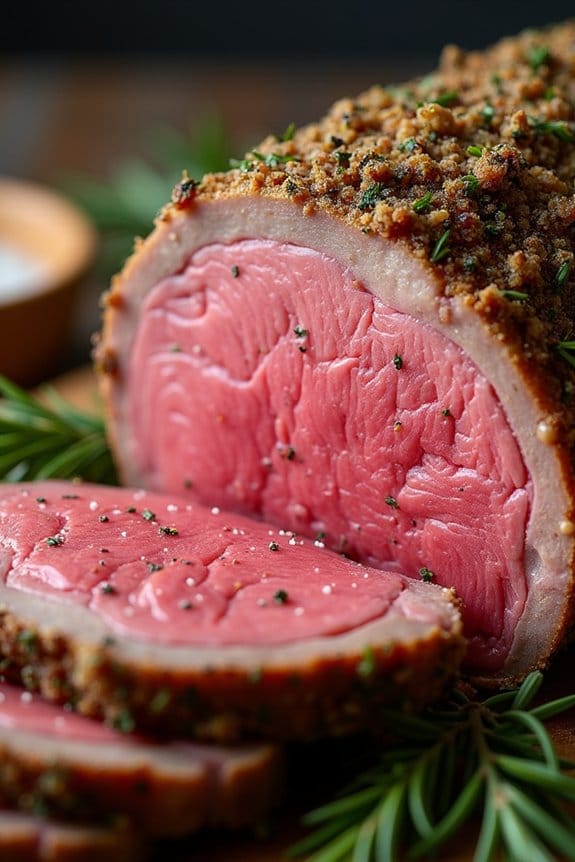
Herb-Crusted Prime Rib Roast is a classic holiday main dish that exudes elegance and flavor. This dish is perfect for Christmas celebrations, offering a tender and juicy roast with a beautifully seasoned crust that impresses both taste buds and guests alike. The prime rib is generously coated with a mixture of fresh herbs and spices, creating a savory crust that complements the rich, succulent beef.
When cooked to perfection, the herb-crusted prime rib roast is a show-stopping centerpiece that embodies the spirit of the holiday season. The key to a successful Herb-Crusted Prime Rib Roast lies in the quality of the meat and the balance of flavors in the herb crust. Selecting a high-grade prime rib guarantees a tender and flavorful roast, while fresh herbs and spices elevate the dish to gourmet levels.
This recipe serves 4-6 people, making it ideal for intimate family gatherings or festive dinner parties. With a little preparation and attention to detail, you can create a memorable and delicious main course that will have everyone at the table savoring every bite.
Ingredients (for 4-6 servings):
- 1 (5-6 pounds) bone-in prime rib roast
- 2 tablespoons olive oil
- 3 cloves garlic, minced
- 2 tablespoons kosher salt
- 1 tablespoon freshly ground black pepper
- 2 tablespoons fresh rosemary, chopped
- 2 tablespoons fresh thyme, chopped
- 1 tablespoon Dijon mustard
Cooking Instructions:
- Preparation: Remove the prime rib roast from the refrigerator and let it sit at room temperature for at least 1 hour. This helps guarantee even cooking.
- Preheat the Oven: Preheat your oven to 450°F (232°C). This initial high temperature will help create a crispy crust on the roast.
- Prepare the Herb Mixture: In a small bowl, combine the olive oil, minced garlic, kosher salt, black pepper, rosemary, thyme, and Dijon mustard. Mix well to form a paste.
- Season the Roast: Pat the prime rib dry with paper towels. Rub the herb mixture generously all over the surface of the meat, making sure that it’s evenly coated.
- Roast the Meat: Place the seasoned prime rib on a rack in a roasting pan, bone side down. Roast in the preheated oven for 20 minutes.
- Reduce the Temperature: After 20 minutes, reduce the oven temperature to 325°F (163°C). Continue to roast until the internal temperature of the meat reaches 120°F (49°C) for medium-rare, about 1.5 to 2 hours. Use a meat thermometer for accuracy.
- Rest the Roast: Remove the roast from the oven and tent it loosely with aluminum foil. Let it rest for 20-30 minutes. This allows the juices to redistribute throughout the meat, guaranteeing a juicy and tender result.
- Carve and Serve: Carve the roast into slices of your desired thickness and serve immediately, garnished with additional fresh herbs if desired.
Extra Tips:
For the best results, it’s essential to allow the roast to rest after cooking, as this helps seal in the juices. Always use a meat thermometer to check the internal temperature for accuracy and to achieve your preferred level of doneness.
If you prefer your roast more well-done, adjust the cooking time accordingly. Additionally, verify your herbs are fresh for peak flavor, and if you can, prepare the herb mixture a day in advance to let the flavors meld together. This dish pairs beautifully with classic sides like garlic mashed potatoes and roasted vegetables, completing your festive meal.
Balsamic Glazed Pork Tenderloin

Balsamic Glazed Pork Tenderloin is a delightful and elegant main dish perfect for your Christmas dinner. The tenderloin, known for its lean and tender texture, is beautifully enhanced by a rich balsamic glaze, which brings a sweet and tangy contrast to the savory meat. This dish not only impresses with its flavors but also with its presentation, making it a stunning centerpiece for your festive table.
The secret to its deliciousness lies in the balance of the glaze ingredients and the careful cooking process, guaranteeing the pork remains juicy and flavorful. Preparing this dish is relatively straightforward, allowing you to focus on the joy of cooking and entertaining.
The balsamic glaze is made with a combination of balsamic vinegar, honey, and Dijon mustard, which perfectly complements the mild flavor of the pork. Roasting the tenderloin to perfection guarantees that each slice is succulent and packed with flavor. Whether you’re a seasoned chef or a home cook looking to impress, this recipe will guide you in creating a memorable meal for your family and friends.
Ingredients (Serves 4-6):
- 2 pork tenderloins (about 1 pound each)
- Salt and freshly ground black pepper
- 1 tablespoon olive oil
- 1/2 cup balsamic vinegar
- 1/4 cup honey
- 2 tablespoons Dijon mustard
- 2 cloves garlic, minced
- 1 teaspoon fresh rosemary, chopped
- 1 teaspoon fresh thyme, chopped
Cooking Instructions:
- Preheat the Oven: Preheat your oven to 400°F (200°C). This temperature is ideal for roasting the pork tenderloin, guaranteeing it cooks through without drying out.
- Prepare the Tenderloin: Remove any silver skin or excess fat from the pork tenderloins. Season them generously with salt and freshly ground black pepper on all sides.
- Sear the Pork: Heat the olive oil in a large ovenproof skillet over medium-high heat. Add the tenderloins and sear them on all sides until browned, about 3-4 minutes per side. This step locks in the flavors and juices.
- Prepare the Glaze: In a small bowl, whisk together the balsamic vinegar, honey, Dijon mustard, minced garlic, rosemary, and thyme until well combined.
- Glaze the Pork: Pour the balsamic glaze over the seared pork tenderloins, turning them to coat evenly. This guarantees that every part of the tenderloin absorbs the delicious flavors of the glaze.
- Roast the Pork: Transfer the skillet to the preheated oven and roast the pork for about 15-20 minutes or until the internal temperature reaches 145°F (63°C). This assures that the pork is cooked to a perfect level of doneness.
- Rest and Serve: Remove the skillet from the oven and let the pork rest for about 5 minutes before slicing. Resting allows the juices to redistribute, guaranteeing each slice is moist and flavorful. Slice the tenderloin and serve with the remaining glaze from the skillet.
Extra Tips:
To guarantee that your Balsamic Glazed Pork Tenderloin has the best possible flavor, consider marinating the pork in a portion of the glaze for several hours or overnight. This will infuse the meat with even more depth.
If you don’t have fresh herbs on hand, dried herbs can be used, but use them sparingly as they’re more concentrated. Additionally, if the glaze seems too thick after roasting, a small amount of water or additional balsamic vinegar can be added to loosen it to your desired consistency.
Enjoy this dish with roasted vegetables or a fresh salad to balance the meal.
Stuffed Turkey Breast With Cranberry Sauce
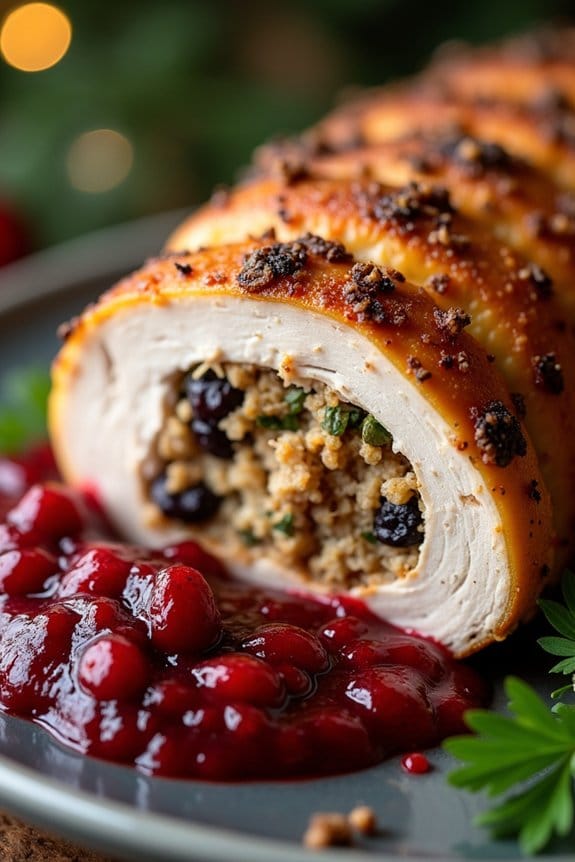
Stuffed Turkey Breast With Cranberry Sauce is a delightful and elegant main dish, perfect for any Christmas feast. This dish combines the classic flavors of turkey and cranberry sauce in a new and exciting way. The turkey breast is carefully butterflied and stuffed with a savory mixture of herbs, breadcrumbs, and dried cranberries, then roasted to perfection. The accompanying homemade cranberry sauce adds a tangy and sweet contrast, enhancing the overall flavor profile of the dish.
This recipe is ideal for a smaller gathering, serving 4-6 people, making it a great option if you’re looking to avoid the hassle of cooking a whole turkey. The stuffing is easy to prepare, and the cranberry sauce can be made ahead of time, allowing you to spend more time enjoying the festivities with your loved ones. The combination of juicy turkey, flavorful stuffing, and vibrant cranberry sauce will surely make this dish a standout at your Christmas dinner.
Ingredients for Stuffed Turkey Breast With Cranberry Sauce (Serves 4-6):
- 1 boneless turkey breast (about 2-3 pounds)
- 1 cup fresh or frozen cranberries
- 1/2 cup granulated sugar
- 1/2 cup water
- 1/2 cup dried cranberries
- 1 cup breadcrumbs
- 1/4 cup chopped fresh parsley
- 1 teaspoon dried thyme
- 1 teaspoon dried sage
- 2 cloves garlic, minced
- 1/4 cup chopped onion
- 2 tablespoons olive oil
- Salt and pepper to taste
- Kitchen twine or skewers
Cooking Instructions:
- Prepare the Cranberry Sauce: In a medium saucepan, combine the fresh or frozen cranberries, granulated sugar, and water. Bring to a boil over medium-high heat, then reduce the heat and simmer for about 10 minutes, or until the cranberries have burst and the sauce has thickened. Remove from heat and let cool.
- Prepare the Stuffing: In a large bowl, mix the dried cranberries, breadcrumbs, parsley, thyme, sage, garlic, onion, and olive oil. Season with salt and pepper to taste. Stir until all ingredients are well combined.
- Butterfly the Turkey Breast: Lay the turkey breast on a clean cutting board. Using a sharp knife, carefully butterfly the breast by slicing it horizontally, stopping about 1/2 inch from the other side, and then open it like a book.
- Stuff the Turkey Breast: Spread the stuffing mixture evenly over the opened turkey breast. Carefully roll the turkey breast tightly from one end to the other. Secure the roll with kitchen twine or skewers to hold it together during cooking.
- Roast the Turkey: Preheat your oven to 375°F (190°C). Place the stuffed turkey breast seam side down in a roasting pan. Season the outside with salt and pepper. Roast in the preheated oven for about 1 to 1.5 hours, or until the internal temperature reaches 165°F (74°C).
- Rest and Serve: Remove the turkey from the oven and let it rest for about 10 minutes before slicing. Serve with the homemade cranberry sauce on the side.
Extra Tips:
When butterflying the turkey breast, be careful not to cut all the way through the meat. This guarantees that the stuffing stays inside during roasting. If you don’t have kitchen twine, skewers can be a good alternative to keep the roll intact.
For an extra flavor boost, consider marinating the turkey breast in a mixture of olive oil, lemon juice, and herbs for a few hours before preparing. Preparing the cranberry sauce a day in advance can save you time on the day of your Christmas feast.
Garlic Butter Roasted Chicken
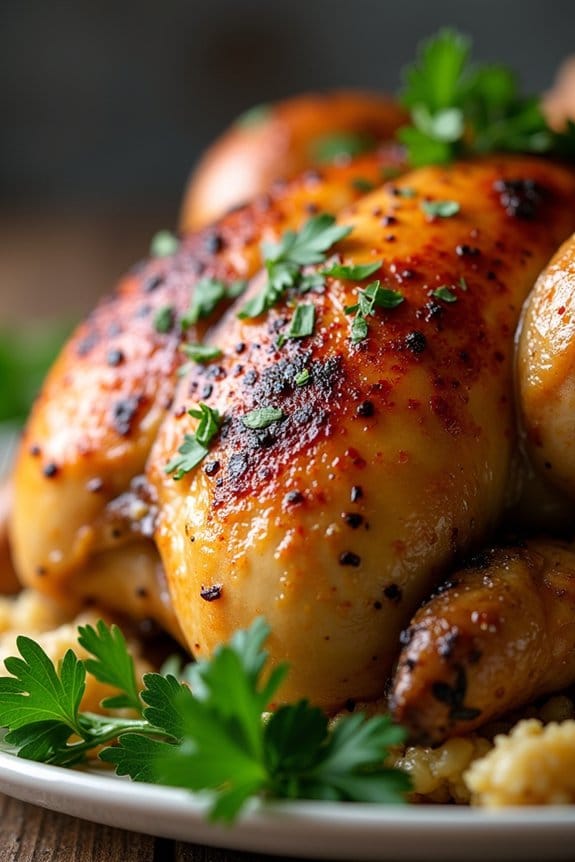
Garlic Butter Roasted Chicken is a savory and succulent dish perfect for making the holiday season even more special. This dish combines the rich, aromatic flavors of garlic and butter with the juicy tenderness of a perfectly roasted chicken. As the chicken roasts, the garlic-infused butter seeps into the meat, ensuring that every bite is moist and bursting with flavor.
Whether you’re hosting a Christmas dinner or simply seeking a cozy meal for your family, this recipe will surely become a festive favorite. This dish serves 4-6 people, making it ideal for a small family gathering or an intimate dinner party. The preparation is straightforward, yet the result is impressive enough to grace any holiday table.
With a few fresh ingredients and some simple steps, you can create a heartwarming main course that captures the essence of the season.
Ingredients:
- 1 whole chicken (4-5 pounds)
- 1/2 cup unsalted butter, softened
- 1 tablespoon olive oil
- 6 cloves garlic, minced
- 1 lemon, halved
- 1 tablespoon fresh thyme leaves
- 1 tablespoon fresh rosemary, chopped
- Salt and pepper, to taste
- 1 cup chicken broth
- Fresh parsley, chopped (for garnish)
Instructions:
- Preparation: Preheat your oven to 425°F (220°C). Make sure the chicken is at room temperature for even cooking. Pat the chicken dry with paper towels, as this helps achieve a crispy skin.
- Make the Garlic Butter: In a small bowl, combine the softened butter, minced garlic, thyme, rosemary, salt, and pepper. Mix until well combined.
- Season the Chicken: Gently loosen the skin over the breast of the chicken by sliding your fingers underneath. Spread half of the garlic butter mixture under the skin, and spread the remaining butter all over the surface of the chicken. Season with additional salt and pepper if desired.
- Prepare the Roasting Pan: Place the chicken breast-side up in a roasting pan. Squeeze the juice of half a lemon over the chicken, and place both halves inside the cavity of the chicken along with any remaining garlic butter.
- Roast the Chicken: Pour the chicken broth into the bottom of the roasting pan. This will help keep the chicken moist and create a delicious base for a sauce. Roast in the preheated oven for about 1 hour and 15 minutes, or until the internal temperature reaches 165°F (75°C) and the juices run clear when the thigh is pierced.
- Rest the Chicken: Remove the chicken from the oven and let it rest for 15 minutes before carving. This allows the juices to redistribute throughout the meat, making it more tender and flavorful.
- Garnish and Serve: Carve the chicken and place it on a serving platter. Garnish with freshly chopped parsley for a touch of color and freshness. Serve with your favorite holiday sides.
Extra Tips:
When roasting the chicken, it’s essential to occasionally baste it with the drippings from the pan. This not only enhances the flavor but also contributes to a beautifully golden and crispy skin.
If you prefer a more intense garlic flavor, you can increase the amount of garlic in the butter mixture. Additionally, if you find that the chicken skin is browning too quickly, cover it loosely with aluminum foil and remove it during the last 15 minutes of roasting to allow the skin to crisp up again.
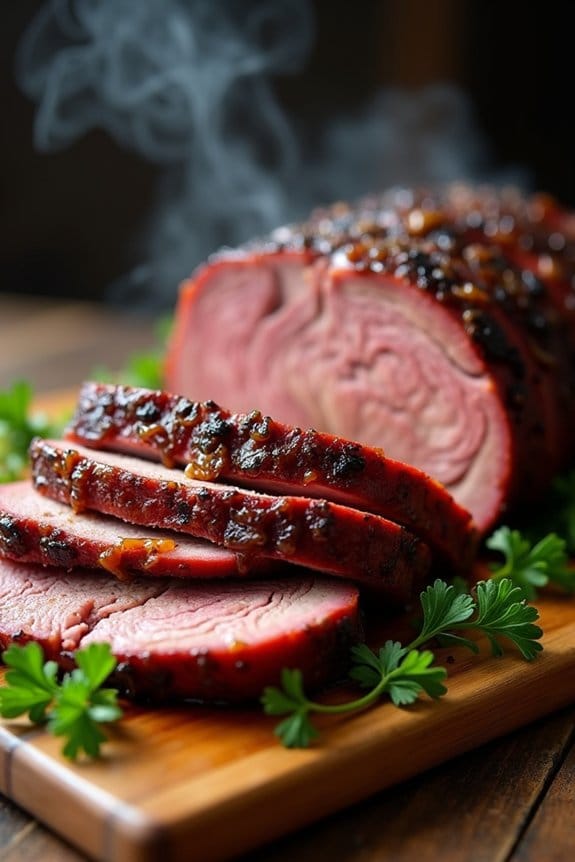
Honey Mustard Glazed Ham
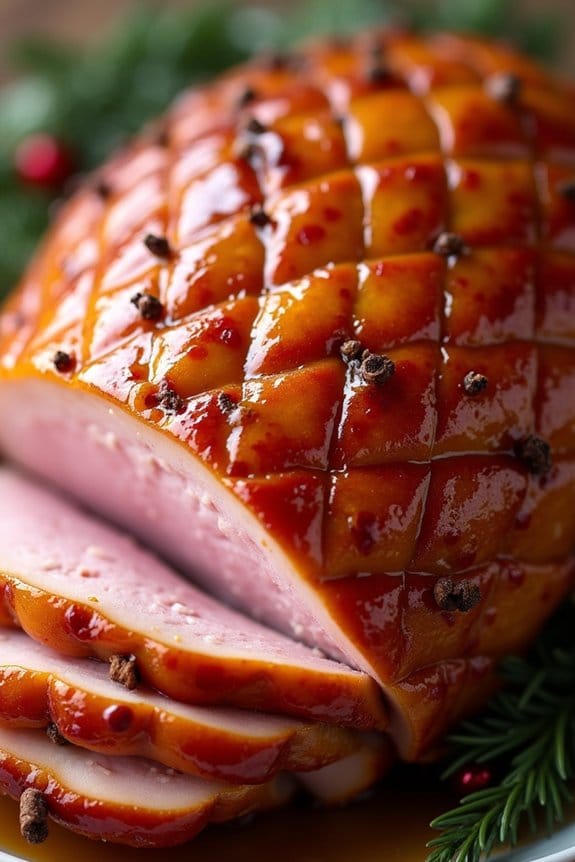
For a Christmas feast that’s both traditional and tantalizing, a Honey Mustard Glazed Ham is the perfect centerpiece. This dish combines the savory richness of ham with the sweet and tangy notes of honey and mustard, creating a flavor profile that’s both festive and satisfying. The glaze caramelizes beautifully in the oven, giving the ham a glossy, appetizing finish that will make your holiday table sparkle.
Preparing a Honey Mustard Glazed Ham is a straightforward process that guarantees you spend less time in the kitchen and more time enjoying the company of loved ones. The key to this dish is balancing the flavors of the glaze and making certain that the ham is cooked to perfection. Here, we’ve provided a recipe that serves 4-6 people, making it ideal for intimate gatherings or a cozy family Christmas dinner.
Ingredients:
- 1 (4-5 pound) bone-in ham
- 1 cup honey
- 1/2 cup Dijon mustard
- 1/4 cup brown sugar
- 2 tablespoons apple cider vinegar
- 1 teaspoon ground cinnamon
- 1/2 teaspoon ground cloves
- Whole cloves for studding (optional)
Instructions:
- Prepare the Ham: Preheat your oven to 325°F (163°C). Remove the ham from its packaging and place it on a roasting rack inside a roasting pan. If the ham isn’t pre-scored, use a sharp knife to score the surface in a diamond pattern, making shallow cuts about 1/4 inch deep.
- Make the Glaze: In a medium saucepan, combine the honey, Dijon mustard, brown sugar, apple cider vinegar, ground cinnamon, and ground cloves. Heat the mixture over medium heat, stirring frequently until the sugar has dissolved and the glaze is smooth. Remove from heat and let it cool slightly.
- Stud the Ham (Optional): If desired, insert whole cloves into the intersections of the scored lines on the ham for added flavor and a decorative touch.
- Apply the Glaze: Using a basting brush, generously coat the entire surface of the ham with the honey mustard glaze, ensuring it gets into the scored crevices. Reserve some glaze for later basting.
- Roast the Ham: Place the ham in the preheated oven and roast for 1.5 to 2 hours, or until the internal temperature reaches 140°F (60°C). Baste the ham with the reserved glaze every 30 minutes to maintain moisture and enhance the flavor.
- Caramelize the Glaze: For an added touch, increase the oven temperature to 400°F (204°C) during the final 10-15 minutes of roasting to caramelize the glaze, keeping a close eye to prevent burning.
- Rest and Serve: Once cooked, remove the ham from the oven and let it rest for 15 minutes before carving. This allows the juices to redistribute, guaranteeing a moist and tender slice.
Extra Tips:
For the best results, choose a high-quality bone-in ham, as it tends to be more flavorful and juicy. If you’re short on time, you can prepare the glaze a day in advance and store it in the refrigerator.
When scoring the ham, be careful not to cut too deep to avoid losing moisture during cooking. Finally, a meat thermometer is essential to verify the ham reaches the correct internal temperature for safe consumption.
Spinach and Feta Stuffed Lamb
Spinach and Feta Stuffed Lamb is a delightful and savory dish that combines the rich, earthy flavors of lamb with the creamy, tangy notes of feta cheese and the fresh, vibrant taste of spinach. This dish is perfect for a Christmas main course, offering a sophisticated yet hearty option that will impress your family and friends. The stuffing not only enhances the flavor of the lamb but also keeps it moist and tender as it roasts to perfection.
This recipe serves 4-6 people, making it an ideal choice for a small holiday gathering. By following this simple recipe, you can create a show-stopping main dish that will be the centerpiece of your Christmas table. With its combination of flavors and elegant presentation, Spinach and Feta Stuffed Lamb is sure to become a festive favorite.
Ingredients:
- 1 boneless leg of lamb (about 3-4 pounds)
- 2 tablespoons olive oil
- 1 onion, finely chopped
- 3 cloves garlic, minced
- 2 cups fresh spinach leaves, chopped
- 1 cup crumbled feta cheese
- 1 tablespoon fresh rosemary, chopped
- 1 tablespoon fresh thyme, chopped
- Salt and pepper to taste
- Kitchen twine
Cooking Instructions:
- Preheat the Oven: Start by preheating your oven to 375°F (190°C). This guarantees that your lamb will cook evenly throughout.
- Prepare the Stuffing: In a medium-sized skillet, heat the olive oil over medium heat. Add the onion and garlic, and sauté until the onion is translucent. Add the chopped spinach and cook until wilted. Remove from heat and let it cool slightly. Stir in the crumbled feta cheese, rosemary, thyme, and season with salt and pepper.
- Prepare the Lamb: Lay the boneless leg of lamb flat on a clean surface, fat side down. Spread the spinach and feta mixture evenly over the lamb, leaving a small border around the edges.
- Roll and Tie the Lamb: Carefully roll the lamb up, starting from one of the short ends, into a tight roll. Use kitchen twine to tie the lamb at regular intervals to secure the stuffing inside.
- Roast the Lamb: Place the stuffed lamb in a roasting pan, seam side down. Rub the outside with a bit more olive oil and season with salt and pepper. Roast in the preheated oven for about 1.5 to 2 hours, or until the internal temperature reaches 135°F (57°C) for medium-rare. Adjust the cooking time if you prefer it more or less done.
- Rest and Serve: Once cooked to your liking, remove the lamb from the oven and let it rest for at least 15 minutes before slicing. This allows the juices to redistribute, guaranteeing a juicy and flavorful roast. Slice and serve with your favorite Christmas side dishes.
Extra Tips:
When preparing the stuffing, make sure the spinach is thoroughly wilted and the mixture is well-seasoned, as this will greatly influence the flavor of the lamb.
Additionally, when rolling and tying the lamb, make certain it’s tightly secured to prevent the stuffing from spilling out during cooking.
If you don’t have fresh herbs, you can substitute with dried herbs, but use about half the amount since dried herbs are more potent.
Finally, for added flavor, you can deglaze the roasting pan with a splash of red wine after removing the lamb to create a simple pan sauce to serve alongside the dish.
Salmon En Papillote With Lemon and Dill
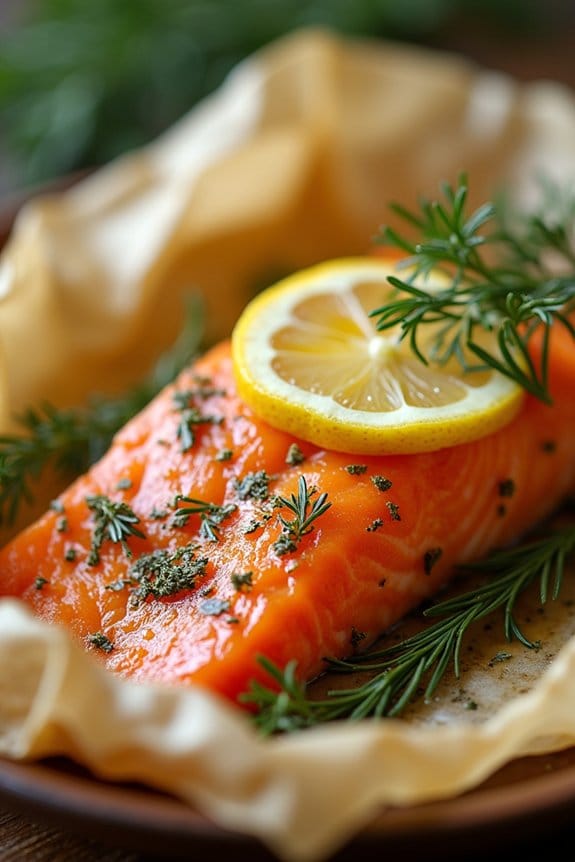
Salmon En Papillote With Lemon and Dill is a perfect main dish for your Christmas feast, offering a delightful combination of flavors with its succulent salmon, fragrant dill, and zesty lemon.
This dish involves baking the salmon in parchment paper, a technique known as “en papillote,” which allows it to steam in its own juices and the aromas of added herbs and seasonings. The result is a tender, moist, and flavorful piece of fish that not only tastes incredible but also presents beautifully when served.
Ideal for a festive holiday meal, Salmon En Papillote is a healthy option that doesn’t compromise on taste. The aromatic herbs and citrusy notes from the lemon complement the natural richness of the salmon, making it a crowd-pleaser for everyone around your Christmas table.
Plus, the simplicity of preparation and minimal cleanup make it a stress-free addition to your holiday menu. This recipe serves 4-6 people, making it perfect for a family gathering or an intimate dinner party.
Ingredients:
- 4-6 salmon fillets (about 6 ounces each)
- 1 lemon, thinly sliced
- 1 small bunch of fresh dill, roughly chopped
- 1 tablespoon olive oil
- Salt, to taste
- Pepper, to taste
- 4-6 sheets of parchment paper (about 12×16 inches each)
Cooking Instructions:
- Preheat the Oven: Begin by preheating your oven to 400°F (200°C). This guarantees the oven is at the right temperature by the time you’re ready to cook your salmon.
- Prepare the Parchment: Cut 4-6 pieces of parchment paper, each about 12×16 inches. Fold each piece in half to create a crease, then open it back up.
- Assemble the Packets: Place a salmon fillet on one side of the fold in the parchment paper. Drizzle each fillet with olive oil and season with salt and pepper to taste.
- Add Flavorings: Top each salmon fillet with a few lemon slices and a generous sprinkle of fresh dill. Feel free to adjust the amount of lemon and dill according to your preference.
- Seal the Packets: Fold the other half of the parchment over the salmon. Starting at one end, make small overlapping folds along the edge to seal the packet tightly, making sure no steam will escape during cooking.
- Bake the Salmon: Place the sealed parchment packets on a baking sheet and bake in the preheated oven for 12-15 minutes, depending on the thickness of your salmon fillets. The packets should puff up slightly as the salmon cooks.
- Serve: Carefully open each packet (watch out for the hot steam) and transfer the salmon along with the lemon and dill onto plates. Serve immediately for the best flavor and texture.
Extra Tips:
For an extra touch of flavor, consider adding thin slices of garlic or some capers inside the packets before sealing.
You can also add a side of seasonal vegetables, like asparagus or green beans, inside the parchment for a complete meal. Make sure the parchment is well-sealed to trap steam, which is vital for keeping the salmon moist.
If you prefer your salmon more well-done, you can add a couple of extra minutes to the cooking time, but be careful not to overcook it to maintain its delicate texture.
Mushroom and Leek Wellington
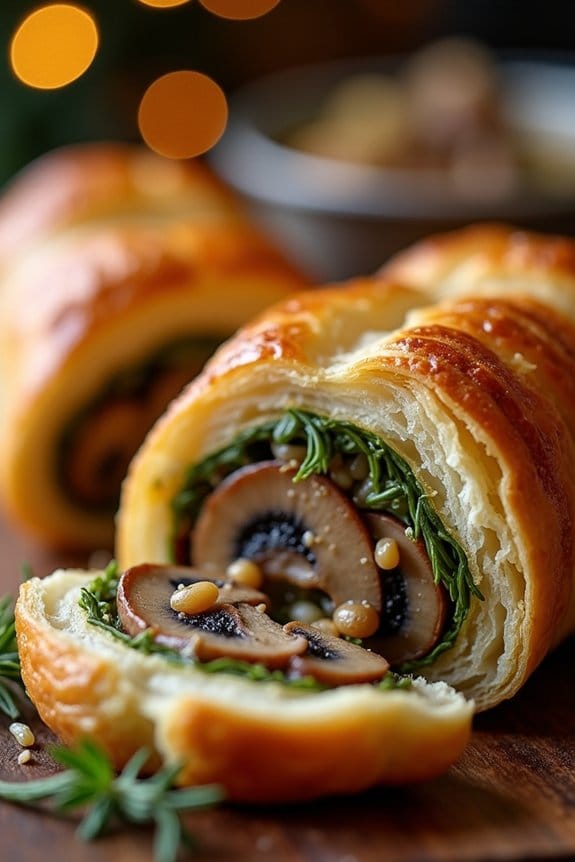
Mushroom and Leek Wellington is a delightful and sophisticated main dish that brings a touch of elegance to your Christmas dinner table. This vegetarian-friendly recipe combines earthy mushrooms and sweet leeks wrapped in golden, flaky puff pastry. It’s a fantastic option for a festive meal that caters to both vegetarians and meat lovers alike, offering a rich and satisfying flavor profile.
The combination of sautéed vegetables, herbs, and a hint of creaminess creates a harmonious balance that’s bound to impress your guests. This dish is perfect for those who want to enjoy a traditional holiday feast without the meat. Not only is Mushroom and Leek Wellington visually stunning, but it also allows for creativity in presentation and garnishing.
Serve it alongside your favorite holiday sides, such as roasted vegetables or a revitalizing salad, to create a complete and memorable Christmas meal. Whether you’re a seasoned cook or a beginner, this recipe is approachable and rewarding, making it a great addition to your holiday repertoire.
Ingredients for 4-6 servings:
- 2 tablespoons olive oil
- 1 tablespoon butter
- 2 large leeks, chopped and rinsed
- 500g (about 1 lb) mixed mushrooms, roughly chopped
- 2 cloves garlic, minced
- 1 tablespoon fresh thyme leaves
- 1 tablespoon fresh rosemary, chopped
- 1 tablespoon Dijon mustard
- 50ml (about 3 tablespoons) heavy cream
- Salt and pepper, to taste
- 500g (about 1 lb) puff pastry
- 1 egg, beaten
Cooking Instructions:
- Prepare the Filling: Heat the olive oil and butter in a large skillet over medium heat. Add the leeks and cook until softened, about 5 minutes. Add the mushrooms and garlic, cooking until the mushrooms release their moisture and begin to brown, approximately 10-12 minutes.
- Season the Filling: Stir in the thyme, rosemary, salt, and pepper. Cook for another 2 minutes to blend the flavors. Add the Dijon mustard and heavy cream, stirring until well combined. Remove from heat and let the mixture cool completely.
- Prepare the Pastry: Preheat your oven to 200°C (400°F). Roll out the puff pastry on a lightly floured surface into a rectangle large enough to encase the mushroom filling.
- Assemble the Wellington: Place the cooled mushroom mixture in the center of the puff pastry, shaping it into a log. Fold the pastry over the filling, sealing the edges with the beaten egg. Place the seam side down on a baking sheet lined with parchment paper.
- Brush and Bake: Brush the entire pastry with the remaining beaten egg to give it a golden color. Using a sharp knife, score the top lightly (this helps release steam). Bake in the preheated oven for 25-30 minutes, or until the pastry is puffed and golden brown.
- Serve: Allow the Wellington to cool for a few minutes before slicing. Serve warm with your choice of sides.
Extra Tips:
For the best results, verify that the mushroom mixture is completely cool before wrapping it in the pastry to prevent sogginess. You can prepare the filling a day in advance and refrigerate it, saving time on the day of cooking.
Additionally, when rolling out the puff pastry, aim for an even thickness to ensure it cooks uniformly. If you prefer a vegan version, substitute the butter and cream with plant-based alternatives and use a vegan puff pastry.
Cranberry Orange Glazed Duck
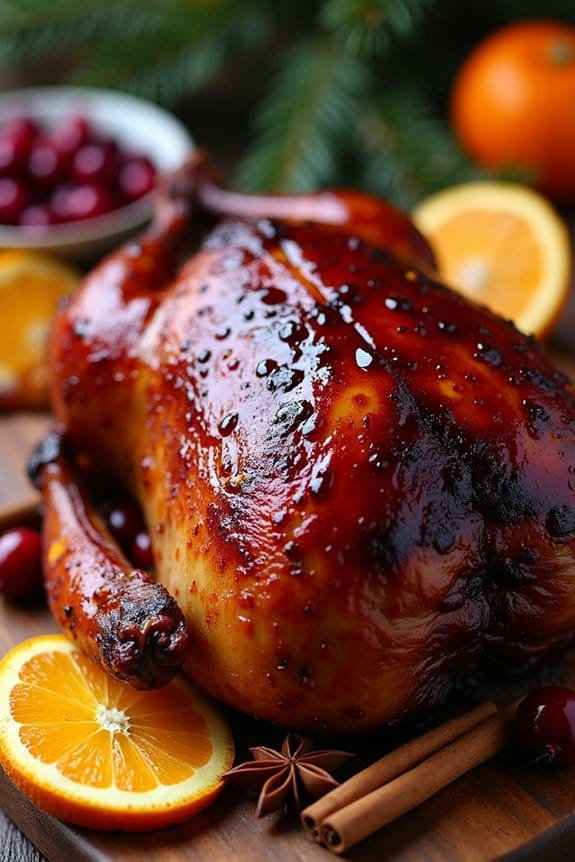
Cranberry Orange Glazed Duck is a delightful and festive main dish that’s perfect for a Christmas feast. The rich, succulent flavor of duck pairs beautifully with the sweet and tangy cranberry orange glaze, creating a symphony of taste that will impress your guests. This dish isn’t only delicious but also visually stunning, with its glossy glaze and vibrant hues.
Whether you’re hosting an intimate gathering or a larger celebration, Cranberry Orange Glazed Duck will be a memorable centerpiece on your holiday table.
Preparing the perfect duck requires attention to detail and a bit of patience, but the results are well worth the effort. This recipe is designed for a serving size of 4-6 people, guaranteeing everyone has a generous portion to enjoy. The combination of fresh cranberries, orange zest, and aromatic spices in the glaze creates a perfect balance of flavors that enhances the natural richness of the duck.
With a few simple steps, you can create a gourmet experience right in your own kitchen.
Ingredients for Cranberry Orange Glazed Duck (serving size: 4-6 people):
- 1 whole duck (approximately 5-6 pounds)
- 1 tablespoon salt
- 1 teaspoon black pepper
- 2 tablespoons olive oil
- 1 cup fresh cranberries
- 1/2 cup freshly squeezed orange juice
- Zest of 1 orange
- 1/4 cup honey
- 1/4 cup brown sugar
- 1 cinnamon stick
- 2 star anise
- 2 cloves of garlic, minced
- 1 tablespoon balsamic vinegar
- 1 tablespoon soy sauce
Cooking Instructions:
- Preheat the Oven: Start by preheating your oven to 350°F (175°C). This will guarantee that the duck is evenly cooked throughout.
- Prepare the Duck: Rinse the duck under cold water and pat it dry with paper towels. Season the duck generously with salt and black pepper, making sure to season both the inside and outside.
- Sear the Duck: In a large, oven-safe skillet, heat the olive oil over medium-high heat. Place the duck in the skillet and sear it on all sides until the skin is golden brown and crispy. This should take about 8-10 minutes.
- Prepare the Glaze: While the duck is searing, combine the cranberries, orange juice, orange zest, honey, brown sugar, cinnamon stick, star anise, minced garlic, balsamic vinegar, and soy sauce in a saucepan over medium heat. Stir until the sugar dissolves and the cranberries begin to break down, forming a thick glaze. This should take about 10 minutes.
- Glaze the Duck: Once the duck is seared, transfer it to a roasting pan. Brush the duck generously with the cranberry orange glaze, making sure to cover all surfaces.
- Roast the Duck: Place the duck in the preheated oven and roast for about 1.5 to 2 hours, or until the internal temperature reaches 165°F (74°C). Baste the duck with the glaze every 30 minutes to keep it moist and flavorful.
- Rest the Duck: Once cooked, remove the duck from the oven and let it rest for at least 15 minutes before carving. This allows the juices to redistribute, guaranteeing a juicy and tender duck.
Extra Tips:
To guarantee your Cranberry Orange Glazed Duck is cooked to perfection, use a meat thermometer to check the internal temperature. This is the most accurate way to guarantee the duck is fully cooked without overcooking it.
Additionally, if you find the glaze is too thick, you can thin it out with a little water or additional orange juice. For a more intense flavor, prepare the glaze a day in advance, allowing the flavors to meld together overnight.
Finally, be sure to carve the duck with a sharp knife to maintain the integrity of the crispy skin.
Roasted Vegetable Lasagna
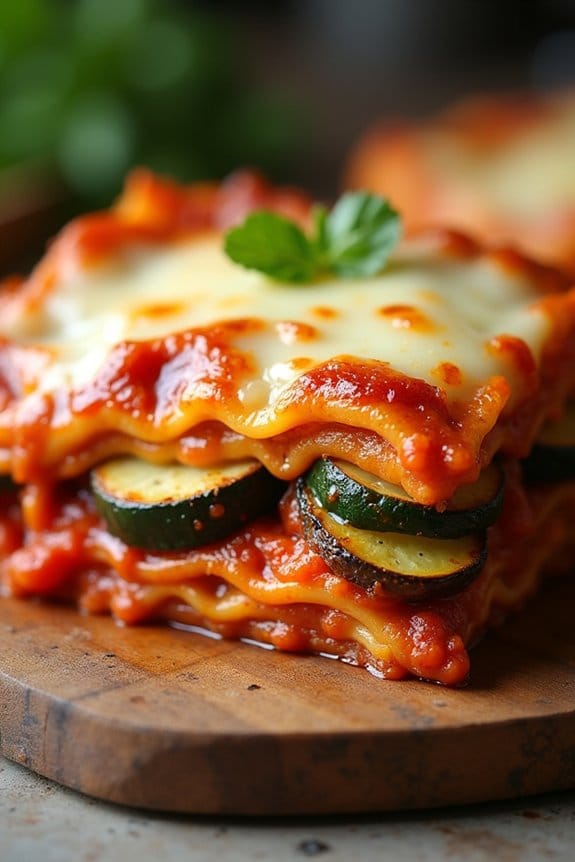
If you’re looking for a comforting and hearty vegetarian main dish for your Christmas dinner, search no further than this Roasted Vegetable Lasagna.
Featuring layers of rich tomato sauce, creamy béchamel, and roasted seasonal vegetables, this dish isn’t only satisfying but also a feast for the eyes. The vibrant colors and robust flavors of the roasted vegetables paired with the creamy layers of cheese and sauce create a delicious and festive main course that even meat lovers will enjoy.
Perfect for feeding a crowd, this Roasted Vegetable Lasagna serves 4-6 people. It’s a great make-ahead option, allowing you to spend more time with your guests and less time in the kitchen on the big day. With ingredients that can be easily adapted to suit your preferences or dietary needs, this lasagna is sure to become a holiday favorite in your household.
Ingredients:
- 2 zucchini, sliced
- 2 red bell peppers, sliced
- 1 eggplant, sliced
- 1 red onion, sliced
- 3 tablespoons olive oil
- Salt and pepper, to taste
- 1 teaspoon dried basil
- 1 teaspoon dried oregano
- 9 lasagna noodles
- 2 cups ricotta cheese
- 1 cup grated Parmesan cheese
- 2 cups shredded mozzarella cheese
- 4 cups marinara sauce
- 2 tablespoons butter
- 2 tablespoons flour
- 2 cups milk
- 1 pinch nutmeg
Cooking Instructions:
- Prepare the Vegetables: Preheat your oven to 400°F (200°C). Place sliced zucchini, red bell peppers, eggplant, and red onion on a large baking sheet. Drizzle with olive oil, and season with salt, pepper, dried basil, and oregano. Toss to coat the vegetables evenly. Roast in the oven for about 25-30 minutes, or until the vegetables are tender and slightly caramelized.
- Cook the Lasagna Noodles: While the vegetables are roasting, cook the lasagna noodles according to the package instructions. Drain, and set aside.
- Make the Béchamel Sauce: In a medium saucepan, melt the butter over medium heat. Stir in the flour and cook for about 1 minute. Gradually add the milk, whisking constantly to avoid lumps. Cook until the sauce thickens, about 5-7 minutes. Add a pinch of nutmeg and season with salt and pepper.
- Assemble the Lasagna: In a 9×13 inch baking dish, spread a thin layer of marinara sauce on the bottom. Place a layer of lasagna noodles over the sauce, followed by half of the roasted vegetables, a third of the ricotta cheese, and a third of the béchamel sauce. Repeat the layers, finishing with a layer of noodles. Top with the remaining marinara sauce, béchamel sauce, and sprinkle with Parmesan and mozzarella cheese.
- Bake the Lasagna: Reduce the oven temperature to 375°F (190°C). Cover the lasagna with aluminum foil and bake for 25 minutes. Remove the foil and bake for an additional 15-20 minutes, or until the cheese is bubbly and golden brown. Allow the lasagna to rest for about 10 minutes before serving.
Extra Tips:
When roasting vegetables, try to cut them into similar sizes for even cooking. Feel free to substitute or add other vegetables such as mushrooms, spinach, or butternut squash, depending on what you have on hand.
For a richer flavor, consider using a mix of cheeses, or add fresh herbs like basil or parsley for garnish just before serving. Preparing the lasagna a day ahead allows the flavors to meld beautifully, making it taste even better the next day.
Slow Cooker Beef Brisket
When it comes to festive celebrations, few dishes capture the essence of a hearty Christmas feast like a perfectly cooked Slow Cooker Beef Brisket. This tender, flavorful dish is ideal for those who wish to spend more time with family and less time in the kitchen. Utilizing a slow cooker not only enhances the flavor but also guarantees the meat remains juicy and succulent. The rich aroma of the brisket cooking gently throughout the day will fill your home with holiday cheer, making it a memorable centerpiece for your Christmas dinner.
Crafting the perfect beef brisket requires patience and attention to detail. This recipe combines a carefully selected blend of spices and herbs to create a deeply satisfying flavor profile. The slow cooking process allows the brisket to absorb the full range of these flavors, resulting in a dish that practically melts in your mouth. Whether you’re hosting a small gathering or a larger family event, this recipe is tailored to serve 4-6 people, making sure everyone has a generous helping of this delicious main course.
Ingredients (Serves 4-6 people):
- 3-4 pounds beef brisket
- 1 tablespoon olive oil
- 2 teaspoons salt
- 1 teaspoon black pepper
- 1 tablespoon smoked paprika
- 1 tablespoon garlic powder
- 1 tablespoon onion powder
- 1 teaspoon dried thyme
- 1 teaspoon dried oregano
- 1 cup beef broth
- 1/2 cup balsamic vinegar
- 1/2 cup brown sugar
- 4 cloves garlic, minced
- 2 onions, sliced
- Fresh parsley for garnish
Cooking Instructions:
- Prepare the Brisket: Begin by patting the beef brisket dry with paper towels. This step is essential for achieving a nice sear on the meat. Rub the brisket with olive oil, then season it generously with salt, pepper, smoked paprika, garlic powder, onion powder, thyme, and oregano. Make sure the brisket is evenly coated with the spice mix.
- Sear the Brisket: Heat a large skillet over medium-high heat. Once hot, sear the brisket on all sides until it develops a rich, brown crust. This should take about 3-4 minutes per side. Searing the meat helps to lock in the flavors and juices.
- Prepare the Slow Cooker: In the bottom of your slow cooker, place the sliced onions and minced garlic. These will serve as a flavorful base for the brisket as it cooks.
- Combine the Liquids: In a small bowl, whisk together the beef broth, balsamic vinegar, and brown sugar. Pour this mixture over the onions and garlic in the slow cooker.
- Cook the Brisket: Place the seared brisket on top of the onions in the slow cooker. Cover and cook on low heat for 8-10 hours, or until the brisket is tender and can be easily shredded with a fork.
- Rest and Serve: Once cooked, remove the brisket from the slow cooker and let it rest for about 15 minutes before slicing. This allows the juices to redistribute throughout the meat. Garnish with freshly chopped parsley before serving.
Extra Tips:
For best results, plan to start the brisket early in the morning if you want it ready for an evening meal. If you’re short on time, you can cook the brisket on high heat for 4-5 hours, but low and slow will yield the most tender results.
Always cut the brisket against the grain to make sure each slice is tender. Additionally, you can thicken the sauce by simmering it in a saucepan for a few minutes before serving, providing a rich gravy to complement the dish.
Finally, leftovers can be stored in an airtight container in the refrigerator for up to three days, or frozen for up to three months.
Maple Dijon Glazed Carrots and Parsnips
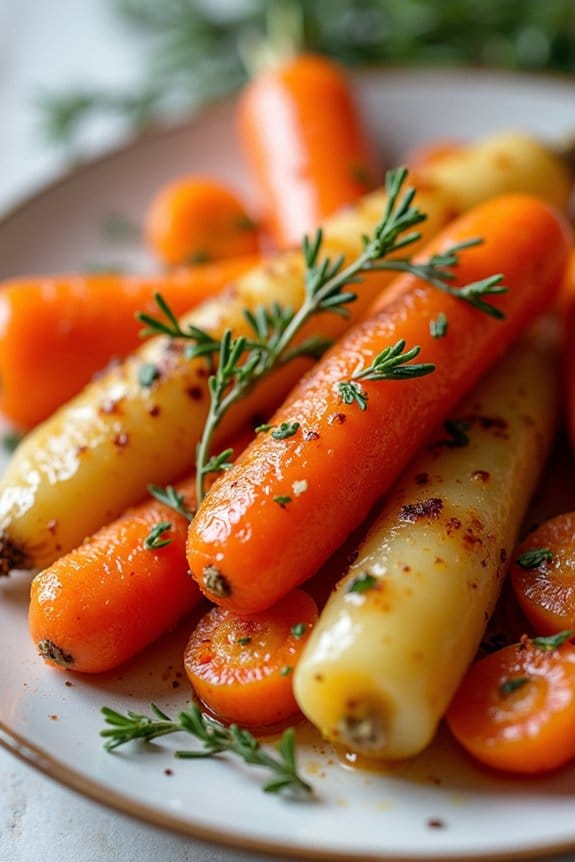
A delightful combination of sweet and savory, Maple Dijon Glazed Carrots and Parsnips is a perfect addition to your Christmas main dish lineup. This recipe brings out the natural sweetness of the root vegetables, enhanced by the rich flavors of maple syrup and the tangy kick of Dijon mustard. The glaze not only adds a beautiful sheen to the vegetables but also creates a harmonious blend of flavors that complement any main course, making it a favorite among holiday feasts.
This dish isn’t only delicious but also a breeze to prepare. With just a few simple ingredients and minimal prep time, you’ll have a vibrant and flavorful side that’s sure to impress your guests. The roasted carrots and parsnips develop a tender texture and a caramelized exterior, making them an irresistible accompaniment to your Christmas dinner. Perfect for serving 4-6 people, it’s an easy yet elegant addition to your holiday table.
Ingredients (Serves 4-6):
- 4 large carrots, peeled and cut into sticks
- 4 large parsnips, peeled and cut into sticks
- 3 tablespoons olive oil
- 2 tablespoons maple syrup
- 2 tablespoons Dijon mustard
- Salt and pepper to taste
- 1 tablespoon fresh thyme leaves, optional
Cooking Instructions:
- Preheat the Oven: Start by preheating your oven to 400°F (200°C). This temperature will allow the vegetables to roast evenly and develop a nice caramelized exterior.
- Prepare the Vegetables: Peel the carrots and parsnips, then cut them into even sticks. This will guarantee they cook at the same rate, giving you perfectly roasted vegetables.
- Make the Glaze: In a small bowl, whisk together the olive oil, maple syrup, and Dijon mustard until fully combined. Season the mixture with salt and pepper to taste.
- Coat the Vegetables: Place the carrot and parsnip sticks in a large mixing bowl. Pour the maple Dijon glaze over the vegetables and toss them until they’re thoroughly coated.
- Arrange on a Baking Sheet: Spread the glazed vegetables in a single layer on a baking sheet lined with parchment paper. This will prevent them from sticking and guarantee even roasting.
- Roast the Vegetables: Place the baking sheet in the preheated oven and roast for 25-30 minutes. Halfway through, toss the vegetables to promote even cooking.
- Check for Doneness: The vegetables should be tender and slightly caramelized when done. If necessary, roast for an additional 5 minutes.
- Garnish and Serve: Once roasted, remove from the oven and sprinkle with fresh thyme leaves if desired. Serve warm as a side dish to your main Christmas meal.
Extra Tips:
For an extra depth of flavor, consider adding a splash of balsamic vinegar to the glaze. If you want a little heat, a pinch of red pepper flakes can add a nice kick. Always remember to taste and adjust the seasoning as needed before roasting.
Additionally, if you prefer a less sweet glaze, you can reduce the amount of maple syrup or try substituting with honey for a different flavor profile. Confirm the vegetables are evenly cut to avoid uneven cooking.
Pomegranate Molasses Roasted Quail

Pomegranate Molasses Roasted Quail is a delightful and elegant dish perfect for adding a touch of sophistication to your Christmas dinner table. The combination of the sweet and tangy pomegranate molasses with the tender, juicy quail creates a truly memorable culinary experience. This dish not only captures the festive spirit with its vibrant flavors but also offers a unique twist from the usual holiday fare, guaranteeing your guests are both surprised and delighted.
Quail, often considered a delicacy, is a small game bird with a rich, flavorful meat that pairs beautifully with the complex notes of pomegranate molasses. The molasses not only enhances the natural flavors of the quail but also imparts a glossy, caramelized finish that makes the dish visually appealing. The recipe is straightforward, allowing even novice cooks to achieve impressive results. With a serving size suitable for 4-6 people, this recipe guarantees that everyone at your Christmas gathering will enjoy a taste of this exquisite dish.
Ingredients (Serves 4-6):
- 8 quails
- 1/2 cup pomegranate molasses
- 1/4 cup olive oil
- 4 cloves garlic, minced
- 2 tablespoons honey
- 1 tablespoon fresh lemon juice
- 1 teaspoon ground cumin
- 1 teaspoon smoked paprika
- Salt and pepper to taste
- Fresh pomegranate seeds (for garnish)
- Fresh parsley, chopped (for garnish)
Cooking Instructions:
- Prepare the Quail: Rinse the quails under cold water and pat them dry with paper towels. Confirm that they’re completely dry to help achieve a crispier skin during roasting.
- Make the Marinade: In a mixing bowl, whisk together the pomegranate molasses, olive oil, minced garlic, honey, lemon juice, ground cumin, smoked paprika, salt, and pepper until well combined. This mixture will serve as both the marinade and the basting sauce.
- Marinate the Quail: Place the quails in a large resealable plastic bag or a shallow dish. Pour the marinade over the quails, making sure each bird is well coated. Seal the bag or cover the dish and refrigerate for at least 2 hours, preferably overnight, to allow the flavors to develop.
- Preheat the Oven: Preheat your oven to 400°F (200°C). Line a baking sheet with foil and place a wire rack on top to elevate the quails for even roasting.
- Roast the Quail: Remove the quails from the marinade, shaking off any excess. Place them on the prepared wire rack, breast side up. Reserve the marinade for basting. Roast in the preheated oven for 20-25 minutes, basting occasionally with the reserved marinade, until the quails are golden brown and cooked through.
- Rest and Garnish: Once cooked, remove the quails from the oven and let them rest for about 5 minutes. This resting period allows the juices to redistribute throughout the meat. Garnish with fresh pomegranate seeds and chopped parsley before serving.
Extra Tips:
When selecting quails, aim for whole birds with intact skin and a plump appearance for the best results. If pomegranate molasses is unavailable, you can create a substitute by reducing pomegranate juice with a bit of sugar and lemon until syrupy.
Be mindful of the roasting time as quails can easily overcook due to their size. Investing in a meat thermometer can help guarantee they reach the perfect internal temperature of 165°F (74°C). Serve with a side of roasted vegetables or a fresh salad to complement the rich flavors of the quail.
Wild Rice and Butternut Squash Casserole
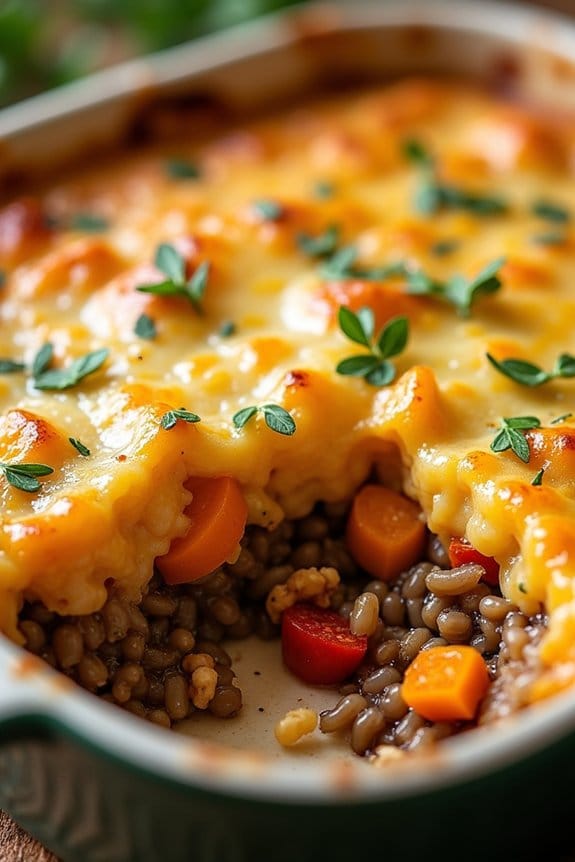
Wild Rice and Butternut Squash Casserole is a festive and hearty dish perfect for holiday gatherings. This vegetarian main course combines the nutty flavor of wild rice with the sweet, earthy taste of butternut squash, creating a deliciously wholesome meal that’s sure to impress your guests.
With a blend of aromatic herbs and a hint of cheese, this casserole is both comforting and satisfying, making it an excellent choice for a Christmas dinner centerpiece. This casserole isn’t only flavorful but also packed with nutrients, thanks to the combination of wild rice, butternut squash, and a variety of fresh vegetables.
The recipe is designed to serve 4-6 people, making it perfect for a family gathering or a festive feast. Let’s explore the recipe and see how you can prepare this delightful dish for your holiday table.
Ingredients (Serves 4-6):
- 1 cup wild rice
- 3 cups vegetable broth
- 1 medium butternut squash, peeled and cubed
- 2 tablespoons olive oil
- 1 onion, finely chopped
- 2 cloves garlic, minced
- 1 red bell pepper, chopped
- 1 teaspoon dried thyme
- 1 teaspoon dried sage
- Salt and pepper to taste
- 1 cup shredded Gruyère or cheddar cheese
- 1/4 cup chopped fresh parsley
- 1/4 cup chopped walnuts (optional)
Instructions:
- Preheat and Prepare: Preheat your oven to 375°F (190°C). Grease a 9×13-inch baking dish and set aside.
- Cook the Wild Rice: Rinse the wild rice under cold water. In a medium saucepan, combine the wild rice and vegetable broth. Bring to a boil over medium-high heat, then reduce the heat to low, cover, and simmer for 45-50 minutes, or until the rice is tender and the broth is absorbed. Fluff with a fork and set aside.
- Roast the Butternut Squash: While the rice is cooking, place the cubed butternut squash on a baking sheet. Drizzle with 1 tablespoon of olive oil, and season with salt and pepper. Toss to coat. Roast in the preheated oven for 25-30 minutes, or until tender and slightly caramelized.
- Sauté the Vegetables: In a large skillet, heat the remaining tablespoon of olive oil over medium heat. Add the chopped onion and red bell pepper, and sauté for 5-7 minutes until the onion is translucent. Add the garlic, thyme, and sage, and cook for an additional 2 minutes until fragrant.
- Combine Ingredients: In a large bowl, combine the cooked wild rice, roasted butternut squash, sautéed vegetables, half of the cheese, and half of the parsley. Mix well to incorporate all the ingredients.
- Assemble the Casserole: Transfer the mixture to the prepared baking dish. Sprinkle the remaining cheese evenly over the top.
- Bake: Place the casserole in the oven and bake for 20-25 minutes, or until the cheese is melted and bubbly.
- Garnish: Remove from the oven and let it cool for a few minutes. Garnish with the remaining parsley and walnuts, if using, before serving.
Extra Tips:
For even more flavor, consider adding a pinch of nutmeg to the butternut squash before roasting. If you prefer a creamier casserole, you can stir in 1/2 cup of cream or a dairy-free alternative before baking.
Feel free to experiment with different cheese varieties like fontina or mozzarella for a unique twist. If you’re preparing this dish in advance, it can be assembled and refrigerated a day ahead, then baked just before serving.
This makes it a convenient option for busy holiday preparations. Enjoy your festive Wild Rice and Butternut Squash Casserole with a side of your favorite holiday salads or roasted vegetables.
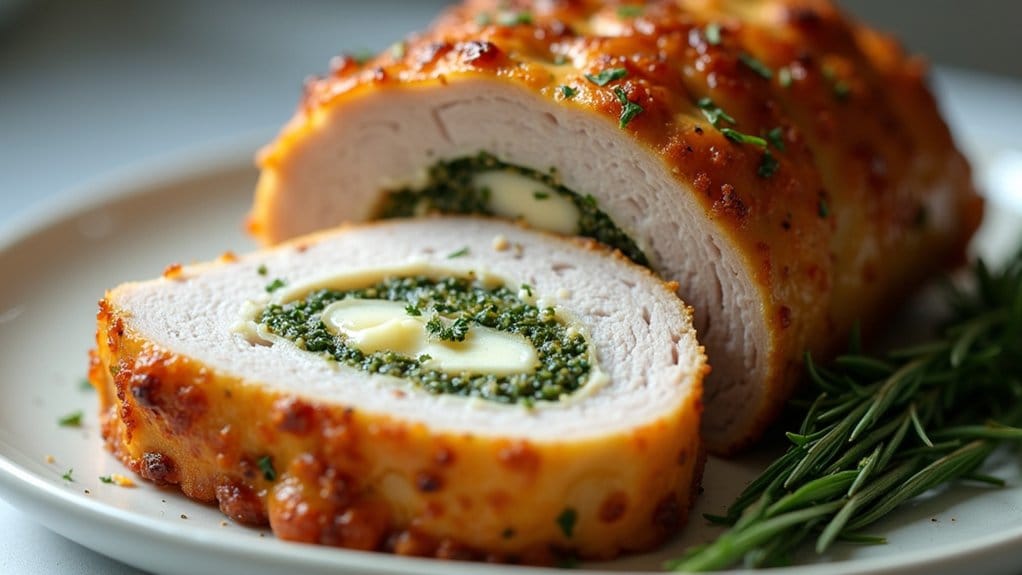
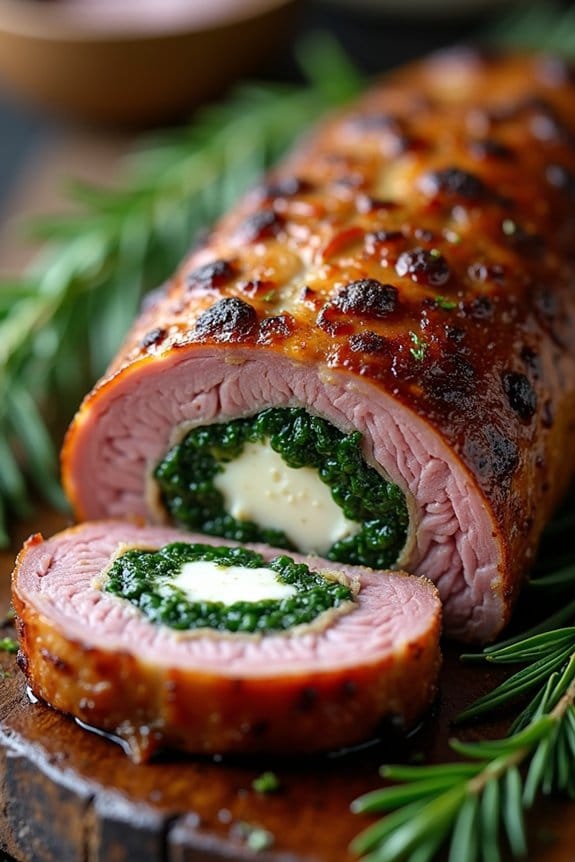
Herb and Cheese Stuffed Pork Loin
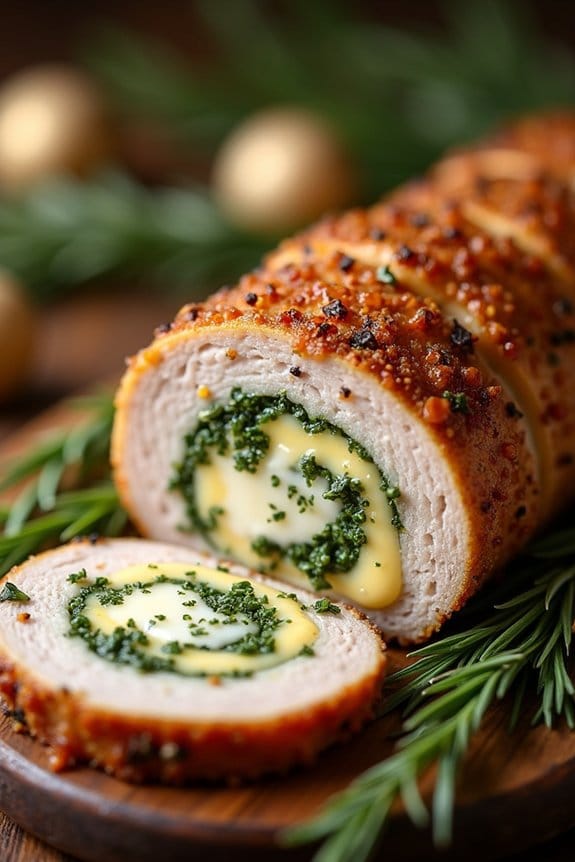
Herb and Cheese Stuffed Pork Loin is an exquisite dish that brings a gourmet touch to any holiday table. This recipe features a succulent pork loin generously stuffed with a fragrant blend of herbs and cheese, creating a delightful harmony of flavors. Perfectly suited for Christmas or any festive occasion, this dish promises to be the centerpiece of your meal, leaving your guests impressed and satisfied.
The combination of savory herbs and creamy cheese enhances the natural taste of the pork, making each bite a savory delight. This recipe serves 4-6 people, making it ideal for a small gathering or family dinner. The preparation involves butterflying the pork loin to create a pocket for the flavorful stuffing, then roasting it until perfectly cooked.
The stuffing is made using a mixture of herbs such as rosemary, thyme, and parsley, combined with a blend of cheeses to create a rich and aromatic filling that complements the tender meat. With careful preparation and cooking, this Herb and Cheese Stuffed Pork Loin is bound to become a beloved holiday tradition.
Ingredients (Serves 4-6):
- 1 boneless pork loin (about 2-3 pounds)
- 1 tablespoon olive oil
- Salt and black pepper to taste
- 1 cup shredded mozzarella cheese
- 1/2 cup grated Parmesan cheese
- 1/4 cup fresh parsley, chopped
- 1 tablespoon fresh rosemary, chopped
- 1 tablespoon fresh thyme, chopped
- 2 cloves garlic, minced
- 1/4 cup bread crumbs
- 1 tablespoon Dijon mustard
- 1 cup chicken broth
- Kitchen twine
Cooking Instructions:
- Prepare the Pork Loin: Begin by preheating your oven to 375°F (190°C). Lay the pork loin on a cutting board. Using a sharp knife, carefully butterfly the pork loin by slicing it horizontally, stopping about 1 inch from the opposite edge, so it opens up like a book.
- Make the Herb and Cheese Stuffing: In a mixing bowl, combine the mozzarella cheese, Parmesan cheese, chopped parsley, rosemary, thyme, minced garlic, bread crumbs, and Dijon mustard. Mix well until all ingredients are evenly incorporated.
- Stuff the Pork Loin: Spread the herb and cheese mixture evenly over the opened pork loin, leaving a small border around the edges. Carefully roll up the pork loin, starting from one end, into a tight log.
- Secure the Pork Loin: Once rolled, use kitchen twine to tie the pork loin at 1-inch intervals to guarantee it holds its shape during cooking. Season the outside of the pork with olive oil, salt, and black pepper.
- Roast the Pork Loin: Place the tied pork loin in a roasting pan. Pour the chicken broth into the pan to help keep the meat moist. Roast in the preheated oven for about 60-75 minutes, or until the internal temperature of the pork reaches 145°F (63°C).
- Rest and Serve: Remove the pork loin from the oven and let it rest for at least 10 minutes before slicing. This allows the juices to redistribute, assuring a juicy and tender result. Slice the pork loin into 1-inch thick pieces and serve.
Extra Tips:
When butterflying the pork loin, be patient and take your time to guarantee an even cut that will hold the stuffing well. If you prefer, you can substitute the mozzarella and Parmesan with other cheeses like Gruyere or Fontina for a different flavor profile.
Additionally, using a meat thermometer is vital to avoid overcooking the pork; it should be slightly pink in the center to remain juicy and flavorful. Don’t forget to remove the kitchen twine before serving!
