

The holiday season is just around the corner, and it’s time to plan a Christmas lunch that’s both delicious and healthy. We all want meals that satisfy our festive cravings without leaving us feeling sluggish. Think vibrant colors and fresh flavors that bring joy to the table. From a zesty winter citrus and pomegranate salad to comforting roasted butternut squash soup, there’s so much to explore. Ready to check out the full menu?
Winter Citrus and Pomegranate Salad
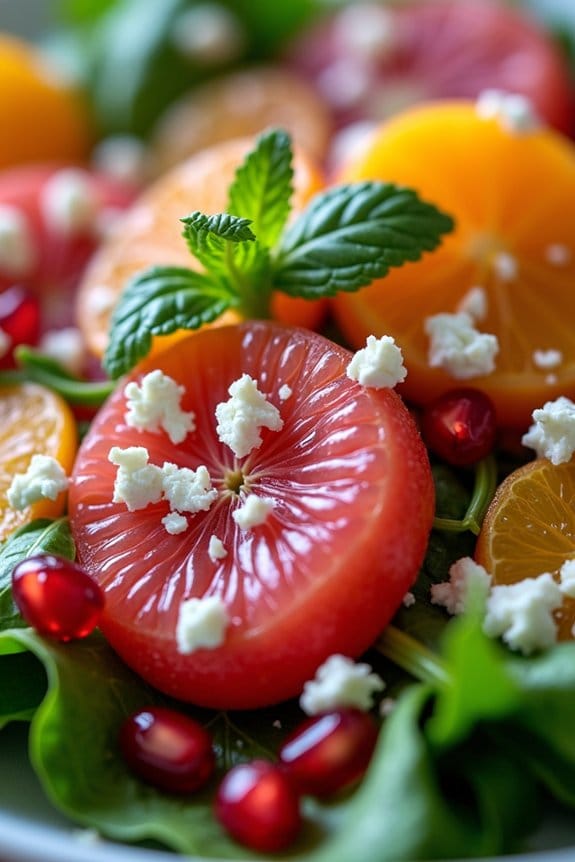
Winter Citrus and Pomegranate Salad is a vibrant and invigorating addition to any Christmas lunch, offering a burst of color and a delightful mix of sweet and tangy flavors. This salad is a celebration of seasonal fruits, combining the juiciness of winter citrus with the crispness of fresh greens, all topped with the jewel-like seeds of a pomegranate.
It’s not only a feast for the eyes but also a healthy option that balances the richness of a festive meal. The salad is tossed with a light dressing that enhances the natural flavors of the ingredients without overpowering them. This dish isn’t only simple to prepare but also packed with nutrients, making it a perfect choice for a health-conscious Christmas spread.
It can be prepared in advance, allowing you to focus on other dishes on the day of your celebration.
Ingredients for 4-6 servings:
- 2 large oranges
- 1 large grapefruit
- 1 cup pomegranate seeds
- 6 cups mixed salad greens (such as arugula, spinach, or kale)
- 1/4 cup thinly sliced red onion
- 1/2 cup crumbled feta cheese
- 1/4 cup chopped fresh mint leaves
- 1/4 cup extra virgin olive oil
- 2 tablespoons fresh lemon juice
- 1 tablespoon honey
- Salt and pepper to taste
Cooking Instructions:
- Prepare the Citrus Fruits: Start by peeling the oranges and grapefruit. Use a sharp knife to remove the peel and the white pith completely. Then, slice the fruits into thin rounds or segments, depending on your preference. This will guarantee that the citrus is juicy and easy to eat in the salad.
- Extract Pomegranate Seeds: Cut the pomegranate in half and gently remove the seeds. You can do this by holding the pomegranate halves over a bowl and tapping the back with a spoon to release the seeds. Confirm no white pith remains attached to the seeds, as it can be bitter.
- Prepare the Salad Base: In a large salad bowl, combine the mixed greens, thinly sliced red onion, and chopped mint leaves. These ingredients form the base of your salad, providing a fresh and aromatic foundation.
- Make the Dressing: In a small bowl, whisk together the olive oil, lemon juice, honey, salt, and pepper. Mix until the dressing is well combined and emulsified. Taste and adjust the seasoning if necessary.
- Assemble the Salad: Add the citrus slices and pomegranate seeds to the salad bowl with the greens. Drizzle the dressing over the top, and gently toss everything together to guarantee the ingredients are evenly coated.
- Final Touch: Sprinkle the crumbled feta cheese over the salad. The feta adds a creamy texture and a salty contrast to the sweetness of the fruit, enhancing the overall flavor profile.
Extra Tips:
When preparing the citrus fruits, be sure to remove as much of the bitter white pith as possible to confirm a sweet, pleasant flavor.
Consider chilling the salad for about 30 minutes before serving to allow the flavors to meld together beautifully. This salad can also be customized by adding other seasonal fruits or nuts, such as sliced avocado or toasted almonds, for additional texture and flavor.
If you prefer a vegan version, simply omit the feta cheese or replace it with a plant-based alternative.
Roasted Butternut Squash Soup
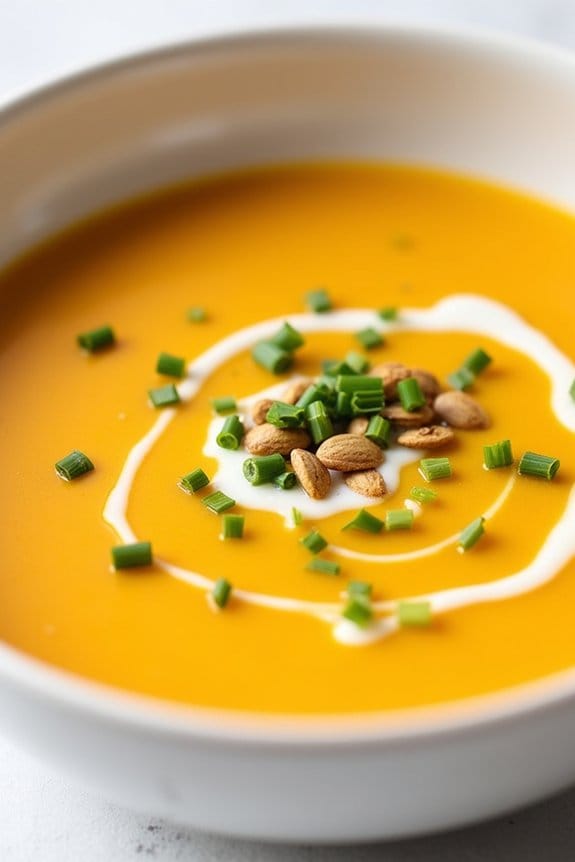
Roasted Butternut Squash Soup is a warm and comforting dish perfect for a healthy Christmas lunch. This soup combines the natural sweetness of butternut squash with a blend of aromatic spices to create a flavorful and velvety texture. Ideal for those crisp winter days, this soup isn’t only nourishing but also simple to prepare, making it a delightful addition to your holiday menu.
Butternut squash, when roasted, develops a rich, caramelized flavor that pairs beautifully with the earthy notes of thyme and the warmth of ginger. This recipe serves 4-6 people, making it perfect for a family gathering or an intimate holiday celebration. With its vibrant color and delicious taste, Roasted Butternut Squash Soup is both a feast for the eyes and the palate.
Ingredients:
- 1 large butternut squash (about 3 pounds)
- 2 tablespoons olive oil
- 1 medium onion, chopped
- 2 cloves garlic, minced
- 1 tablespoon fresh ginger, grated
- 4 cups vegetable broth
- 1 teaspoon dried thyme
- Salt and pepper to taste
- 1/2 cup coconut milk (optional)
- Fresh parsley or chives for garnish
Instructions:
- Preheat the Oven: Start by preheating your oven to 400°F (200°C). This will guarantee the butternut squash roasts evenly.
- Prepare the Squash: Peel the butternut squash and cut it into 1-inch cubes. Spread the cubes on a baking sheet, drizzle with 1 tablespoon of olive oil, and season with salt and pepper. Toss the cubes to coat them evenly.
- Roast the Squash: Place the baking sheet in the preheated oven and roast the squash for 25-30 minutes or until it’s tender and slightly caramelized. Stir halfway through to guarantee even roasting.
- Sauté Aromatics: While the squash is roasting, heat the remaining olive oil in a large pot over medium heat. Add the chopped onion and sauté for about 5 minutes until translucent. Add the minced garlic and grated ginger, and sauté for another 2 minutes until fragrant.
- Combine Ingredients: Once the squash is roasted, add it to the pot with the sautéed onions, garlic, and ginger. Pour in the vegetable broth and add the dried thyme. Bring the mixture to a simmer.
- Blend the Soup: Using an immersion blender, blend the soup until smooth and creamy. If you don’t have an immersion blender, carefully transfer the soup to a blender in batches and blend until smooth.
- Adjust Seasoning: Taste the soup and adjust the seasoning with more salt and pepper if needed. If you prefer a creamier soup, stir in the coconut milk at this point.
- Serve: Ladle the soup into bowls and garnish with fresh parsley or chives for a pop of color and flavor. Serve hot.
Extra Tips:
To enhance the flavor of your Roasted Butternut Squash Soup, consider adding a pinch of nutmeg or cinnamon for a warm, festive touch. If you want a slightly richer texture, you can substitute half of the vegetable broth with chicken broth.
Additionally, for a bit of crunch, top the soup with toasted pumpkin seeds or croutons before serving. Finally, this soup can be made ahead of time and stored in the refrigerator for up to three days or frozen for up to a month, making it a convenient option for holiday meal planning.
Herb-Crusted Salmon With Lemon
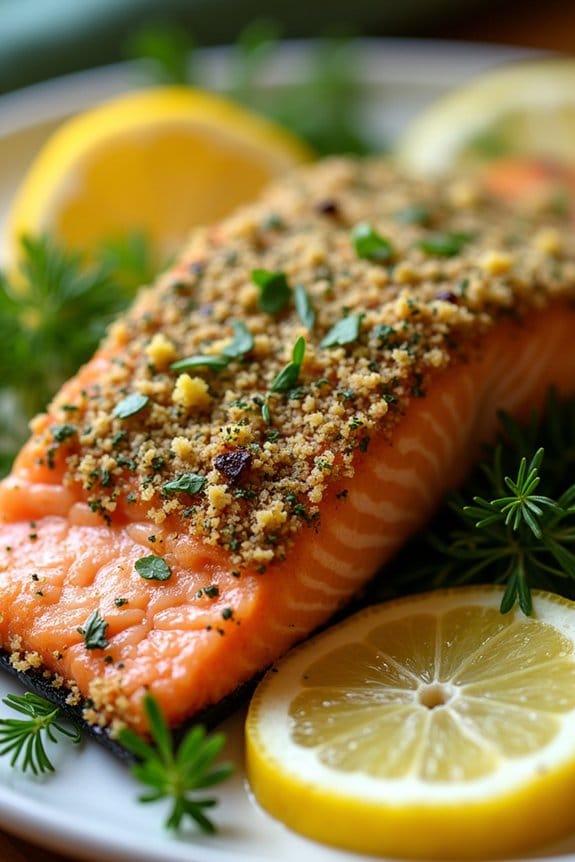
Herb-Crusted Salmon With Lemon is a delightful dish that combines the rich flavors of fresh herbs and the zesty brightness of lemon. This recipe is perfect for a Christmas lunch, bringing a touch of elegance to your holiday table without compromising on healthiness. The salmon, with its tender, flaky texture, is perfectly complemented by a crispy herb crust, guaranteeing a meal that’s both nutritious and satisfying. Not only does this dish appeal to the eyes, but it also tantalizes the taste buds with every bite.
Preparing Herb-Crusted Salmon With Lemon is straightforward and doesn’t require advanced cooking skills, making it an excellent choice for home cooks of all levels. The use of fresh herbs such as dill, parsley, and chives, along with the tangy lemon zest, infuses the salmon with vibrant flavors while maintaining its natural richness. This recipe serves 4-6 people, making it ideal for a small gathering or family meal during the festive season. Below, you’ll find the list of ingredients and step-by-step instructions to create this delicious dish.
Ingredients (serves 4-6):
- 4-6 salmon fillets (about 6-8 ounces each)
- 2 tablespoons olive oil
- 1 cup breadcrumbs
- 1/4 cup fresh dill, chopped
- 1/4 cup fresh parsley, chopped
- 1/4 cup fresh chives, chopped
- 2 tablespoons lemon zest
- 2 cloves garlic, minced
- Salt and pepper to taste
- Lemon wedges, for serving
Cooking Instructions:
- Preheat the Oven: Begin by preheating your oven to 400°F (200°C). This guarantees that the salmon cooks evenly and that the herb crust crisps up nicely.
- Prepare the Herb Crust Mixture: In a medium bowl, combine the breadcrumbs, chopped dill, parsley, chives, lemon zest, and minced garlic. Add a pinch of salt and pepper, then mix well to incorporate all the ingredients. This mixture will form the flavorful crust for your salmon.
- Season the Salmon: Place the salmon fillets on a baking sheet lined with parchment paper. Drizzle olive oil over each fillet, and season them with salt and pepper to taste. This step enhances the natural flavor of the salmon while providing a base for the herb crust to adhere.
- Apply the Herb Crust: Generously spoon the herb mixture over each salmon fillet, pressing it down gently to guarantee it sticks. Make sure the top of each fillet is well-covered with the herb crust for maximum flavor.
- Bake the Salmon: Transfer the baking sheet to the preheated oven and bake for about 12-15 minutes, or until the salmon is cooked through and the crust is golden brown. The internal temperature of the salmon should reach 145°F (63°C) for ideal doneness.
- Serve and Enjoy: Remove the salmon from the oven and let it rest for a couple of minutes. Serve the herb-crusted salmon with lemon wedges on the side for an extra burst of citrus flavor.
Extra Tips: When selecting salmon, opt for wild-caught varieties if possible, as they tend to be richer in omega-3 fatty acids and have a firmer texture. If you prefer a spicier kick, consider adding a pinch of red pepper flakes to the herb mixture. Additionally, if you have any leftover herb crust mixture, you can store it in an airtight container in the refrigerator for up to a week and use it on other proteins like chicken or tofu. Enjoy your festive meal!
Quinoa and Cranberry Stuffed Bell Peppers
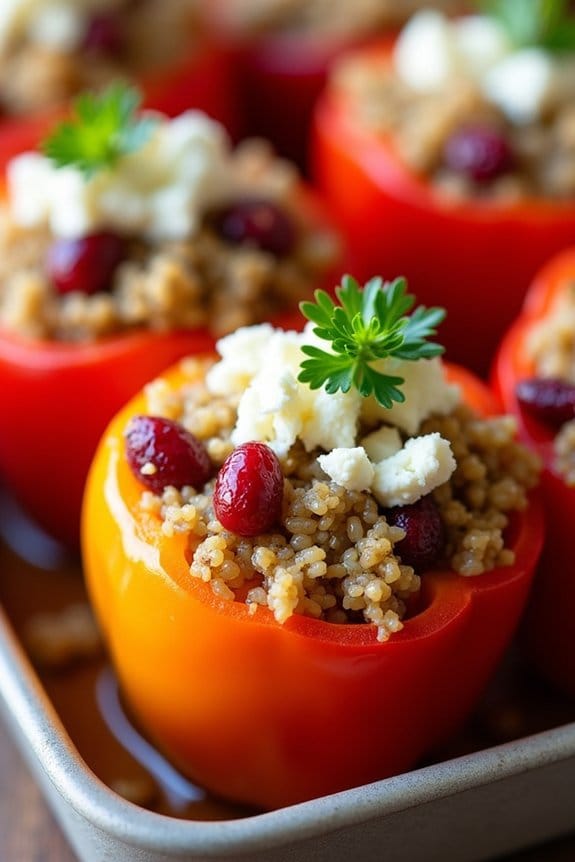
Quinoa and Cranberry Stuffed Bell Peppers are a delightful and healthy addition to your Christmas lunch table. These vibrant and flavorful stuffed peppers not only look festive, but they also pack a nutritional punch. The combination of protein-rich quinoa, tart cranberries, and a medley of spices creates a dish that’s both satisfying and nourishing. Perfect for a holiday gathering, these stuffed peppers are sure to impress your guests with their beautiful presentation and delicious taste.
This dish is versatile and can easily be adapted to suit different dietary preferences. It’s naturally vegetarian and can be made vegan by omitting or substituting the cheese. The sweet and tangy cranberries complement the savory quinoa mixture, while the bell peppers add a satisfying crunch. The recipe serves 4-6 people, making it ideal for a family lunch or a small holiday gathering. With relatively simple preparation, Quinoa and Cranberry Stuffed Bell Peppers are an excellent choice for those looking to offer a healthy yet indulgent meal during the festive season.
Ingredients (Serving Size: 4-6 people):
- 6 large bell peppers (red, yellow, or green)
- 1 cup quinoa
- 2 cups vegetable broth
- 1 cup dried cranberries
- 1 small onion, finely chopped
- 2 cloves garlic, minced
- 1 teaspoon ground cumin
- 1 teaspoon dried oregano
- Salt and pepper to taste
- 1 cup crumbled feta cheese (optional)
- 2 tablespoons olive oil
- Fresh parsley, chopped, for garnish
Cooking Instructions:
- Preheat the Oven: Begin by preheating your oven to 375°F (190°C). This guarantees that the oven is hot enough to properly cook and roast the stuffed peppers.
- Prepare the Bell Peppers: Carefully slice the tops off the bell peppers and remove the seeds and membranes. Rinse the peppers under cold water and set them aside.
- Cook the Quinoa: In a medium saucepan, combine the quinoa and vegetable broth. Bring the mixture to a boil over medium-high heat. Once boiling, reduce the heat to low, cover the pan, and let it simmer for about 15 minutes or until the quinoa is fully cooked and the liquid is absorbed.
- Sauté the Aromatics: In a large skillet, heat the olive oil over medium heat. Add the chopped onion and minced garlic, sautéing them until the onion becomes translucent and fragrant, which should take about 5 minutes.
- Mix the Filling: To the skillet with the sautéed onion and garlic, add the cooked quinoa, dried cranberries, cumin, oregano, salt, and pepper. Stir the mixture well to ascertain all ingredients are evenly combined. If using, fold in the crumbled feta cheese.
- Stuff the Peppers: Spoon the quinoa mixture into each prepared bell pepper, filling them generously. Place the stuffed peppers upright in a baking dish.
- Bake the Peppers: Cover the dish with aluminum foil and bake in the preheated oven for about 30-35 minutes. Remove the foil during the last 10 minutes of baking to allow the tops to lightly brown.
- Garnish and Serve: Once baked, remove the peppers from the oven and let them cool slightly. Garnish with fresh chopped parsley before serving. Enjoy warm.
Extra Tips:
When preparing Quinoa and Cranberry Stuffed Bell Peppers, feel free to get creative with the stuffing. You can add chopped nuts for a crunchy texture or incorporate additional vegetables like spinach or mushrooms for extra nutrients.
For a vegan version, replace the feta cheese with a plant-based alternative. If you’re short on time, the quinoa mixture can be prepared a day in advance and stored in the refrigerator until you’re ready to stuff the peppers.
This dish isn’t only perfect for Christmas but can also be enjoyed as a healthy meal throughout the year.
Balsamic Glazed Brussels Sprouts
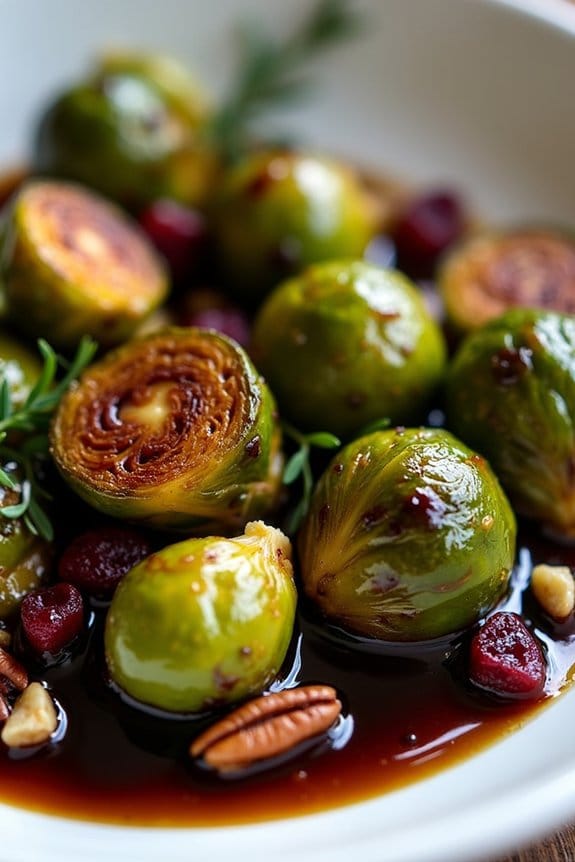
Balsamic Glazed Brussels Sprouts are a delightful side dish that brings a perfect balance of sweet and savory to your Christmas lunch. These Brussels sprouts are roasted to a crispy perfection and then drizzled with a rich balsamic glaze, making them a delicious and healthy addition to your festive meal.
The natural sweetness of the balsamic vinegar complements the earthy taste of the Brussels sprouts, creating a dish that’s both satisfying and nutritious. This recipe isn’t only easy to prepare but also highlights the Brussels sprouts’ flavors in a way that might even convert those who typically shy away from this vegetable.
By roasting them, you enhance their natural sweetness and create a slightly caramelized exterior, which pairs beautifully with the tangy sweetness of the balsamic glaze. It’s a perfect dish for 4-6 people, guaranteeing everyone gets a taste of this festive delight.
Ingredients (Serves 4-6):
- 1 1/2 pounds Brussels sprouts, trimmed and halved
- 3 tablespoons olive oil
- Salt and pepper to taste
- 1/2 cup balsamic vinegar
- 2 tablespoons honey
- 1/4 cup chopped pecans (optional)
- 1/4 cup dried cranberries (optional)
Cooking Instructions:
- Preheat the Oven: Begin by preheating your oven to 400°F (200°C). This temperature is ideal for roasting Brussels sprouts to achieve a crispy texture.
- Prepare the Brussels Sprouts: Trim the ends and remove any yellow or damaged outer leaves from the Brussels sprouts. Cut them in half to guarantee even cooking.
- Season the Sprouts: Place the halved Brussels sprouts in a large mixing bowl. Drizzle with olive oil, and season generously with salt and pepper. Toss them well to make sure they’re evenly coated.
- Roast the Sprouts: Spread the Brussels sprouts in a single layer on a baking sheet. Roast in the preheated oven for about 25-30 minutes, or until they’re golden brown and tender, stirring them halfway through the cooking time for even roasting.
- Prepare the Balsamic Glaze: While the Brussels sprouts are roasting, combine the balsamic vinegar and honey in a small saucepan. Bring to a simmer over medium heat and let it reduce for about 10 minutes, or until it thickens slightly to a syrup-like consistency.
- Combine and Serve: Once the Brussels sprouts are done roasting, remove them from the oven. Drizzle the balsamic glaze over the roasted Brussels sprouts and toss to coat evenly. If using, sprinkle the chopped pecans and dried cranberries on top for added texture and flavor.
Extra Tips:
To guarantee the Brussels sprouts roast evenly, try to select sprouts of similar size or cut larger ones into quarters. If you prefer a sharper flavor, reduce the honey in the balsamic glaze.
You can also add a sprinkle of Parmesan cheese before serving for an extra layer of richness. When roasting, make sure not to overcrowd the pan, as this can prevent the sprouts from becoming crispy. Enjoy this delightful dish as a flavorful and nutritious addition to your Christmas feast!
Spinach and Feta Stuffed Chicken Breast
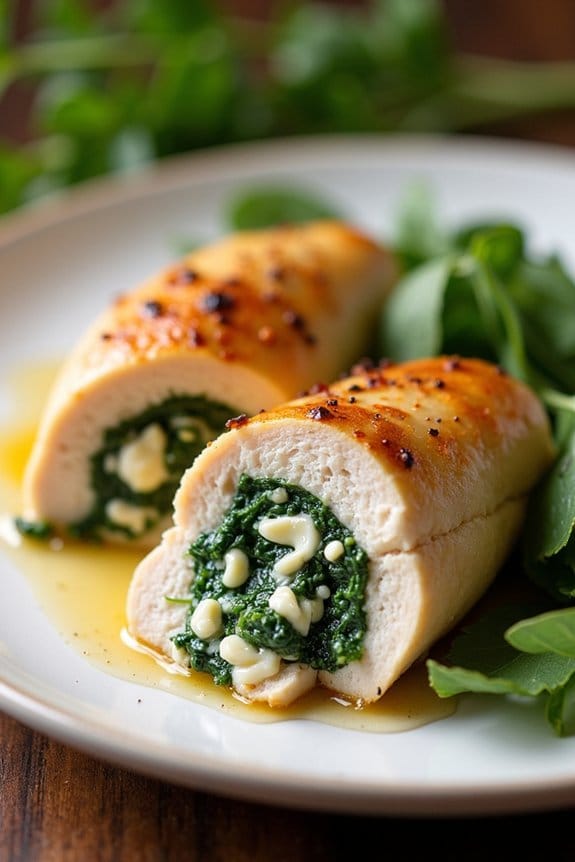
Spinach and Feta Stuffed Chicken Breast is a delightful and healthy option for your Christmas lunch menu. This dish combines the tender juiciness of chicken breast with a flavorful mixture of spinach and feta cheese, creating a savory filling that’s both nutritious and satisfying.
The recipe isn’t only visually appealing with its vibrant colors and textures but also offers a delightful combination of flavors that will surely impress your guests. Perfect for a festive gathering, this dish is easy to prepare and requires minimal ingredients, making it an ideal choice for those who want to spend more time with family and friends, rather than in the kitchen.
The spinach and feta stuffing add a Mediterranean twist to the traditional chicken breast, elevating its taste to a whole new level. Whether you’re hosting a large family gathering or an intimate Christmas lunch, this recipe serves 4-6 people, guaranteeing everyone gets to enjoy a hearty and delicious meal.
Ingredients (Serves 4-6):
- 4 large chicken breasts
- 2 cups fresh spinach, chopped
- 1 cup feta cheese, crumbled
- 2 cloves garlic, minced
- 1 tablespoon olive oil
- 1 teaspoon dried oregano
- Salt and pepper to taste
- Toothpicks or kitchen twine
Cooking Instructions:
1. Preheat the Oven: Begin by preheating your oven to 375°F (190°C). This guarantees that the chicken cooks evenly and reaches the desired level of tenderness.
2. Prepare the Filling: In a skillet over medium heat, add the olive oil and sauté the minced garlic until fragrant, about 1 minute. Add the chopped spinach and cook until wilted, approximately 2-3 minutes.
Remove from heat and stir in the crumbled feta cheese and dried oregano. Season with salt and pepper to taste. Mix well and set aside to cool slightly.
3. Prepare the Chicken: Using a sharp knife, carefully cut a pocket into each chicken breast. Be cautious not to cut all the way through. The pocket should be large enough to hold a generous amount of filling.
4. Stuff the Chicken: Spoon the spinach and feta mixture into each chicken breast, dividing it equally among them. Use toothpicks or kitchen twine to secure the openings, guaranteeing the filling stays inside during baking.
5. Bake the Chicken: Place the stuffed chicken breasts in a baking dish and season the outside with a little salt and pepper. Bake in the preheated oven for 25-30 minutes, or until the chicken is cooked through and no longer pink in the center. The internal temperature should reach 165°F (74°C).
6. Rest and Serve: Once baked, remove the chicken from the oven and let it rest for a few minutes before removing the toothpicks or twine. Serve warm with your choice of side dishes.
Extra Tips:
For an even more flavorful dish, consider marinating the chicken breasts in olive oil, lemon juice, and herbs for a few hours before stuffing them. This will enhance the flavor and tenderness of the chicken.
Additionally, you can customize the filling by adding other ingredients such as sun-dried tomatoes or olives for extra depth of flavor. Always verify the chicken is fully cooked by checking the internal temperature, and let it rest after baking to retain its juices. Enjoy your festive and healthy Christmas lunch!
Cauliflower Mashed Potatoes

Cauliflower Mashed Potatoes are a wonderful, low-carb alternative to traditional mashed potatoes, making them a perfect addition to your healthy Christmas lunch. This dish combines the creamy texture you love with the subtle flavor of cauliflower, giving you a guilt-free indulgence during the festive season.
Not only is this recipe simple to prepare, but it also accommodates a variety of dietary preferences, guaranteeing everyone at your table can enjoy a hearty side dish without compromising their health goals.
Whether you’re serving a crowd or just a small gathering, this recipe yields enough to satisfy 4-6 people. The ingredients used are basic and easy to find, allowing you to focus on spending more time with your loved ones rather than in the kitchen.
With just a few key ingredients and some simple steps, you’ll have a bowl of creamy, delicious cauliflower mashed potatoes that everyone will love.
Ingredients:
- 2 large heads of cauliflower, cut into florets
- 4 tablespoons unsalted butter
- 1/4 cup grated Parmesan cheese
- 1/4 cup cream cheese
- 2 cloves garlic, minced
- Salt and pepper to taste
- Fresh chives, chopped (optional, for garnish)
Cooking Instructions:
- Prepare the Cauliflower:
- Begin by cutting the cauliflower into florets. Rinse them thoroughly under cold water to remove any dirt or debris.
- Steam the Cauliflower:
- In a large pot, add about an inch of water and bring it to a boil. Place a steamer basket inside the pot, and add the cauliflower florets. Cover the pot with a lid and steam the cauliflower for about 10-15 minutes, or until they’re tender and easily pierced with a fork.
- Drain and Dry:
- Once the cauliflower is tender, remove it from the pot and allow it to drain completely. It’s important to remove as much water as possible to achieve a creamy consistency. Pat the cauliflower dry with a clean kitchen towel or paper towels.
- Blend the Ingredients:
- Transfer the steamed cauliflower to a food processor. Add the butter, Parmesan cheese, cream cheese, and minced garlic. Season with salt and pepper to taste.
- Puree Until Smooth:
- Blend the mixture until smooth and creamy. You may need to scrape down the sides of the processor a few times to guarantee everything is well incorporated.
- Adjust Seasoning:
- Taste the mashed cauliflower and adjust the seasoning if necessary. You can add more salt, pepper, or Parmesan cheese according to your preference.
- Serve Warm:
- Transfer the cauliflower mashed potatoes to a serving dish. Garnish with freshly chopped chives if desired, and serve warm.
Extra Tips:
For an even creamier texture, you can add a splash of milk or a little more cream cheese. If you don’t have a food processor, a hand blender or potato masher will work, though the texture may be slightly chunkier.
To add a bit of flavor, try incorporating roasted garlic instead of raw garlic. For those who enjoy herbs, a dash of rosemary or thyme can elevate the taste of this dish.
Finally, remember that the key to great cauliflower mash is to guarantee the cauliflower is well-drained to prevent a watery consistency. Enjoy your healthy and delicious Christmas side dish!
Zucchini Noodles With Pesto
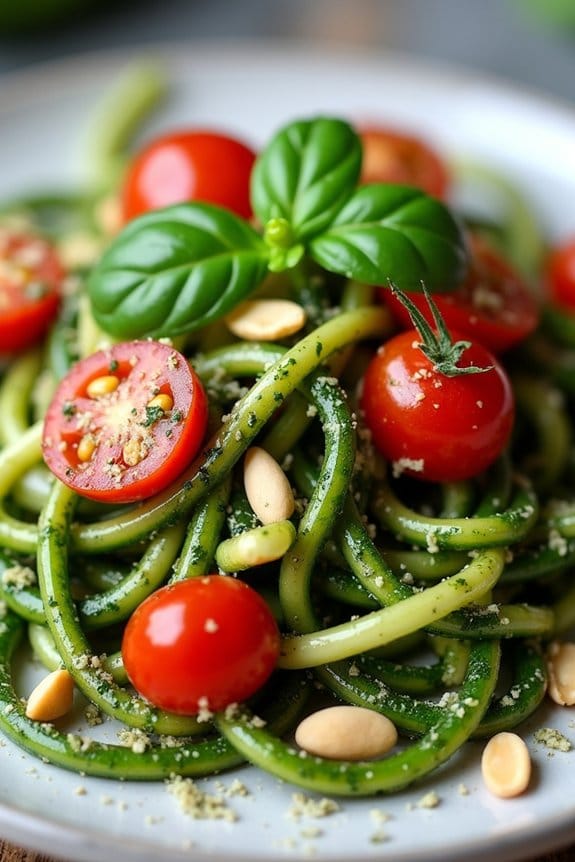
Zucchini Noodles With Pesto is a delightful and healthy alternative to traditional pasta dishes, perfect for a Christmas lunch that’s both light and satisfying. This dish isn’t only visually appealing with its vibrant green color but also bursts with flavor from the fresh homemade pesto.
It’s a great choice for those looking to add a nutritious and gluten-free option to their holiday spread, guaranteeing everyone around the table feels included and satisfied.
The star of this dish is the zucchini noodles, often referred to as “zoodles,” which are spiralized zucchini that mimic the texture of pasta. Tossed with a rich and aromatic basil pesto, this dish is enhanced by the addition of cherry tomatoes and pine nuts, providing a crunchy and tangy contrast.
This recipe serves 4-6 people, making it an ideal side dish or a light main course for your festive gathering.
Ingredients:
- 4 medium zucchinis
- 2 cups fresh basil leaves
- 1/2 cup pine nuts
- 2 cloves garlic
- 1/2 cup grated Parmesan cheese
- 1/2 cup extra virgin olive oil
- Salt and pepper to taste
- 1 cup cherry tomatoes, halved
- 1/4 cup pine nuts for garnish
- Optional: grated Parmesan cheese for garnish
Instructions:
- Prepare the Zucchini Noodles: Wash the zucchinis thoroughly. Using a spiralizer, create noodles from the zucchini. If you don’t have a spiralizer, you can use a vegetable peeler to create thin ribbons. Set the zucchini noodles aside in a large bowl.
- Make the Pesto: In a food processor, combine the basil leaves, 1/2 cup pine nuts, garlic, and Parmesan cheese. Pulse until the mixture is finely chopped. With the processor running, slowly add the olive oil until the mixture is smooth and emulsified. Season the pesto with salt and pepper to taste.
- Combine Ingredients: Add the cherry tomatoes to the bowl with the zucchini noodles. Pour the pesto over the noodles and gently toss to verify the zucchini is evenly coated with the sauce.
- Serve: Divide the zucchini noodles among serving plates. Garnish with the remaining pine nuts and additional Parmesan cheese if desired. Serve immediately for the freshest taste.
Extra Tips:
To prevent the zucchini noodles from becoming watery, it’s best to serve them immediately after tossing with the pesto. If you need to prepare them in advance, store the noodles and pesto separately and combine them just before serving.
For added flavor, lightly toast the pine nuts before incorporating them into the dish. You can also personalize the pesto by adding a squeeze of lemon juice for a tangy twist or substituting walnuts for pine nuts.
This dish is also easily adaptable for a vegan diet by omitting the Parmesan cheese or replacing it with a vegan alternative.
Sweet Potato and Kale Casserole
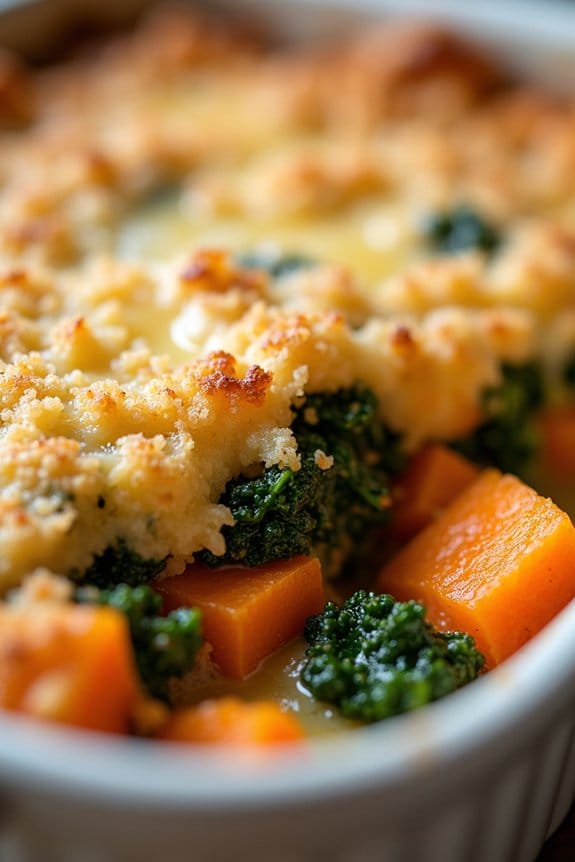
When it comes to healthy holiday meals, incorporating nutritious vegetables like sweet potatoes and kale can make for a delicious and nourishing feast. This Sweet Potato and Kale Casserole isn’t only vibrant and full of flavor, but it also provides a satisfying comfort food experience without the guilt. The natural sweetness of the sweet potatoes paired with the earthy tones of kale creates a delightful balance, while the creamy sauce and crunchy topping make it a holiday favorite.
This casserole is perfect for a Christmas lunch, serving 4-6 people. It’s a great dish for those who want to indulge in traditional holiday fare while still keeping their meals health-conscious. The preparation is straightforward, and the outcome is a wholesome dish that will have your family and friends coming back for seconds. Here’s how you can prepare this delightful meal.
Ingredients:
- 4 medium sweet potatoes, peeled and cubed
- 1 bunch of kale, stems removed and chopped
- 1 cup of low-fat milk
- 2 tablespoons of olive oil
- 1 onion, finely chopped
- 3 cloves garlic, minced
- 1/2 cup grated Parmesan cheese
- 1/2 cup breadcrumbs
- 1 teaspoon salt
- 1/2 teaspoon black pepper
- 1 teaspoon dried thyme
- 1/2 teaspoon smoked paprika
Instructions:
- Preheat and Prep: Preheat your oven to 375°F (190°C). While the oven is heating, bring a large pot of salted water to a boil.
- Cook Sweet Potatoes: Add the cubed sweet potatoes to the boiling water and cook for about 10-15 minutes, or until they’re tender. Drain the sweet potatoes and set them aside.
- Sauté Onions and Garlic: In a large skillet, heat the olive oil over medium heat. Add the chopped onion and garlic, and sauté until the onion is translucent and fragrant, about 5 minutes.
- Cook the Kale: Add the chopped kale to the skillet with the onions and garlic. Cook until the kale is wilted, which should take around 5 minutes.
- Combine Ingredients: In a large mixing bowl, combine the cooked sweet potatoes, sautéed onions and kale, low-fat milk, salt, pepper, thyme, and smoked paprika. Mix well until all ingredients are evenly distributed.
- Assemble the Casserole: Transfer the mixture into a greased baking dish. Sprinkle the Parmesan cheese and breadcrumbs evenly over the top to form a crust.
- Bake: Place the casserole in the preheated oven and bake for about 25-30 minutes, or until the top is golden brown and the casserole is heated through.
- Serve and Enjoy: Remove the casserole from the oven and let it sit for a few minutes before serving. This dish can be served as a main dish or as a hearty side.
Extra Tips:
For the best results, make sure that the sweet potatoes are cooked just until tender, as overcooking can make them mushy when baked.
Feel free to add additional spices or herbs to suit your taste preferences, such as a dash of nutmeg for extra warmth.
This casserole can be prepared a day in advance and stored in the refrigerator, making it convenient for busy holiday schedules. Just reheat in the oven before serving.
Enjoy this nutritious and comforting dish that will add a colorful and healthy touch to your Christmas lunch.
Dark Chocolate and Almond Bark

Indulge in the rich and decadent flavors of our Dark Chocolate and Almond Bark this holiday season. This delightful treat combines the intense taste of dark chocolate with the nutty crunch of toasted almonds, creating a symphony of textures and flavors that’s sure to please any chocolate lover.
Perfect as a dessert or as a thoughtful homemade gift, this bark isn’t only delicious but also packed with antioxidants and healthy fats, making it a guilt-free indulgence.
Making Dark Chocolate and Almond Bark is a straightforward process that requires minimal ingredients and effort. Whether you’re a seasoned chef or a novice in the kitchen, this recipe is simple to follow and yields impressive results.
The key to this dish is high-quality dark chocolate, which provides a robust flavor profile, and fresh almonds, which add a delightful crunch. In just a few steps, you’ll have a beautiful, glossy bark that will make a wonderful addition to your Christmas lunch menu.
Ingredients (for 4-6 servings):
- 12 ounces (340 grams) of high-quality dark chocolate (at least 70% cocoa)
- 1 cup of whole almonds
- 1/2 teaspoon of sea salt
- Optional: 1 teaspoon of vanilla extract or almond extract
Cooking Instructions:
- Prepare the Almonds: Preheat your oven to 350°F (175°C). Spread the almonds in a single layer on a baking sheet. Toast them in the oven for about 10 minutes, or until they’re golden brown and aromatic. Remove from oven and let them cool.
- Melt the Chocolate: Break the dark chocolate into small pieces and place them in a heat-proof bowl. Set the bowl over a pot of simmering water, ensuring that the bowl doesn’t touch the water. Stir the chocolate gently until it’s completely melted and smooth.
- Add Flavor: Once the chocolate is melted, optionally stir in the vanilla or almond extract. This will enhance the flavor of the chocolate.
- Mix in the Almonds: Add the toasted almonds to the melted chocolate, stirring until they’re well coated.
- Spread the Mixture: Line a baking sheet with parchment paper. Pour the chocolate and almond mixture onto the parchment paper, spreading it evenly to about 1/4-inch thickness. Sprinkle sea salt evenly over the top for a hint of contrast in flavor.
- Cool and Set: Allow the chocolate to cool completely at room temperature, or place it in the refrigerator for faster setting. Once the chocolate is hard, break it into irregular pieces.
- Serve or Store: Serve immediately or store in an airtight container at room temperature for up to two weeks.
Extra Tips:
To achieve the best results, always use high-quality chocolate with a high cocoa content, as this will affect both the flavor and texture of your bark.
Be careful not to overheat the chocolate when melting, as this can cause it to seize. If you prefer a sweeter bark, consider adding a tablespoon of honey or maple syrup to the melted chocolate.
Feel free to customize your bark by incorporating other ingredients such as dried fruits, other nuts, or seeds for added flavor and nutrition.
