
As the holiday season approaches, I’m excited to share some beautiful, healthy vegetarian recipes that will add a splash of color and flavor to your Christmas table. Picture a Roasted Butternut Squash and Quinoa Salad or a Creamy Mushroom and Spinach Wellington gracing your spread. These dishes aren’t just about taste; they’re a celebration of seasonal produce. Let’s create a festive feast that’s both nutritious and delightful. Ready to explore these vibrant holiday recipes?
Roasted Butternut Squash and Quinoa Salad
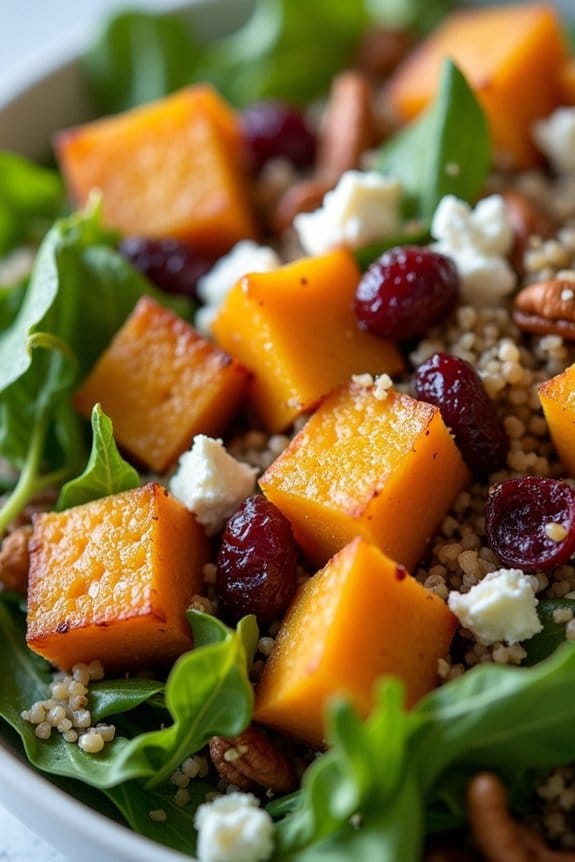
Roasted Butternut Squash and Quinoa Salad is a delightful and nutritious dish that’s perfect for a festive Christmas meal. This vibrant salad combines the sweet, nutty flavors of roasted butternut squash with the hearty texture of quinoa, making it a satisfying and wholesome choice for vegetarians and non-vegetarians alike.
The addition of fresh greens, crunchy nuts, and a tangy dressing elevates this dish to a holiday-worthy centerpiece that will impress your guests with both its flavor and presentation.
The beauty of this salad lies in its simplicity and versatility. The roasted butternut squash provides a rich, caramelized sweetness, while the quinoa adds a protein-packed base. Tossed with crisp arugula, tangy cranberries, and a sprinkle of toasted nuts, this salad is a medley of textures and flavors that will brighten any holiday table.
Whether served as a main course or a hearty side, this Roasted Butternut Squash and Quinoa Salad is sure to become a favorite in your festive recipe repertoire.
Ingredients for 4-6 servings:
- 1 large butternut squash, peeled and cubed
- 2 tablespoons olive oil
- Salt and pepper to taste
- 1 cup quinoa
- 2 cups vegetable broth or water
- 3 cups arugula or mixed greens
- 1/2 cup dried cranberries
- 1/2 cup toasted pecans or walnuts, roughly chopped
- 1/4 cup crumbled feta cheese (optional)
- 1/4 cup balsamic vinaigrette dressing
Cooking Instructions:
- Preheat the Oven: Start by preheating your oven to 400°F (200°C). This will guarantee that the butternut squash roasts evenly and develops a nice caramelized exterior.
- Prepare the Butternut Squash: Peel and cube the butternut squash into bite-sized pieces. Place the cubes on a baking sheet, drizzle with olive oil, and season generously with salt and pepper. Toss to coat the squash evenly.
- Roast the Squash: Spread the butternut squash cubes in a single layer on the baking sheet. Roast in the preheated oven for 25-30 minutes, turning halfway through, until the squash is tender and golden brown.
- Cook the Quinoa: While the squash is roasting, rinse the quinoa under cold water to remove any bitterness. In a medium saucepan, combine the quinoa with vegetable broth or water. Bring to a boil, then reduce the heat to low, cover, and simmer for about 15 minutes until the quinoa is cooked and the liquid is absorbed. Fluff with a fork and set aside.
- Assemble the Salad: In a large salad bowl, combine the cooked quinoa, roasted butternut squash, arugula, dried cranberries, toasted nuts, and crumbled feta cheese. Toss gently to mix the ingredients.
- Dress the Salad: Drizzle the balsamic vinaigrette over the salad. Toss again to confirm everything is well coated with the dressing. Adjust seasoning with salt and pepper if needed.
- Serve: Transfer the salad to a serving platter or individual bowls. Serve immediately for the freshest taste and texture.
Extra Tips:
When preparing this dish, you can customize it to suit your preferences. Try adding a sprinkle of cinnamon or nutmeg to the butternut squash before roasting for an extra layer of warmth and depth.
If you prefer a nut-free version, substitute the nuts with pumpkin seeds for a similar crunch. For a vegan option, simply omit the feta cheese or replace it with a plant-based alternative.
This salad can also be made ahead of time; just keep the dressing separate and toss it with the salad just before serving to maintain the freshness of the greens.
Stuffed Bell Peppers With Wild Rice and Cranberries
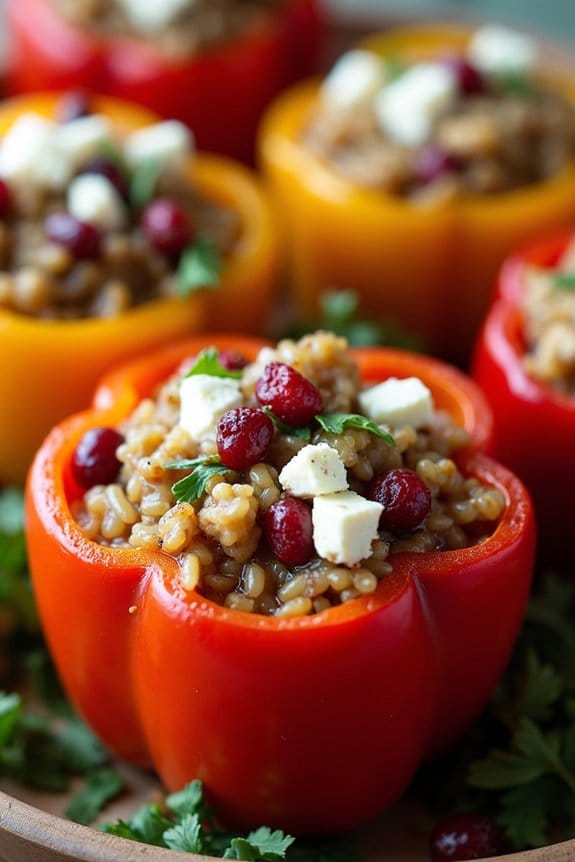
Stuffed Bell Peppers With Wild Rice and Cranberries is a delightful and festive dish that’s perfect for a healthy vegetarian Christmas meal. This recipe combines the earthy flavors of wild rice with the sweet and tart notes of cranberries, all encased within vibrant bell peppers.
The dish isn’t only visually appealing, with its array of colors, but also nutritionally balanced, offering a hearty and satisfying meal that’s sure to impress your guests during the holiday season.
The combination of ingredients in this recipe creates a harmonious blend of flavors and textures. The wild rice provides a chewy bite, while the cranberries add a burst of sweetness. The bell peppers, when roasted, become tender and slightly caramelized, adding depth to the dish.
This recipe isn’t only easy to prepare but also versatile, allowing you to adapt it to your taste preferences or dietary needs. It’s a perfect centerpiece for your vegetarian Christmas spread, ensuring everyone at the table can enjoy a delicious holiday meal.
Ingredients for 4-6 servings:
- 6 large bell peppers (any color)
- 1 cup wild rice
- 2 cups vegetable broth
- 1 cup fresh or dried cranberries
- 1 cup chopped walnuts
- 1 medium onion, diced
- 2 cloves garlic, minced
- 1 tablespoon olive oil
- 1 teaspoon dried thyme
- 1 teaspoon dried sage
- Salt and pepper to taste
- 1/2 cup crumbled feta cheese (optional)
Cooking Instructions:
- Prepare Bell Peppers: Preheat your oven to 375°F (190°C). Slice the tops off the bell peppers and remove the seeds and membranes. Lightly brush the exterior with olive oil and place them in a baking dish.
- Cook Wild Rice: In a medium saucepan, bring the vegetable broth to a boil. Add the wild rice, reduce the heat to low, cover, and simmer for about 40-45 minutes or until the rice is tender and has absorbed the liquid.
- Sauté Vegetables: In a large skillet, heat the olive oil over medium heat. Add the diced onion and minced garlic, sautéing until the onion is translucent and fragrant, about 5 minutes.
- Combine Stuffing Ingredients: In the same skillet, add the cooked wild rice, cranberries, chopped walnuts, dried thyme, and dried sage. Stir everything together and season with salt and pepper to taste. Let the mixture cook for an additional 2-3 minutes to allow the flavors to meld.
- Fill Bell Peppers: Spoon the wild rice mixture into each bell pepper, packing it firmly. If desired, sprinkle crumbled feta cheese on top of each stuffed pepper.
- Bake: Place the stuffed peppers in the preheated oven and bake for 25-30 minutes, or until the peppers are tender and the tops are lightly browned.
- Serve: Remove from the oven and let cool slightly before serving. Enjoy your festive Stuffed Bell Peppers With Wild Rice and Cranberries warm.
Extra Tips:
To enhance the flavor, consider adding a splash of balsamic vinegar to the stuffing mixture for a tangy twist. If you prefer a spicier dish, you can add a pinch of red pepper flakes or diced jalapeños to the stuffing.
For a nut-free version, substitute the walnuts with sunflower seeds or pumpkin seeds. This dish can also be made in advance; simply prepare the stuffed peppers and store them in the refrigerator, baking them just before serving to save time on Christmas day.
Creamy Mushroom and Spinach Wellington
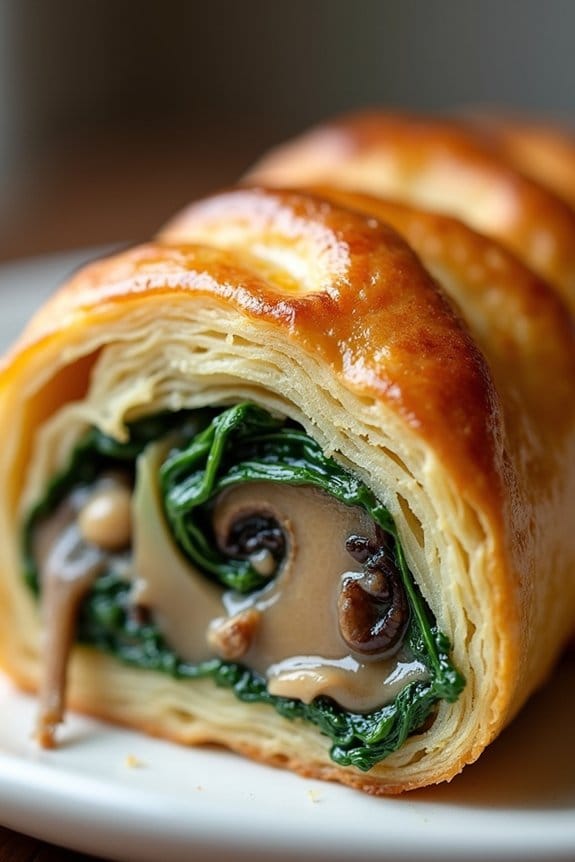
Creamy Mushroom and Spinach Wellington is a delightful vegetarian centerpiece perfect for your Christmas dinner. This dish combines the earthy flavors of mushrooms with the creamy richness of spinach, all wrapped up in a golden, flaky puff pastry that will certainly impress your guests.
The combination of textures and flavors makes this Wellington a satisfying and indulgent option, even for the most discerning of palates. Ideal for a festive gathering, this recipe serves 4-6 people and is both satisfying and elegant.
With its rich filling and buttery pastry, it’s a dish that not only looks impressive but also tastes delicious. Whether you’re a seasoned cook or trying something new, this Wellington is a manageable yet rewarding recipe to try this holiday season.
Ingredients:
- 2 tablespoons olive oil
- 1 large onion, finely chopped
- 3 cloves garlic, minced
- 500g mushrooms, finely chopped
- 2 tablespoons soy sauce
- 1 teaspoon fresh thyme leaves
- 100ml heavy cream
- 200g fresh spinach, roughly chopped
- Salt and pepper to taste
- 500g puff pastry
- 1 egg, beaten (for egg wash)
Instructions:
- Prepare the Filling: Heat the olive oil in a large skillet over medium heat. Add the chopped onion and minced garlic, sautéing until the onion becomes translucent and fragrant, about 4-5 minutes.
- Cook the Mushrooms: Add the finely chopped mushrooms to the skillet. Cook until they’ve released their moisture and are starting to brown, approximately 8-10 minutes. Stir frequently to prevent sticking.
- Add Flavors: Stir in the soy sauce and thyme leaves, allowing them to blend with the mushrooms. Cook for another 2 minutes.
- Create the Creamy Mixture: Pour in the heavy cream and bring the mixture to a simmer. Add the chopped spinach and cook until wilted. Season with salt and pepper to taste. Remove from heat and let cool slightly.
- Prepare the Pastry: Roll out the puff pastry on a floured surface into a rectangle about 1/8 inch thick. Place the cooled mushroom and spinach mixture down the center of the pastry.
- Assemble the Wellington: Fold the sides of the pastry over the filling, sealing the edges with a little water. Place the Wellington seam side down on a baking sheet lined with parchment paper.
- Apply the Egg Wash: Brush the top and sides of the Wellington with beaten egg to guarantee a golden, shiny finish.
- Bake the Wellington: Preheat your oven to 200°C (400°F). Bake the Wellington in the preheated oven for 25-30 minutes or until the pastry is golden brown and puffed.
- Serve: Allow the Wellington to cool slightly before slicing it into thick pieces. Serve warm with your choice of sides.
Extra Tips: To guarantee the pastry stays crisp, make sure the filling isn’t too wet when assembling the Wellington. If the mushroom mixture seems too moist, cook it a little longer to evaporate excess liquid.
Additionally, you can experiment with different herbs or add nuts like walnuts or pecans to the filling for extra texture and flavor. This dish can also be prepared ahead of time and stored in the refrigerator, then baked just before serving.
Maple-Glazed Brussels Sprouts With Pomegranate Seeds

Maple-Glazed Brussels Sprouts With Pomegranate Seeds is a delightful addition to any festive table, offering a vibrant pop of color and a sweet-savory flavor profile. This dish combines the natural bitterness of Brussels sprouts with the rich sweetness of maple syrup, while pomegranate seeds add a burst of freshness and texture.
Perfect for a Christmas feast, this recipe isn’t only delicious but also visually stunning, making it a conversation starter as well as a crowd-pleaser.
In addition to being a nutritional powerhouse, Brussels sprouts are versatile and can be transformed into a gourmet dish with just a few ingredients. This recipe is ideal for those who enjoy experimenting with flavors and for anyone looking to incorporate more plant-based dishes into their holiday menu.
The combination of roasted Brussels sprouts with the sticky, caramelized maple glaze and the juicy, tart pomegranate seeds creates an unforgettable taste experience.
Ingredients (Serving size: 4-6 people):
- 1 1/2 pounds Brussels sprouts, trimmed and halved
- 3 tablespoons olive oil
- Salt and pepper to taste
- 1/4 cup pure maple syrup
- 1 tablespoon balsamic vinegar
- 1/2 cup pomegranate seeds
- 1/4 cup chopped pecans (optional)
- Fresh parsley for garnish (optional)
Cooking Instructions:
- Preheat the Oven: Start by preheating your oven to 400°F (200°C). This temperature allows the Brussels sprouts to roast evenly, achieving a crispy exterior while remaining tender inside.
- Prepare the Brussels Sprouts: Wash and trim the Brussels sprouts by removing any yellow or tough outer leaves. Cut them in half to guarantee they cook evenly. Place the halved Brussels sprouts in a large mixing bowl.
- Season the Brussels Sprouts: Drizzle the Brussels sprouts with olive oil and sprinkle generously with salt and pepper. Toss them well to confirm they’re evenly coated with the oil and seasoning.
- Roast the Brussels Sprouts: Spread the seasoned Brussels sprouts in a single layer on a baking sheet. Roast them in the preheated oven for 20-25 minutes, or until they’re golden brown and crispy on the outside. During roasting, stir them halfway through to guarantee even cooking.
- Prepare the Maple Glaze: In a small saucepan, combine the maple syrup and balsamic vinegar. Heat the mixture over low heat, stirring occasionally, until it begins to simmer and thicken slightly, about 3-5 minutes.
- Combine and Serve: Once the Brussels sprouts are roasted, transfer them back to the mixing bowl. Pour the warm maple glaze over the sprouts, tossing them to coat evenly. Add the pomegranate seeds and, if desired, the chopped pecans for added crunch. Toss gently to combine.
- Garnish and Enjoy: Transfer the glazed Brussels sprouts to a serving platter. Garnish with fresh parsley if you like. Serve immediately to enjoy them warm and crispy.
Extra Tips:
To verify your Brussels sprouts are perfectly roasted, make sure they’re spaced out on the baking sheet. Overcrowding can lead to steaming instead of roasting, which prevents them from becoming crisp.
If you need to double the recipe, consider using two baking sheets. Additionally, for a nutty flavor, you can lightly toast the pecans in a dry skillet before adding them to the dish. This step enhances their flavor and adds an extra layer of complexity to the dish.
Sweet Potato and Black Bean Enchiladas

Sweet Potato and Black Bean Enchiladas are a delightful and nutritious addition to your vegetarian Christmas menu. This dish combines the earthiness of sweet potatoes with the robust flavor of black beans, all wrapped in soft corn tortillas and smothered in a rich enchilada sauce. Not only are these enchiladas bursting with flavor, but they’re also packed with protein and fiber, making them a wholesome choice for a festive gathering.
Whether you’re hosting a vegetarian Christmas dinner or simply looking to add a plant-based option to your holiday spread, these enchiladas are bound to impress your guests. The combination of sweet potatoes and black beans creates a hearty filling that’s both satisfying and energizing. When paired with creamy cheese and tangy enchilada sauce, these enchiladas offer a perfect balance of flavors.
Preparing this dish is straightforward and can be a fun activity to involve family members in, as everyone can lend a hand in assembling the enchiladas. With a serving size of 4-6 people, this recipe is ideal for an intimate holiday meal or as a side dish to complement a larger feast.
Ingredients (serving size: 4-6 people):
- 2 large sweet potatoes, peeled and diced
- 1 tablespoon olive oil
- 1 teaspoon cumin
- 1 teaspoon smoked paprika
- Salt and pepper to taste
- 1 can (15 oz) black beans, drained and rinsed
- 1 cup corn kernels (fresh, frozen, or canned)
- 1/2 cup chopped red onion
- 2 cups shredded cheese (cheddar or a Mexican blend)
- 12 corn tortillas
- 2 cups enchilada sauce
- 1/4 cup chopped fresh cilantro (optional, for garnish)
- Sour cream (optional, for serving)
Cooking Instructions:
- Preheat the Oven: Begin by preheating your oven to 375°F (190°C) to make certain it’s hot and ready for baking the enchiladas.
- Prepare the Sweet Potatoes: In a large mixing bowl, toss the diced sweet potatoes with olive oil, cumin, smoked paprika, salt, and pepper until evenly coated. Spread the sweet potatoes on a baking sheet and roast them in the oven for about 20-25 minutes, or until they’re tender and slightly caramelized.
- Prepare the Filling: In a large bowl, combine the roasted sweet potatoes, black beans, corn, chopped red onion, and half of the shredded cheese. Mix thoroughly so that all the ingredients are evenly distributed.
- Assemble the Enchiladas: Pour a small amount of enchilada sauce to coat the bottom of a 9×13-inch baking dish. Warm the corn tortillas slightly to make them pliable. Spoon a generous amount of the sweet potato and black bean filling onto each tortilla, roll them up, and place them seam side down in the baking dish.
- Add the Sauce and Cheese: Once all the enchiladas are assembled, pour the remaining enchilada sauce evenly over the top. Sprinkle the rest of the shredded cheese over the enchiladas, covering them completely.
- Bake the Enchiladas: Cover the baking dish with foil and bake in the preheated oven for 15 minutes. After 15 minutes, remove the foil and bake for an additional 10 minutes, or until the cheese is melted and bubbly.
- Garnish and Serve: Remove the enchiladas from the oven and let them cool slightly. Garnish with freshly chopped cilantro and serve with a dollop of sour cream, if desired.
Extra Tips:
When making Sweet Potato and Black Bean Enchiladas, feel free to customize the filling by adding other vegetables such as bell peppers or spinach for extra nutrients. If you prefer a spicier dish, consider adding a diced jalapeño to the filling.
To save time, you can prepare the filling a day in advance and store it in the refrigerator until you’re ready to assemble the enchiladas. Additionally, if you have any leftover enchiladas, they can be stored in an airtight container and reheated in the oven or microwave for a quick and delicious meal.
Festive Beetroot and Goat Cheese Tart
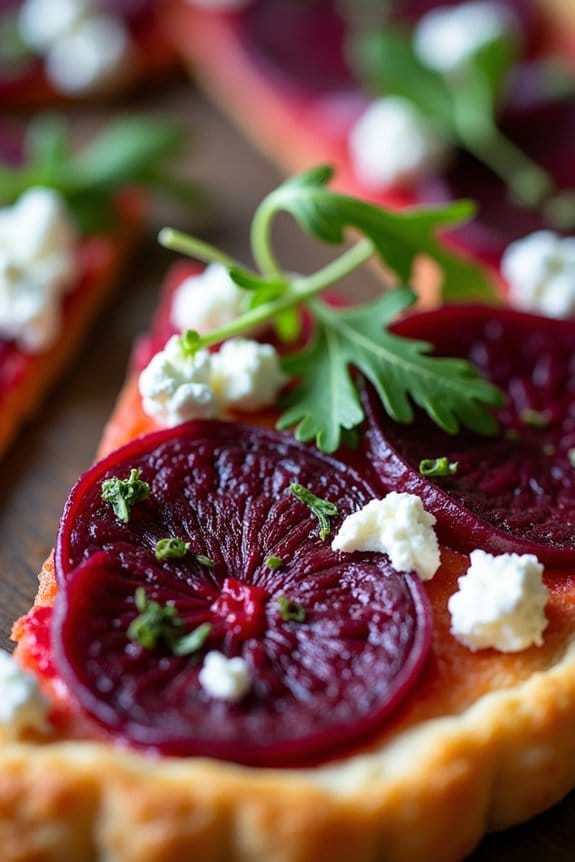
The Festive Beetroot and Goat Cheese Tart is a delightful centerpiece for any vegetarian Christmas celebration. This dish combines the earthy sweetness of beetroot with the creamy tang of goat cheese, all encased in a flaky, golden pastry. Not only does this tart offer a burst of vibrant colors, perfect for the holiday table, but it also delivers a satisfying blend of flavors and textures.
It’s a perfect choice for those looking to add a sophisticated yet simple vegetarian option to their Christmas menu. This tart isn’t just visually appealing but also nutritious, providing a good source of antioxidants from the beetroot and protein from the goat cheese. The balance of ingredients guarantees a rich yet balanced taste, making it a hit with both vegetarians and non-vegetarians alike.
Serve it as a main course or a hearty appetizer, and watch it quickly become a new holiday favorite. Designed to serve 4-6 people, this recipe will leave your guests impressed and satisfied.
Ingredients:
- 1 sheet of puff pastry (store-bought or homemade)
- 4 medium-sized beetroots
- 200g goat cheese, crumbled
- 1 red onion, thinly sliced
- 2 tablespoons olive oil
- 1 tablespoon balsamic vinegar
- 1 teaspoon fresh thyme leaves
- Salt and pepper to taste
- Handful of arugula for garnish
Cooking Instructions:
- Prepare the Beetroots: Preheat your oven to 200°C (390°F). Wrap each beetroot in aluminum foil and place them on a baking sheet. Roast the beetroots in the oven for about 45-50 minutes or until they’re tender when pierced with a fork. Once cooked, allow them to cool slightly, then peel and slice them into thin rounds.
- Prepare the Pastry: While the beetroots are roasting, roll out the puff pastry on a lightly floured surface until it’s about 1/8 inch thick. Transfer the pastry to a tart pan or a baking sheet lined with parchment paper. Prick the base lightly with a fork to prevent it from puffing up during baking.
- Caramelize the Onions: In a skillet, heat the olive oil over medium heat. Add the sliced red onion and cook, stirring frequently, until they become soft and caramelized, about 10 minutes. Add the balsamic vinegar and cook for an additional 2 minutes. Remove from heat and set aside.
- Assemble the Tart: Spread the caramelized onions evenly over the base of the pastry. Arrange the beetroot slices on top of the onions in a single layer, slightly overlapping them. Sprinkle the crumbled goat cheese over the beetroot and season with thyme leaves, salt, and pepper.
- Bake the Tart: Place the assembled tart in the oven and bake for 25-30 minutes, or until the pastry is golden brown and crispy. Remove from the oven and allow it to cool for a few minutes.
- Garnish and Serve: Before serving, garnish the tart with a handful of fresh arugula for a peppery finish. Slice the tart and serve warm or at room temperature.
Extra Tips:
To guarantee the best results, use fresh, high-quality ingredients, especially the goat cheese, which greatly influences the flavor. If you prefer a more robust flavor, consider adding a sprinkle of walnuts or a drizzle of honey before serving.
Additionally, this tart can be made ahead of time and reheated just before serving, making it a convenient option for holiday gatherings.
Herbed Cauliflower and Lentil Loaf
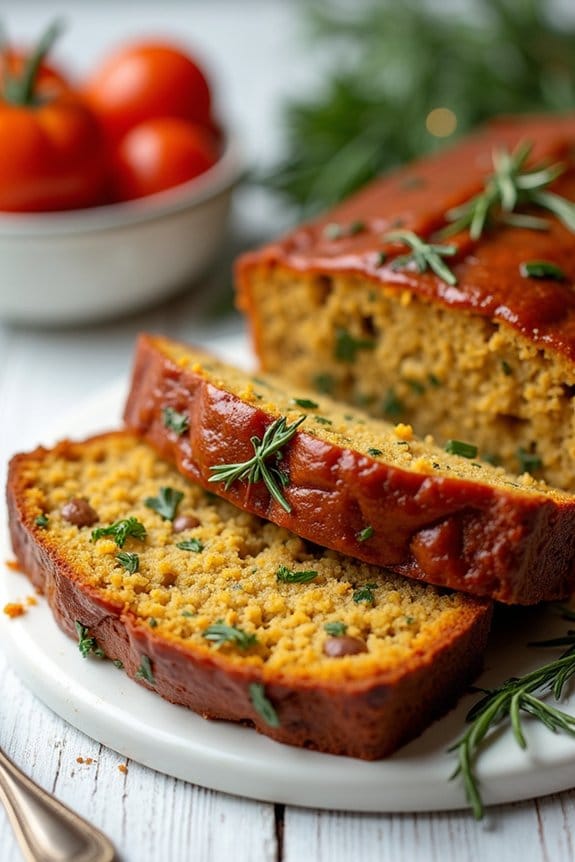
Herbed Cauliflower and Lentil Loaf is a delightful and nutritious alternative to traditional holiday roasts, perfect for those who prefer a vegetarian option. This loaf combines the earthy flavors of lentils with the subtle sweetness of roasted cauliflower, enhanced by a medley of herbs that bring a festive aroma to your dining table.
Not only is this dish hearty and satisfying, but it’s also packed with protein and fiber, making it an excellent choice for a balanced and wholesome Christmas meal. The texture of this loaf is both firm and moist, guaranteeing it holds together well when sliced.
It’s an ideal centerpiece for a vegetarian feast and pairs beautifully with a variety of sides, such as roasted vegetables or a fresh salad. The combination of ingredients creates a savory and comforting flavor profile, appealing to vegetarians and non-vegetarians alike. Perfect for serving 4-6 people, this recipe offers a generous portion for everyone to enjoy.
Ingredients for 4-6 servings:
- 1 small head of cauliflower, chopped into florets
- 2 cups cooked lentils
- 1 onion, finely chopped
- 2 cloves garlic, minced
- 1 cup breadcrumbs
- 2 tablespoons ground flaxseed mixed with 6 tablespoons water
- 1/2 cup chopped walnuts
- 1/4 cup chopped fresh parsley
- 1 tablespoon fresh thyme leaves
- 1 tablespoon fresh rosemary, minced
- 1 teaspoon salt
- 1/2 teaspoon black pepper
- 1/4 cup ketchup (optional, for topping)
- 1 tablespoon olive oil
Cooking Instructions:
- Prepare the Cauliflower: Preheat your oven to 400°F (200°C). Spread the cauliflower florets on a baking sheet, drizzle with olive oil, and roast for 20-25 minutes until they’re tender and slightly golden brown. Allow them to cool slightly.
- Cook the Lentils: While the cauliflower is roasting, confirm your lentils are cooked. If starting with dry lentils, rinse and cook them according to package instructions until tender, then drain and set aside.
- Sauté the Aromatics: In a skillet, heat a little olive oil over medium heat. Add the chopped onion and sauté for about 5 minutes until it becomes translucent. Add the minced garlic and cook for another minute until fragrant.
- Mix the Ingredients: In a large mixing bowl, combine the roasted cauliflower, cooked lentils, sautéed onion and garlic, breadcrumbs, ground flaxseed mixture, walnuts, parsley, thyme, rosemary, salt, and pepper. Mix well until all ingredients are evenly incorporated.
- Shape the Loaf: Line a loaf pan with parchment paper. Transfer the mixture into the pan, pressing down firmly to guarantee it holds together. If desired, spread a thin layer of ketchup on top of the loaf for added flavor and moisture.
- Bake the Loaf: Place the loaf in the preheated oven and bake for 40-45 minutes, or until the top is firm and golden brown. Allow it to cool in the pan for at least 10 minutes before slicing and serving.
Extra Tips:
For an additional burst of flavor, consider adding a teaspoon of smoked paprika or a dash of soy sauce to the mixture. If you want a gluten-free version, substitute the breadcrumbs with gluten-free breadcrumbs or ground oats.
Always let the loaf cool slightly before slicing to confirm it maintains its shape. This dish can be made a day in advance, allowing the flavors to meld together beautifully, and simply reheated before serving.
Zucchini Noodles With Walnut Pesto
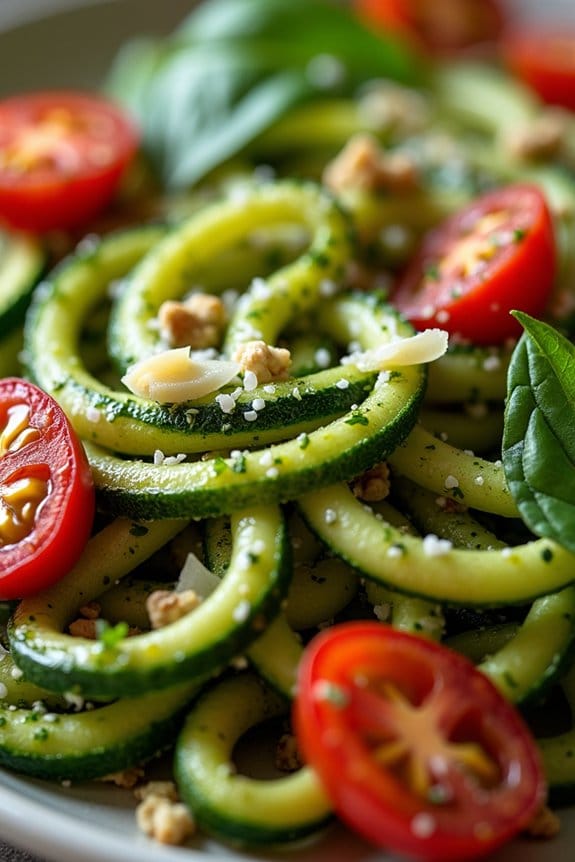
Zucchini Noodles With Walnut Pesto is a delightful and healthy dish perfect for a festive Christmas meal that caters to vegetarian preferences. This dish substitutes traditional pasta with zucchini noodles, making it a lighter option that’s still full of flavor. The walnut pesto brings a rich, nutty taste that complements the freshness of the zucchini, creating a harmonious blend of textures and flavors that will leave your guests longing for more.
This inviting and colorful dish isn’t only delicious but also quick to prepare, ensuring you spend less time in the kitchen and more time celebrating with loved ones.
The star of this dish, zucchini noodles, are a great low-carb alternative to pasta and are packed with vitamins and minerals. Paired with a homemade walnut pesto, this recipe offers a unique twist on a classic favorite. The walnut pesto is made with fresh basil, garlic, and Parmesan cheese, providing a robust flavor profile that elevates the simple zucchini noodles to a gourmet level.
Ideal for a Christmas dinner, this dish is also versatile enough to be enjoyed year-round.
Ingredients for 4-6 servings:
- 4 medium zucchini
- 2 cups fresh basil leaves
- 1 cup walnuts, toasted
- 2 cloves garlic
- 1/2 cup grated Parmesan cheese
- 1/2 cup olive oil
- 1 tablespoon lemon juice
- Salt and pepper to taste
- Cherry tomatoes, halved (optional, for garnish)
Cooking Instructions:
- Prepare the Zucchini Noodles: Use a spiralizer to turn the zucchini into noodles. If you don’t have a spiralizer, you can use a julienne peeler or a mandoline slicer to cut the zucchini into thin strips. Set the noodles aside.
- Toast the Walnuts: In a dry skillet over medium heat, toast the walnuts for about 5 minutes, stirring frequently, until they’re fragrant and lightly browned. Remove from heat and let them cool.
- Make the Pesto: In a food processor, combine the toasted walnuts, basil leaves, garlic, Parmesan cheese, and lemon juice. Pulse until the ingredients are finely chopped. With the processor running, slowly drizzle in the olive oil until the mixture is smooth and creamy. Season with salt and pepper to taste.
- Combine Noodles and Pesto: In a large mixing bowl, add the zucchini noodles and pour the walnut pesto over them. Toss gently until the noodles are evenly coated with the pesto.
- Serve: Transfer the zucchini noodles to a serving platter. If using, scatter halved cherry tomatoes over the top for an extra burst of color and flavor. Serve immediately and enjoy.
Extra Tips:
When preparing Zucchini Noodles With Walnut Pesto, it’s important to not overcook the noodles; they should remain crisp to maintain their texture and prevent them from becoming watery.
If you prefer warm noodles, you can sauté them briefly in a pan with a little olive oil before adding the pesto. This recipe can be easily customized by adding other vegetables, such as roasted red peppers or sautéed mushrooms, to enhance the flavor and nutritional profile.
Additionally, for a vegan version, simply omit the Parmesan cheese or replace it with a vegan alternative.
Vegan Chocolate Peppermint Bark

Vegan Chocolate Peppermint Bark is a delightful treat that combines the rich, creamy texture of chocolate with the invigorating zing of peppermint. This recipe is perfect for those looking to indulge in a festive dessert that caters to a plant-based lifestyle.
It’s simple to make, requiring minimal ingredients and effort, yet it delivers a luxurious taste experience that will be loved by vegans and non-vegans alike. Adding this treat to your holiday spread is sure to be a hit, leaving your guests impressed and satisfied.
This Vegan Chocolate Peppermint Bark not only captures the essence of Christmas in both flavor and presentation but also allows for creativity in its preparation. You can choose to use different types and brands of vegan chocolate, and the peppermint topping can be adjusted to taste, allowing for a personalized touch to the classic holiday dessert.
Serve it at your next Christmas gathering and watch as it quickly becomes a favorite among both children and adults.
Ingredients (Serving Size: 4-6 people):
- 2 cups vegan dark chocolate chips
- 1 cup vegan white chocolate chips
- 1 teaspoon peppermint extract
- 1/2 cup crushed candy canes (confirm they’re vegan)
- A pinch of sea salt
Instructions:
- Prepare the Baking Sheet: Line a baking sheet with parchment paper. This will prevent the chocolate from sticking and make it easier to remove once set.
- Melt the Dark Chocolate: In a microwave-safe bowl, add the vegan dark chocolate chips. Microwave in 30-second intervals, stirring in between, until the chocolate is fully melted and smooth.
- Add Peppermint Extract: Once the dark chocolate is melted, stir in the teaspoon of peppermint extract. This will infuse the chocolate with a invigorating minty flavor.
- Spread the Chocolate: Pour the melted dark chocolate onto the lined baking sheet and spread it evenly with a spatula to about 1/4 inch thick.
- Melt the White Chocolate: In a separate microwave-safe bowl, melt the vegan white chocolate chips using the same method as the dark chocolate.
- Create Swirls: Drizzle the melted white chocolate over the dark chocolate layer. Use a knife or skewer to gently swirl the two chocolates together, creating a marbled effect.
- Add Candy Cane Topping: Sprinkle the crushed candy canes evenly over the chocolate mixture, pressing them lightly into the chocolate so they adhere.
- Set the Bark: Allow the bark to cool at room temperature for about 2 hours or until fully set. You can also place it in the refrigerator to speed up the process.
- Break into Pieces: Once set, break the bark into pieces of your desired size. Store in an airtight container until ready to serve.
Extra Tips:
For an even more festive touch, consider adding a sprinkle of edible glitter to the top of the bark before it sets. If you’re a fan of nuts, adding chopped almonds or pistachios can provide an additional crunch and flavor.
Be sure to check the ingredients of the candy canes to confirm they’re vegan, as some may contain non-vegan ingredients like gelatin or milk derivatives. Finally, if you prefer a less sweet version, you can reduce the amount of white chocolate or increase the ratio of dark chocolate.
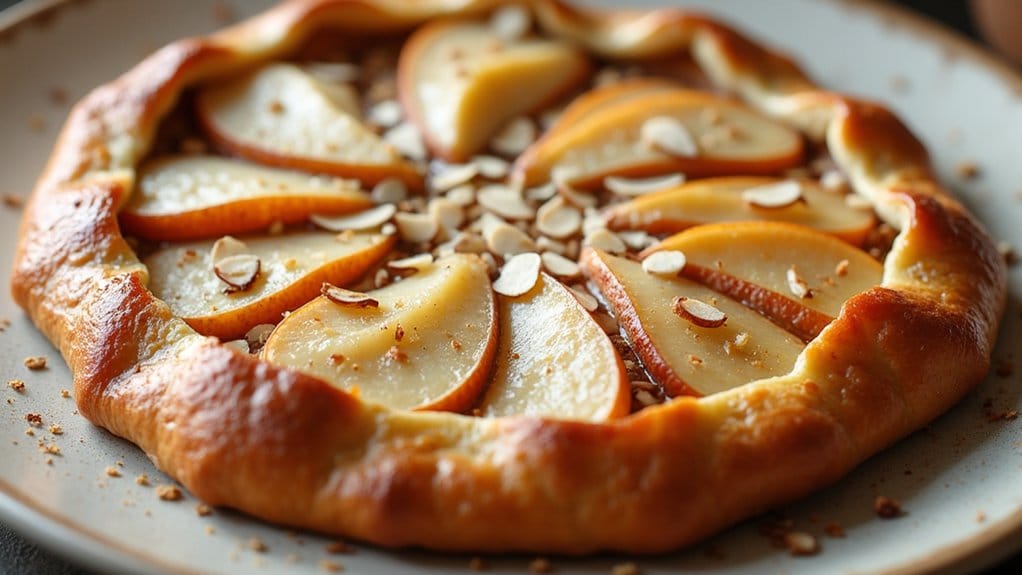
Spiced Pear and Almond Galette
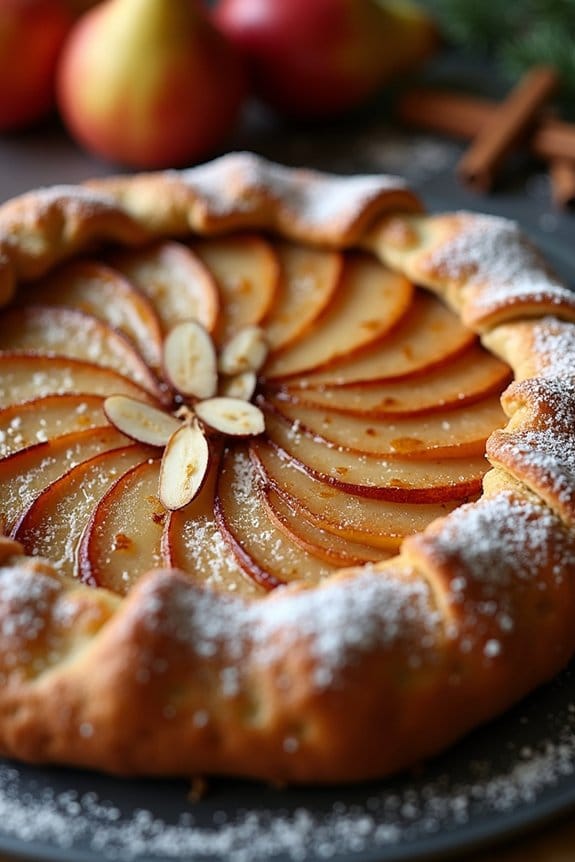
A Spiced Pear and Almond Galette is a delightful and elegant dessert that perfectly embodies the festive spirit of Christmas while catering to a vegetarian diet. This rustic French pastry combines the natural sweetness of ripe pears with the nutty richness of almonds, all wrapped in a flaky, buttery crust. The subtle warmth of spices like cinnamon and nutmeg adds a seasonal touch, making it an ideal treat for holiday gatherings.
Whether you’re hosting a vegetarian Christmas dinner or simply want to impress your family and friends with a homemade dessert, this galette is sure to be a crowd-pleaser.
To make the Spiced Pear and Almond Galette, you begin by preparing a simple, yet delicious almond filling that serves as the base for the sliced pears. The pears are then tossed with spices and a hint of sugar to enhance their natural flavor. The pastry dough, which can be homemade or store-bought for convenience, is rolled out and filled with the almond mixture and spiced pears, then folded into a beautiful free-form tart.
Baked until golden brown and served with a scoop of vanilla ice cream or a dollop of whipped cream, this galette is a festive dessert that’s as beautiful as it’s delicious.
Ingredients for 4-6 servings:
- 1 1/4 cups all-purpose flour
- 1/2 cup unsalted butter, chilled and cut into cubes
- 1/4 cup granulated sugar
- 1/4 teaspoon salt
- 3-4 tablespoons cold water
- 3 ripe pears, peeled, cored, and sliced
- 1/4 cup brown sugar
- 1/2 teaspoon ground cinnamon
- 1/4 teaspoon ground nutmeg
- 1/4 teaspoon ground ginger
- 1/2 cup almond meal (almond flour)
- 2 tablespoons honey
- 1 egg, beaten (for egg wash)
- 1/4 cup sliced almonds
- Powdered sugar (optional, for dusting)
Cooking Instructions:
1. Prepare the Dough: In a large mixing bowl, combine the flour, granulated sugar, and salt. Add the chilled butter cubes and use a pastry cutter or your fingers to combine until the mixture resembles coarse crumbs. Gradually add cold water, one tablespoon at a time, mixing until the dough comes together.
Form the dough into a disk, wrap in plastic wrap, and refrigerate for at least 30 minutes.
2. Prepare the Pear Filling: In a large bowl, combine the pear slices with brown sugar, cinnamon, nutmeg, and ginger. Toss until the pears are evenly coated with the spices and sugar. Set aside to allow the flavors to meld.
3. Prepare the Almond Filling: In a small bowl, mix the almond meal with honey until a thick paste forms. This will serve as the base layer in the galette to provide a nutty flavor.
4. Roll Out the Dough: Preheat your oven to 375°F (190°C). On a lightly floured surface, roll out the chilled dough into a rough 12-inch circle. Transfer the dough onto a parchment-lined baking sheet.
5. Assemble the Galette: Spread the almond paste evenly over the center of the dough, leaving a 2-inch border. Arrange the spiced pear slices over the almond filling in an overlapping pattern. Fold the edges of the dough over the pears, leaving the center exposed.
6. Egg Wash and Almond Topping: Brush the folded edges of the dough with the beaten egg. Sprinkle sliced almonds over the pears and the crust for added texture and flavor.
7. Bake: Place the galette in the preheated oven and bake for 35-40 minutes, or until the crust is golden brown and the pears are tender. Allow it to cool slightly before dusting with powdered sugar if desired.
8. Serve: Slice the galette into wedges and serve warm with a scoop of vanilla ice cream or a dollop of whipped cream.
Extra Tips: For the best results, make sure the butter is properly chilled before incorporating it into the dough. This helps create a flaky crust. If you’re short on time, you can use store-bought pie crust to save a step.
When selecting pears, choose ones that are ripe but firm, such as Bosc or Anjou, as they hold their shape well during baking. Ultimately, feel free to experiment with different spices or add a splash of vanilla extract to the filling for an extra layer of flavor.
