

The holiday season is here, and I’ve gathered a list of 13 delicious Christmas party main dish recipes that will wow your guests. Picture serving a beautifully prepared Herb-Crusted Prime Rib Roast or a delectable Honey-Glazed Spiral Ham. Each recipe is designed to make your celebrations special, combining flavors in delightful ways. Ready to impress your guests with some culinary magic? Let’s explore these festive delights together!
Herb-Crusted Prime Rib Roast
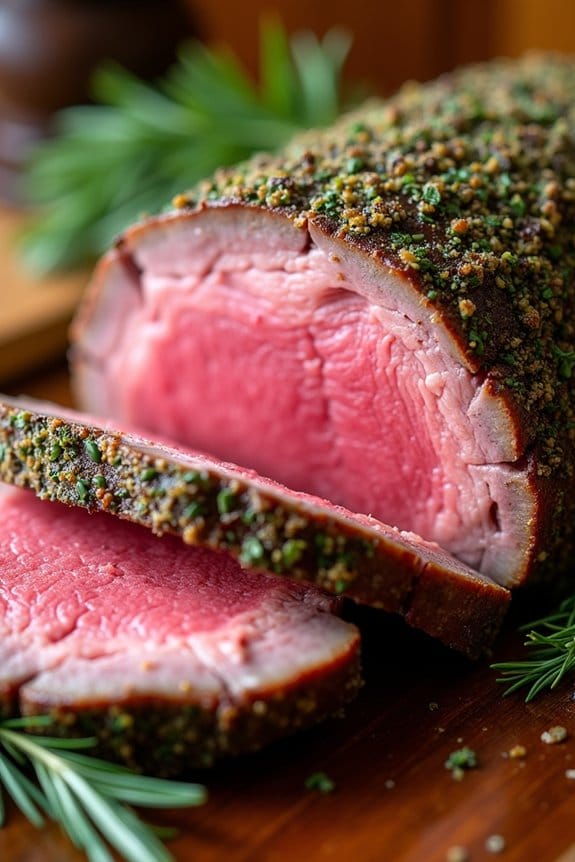
Herb-Crusted Prime Rib Roast is a classic and indulgent main dish perfect for a Christmas party. This succulent cut of beef is coated with a luscious herb mixture that enhances the flavor and creates a beautiful crust as it roasts to perfection. The prime rib roast isn’t only a feast for the eyes but also a culinary delight that will surely impress your guests.
Whether you’re hosting a small gathering or a large family dinner, this dish is sure to be a showstopper. The secret to a perfect Herb-Crusted Prime Rib Roast lies in selecting the right cut of meat and allowing it to roast slowly to maintain its tenderness and juiciness. This recipe serves 4-6 people, offering each guest a generous slice of this mouthwatering delicacy.
The combination of fresh herbs, garlic, and seasoning creates an aromatic blend that complements the rich flavor of the beef. Let’s explore the ingredients and step-by-step instructions to create this festive centerpiece.
Ingredients for 4-6 people:
- 1 (4-5 pound) bone-in prime rib roast
- 4 cloves garlic, minced
- 1/4 cup fresh rosemary, chopped
- 1/4 cup fresh thyme, chopped
- 1/4 cup fresh parsley, chopped
- 1 tablespoon kosher salt
- 1 tablespoon black pepper
- 2 tablespoons olive oil
- 2 tablespoons Dijon mustard
Cooking Instructions:
- Prepare the Roast: Remove the prime rib from the refrigerator at least 2 hours before cooking to allow it to reach room temperature. This guarantees even cooking throughout the roast.
- Preheat the Oven: Preheat your oven to 450°F (232°C). This high initial temperature will help create a beautiful crust on the roast.
- Make the Herb Mixture: In a small bowl, combine the minced garlic, chopped rosemary, thyme, parsley, kosher salt, black pepper, olive oil, and Dijon mustard. Mix well to form a paste.
- Season the Roast: Pat the prime rib dry with paper towels. Rub the herb mixture all over the surface of the roast, guaranteeing it’s evenly coated.
- Roast the Prime Rib: Place the roast bone-side down in a roasting pan. Insert a meat thermometer into the thickest part of the roast, avoiding bone. Roast in the preheated oven for 20 minutes at 450°F (232°C).
- Lower the Temperature: After 20 minutes, reduce the oven temperature to 325°F (163°C). Continue roasting until the internal temperature reaches 120°F (49°C) for medium-rare, approximately 1.5 to 2 hours.
- Rest the Roast: Once done, remove the roast from the oven and tent it with aluminum foil. Allow it to rest for at least 20-30 minutes before carving. This helps redistribute the juices, guaranteeing a moist and flavorful roast.
Extra Tips: For the best results, always use a meat thermometer to check the internal temperature of the roast, as ovens can vary. If your guests prefer different levels of doneness, keep in mind that the ends of the roast will be more well-done than the center.
You can also prepare the herb mixture a day in advance to save time on the day of your party. Finally, serve the prime rib with a simple au jus or horseradish sauce to enhance its flavors even further.
Honey-Glazed Spiral Ham
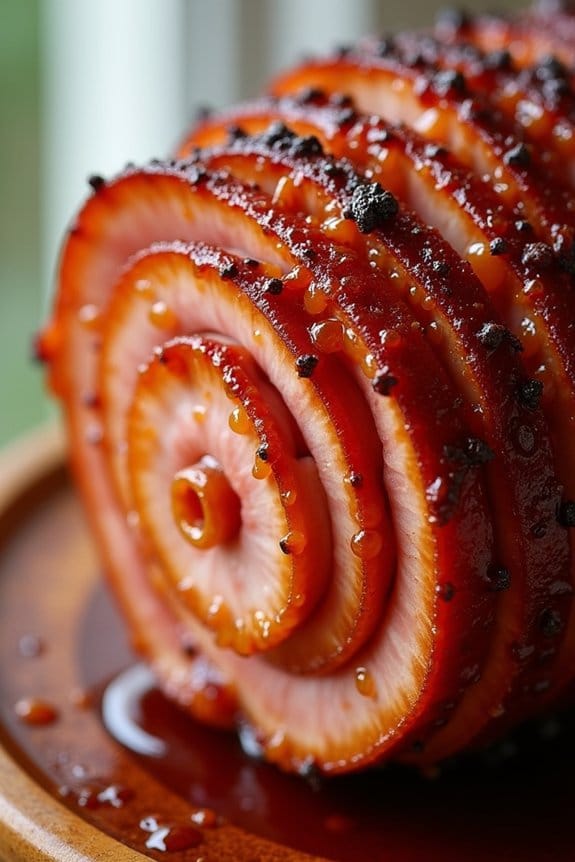
Celebrate the holiday season with a delicious Honey-Glazed Spiral Ham, a perfect centerpiece for your Christmas party. This dish combines the succulent flavor of ham with a sweet and sticky honey glaze, resulting in a delightful balance that will impress your guests. The spiral cut guarantees that every piece is evenly coated with the glaze, making it a hassle-free yet elegant main course.
Whether you’re hosting a small family gathering or a larger festive celebration, this dish is sure to be a hit. Preparing a Honey-Glazed Spiral Ham is straightforward, allowing you to focus on enjoying the holiday festivities. The key to this recipe is the glaze, which adds a flavorful, caramelized crust to the ham while keeping the interior juicy and tender.
With just a few ingredients and a simple cooking process, this recipe is suitable for both seasoned cooks and those new to holiday meal preparations. Follow the steps below to create a delectable ham that will have everyone reaching for seconds.
Ingredients for 4-6 servings:
- 1 (5-7 pound) fully cooked spiral-cut ham
- 1 cup honey
- 1/2 cup brown sugar
- 1/4 cup Dijon mustard
- 1/4 cup apple cider vinegar
- 1 teaspoon ground cinnamon
- 1/2 teaspoon ground cloves
- 1/2 teaspoon ground nutmeg
Cooking Instructions:
- Preheat the oven to 325°F (165°C). This temperature allows the ham to heat slowly and evenly, guaranteeing that it remains moist and tender.
- Prepare the glaze by combining honey, brown sugar, Dijon mustard, apple cider vinegar, cinnamon, cloves, and nutmeg in a saucepan. Heat the mixture over medium heat, stirring constantly until the sugar dissolves and the glaze is smooth and slightly thickened. This should take about 5 minutes.
- Place the ham in a roasting pan, cut side down. This orientation helps the juices to flow over the meat and keep it moist. If the ham comes with a plastic disk on the bone, make sure to remove it.
- Brush the ham generously with about half of the glaze, making sure that it covers the surface and seeps into the spiral cuts for maximum flavor infusion.
- Cover the ham loosely with aluminum foil to prevent it from drying out during the initial baking period. Bake for 10-12 minutes per pound, or about 50-60 minutes total for a 5-pound ham.
- Remove the foil and increase the oven temperature to 400°F (200°C). Brush the ham with the remaining glaze and return it to the oven. Bake uncovered for an additional 15-20 minutes, or until the glaze is caramelized and the internal temperature of the ham reaches 140°F (60°C).
- Let the ham rest for at least 10 minutes before slicing and serving. This resting period allows the juices to redistribute, making each slice tender and flavorful.
Extra Tips:
When preparing a Honey-Glazed Spiral Ham, consider using a meat thermometer to verify perfect cooking. Insert the thermometer into the thickest part of the ham, away from the bone, to check the internal temperature.
If you prefer a more robust flavor, you can add a splash of bourbon to the glaze for a rich depth of taste. Additionally, saving some of the glaze to drizzle over the sliced ham before serving can enhance the presentation and flavor.
Finally, leftover ham can be stored in the fridge for up to five days or frozen for longer storage, perfect for quick sandwiches or adding to soups and casseroles.
Stuffed Pork Tenderloin With Cranberry Sauce
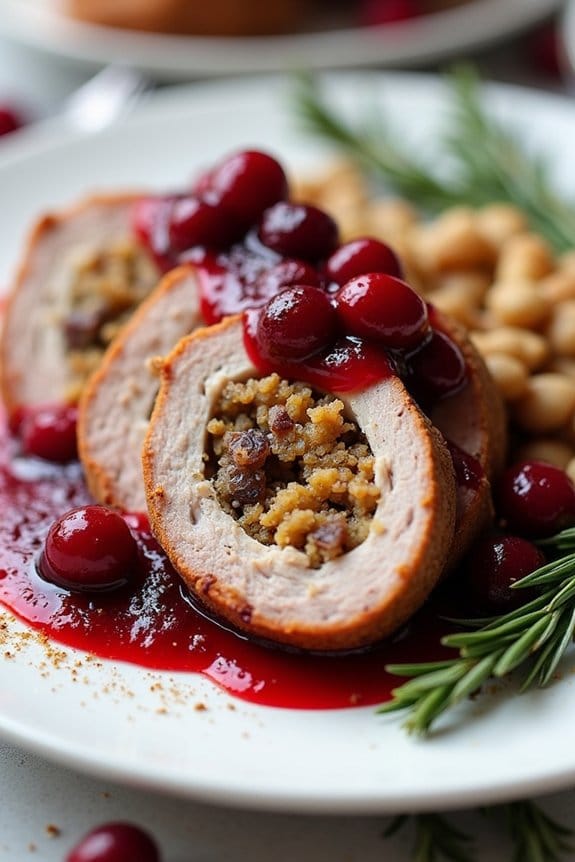
Stuffed Pork Tenderloin With Cranberry Sauce is a festive and flavorful main dish perfect for a Christmas party. This dish combines the savory taste of pork tenderloin with the sweet and tangy flavor of cranberry sauce, creating a delightful balance that will impress your guests.
The stuffing, made with a blend of herbs, breadcrumbs, and perhaps some nuts or fruit, adds an extra layer of flavor and texture to the dish. When cooked to perfection, the pork tenderloin is juicy and tender, while the cranberry sauce provides a beautiful color and a burst of flavor that complements the meat wonderfully.
The preparation of Stuffed Pork Tenderloin With Cranberry Sauce isn’t overly complicated, making it an excellent choice for home cooks who want to offer something special without spending all day in the kitchen. This dish isn’t only delicious but also visually appealing, making it a centerpiece worthy of any holiday table.
Whether you’re hosting a small gathering or a larger festive celebration, this recipe is sure to be a hit with family and friends alike.
Ingredients for 4-6 servings:
- 2 pork tenderloins (about 1 pound each)
- 1 cup fresh or store-bought cranberry sauce
- 1 cup breadcrumbs
- 1/2 cup chopped walnuts or pecans
- 1/4 cup dried cranberries
- 1/4 cup finely chopped onion
- 2 cloves garlic, minced
- 1 tablespoon fresh rosemary, chopped
- 1 tablespoon fresh thyme, chopped
- 1/2 teaspoon salt
- 1/2 teaspoon black pepper
- 2 tablespoons olive oil
- 1/4 cup chicken broth
- Kitchen twine
Cooking Instructions:
- Preheat and Prepare: Preheat your oven to 375°F (190°C). While the oven is heating, prepare the pork tenderloins by trimming any excess fat and silver skin. Carefully slice each tenderloin lengthwise, being careful not to cut all the way through, to create a pocket for the stuffing.
- Make the Stuffing: In a medium-sized bowl, combine the breadcrumbs, chopped walnuts or pecans, dried cranberries, chopped onion, minced garlic, rosemary, thyme, salt, and pepper. Mix well to combine all ingredients.
- Stuff the Pork: Open the pork tenderloins and evenly distribute the stuffing mixture inside each one. Gently press the stuffing into the pockets, then fold the tenderloins back together. Use kitchen twine to tie the tenderloins at 2-inch intervals to secure the stuffing inside.
- Sear the Pork: Heat the olive oil in a large oven-safe skillet over medium-high heat. Once hot, add the stuffed pork tenderloins and sear them for about 2-3 minutes on each side until they’re browned all over.
- Roast in the Oven: After searing, pour the chicken broth into the skillet around the pork tenderloins. Transfer the skillet to the preheated oven and roast for 20-25 minutes or until the internal temperature of the pork reaches 145°F (63°C).
- Prepare the Cranberry Sauce: While the pork is roasting, warm the cranberry sauce in a small saucepan over low heat.
- Rest and Serve: Once the pork is cooked, remove it from the oven and let it rest for 5-10 minutes. Remove the kitchen twine, slice the pork into medallions, and serve with a generous spoonful of warm cranberry sauce on top.
Extra Tips:
For the best results, make sure that the pork tenderloin is evenly stuffed and securely tied to prevent the stuffing from falling out during cooking.
If you prefer a thicker sauce, you can reduce the cranberry sauce further by simmering it longer. To add a richer flavor to the sauce, consider adding a splash of red wine or balsamic vinegar.
Citrus and Herb Roasted Turkey
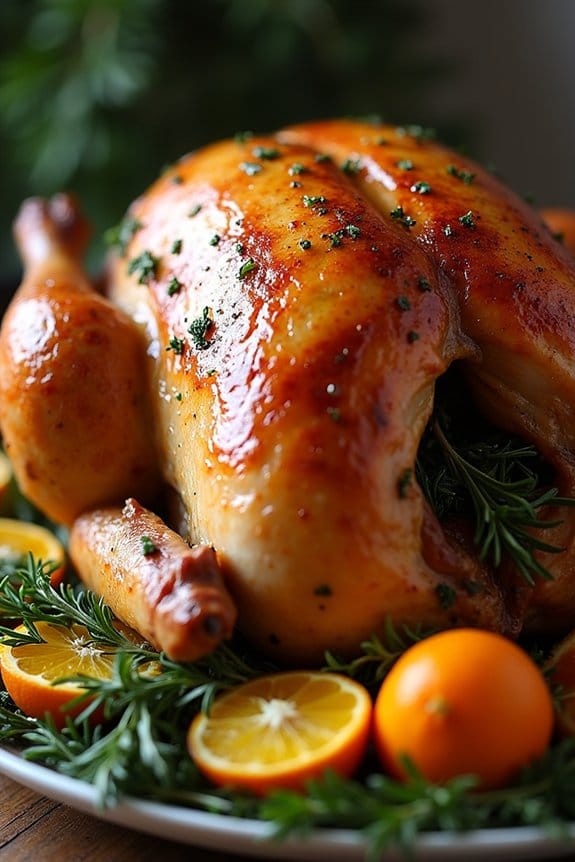
For a Christmas party main dish that’s both festive and flavorful, Citrus and Herb Roasted Turkey is an excellent choice. This dish combines the traditional comfort of a roasted turkey with the bright, tangy flavors of citrus and the aromatic notes of fresh herbs. Perfectly suited for a gathering of friends and family, this turkey recipe is designed to serve 4-6 people, guaranteeing everyone gets to enjoy a hearty portion of succulent meat that’s both juicy and infused with a delightful blend of flavors.
Whether you’re a seasoned cook or a novice in the kitchen, this recipe for Citrus and Herb Roasted Turkey is simple to follow and promises a show-stopping centerpiece for your Christmas celebration. The combination of citrus fruits like oranges and lemons with herbs such as rosemary and thyme not only enhances the flavor of the turkey but also fills your home with an irresistible aroma as it roasts to perfection.
Let’s plunge into the ingredients and steps needed to create this delicious holiday meal.
Ingredients (serving size 4-6 people):
- 1 turkey (about 8-10 lbs)
- 2 oranges, quartered
- 2 lemons, quartered
- 1 bunch of fresh thyme
- 1 bunch of fresh rosemary
- 1 bunch of fresh sage
- 1/2 cup butter, softened
- 4 cloves garlic, minced
- Salt and pepper to taste
- 1 cup chicken broth
Cooking Instructions:
- Preheat the Oven: Start by preheating your oven to 325°F (165°C). This will guarantee the oven is at the right temperature when your turkey is ready to be roasted.
- Prepare the Turkey: Remove the giblets from the turkey cavity. Rinse the turkey inside and out with cold water and pat it dry with paper towels. Place the turkey on a rack in a large roasting pan.
- Season the Turkey: In a small bowl, mix the softened butter with minced garlic, salt, and pepper. Gently loosen the skin over the turkey breast and thighs by sliding your hand underneath. Spread half of the butter mixture under the skin and the other half over the skin.
- Stuff the Turkey: Stuff the cavity of the turkey with the quartered oranges, lemons, and the bunches of thyme, rosemary, and sage. This will infuse the turkey with a citrusy, herby aroma and flavor.
- Roast the Turkey: Pour the chicken broth into the bottom of the roasting pan. This will help keep the turkey moist throughout the cooking process. Place the turkey in the preheated oven and roast according to the weight of your turkey (approximately 13-15 minutes per pound). Baste the turkey every 30 minutes with the pan juices to guarantee it remains moist.
- Check for Doneness: Use a meat thermometer to check the turkey’s internal temperature. The turkey is done when the thickest part of the thigh reaches 165°F (74°C).
- Rest the Turkey: Once cooked, remove the turkey from the oven and let it rest for 20-30 minutes before carving. This allows the juices to redistribute, guaranteeing each slice is tender and juicy.
Extra Tips: For a crispy skin, increase the oven temperature to 425°F (220°C) during the last 30 minutes of roasting. If the skin starts to brown too quickly, cover it loosely with aluminum foil.
Additionally, make sure to carve the turkey properly by slicing against the grain for the most tender pieces. Remember, the leftover turkey can be used in sandwiches, salads, or soups, making it a versatile post-holiday treat!
Maple-Balsamic Glazed Salmon
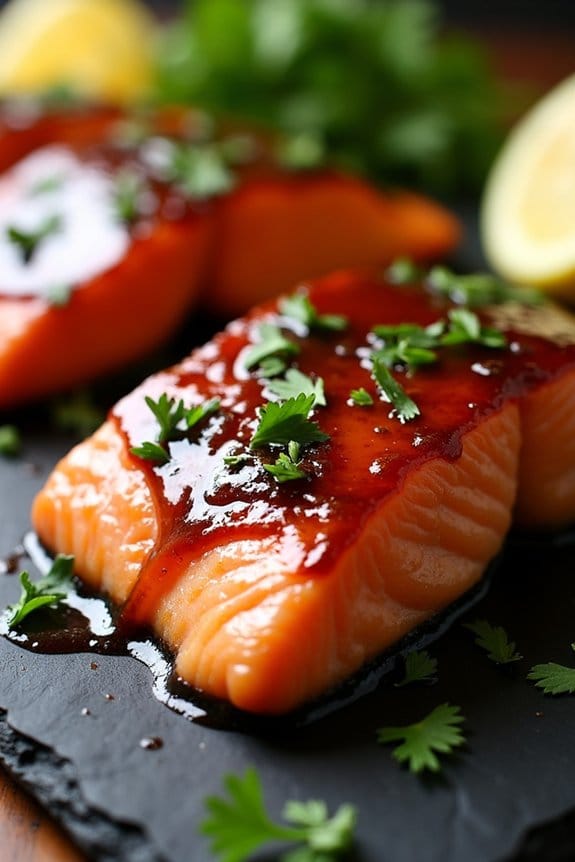
Maple-Balsamic Glazed Salmon is a delightful and festive main dish that perfectly combines the rich flavors of salmon with the sweet and tangy notes of maple syrup and balsamic vinegar. This dish isn’t only delicious but also presents a beautiful contrast of colors and flavors, making it an ideal centerpiece for your Christmas party.
The glaze, made with a mix of maple syrup and balsamic vinegar, caramelizes beautifully over the salmon, giving it a lovely, glossy finish. This dish is both sophisticated and simple, allowing you to impress your guests with minimal effort.
Cooking Maple-Balsamic Glazed Salmon is straightforward and requires only a few ingredients, most of which you probably already have in your pantry. The key is to use fresh, high-quality salmon fillets and to balance the sweetness of the maple syrup with the acidity of the balsamic vinegar.
The cooking process involves minimal preparation time, allowing you to focus on other aspects of your holiday celebration. Serving 4-6 people, this recipe is designed to be both flavorful and elegant, perfect for a memorable Christmas gathering.
Ingredients (Serves 4-6):
- 4-6 salmon fillets (6-8 ounces each)
- 1/2 cup maple syrup
- 1/4 cup balsamic vinegar
- 2 tablespoons soy sauce
- 2 cloves garlic, minced
- 1 tablespoon Dijon mustard
- 1 tablespoon olive oil
- Salt and pepper to taste
- Chopped fresh parsley for garnish (optional)
- Lemon wedges for serving (optional)
Cooking Instructions:
- Prepare the Glaze: In a small saucepan, combine the maple syrup, balsamic vinegar, soy sauce, minced garlic, and Dijon mustard. Stir the mixture over medium heat until it begins to simmer. Reduce the heat to low and let it simmer for about 5-7 minutes, stirring occasionally, until the glaze thickens slightly. Remove from heat and set aside.
- Preheat and Prepare the Oven: Preheat your oven to 400°F (200°C). Line a baking sheet with aluminum foil or parchment paper for easy cleanup and lightly brush it with olive oil to prevent sticking.
- Season the Salmon: Pat the salmon fillets dry with paper towels and place them skin-side down on the prepared baking sheet. Season the fillets with salt and pepper to taste.
- Glaze the Salmon: Using a pastry brush or spoon, generously coat each salmon fillet with the prepared maple-balsamic glaze. Reserve a small amount of glaze for serving.
- Bake the Salmon: Place the baking sheet in the preheated oven and bake the salmon for 10-15 minutes, depending on the thickness of the fillets. The salmon should be opaque and flake easily with a fork.
- Broil for a Finish: For an extra caramelized finish, switch the oven to broil on high for the last 2-3 minutes of cooking. Keep a close eye on the salmon to prevent burning.
- Garnish and Serve: Remove the salmon from the oven and let it rest for a few minutes. Garnish with chopped fresh parsley and serve with lemon wedges and the reserved glaze on the side.
Extra Tips: When selecting salmon fillets, look for vibrant, firm flesh and avoid any with a fishy odor. For added depth of flavor, marinate the salmon in the glaze for up to an hour before cooking.
If you prefer a smokier taste, consider grilling the salmon instead of baking it. Finally, to guarantee even cooking, try to select fillets of similar thickness. The combination of these careful selections and techniques will assure a perfectly cooked Maple-Balsamic Glazed Salmon that’s both flavorful and visually stunning.
Rosemary Garlic Lamb Chops
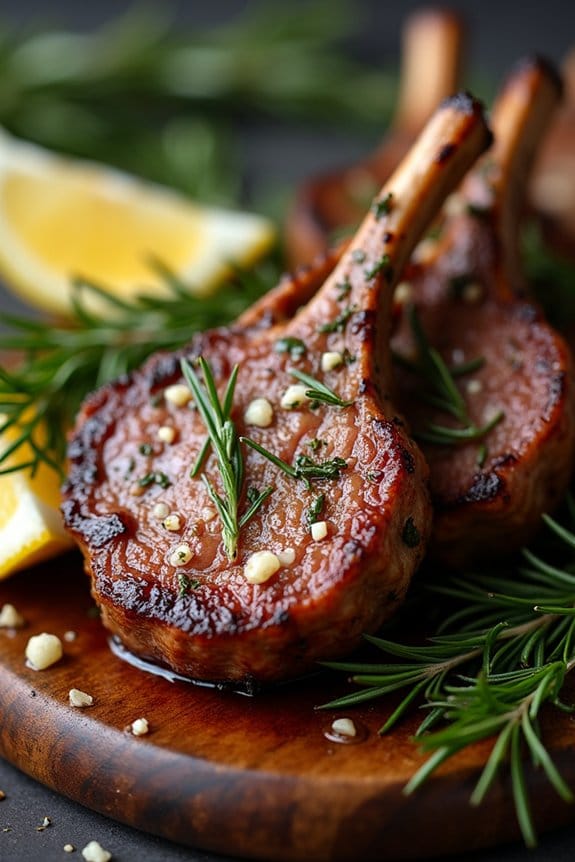
Rosemary Garlic Lamb Chops is a classic dish that elegantly combines the rich, tender flavor of lamb with the aromatic notes of rosemary and garlic. This dish is perfect for a Christmas party, offering a sophisticated yet comforting main course that’s sure to impress your guests.
The lamb chops are cooked to perfection, guaranteeing a juicy and flavorful experience with each bite. The blend of rosemary and garlic not only enhances the natural taste of the lamb but also provides a festive aroma that fills your home with the spirit of the season.
Preparing Rosemary Garlic Lamb Chops is relatively simple, making it an ideal choice for hosts who want to deliver a gourmet dish without spending hours in the kitchen. The key to this recipe lies in the marination, which allows the flavors to deeply penetrate the meat, resulting in a succulent and aromatic presentation.
Whether you’re serving a small family gathering or a larger festive celebration, these lamb chops will surely become a memorable highlight of your Christmas feast.
Ingredients (Serves 4-6):
- 8 lamb chops
- 4 cloves garlic, minced
- 2 tablespoons fresh rosemary, finely chopped
- 1 teaspoon salt
- 1 teaspoon black pepper
- 2 tablespoons olive oil
- 1 tablespoon lemon juice
- 1 tablespoon unsalted butter
Cooking Instructions:
- Prepare the Marinade: In a small bowl, combine minced garlic, chopped rosemary, salt, black pepper, olive oil, and lemon juice. Mix well to create a marinade.
- Marinate the Lamb Chops: Place the lamb chops in a shallow dish or a resealable plastic bag. Pour the marinade over the chops, guaranteeing they’re well-coated. Seal the bag or cover the dish and refrigerate for at least 1 hour, allowing the flavors to meld with the meat.
- Preheat the Pan: Remove the lamb chops from the refrigerator and let them sit at room temperature for about 20 minutes. Meanwhile, heat a large skillet over medium-high heat.
- Cook the Lamb Chops: Add the butter to the hot skillet and allow it to melt and sizzle. Place the marinated lamb chops in the skillet and sear each side for about 3-4 minutes, or until they reach your desired level of doneness. For medium-rare, aim for an internal temperature of 135°F (57°C).
- Rest the Chops: Once cooked, remove the lamb chops from the skillet and let them rest on a plate for 5 minutes. This resting period allows the juices to redistribute, guaranteeing a tender and juicy bite.
Extra Tips:
For a more robust flavor, consider marinating the lamb chops overnight. If you’re short on time, you can also make crosshatch cuts on the surface of each chop before marinating to help the marinade penetrate more deeply.
When cooking, avoid overcrowding the skillet; if necessary, cook in batches to guarantee even browning. Pair these lamb chops with roasted vegetables or a fresh salad to complement the rich flavors of the dish.
Beef Wellington With Mushroom Duxelles
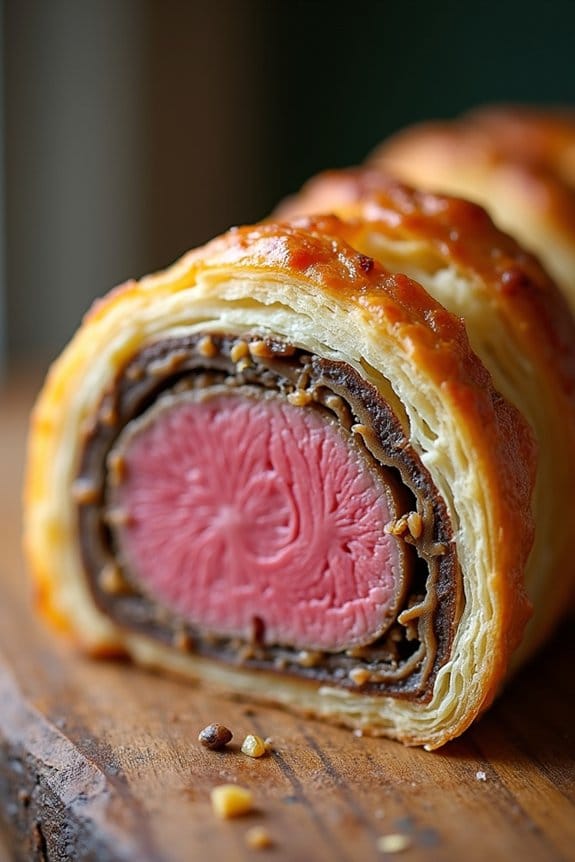
Beef Wellington is a classic and elegant dish that’s perfect for a special Christmas party. This dish features a tender beef fillet coated with a savory mushroom duxelles, wrapped in prosciutto and puff pastry, then baked to perfection. The combination of flavors and textures is sure to impress your guests and make your holiday celebration memorable. This recipe serves 4-6 people, making it ideal for a festive gathering.
The secret to a delicious Beef Wellington lies in its preparation and quality ingredients. The mushroom duxelles adds a rich, earthy flavor, while the prosciutto provides a salty contrast to the tender beef. The puff pastry encases all the ingredients, creating a golden, flaky crust that holds everything together. With a bit of patience and attention to detail, you can create a show-stopping main dish that will be the highlight of your Christmas party.
Ingredients for 4-6 servings:
- 2 pounds beef tenderloin, trimmed
- Salt and freshly ground black pepper
- 2 tablespoons olive oil
- 1 pound mushrooms, finely chopped
- 2 tablespoons butter
- 2 cloves garlic, minced
- 1 tablespoon fresh thyme leaves
- 1/2 cup dry white wine or sherry
- 12 slices prosciutto
- 1 sheet puff pastry, thawed
- 2 egg yolks, beaten with 1 tablespoon water
- All-purpose flour, for dusting
Cooking Instructions:
- Prepare the Beef Tenderloin: Season the beef tenderloin with salt and pepper. Heat olive oil in a large pan over medium-high heat. Sear the beef on all sides until browned, about 2-3 minutes per side. Remove from heat and let it cool completely.
- Make the Mushroom Duxelles: In the same pan, melt butter over medium heat. Add the chopped mushrooms, garlic, and thyme. Cook until the mushrooms release their moisture and become golden brown, about 10 minutes. Add the wine or sherry and cook until the liquid evaporates. Let the mixture cool.
- Assemble the Wellington: Lay out a large piece of cling film on a flat surface. Arrange the prosciutto slices in a single layer, slightly overlapping. Spread the mushroom duxelles evenly over the prosciutto. Place the cooled beef tenderloin on top.
- Wrap the Beef: Using the cling film, tightly roll the prosciutto and mushroom-covered beef into a log. Twist the ends of the film to seal and refrigerate for at least 30 minutes.
- Prepare the Pastry: Preheat your oven to 400°F (200°C). Roll out the puff pastry on a floured surface to a rectangle large enough to encase the beef. Remove the cling film from the beef and place it in the center of the pastry.
- Encase with Pastry: Brush the edges of the pastry with the egg wash. Fold the pastry over the beef, sealing the edges tightly and trimming any excess. Place seam-side down on a baking sheet.
- Bake the Wellington: Brush the entire pastry with the remaining egg wash. Use a sharp knife to score a decorative pattern on top, being careful not to cut through to the beef. Bake in the preheated oven for 25-30 minutes, or until the pastry is golden brown and crisp.
- Rest and Serve: Allow the Beef Wellington to rest for 10 minutes before slicing. Serve in thick slices, and enjoy the mouthwatering combination of flavors.
Extra Tips:
When preparing Beef Wellington, it’s vital to let each component cool completely before assembly to prevent the pastry from becoming soggy.
Using cling film to tightly wrap the beef helps maintain its shape and guarantees even cooking. If you’re short on time, you can prepare the mushroom duxelles and sear the beef a day ahead, storing them in the fridge until you’re ready to assemble.
For a perfect finish, don’t forget to score the pastry lightly, as this will help the steam escape and promote a crispy crust.
Chestnut and Sage Stuffed Chicken
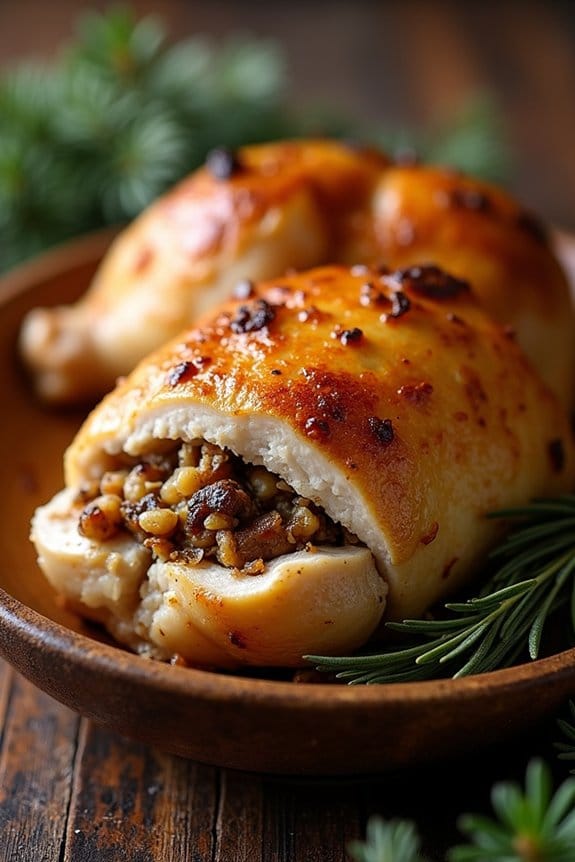
Chestnut and Sage Stuffed Chicken is a delightful main dish perfect for a festive Christmas party. The combination of tender chicken, savory chestnuts, and aromatic sage creates a mouthwatering experience that’s certain to impress your guests. This dish not only looks impressive but is also rich in flavors, capturing the essence of a cozy holiday feast.
The stuffing, which includes a harmonious blend of chestnuts, breadcrumbs, and herbs, enhances the chicken’s natural flavors, creating a succulent main course that pairs well with any side dishes you choose to serve.
This recipe is designed for 4-6 people, making it ideal for a small gathering or family dinner. By preparing this dish, you’ll not only enjoy the process of creating a memorable meal but also experience the joy of bringing people together over a deliciously prepared chicken. The stuffing can easily be adjusted to suit different tastes, allowing for a personal touch that can make this recipe a family favorite for years to come.
Ingredients (Serves 4-6):
- 1 whole chicken (about 4-5 pounds)
- 2 cups cooked and peeled chestnuts, roughly chopped
- 1 cup breadcrumbs
- 1 small onion, finely chopped
- 2 cloves garlic, minced
- 1/4 cup fresh sage leaves, chopped
- 1/2 teaspoon dried thyme
- 1 tablespoon olive oil
- 1 egg, lightly beaten
- Salt and pepper to taste
- 1/4 cup chicken broth
- 2 tablespoons melted butter
Cooking Instructions:
- Preheat the Oven: Begin by preheating your oven to 375°F (190°C). This guarantees that the chicken cooks evenly once it’s placed inside.
- Prepare the Stuffing: In a large skillet, heat the olive oil over medium heat. Add the chopped onion and garlic, and sauté until the onion becomes translucent. Add the chopped chestnuts, breadcrumbs, sage, and thyme. Stir the mixture well to combine all the ingredients. Cook for an additional 2-3 minutes until the breadcrumbs are lightly toasted.
- Mix the Stuffing: Remove the skillet from heat and transfer the mixture to a large bowl. Add the beaten egg, salt, and pepper, and mix thoroughly until the ingredients are well combined. If the mixture is too dry, gradually add the chicken broth until it reaches a moist but firm consistency.
- Stuff the Chicken: Carefully loosen the skin of the chicken without tearing it, then stuff the chestnut-sage mixture under the skin and into the cavity of the chicken. Use kitchen twine to tie the legs together, guaranteeing the stuffing remains inside during cooking.
- Season the Chicken: Rub the melted butter over the skin of the chicken and season with additional salt and pepper. This will help create a crispy, flavorful skin.
- Roast the Chicken: Place the stuffed chicken in a roasting pan and cover it loosely with aluminum foil. Roast in the preheated oven for approximately 1.5 to 2 hours, or until the internal temperature reaches 165°F (74°C) when checked with a meat thermometer. Remove the foil during the last 30 minutes to allow the skin to brown beautifully.
- Rest and Serve: Once done, remove the chicken from the oven and let it rest for 10-15 minutes before carving. This helps the juices redistribute, making the meat tender and juicy.
Extra Tips:
When preparing the Chestnut and Sage Stuffed Chicken, make sure to taste the stuffing before adding it to the chicken to verify the seasoning is to your liking. If you prefer a more pronounced sage flavor, feel free to increase the amount slightly.
Additionally, consider spatchcocking the chicken before roasting if you desire a quicker cooking time and more evenly roasted skin. Finally, serving the chicken with a side of roasted vegetables or a light salad will balance the richness of the dish, providing a delightful contrast to the earthy flavors of the stuffing.
Vegetarian Mushroom Wellington
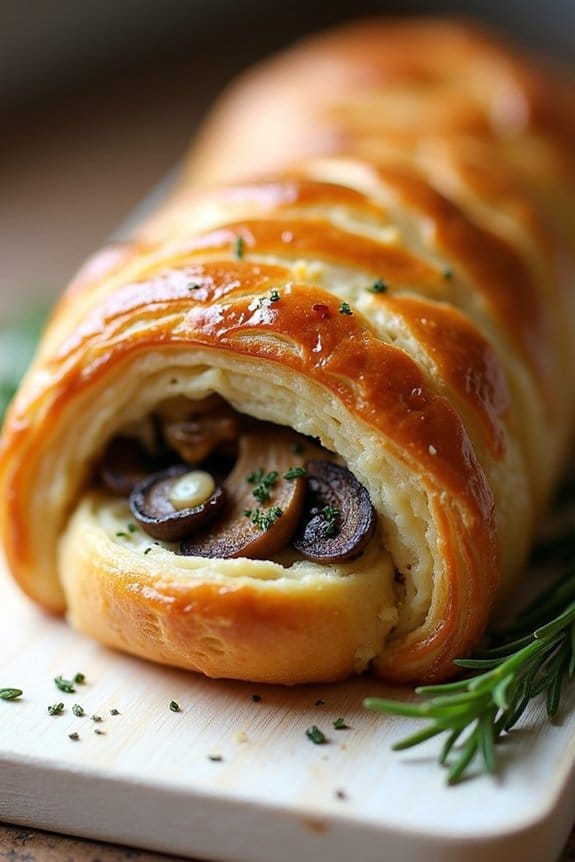
Impress your guests this holiday season with a delicious and elegant Vegetarian Mushroom Wellington. This dish is a plant-based take on the classic beef Wellington, showcasing a flaky puff pastry wrapped around a rich, savory mushroom filling. The umami-rich mushrooms combined with aromatic herbs and a touch of creaminess from goat cheese create a harmonious balance of flavors, making it a perfect main dish for your Christmas party.
Not only is it visually stunning, but it also caters to vegetarians and meat-eaters alike, making it a versatile and crowd-pleasing choice for your festive gathering. The preparation and cooking process of the Vegetarian Mushroom Wellington is straightforward, though it does require some attention to detail to guarantee the filling is perfectly seasoned and the pastry is golden and crisp.
This recipe serves 4-6 people, making it ideal for a small to medium-sized holiday gathering. By following the instructions carefully, you’ll achieve a delightful dish that will surely become a holiday favorite.
Ingredients for 4-6 Servings:
- 2 tablespoons olive oil
- 1 onion, finely chopped
- 3 cloves garlic, minced
- 500g mixed mushrooms, finely chopped
- 1 teaspoon fresh thyme leaves
- 1 teaspoon fresh rosemary, chopped
- Salt and pepper, to taste
- 2 tablespoons soy sauce
- 2 tablespoons breadcrumbs
- 100g goat cheese, crumbled (optional)
- 1 sheet puff pastry, thawed
- 1 egg, beaten (for egg wash)
- 1 tablespoon Dijon mustard
- Flour, for dusting
Cooking Instructions:
- Prepare the Filling:
- Heat olive oil in a large skillet over medium heat. Add the chopped onion and garlic, and sauté until the onion becomes translucent, about 3-4 minutes.
- Add the finely chopped mushrooms to the skillet. Cook, stirring occasionally, until the mushrooms release their moisture and begin to brown, approximately 10-12 minutes.
- Stir in thyme, rosemary, soy sauce, salt, and pepper. Cook for another 2-3 minutes until the mixture is fragrant. Remove from heat and let it cool slightly.
- Once cooled, mix in breadcrumbs and crumbled goat cheese, if using. This will help bind the filling together.
- Assemble the Wellington:
- Preheat your oven to 200°C (390°F).
- On a lightly floured surface, roll out the puff pastry to a rectangle large enough to encase the mushroom filling.
- Spread Dijon mustard evenly over the pastry, leaving a 1-inch border around the edges.
- Spoon the mushroom mixture onto the center of the pastry, shaping it into a log. Guarantee it’s tightly packed and even.
- Carefully fold the pastry over the filling, sealing the edges by pressing them together. Use a fork to crimp the edges for a decorative touch.
- Bake the Wellington:
- Transfer the wrapped Wellington onto a baking sheet lined with parchment paper, seam side down.
- Brush the pastry with beaten egg to give it a rich golden color.
- Using a sharp knife, lightly score the top of the pastry to allow steam to escape and create a decorative pattern.
- Bake in the preheated oven for 25-30 minutes, or until the pastry is golden brown and crisp.
- Serve:
- Remove from oven and let it rest for a few minutes before slicing.
- Serve warm, garnished with additional fresh thyme or rosemary if desired.
Extra Tips:
To enhance the flavor of the mushroom filling, consider adding a splash of balsamic vinegar or red wine during cooking. Guarantee that the mushroom mixture isn’t too wet before assembling the Wellington, as excess moisture can make the pastry soggy.
If you prefer a vegan version, replace goat cheese with a vegan cheese alternative and use a plant-based milk wash instead of egg wash for the pastry. Pre-cooked lentils can also be added to the mushroom mix for extra texture and protein. Enjoy your festive feast!
Baked Ziti With Sausage and Ricotta
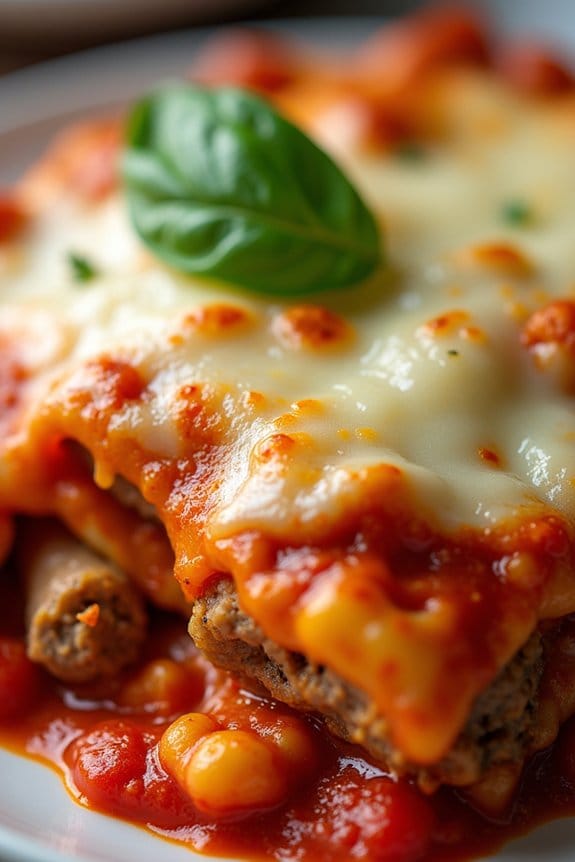
Baked Ziti With Sausage and Ricotta is a classic Italian-American dish that’s perfect for a Christmas party. This comforting and hearty main dish combines the robust flavors of Italian sausage, creamy ricotta, and tangy tomato sauce, all layered with al dente pasta and melted cheese.
It’s a crowd-pleaser that can be prepared in advance, making it an ideal choice for a festive gathering where you want to spend more time with your guests and less time in the kitchen.
The dish isn’t only delicious but also visually appealing with its golden, bubbling cheese top. The layers of ziti, sauce, and cheese create a harmonious blend of textures and flavors that will have your guests asking for seconds.
Baked Ziti With Sausage and Ricotta serves 4-6 people, making it a great option for a small to medium-sized gathering. With the right balance of ingredients, this dish is sure to become a staple at your holiday celebrations.
Ingredients for 4-6 servings:
- 1 pound ziti pasta
- 1 tablespoon olive oil
- 1 pound Italian sausage, casing removed
- 3 cloves garlic, minced
- 1 teaspoon dried oregano
- 1/2 teaspoon red pepper flakes (optional)
- 1 jar (24 ounces) marinara sauce
- 1 cup ricotta cheese
- 1 cup shredded mozzarella cheese
- 1/2 cup grated Parmesan cheese
- 1 handful fresh basil leaves, chopped
- Salt and pepper, to taste
Cooking Instructions:
- Preheat the Oven: Start by preheating your oven to 375°F (190°C). This guarantees that your baked ziti will cook evenly and develop a golden crust.
- Cook the Pasta: Bring a large pot of salted water to a boil. Add the ziti pasta and cook until just al dente, according to package instructions. Drain the pasta and set aside.
- Prepare the Sausage: In a large skillet, heat the olive oil over medium heat. Add the sausage and cook, breaking it apart with a spoon, until browned and cooked through, about 5-7 minutes.
- Add Aromatics and Sauce: Stir in the minced garlic, oregano, and red pepper flakes (if using) into the sausage. Cook for another 1-2 minutes until fragrant. Pour in the marinara sauce, stir well, and let it simmer for about 5 minutes. Season with salt and pepper to taste.
- Combine Pasta and Sauce: In a large mixing bowl, combine the cooked ziti, sausage sauce, ricotta cheese, and half of the mozzarella cheese. Mix until all ingredients are evenly distributed.
- Assemble the Dish: Spread half of the ziti mixture into a 9×13-inch baking dish. Sprinkle half of the Parmesan cheese over the top. Add the remaining ziti mixture and top with the rest of the mozzarella and Parmesan cheeses.
- Bake the Ziti: Cover the dish with aluminum foil and bake in the preheated oven for 20 minutes. Remove the foil and bake for an additional 10-15 minutes, or until the cheese is melted and bubbly.
- Garnish and Serve: Remove the dish from the oven and let it cool for a few minutes. Garnish with fresh basil leaves before serving.
Extra Tips:
When making Baked Ziti With Sausage and Ricotta, consider using a combination of sweet and spicy Italian sausages for a more complex flavor profile.
You can also prepare the dish a day in advance and refrigerate it; just add an extra 5-10 minutes to the baking time if it’s coming straight from the fridge.
For a crispier top, finish the dish under the broiler for a minute or two before serving. Finally, feel free to customize the recipe by adding vegetables like spinach or bell peppers for added nutrition and flavor.
Duck À L’orange
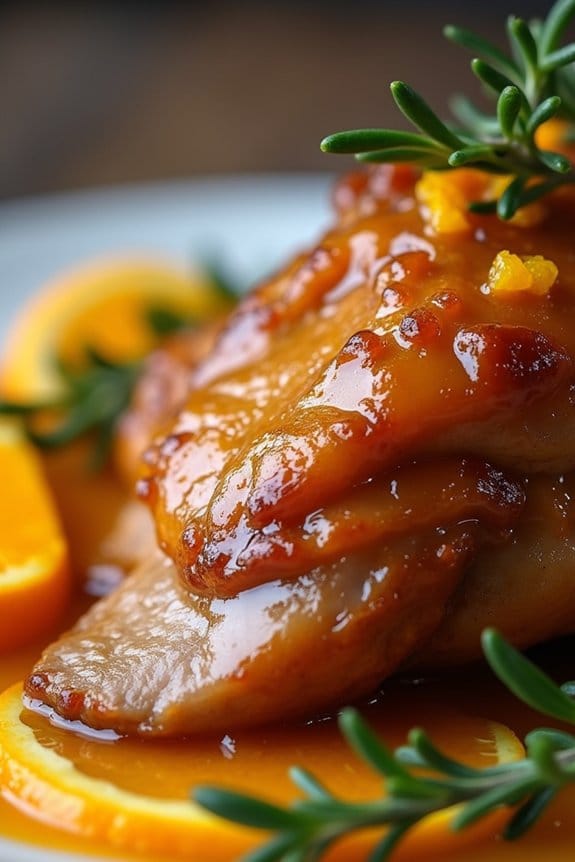
Duck À L’orange is a classic French dish that combines the rich, savory flavors of duck with the sweet, tangy taste of orange sauce. This elegant dish is perfect for a Christmas party, providing a sophisticated and delicious main course that will impress your guests. The duck is roasted until the skin is crispy and golden brown, while the meat remains tender and juicy. The orange sauce, made from fresh oranges, adds a delightful citrusy glaze that complements the richness of the duck perfectly.
Preparing Duck À L’orange is easier than it sounds, and with a little attention to detail, you can create a restaurant-quality dish in your own kitchen. The key is to use high-quality ingredients and to take your time with each step of the cooking process. This recipe serves 4-6 people, making it an ideal choice for a holiday gathering. Serve it with some roasted vegetables or a fresh salad to complete the meal.
Ingredients (for 4-6 servings):
- 1 whole duck (about 5-6 pounds)
- Salt and pepper
- 4 oranges (2 for juice and zest, 2 peeled and segmented)
- 1/4 cup granulated sugar
- 1/4 cup white wine vinegar
- 1 cup chicken stock
- 2 tablespoons Grand Marnier or other orange liqueur
- 1 tablespoon cornstarch mixed with 2 tablespoons water
- Fresh thyme sprigs (for garnish)
Cooking Instructions:
- Prepare the Duck: Preheat your oven to 400°F (200°C). Pat the duck dry with paper towels, and season it generously with salt and pepper, both inside and out. Place the duck on a rack in a roasting pan, breast side up.
- Roast the Duck: Roast the duck in the preheated oven for about 1 hour and 30 minutes, or until the skin is crispy and the internal temperature reaches 165°F (74°C). Baste the duck occasionally with its own juices to enhance the flavor and crispness.
- Make the Orange Sauce: While the duck is roasting, zest and juice two oranges. In a saucepan, combine the orange zest, orange juice, sugar, and white wine vinegar. Bring the mixture to a simmer over medium heat until the sugar dissolves.
- Add Stock and Liqueur: Add the chicken stock and Grand Marnier to the orange sauce, and continue to simmer until the sauce reduces slightly and thickens. This should take about 10-15 minutes.
- Thicken the Sauce: Stir in the cornstarch and water mixture, and cook for another 2-3 minutes until the sauce thickens to your desired consistency. Remove from heat.
- Finish the Duck: Once the duck is cooked, remove it from the oven and let it rest for 10-15 minutes before carving. This allows the juices to redistribute throughout the meat.
- Serve: Carve the duck and arrange it on a serving platter. Drizzle with the orange sauce, and garnish with orange segments and fresh thyme sprigs. Serve immediately.
Extra Tips:
When cooking Duck À L’orange, it’s important to let the duck rest after roasting to guarantee it remains juicy. For a deeper flavor, consider marinating the duck overnight with some of the orange juice and zest.
If you prefer a thicker sauce, simply adjust the amount of cornstarch used. Additionally, if you don’t have Grand Marnier, you can substitute it with another orange-flavored liqueur or even a splash of brandy. Enjoy your festive dish!
Slow-Cooked Red Wine Braised Short Ribs
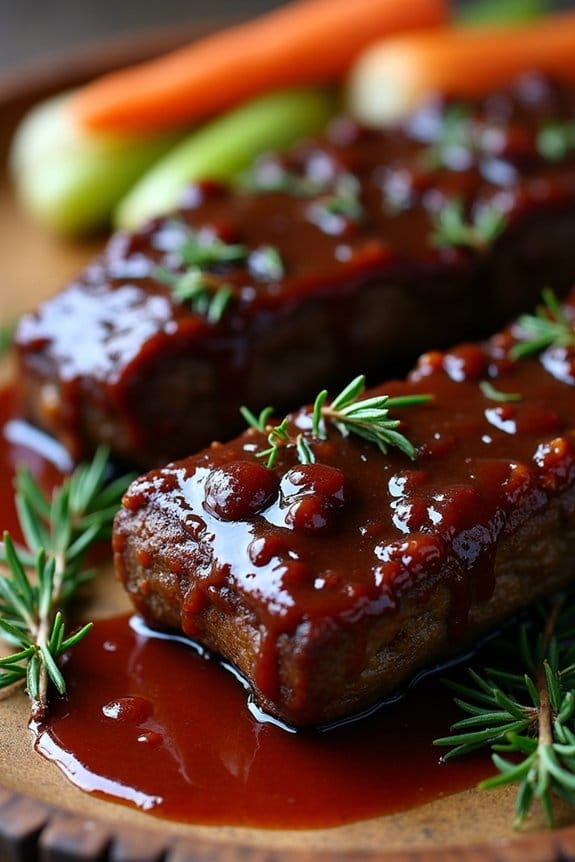
Slow-Cooked Red Wine Braised Short Ribs is an elegant and comforting dish perfect for a Christmas party. The tender, fall-off-the-bone beef is infused with the rich flavors of red wine, herbs, and aromatic vegetables, making it a standout main course for any festive gathering. This dish not only fills the house with a tantalizing aroma as it cooks but also provides a hearty and satisfying meal that pairs beautifully with a variety of side dishes.
The beauty of this recipe is in its simplicity and the depth of flavor it develops over time. The short ribs are seared to lock in their juices, then slowly braised in a robust red wine and beef stock mixture which allows the meat to become incredibly tender. The braising liquid reduces into a luxurious sauce that perfectly complements the richness of the ribs. This dish can be prepared in advance, making it ideal for stress-free holiday entertaining.
Ingredients (Serves 4-6):
- 4 pounds bone-in beef short ribs
- Salt and freshly ground black pepper
- 2 tablespoons olive oil
- 1 large onion, chopped
- 2 carrots, peeled and chopped
- 2 celery stalks, chopped
- 4 cloves garlic, minced
- 3 tablespoons tomato paste
- 1 bottle (750ml) dry red wine
- 2 cups beef stock
- 4 sprigs fresh thyme
- 2 sprigs fresh rosemary
- 2 bay leaves
Cooking Instructions:
- Preheat and Prepare: Preheat your oven to 325°F (160°C). Season the short ribs generously with salt and pepper on all sides.
- Sear the Ribs: In a large Dutch oven or heavy pot, heat the olive oil over medium-high heat. Add the short ribs in batches, making sure not to overcrowd the pot, and sear them on all sides until they’re nicely browned, about 2-3 minutes per side. Remove the ribs and set aside on a plate.
- Sauté the Vegetables: In the same pot, add the chopped onion, carrots, and celery. Cook, stirring occasionally, until the vegetables are softened and lightly browned, about 5 minutes. Add the minced garlic and tomato paste, and cook for an additional 1-2 minutes until the tomato paste darkens slightly.
- Deglaze with Wine: Pour the red wine into the pot, scraping up any browned bits from the bottom. Bring the wine to a boil and let it reduce by half, which should take about 10 minutes.
- Add Stock and Herbs: Once the wine is reduced, return the short ribs to the pot. Add the beef stock, thyme, rosemary, and bay leaves. The liquid should almost cover the ribs. Bring the mixture to a simmer.
- Braise in the Oven: Cover the pot with a lid and transfer it to the preheated oven. Allow the ribs to braise for 2.5 to 3 hours, or until the meat is tender and easily pulls away from the bone.
- Finish and Serve: Remove the pot from the oven. Carefully take out the ribs and place them on a serving platter. Strain the braising liquid, discarding the solids, and return the liquid to the pot. Simmer until slightly thickened to a sauce-like consistency. Spoon the sauce over the ribs before serving.
Extra Tips:
To enhance the flavor, consider preparing the dish a day in advance and refrigerating it overnight. This allows the flavors to meld and intensify, and the fat can be easily removed once chilled.
When reheating, gently warm the ribs and sauce over low heat until heated through. Additionally, choose a quality dry red wine such as Cabernet Sauvignon or Merlot to guarantee the sauce is rich and flavorful.
Pair the short ribs with mashed potatoes, polenta, or a crusty bread to soak up the delicious sauce.
Festive Seafood Paella
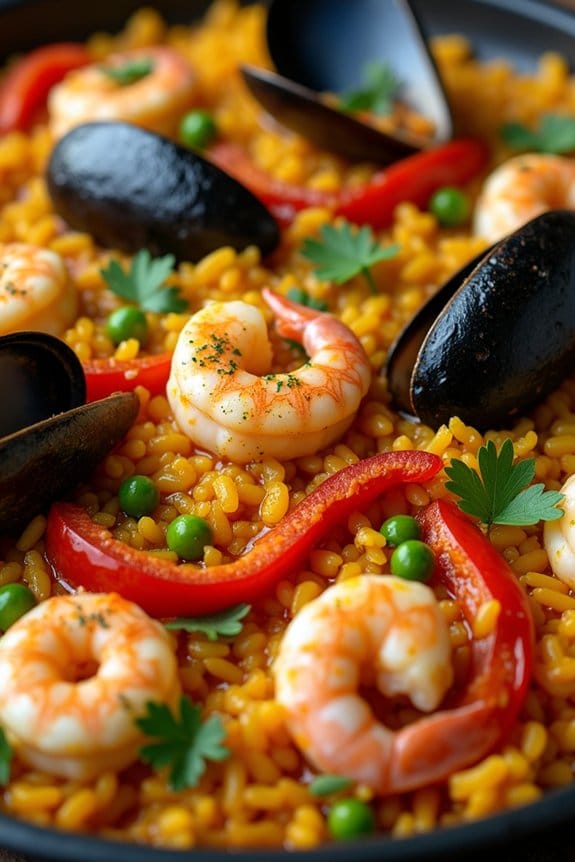
Seafood paella is a vibrant and flavorful dish that combines the richness of the sea with the aromatic spices of Spain. Perfect for a Christmas party, this festive seafood paella will add an exotic touch to your holiday feast. The dish is known for its beautiful presentation, with saffron-infused rice and an assortment of colorful seafood and vegetables. Not only is it a treat for the taste buds, but it also offers a delightful visual appeal that will impress your guests.
This recipe is designed for a serving size of 4-6 people, making it perfect for a small gathering of family and friends. The key to a successful paella is using the freshest seafood available and allowing the flavors to meld together over a gentle heat. By following these steps, you can create a delicious and authentic paella that brings a taste of Spain to your Christmas celebration.
Ingredients (Serves 4-6):
- 2 cups Bomba or Arborio rice
- 1/2 teaspoon saffron threads
- 4 cups fish or seafood stock
- 1/2 cup dry white wine
- 2 tablespoons olive oil
- 1 onion, finely chopped
- 4 cloves garlic, minced
- 1 red bell pepper, diced
- 1 cup green peas
- 1 pound mussels, cleaned and debearded
- 1 pound clams, cleaned
- 1/2 pound large shrimp, peeled and deveined
- 1/2 pound squid rings
- 1 teaspoon smoked paprika
- Salt and pepper to taste
- 2 tablespoons chopped fresh parsley
- Lemon wedges for serving
Cooking Instructions:
- Prepare the Saffron Stock: Warm the fish or seafood stock in a saucepan. Add the saffron threads, letting them infuse in the warm stock for about 5 minutes. This step is essential as the saffron will impart a beautiful golden color and unique flavor to the rice.
- Cook the Aromatics: In a large paella pan or a wide skillet, heat the olive oil over medium heat. Add the chopped onion and garlic, sautéing until they become translucent and fragrant. Stir in the diced red bell pepper and continue to cook for another 2-3 minutes until the vegetables are softened.
- Toast the Rice: Add the rice to the pan, stirring it well with the vegetables to coat the grains in the oil. Toast the rice for about 2 minutes until it becomes slightly translucent at the edges.
- Deglaze and Simmer: Pour in the white wine, stirring to deglaze the pan and scrape any stuck bits from the bottom. Let the wine reduce by half before adding the saffron-infused stock and smoked paprika. Season with salt and pepper to taste.
- Cook the Paella: Bring the mixture to a gentle simmer and cook, without stirring, for about 15 minutes until the rice has absorbed most of the liquid. Adjust the heat as needed to maintain a gentle simmer.
- Add the Seafood: Arrange the mussels, clams, shrimp, and squid over the rice. Press them slightly into the rice. Cover the pan with a lid or foil and continue to cook for another 10 minutes until the seafood is cooked through and the shellfish have opened.
- Finish with Peas and Parsley: Sprinkle the green peas over the top and cover again, cooking for an additional 2 minutes. Once done, remove from heat and let it rest for 5 minutes. Garnish with fresh parsley and serve with lemon wedges.
Extra Tips:
Ensure all your seafood is as fresh as possible for the best flavor and texture. If some of the mussels or clams don’t open after cooking, discard them as this indicates they weren’t alive when cooked.
Using a paella pan is ideal for even cooking, but a wide skillet can work in a pinch. Finally, resist the urge to stir the rice once the stock is added, as this will help create the traditional crispy layer at the bottom known as “socarrat.”
Enjoy your festive seafood paella with a crisp white wine or a revitalizing sangria for a true Spanish holiday experience.
