

As the holiday season approaches, I’m already dreaming about the sweet treats that will grace our Christmas party table. Peppermint bark brownies and gingerbread cookie trifles are just the beginning. With these 15 dessert recipes, there’s something to captivate every guest. Each creation is a delightful combination of flavors and presentation. I can’t wait to share more about each delicious treat!
Peppermint Bark Brownies
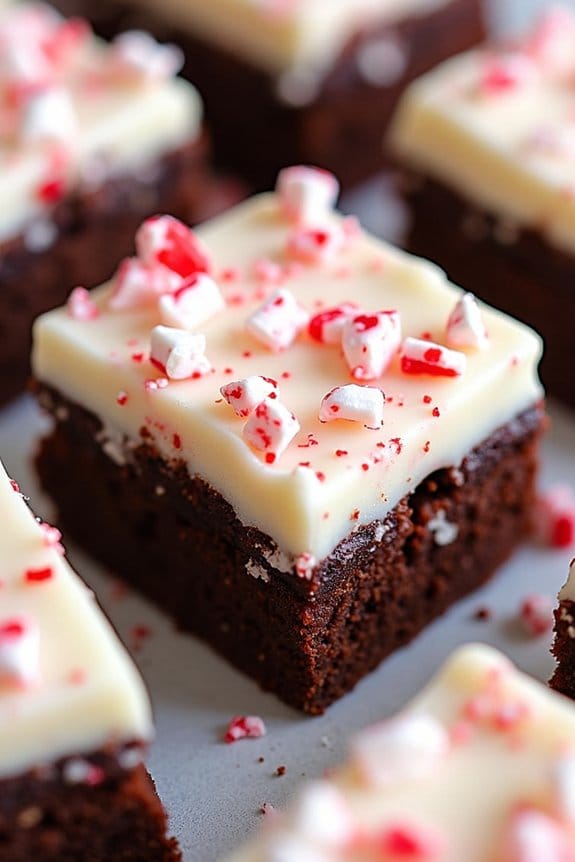
Indulge in a festive treat with these decadent Peppermint Bark Brownies, the perfect dessert for your Christmas party. Combining rich, fudgy brownies with the invigorating crunch of peppermint bark, this dessert offers a delightful contrast of textures and flavors. The brownies are dense and chocolatey, topped with smooth white chocolate and sprinkled with crushed peppermint candy, making each bite a holiday delight.
These Peppermint Bark Brownies aren’t only delicious but also visually appealing, with a snowy white top speckled with red candy pieces. Serve them as a sweet finish to your Christmas feast or wrap them up as a thoughtful edible gift for friends and family. This recipe yields enough brownies to serve 4-6 people, guaranteeing everyone gets to enjoy a piece of holiday cheer.
Ingredients:
- 1 cup unsalted butter
- 2 cups granulated sugar
- 4 large eggs
- 1 teaspoon vanilla extract
- 1 cup all-purpose flour
- 1 cup unsweetened cocoa powder
- 1/2 teaspoon salt
- 1/2 teaspoon baking powder
- 8 ounces white chocolate, melted
- 1 cup crushed peppermint candies
Cooking Instructions:
- Preheat and Prepare Pan: Preheat your oven to 350°F (175°C). Line an 8×8 inch baking pan with parchment paper, leaving some overhang on the sides for easy removal.
- Melt Butter: In a medium saucepan, melt the butter over low heat. Once melted, remove from heat and let it cool slightly.
- Mix Wet Ingredients: In a large mixing bowl, combine the melted butter and sugar. Whisk in the eggs one at a time, making sure each is fully incorporated before adding the next. Stir in the vanilla extract.
- Combine Dry Ingredients: In a separate bowl, sift together the flour, cocoa powder, salt, and baking powder.
- Combine Mixtures: Gradually add the dry ingredients to the wet ingredients, stirring until just combined. Be careful not to overmix, as this can lead to tough brownies.
- Bake Brownies: Pour the brownie batter into the prepared pan, spreading it evenly. Bake in the preheated oven for 25-30 minutes, or until a toothpick inserted into the center comes out with only a few crumbs attached.
- Cool and Add Topping: Allow the brownies to cool completely in the pan on a wire rack. Once cooled, pour the melted white chocolate over the top, spreading it evenly with a spatula.
- Add Peppermint: Sprinkle the crushed peppermint candies over the white chocolate before it sets. Gently press down to make sure they adhere.
- Set and Serve: Let the topping set at room temperature or chill in the refrigerator for quicker setting. Once set, lift the brownies out of the pan using the parchment paper overhang, cut into squares, and serve.
Extra Tips:
When making these Peppermint Bark Brownies, confirm that the white chocolate is completely melted and smooth before spreading it over the brownies to achieve an even layer.
If you prefer a stronger peppermint flavor, you can add a drop of peppermint extract to the brownie batter. For a festive touch, use a combination of red and green peppermint candies.
Finally, store any leftovers in an airtight container to keep them fresh for up to a week.
Gingerbread Cookie Trifle
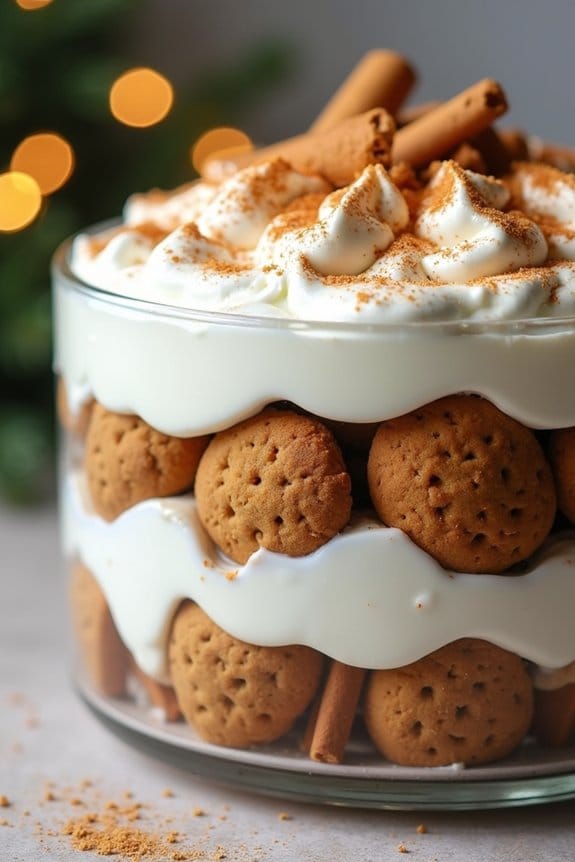
Gingerbread Cookie Trifle is a delightful dessert that brings warmth and festive cheer to any Christmas party. This layered dessert combines the rich, spicy flavors of gingerbread cookies with creamy layers of whipped cream and a touch of tang from cream cheese. Perfect for those who love a good trifle, this dessert isn’t only delicious but also visually appealing, with layers of contrasting colors and textures.
Serve it in a large trifle bowl for a beautiful centerpiece, or in individual cups for a more personal touch. Ideal for a serving size of 4-6 people, the Gingerbread Cookie Trifle can be prepared ahead of time, making it a convenient option for holiday gatherings. The gingerbread cookies add a nice crunch, while the creamy layers bring a smooth contrast, and the hint of spices like cinnamon and nutmeg evoke the essence of the holiday season.
This dessert is sure to impress your guests and add a touch of sweetness to your Christmas celebrations.
Ingredients:
- 12-15 gingerbread cookies
- 2 cups heavy whipping cream
- 1/4 cup powdered sugar
- 8 oz cream cheese, softened
- 1/2 cup brown sugar
- 1 teaspoon vanilla extract
- 1/2 teaspoon ground cinnamon
- 1/4 teaspoon ground nutmeg
- Optional garnish: crushed gingerbread cookies or cinnamon sticks
Cooking Instructions:
- Prepare the Whipped Cream: In a large mixing bowl, combine the heavy whipping cream and powdered sugar. Use an electric mixer to whip the cream until stiff peaks form. Set aside in the refrigerator to keep it chilled.
- Make the Cream Cheese Mixture: In another bowl, beat the softened cream cheese, brown sugar, and vanilla extract until smooth and creamy. Add in the ground cinnamon and nutmeg, and mix well to incorporate the spices evenly.
- Crush the Gingerbread Cookies: Place the gingerbread cookies in a ziplock bag and crush them using a rolling pin until they form coarse crumbs. These will serve as the base and top layers of your trifle.
- Assemble the Trifle: Begin by layering the bottom of your trifle bowl or individual serving cups with a layer of crushed gingerbread cookies. Follow with a layer of the cream cheese mixture, spreading it evenly. Add a layer of whipped cream on top. Repeat these layers until the container is filled or you run out of ingredients, finishing with a layer of whipped cream on top.
- Garnish: Optionally, sprinkle some additional crushed gingerbread cookies on top of the final whipped cream layer or decorate with a cinnamon stick for a festive touch.
- Chill Before Serving: Place the assembled trifle in the refrigerator for at least 2 hours to allow the flavors to meld and the trifle to set.
Extra Tips:
For an added depth of flavor, consider adding a tablespoon of molasses to the cream cheese mixture. This will enhance the gingerbread taste and provide a more authentic flavor profile.
If you prefer a more boozy dessert, you can drizzle a bit of spiced rum or brandy over the crushed gingerbread cookies before assembling the trifle. Additionally, using homemade gingerbread cookies will elevate the taste, but store-bought options work just as well for convenience.
Remember to serve the trifle chilled and enjoy the festive flavors with your loved ones!
Eggnog Cheesecake Bars
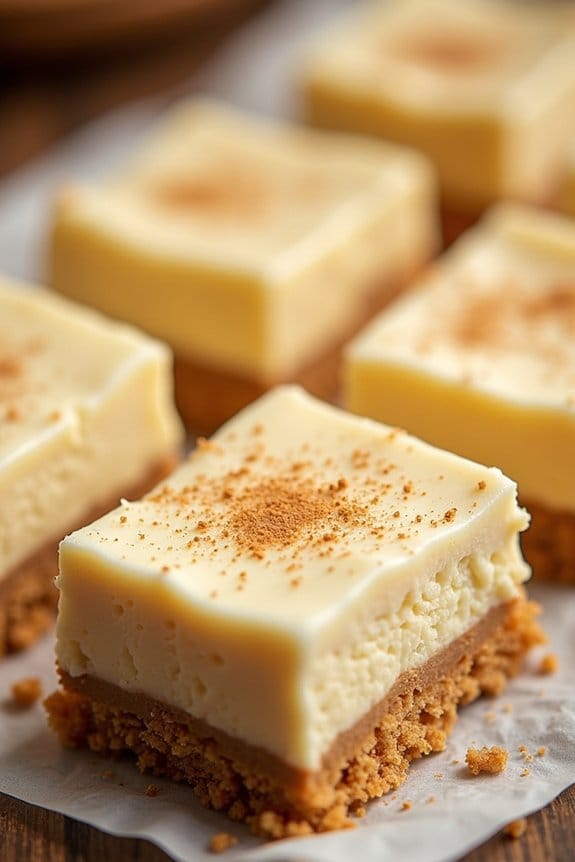
Eggnog Cheesecake Bars are a delightful twist on a traditional holiday favorite, combining the creamy richness of cheesecake with the festive flavors of eggnog. Perfect for a Christmas party or a cozy family gathering, these bars are certain to impress your guests with their smooth texture and warm spices.
The blend of nutmeg and cinnamon enhances the eggnog flavor, creating a dessert that’s both comforting and indulgent. Plus, the bar format makes them easy to serve and enjoy, whether you’re mingling at a party or enjoying a quiet evening at home.
These bars start with a buttery graham cracker crust, topped with a creamy eggnog cheesecake filling, and are finished with a sprinkle of nutmeg for an extra festive touch. They’re easy to make ahead of time, allowing you to focus on other holiday preparations.
Whether you’re an experienced baker or a novice in the kitchen, this recipe is straightforward and rewarding, guaranteeing you end up with perfectly creamy and flavorful bars every time.
Ingredients for Eggnog Cheesecake Bars (serving size: 4-6 people):
- 1 1/2 cups graham cracker crumbs
- 1/4 cup granulated sugar
- 1/2 cup unsalted butter, melted
- 16 oz cream cheese, softened
- 1 cup granulated sugar
- 3 large eggs
- 1 cup eggnog
- 1 tablespoon all-purpose flour
- 1 teaspoon vanilla extract
- 1/2 teaspoon ground nutmeg
- 1/4 teaspoon ground cinnamon
- Additional nutmeg for sprinkling (optional)
Cooking Instructions:
- Prepare the crust: Preheat your oven to 325°F (163°C). In a medium bowl, combine the graham cracker crumbs and 1/4 cup of sugar. Add the melted butter and mix until the crumbs are evenly moistened. Press the mixture firmly into the bottom of a 9×9-inch baking pan lined with parchment paper. Bake for 10 minutes, then remove from the oven and allow to cool.
- Make the cheesecake filling: In a large bowl, beat the softened cream cheese with 1 cup of sugar using an electric mixer until smooth and creamy. Add the eggs one at a time, mixing well after each addition.
- Add flavors: Gradually mix in the eggnog, flour, vanilla extract, nutmeg, and cinnamon. Beat on medium speed until the mixture is well combined and smooth.
- Assemble: Pour the cheesecake filling over the cooled crust, spreading it evenly with a spatula.
- Bake the cheesecake bars: Bake in the preheated oven for 40-45 minutes, or until the edges are set and the center is slightly jiggly. Avoid overbaking, as this can cause cracks in the cheesecake.
- Cool and chill: Remove from the oven and allow to cool at room temperature for about an hour. Once cooled, refrigerate for at least 3 hours or overnight for best results.
- Serve: Once chilled, cut into bars and sprinkle with additional nutmeg before serving, if desired.
Extra Tips:
When making Eggnog Cheesecake Bars, it’s important to ascertain that your cream cheese is fully softened to prevent lumps in the filling. For extra stability, you can line your baking pan with parchment paper, leaving an overhang on the sides to easily lift the bars out of the pan once chilled.
If you prefer a spicier bar, feel free to adjust the amount of nutmeg and cinnamon according to your taste. Remember that chilling the bars thoroughly will help achieve the best texture and flavor, so be sure to plan ahead. Enjoy your delightful holiday treat!
Chocolate Yule Log
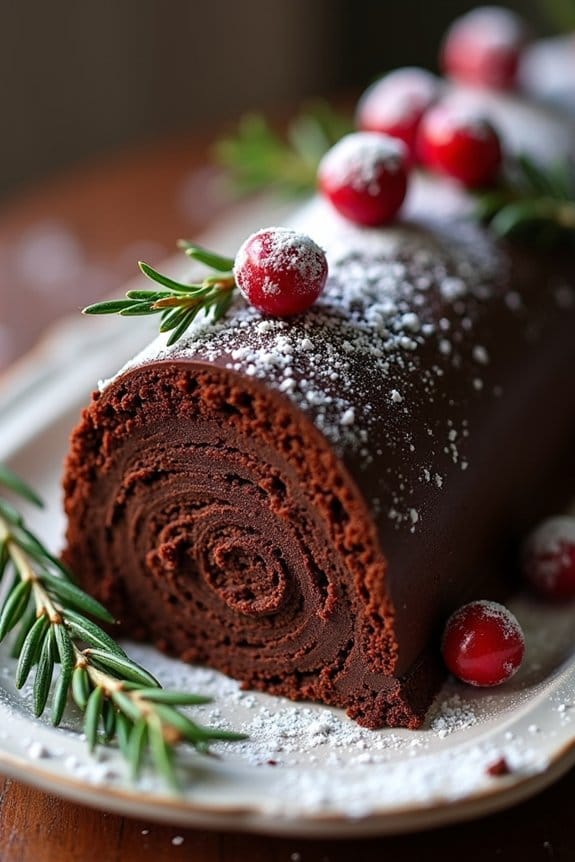
The Chocolate Yule Log, or Bûche de Noël as it’s traditionally known in France, is a classic Christmas dessert that adds a touch of elegance and festivity to any holiday gathering. This decadent dessert resembles a festive log and is often adorned with intricate decorations to enhance its visual appeal.
The rich chocolate sponge cake is rolled with a velvety chocolate filling and then frosted to perfection with chocolate ganache, mimicking the bark of a tree. This delightful dessert not only looks stunning but also offers a scrumptious combination of flavors and textures that are certain to impress your guests.
Whether you’re hosting a Christmas party or attending one, a Chocolate Yule Log is a show-stopping centerpiece that will make your dessert table stand out. Perfect for serving 4-6 people, this recipe is surprisingly simple to make, allowing you to create a professional-looking dessert in your own kitchen.
With just the right balance of sweetness and a hint of bitterness from the chocolate, this dessert is sure to become a holiday favorite. Gather your ingredients and follow the step-by-step instructions to create a Chocolate Yule Log that everyone will remember.
Ingredients (serving size: 4-6 people):
- 4 large eggs
- 1/2 cup granulated sugar
- 1/3 cup all-purpose flour
- 1/4 cup unsweetened cocoa powder
- 1 teaspoon baking powder
- 1/4 teaspoon salt
- 1/2 teaspoon vanilla extract
- 1/2 cup heavy cream
- 1 cup dark chocolate, chopped
- 3 tablespoons butter, softened
- Powdered sugar for dusting
- Christmas decorations (optional)
Instructions:
- Preheat and Prepare: Preheat your oven to 350°F (175°C). Line a 10×15-inch jelly roll pan with parchment paper, guaranteeing it covers the sides for easy cake removal.
- Make the Sponge Cake: In a large mixing bowl, beat the eggs and sugar with an electric mixer until thick and pale, about 5 minutes. Gently fold in the flour, cocoa powder, baking powder, and salt until well combined. Add the vanilla extract and mix until just incorporated.
- Bake the Cake: Pour the batter evenly into the prepared pan, spreading it to the edges. Bake for 10-12 minutes, or until the cake springs back when lightly touched.
- Roll the Cake: Once baked, immediately turn the cake out onto a clean kitchen towel dusted with powdered sugar. Peel off the parchment paper. Carefully roll the cake in the towel, starting from the short end, and let it cool completely.
- Prepare the Filling: In a small saucepan, heat the heavy cream over medium heat until it begins to simmer. Remove from heat and add the chopped chocolate, stirring until smooth. Let the mixture cool slightly before stirring in the softened butter.
- Assemble the Yule Log: Unroll the cooled cake and spread an even layer of the chocolate filling over the surface. Re-roll the cake, this time without the towel, and place it seam-side down on a serving platter.
- Frost the Yule Log: Spread the remaining chocolate filling over the rolled cake to create a bark-like texture. Use a fork to create wood grain patterns. Dust with powdered sugar for a snowy effect and garnish with festive decorations if desired.
Tips:
When making the Chocolate Yule Log, verify the cake is warm but not hot when rolling it in the towel; this helps prevent cracks. If cracks do occur, they can often be hidden with frosting.
For a richer flavor, consider adding a tablespoon of coffee to the chocolate filling. Allow the completed Yule Log to chill in the refrigerator for at least an hour before serving to let the flavors meld and guarantee clean slices when serving. Enjoy this delightful treat as a perfect ending to your festive meal!
Cranberry Pistachio Fudge
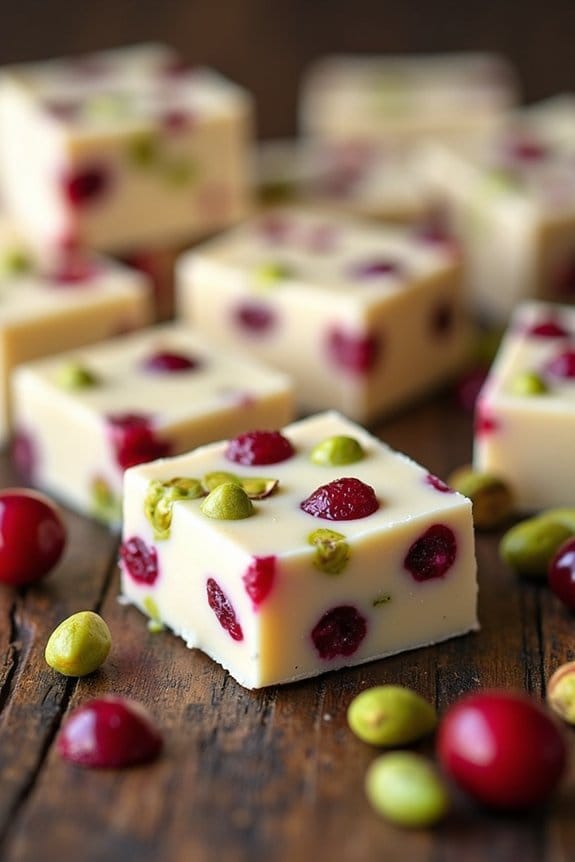
Cranberry Pistachio Fudge is a delightful treat that perfectly blends the tartness of cranberries with the rich, nutty flavor of pistachios, making it a quintessential holiday dessert. This fudge isn’t only delicious but also visually appealing, with its creamy white base speckled with vibrant red cranberries and green pistachios.
It’s a sweet indulgence that’s easy to prepare and certain to impress your guests at any Christmas party. This recipe is designed to serve 4-6 people, making it ideal for small gatherings or as a special treat for your family. The combination of sweet, tart, and crunchy elements makes this fudge a favorite for all ages.
With just a few simple steps, you can create a festive dessert that captures the essence of the holiday season.
Ingredients for 4-6 servings:
- 2 cups white chocolate chips
- 1 can (14 ounces) sweetened condensed milk
- 1 teaspoon vanilla extract
- 1/2 cup dried cranberries
- 1/2 cup shelled pistachios
- 1/4 teaspoon salt
Cooking Instructions:
- Prepare the Pan: Line an 8×8-inch square baking pan with parchment paper, leaving some overhang on the sides for easy removal later. This will prevent the fudge from sticking and make it easier to lift out once set.
- Melt the Chocolate: In a medium saucepan over low heat, combine the white chocolate chips and sweetened condensed milk. Stir continuously until the chocolate is completely melted and the mixture is smooth. Be careful not to overheat, as white chocolate can burn easily.
- Add Flavor: Remove the saucepan from heat and stir in the vanilla extract and salt. This will enhance the flavor of the fudge and balance the sweetness.
- Mix in the Add-Ins: Fold in the dried cranberries and pistachios, making sure they’re evenly distributed throughout the mixture. This will guarantee every bite has a mix of flavors and textures.
- Pour and Set: Pour the mixture into the prepared baking pan, spreading it evenly with a spatula. Gently press down to create an even surface.
- Chill: Place the pan in the refrigerator for at least 2 hours, or until the fudge is firm. This chilling time is essential for the fudge to set properly.
- Cut and Serve: Once set, lift the fudge out of the pan using the parchment overhang. Cut into small squares and serve. Store any leftovers in an airtight container in the refrigerator.
Extra Tips: When melting the chocolate, keep the heat low and stir continuously to prevent scorching. If you prefer a softer fudge, you can reduce the chilling time slightly, but make sure it’s firm enough to cut.
Feel free to experiment with other nuts or dried fruits for different flavor combinations, but keep the total quantity similar to maintain the fudge’s texture. Enjoy your Cranberry Pistachio Fudge as a festive treat or as a delightful homemade gift!
Sugar Cookie Christmas Trees

Sugar Cookie Christmas Trees are a delightful and festive treat perfect for any holiday gathering. These charming, tree-shaped cookies aren’t only visually appealing but also deliciously sweet and buttery. Made with a classic sugar cookie dough, these cookies are decorated with vibrant green icing and colorful sprinkles to resemble tiny Christmas trees. They make a wonderful addition to any dessert table and are certain to be a hit with both kids and adults alike.
Creating Sugar Cookie Christmas Trees is a fun and rewarding process that can easily be turned into a family activity. The recipe is simple enough for beginners, yet allows room for creativity in decoration. Whether you’re hosting a Christmas party or simply want to enjoy a festive baking session, these cookies will bring a touch of holiday magic to your kitchen.
Ingredients (serves 4-6 people):
- 2 3/4 cups all-purpose flour
- 1 teaspoon baking soda
- 1/2 teaspoon baking powder
- 1 cup unsalted butter, softened
- 1 1/2 cups granulated sugar
- 1 egg
- 1 teaspoon vanilla extract
- 1/2 teaspoon almond extract (optional)
- Green food coloring
- 2 cups powdered sugar
- 2-3 tablespoons milk
- Assorted sprinkles
Cooking Instructions:
- Prepare the Dough: In a medium-sized bowl, whisk together the flour, baking soda, and baking powder. In a separate large bowl, cream the softened butter and granulated sugar until smooth and creamy. Beat in the egg, vanilla extract, and almond extract (if using) until well combined.
- Combine Ingredients: Gradually add the dry ingredients to the butter mixture, mixing until a dough begins to form. Divide the dough into two portions, wrap in plastic wrap, and refrigerate for at least one hour. This chilling step is vital for preventing the cookies from spreading too much during baking.
- Shape the Cookies: Preheat your oven to 375°F (190°C) and line a baking sheet with parchment paper. Roll out one portion of the dough on a lightly floured surface to about 1/4 inch thickness. Use a tree-shaped cookie cutter to cut out the cookies and place them on the prepared baking sheet, spacing them about 2 inches apart.
- Bake the Cookies: Bake the cookies in the preheated oven for 8-10 minutes, or until they’re lightly golden around the edges. Remove from the oven and allow the cookies to cool on the baking sheet for 5 minutes before transferring them to a wire rack to cool completely.
- Decorate the Cookies: While the cookies are cooling, prepare the icing by mixing the powdered sugar, milk, and a few drops of green food coloring in a small bowl until smooth. Adjust the consistency by adding more milk or powdered sugar as needed. Once the cookies are completely cool, use a small spatula or piping bag to spread the green icing onto each cookie. Decorate with assorted sprinkles to resemble ornaments on the Christmas trees.
Extra Tips: When rolling out the dough, make sure that your surface and rolling pin are well-floured to prevent sticking. If you find the dough difficult to work with, return it to the refrigerator for a few minutes to firm up again. For perfectly even cookies, consider using a rolling pin with adjustable thickness rings.
Additionally, feel free to get creative with decorations—try using different colored icing or edible glitter for extra sparkle. Store the cookies in an airtight container to keep them fresh for up to a week. Enjoy your delicious Sugar Cookie Christmas Trees!
Spiced Apple Tart
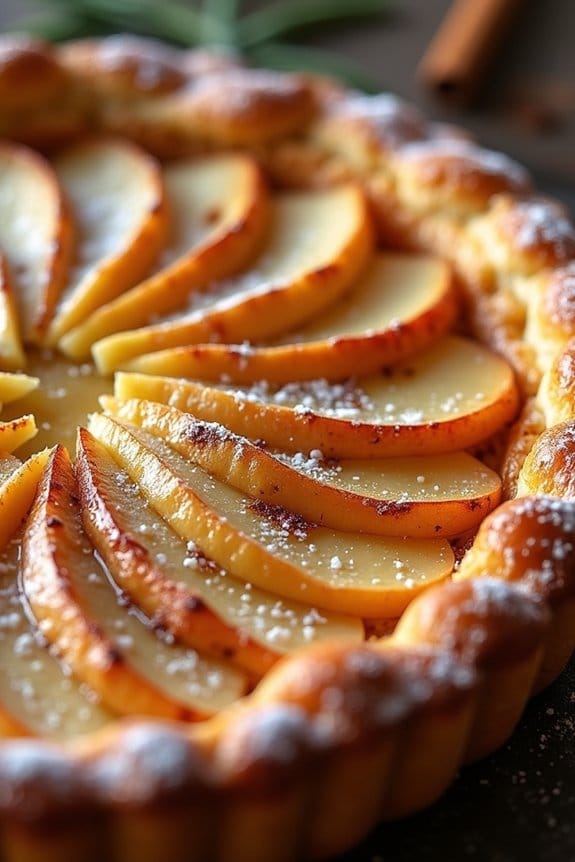
Spiced Apple Tart is a delightful dessert that brings the warmth and comfort of the holiday season to your table. This dessert combines the classic flavors of apples and cinnamon with a flaky pastry crust, making it the perfect finale to your Christmas party. The tart’s inviting aroma and rich taste will surely make it a favorite among your family and friends.
Whether you’re an experienced baker or a novice in the kitchen, this recipe is approachable and yields impressive results. The beauty of the Spiced Apple Tart lies in its simplicity and the way it highlights the natural sweetness of the apples, enhanced by a hint of spice. The buttery crust provides a satisfying crunch, while the tender apple filling offers a perfect balance of sweet and tart flavors.
The addition of spices such as cinnamon, nutmeg, and cloves elevates the dish, making it an unforgettable holiday treat. This recipe serves 4-6 people, making it ideal for a small gathering.
Ingredients (for 4-6 servings):
- 1 sheet of puff pastry, thawed
- 4 medium-sized apples (preferably Granny Smith or Honeycrisp)
- 1/2 cup granulated sugar
- 1 teaspoon ground cinnamon
- 1/4 teaspoon ground nutmeg
- 1/4 teaspoon ground cloves
- 1 tablespoon lemon juice
- 2 tablespoons unsalted butter, cut into small pieces
- 1 tablespoon all-purpose flour (for dusting)
- 1 egg, beaten (for egg wash)
- Powdered sugar (for dusting, optional)
Instructions:
- Preheat the Oven: Preheat your oven to 400°F (200°C). This will guarantee that the oven is at the right temperature when you’re ready to bake the tart.
- Prepare the Apples: Peel, core, and slice the apples into thin, even slices. Place the apple slices in a mixing bowl and toss them with lemon juice to prevent browning.
- Mix the Spices: In a small bowl, combine the granulated sugar, ground cinnamon, ground nutmeg, and ground cloves. Sprinkle this mixture over the apple slices and toss until the apples are evenly coated with the spices.
- Prepare the Puff Pastry: Lightly flour your work surface and roll out the puff pastry sheet to smooth out any creases. Transfer the pastry to a parchment-lined baking sheet.
- Assemble the Tart: Arrange the spiced apple slices in an overlapping pattern on top of the puff pastry, leaving about a 1-inch border around the edges. Dot the apples with small pieces of butter.
- Fold the Edges: Gently fold the edges of the pastry over the apples, creating a border. Brush the folded edges with the beaten egg to give the crust a golden color when baked.
- Bake the Tart: Place the assembled tart in the preheated oven and bake for 25-30 minutes, or until the pastry is golden brown and the apples are tender.
- Cool and Serve: Allow the tart to cool slightly before dusting it with powdered sugar, if desired. Serve warm or at room temperature.
Extra Tips:
To ascertain your Spiced Apple Tart is a success, choose apples that hold their shape well during baking, such as Granny Smith or Honeycrisp. These varieties offer a nice balance of sweetness and tartness.
If you prefer a sweeter tart, you can add a tablespoon of honey or maple syrup to the apple mixture before baking. For a more rustic appearance, don’t worry about making the apple slices perfectly uniform.
Finally, if you have leftovers, the tart can be stored in an airtight container in the refrigerator for up to two days, though it’s best enjoyed fresh.
Hot Chocolate Cupcakes
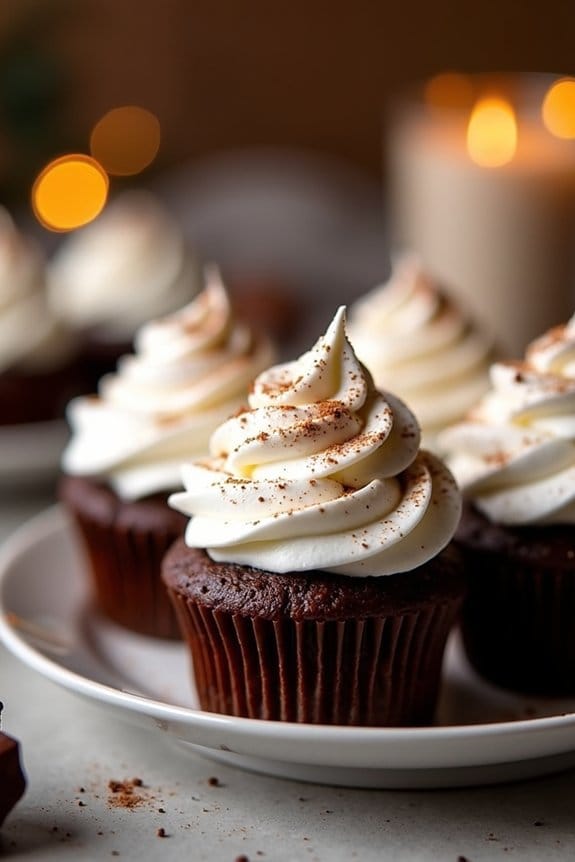
Hot Chocolate Cupcakes are the perfect dessert to bring a touch of warmth and sweetness to your Christmas party. These delightful cupcakes capture the rich, velvety taste of hot chocolate in a portable, bite-sized form. With a chocolatey base and a luscious marshmallow frosting, these cupcakes are sure to be a hit with both kids and adults alike.
Whether you’re hosting a holiday gathering or simply want to indulge in a festive treat, these cupcakes are a must-try.
The recipe for Hot Chocolate Cupcakes is straightforward, making it ideal for both novice bakers and seasoned dessert aficionados. Using simple ingredients that you likely already have in your pantry, you can whip up a batch of these delicious cupcakes in no time.
The key to their irresistible taste lies in using high-quality cocoa powder and chocolate, along with a touch of vanilla to enhance the flavors. To make the experience even more delightful, top each cupcake with a marshmallow frosting that mimics the soft, gooey marshmallows found in a cup of hot cocoa.
Ingredients (Serving Size: 4-6 people):
- 1 cup all-purpose flour
- 1/2 cup unsweetened cocoa powder
- 1 teaspoon baking powder
- 1/2 teaspoon baking soda
- 1/4 teaspoon salt
- 1/2 cup unsalted butter, softened
- 1 cup granulated sugar
- 2 large eggs
- 1 teaspoon vanilla extract
- 3/4 cup milk
- 1/2 cup semi-sweet chocolate chips
- 1 cup mini marshmallows
- 1/2 cup heavy cream
- 1 cup powdered sugar
Cooking Instructions:
- Preheat the Oven: Preheat your oven to 350°F (175°C) and line a 12-cup muffin tin with cupcake liners.
- Mix Dry Ingredients: In a medium bowl, whisk together the flour, cocoa powder, baking powder, baking soda, and salt. Set aside.
- Cream Butter and Sugar: In a large mixing bowl, beat the softened butter and granulated sugar together until light and fluffy, about 3-4 minutes.
- Add Eggs and Vanilla: Add the eggs one at a time, beating well after each addition. Mix in the vanilla extract.
- Combine Ingredients: Gradually add the dry ingredients to the butter mixture, alternating with the milk, starting and ending with the dry ingredients. Mix until just combined.
- Fold in Chocolate Chips: Gently fold in the semi-sweet chocolate chips until evenly distributed.
- Bake Cupcakes: Divide the batter evenly among the prepared cupcake liners, filling each about two-thirds full. Bake for 18-20 minutes, or until a toothpick inserted into the center comes out clean. Allow cupcakes to cool completely.
- Prepare Frosting: In a saucepan, heat the heavy cream over medium heat until it begins to simmer. Remove from heat and add the mini marshmallows, stirring until melted and smooth.
- Finish Frosting: Allow the marshmallow mixture to cool slightly, then transfer to a large mixing bowl. Gradually add the powdered sugar, beating until smooth and thick.
- Frost Cupcakes: Once the cupcakes are completely cooled, generously pipe or spread the marshmallow frosting onto each cupcake. Optionally, garnish with a sprinkle of cocoa powder or chocolate shavings.
Extra Tips:
For the best results, make sure all your ingredients are at room temperature before you start baking. This guarantees a smoother batter and more even baking.
If you’re a fan of extra chocolate, consider adding a chocolate ganache drizzle on top of the frosting for an additional layer of decadence.
To make the cupcakes look even more festive, decorate them with holiday-themed sprinkles or edible glitter.
Finally, if you want the marshmallow frosting to set more firmly, refrigerate the frosted cupcakes for about 15 minutes before serving.
Raspberry Linzer Cookies
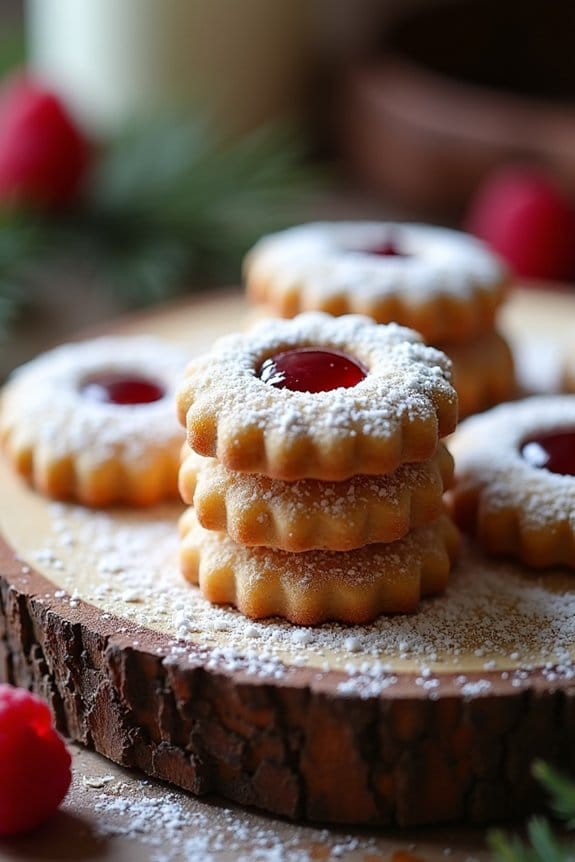
Raspberry Linzer Cookies are a delightful treat that bring a touch of elegance to any Christmas party dessert table. These traditional Austrian cookies are known for their buttery, nutty flavor and the sweet, tart contrast provided by the raspberry jam filling. The cookies are typically dusted with powdered sugar, creating a beautifully snowy appearance that’s perfect for the holiday season.
Whether you’re serving them after a festive dinner or gifting them to friends and family, Raspberry Linzer Cookies are bound to be a hit. The cookies are made by sandwiching a layer of raspberry jam between two almond-flavored cookies, with a cut-out on the top cookie to reveal the jam beneath. This recipe provides a serving size of 4-6 people, allowing everyone to enjoy these delectable treats.
The almond flour used in the dough gives the cookies a rich texture and flavor, while the raspberry jam adds a vibrant pop of color and sweetness. With just a bit of preparation and care, you can create these classic cookies with ease.
Ingredients (serving size: 4-6 people):
- 1 cup all-purpose flour
- 1 cup almond flour
- 1/2 teaspoon ground cinnamon
- 1/4 teaspoon salt
- 1/2 cup unsalted butter, softened
- 1/2 cup granulated sugar
- 1 large egg yolk
- 1 teaspoon vanilla extract
- 1/2 cup raspberry jam
- Powdered sugar for dusting
Cooking Instructions:
- Prepare the Dough: In a medium bowl, whisk together the all-purpose flour, almond flour, ground cinnamon, and salt. In a separate large bowl, beat the softened butter and granulated sugar with an electric mixer until light and fluffy, about 2-3 minutes. Add the egg yolk and vanilla extract to the butter mixture, beating until well combined.
- Combine and Chill: Gradually add the dry ingredients to the wet ingredients, mixing on low speed until a dough forms. Divide the dough in half, shape each half into a disk, wrap in plastic wrap, and refrigerate for at least 1 hour or until firm.
- Roll Out and Cut: Preheat the oven to 350°F (175°C) and line two baking sheets with parchment paper. On a lightly floured surface, roll out one disk of dough to about 1/8-inch thickness. Use a round cookie cutter to cut out circles, and a smaller cutter to create a window in the center of half of the circles. Repeat with the second disk of dough.
- Bake the Cookies: Arrange the cookies on the prepared baking sheets, making sure they’re spaced about 1 inch apart. Bake for 10-12 minutes or until the edges are lightly golden. Allow the cookies to cool completely on a wire rack.
- Assemble the Cookies: Spread about 1 teaspoon of raspberry jam on the flat side of each whole cookie. Place the windowed cookies on top to form a sandwich, pressing gently to adhere.
- Dust with Powdered Sugar: Just before serving, dust the tops of the cookies with powdered sugar for a festive finish.
Extra Tips: For the best flavor, use high-quality raspberry jam or even homemade if possible. Confirm that the dough is well-chilled before rolling out to prevent sticking and to maintain the cookies’ shape during baking. If the dough becomes too soft while working, simply pop it back into the refrigerator for a few minutes.
Additionally, experiment with different shapes for the cut-out window to add a personal touch to your cookies. Enjoy these Raspberry Linzer Cookies with a warm cup of tea or coffee for a cozy holiday treat.
Salted Caramel Pecan Tarts
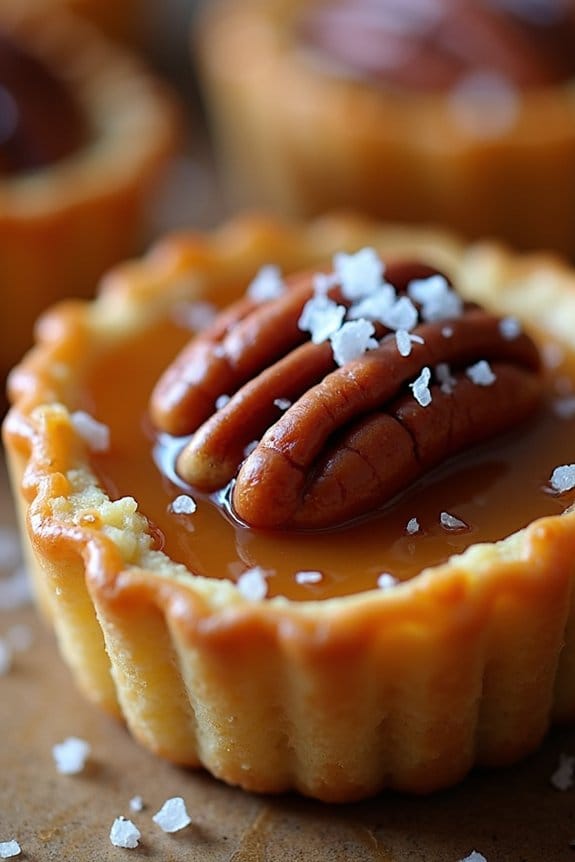
Salted Caramel Pecan Tarts are the perfect indulgent treat for your Christmas party. These tarts combine the buttery richness of pecans with the smooth, sweet, and salty allure of caramel. The combination of flavors is bound to impress your guests and provide a sweet ending to your festive gathering.
Whether you’re a seasoned baker or trying your hand at something new, these tarts are wonderfully satisfying and not overly complicated to prepare.
The base of these tarts is a simple yet delicious pastry crust that crisps up beautifully in the oven, creating the perfect vessel for the gooey caramel and crunchy pecan filling. As the tarts bake, the caramel bubbles and thickens, creating a luscious, rich filling that pairs perfectly with the nutty pecans.
Finished with a sprinkle of sea salt, these tarts offer a delightful balance of flavors and textures that will have everyone reaching for seconds.
Ingredients (Serves 4-6):
- 1 1/2 cups all-purpose flour
- 1/2 cup unsalted butter, chilled and cubed
- 1/4 cup granulated sugar
- 1/4 teaspoon salt
- 1/4 cup ice water
- 1 cup granulated sugar
- 1/4 cup water
- 1/2 cup heavy cream
- 2 tablespoons unsalted butter
- 1 teaspoon vanilla extract
- 1/2 teaspoon sea salt, plus more for sprinkling
- 1 1/2 cups pecan halves
Instructions:
- Prepare the Pastry Crust: In a large bowl, combine 1 1/2 cups of flour, 1/4 cup of sugar, and 1/4 teaspoon of salt. Add 1/2 cup of chilled, cubed butter and use a pastry cutter or your fingers to blend until the mixture resembles coarse crumbs. Gradually add 1/4 cup of ice water, mixing until the dough comes together. Form into a disk, wrap in plastic wrap, and refrigerate for at least 30 minutes.
- Preheat the Oven: Preheat your oven to 350°F (175°C). Roll out the chilled dough on a lightly floured surface to about 1/8-inch thickness. Cut into rounds to fit your tart pans and press into the pans, trimming any excess. Chill the tart shells for about 10 minutes.
- Blind Bake the Tart Shells: Line the tart shells with parchment paper and fill with pie weights or dried beans. Bake in the preheated oven for 15 minutes. Remove the weights and parchment, then bake for another 5 minutes until the crust is lightly golden. Let cool completely.
- Make the Salted Caramel: In a medium saucepan, combine 1 cup sugar and 1/4 cup water. Cook over medium heat without stirring until the sugar dissolves and starts to turn a golden brown. Carefully whisk in 1/2 cup heavy cream, then add 2 tablespoons butter, 1 teaspoon vanilla extract, and 1/2 teaspoon sea salt. Stir until smooth and remove from heat.
- Assemble the Tarts: Divide the pecan halves evenly among the cooled tart shells. Pour the salted caramel over the pecans, filling each tart to just below the rim. Sprinkle a pinch of sea salt over each tart.
- Bake the Tarts: Place the filled tarts back into the oven and bake for 20-25 minutes, or until the caramel is bubbly and the pecans are toasted. Allow to cool before serving.
Extra Tips:
When making the caramel, it’s essential to avoid stirring once the sugar and water are combined in the saucepan, as this can cause crystallization. Instead, gently swirl the pan to guarantee even cooking.
Additionally, keep a close eye on the caramel as it cooks, as it can quickly move from golden to burnt. Once you add the cream, be cautious as it will bubble vigorously.
For a more sophisticated presentation, consider garnishing each tart with a dollop of whipped cream or a scoop of vanilla ice cream.
White Chocolate Cranberry Blondies
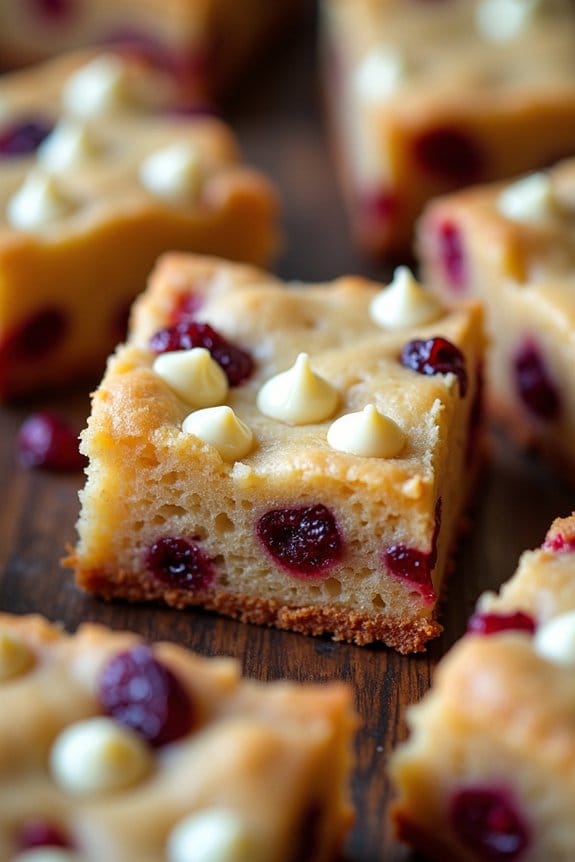
White Chocolate Cranberry Blondies are a delightful and festive treat perfect for your Christmas party dessert table. These blondies are rich and buttery with a hint of vanilla, packed with sweet white chocolate chips and tart dried cranberries. The combination of flavors and textures provides a perfect balance that’s sure to please your guests.
Whether served with a warm cup of coffee or a glass of cold milk, these blondies are a crowd-pleaser that will leave everyone asking for the recipe.
The beauty of this recipe is its simplicity and the ease with which it comes together. With just a few simple ingredients and straightforward steps, you can whip up a batch of these delicious blondies in no time. This recipe yields about 16 blondies, making it ideal for a serving size of 4-6 people, assuming each person enjoys 2-3 pieces.
Ingredients:
- 1 cup unsalted butter, melted
- 1 cup packed light brown sugar
- 1/2 cup granulated sugar
- 2 large eggs
- 2 teaspoons vanilla extract
- 1/2 teaspoon salt
- 2 cups all-purpose flour
- 1 teaspoon baking powder
- 1 cup white chocolate chips
- 1 cup dried cranberries
Instructions:
- Preheat and Prepare: Preheat your oven to 350°F (175°C). Line a 9×13-inch baking pan with parchment paper, leaving some overhang on the sides for easy removal later.
- Mix Wet Ingredients: In a large mixing bowl, combine the melted butter, brown sugar, and granulated sugar. Whisk together until the mixture is smooth and well combined. Add the eggs and vanilla extract, then continue whisking until fully incorporated.
- Combine Dry Ingredients: In a separate bowl, sift together the flour, baking powder, and salt. Gradually add the dry ingredients into the wet mixture, stirring gently with a spatula or wooden spoon until just combined.
- Add Mix-ins: Fold in the white chocolate chips and dried cranberries, ensuring they’re evenly distributed throughout the batter.
- Spread and Bake: Pour the batter into the prepared baking pan, spreading it evenly with a spatula. Bake in the preheated oven for 25-30 minutes, or until a toothpick inserted into the center comes out with just a few moist crumbs.
- Cool and Serve: Allow the blondies to cool in the pan for about 10 minutes before using the parchment overhang to lift them out onto a wire rack to cool completely. Once cooled, cut into squares and serve.
Extra Tips:
For an added festive touch, consider drizzling melted white chocolate over the cooled blondies before cutting them. This not only enhances the presentation but also adds an extra layer of sweetness.
If you prefer a more pronounced cranberry flavor, you can increase the amount of dried cranberries slightly. Additionally, storing the blondies in an airtight container at room temperature will keep them fresh for up to a week, making them a great make-ahead dessert option for your holiday gatherings.
Red Velvet Cake Pops
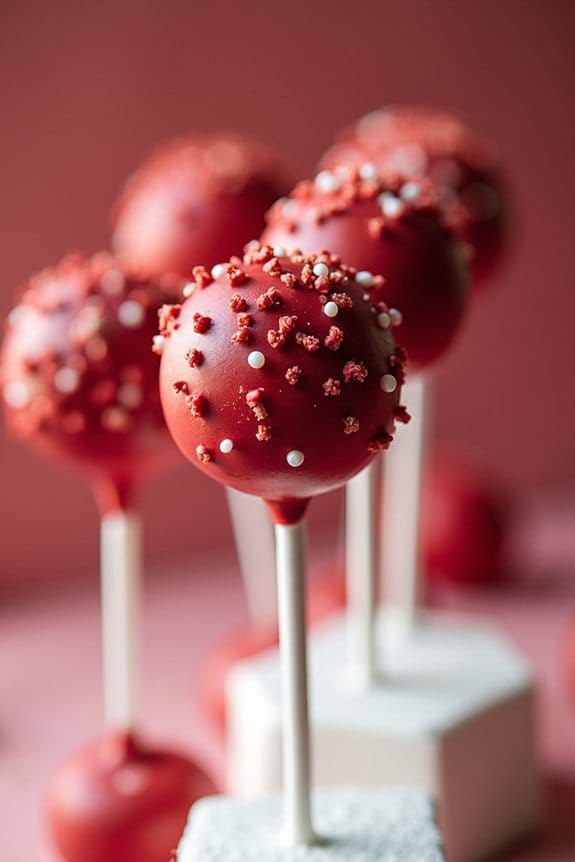
Red Velvet Cake Pops are the perfect festive treat to add a pop of color and sweetness to your Christmas party dessert table. These delightful bites are a fun twist on the classic red velvet cake, offering a convenient and portable option for your guests to enjoy. With their vibrant red color and rich, creamy flavor, they’re sure to be a hit at any holiday gathering.
Making Red Velvet Cake Pops involves baking a moist red velvet cake, crumbling it, and mixing it with a luscious cream cheese frosting. The mixture is then shaped into small balls, placed on sticks, and coated with a smooth layer of chocolate or candy melts. Once the coating hardens, you can decorate them with festive sprinkles or edible glitter to enhance their holiday appeal.
Ingredients for 4-6 Servings:
- 1 box of red velvet cake mix (or homemade red velvet cake recipe)
- Ingredients as specified on the cake mix package (usually eggs, water, and oil)
- 1 cup cream cheese frosting
- 2 cups white or dark chocolate candy melts
- Lollipop sticks
- Festive sprinkles for decoration
Cooking Instructions:
- Bake the Cake: Prepare the red velvet cake according to the package instructions or your homemade recipe. Allow the cake to cool completely before proceeding to the next step.
- Crumb the Cake: Once the cake is fully cooled, crumble it into a large bowl. Confirm there are no large chunks, as you want a fine consistency.
- Mix with Frosting: Add the cream cheese frosting to the crumbled cake. Mix thoroughly using your hands or a spoon until the mixture is well combined and holds together when pressed.
- Shape the Pops: Roll the cake mixture into small balls, about 1-1.5 inches in diameter. Place them on a baking sheet lined with parchment paper.
- Insert Sticks: Melt a small amount of the candy melts in the microwave. Dip the tip of each lollipop stick into the melted candy and insert it halfway into each cake ball. This helps secure the stick in place.
- Chill the Cake Balls: Place the baking sheet in the refrigerator for at least 30 minutes to allow the cake balls to firm up.
- Melt the Candy Coating: Melt the remaining candy melts in a microwave-safe bowl, stirring every 30 seconds until smooth.
- Coat the Cake Pops: Remove the cake balls from the refrigerator. Dip each cake pop into the melted candy, covering it completely. Gently tap off any excess coating.
- Decorate: Before the coating hardens, sprinkle the cake pops with festive sprinkles or edible glitter for decoration.
- Set the Cake Pops: Place the coated cake pops upright in a styrofoam block or a cake pop stand to dry completely.
Extra Tips:
Confirm your cake pops are chilled well before dipping in the melted candy coating, as this helps them maintain their shape. If the coating is too thick, try adding a teaspoon of vegetable oil to thin it out. Always work quickly when decorating, as the coating can set faster than expected.
For an extra touch, consider using different colors of candy melts to create a marbled effect or drizzle contrasting colors over the finished cake pops.
Almond Snowball Cookies
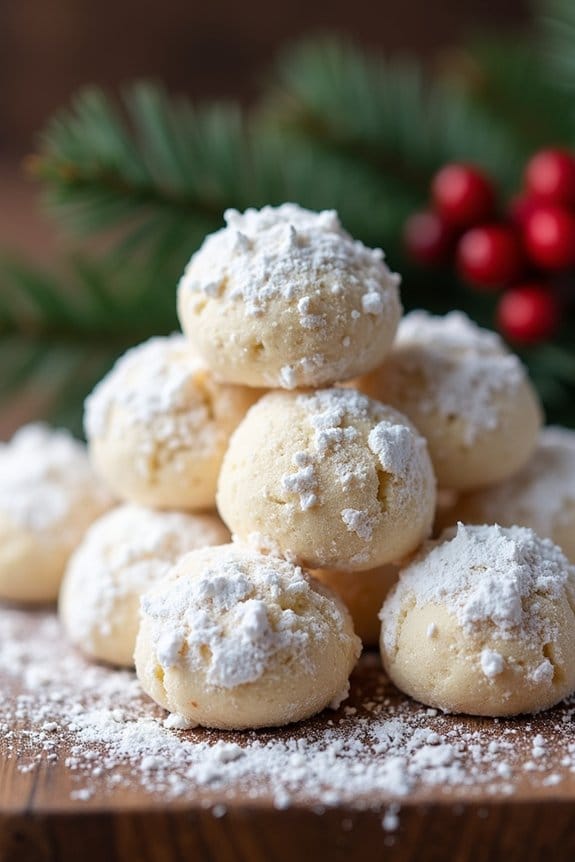
Almond Snowball Cookies are a delightful addition to your Christmas party dessert spread. These classic cookies, also known as Russian tea cakes or Mexican wedding cookies, are famous for their melt-in-your-mouth texture and buttery almond flavor. Coated generously in powdered sugar, they resemble little snowballs, making them a perfect festive treat.
Whether you’re looking to bake something special for a holiday gathering or simply want to enjoy a sweet bite with your afternoon tea, these cookies are bound to impress with their simplicity and elegance.
Creating these Almond Snowball Cookies is straightforward and doesn’t require any fancy ingredients. The key to their delicate texture lies in the use of ground almonds, which adds a rich, nutty flavor to the cookies. A few simple steps and ingredients come together to create a batch of these delicious treats in no time. The recipe below serves 4-6 people, making it ideal for small gatherings or a cozy family dessert.
Ingredients:
- 1 cup unsalted butter, softened
- 1/2 cup powdered sugar, plus extra for rolling
- 1 teaspoon vanilla extract
- 2 cups all-purpose flour
- 1 cup ground almonds
- 1/4 teaspoon salt
Cooking Instructions:
- Preheat the Oven: Begin by preheating your oven to 350°F (175°C). This guarantees that your cookies bake evenly once they’re ready to go in.
- Cream the Butter and Sugar: In a large mixing bowl, cream together the softened unsalted butter and 1/2 cup of powdered sugar until the mixture is light and fluffy. This should take about 2-3 minutes with an electric mixer.
- Add Vanilla: Mix in the vanilla extract until fully incorporated. This adds a lovely aromatic touch to the cookies.
- Combine Dry Ingredients: In a separate bowl, whisk together the all-purpose flour, ground almonds, and salt. This helps to evenly distribute the dry ingredients before combining with the wet mixture.
- Form the Dough: Gradually add the dry ingredients to the butter mixture, stirring until a soft dough forms. Be careful not to over-mix, as this can make the cookies tough.
- Shape the Cookies: Using your hands, roll the dough into 1-inch balls and place them on a baking sheet lined with parchment paper. Leave some space between each cookie for even baking.
- Bake: Place the baking sheet in the preheated oven and bake for 12-15 minutes or until the cookies are set and the bottoms are lightly golden. Avoid over-baking as this can lead to dry cookies.
- Cool and Roll in Sugar: Allow the cookies to cool slightly on the baking sheet for about 5 minutes, then roll them in powdered sugar while they’re still warm. This guarantees a nice coating that sticks well to the cookies.
- Second Coating: Once all the cookies are coated, allow them to cool completely, then roll them again in powdered sugar for a second layer. This gives them their signature snowball look.
Extra Tips:
For best results, make sure your butter is properly softened before you begin mixing; this helps achieve the right cookie texture. If you find your dough is too crumbly, you can add a tablespoon of milk to bring it together.
Also, feel free to experiment with other nuts like pecans or walnuts for a different flavor profile. Finally, storing these cookies in an airtight container keeps them fresh and delicious, allowing you to enjoy them well beyond your holiday festivities.
Caramelized Pear Bread Pudding
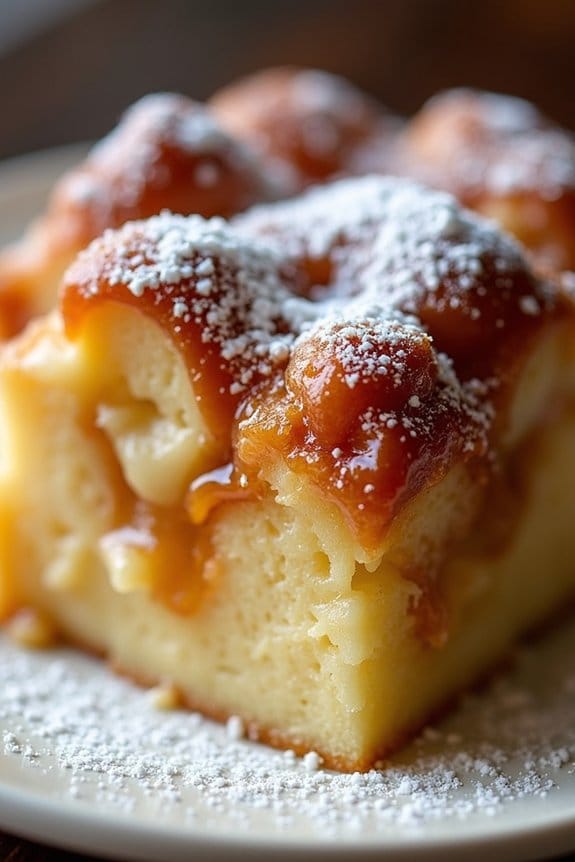
Indulge in the warm, comforting flavors of the holiday season with this Caramelized Pear Bread Pudding. This delightful dessert combines the rich sweetness of caramelized pears with the comforting texture of bread pudding, making it a perfect addition to your Christmas party menu.
The caramelized pears add a sophisticated depth of flavor that elevates the traditional bread pudding to a festive masterpiece sure to impress your guests. This dish is perfect for serving 4-6 people, making it an ideal choice for intimate gatherings or as an extra dessert option at larger celebrations.
With a balance of sweet and savory notes, this bread pudding captures the essence of holiday cheer, while its ease of preparation allows you to focus on spending time with family and friends. The following recipe provides all the necessary ingredients and detailed steps to create this delicious treat.
Ingredients (Serving Size: 4-6 people):
- 4 cups of day-old bread, cubed
- 3 ripe pears, peeled, cored, and sliced
- 1 cup granulated sugar
- 1/2 cup unsalted butter
- 1 teaspoon vanilla extract
- 1 teaspoon ground cinnamon
- 1/2 teaspoon ground nutmeg
- 1/2 teaspoon salt
- 4 large eggs
- 2 cups whole milk
- 1/2 cup heavy cream
- 1/4 cup brown sugar
- Powdered sugar (for garnish, optional)
Cooking Instructions:
- Preheat the Oven: Preheat your oven to 350°F (175°C). Grease a 9×13 inch baking dish with butter or non-stick spray and set aside.
- Caramelize the Pears: In a large skillet over medium heat, melt the unsalted butter. Add the granulated sugar and stir until it dissolves. Add the sliced pears, stirring occasionally, until they become soft and caramelized (about 10 minutes). Set aside to cool slightly.
- Prepare the Bread: In a large mixing bowl, combine the cubed bread with the caramelized pears, making sure the pears are evenly distributed throughout the bread.
- Mix the Custard: In another bowl, whisk together the eggs, milk, heavy cream, vanilla extract, ground cinnamon, ground nutmeg, and salt. Confirm the mixture is smooth and well combined.
- Assemble the Pudding: Pour the custard mixture over the bread and pear mixture, pressing down gently to guarantee all the bread is soaked. Let it sit for 10 minutes to allow the bread to absorb the custard.
- Top with Brown Sugar: Sprinkle the brown sugar evenly over the top of the pudding.
- Bake the Pudding: Place the baking dish in the preheated oven and bake for 40-45 minutes, or until the top is golden brown and the custard is set.
- Cool and Serve: Remove the pudding from the oven and allow it to cool for about 10 minutes. Dust with powdered sugar before serving, if desired.
Extra Tips:
To make the most of this Caramelized Pear Bread Pudding, choose a dense, hearty bread like brioche or challah, which will hold up well to the custard.
For added flavor, consider adding a handful of chopped nuts, such as pecans or walnuts, into the pudding before baking. If you prefer a more intense pear flavor, you can add a splash of pear brandy or pear juice to the custard mixture.
Finally, serving the bread pudding with a scoop of vanilla ice cream or a dollop of whipped cream will enhance its decadence, making it an irresistible holiday dessert.
Hazelnut Chocolate Tart
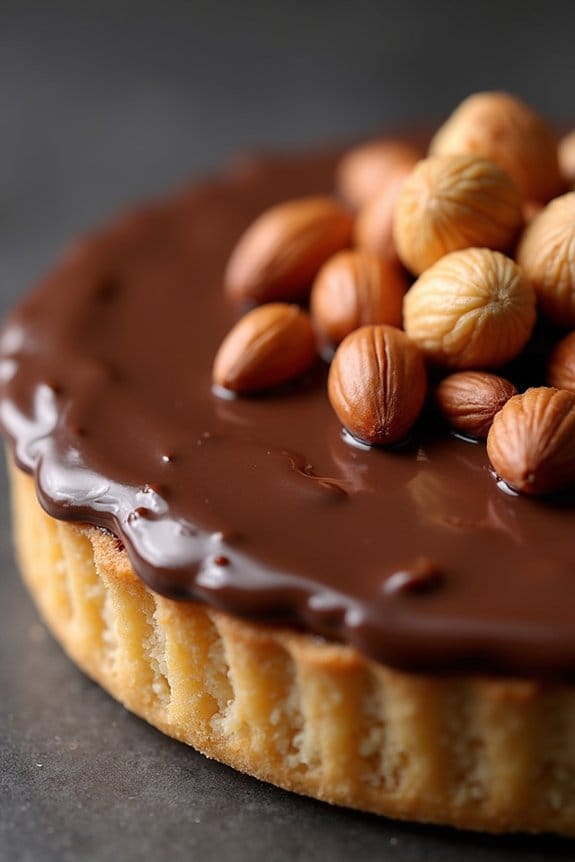
Hazelnut Chocolate Tart is a decadent dessert perfect for a Christmas party, combining the rich flavors of chocolate with the nutty taste of hazelnuts. This tart features a crisp, buttery crust filled with a luscious chocolate ganache, topped with roasted hazelnuts for an added crunch.
It’s a showstopper dessert that’s guaranteed to impress your guests and leave them savoring each bite.
The process of making a Hazelnut Chocolate Tart is straightforward, yet elegant, making certain that even novice bakers can achieve a professional result. The key is to use high-quality chocolate and fresh hazelnuts to guarantee the best flavor.
This recipe yields a tart that serves 4-6 people, making it ideal for a small gathering or a cozy family celebration.
Ingredients (serves 4-6 people):
- 1 1/2 cups all-purpose flour
- 1/2 cup unsweetened cocoa powder
- 1/2 cup unsalted butter, softened
- 1/2 cup granulated sugar
- 1 large egg
- 1/4 teaspoon salt
- 1 cup heavy cream
- 8 ounces dark chocolate, chopped
- 1/2 cup roasted hazelnuts, chopped
- 1 teaspoon vanilla extract
Cooking Instructions:
- Prepare the Tart Shell: In a mixing bowl, combine the flour, cocoa powder, and salt. In another bowl, beat the butter and sugar together until creamy. Add the egg and mix until well combined. Gradually add the dry ingredients to the butter mixture, mixing until a dough forms.
- Chill and Bake the Crust: Shape the dough into a disc, wrap it in plastic wrap, and refrigerate for at least 30 minutes. Preheat your oven to 350°F (175°C). Roll out the chilled dough on a floured surface and fit it into a tart pan. Prick the bottom with a fork, cover with parchment paper, and fill with pie weights. Bake for 15 minutes. Remove the weights and parchment, then bake for another 10 minutes. Allow to cool completely.
- Make the Chocolate Ganache: In a saucepan, heat the heavy cream over medium heat until it begins to simmer. Remove from heat and pour over the chopped dark chocolate in a bowl. Let it sit for a minute, then stir until smooth. Add the vanilla extract and mix well.
- Assemble the Tart: Pour the chocolate ganache into the cooled tart shell, smoothing the top with a spatula. Sprinkle the roasted hazelnuts evenly over the ganache.
- Chill the Tart: Place the tart in the refrigerator for at least 2 hours, or until the ganache is set and firm.
Extra Tips:
When making the tart crust, make sure that the butter is softened to room temperature to make it easier to blend with the sugar. Chilling the dough is essential to prevent it from shrinking while baking.
For the ganache, using high-quality dark chocolate will enhance the flavor of the tart. If desired, you can lightly toast the hazelnuts in a dry skillet before sprinkling them over the ganache to bring out their natural oils and intensify their flavor.
Enjoy this tart with a dollop of whipped cream or a scoop of vanilla ice cream for a delightful holiday treat.
