

As the festive season approaches, I’m always eager to find ways to make our Christmas celebrations both joyful and easygoing. This year, I’ve put together a collection of 11 wonderful family-friendly recipes that will delight guests of all ages. Whether you’re in the mood for savory bites like Mini Cheese Ball Bites or craving sweet treats such as Reindeer Rice Krispie Treats, there’s something here for everyone. Ready to explore these festive culinary gems? Let’s make this holiday season unforgettable with these delicious ideas.
Mini Cheese Ball Bites
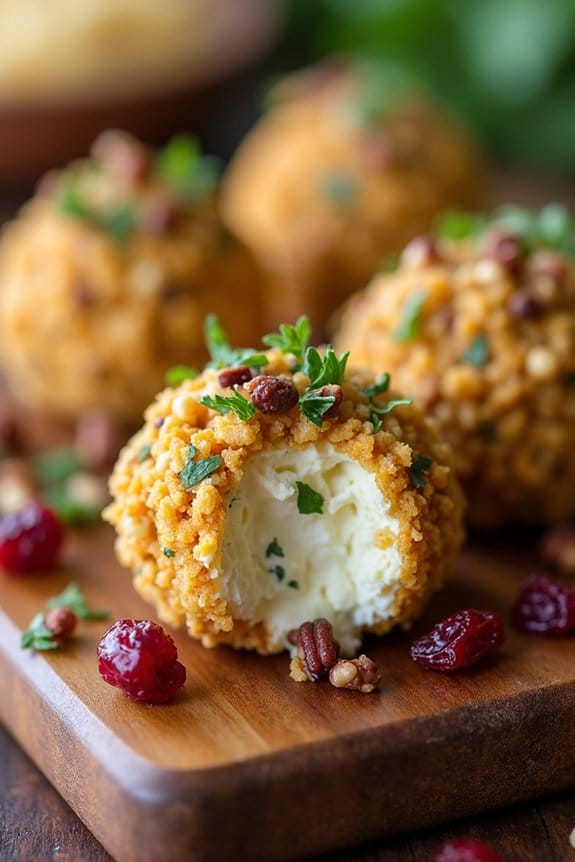
Mini Cheese Ball Bites are the perfect appetizer for a family-friendly Christmas party. These bite-sized treats aren’t only delicious but also incredibly festive, making them a crowd favorite during the holiday season.
With their creamy texture and burst of flavors, mini cheese ball bites offer a delightful contrast to the more traditional snacks typically found at holiday gatherings. They’re easy to make ahead of time, allowing you to focus on enjoying the party rather than being stuck in the kitchen.
The versatility of mini cheese ball bites means you can customize them to fit the preferences of your guests. Whether you want to add a touch of heat with some spices or keep it mild with the classic combination of cream cheese and herbs, the options are endless.
Serve them on a platter with crackers, pretzels, or vegetable sticks for a complete party snack. This recipe will make enough for 4-6 people, guaranteeing everyone has a chance to enjoy these tasty morsels.
Ingredients:
- 8 oz cream cheese, softened
- 1 cup sharp cheddar cheese, shredded
- 1 teaspoon garlic powder
- 1 teaspoon onion powder
- 1/2 teaspoon smoked paprika
- 1/4 cup chopped fresh parsley
- 1/4 cup chopped pecans
- 1/4 cup dried cranberries, chopped
- Salt and pepper to taste
- Crackers or pretzels for serving
Instructions:
- Prepare the Cheese Mixture: In a medium-sized mixing bowl, combine the softened cream cheese and shredded cheddar cheese. Mix well until thoroughly combined and smooth.
- Season the Mixture: Add garlic powder, onion powder, smoked paprika, salt, and pepper to the cheese mixture. Stir until all the spices are evenly distributed.
- Form Cheese Balls: Using a tablespoon, scoop small amounts of the cheese mixture and roll them into balls about the size of a walnut. Place the cheese balls on a parchment-lined baking sheet.
- Prepare Coating: In a shallow dish, mix together the chopped parsley, chopped pecans, and dried cranberries.
- Coat the Cheese Balls: Roll each cheese ball in the parsley, pecan, and cranberry mixture until fully coated. Be sure to press gently to make certain the coating adheres to the cheese balls.
- Chill the Cheese Balls: Place the coated cheese balls in the refrigerator for at least 1 hour to firm up and allow the flavors to meld.
- Serve: Arrange the mini cheese ball bites on a serving platter with crackers or pretzels. Enjoy them cold or at room temperature.
Extra Tips: For a smoother texture, make sure the cream cheese is thoroughly softened before mixing. If you’re preparing these cheese balls ahead of time, store them in an airtight container in the fridge for up to two days.
Feel free to experiment with different coatings, such as crushed nuts, seeds, or even finely chopped herbs, to add variety to your platter. Remember to taste the cheese mixture before forming the balls to adjust seasoning according to your preference.
Christmas Tree Veggie Platter

The Christmas Tree Veggie Platter is a delightful and festive way to serve vegetables during your family-friendly holiday gatherings. This platter not only serves as a healthy appetizer but also adds a colorful and thematic touch to your table.
It’s perfect for guests of all ages and can be easily customized with your favorite vegetables. The platter is designed to resemble a Christmas tree, complete with vibrant green broccoli for the branches and a variety of other colorful veggies as ornaments.
This recipe serves 4-6 people and is both simple to assemble and fun to prepare. It’s a great opportunity to involve kids in the kitchen during the holiday season as they can help with the arrangement. You can serve it with a variety of dips like hummus, ranch, or a homemade yogurt dip to complement the fresh crunch of the vegetables.
Ingredients:
- 3 cups broccoli florets
- 1 cup cherry tomatoes
- 1 yellow bell pepper
- 1 red bell pepper
- 1 cup baby carrots
- 1 cup sugar snap peas
- 1 cucumber
- 1/2 cup black olives
- Optional: 1/2 cup cauliflower florets for snow effect
- Various dips (ranch, hummus, or yogurt dip)
Instructions:
- Prepare the Vegetables: Begin by washing all the vegetables thoroughly under cold water to guarantee they’re clean and fresh. Pat them dry with a paper towel.
- Cut the Vegetables: Chop the broccoli into medium-sized florets. Slice the cucumber into rounds, and cut the bell peppers into thin strips. Leave the cherry tomatoes and baby carrots whole.
- Arrange the Broccoli Base: On a large rectangular platter or cutting board, start by arranging the broccoli florets in the shape of a Christmas tree. Begin with a wide base at the bottom and taper it up to a point at the top.
- Decorate the Tree: Use cherry tomatoes as ornaments, scattering them evenly over the broccoli. Add strips of yellow and red bell peppers to mimic garlands. Place the cucumber rounds and sugar snap peas strategically to add texture and variety.
- Add Final Touches: Use baby carrots to form the trunk of the tree at the bottom center. If desired, scatter cauliflower florets around the base to represent snow. Top the tree with a star-shaped cutout of yellow bell pepper.
- Serve with Dips: Arrange small bowls of your chosen dips around the platter to complete the presentation. Verify each guest has easy access to a dip for their veggies.
Extra Tips:
To make your Christmas Tree Veggie Platter even more festive, consider using a variety of colorful vegetables to add contrast and appeal.
You might also prepare the platter a few hours in advance and cover it with plastic wrap to keep the veggies fresh until serving time. If you want to add a little more holiday spirit, you can sprinkle some edible glitter or use small edible stars to enhance the visual appeal.
Enjoy the process of creating this edible centerpiece and watch as your guests delight in its festive charm!
Cranberry Brie Bites
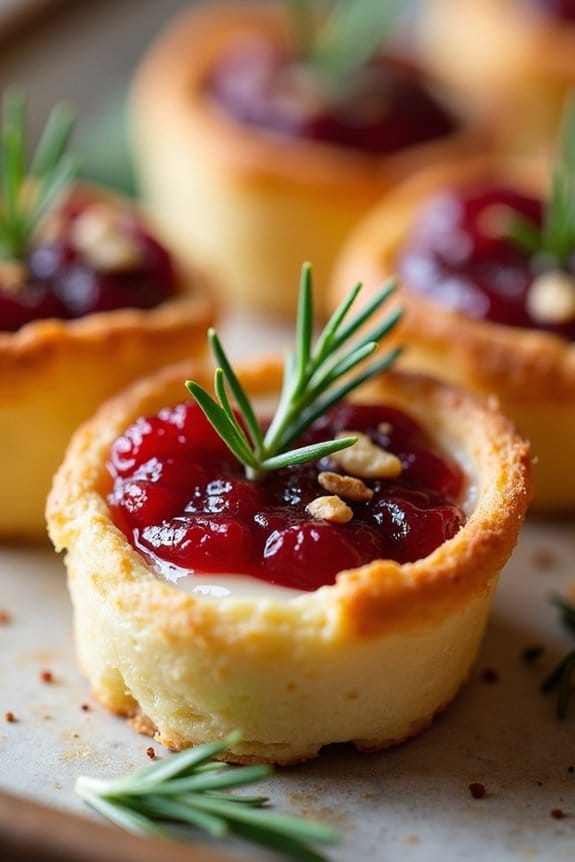
Cranberry Brie Bites are a delightful and festive appetizer that perfectly blend the creamy richness of Brie cheese with the tangy sweetness of cranberry sauce, all nestled in a flaky puff pastry shell. This dish is quick to prepare and makes for an elegant addition to any family-friendly Christmas party.
Not only do these bites look beautiful on the table, but they’re also a crowd-pleaser, combining flavors and textures that guests of all ages will enjoy. Ideal for serving a group of 4-6 people, these Cranberry Brie Bites are simple yet sophisticated.
The use of pre-made puff pastry cuts down on preparation time, allowing you to focus on the assembly and baking. The bites can be served warm straight from the oven, or at room temperature, making them versatile for any holiday gathering. With just a handful of ingredients, you can create a memorable dish that encapsulates the flavors of the season.
Ingredients:
- 1 sheet of puff pastry, thawed
- 8 oz Brie cheese, cut into small cubes
- 1/2 cup cranberry sauce (store-bought or homemade)
- 1/4 cup chopped pecans (optional)
- Fresh rosemary sprigs for garnish (optional)
Instructions:
- Prepare the Puff Pastry: Preheat your oven to 375°F (190°C). On a lightly floured surface, roll out the thawed puff pastry sheet into a square. Cut the pastry into 2-inch squares, aiming for about 24 squares to fill a mini muffin tin.
- Assemble in Muffin Tin: Lightly grease a mini muffin tin. Gently press each pastry square into the wells of the tin, making sure that the pastry forms a small cup.
- Add the Brie and Cranberry Sauce: Place a cube of Brie cheese into each pastry cup. Top the Brie with approximately a teaspoon of cranberry sauce.
- Add Optional Ingredients: If using pecans, distribute them evenly over the cranberry sauce in each pastry cup. This adds a crunchy texture and nutty flavor that pairs well with the Brie and cranberry.
- Bake the Bites: Place the muffin tin in the preheated oven and bake for 15-20 minutes, or until the pastry is golden brown and puffed up. Keep an eye on the bites to prevent the cheese from over-browning.
- Garnish and Serve: Once baked, remove the bites from the oven and allow them to cool slightly. Garnish with a small sprig of fresh rosemary on top of each bite for an added touch of holiday flair. Serve warm or at room temperature.
Extra Tips:
When preparing Cranberry Brie Bites, make sure that the puff pastry is fully thawed but still cold to the touch before working with it; this will make it easier to handle and help it puff up nicely in the oven.
If you prefer a homemade touch, consider making your own cranberry sauce using fresh or frozen cranberries, sugar, and orange zest for a more personalized flavor. Additionally, experiment with different toppings such as candied walnuts or a drizzle of honey to add unique flavors to your bites.
Sausage Stuffed Mushrooms

Sausage Stuffed Mushrooms are a delightful and savory appetizer that perfectly complements any family-friendly Christmas party. The combination of earthy mushrooms and flavorful sausage filling creates a bite-sized treat that’s certain to impress your guests.
Whether you’re an experienced cook or a beginner, this recipe is simple to follow and results in a delicious dish that adds elegance and taste to your holiday spread.
This recipe serves 4-6 people and is perfect for a cozy gathering. The key to achieving the best flavor is using high-quality sausage and fresh mushrooms. The filling is a delightful mix of creamy cheese, aromatic herbs, and breadcrumbs that add texture and depth to the dish.
These stuffed mushrooms are easy to prepare ahead of time, allowing you to spend more time enjoying the festivities with your loved ones.
Ingredients:
- 18-24 large white or cremini mushrooms
- 1/2 pound Italian sausage, casings removed
- 1/4 cup finely chopped onion
- 1 garlic clove, minced
- 1/2 cup cream cheese, softened
- 1/4 cup grated Parmesan cheese
- 1/4 cup breadcrumbs
- 2 tablespoons chopped fresh parsley
- 1/2 teaspoon dried oregano
- Salt and pepper to taste
- 2 tablespoons olive oil
Instructions:
- Preheat the Oven: Start by preheating your oven to 375°F (190°C). This guarantees that the oven is at the right temperature when you’re ready to bake the mushrooms.
- Prepare the Mushrooms: Gently clean the mushrooms with a damp paper towel. Remove the stems and set them aside. Use a small spoon or a melon baller to carefully hollow out the center of each mushroom cap, creating space for the filling.
- Cook the Sausage: In a skillet over medium heat, add the olive oil. Once hot, add the sausage, breaking it up with a spoon as it cooks. Brown the sausage until fully cooked, about 5-7 minutes. Drain any excess fat.
- Sauté the Aromatics: Add the chopped onion and minced garlic to the skillet with the sausage. Sauté for 2-3 minutes until the onion is translucent and the garlic is fragrant.
- Make the Filling: In a mixing bowl, combine the cooked sausage mixture with cream cheese, Parmesan cheese, breadcrumbs, parsley, oregano, salt, and pepper. Mix until the ingredients are well incorporated.
- Stuff the Mushrooms: Using a spoon, fill each mushroom cap generously with the sausage mixture. Press down gently to confirm the filling stays in place.
- Bake the Mushrooms: Place the stuffed mushrooms on a baking sheet lined with parchment paper. Bake in the preheated oven for 20-25 minutes, or until the mushrooms are tender and the tops are golden brown.
- Serve: Remove the mushrooms from the oven and let them cool slightly before serving. Arrange them on a platter and garnish with extra parsley if desired.
Extra Tips:
For added flavor, consider using a mix of different types of mushrooms like portobello or shiitake. If you prefer a little heat, try adding a pinch of red pepper flakes to the filling.
These mushrooms can be prepared a day in advance and stored in the refrigerator; simply bake them just before serving to save time on the day of your event. Additionally, make sure that the cream cheese is at room temperature before mixing to achieve a smooth consistency in the filling.
Enjoy the process and have fun presenting this festive and delicious appetizer at your Christmas gathering!
Holiday Caprese Skewers
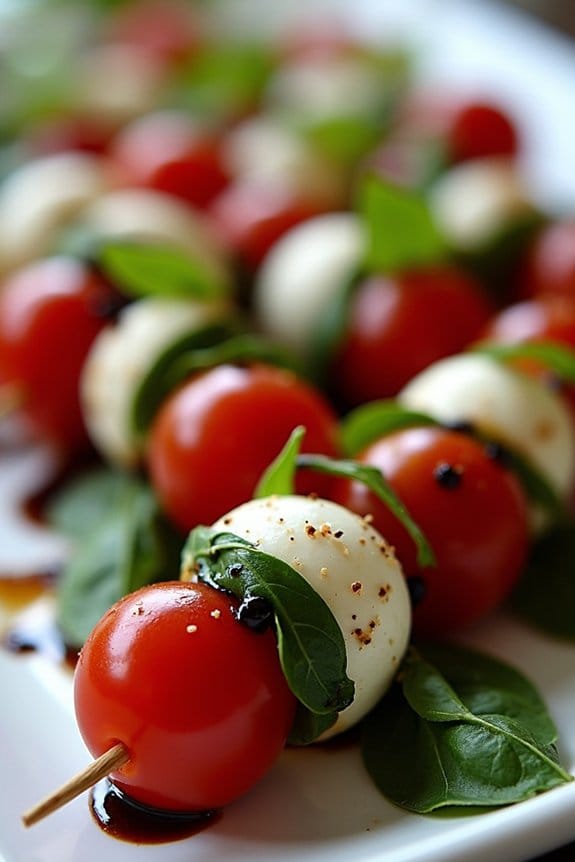
Holiday Caprese Skewers are a festive twist on the traditional Caprese salad, perfect for a family-friendly Christmas party. These skewers combine the classic flavors of fresh mozzarella, juicy cherry tomatoes, and aromatic basil with a holiday flair.
They’re easy to prepare, visually appealing, and can be served as an invigorating appetizer or a colorful addition to your holiday buffet table. These skewers aren’t only delicious but also healthy, offering a light and nutritious option for your guests.
They can be assembled ahead of time, allowing you to spend more time enjoying the company of your loved ones during the festivities. The vibrant colors of red, white, and green also bring a touch of Christmas cheer to your dining table, making these skewers a perfect choice for your holiday gatherings.
Ingredients for 4-6 servings:
- 20 cherry tomatoes
- 20 small fresh mozzarella balls (bocconcini)
- 20 fresh basil leaves
- 2 tablespoons balsamic glaze
- 1 tablespoon extra-virgin olive oil
- Salt and pepper to taste
- 20 wooden or bamboo skewers
Cooking Instructions:
- Prepare the Ingredients: Rinse the cherry tomatoes and pat them dry. Drain the mozzarella balls and gently pat them dry with a paper towel. Wash and dry the basil leaves.
- Assemble the Skewers: Take a skewer and thread one cherry tomato onto it. Follow with a fresh basil leaf, folding it in half if needed to fit. Add a mozzarella ball next. Repeat this pattern until you have about 3 sets of each ingredient on the skewer. Continue assembling the remaining skewers in the same manner.
- Season the Skewers: Arrange the assembled skewers on a serving platter. Drizzle the balsamic glaze generously over the skewers, ensuring each skewer gets a good coating. Lightly drizzle with olive oil.
- Final Touches: Sprinkle the skewers with a pinch of salt and freshly ground black pepper to taste. Serve immediately or refrigerate until ready to serve.
Extra Tips:
For an added burst of flavor, consider marinating the mozzarella balls in a mixture of olive oil, minced garlic, and Italian herbs for about an hour before assembling the skewers.
If you can’t find small mozzarella balls, you can cut larger mozzarella into bite-sized pieces. Additionally, using high-quality balsamic glaze can elevate the taste of the skewers.
If you prefer, you can make your own balsamic reduction by simmering balsamic vinegar until it thickens. Remember to soak wooden skewers in water for about 30 minutes before using them to prevent splintering.
Turkey and Cranberry Sliders
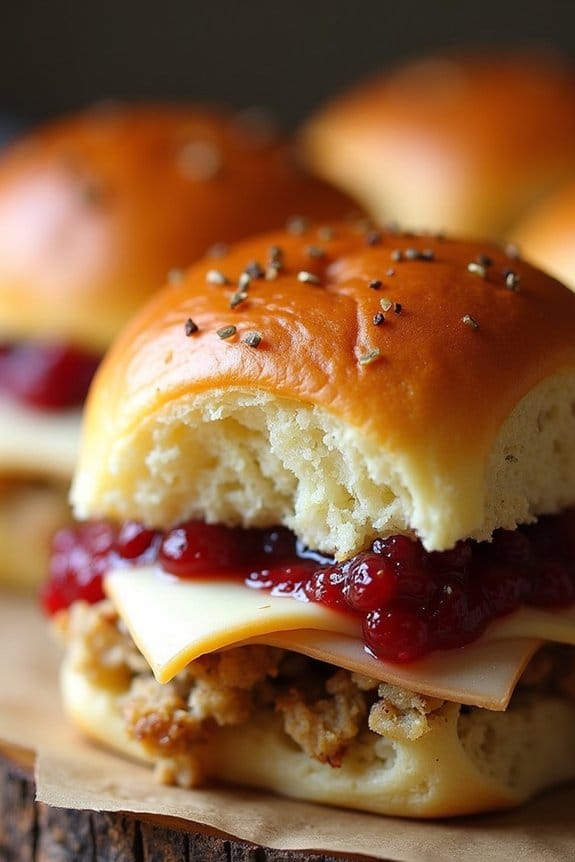
Turkey and Cranberry Sliders are a delightful and festive twist on the classic slider, bringing the flavors of Thanksgiving into a bite-sized treat perfect for any holiday gathering. This dish combines tender turkey slices with tangy cranberry sauce, creamy cheese, and savory stuffing, all nestled in soft slider buns.
It’s a family-friendly recipe that not only serves as a great main dish for a Christmas party but also makes excellent use of any leftover turkey and cranberry sauce you might have.
These sliders are perfect for a gathering of 4-6 people, offering a flavorful combination that’s certain to please both adults and children alike. The preparation is simple and quick, allowing you to spend more time enjoying the festivities rather than being stuck in the kitchen.
The mingling flavors of the turkey, cranberry, and stuffing create a comforting and nostalgic taste that embodies the spirit of the holiday season.
Ingredients (Serving Size: 4-6 people):
- 12 slider buns
- 1 pound of cooked turkey breast, sliced
- 1 cup cranberry sauce
- 6 slices of provolone or Swiss cheese
- 1 cup prepared stuffing
- 1/4 cup mayonnaise
- 2 tablespoons Dijon mustard
- 2 tablespoons melted butter
- 1 teaspoon dried thyme
- 1 teaspoon garlic powder
- Salt and pepper to taste
Cooking Instructions:
- Preheat Oven: Begin by preheating your oven to 350°F (175°C). This will guarantee the sliders bake evenly and the cheese melts perfectly.
- Prepare the Slider Base: Slice the slider buns in half horizontally, retaining the top and bottom halves. Arrange the bottom halves on a baking sheet lined with parchment paper.
- Assemble the Sliders: Spread a thin layer of mayonnaise on the bottom half of each bun. On top of the mayonnaise, layer slices of turkey evenly across all buns. Follow by spooning cranberry sauce over the turkey, then add a layer of stuffing.
- Add Cheese: Place a slice of cheese on top of each slider, allowing it to cover the turkey and cranberry layers. This will help hold everything together once melted.
- Top with Bun: Place the top half of the buns over the cheese, gently pressing down to ascertain all layers are secure.
- Prepare Butter Mixture: In a small bowl, whisk together the melted butter, Dijon mustard, dried thyme, garlic powder, salt, and pepper.
- Brush the Sliders: Using a pastry brush, generously coat the tops of the sliders with the butter mixture. This will add flavor and help the buns achieve a golden, crispy finish.
- Bake the Sliders: Place the assembled sliders in the preheated oven and bake for 12-15 minutes or until the cheese has melted and the tops of the buns are golden brown.
- Serve: Once baked, remove from the oven and allow to cool slightly before serving. These sliders are best enjoyed warm.
Extra Tips:
For an even richer flavor, consider adding some sautéed onions or a layer of mashed potatoes inside the sliders. If you prefer a spicier kick, sprinkle a little cayenne pepper into the butter mixture before brushing it on the buns.
Leftover turkey works wonderfully for this recipe, but if you’re short on time, feel free to use deli turkey slices. To make the sliders ahead of time, you can assemble them up to the baking step and store them in the refrigerator for a few hours before baking them fresh for your party.
Enjoy your festive sliders as a delicious reminder of the joys of the holiday season!
Sweet Potato and Marshmallow Casserole
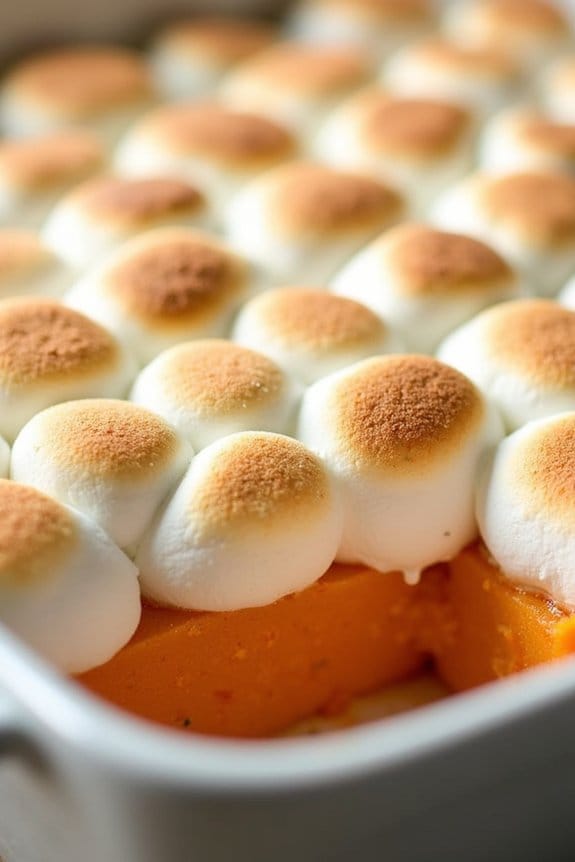
Sweet Potato and Marshmallow Casserole is a classic holiday dish that combines the natural sweetness of sweet potatoes with the gooey delight of marshmallows. This comforting casserole is a staple at many Christmas gatherings, thanks to its blend of flavors and textures that appeal to both young and old.
It’s an incredibly easy dish to prepare, making it perfect for family-friendly settings where you want to spend more time enjoying the festivities and less time in the kitchen. The dish features velvety mashed sweet potatoes that are perfectly spiced and sweetened, topped with a layer of marshmallows that caramelize beautifully in the oven.
Served warm, this casserole is a delightful side dish that complements a variety of main courses, from roasted turkey to glazed ham. With its beautiful presentation and irresistible taste, the Sweet Potato and Marshmallow Casserole is bound to be a hit at any holiday event.
Ingredients (Serves 4-6):
- 4 large sweet potatoes
- 1/4 cup unsalted butter, melted
- 1/3 cup brown sugar
- 1/2 teaspoon ground cinnamon
- 1/4 teaspoon ground nutmeg
- 1/4 teaspoon salt
- 1 teaspoon vanilla extract
- 2 cups mini marshmallows
Instructions:
- Prepare the Sweet Potatoes: Preheat your oven to 375°F (190°C). Wash and peel the sweet potatoes, then cut them into large chunks. Place the chunks in a large pot and cover with water. Bring the water to a boil over medium-high heat, then reduce the heat and simmer until the sweet potatoes are fork-tender, about 20-25 minutes.
- Mash the Sweet Potatoes: Drain the cooked sweet potatoes and transfer them to a large mixing bowl. Add the melted butter, brown sugar, cinnamon, nutmeg, salt, and vanilla extract. Use a potato masher or an electric mixer to mash the sweet potatoes until they’re smooth and well combined.
- Assemble the Casserole: Transfer the mashed sweet potato mixture into a greased 9×13-inch baking dish, spreading it out evenly. Sprinkle the mini marshmallows evenly over the top of the sweet potatoes.
- Bake the Casserole: Place the baking dish in the preheated oven and bake for 15-20 minutes, or until the marshmallows are golden brown and the casserole is heated through. Keep an eye on the marshmallows to guarantee they don’t burn.
- Serve: Remove the casserole from the oven and let it cool for a few minutes before serving. Enjoy this sweet and savory dish warm.
Extra Tips: For a twist, consider adding a layer of crushed pecans or walnuts beneath the marshmallows for added crunch and flavor. You can also experiment with spices, adjusting the cinnamon and nutmeg to taste, or even adding a pinch of ginger or cloves for extra warmth.
If you prefer a less sweet casserole, reduce the amount of brown sugar or opt for unsweetened marshmallows. This dish can be prepared in advance; simply prepare the mashed sweet potato mixture and refrigerate. When ready to serve, top with marshmallows and bake as directed.
Reindeer Rice Krispie Treats

Reindeer Rice Krispie Treats are a delightful addition to any family-friendly Christmas party. These whimsical and festive treats aren’t only visually appealing but also incredibly easy to make, making them perfect for involving kids in the kitchen. Their crunchy texture combined with a sweet, gooey marshmallow coating is bound to be a hit among guests of all ages.
Whether you’re serving them at a holiday gathering or as a fun project on a cozy winter afternoon, these treats capture the playful spirit of the season.
The Reindeer Rice Krispie Treats are crafted by shaping classic Rice Krispie treats into reindeer heads and decorating them with chocolate, pretzels for antlers, and candies for facial features. This recipe yields about 12 to 16 treats, making it ideal for serving 4-6 people.
With just a handful of ingredients and a few simple steps, you’ll have a batch of charming reindeer ready to spread cheer at your Christmas celebration.
Ingredients:
- 3 tablespoons unsalted butter
- 1 package (10 ounces) mini marshmallows
- 6 cups Rice Krispies cereal
- 1 cup semi-sweet chocolate chips
- 12-16 small pretzels
- 24-32 candy eyes
- 12-16 red M&M’s or red candy-coated chocolate
Instructions:
- Prepare the Base: Begin by lining a 9×13-inch baking pan with parchment paper or greasing it lightly with butter to prevent sticking. This will make it easier to remove the treats later.
- Melt the Butter and Marshmallows: In a large saucepan, melt the butter over low heat. Add the mini marshmallows and stir continuously until they’re completely melted and smooth. Remove from heat immediately to avoid burning.
- Combine with Cereal: Quickly add the Rice Krispies cereal to the melted marshmallow mixture. Stir well until the cereal is evenly coated with the marshmallow mixture.
- Shape the Treats: Pour the mixture into the prepared baking pan. Use a buttered spatula or wax paper to evenly press the mixture into the pan. Allow it to cool for about 10-15 minutes.
- Cut and Shape: Once cooled, cut the Rice Krispie mixture into oval or round shapes using a cookie cutter or a knife. These will form the reindeer heads.
- Decorate: Melt the semi-sweet chocolate chips in a microwave-safe bowl, heating in 30-second intervals and stirring after each until fully melted. Dip the top of each Rice Krispie shape into the chocolate to create the reindeer’s forehead and antlers area.
- Attach Features: Press two pretzels into the chocolate on each treat to represent antlers. Place two candy eyes and a red M&M or candy on each face to create eyes and a nose.
- Set and Serve: Allow the chocolate to set completely before serving. You can speed up the process by placing the treats in the refrigerator for about 10 minutes.
Extra Tips:
To guarantee your Reindeer Rice Krispie Treats hold their shape, make sure the marshmallow mixture is still warm when shaping the treats. If the mixture cools too much, it will become difficult to mold.
For a more personalized touch, consider using different colored candies for the noses, or substitute the M&M’s with small gumdrops. If you’re planning to store them, keep them in an airtight container at room temperature for up to 3 days to maintain their freshness and crunch.
Festive Sugar Cookies

Celebrate the holiday season with delightful Festive Sugar Cookies that are perfect for a family-friendly Christmas party. These cookies aren’t only delicious but also a fun activity for everyone to enjoy together. With a simple recipe that yields beautifully decorated cookies, they add a charming touch to your holiday table.
Whether you choose to use classic holiday shapes or your own creative designs, these cookies will surely become a festive favorite. The joy of making sugar cookies lies in their versatility. You can personalize each batch with colorful icing, sprinkles, or edible glitter to match your Christmas theme.
Kids will love getting involved in the decorating process, making it a memorable family tradition. These cookies are great for sharing, gifting, or simply indulging in yourself. Here’s how you can make a batch for 4-6 people.
Ingredients:
- 1 cup unsalted butter, softened
- 1 cup granulated sugar
- 1 large egg
- 1 teaspoon vanilla extract
- 2 ½ cups all-purpose flour
- ½ teaspoon baking powder
- ½ teaspoon salt
- Assorted cookie cutters
- Icing (store-bought or homemade)
- Colored sprinkles
Instructions:
- Prepare the Dough: In a large bowl, cream together the softened butter and granulated sugar until light and fluffy. This should take about 2-3 minutes with an electric mixer. Add the egg and vanilla extract, and continue to mix until well combined.
- Combine Dry Ingredients: In another bowl, whisk together the all-purpose flour, baking powder, and salt. Gradually add the dry ingredients to the wet mixture, mixing on low speed until the dough forms.
- Chill the Dough: Divide the dough into two equal parts. Flatten each portion into a disk, wrap in plastic wrap, and refrigerate for at least 1 hour. This helps the dough firm up and makes it easier to handle and cut.
- Preheat and Prepare: Preheat your oven to 350°F (175°C). Line two baking sheets with parchment paper to prevent the cookies from sticking.
- Roll and Cut: On a lightly floured surface, roll out one disk of dough to about ¼ inch thickness. Use your chosen cookie cutters to cut out festive shapes. Transfer the cut-out cookies to the prepared baking sheets, leaving about 1 inch space between each cookie.
- Bake the Cookies: Bake in the preheated oven for 8-10 minutes, or until the edges are just beginning to turn golden. Be careful not to overbake, as they continue to firm up as they cool. Let the cookies cool on the baking sheets for 5 minutes before transferring them to wire racks to cool completely.
- Decorate: Once the cookies are completely cool, use icing to decorate them. Apply a thin layer of icing and let the creativity flow with colored sprinkles or edible glitter.
Extra Tips:
For best results, make sure that your butter is softened to room temperature, as this will help in achieving the right dough consistency. If your dough becomes too warm while rolling out, pop it back in the fridge for a few minutes to firm up.
When decorating, consider setting up a decorating station with various icings and toppings for a fun, interactive experience. Finally, store your decorated cookies in an airtight container to keep them fresh for several days. Enjoy the festive fun!
Chocolate Peppermint Bark

Chocolate Peppermint Bark is a delightful holiday treat that combines the rich taste of chocolate with the invigorating zing of peppermint. This family-friendly recipe is perfect for a Christmas party, offering a festive and delicious dessert that appeals to both kids and adults.
The layers of smooth chocolate and crunchy peppermint candy create a harmonious blend of textures and flavors, making it an irresistible addition to your holiday table. Making Chocolate Peppermint Bark isn’t only easy but also a fun activity to do with the family.
With just a few ingredients and simple steps, you can create a beautiful and tasty treat that looks impressive but requires little effort. The recipe yields a serving size perfect for 4-6 people, making it ideal for small gatherings or as a part of a larger dessert spread.
Whether you’re a seasoned cook or a beginner, this recipe is sure to be a hit at your next Christmas celebration.
Ingredients for 4-6 people:
- 12 ounces of semisweet chocolate chips
- 12 ounces of white chocolate chips
- 1 teaspoon of peppermint extract
- 1/2 cup of crushed candy canes
Cooking Instructions:
- Prepare the Baking Sheet: Line a baking sheet with parchment paper to guarantee easy removal of the bark once it has set.
- Melt the Semisweet Chocolate: In a microwave-safe bowl, melt the semisweet chocolate chips in 30-second intervals, stirring between each interval until smooth. This should take about 1-2 minutes in total.
- Spread the Semisweet Chocolate: Pour the melted semisweet chocolate onto the prepared baking sheet, using a spatula to spread it evenly into a rectangular shape, about 1/4 inch thick. Place it in the refrigerator to set for about 15 minutes.
- Melt the White Chocolate: While the semisweet chocolate is setting, melt the white chocolate chips in a separate microwave-safe bowl using the same method as above.
- Add Peppermint Extract: Once the white chocolate is melted, stir in the peppermint extract until fully incorporated.
- Spread the White Chocolate: Remove the baking sheet from the refrigerator and pour the melted white chocolate over the semisweet chocolate layer. Spread it evenly with a spatula.
- Sprinkle the Candy Canes: Quickly sprinkle the crushed candy canes over the white chocolate while it’s still warm, gently pressing them into the surface.
- Set the Bark: Allow the bark to set at room temperature or place it in the refrigerator for about 1 hour until it’s completely firm.
- Break into Pieces: Once set, break the bark into pieces of desired size and serve.
Extra Tips:
When making Chocolate Peppermint Bark, confirm that each layer is fully set before adding the next to prevent the colors from mixing.
If you prefer a more intense peppermint flavor, you can increase the amount of peppermint extract slightly, but be cautious as it can be quite strong.
For a decorative touch, try drizzling melted dark or milk chocolate over the top before adding the candy canes. This treat can be stored in an airtight container for up to two weeks, making it a great make-ahead option for holiday parties.
Gingerbread Cupcakes

Gingerbread cupcakes are a delightful twist on the classic holiday treat that can bring warmth and cheer to any family-friendly Christmas party. These cupcakes capture the rich, spicy flavors of traditional gingerbread cookies in a moist and fluffy cake form. Perfectly spiced with ginger, cinnamon, and cloves, these cupcakes are topped with a creamy vanilla or cream cheese frosting, making them a festive and irresistible dessert option for your holiday gathering.
Ideal for serving 4-6 people, these gingerbread cupcakes aren’t only delicious but also fun to make. They offer a wonderful opportunity for family members, especially the young ones, to join in on the baking process. Whether you’re hosting a Christmas party or simply enjoying a cozy night at home, these cupcakes are sure to become a holiday favorite.
Ingredients (Serving Size: 4-6 People)
- 1 1/4 cups all-purpose flour
- 1 teaspoon baking powder
- 1/4 teaspoon baking soda
- 1/2 teaspoon salt
- 1 teaspoon ground ginger
- 1 teaspoon ground cinnamon
- 1/4 teaspoon ground cloves
- 1/4 cup unsalted butter, room temperature
- 1/4 cup packed brown sugar
- 1/4 cup molasses
- 1/4 cup milk
- 1 large egg
- 1 teaspoon vanilla extract
- 1/2 cup cream cheese frosting or vanilla frosting
Cooking Instructions
- Preheat the Oven: Begin by preheating your oven to 350°F (175°C). Line a 12-cup muffin tin with cupcake liners and set aside.
- Mix Dry Ingredients: In a medium bowl, whisk together the flour, baking powder, baking soda, salt, ginger, cinnamon, and cloves. This step guarantees that the spices are evenly distributed throughout the batter.
- Cream the Butter and Sugar: In a separate large bowl, cream the butter and brown sugar together using an electric mixer on medium speed until light and fluffy, about 3 minutes.
- Add Wet Ingredients: Add the molasses, milk, egg, and vanilla extract to the butter mixture. Beat on low speed until well combined. It may look slightly curdled, but this is normal.
- Combine Wet and Dry Ingredients: Gradually add the dry ingredients to the wet mixture, beating on low speed until just combined. Be careful not to overmix, as this can lead to dense cupcakes.
- Fill the Cupcake Liners: Divide the batter evenly among the prepared cupcake liners, filling each about two-thirds full.
- Bake the Cupcakes: Place the muffin tin in the preheated oven and bake for 15-18 minutes, or until a toothpick inserted into the center of a cupcake comes out clean.
- Cool and Frost: Allow the cupcakes to cool in the pan for about 5 minutes before transferring them to a wire rack to cool completely. Once cooled, frost each cupcake with cream cheese or vanilla frosting as desired.
Extra Tips
For an added festive touch, consider sprinkling a little cinnamon or nutmeg over the frosted cupcakes or adorning them with holiday-themed sprinkles.
If you’re making these cupcakes with kids, let them get creative with the frosting and decorations. When measuring molasses, lightly grease the measuring cup to guarantee it pours out smoothly.
Finally, if you prefer a milder spice, feel free to adjust the amount of ginger and cloves to suit your taste. Enjoy your gingerbread cupcakes with a warm cup of cocoa or spiced cider for the perfect holiday treat!
