
There’s something magical about starting the Christmas celebrations with a delightful lunch that brings loved ones together. Picture the cozy aroma of French onion soup paired with the vibrant hues of a cranberry and walnut salad. Every dish, from the herb-crusted rack of lamb to the indulgent smoked salmon blinis, has its own charm. These recipes are perfect for creating cherished memories around the table. Are you ready to make this Christmas Eve truly special?
Classic French Onion Soup

There’s nothing quite like a warm, savory bowl of French Onion Soup to bring comfort and joy to your Christmas Eve lunch. This classic dish, with its rich caramelized onion broth topped with a layer of gooey, melted Gruyère cheese, is both hearty and elegant, making it a perfect choice for a festive meal.
The secret to a great French Onion Soup lies in patiently caramelizing the onions until they reach a deep, sweet flavor, and using quality beef stock that creates a robust base for the soup.
French Onion Soup is a timeless recipe that beautifully balances sweet and savory flavors, and when served with slices of crusty baguette, it becomes a satisfying meal that’s sure to impress your guests. This recipe serves 4-6 people and captures the essence of French cuisine with simple yet flavorful ingredients. It’s an ideal choice for those looking to add a touch of elegance to their holiday menu while keeping the preparation straightforward.
Ingredients (serves 4-6):
- 4 large yellow onions, thinly sliced
- 4 tablespoons unsalted butter
- 1 tablespoon olive oil
- 2 cloves garlic, minced
- 1 teaspoon sugar
- 1/2 cup dry white wine
- 6 cups beef stock
- 2 sprigs fresh thyme
- 1 bay leaf
- Salt and freshly ground black pepper to taste
- 1 baguette, sliced
- 2 cups grated Gruyère cheese
Cooking Instructions:
- Prepare the Onions: In a large, heavy-bottomed pot over medium heat, melt the butter with the olive oil. Add the sliced onions and stir to coat them evenly. Cook the onions, stirring occasionally, for about 15 minutes until they begin to soften.
- Caramelize the Onions: Add the sugar and continue to cook the onions for an additional 30-40 minutes, stirring frequently. The onions should turn a deep golden brown and become caramelized without burning.
- Deglaze the Pot: Add the minced garlic to the pot and cook for another minute. Pour in the white wine to deglaze, scraping up any browned bits from the bottom of the pot. Allow the wine to reduce by half.
- Make the Broth: Add the beef stock, thyme sprigs, and bay leaf to the pot. Bring the soup to a boil, then reduce the heat to low and let it simmer for about 30 minutes to allow the flavors to meld together. Season with salt and pepper to taste.
- Prepare the Baguette: While the soup simmers, preheat your oven to 400°F (200°C). Arrange the baguette slices on a baking sheet and toast them in the oven for about 5 minutes on each side until they’re crisp and golden.
- Assemble and Serve: Ladle the soup into oven-safe bowls, place a toasted baguette slice on top of each serving, and sprinkle generously with Gruyère cheese. Place the bowls on a baking sheet and broil them in the oven until the cheese is bubbly and golden brown. Serve immediately.
Extra Tips:
For the best flavor, patience is key when caramelizing the onions; don’t rush this step as it’s vital for developing the soup’s depth of flavor.
If you prefer a slightly thicker soup, you can add a tablespoon of flour to the onions before deglazing with wine. Additionally, for an extra layer of flavor, consider using a mixture of different cheeses such as Swiss or Emmental along with Gruyère.
Finally, confirm your bowls are broiler-safe to avoid any mishaps when melting the cheese. Enjoy your Classic French Onion Soup with a glass of wine for the ultimate festive experience.
Festive Cranberry and Walnut Salad
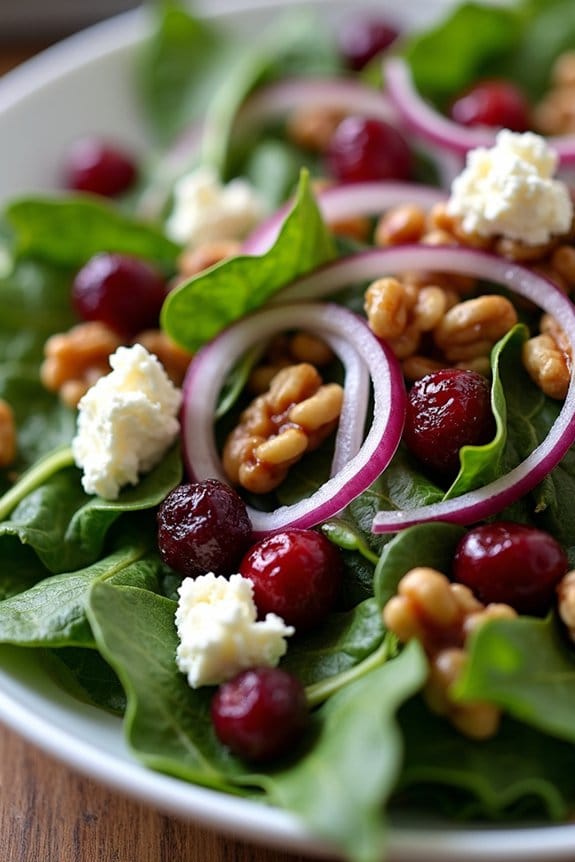
Celebrate the holiday season with a vibrant and invigorating Festive Cranberry and Walnut Salad. This dish is perfect for a light Christmas Eve lunch, combining sweet, tart, and nutty flavors with a touch of festive flair.
The combination of dried cranberries, crunchy walnuts, crisp greens, and a tangy dressing creates a delightful balance of texture and taste. It’s not only a feast for the palate but also a visually appealing addition to your holiday table, with its rich colors and inviting presentation.
This salad is simple to prepare and can be easily tailored to suit your personal preferences. It’s a great option for vegetarians and can be made vegan by choosing a dairy-free cheese alternative. Whether you’re serving it as a starter or a side, this Festive Cranberry and Walnut Salad is sure to impress your guests and add a touch of elegance to your Christmas Eve meal.
Ingredients for 4-6 Servings:
- 6 cups mixed salad greens (such as arugula, spinach, and romaine)
- 1 cup dried cranberries
- 1 cup walnut halves, toasted
- 1/2 cup crumbled feta cheese (or a dairy-free alternative)
- 1 small red onion, thinly sliced
- 1/4 cup balsamic vinaigrette dressing
- Salt and pepper to taste
Cooking Instructions:
- Prepare the Greens: Start by washing and drying the mixed salad greens thoroughly. Use a salad spinner to remove excess water, guaranteeing that the greens are crisp and fresh.
- Toast the Walnuts: Place the walnut halves in a dry skillet over medium heat. Stir frequently for about 5-7 minutes until they’re golden brown and fragrant. Be careful not to burn them. Once toasted, set aside to cool.
- Assemble the Salad: In a large salad bowl, combine the mixed greens, dried cranberries, toasted walnuts, crumbled feta cheese, and thinly sliced red onion. Gently toss the ingredients together to ensure an even distribution throughout the salad.
- Dress the Salad: Drizzle the balsamic vinaigrette dressing over the salad. Toss the salad again to coat all the ingredients evenly with the dressing. Add salt and pepper to taste, adjusting the seasoning to your preference.
- Serve Immediately: Transfer the salad to a serving platter or individual plates. Serve immediately while the salad is fresh and crisp, allowing your guests to enjoy the blend of flavors and textures.
Extra Tips:
For a more robust flavor profile, consider adding a handful of sliced apples or pears to the salad for a fruity touch.
To save time, you can toast the walnuts in advance and store them in an airtight container until ready to use.
When selecting a balsamic vinaigrette, opt for one with a balance of sweetness and acidity to complement the cranberries and walnuts.
If you wish to prepare the salad ahead of time, keep the dressing separate and toss it with the salad just before serving to maintain the freshness of the greens.
Smoked Salmon and Cream Cheese Blinis

Smoked Salmon and Cream Cheese Blinis are a delightful, elegant dish perfect for a festive Christmas Eve lunch. These bite-sized treats feature a soft, pillowy blini as the base, topped with a smooth layer of creamy cheese and luxurious smoked salmon. The combination of flavors creates a harmonious balance, making them a hit for any holiday gathering.
Not only are they visually appealing, but they also bring a burst of flavor with every bite, making them an excellent choice for those looking to add a sophisticated touch to their Christmas menu.
Preparing Smoked Salmon and Cream Cheese Blinis is straightforward, and the results are bound to impress your guests. The key is to guarantee that all elements are fresh, particularly the smoked salmon, which provides the dish’s distinctive taste.
With a few simple ingredients and some preparation, you can create a platter that looks and tastes like it was made by a top chef. Whether you’re hosting a large family gathering or an intimate meal, these blinis will add a touch of elegance and festivity to the occasion.
Ingredients (Serves 4-6)
- 1 cup all-purpose flour
- 1 cup milk
- 1 large egg
- 1 teaspoon baking powder
- 1/4 teaspoon salt
- 1 tablespoon butter, melted
- 8 ounces cream cheese, softened
- 4 ounces smoked salmon, thinly sliced
- Fresh dill, for garnish
- Lemon wedges, for serving
Cooking Instructions
- Prepare the Batter: In a mixing bowl, whisk together the flour, milk, egg, baking powder, and salt until smooth. Add melted butter and mix until fully combined. Let the batter rest for about 10 minutes to allow the gluten to relax, which will help achieve light and fluffy blinis.
- Cook the Blinis: Heat a non-stick skillet or griddle over medium heat. Lightly grease the surface with butter or oil. Spoon about 1 tablespoon of batter onto the skillet for each blini, spacing them apart. Cook until bubbles form on the surface and the edges are set, about 2-3 minutes. Flip and cook the other side until golden brown, another 1-2 minutes. Transfer to a plate and keep warm.
- Prepare the Toppings: In a small bowl, beat the softened cream cheese until smooth and spreadable. Thinly slice the smoked salmon and set aside.
- Assemble the Blinis: Spread a generous layer of cream cheese over each blini. Top with a slice of smoked salmon. Garnish with a sprig of fresh dill.
- Serve: Arrange the blinis on a serving platter. Serve with lemon wedges on the side, allowing guests to squeeze fresh lemon juice over their blinis to enhance the flavors.
Extra Tips
To guarantee your blinis are perfectly light and fluffy, don’t overmix the batter as this can make them dense. If you have time, you can prepare the blini batter a day in advance and store it in the refrigerator, which can enhance the flavor.
When cooking the blinis, make sure your skillet is properly heated before pouring the batter, as this helps achieve a nice golden color. For added flavor, consider adding a touch of lemon zest to the cream cheese before spreading it on the blinis.
Herb-Crusted Rack of Lamb
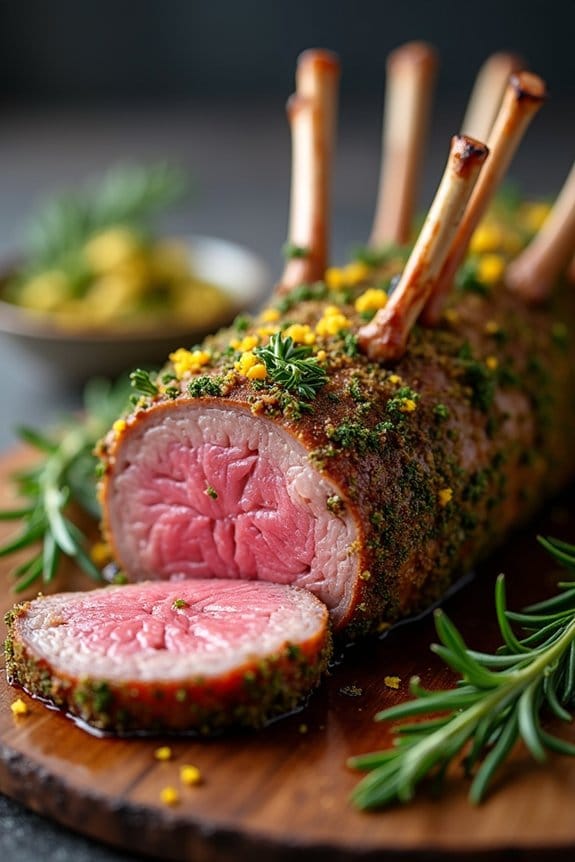
Herb-Crusted Rack of Lamb is a sophisticated and flavorful dish that makes a perfect centerpiece for your Christmas Eve lunch. This dish balances the rich, tender meat of the lamb with a fragrant and crisp herb crust, creating a harmonious blend of flavors and textures. The use of fresh herbs not only enhances the taste but also gives it a festive touch, making it an impressive dish to serve to family and friends during the holiday season.
The preparation of Herb-Crusted Rack of Lamb is relatively straightforward, yet it delivers a gourmet-level dish. The lamb is first seared to lock in its natural juices, then coated with a mixture of herbs, garlic, and breadcrumbs before finishing in the oven. This method guarantees a succulent and flavorful roast that’s both tender and visually appealing. With minimal ingredients and a few careful steps, you can prepare a dish that’s bound to impress your guests and bring a touch of elegance to your Christmas Eve table.
Ingredients (Serves 4-6):
- 2 racks of lamb (8 ribs each), French-trimmed
- 3 tablespoons olive oil, divided
- Salt and freshly ground black pepper, to taste
- 1 cup breadcrumbs
- 2 tablespoons Dijon mustard
- 4 cloves garlic, minced
- 2 tablespoons fresh rosemary, chopped
- 2 tablespoons fresh thyme, chopped
- Zest of 1 lemon
Cooking Instructions:
- Preheat the Oven: Start by preheating your oven to 400°F (200°C). This will make sure that the oven is ready once the lamb is prepared for roasting.
- Prepare the Lamb: Season the racks of lamb generously with salt and pepper on all sides. This enhances the natural flavor of the meat and forms the base seasoning layer.
- Sear the Lamb: In a large skillet, heat 2 tablespoons of olive oil over medium-high heat. Once hot, add the lamb racks, fat side down, and sear for about 2-3 minutes on each side until they’re browned. This step locks in the juices and adds a rich flavor to the meat.
- Prepare the Herb Crust: In a medium bowl, combine the breadcrumbs, minced garlic, rosemary, thyme, lemon zest, and the remaining tablespoon of olive oil. Mix well to form a cohesive mixture.
- Coat the Lamb: Brush the seared lamb racks with Dijon mustard all over. This will help the herb crust adhere to the meat. Then, press the herb mixture onto the mustard-coated lamb, ensuring it sticks well and covers the meat evenly.
- Roast the Lamb: Place the herb-crusted lamb racks on a baking sheet or roasting pan, bone side down. Roast in the preheated oven for about 20-25 minutes, or until the internal temperature reaches your desired level of doneness (120°F for rare, 130°F for medium-rare).
- Rest the Lamb: Remove the lamb from the oven and let it rest for 10 minutes. Resting allows the juices to redistribute, guaranteeing tender and juicy meat when sliced.
Extra Tips:
When preparing the Herb-Crusted Rack of Lamb, it’s important to use fresh herbs as they impart a much more aromatic and vibrant flavor compared to dried herbs.
Additionally, when searing the lamb, avoid overcrowding the pan as this can prevent proper browning. For a more robust flavor, you can marinate the lamb racks with the herbs and garlic mixture overnight before applying the final crust.
Finally, always use a meat thermometer to check for doneness, as this helps avoid overcooking the lamb, maintaining its tenderness and juiciness.
Mushroom and Sage Risotto
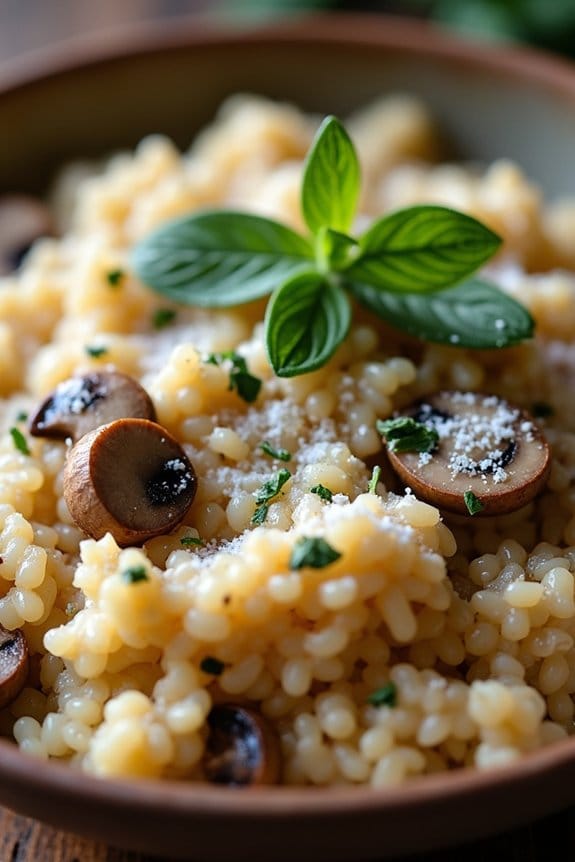
Mushroom and Sage Risotto is an elegant and comforting dish perfect for a Christmas Eve lunch. This creamy risotto is infused with earthy mushrooms and the aromatic flavor of fresh sage, making it a delightful addition to any festive table. The combination of these ingredients creates a rich and savory profile that’s sure to impress your family and friends.
This recipe serves 4-6 people and is a wonderful way to showcase the natural flavors of the season. The slow-cooked Arborio rice absorbs the delicious broth, while the mushrooms and sage add depth and complexity to the dish. With a little patience and some stirring, you’ll have a beautiful risotto that’s perfect for a cozy holiday meal.
Ingredients:
- 2 tablespoons olive oil
- 1 tablespoon butter
- 1 medium onion, finely chopped
- 2 cloves garlic, minced
- 200g (about 7 oz) fresh mushrooms, sliced (such as cremini or button mushrooms)
- 1 1/2 cups Arborio rice
- 1/2 cup dry white wine
- 4 cups vegetable or chicken broth, kept warm
- 1/2 cup grated Parmesan cheese
- Salt and pepper to taste
- 2 tablespoons fresh sage leaves, chopped
- Extra Parmesan cheese and fresh sage leaves for garnish
Instructions:
- Prepare the Base: In a large saucepan, heat the olive oil and butter over medium heat. Add the chopped onion and sauté until it becomes translucent, about 5 minutes. Stir in the minced garlic and cook for another minute until fragrant.
- Cook the Mushrooms: Add the sliced mushrooms to the pan and cook until they’re browned and have released their moisture, about 5-7 minutes. This will enhance the flavor of the risotto.
- Toast the Rice: Stir in the Arborio rice, ensuring it’s well coated with the oil and butter. Cook the rice for 2-3 minutes, stirring frequently, until the rice edges appear translucent.
- Deglaze with Wine: Pour in the white wine and stir continuously until the liquid is absorbed. This step adds a wonderful depth of flavor to the risotto.
- Add Broth Gradually: Begin adding the warm broth, one ladle at a time, stirring continuously. Allow each addition of broth to be absorbed before adding the next. This process will take about 18-20 minutes, and the risotto should become creamy and tender.
- Finish the Risotto: Once the rice is cooked to your liking, stir in the grated Parmesan cheese. Season with salt and pepper to taste. Finally, add the chopped sage leaves and stir well to combine.
- Serve: Remove from heat and let the risotto sit for a minute. Serve hot, garnished with extra Parmesan cheese and fresh sage leaves.
Extra Tips:
For the best results, use a high-quality Arborio rice, as it gives the risotto its signature creamy texture. It’s crucial to stir the risotto continuously while gradually adding the broth; this releases the rice’s starch, making the dish creamy.
If you prefer a more pronounced mushroom flavor, consider using a mix of different mushroom varieties or adding a small amount of dried porcini mushrooms rehydrated in warm water.
Remember not to rush the process; patience is key to achieving the perfect risotto consistency. Enjoy your Mushroom and Sage Risotto with a glass of the same white wine used in cooking for a harmonious pairing.
Honey-Glazed Holiday Ham

The Honey-Glazed Holiday Ham is a quintessential centerpiece for any festive Christmas Eve lunch. Its succulent flavors and enticing aroma create a joyful culinary experience that brings families together. This dish combines the savory taste of a perfectly cooked ham with the sweet, sticky glaze of honey, creating a mouthwatering contrast that delights the senses.
When served with traditional sides like roasted vegetables or mashed potatoes, the Honey-Glazed Holiday Ham becomes a memorable meal that warms both the heart and soul during the holiday season.
Preparing the Honey-Glazed Holiday Ham requires a bit of time and attention to detail, but the end result is well worth the effort. The key to achieving the perfect glaze lies in the balance of flavors, guaranteeing that the sweetness of the honey complements the natural saltiness of the ham without overpowering it.
By following this recipe, you’ll be able to create a tender, juicy ham with a beautifully caramelized crust that your family and friends will rave about for years to come.
Ingredients (Serves 4-6):
- 1 (4-5 pounds) bone-in ham
- 1 cup honey
- 1/2 cup brown sugar
- 1/4 cup Dijon mustard
- 1/4 cup apple cider vinegar
- 1/2 teaspoon ground cloves
- 1 teaspoon ground cinnamon
- 1/2 teaspoon ground allspice
Cooking Instructions:
- Preheat the Oven: Begin by preheating your oven to 325°F (165°C). Adjust the racks to guarantee there’s enough space for your ham.
- Prepare the Ham: Place the ham on a large roasting pan. Score the surface of the ham in a criss-cross pattern using a sharp knife, about 1/4 inch deep. This will help the glaze penetrate the meat.
- Make the Glaze: In a medium saucepan, combine the honey, brown sugar, Dijon mustard, apple cider vinegar, ground cloves, cinnamon, and allspice. Heat over medium heat, stirring frequently, until the sugar dissolves completely and the glaze is smooth.
- Apply the Glaze: Brush a generous amount of the glaze all over the scored ham, guaranteeing it gets into the crevices. Reserve some glaze for later.
- Bake the Ham: Place the ham in the preheated oven and bake for approximately 1.5 to 2 hours, or until the internal temperature reaches 140°F (60°C). Baste the ham with the reserved glaze every 20-30 minutes to build up a sticky, caramelized coating.
- Rest and Serve: Once cooked, remove the ham from the oven and let it rest for 10-15 minutes before carving. This allows the juices to redistribute throughout the meat, guaranteeing a moist and flavorful result.
Extra Tips:
For an even more flavorful ham, consider marinating the ham in the glaze mixture overnight in the refrigerator before baking. Additionally, using a digital meat thermometer can help you monitor the internal temperature more accurately, avoiding overcooking.
If you prefer a smokier flavor, try adding 1/4 teaspoon of smoked paprika to the glaze. Finally, be sure to save any leftover ham for sandwiches or soups – a delicious way to extend the holiday flavors!
Roasted Butternut Squash and Apple Soup
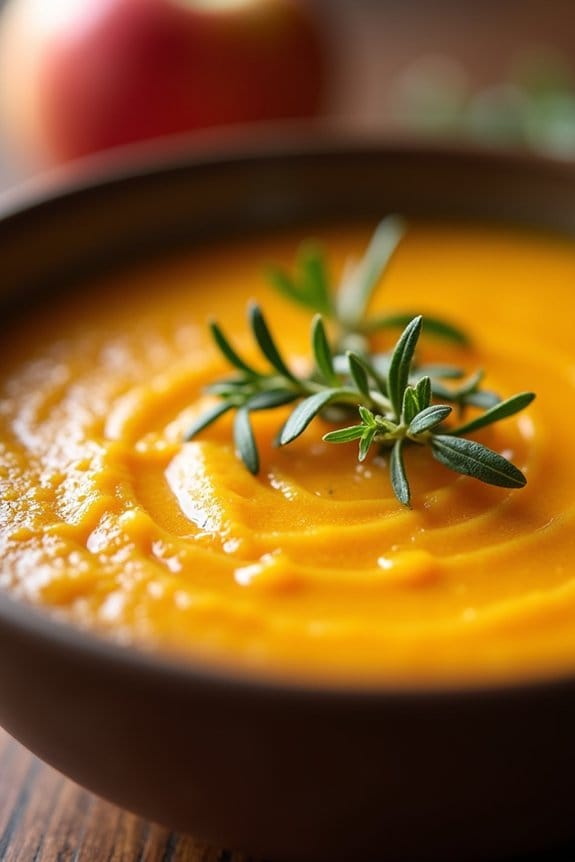
Roasted Butternut Squash and Apple Soup is a delightful blend of sweet and savory flavors that makes for a perfect starter or a light meal during the festive Christmas Eve lunch. The rich, creamy texture of the roasted butternut squash, combined with the natural sweetness of apples, creates a harmonious balance that’s certain to please your palate.
This comforting soup isn’t only delicious but also a healthy choice, packed with vitamins and nutrients that will keep you energized throughout the holiday season. Ideal for a serving size of 4-6 people, this recipe is both simple and rewarding to make.
The key to achieving the deep, caramelized flavor lies in roasting the vegetables, which enhances their natural sweetness and adds an extra depth to the soup. A dash of spices complements the sweetness, while a hint of cream brings everything together in a silky, luxurious finish.
Whether you’re hosting a gathering or enjoying a quiet meal with loved ones, this Roasted Butternut Squash and Apple Soup is sure to become a holiday favorite.
Ingredients:
- 1 medium butternut squash, peeled and cubed
- 2 tablespoons olive oil
- Salt and pepper to taste
- 2 medium apples, peeled, cored, and chopped
- 1 large onion, chopped
- 2 cloves garlic, minced
- 4 cups vegetable broth
- 1/2 teaspoon ground cinnamon
- 1/4 teaspoon ground nutmeg
- 1/2 cup heavy cream
- Fresh thyme leaves for garnish (optional)
Instructions:
- Preheat and Prepare Vegetables: Preheat your oven to 400°F (200°C). Spread the cubed butternut squash on a baking sheet, drizzle with olive oil, and season with salt and pepper. Toss to coat evenly.
- Roast the Vegetables: Place the baking sheet in the preheated oven and roast for about 25-30 minutes, or until the squash is tender and slightly caramelized. Stir halfway through to guarantee even roasting.
- Sauté Aromatics: While the squash is roasting, heat a tablespoon of olive oil in a large pot over medium heat. Add the chopped onion and cook until translucent, about 5 minutes. Add the garlic and cook for an additional minute until fragrant.
- Combine Ingredients: Add the roasted squash, chopped apples, vegetable broth, cinnamon, and nutmeg to the pot. Stir to combine, then bring the mixture to a boil. Reduce the heat to low and simmer for 15-20 minutes, allowing the flavors to meld.
- Blend the Soup: Remove the pot from the heat. Using an immersion blender, blend the soup until smooth and creamy. Alternatively, you can transfer the soup in batches to a countertop blender. If using a blender, return the soup to the pot afterward.
- Finish with Cream: Stir in the heavy cream and heat the soup gently over low heat for an additional 5 minutes. Taste and adjust seasoning with salt and pepper as needed.
- Serve and Garnish: Ladle the soup into bowls and garnish with fresh thyme leaves if desired. Serve warm and enjoy.
Extra Tips: When roasting the squash, make sure the cubes are cut evenly to promote uniform cooking. If you prefer a vegan version, you can substitute the heavy cream with coconut milk or almond milk.
For a touch of heat, consider adding a pinch of cayenne pepper while simmering the soup. This dish can be made ahead of time and stored in the refrigerator for up to 3 days. Simply reheat gently on the stove before serving.
Prosciutto-Wrapped Asparagus Bundles

The secret to perfect Prosciutto-Wrapped Asparagus Bundles lies in choosing fresh, vibrant asparagus spears and high-quality prosciutto. The spears are lightly seasoned and then wrapped in thin slices of prosciutto, which crisp up beautifully in the oven.
This recipe serves 4-6 people, making it an ideal side dish for a festive gathering. With minimal ingredients and a straightforward cooking process, you’ll have these tasty bundles ready in no time.
Ingredients for 4-6 people:
- 1 pound fresh asparagus, trimmed
- 8-12 slices of prosciutto
- 2 tablespoons olive oil
- 1/2 teaspoon salt
- 1/4 teaspoon black pepper
- 1/2 teaspoon garlic powder (optional)
- 1 lemon, cut into wedges (for serving)
Cooking Instructions:
- Preheat the Oven: Start by preheating your oven to 400°F (200°C). Line a baking sheet with parchment paper for easy cleanup.
- Prepare the Asparagus: Wash the asparagus and trim the woody ends. You can do this by gently bending each spear until it naturally snaps, or by cutting off about 1-2 inches from the bottom.
- Season the Asparagus: In a large bowl, toss the asparagus spears with olive oil, salt, black pepper, and garlic powder, guaranteeing each spear is evenly coated.
- Wrap the Asparagus: Take 3-4 asparagus spears and wrap them tightly with a slice of prosciutto. The prosciutto should overlap slightly as you wrap it around the asparagus, securing the bundle. Repeat this process until all asparagus spears are wrapped.
- Bake the Bundles: Place the wrapped bundles on the prepared baking sheet, making sure they’re evenly spaced. Bake in the preheated oven for 12-15 minutes, or until the prosciutto is crispy and the asparagus is tender.
- Serve: Once done, remove from the oven and let cool slightly. Serve warm with lemon wedges on the side for an extra burst of freshness.
Extra Tips:
- To guarantee even cooking, try to select asparagus spears that are similar in size and thickness. This will help them cook evenly and prevent overcooking of thinner spears.
- If the prosciutto slices are too long, feel free to cut them in half before wrapping to avoid excessive overlapping.
- You can prepare the bundles ahead of time and store them in the refrigerator for a few hours before baking, making them a convenient option for busy holiday preparations.
Baked Brie With Cranberry Chutney
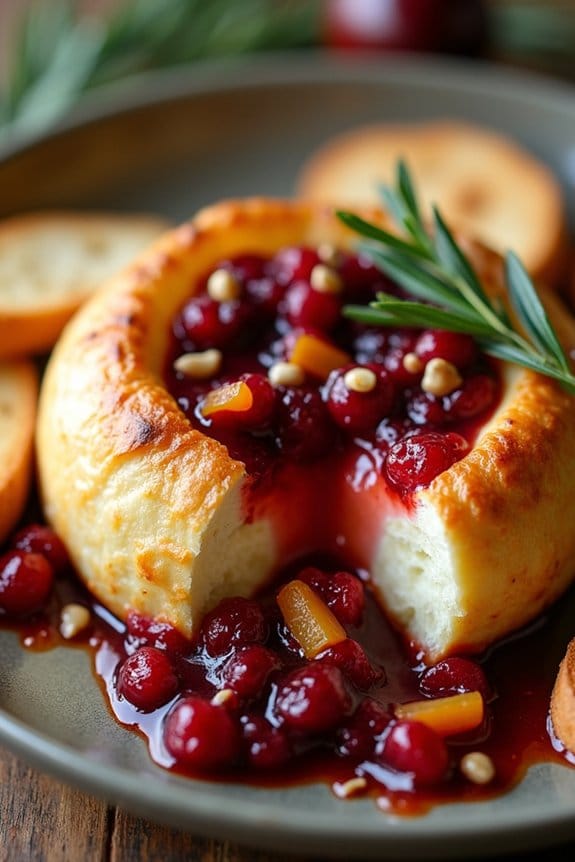
Baked Brie With Cranberry Chutney is an irresistible appetizer that combines creamy, gooey cheese with a sweet and tangy chutney, making it a perfect starter for your Christmas Eve lunch. The warmth of the baked brie pairs beautifully with the tartness of the cranberry chutney, offering a delightful contrast in flavors and textures.
This dish not only looks elegant when served but also requires minimal effort, allowing you to spend more time with your loved ones during the festivities.
To make this mouthwatering appetizer, you’ll need to prepare a homemade cranberry chutney that complements the richness of the brie. The chutney can be made in advance, allowing you to focus on the baking process on the day of your celebration.
Served with crusty bread or crackers, Baked Brie With Cranberry Chutney is sure to be a hit among your guests and leave them enthusiastic about the main course.
Ingredients (Serves 4-6):
- 1 wheel of brie cheese (about 8 ounces)
- 1 cup fresh or frozen cranberries
- 1/2 cup granulated sugar
- 1/4 cup water
- 1/4 cup apple cider vinegar
- 1/4 cup chopped pecans
- 1/4 cup dried apricots, chopped
- 1/2 teaspoon ground cinnamon
- 1/4 teaspoon ground ginger
- 1 sheet puff pastry, thawed
- 1 egg, beaten (for egg wash)
- Crackers or baguette slices for serving
Instructions:
1. Preheat the Oven: Begin by preheating your oven to 375°F (190°C). This will guarantee that the oven is ready for baking the brie once it’s wrapped in puff pastry.
2. Prepare the Cranberry Chutney: In a medium saucepan, combine the cranberries, sugar, water, and apple cider vinegar. Cook over medium heat until the cranberries begin to pop and the mixture thickens, about 10 minutes.
Stir in the chopped pecans, dried apricots, ground cinnamon, and ground ginger. Allow the chutney to cool slightly.
3. Prepare the Brie: On a lightly floured surface, roll out the puff pastry sheet to ensure it’s large enough to wrap around the brie. Place the brie in the center of the pastry. Spoon the cranberry chutney over the top of the brie.
4. Wrap the Brie: Gently fold the edges of the puff pastry over the brie, ensuring it’s completely covered. Trim any excess pastry if necessary. Brush the beaten egg over the surface of the pastry to create a golden, shiny crust when baked.
5. Bake the Brie: Place the wrapped brie on a baking sheet lined with parchment paper. Bake in the preheated oven for 20-25 minutes, or until the pastry is golden brown and the cheese is warmed through.
6. Serve: Remove from the oven and let it cool for 5 minutes before serving. Transfer the baked brie to a serving platter and surround it with crackers or baguette slices.
Extra Tips:
For a more festive presentation, you can cut small decorative shapes out of any leftover puff pastry and place them on top of the wrapped brie before baking.
If you prefer a stronger flavor, consider using a wheel of brie with a stronger rind or incorporating herbs into the chutney. Keep an eye on the brie as it bakes to prevent the pastry from over-browning.
Enjoy this dish warm to fully appreciate the creamy texture of the melted brie.
Garlic and Rosemary Roasted Chicken

If you’re looking for a dish that embodies the warmth and comfort of the holiday season, Garlic and Rosemary Roasted Chicken is an excellent choice for your Christmas Eve lunch. This recipe combines the aromatic flavors of garlic and rosemary with succulent roasted chicken, creating a dish that’s both flavorful and festive. Perfect for gathering around the table with family and friends, this roasted chicken recipe is sure to be a hit and bring joy to your holiday meal.
Roasting a chicken is a classic cooking method that allows the natural flavors of the meat to shine while being enhanced by a few carefully chosen ingredients. The garlic provides a robust depth, while the rosemary offers an earthy, slightly piney aroma that complements the savory notes of the chicken. The result is a tender, juicy bird with crispy, golden skin that will have everyone reaching for seconds. This recipe serves 4-6 people, making it perfect for a small family gathering or intimate celebration.
Ingredients:
- 1 whole chicken (approximately 4-5 pounds)
- 3 tablespoons olive oil
- 1 tablespoon fresh rosemary, chopped
- 6 cloves garlic, minced
- Salt and pepper, to taste
- 1 lemon, sliced
- 1 onion, quartered
- 4 sprigs fresh rosemary, for stuffing
- 4 garlic cloves, whole, for stuffing
Cooking Instructions:
- Preheat the Oven: Start by preheating your oven to 425°F (220°C). This will guarantee that the chicken cooks evenly and develops a crispy skin.
- Prepare the Chicken: Rinse the chicken under cold water and pat it dry with paper towels. Make sure the cavity is empty. Place the chicken in a roasting pan.
- Season the Chicken: In a small bowl, mix the olive oil, chopped rosemary, minced garlic, salt, and pepper. Rub this mixture all over the chicken, making sure that you cover both the outside skin and the cavity.
- Stuff the Chicken: Stuff the cavity of the chicken with the lemon slices, quartered onion, whole garlic cloves, and rosemary sprigs. This will infuse the chicken with additional flavor as it cooks.
- Tie the Legs: Use kitchen twine to tie the legs of the chicken together. This guarantees that the chicken cooks evenly and helps keep the stuffing inside.
- Roast the Chicken: Place the chicken in the preheated oven and roast for about 1 hour and 15 minutes, or until the internal temperature reaches 165°F (74°C). Baste the chicken occasionally with the pan juices to keep it moist.
- Rest and Serve: Once cooked, remove the chicken from the oven and let it rest for about 10 minutes before carving. This allows the juices to redistribute, resulting in a juicier chicken. Serve with your favorite side dishes and enjoy!
Extra Tips:
For an even more flavorful dish, marinate the chicken in the garlic and rosemary mixture for a few hours or overnight before roasting. This allows the flavors to penetrate the meat more deeply.
If you prefer a spicier kick, consider adding a pinch of red pepper flakes to the seasoning mix. When roasting, using a roasting rack can help elevate the chicken, allowing hot air to circulate around it for a more evenly cooked bird.
Finally, if you notice the skin browning too quickly, cover the chicken loosely with aluminum foil to prevent burning. Enjoy your festive Garlic and Rosemary Roasted Chicken this Christmas Eve!
Spinach and Ricotta Stuffed Shells
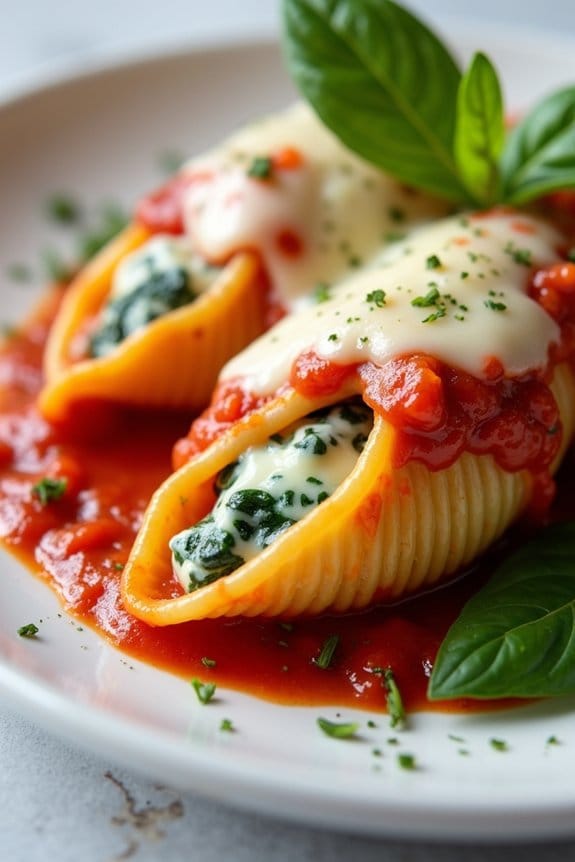
Spinach and Ricotta Stuffed Shells are a delightful Italian-inspired dish perfect for a festive Christmas Eve lunch. This recipe combines the creamy richness of ricotta cheese with the fresh, earthy flavor of spinach, all encased in tender pasta shells. Baked to perfection with a tangy tomato sauce and a layer of melted mozzarella, these stuffed shells are a comforting and satisfying meal that will impress your family and guests.
The dish not only looks beautiful on the table, but it also offers a balanced blend of flavors that make it a standout choice for a special occasion.
The recipe is straightforward, making it an excellent option for both novice and experienced cooks. Preparing the stuffed shells involves a few simple steps, including cooking the pasta, preparing the filling, assembling the dish, and baking it to bubbly perfection.
Once you have everything prepped, the oven does the rest of the work, leaving you with time to enjoy the company of your loved ones. This recipe yields enough to generously serve 4-6 people, guaranteeing everyone at the table gets their fill of this delectable dish.
Ingredients for 4-6 servings:
- 20-24 jumbo pasta shells
- 1 tablespoon olive oil
- 2 cups ricotta cheese
- 1 cup grated Parmesan cheese
- 1 egg
- 2 cups fresh spinach, chopped
- 2 cloves garlic, minced
- 1 teaspoon dried oregano
- 1 teaspoon dried basil
- Salt and pepper to taste
- 3 cups marinara sauce
- 2 cups shredded mozzarella cheese
- Fresh basil leaves for garnish (optional)
Cooking Instructions:
- Preheat the Oven: Begin by preheating your oven to 375°F (190°C). This guarantees that it’s at the right temperature by the time you’re ready to bake the stuffed shells.
- Cook the Pasta Shells: In a large pot of salted boiling water, cook the jumbo pasta shells according to the package instructions until they’re al dente. Drain the pasta and rinse under cold water to stop the cooking process. Set aside.
- Prepare the Filling: In a large mixing bowl, combine the ricotta cheese, Parmesan cheese, egg, chopped spinach, minced garlic, oregano, basil, salt, and pepper. Mix well until all the ingredients are thoroughly combined.
- Stuff the Shells: Using a spoon, carefully fill each cooked pasta shell with the ricotta and spinach mixture. Be generous with the filling, but verify the shells don’t tear.
- Assemble the Dish: Spread about 1 cup of marinara sauce over the bottom of a large baking dish. Arrange the stuffed shells in a single layer over the sauce. Pour the remaining marinara sauce evenly over the top of the shells.
- Add Cheese Topping: Sprinkle the shredded mozzarella cheese evenly over the top of the sauce-covered shells.
- Bake the Shells: Cover the baking dish with aluminum foil and bake in the preheated oven for 25 minutes. Then, remove the foil and bake for an additional 10-15 minutes, or until the cheese is bubbly and lightly golden.
- Garnish and Serve: Once done, remove the baking dish from the oven and let it sit for a few minutes. Garnish with fresh basil leaves if desired and serve warm.
Extra Tips:
When cooking the pasta shells, make sure they aren’t overcooked, as they’ll continue to cook during baking. Using fresh spinach provides the best flavor, but you can also use frozen spinach—just thaw and drain it well before adding to the filling.
For an extra depth of flavor, consider adding a pinch of nutmeg to the ricotta mixture. If you prefer a spicier dish, a sprinkle of crushed red pepper flakes over the marinara sauce can add a nice kick.
Finally, feel free to prepare the dish ahead of time and refrigerate until you’re ready to bake, making it a convenient option for a stress-free Christmas Eve lunch.
Citrus and Herb Grilled Shrimp Skewers
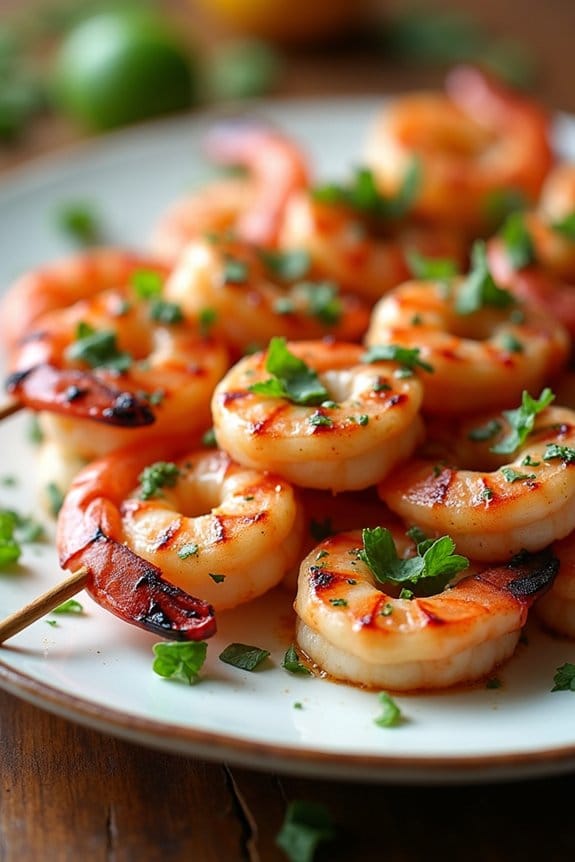
Citrus and Herb Grilled Shrimp Skewers are a delightful addition to any Christmas Eve lunch, offering a fresh and flavorful twist that captures the essence of the festive season. These skewers are marinated in a zesty blend of citrus juices and fragrant herbs, bringing a lively burst of flavor to the tender shrimp. Perfectly grilled, they make a light and invigorating dish that pairs wonderfully with a variety of side dishes and drinks, making them a versatile option for your holiday table.
The marinade, featuring a mixture of lemon, lime, and orange juices, infuses the shrimp with a tangy brightness, while the combination of fresh herbs such as parsley, cilantro, and mint adds a vibrant green freshness. Preparing these skewers is quite straightforward, making it an excellent choice for those who want a dish that’s both impressive and easy to prepare.
Whether you’re hosting a large gathering or a more intimate celebration, these Citrus and Herb Grilled Shrimp Skewers are sure to be a hit with your guests.
Ingredients for 4-6 servings:
- 2 pounds large shrimp, peeled and deveined
- 1/4 cup olive oil
- Juice of 1 lemon
- Juice of 1 lime
- Juice of 1 orange
- 3 cloves garlic, minced
- 1 teaspoon salt
- 1/2 teaspoon black pepper
- 1 tablespoon honey
- 2 tablespoons fresh parsley, chopped
- 2 tablespoons fresh cilantro, chopped
- 1 tablespoon fresh mint, chopped
- Wooden or metal skewers
Cooking Instructions:
- Prepare the Marinade: In a large mixing bowl, combine the olive oil, lemon juice, lime juice, orange juice, minced garlic, salt, black pepper, and honey. Whisk everything together until well combined.
- Add Fresh Herbs: Stir in the chopped parsley, cilantro, and mint to the marinade, ensuring the herbs are evenly distributed throughout the mixture.
- Marinate the Shrimp: Add the shrimp to the bowl, tossing them until they’re fully coated in the marinade. Cover the bowl with plastic wrap and refrigerate for at least 30 minutes to allow the flavors to meld. For best results, marinate for up to 2 hours.
- Preheat the Grill: If using an outdoor grill, preheat it to medium-high heat. If using an indoor grill pan, heat it over medium-high heat on your stovetop.
- Assemble the Skewers: Once the shrimp have marinated, thread them onto skewers, making sure they’re evenly spaced. If you’re using wooden skewers, soak them in water for at least 30 minutes beforehand to prevent them from burning.
- Grill the Skewers: Place the skewers on the grill or grill pan. Cook the shrimp for about 2-3 minutes on each side, or until they’re opaque and have grill marks. Be careful not to overcook them, as shrimp can become rubbery if grilled for too long.
- Serve: Remove the skewers from the grill and let them rest for a minute before serving. These skewers can be served as they are, or with a side of your choice, such as a fresh salad or a light rice dish.
Extra Tips: For a deeper flavor, consider reserving a portion of the marinade before adding the shrimp, and use it to baste the skewers while grilling. This will enhance the flavors even more.
Additionally, if you prefer a spicier kick, you can add a pinch of red pepper flakes to the marinade. Make sure to keep an eye on the shrimp as they cook quickly, and adjust the grilling time depending on the size of the shrimp.
Enjoy these skewers as part of a festive Christmas Eve lunch, bringing a touch of summer brightness to your winter celebration.
Chestnut and Wild Rice Stuffed Acorn Squash
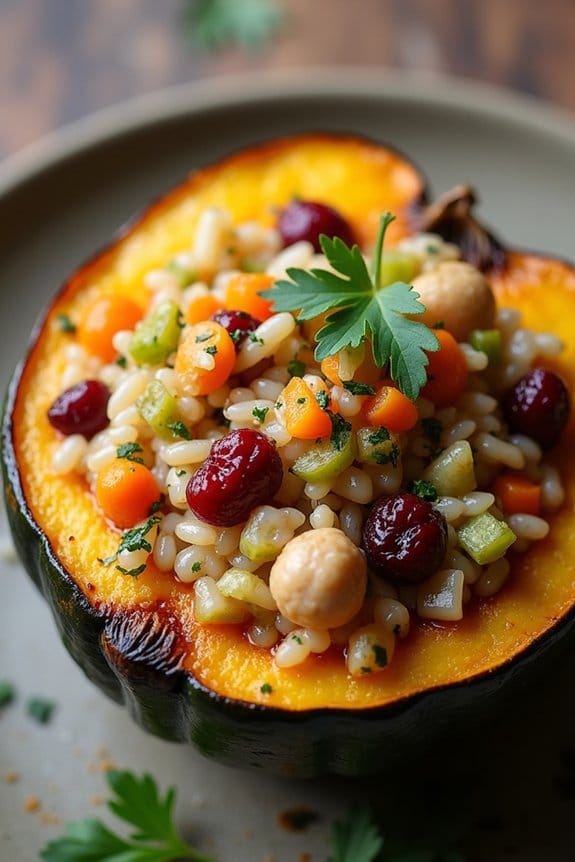
Chestnut and Wild Rice Stuffed Acorn Squash is a delightful and hearty dish perfect for a festive Christmas Eve lunch. This recipe combines the earthy flavors of chestnuts and wild rice with the sweetness of acorn squash, creating a balanced and satisfying meal that’s both nutritious and visually appealing.
The stuffing is loaded with aromatic herbs and vegetables, making it not only a tasty dish but also a nutritious one. It’s a wonderful vegetarian option that can complement other dishes on your holiday table.
This dish isn’t only delicious but also relatively simple to prepare, making it an excellent choice for a stress-free holiday meal. The acorn squash serves as a beautiful vessel for the stuffing, creating an impressive presentation that will surely impress your guests.
With a perfect blend of textures and flavors, this dish will quickly become a family favorite. Let’s explore the ingredients and step-by-step instructions to create this festive dish.
Ingredients (Serves 4-6):
- 3 medium acorn squash
- 1 cup wild rice
- 2 cups vegetable broth
- 1 cup cooked and peeled chestnuts, chopped
- 1 small onion, diced
- 2 cloves garlic, minced
- 1 celery stalk, diced
- 1 carrot, diced
- 2 tablespoons olive oil
- 1 teaspoon dried thyme
- 1 teaspoon dried sage
- Salt and pepper to taste
- 1/4 cup dried cranberries
- 1/4 cup chopped fresh parsley
Cooking Instructions:
- Preheat the Oven: Preheat your oven to 400°F (200°C). This guarantees that the squash will roast evenly and develop a nice caramelized edge.
- Prepare the Squash: Cut each acorn squash in half lengthwise and remove the seeds. Brush the inside of each half with olive oil and season with salt and pepper. Place the squash halves cut side down on a baking sheet.
- Roast the Squash: Roast the squash in the preheated oven for 25-30 minutes, or until fork-tender. Once done, remove from the oven and set aside.
- Cook the Wild Rice: While the squash is roasting, rinse the wild rice under cold water. In a medium saucepan, combine the wild rice and vegetable broth. Bring to a boil, then reduce the heat to low, cover, and simmer for about 40-45 minutes or until the rice is tender and has absorbed the liquid.
- Sauté the Vegetables: In a large skillet, heat 2 tablespoons of olive oil over medium heat. Add the diced onion, garlic, celery, and carrot. Sauté for about 5-7 minutes until the vegetables are soft and fragrant.
- Prepare the Stuffing: Add the chopped chestnuts, thyme, sage, salt, and pepper to the skillet. Stir well to combine all the ingredients. Then, add the cooked wild rice and dried cranberries. Cook for another 5 minutes, stirring occasionally, to confirm all flavors are well combined.
- Stuff the Squash: Turn the roasted squash halves cut side up. Spoon the wild rice and chestnut mixture into each squash half, packing it gently.
- Bake the Stuffed Squash: Return the stuffed squash to the oven and bake for an additional 10-15 minutes, allowing the flavors to meld together beautifully.
- Garnish and Serve: Remove from the oven and sprinkle with fresh parsley before serving.
Extra Tips:
For a nutty flavor, you can toast the chestnuts before chopping and adding them to the stuffing. If you want to add a bit of sweetness, a drizzle of maple syrup over the finished dish can enhance the flavors beautifully.
Be sure to taste the stuffing before filling the squash to adjust the seasoning to your preference. Additionally, you can prepare the stuffing a day in advance to save time on the day of your Christmas Eve lunch.
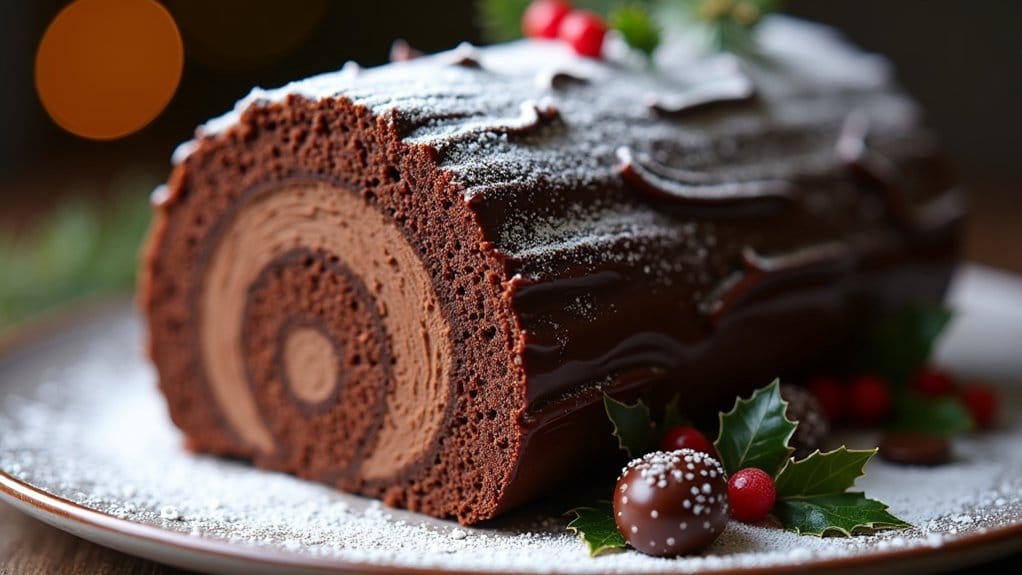
Decadent Chocolate Yule Log Cake

A Chocolate Yule Log Cake, also known as Bûche de Noël, is a classic holiday dessert that brings a touch of festivity and indulgence to any Christmas Eve lunch. This rich and creamy dessert isn’t only a delight to eat but also a beautiful centerpiece for your holiday table.
The cake is made with a delicate chocolate sponge, filled with a luscious chocolate cream, and then rolled and coated in a decadent chocolate ganache. The final decoration with a dust of powdered sugar and festive adornments makes it a showstopper dessert.
This recipe serves 4-6 people and will guide you through the process of baking a perfect Yule Log Cake. With a little patience and attention to detail, you can create this stunning dessert that will impress your guests and add a magical touch to your Christmas celebrations.
Whether you’re a seasoned baker or a beginner, this recipe is straightforward and rewarding, ensuring you end up with a delicious treat that everyone will love.
Ingredients:
- 3/4 cup all-purpose flour
- 1/4 cup unsweetened cocoa powder
- 1 teaspoon baking powder
- 1/4 teaspoon salt
- 4 large eggs
- 3/4 cup granulated sugar
- 1 teaspoon vanilla extract
- 1/2 cup heavy cream
- 1 cup semi-sweet chocolate chips
- 1/2 cup powdered sugar, plus extra for dusting
- 2 tablespoons butter
- Festive decorations (e.g., holly, berries, chocolate shavings)
Cooking Instructions:
- Preheat and Prepare: Preheat your oven to 350°F (175°C). Line a 10×15-inch jelly roll pan with parchment paper, ensuring the paper overhangs on the edges for easy removal.
- Mix Dry Ingredients: In a bowl, sift together the flour, cocoa powder, baking powder, and salt. Set aside.
- Beat Eggs and Sugar: In a large mixing bowl, beat the eggs and granulated sugar with an electric mixer on high speed until thick and pale, about 5 minutes. Stir in the vanilla extract.
- Combine Ingredients: Gradually fold the dry ingredients into the egg mixture using a spatula, being careful not to deflate the batter. Spread the batter evenly in the prepared pan.
- Bake the Cake: Bake in the preheated oven for 10-12 minutes, or until the cake springs back when lightly pressed. Don’t overbake.
- Roll the Cake: While the cake is still warm, use the parchment paper to roll the cake from the short end. Let it cool completely, rolled up.
- Prepare the Filling: In a small saucepan, heat the heavy cream until it just begins to simmer. Remove from heat and add the chocolate chips, stirring until smooth. Allow to cool slightly, then unroll the cake and spread the filling evenly over the cake. Roll it back up.
- Make the Ganache: In a microwave-safe bowl, melt the butter and remaining chocolate chips together, stirring every 30 seconds until smooth. Spread the ganache over the rolled cake.
- Decorate and Serve: Dust the cake with powdered sugar and add festive decorations as desired. Refrigerate for at least 1 hour before slicing and serving.
Extra Tips:
When making a Chocolate Yule Log Cake, ensuring the cake is rolled while still warm is essential to prevent cracking. If you find the cake is too dry, a simple syrup brushed over the surface can help keep it moist.
Additionally, when spreading the ganache, use a spatula to create a bark-like texture for an authentic look. Finally, don’t be afraid to get creative with your decorations; edible glitter or marzipan figures can add a whimsical touch to your presentation. Enjoy your delicious creation!
