
As the holiday season approaches, I’m thrilled to share a collection of 14 classic Christmas candy recipes that are perfect for gifting. These recipes are not only easy to make but also bring a touch of homemade charm to your festive celebrations. From rich chocolate fudge to crunchy peanut brittle, each treat is a delightful addition to your holiday traditions. Let’s get ready to spread some sweetness with these festive favorites. I hope you enjoy making them as much as I do!
Creamy Chocolate Fudge
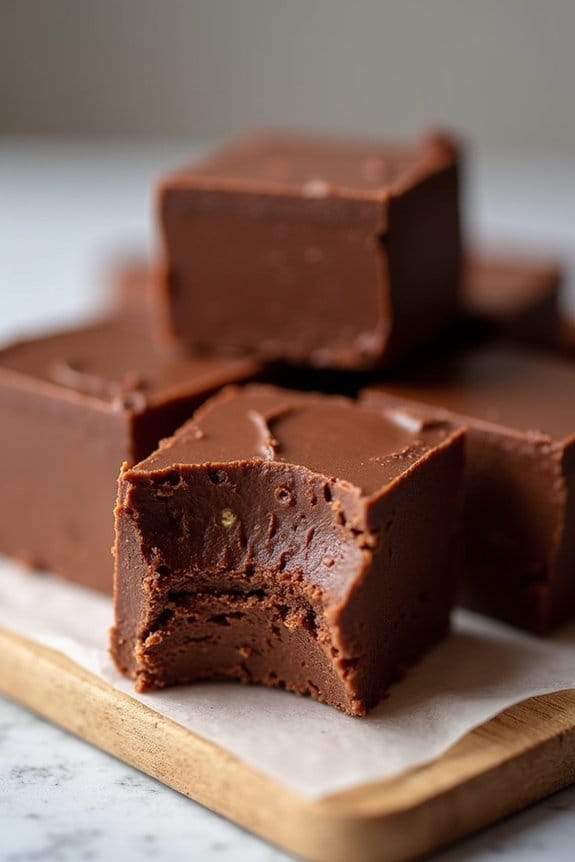
Creamy Chocolate Fudge is a classic holiday treat that brings joy with every bite. This rich and velvety dessert is perfect for Christmas gatherings, as its smooth texture and deep chocolate flavor are certain to impress your family and friends.
Whether you’re an experienced baker or a novice in the kitchen, this simple yet indulgent recipe will make your holiday celebrations even sweeter.
The key to making perfect Creamy Chocolate Fudge lies in using high-quality ingredients and guaranteeing that the mixture is cooked to the right temperature. With just a few steps, you can create a batch of this delightful fudge that serves 4-6 people, making it an ideal choice for sharing or gifting during the festive season.
Ingredients:
- 2 cups granulated sugar
- 2/3 cup evaporated milk
- 1/2 cup unsalted butter
- 12 ounces semi-sweet chocolate chips
- 1 jar (7 ounces) marshmallow creme
- 1 teaspoon vanilla extract
- 1/4 teaspoon salt
Cooking Instructions:
- Prepare the Pan: Line an 8-inch square baking pan with aluminum foil or parchment paper, leaving some overhang on the sides for easy removal. Lightly grease the foil or paper with butter to prevent sticking.
- Mix the Base Ingredients: In a medium-sized saucepan over medium heat, combine the granulated sugar, evaporated milk, and butter. Stir constantly until the butter is melted and the sugar is dissolved.
- Bring to a Boil: Increase the heat to medium-high and bring the mixture to a rolling boil. Once boiling, continue to stir constantly to prevent burning. Allow it to boil for approximately 4-5 minutes, or until it reaches 234°F on a candy thermometer (soft-ball stage).
- Add Chocolate and Marshmallow: Remove the saucepan from the heat. Quickly stir in the chocolate chips, marshmallow creme, vanilla extract, and salt. Stir vigorously until the chocolate is completely melted and the mixture is smooth and creamy.
- Pour and Cool: Pour the fudge mixture into the prepared pan, spreading it evenly with a spatula. Let it cool at room temperature until set, which usually takes about 2 hours. For faster setting, you can refrigerate it for about 1 hour.
- Cut and Serve: Once the fudge is firm, lift it out of the pan using the overhang foil or paper. Cut the fudge into small squares using a sharp knife. Serve and enjoy!
Extra Tips:
For the best results, guarantee that you stir the sugar mixture constantly to prevent it from sticking to the bottom of the pan and burning.
Using a candy thermometer is highly recommended to achieve the perfect consistency. If you prefer a nuttier texture, you can fold in chopped nuts like walnuts or pecans after adding the chocolate and marshmallow creme.
Store the fudge in an airtight container at room temperature for up to two weeks, or freeze it for longer storage. Enjoy your homemade Creamy Chocolate Fudge as a delightful treat during the holiday season!
Classic Peanut Brittle
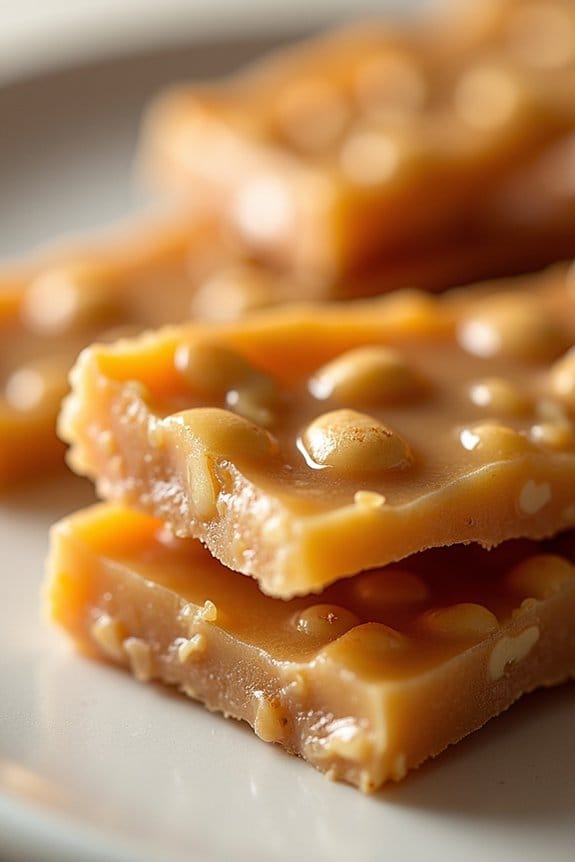
Peanut Brittle is a timeless holiday treat that combines the rich, nutty flavor of peanuts with a sweet, crunchy candy base. This classic confection is perfect for sharing with friends and family during the festive season.
Making peanut brittle at home is an enjoyable process that fills your kitchen with the delightful aroma of caramelized sugar and roasted peanuts. It’s a great recipe to try if you’re looking to create a homemade gift or simply want to indulge in a nostalgic treat.
The classic peanut brittle recipe involves cooking sugar to the hard crack stage and incorporating peanuts for that signature crunch. It may seem intimidating at first, but with a little patience and attention to detail, you’ll be able to create a delicious batch of this golden-hued candy.
Once you’ve mastered the basics, you can even experiment with additional flavors and ingredients to make the recipe your own.
Ingredients (Serving Size: 4-6 people):
- 1 cup granulated sugar
- 1/2 cup light corn syrup
- 1/4 cup water
- 1 cup unsalted roasted peanuts
- 2 tablespoons unsalted butter
- 1 teaspoon vanilla extract
- 1 teaspoon baking soda
- 1/4 teaspoon salt
Cooking Instructions:
- Prepare Your Workspace: Line a baking sheet with parchment paper or a silicone baking mat. Confirm you have all your ingredients pre-measured and ready to go. This will make the process smoother, as timing is essential for peanut brittle.
- Combine the Base Ingredients: In a medium saucepan, combine sugar, corn syrup, and water. Stir the mixture over medium heat until the sugar has dissolved completely.
- Heat to the Right Temperature: Attach a candy thermometer to the side of the saucepan, making sure it doesn’t touch the bottom. Continue to cook the sugar mixture without stirring, until it reaches 300°F (the hard crack stage).
- Add Peanuts and Butter: Once the mixture reaches 300°F, quickly stir in the peanuts and butter. The mixture will bubble up, so be careful. Stir continuously to confirm the peanuts are evenly coated and the butter is fully melted.
- Incorporate the Final Ingredients: Remove the pan from the heat and immediately stir in the vanilla extract, baking soda, and salt. The mixture will foam up as the baking soda reacts, creating the light, airy texture of the brittle.
- Spread the Mixture: Quickly pour the mixture onto the prepared baking sheet. Use a spatula to spread it out into an even layer. Work swiftly, as the mixture will harden quickly.
- Cool and Break: Allow the peanut brittle to cool completely at room temperature. Once set, break the brittle into pieces using your hands or a kitchen mallet.
Extra Tips:
When making peanut brittle, it’s essential to work quickly and carefully, especially when adding the final ingredients, as the mixture will harden fast.
Use a heavy-bottomed saucepan to confirm even heat distribution, which helps prevent burning. Keep an eye on the candy thermometer and avoid stirring the sugar mixture once it starts boiling, as this can cause the sugar to crystallize.
If you want to add a twist to the classic recipe, consider sprinkling a bit of sea salt over the brittle before it sets or experimenting with different nuts for varied flavors.
Peppermint Bark Delights
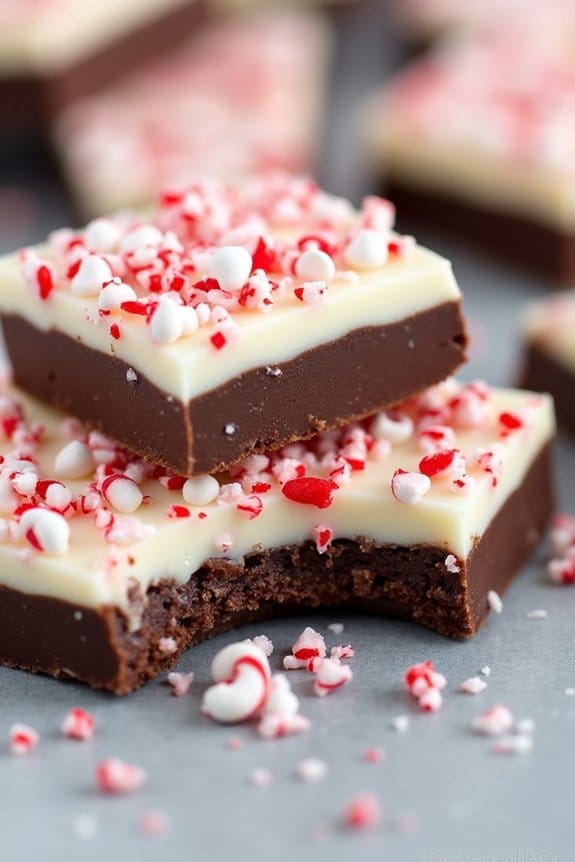
Peppermint Bark Delights is a quintessential holiday treat that combines the rich flavors of chocolate with the invigorating taste of peppermint. This easy-to-make recipe is perfect for entertaining guests or simply enjoying a festive snack with your family.
The layered texture of creamy white chocolate, luscious dark chocolate, and a sprinkle of crushed candy canes creates a delightful contrast that’s both visually appealing and deliciously satisfying.
Ideal for serving 4-6 people, Peppermint Bark Delights can be prepared in just a few simple steps. This recipe doesn’t require any fancy equipment, making it accessible for cooks of all skill levels. The end result is a beautiful, homemade candy that will impress even the most discerning holiday guests.
Ingredients:
- 12 oz of dark chocolate chips
- 12 oz of white chocolate chips
- 1 teaspoon of peppermint extract
- 1/2 cup of crushed candy canes
- 1 tablespoon of vegetable oil
- Parchment paper
Cooking Instructions:
- Prepare the Baking Sheet: Line a baking sheet with parchment paper to prevent sticking and guarantee easy removal of the peppermint bark once it’s set.
- Melt the Dark Chocolate: In a microwave-safe bowl, combine the dark chocolate chips and 1/2 tablespoon of vegetable oil. Microwave in 30-second intervals, stirring between each, until the chocolate is completely melted and smooth.
- Spread the Dark Chocolate Layer: Pour the melted dark chocolate onto the prepared baking sheet and use a spatula to spread it into an even layer, approximately 1/4 inch thick. Place the baking sheet in the refrigerator for about 15 minutes, or until the chocolate is firm.
- Melt the White Chocolate: In another microwave-safe bowl, combine the white chocolate chips and remaining 1/2 tablespoon of vegetable oil. Microwave in 30-second intervals, stirring between each, until smooth. Stir in the peppermint extract.
- Spread the White Chocolate Layer: Once the dark chocolate layer has set, pour the melted white chocolate over it. Use a spatula to spread the white chocolate evenly on top of the dark chocolate layer.
- Add the Candy Cane Topping: Immediately sprinkle the crushed candy canes over the white chocolate layer, pressing lightly to guarantee they adhere.
- Set the Peppermint Bark: Refrigerate the peppermint bark for at least 30 minutes, or until completely set. Once firm, break into pieces and serve.
Extra Tips:
For best results, make sure each chocolate layer is fully set before adding the next to prevent mixing. If you don’t have a microwave, you can melt the chocolate using a double boiler.
To crush candy canes easily, place them in a ziplock bag and use a rolling pin to break them into small pieces. Store any leftover peppermint bark in an airtight container to keep it fresh for up to two weeks.
Rich Caramel Squares
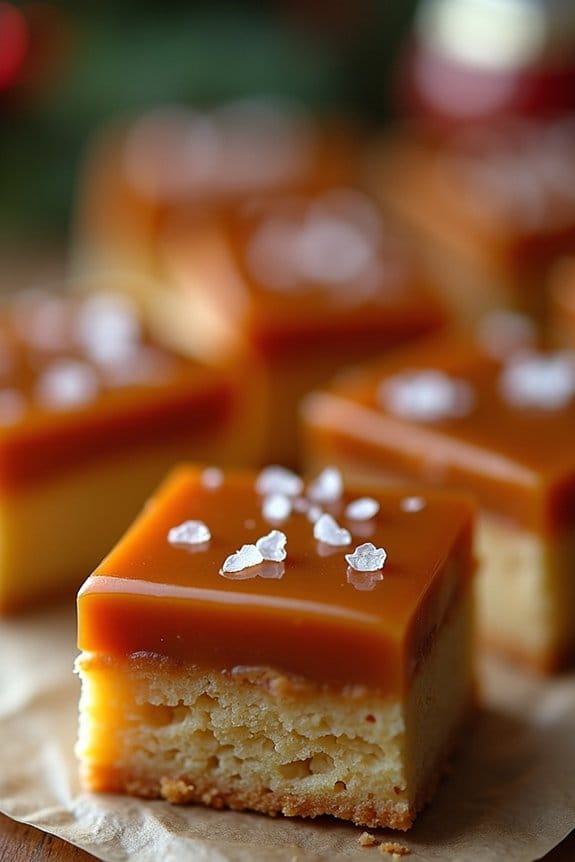
Rich Caramel Squares are the perfect treat to add a touch of decadence to your Christmas candy selection. With their buttery, melt-in-your-mouth texture and rich caramel flavor, these squares will surely delight anyone with a sweet tooth. Perfect for sharing during the holiday season, they offer an indulgent experience that pairs well with a warm cup of coffee or a festive glass of eggnog.
Creating these delightful squares is a straightforward process that combines the art of caramel-making with the simplicity of a shortbread base. The key to achieving the perfect balance in this recipe is taking the time to allow the caramel to develop its rich flavor without burning. Once the caramel is ready, it’s layered over a buttery shortbread that adds a subtle crispness to each bite. This recipe yields enough for 4-6 people, making it ideal for a small gathering or as a thoughtful homemade gift.
Ingredients:
- 1 cup unsalted butter, softened
- 1/2 cup granulated sugar
- 2 cups all-purpose flour
- 1/4 teaspoon salt
- 1 cup packed light brown sugar
- 1/2 cup heavy cream
- 1/4 cup light corn syrup
- 1 teaspoon vanilla extract
- 1/2 teaspoon sea salt (optional for garnish)
Instructions:
1. Preheat the Oven: Begin by preheating your oven to 350°F (175°C). This guarantees that the oven is at the perfect temperature for baking the shortbread base.
2. Prepare the Shortbread Base: In a large mixing bowl, cream together 1/2 cup of the softened butter and granulated sugar until light and fluffy. Gradually mix in the flour and salt until the mixture resembles coarse crumbs.
Press this mixture evenly into the bottom of a greased 9×9-inch baking pan to form the shortbread base. Bake for 20-25 minutes, or until lightly golden brown. Remove from the oven and let it cool.
3. Make the Caramel Layer: In a medium saucepan over medium heat, combine the remaining 1/2 cup of butter, light brown sugar, heavy cream, and light corn syrup. Stir constantly until the mixture begins to boil.
Once boiling, continue to cook for about 5 minutes, stirring frequently, until the caramel thickens slightly and reaches a deep amber color.
4. Add Flavor to Caramel: Remove the saucepan from heat and stir in the vanilla extract. Allow the caramel to cool slightly, then pour it over the cooled shortbread base, spreading it evenly.
5. Set the Caramel: Allow the caramel squares to cool at room temperature for about 30 minutes, then refrigerate for an additional 2 hours to confirm the caramel sets properly.
6. Cut and Garnish: Once set, remove the caramel squares from the pan. Using a sharp knife, cut them into even squares. If desired, sprinkle a small pinch of sea salt on top of each square for an extra layer of flavor.
Extra Tips:
When making caramel, it’s important to keep a close eye on it as it can go from perfect to burnt in seconds. Stir continuously to avoid any sticking or burning, especially towards the end of cooking.
If you prefer a firmer caramel, you can increase the cooking time slightly. Additionally, verify that the shortbread base is completely cool before pouring the caramel over it to prevent the caramel from melting into the shortbread.
For an extra festive touch, consider drizzling melted chocolate over the top once the caramel has set.
Old-Fashioned Divinity
Old-Fashioned Divinity is a classic Christmas candy that brings back a wave of nostalgia with its light, airy texture and sweet, nutty flavor. This delightful confection is made primarily with sugar, corn syrup, and egg whites, resulting in a melt-in-your-mouth experience that’s perfect for the holiday season.
Often enjoyed during festive gatherings, Old-Fashioned Divinity is a treat that embodies the spirit of Christmas, making it a cherished favorite for many families.
Creating Old-Fashioned Divinity requires a bit of patience and precision, as the process involves whipping egg whites to stiff peaks and carefully folding in the other ingredients. However, with a little practice, you can master this recipe and offer a homemade candy that will impress your family and friends.
Whether you’re a seasoned candy maker or a beginner, this recipe will guide you through the steps to create a batch of divinity that’s certain to become a holiday tradition.
Ingredients (Serves 4-6):
- 2 1/2 cups granulated sugar
- 1/2 cup light corn syrup
- 1/2 cup water
- 2 large egg whites
- 1 teaspoon vanilla extract
- 1/2 cup chopped pecans or walnuts (optional)
- Pinch of salt
Cooking Instructions:
- Prepare the Ingredients: Begin by gathering all your ingredients and setting them up for easy access. This will help guarantee a smooth cooking process.
- Heat the Sugar Mixture: In a heavy-bottomed saucepan, combine the granulated sugar, corn syrup, and water. Stir the mixture over medium heat until the sugar dissolves. Once dissolved, stop stirring and allow the mixture to come to a boil.
- Monitor the Temperature: Using a candy thermometer, cook the sugar mixture until it reaches 250°F (hard-ball stage). This step is vital for achieving the right texture in your divinity.
- Beat the Egg Whites: While the sugar mixture is cooking, beat the egg whites and a pinch of salt in a large mixing bowl until they form stiff peaks. This will create the base for the fluffy texture of your candy.
- Combine and Mix: Once the sugar mixture reaches the desired temperature, carefully pour it in a thin, steady stream into the beaten egg whites while constantly mixing at high speed. Be cautious to avoid splattering the hot syrup.
- Add Flavor and Nuts: Continue beating the mixture until it holds its shape and turns opaque. Add the vanilla extract and, if desired, fold in the chopped nuts gently.
- Shape the Divinity: Quickly drop spoonfuls of the mixture onto a wax paper-lined baking sheet. Use two spoons to help shape the candies into mounds. Work swiftly, as the mixture sets quickly.
- Let Set: Allow the divinity to cool and set at room temperature until firm, which usually takes about 1-2 hours. Once set, store them in an airtight container.
Extra Tips:
For best results, make sure to prepare Old-Fashioned Divinity on a dry day, as humidity can affect the setting of the candy. Additionally, confirm all your equipment is clean and grease-free, as any fat residue can prevent the egg whites from forming stiff peaks.
Adjust the cooking time slightly if you’re at a higher altitude, as boiling points can vary. Finally, be patient and work efficiently, as timing is key to achieving the perfect texture. Enjoy your homemade divinity as a delightful addition to your holiday treats!
Chocolate-Covered Toffee
Chocolate-Covered Toffee is a delightful treat that perfectly embodies the spirit of the holiday season. This sweet and crunchy confection is a wonderful addition to any Christmas candy collection, offering the rich and creamy flavor of chocolate combined with the buttery goodness of toffee.
It’s a versatile recipe that not only makes a great gift but can also be a festive indulgence for family gatherings. Whether you’re a seasoned candy maker or trying your hand at something new, Chocolate-Covered Toffee is a rewarding recipe that will quickly become a holiday favorite.
The process of making Chocolate-Covered Toffee is both simple and enjoyable, allowing you to experiment with different toppings or enhance the flavor with a pinch of sea salt. The key to perfecting this recipe is achieving the ideal toffee texture, which is crunchy yet brittle enough to break easily.
With a few basic ingredients and a bit of patience, you can create a batch of this delightful candy that will have everyone reaching for seconds. Here’s how you can make a serving size suitable for 4-6 people:
Ingredients:
- 1 cup unsalted butter
- 1 cup granulated sugar
- 1/4 teaspoon salt
- 1 teaspoon vanilla extract
- 1 cup semi-sweet chocolate chips
- 1/2 cup chopped nuts (such as almonds or pecans, optional)
Cooking Instructions:
- Prepare Baking Sheet: Line a baking sheet with parchment paper or a silicone baking mat, and set it aside. This will be used to cool the toffee once it’s cooked.
- Melt Butter: In a medium saucepan, melt the butter over medium heat. Once melted, stir in the granulated sugar and salt.
- Cook Toffee Mixture: Continue to cook the mixture, stirring constantly with a wooden spoon or heat-resistant spatula. Keep cooking until the mixture reaches a deep golden brown color and a temperature of about 300°F (150°C) on a candy thermometer. This is the hard crack stage, critical for achieving the right toffee texture.
- Add Vanilla: Immediately remove the saucepan from heat and carefully stir in the vanilla extract. Be cautious as the mixture may bubble up when adding the vanilla.
- Pour Toffee: Quickly pour the hot toffee mixture onto the prepared baking sheet, spreading it out into an even layer using a spatula.
- Add Chocolate Chips: While the toffee is still hot, sprinkle the semi-sweet chocolate chips evenly over the surface. Allow them to sit for a minute or two to melt.
- Spread Chocolate: Once the chocolate has melted, use a spatula to spread it evenly over the toffee.
- Add Nuts: If using nuts, sprinkle them over the chocolate layer. Press them gently to assure they adhere to the chocolate.
- Cool and Break: Allow the chocolate-covered toffee to cool completely, either at room temperature or in the refrigerator. Once set, break the toffee into pieces.
Extra Tips:
When making Chocolate-Covered Toffee, using a candy thermometer is essential to ascertain accuracy and achieve the desired texture. If you don’t have a thermometer, you can test the toffee by dropping a small amount into cold water to see if it hardens immediately.
Be sure to work quickly when pouring and spreading the toffee, as it sets fast. Additionally, storing the toffee in an airtight container can help maintain its crunchiness and keep it fresh for up to two weeks. Feel free to experiment with different types of chocolate or toppings to customize your toffee to your liking.
Homemade Marshmallow Treats
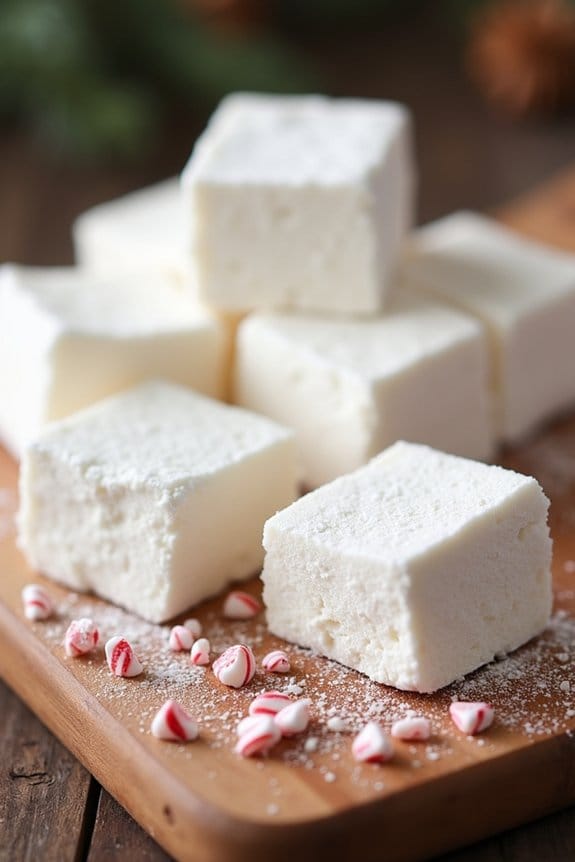
Nothing says Christmas like a batch of fluffy, homemade marshmallow treats. These delightful squares are perfect for snacking or for gifting to friends and family. With a soft, cloud-like texture and a hint of vanilla, these marshmallows will melt in your mouth and bring a smile to anyone’s face.
The process of making marshmallows at home is surprisingly simple and allows you to control the flavor and sweetness according to your preference. Once you master the basic vanilla version, feel free to experiment with different flavors or festive add-ins, such as peppermint extract or crushed candy canes.
Creating these marshmallow treats is a rewarding experience, allowing you to share the joy of homemade confections with everyone around you. The recipe yields a batch suitable for 4-6 people, making it perfect for small gatherings or as part of a larger dessert spread. Not only will you enjoy the process of making them, but you’ll also appreciate the compliments when your guests taste these delicious, pillowy treats.
Let’s jump into the recipe and see just how simple it’s to craft these marshmallow delights.
Ingredients (Serves 4-6):
- 3 envelopes of unflavored gelatin
- 1 cup of cold water, divided
- 2 cups granulated sugar
- 1 cup light corn syrup
- 1/4 teaspoon salt
- 1 tablespoon pure vanilla extract
- 1/4 cup powdered sugar
- 1/4 cup cornstarch
Cooking Instructions:
- Prepare the Gelatin: In the bowl of a stand mixer, combine the gelatin and 1/2 cup of cold water. Let it sit and bloom while you prepare the sugar syrup.
- Make the Sugar Syrup: In a small saucepan, combine the granulated sugar, corn syrup, salt, and the remaining 1/2 cup of water. Place the saucepan over medium heat, stirring gently until the sugar dissolves.
- Boil the Mixture: Once the sugar has dissolved, increase the heat to high and bring the mixture to a boil without stirring. Use a candy thermometer and continue boiling until the mixture reaches 240°F (soft-ball stage).
- Mix the Syrup into Gelatin: Remove the saucepan from heat. Start your stand mixer on low speed and slowly pour the hot syrup into the gelatin mixture. Once combined, increase the mixer speed to high.
- Whip the Marshmallow Base: Continue to whip the mixture on high speed for about 10-15 minutes, or until it becomes very thick, white, and has tripled in volume. Add the vanilla extract in the last minute of whipping.
- Prepare the Pan: While the marshmallow base is whipping, mix the powdered sugar and cornstarch in a small bowl. Lightly grease a 9×13 inch baking dish and dust it generously with the sugar-cornstarch mixture.
- Pour and Set: Pour the whipped marshmallow mixture into the prepared baking dish, using a greased spatula to spread it evenly. Dust the top with more of the sugar-cornstarch mixture. Let it sit uncovered at room temperature for at least 4 hours (preferably overnight) to set.
- Cut and Coat: Once set, remove the marshmallow block from the pan onto a cutting board. Use a sharp knife greased with oil to cut it into squares. Toss each square in the remaining sugar-cornstarch mixture to guarantee they’re no longer sticky.
Extra Tips:
- Make sure to use a candy thermometer for accurate temperature measurement of the sugar syrup. Reaching the correct temperature is vital for the marshmallows to set properly.
- If you prefer colored marshmallows, add a few drops of food coloring during the whipping process with the vanilla extract.
- Store marshmallows in an airtight container at room temperature. They can last for several weeks, making them a great make-ahead treat for the holiday season.
Coconut Macaroon Bites
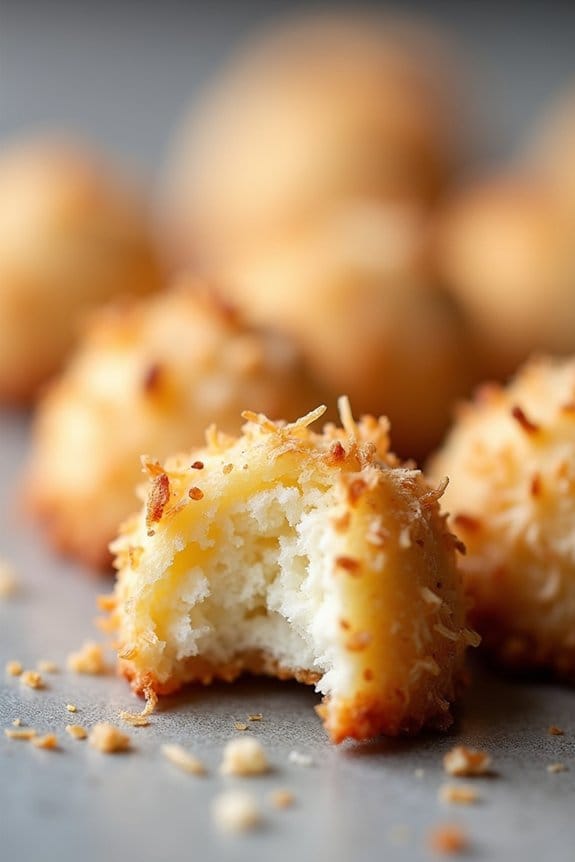
Coconut Macaroon Bites are delightful little treats that bring a touch of tropical sweetness to your Christmas candy platter. These bite-sized morsels are perfect for those who love the combination of chewy coconut and a hint of vanilla. The exterior of the macaroon is golden and slightly crispy, while the inside remains moist and chewy, making them an irresistible holiday favorite.
Not only are they delicious, but they’re also quite simple to prepare, making them an excellent choice for any home baker looking to add a homemade touch to their Christmas festivities.
Ideal for serving 4-6 people, this recipe requires only a few ingredients and minimal prep time. The Coconut Macaroon Bites are naturally gluten-free and can be made dairy-free by substituting the condensed milk with a non-dairy alternative. Whether you’re gifting them to friends and family or setting them out for guests at your holiday gathering, these macaroons are sure to impress with their rich coconut flavor and tender texture.
Ingredients:
- 3 cups sweetened shredded coconut
- 1 cup sweetened condensed milk
- 1 teaspoon pure vanilla extract
- 2 large egg whites
- 1/4 teaspoon salt
Cooking Instructions:
- Preheat the Oven: Begin by preheating your oven to 325°F (163°C). Line a baking sheet with parchment paper to prevent the macaroons from sticking and guarantee even baking.
- Mix the Coconut Base: In a large mixing bowl, combine the sweetened shredded coconut, sweetened condensed milk, and vanilla extract. Stir the mixture thoroughly until all the coconut is evenly coated with the condensed milk and vanilla.
- Prepare the Egg Whites: In a separate bowl, beat the egg whites with a hand mixer or a whisk until they form stiff peaks. This process will aerate the egg whites and add volume to your macaroons.
- Combine Mixtures: Gently fold the stiff egg whites and salt into the coconut mixture. Be careful not to deflate the egg whites as you fold, as they’re essential for giving the macaroons their light and airy texture.
- Form the Macaroons: Using a tablespoon or a small cookie scoop, drop rounded mounds of the mixture onto the prepared baking sheet, spacing them about 1 inch apart. These should be about 1 1/2 inches in diameter.
- Bake: Place the baking sheet in the preheated oven and bake for 20-25 minutes, or until the macaroons are golden brown at the edges and slightly firm to the touch.
- Cool: Allow the macaroons to cool on the baking sheet for about 5 minutes before transferring them to a wire rack to cool completely. This will help them set properly and prevent them from breaking apart.
Extra Tips: For an added touch of decadence, consider dipping the bottoms of the cooled macaroons in melted chocolate and allowing them to set on parchment paper.
If you prefer a less sweet version, you can use unsweetened shredded coconut and adjust the sweetness with a bit of sugar or honey as desired. For storage, keep the macaroons in an airtight container at room temperature for up to a week, or freeze them for longer storage. Enjoy these Coconut Macaroon Bites with a cup of tea or coffee for a delightful holiday treat!
Easy Chocolate Truffles

Indulge in the rich, creamy decadence of homemade chocolate truffles with this easy recipe, perfect for the festive season. These bite-sized delights aren’t just irresistible, but they also make for an excellent homemade gift.
Whether you’re sharing these with family or treating yourself, these truffles will surely bring a touch of elegance to any holiday gathering. With their smooth texture and intense chocolate flavor, they’re sure to become a favorite in your Christmas candy repertoire.
Creating these Easy Chocolate Truffles at home is remarkably simple and requires minimal ingredients. In just a few steps, you can produce a treat that rivals any store-bought confectionery. This recipe is designed to yield approximately 24 truffles, making it ideal for serving 4-6 people.
Whether you prefer classic chocolate or want to experiment with flavors like orange or peppermint, this versatile recipe can be customized to suit your taste.
Ingredients:
- 8 oz (225 g) semi-sweet chocolate, finely chopped
- 1/2 cup (120 ml) heavy cream
- 1 tablespoon unsalted butter
- 1/4 teaspoon vanilla extract
- Cocoa powder, for coating
Instructions:
- Prepare the Chocolate Mixture: Place the finely chopped semi-sweet chocolate in a medium heatproof bowl.
- Heat the Cream: In a small saucepan, heat the heavy cream over medium heat until it begins to simmer. Don’t let it boil. Once simmering, remove it from the heat immediately.
- Combine Cream and Chocolate: Pour the hot cream over the chopped chocolate. Let it sit undisturbed for about 2-3 minutes to allow the chocolate to melt.
- Stir until Smooth: Using a spatula or a whisk, gently stir the mixture until the chocolate is completely melted and the mixture is smooth.
- Add Butter and Vanilla: Stir in the unsalted butter and vanilla extract until fully incorporated. The mixture should be silky and shiny.
- Chill the Mixture: Cover the bowl with plastic wrap and refrigerate for about 1-2 hours, or until the mixture is firm enough to handle.
- Shape the Truffles: Using a teaspoon or a melon baller, scoop out small amounts of the chocolate mixture and roll them into 1-inch balls between your palms.
- Coat the Truffles: Roll each truffle in cocoa powder until fully coated. This not only adds a rustic finish but also prevents them from sticking together.
- Serve or Store: The truffles can be served immediately or stored in an airtight container in the refrigerator for up to two weeks.
Extra Tips:
For an extra touch of flavor, consider adding a dash of your favorite liquor, such as Grand Marnier or Baileys, to the chocolate mixture before chilling.
Additionally, you can experiment with different coatings like crushed nuts, shredded coconut, or powdered sugar for variety.
When shaping the truffles, if the mixture becomes too soft to handle, simply return it to the refrigerator for a few minutes.
Always use high-quality chocolate for the best results, as the flavor of the truffles is largely dependent on the chocolate you choose.
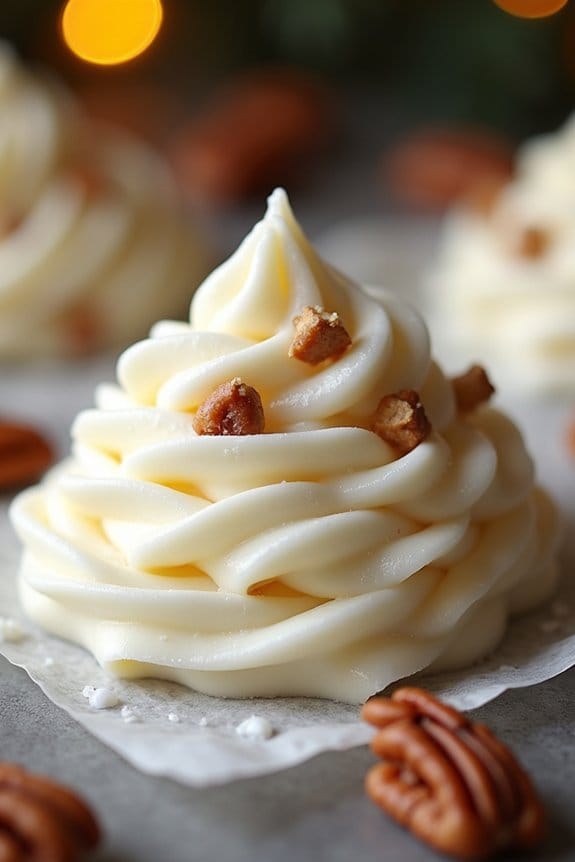
Cinnamon Sugar Pecans
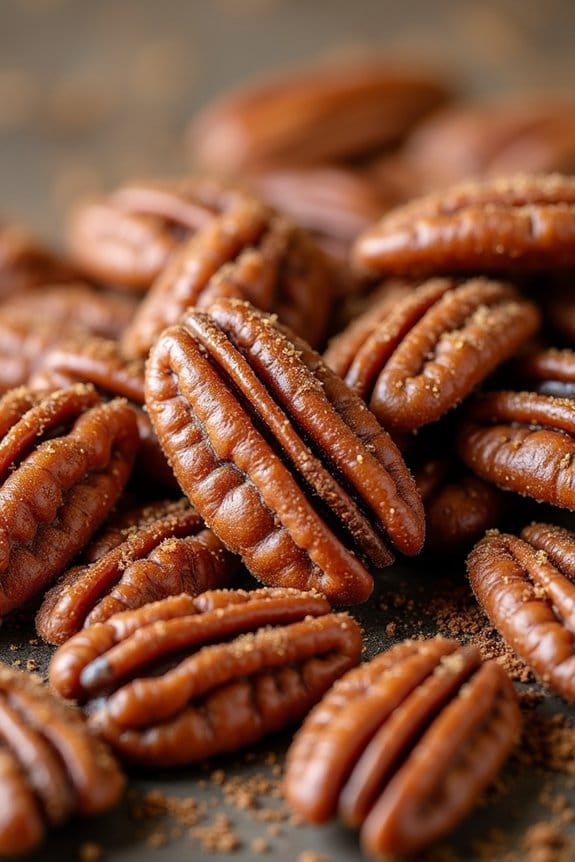
Cinnamon Sugar Pecans are a delightful treat that combines the warmth of cinnamon with the rich, nutty flavor of pecans. This snack isn’t only perfect for the holiday season but also makes a wonderful homemade gift. The sweet and spicy aroma of these pecans baking in the oven will fill your kitchen, evoking the coziness of Christmas.
Whether you serve them as an appetizer, use them to top off a salad, or simply enjoy them as a snack, these nuts are bound to be a hit at any gathering. This recipe is designed for a serving size of 4-6 people, making it perfect for small family gatherings or holiday parties.
The pecans are coated in a mixture of sugar, cinnamon, and other spices, then baked until they’re perfectly crispy. The result is a sweet and slightly spicy treat that’s impossible to resist. With just a few simple ingredients and easy steps, you can create a delicious snack that everyone will love.
Ingredients:
- 1 pound pecan halves
- 1 egg white
- 1 tablespoon water
- 1 cup granulated sugar
- 1 tablespoon ground cinnamon
- 1 teaspoon salt
Instructions:
- Preheat the Oven: Begin by preheating your oven to 250°F (120°C). This low temperature will allow the pecans to cook slowly, guaranteeing that they become crispy without burning.
- Prepare the Baking Sheet: Line a large baking sheet with parchment paper or a silicone baking mat. This will prevent the pecans from sticking and make cleanup much easier.
- Whisk Egg White and Water: In a large mixing bowl, whisk together the egg white and water until the mixture becomes frothy. This will help the sugar and cinnamon adhere to the pecans.
- Coat the Pecans: Add the pecan halves to the egg white mixture, stirring to coat them evenly. Confirm each pecan is fully covered with the mixture.
- Combine Dry Ingredients: In a separate bowl, mix together the sugar, cinnamon, and salt. Stir until well combined.
- Add the Sugar Mixture: Pour the sugar and cinnamon mixture over the coated pecans, stirring until all the pecans are evenly coated with the sugar-cinnamon blend.
- Spread and Bake: Spread the pecans in a single layer on the prepared baking sheet. Bake in the preheated oven for about 1 hour, stirring every 15 minutes to guarantee even cooking and coating.
- Cool and Serve: Once the pecans are golden brown and crisp, remove them from the oven and allow them to cool completely on the baking sheet. Once cooled, transfer them to a serving dish or store them in an airtight container.
Extra Tips:
For a deeper flavor, consider adding a pinch of nutmeg or a dash of vanilla extract to the sugar mixture. If you prefer a less sweet version, reduce the amount of sugar to 3/4 cup.
Be sure to keep an eye on the pecans during the last 15 minutes of baking to prevent them from over-browning. If you’re storing them, confirm they’re completely cool before sealing in an airtight container to maintain their crispiness. Enjoy these tasty treats as a snack or use them to add a festive touch to your favorite holiday dishes!
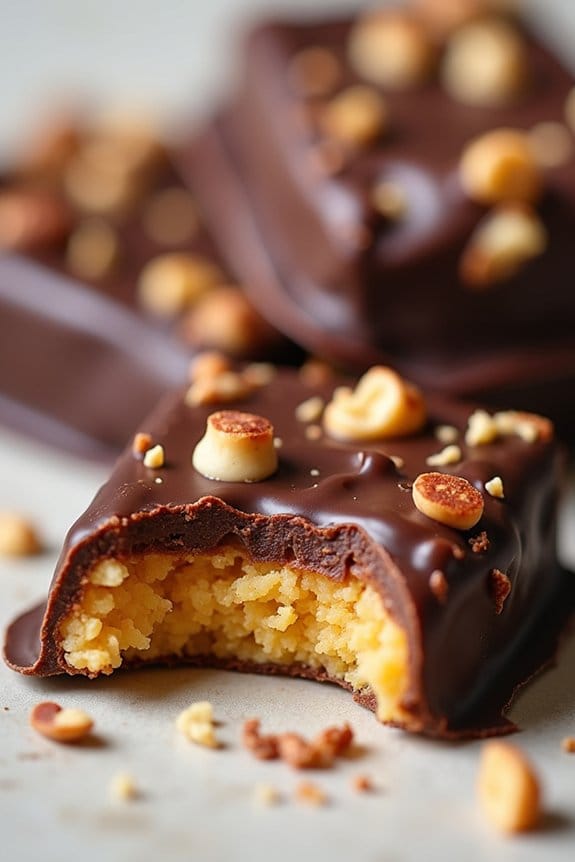
Festive Almond Roca
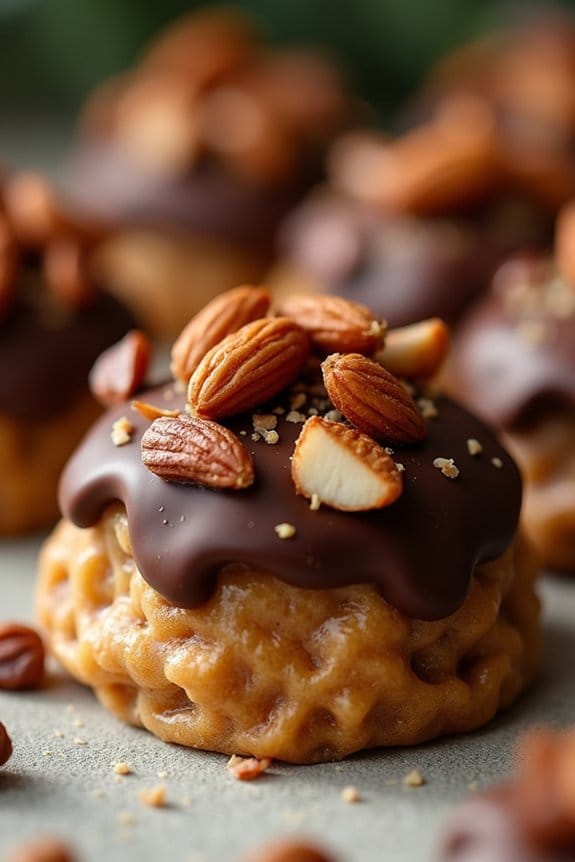
Festive Almond Roca is a delightful holiday treat that combines the rich flavors of buttery toffee, crunchy almonds, and smooth chocolate. This classic candy is perfect for sharing with friends and family during Christmas gatherings.
Its irresistible combination of textures and flavors makes it a crowd favorite, and it’s surprisingly simple to make at home. With just a few ingredients, you can create a festive treat that will impress your guests and add a touch of homemade charm to your holiday celebrations.
This recipe yields a serving size of 4-6 people, making it perfect for a small gathering or for sharing as a thoughtful homemade gift. The process involves creating a golden toffee base, generously coating it with melted chocolate, and sprinkling it with almonds for added crunch.
With a little patience and attention to detail, you’ll have a batch of Festive Almond Roca ready to enjoy in no time.
Ingredients:
- 1 cup unsalted butter
- 1 cup granulated sugar
- 1/4 teaspoon salt
- 1 teaspoon vanilla extract
- 1 cup chopped almonds, toasted
- 1 cup semi-sweet chocolate chips
Instructions:
- Prepare the Baking Sheet: Line a 9×13 inch baking sheet with parchment paper or a silicone baking mat. This will prevent the toffee from sticking and make it easier to remove once it has cooled.
- Toast the Almonds: Preheat your oven to 350°F (175°C). Spread the chopped almonds on a baking sheet and toast them in the oven for about 10 minutes, or until they’re golden brown and fragrant. Set aside to cool.
- Make the Toffee: In a medium saucepan, combine the butter, sugar, and salt. Cook over medium heat, stirring constantly, until the mixture reaches 290°F (143°C) on a candy thermometer. This should take about 10-15 minutes. The mixture will turn a golden brown color as it cooks.
- Add Vanilla and Almonds: Once the toffee reaches the desired temperature, remove it from the heat and stir in the vanilla extract. Quickly pour the hot toffee onto the prepared baking sheet, spreading it evenly with a spatula. Immediately sprinkle half of the toasted almonds over the top, gently pressing them into the toffee.
- Melt the Chocolate: While the toffee is still warm, sprinkle the chocolate chips evenly over the surface. Let them sit for a few minutes to soften, then use a spatula to spread the melted chocolate over the toffee.
- Finish with Almonds: Sprinkle the remaining toasted almonds over the chocolate layer, pressing them gently so they adhere.
- Cool and Break Into Pieces: Allow the Festive Almond Roca to cool completely at room temperature, or place it in the refrigerator to speed up the process. Once hardened, break the candy into pieces and serve.
Extra Tips: When making the toffee, it’s important to stir continuously to prevent the sugar from burning. Use a candy thermometer to guarantee accuracy in reaching the correct temperature for the toffee.
If you don’t have a candy thermometer, look for a deep golden color and test the toffee by dropping a small piece into ice water; it should harden and snap easily. Also, make sure the almonds are toasted and cooled before adding them to the toffee, as this enhances their flavor and texture in the final product.
Butterscotch Haystacks
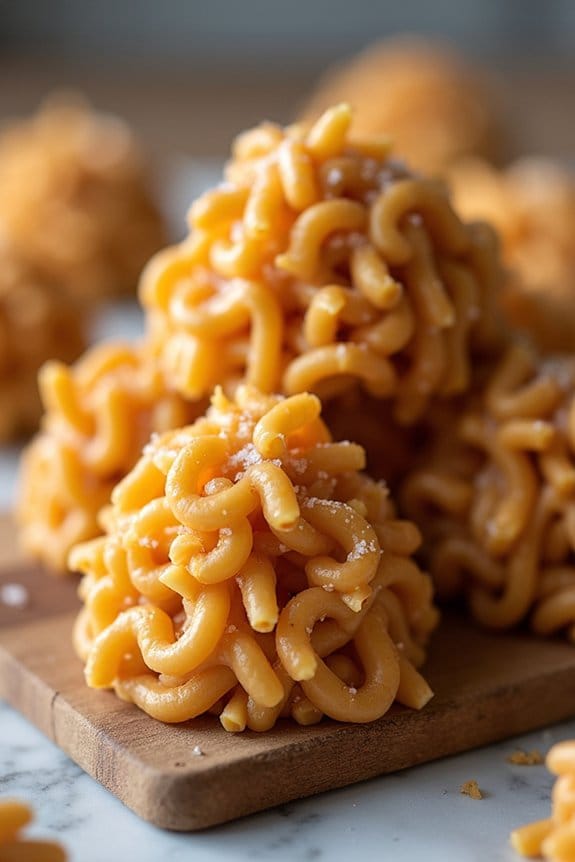
Butterscotch Haystacks are a classic, no-bake Christmas treat that combines the rich, creamy flavor of butterscotch with the satisfying crunch of chow mein noodles and peanuts. These sweet treats not only capture the spirit of the holiday season but are also incredibly easy and quick to prepare, making them perfect for last-minute holiday gatherings or as a fun activity to do with children.
Their unique flavor and texture make them a delightful addition to any dessert table, and they can easily be customized with additional ingredients such as marshmallows or chocolate chips.
These festive candies require minimal ingredients and no oven time, which is ideal during the busy holiday season when your oven might be occupied with other dishes. The recipe yields a batch large enough to serve 4-6 people, making it great for small family gatherings or as part of a larger assortment of Christmas sweets.
With just a few simple steps, you can create a delicious and visually appealing treat that will be loved by both children and adults alike.
Ingredients (Serves 4-6):
- 1 cup butterscotch chips
- 1/2 cup creamy peanut butter
- 2 cups chow mein noodles
- 1 cup salted peanuts
Cooking Instructions:
- Melt the Butterscotch and Peanut Butter: In a large microwave-safe bowl, combine the butterscotch chips and creamy peanut butter. Microwave in 30-second intervals, stirring in between, until the mixture is completely melted and smooth. This should take about 1-2 minutes total. Be careful not to overheat, as the butterscotch can burn easily.
- Combine with Noodles and Peanuts: Once the butterscotch and peanut butter mixture is smooth, add the chow mein noodles and salted peanuts to the bowl. Gently fold the ingredients together with a spatula until the noodles and peanuts are evenly coated with the butterscotch mixture. Make sure that every piece is well covered to guarantee even distribution of flavors.
- Shape the Haystacks: Line a baking sheet with parchment paper or wax paper. Using a tablespoon or a small cookie scoop, drop spoonfuls of the mixture onto the prepared baking sheet, forming small haystacks. Leave some space between each haystack to allow them to set properly.
- Set the Haystacks: Allow the haystacks to cool and set at room temperature for about 30 minutes. Alternatively, you can place the baking sheet in the refrigerator for quicker setting, about 15 minutes. Confirm they’re completely firm before serving or storing.
Extra Tips: For a festive touch, consider adding a handful of mini marshmallows or chocolate chips to the mixture for extra texture and flavor. If you find the mixture is too sticky to work with, lightly dampen your hands or the scoop with water to prevent sticking.
Store the haystacks in an airtight container at room temperature for up to a week, or refrigerate them to extend their shelf life. These haystacks also make for great homemade gifts; simply package them in decorative bags or boxes to share the holiday cheer.
Holiday Candy Cane Bark
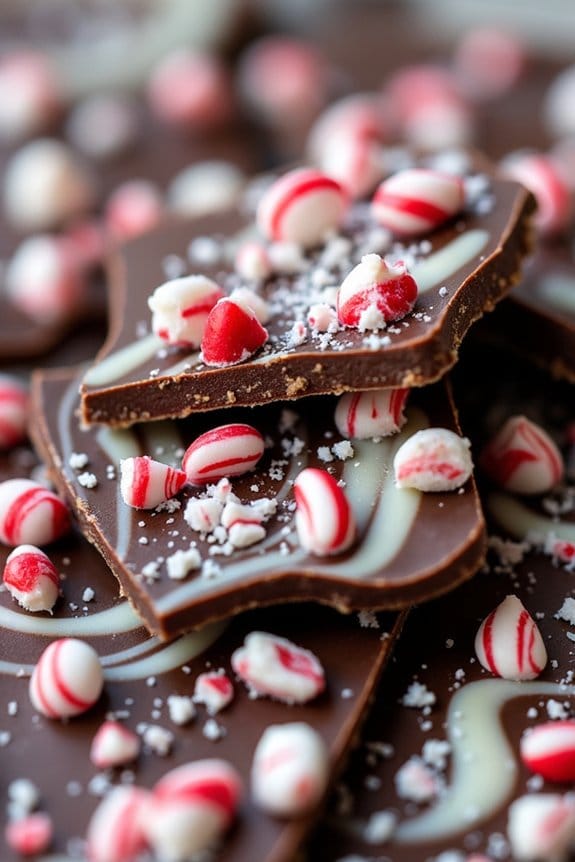
Holiday Candy Cane Bark is a delightful and festive treat that’s perfect for the Christmas season. This colorful and crunchy dessert combines the rich flavor of chocolate with the invigorating zing of peppermint, making it a favorite at holiday gatherings. Not only is it delicious, but it’s also incredibly easy to make, requiring just a few simple ingredients and minimal time.
Whether you’re hosting a party or looking for a homemade gift idea, this candy cane bark will surely impress your friends and family.
The beauty of Holiday Candy Cane Bark lies in its simplicity. With just a few steps, you can create a visually appealing dessert that captures the essence of the holidays. The combination of smooth chocolate and crushed candy canes creates a texture that’s both satisfying and indulgent. Plus, the contrast of the dark chocolate and the white peppermint bits makes for a stunning presentation.
Let’s explore the ingredients and steps required to make this festive treat.
Ingredients (Serves 4-6 people):
- 12 ounces of dark chocolate chips
- 12 ounces of white chocolate chips
- 1 teaspoon of peppermint extract
- 1/2 cup crushed candy canes
- Parchment paper
Instructions:
- Prepare the Baking Sheet: Line a baking sheet with parchment paper, guaranteeing it covers the entire surface. This will prevent the chocolate from sticking and make it easier to break the bark into pieces later.
- Melt the Dark Chocolate: In a microwave-safe bowl, melt the dark chocolate chips in the microwave in 30-second intervals, stirring in between until smooth. Alternatively, you can melt the chocolate using a double boiler method over the stove.
- Spread the Dark Chocolate: Once fully melted, pour the dark chocolate onto the prepared baking sheet. Use a spatula to spread the chocolate evenly into a rectangle, about 1/4 inch thick.
- Melt the White Chocolate: In a separate microwave-safe bowl, melt the white chocolate chips using the same method as the dark chocolate. Stir in the peppermint extract once the chocolate is smooth.
- Drizzle the White Chocolate: Carefully drizzle the melted white chocolate over the dark chocolate layer. Use a spatula or a spoon to gently swirl the two chocolates together, creating a marbled effect.
- Add the Candy Cane Topping: Sprinkle the crushed candy canes evenly over the chocolate. Press them lightly into the surface to make sure they adhere as the chocolate cools.
- Chill the Bark: Place the baking sheet in the refrigerator for about 30 minutes, or until the chocolate is completely set and firm.
- Break into Pieces: Once set, remove the bark from the refrigerator. Break it into pieces of desired size by hand or use a knife for more uniform pieces.
Extra Tips:
When making Holiday Candy Cane Bark, make sure to use high-quality chocolate for the best flavor. If you prefer a sweeter bark, you can substitute milk chocolate for dark chocolate.
For a more festive look, consider adding edible glitter or sprinkles along with the candy canes. If you’re making this ahead of time, store the bark in an airtight container in a cool, dry place to maintain its freshness.
Avoid letting the chocolate overheat during melting, as this can cause it to seize and become unusable. Enjoy your festive creation!
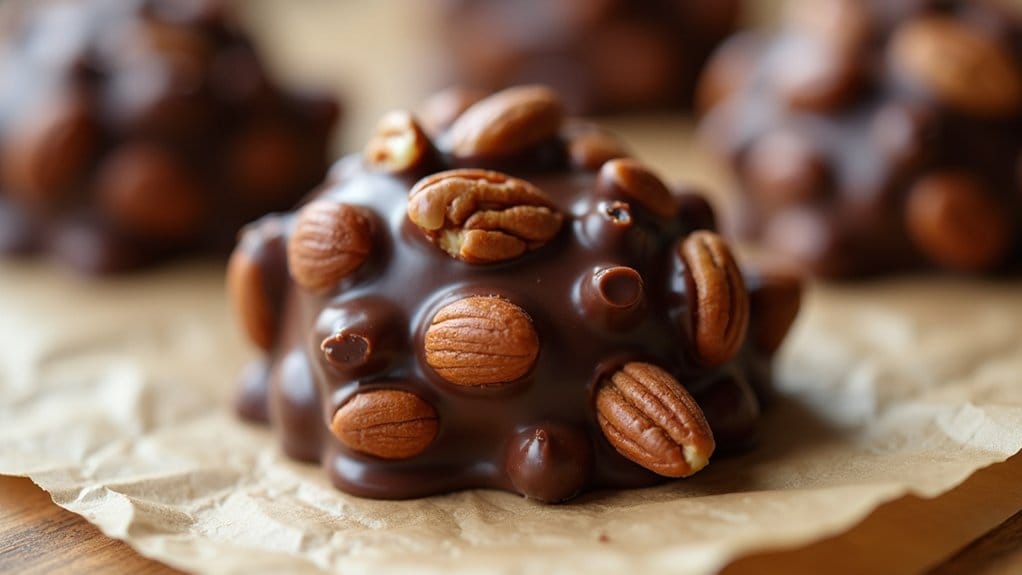
Nutty Chocolate Clusters
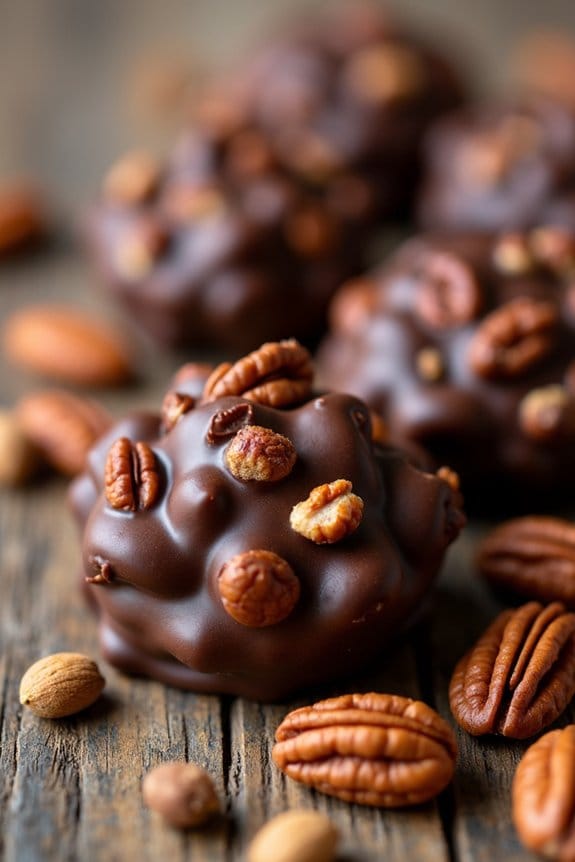
Nutty Chocolate Clusters are a delightful treat that combines the richness of chocolate with the crunch of nuts, perfect for adding a sweet touch to your holiday festivities.
These clusters are incredibly easy to make, requiring minimal ingredients and effort, yet they deliver a satisfying blend of flavors and textures. Whether you’re gifting them to friends and family or serving them at a festive gathering, these clusters are bound to be a hit.
The recipe allows for flexibility, letting you choose your favorite nuts to personalize the clusters. Almonds, pecans, walnuts, or a mix of all three can be used to suit your taste preferences. The key is to use high-quality chocolate that melts smoothly, guaranteeing a glossy finish and a rich flavor in every bite.
This recipe serves 4-6 people, making it a great option for small get-togethers or as a part of a larger dessert spread.
Ingredients:
- 2 cups semi-sweet chocolate chips
- 1 cup almonds, whole or chopped
- 1 cup pecans, chopped
- 1 cup walnuts, chopped
- 1 teaspoon vanilla extract
- A pinch of sea salt
Cooking Instructions:
- Prepare the Ingredients: Gather all the ingredients and line a baking sheet with parchment paper. This will prevent the clusters from sticking and make cleanup easier.
- Melt the Chocolate: In a microwave-safe bowl, heat the semi-sweet chocolate chips in 30-second intervals, stirring well after each interval, until the chocolate is completely melted and smooth. Alternatively, you can melt the chocolate using a double boiler on the stove.
- Mix in the Nuts: Once the chocolate is melted, stir in the almonds, pecans, and walnuts until they’re fully coated with chocolate. Make sure each piece of nut is well-covered for even flavor distribution.
- Add Vanilla and Salt: Stir in the vanilla extract and a pinch of sea salt. The vanilla will enhance the chocolate flavor, and the salt will add a nice contrast to the sweetness.
- Form the Clusters: Using a spoon, drop spoonfuls of the chocolate-nut mixture onto the prepared baking sheet. Aim for clusters about 1-2 inches in size, leaving enough space between each to avoid them sticking together.
- Cool and Set: Let the clusters sit at room temperature until they’re firm. If you’re in a hurry, you can place the baking sheet in the refrigerator for about 30 minutes to speed up the setting process.
Extra Tips:
When making Nutty Chocolate Clusters, verify your nuts are fresh for the best flavor. You can toast them in the oven for a few minutes before mixing them with the chocolate to enhance their nuttiness.
If you prefer sweeter clusters, consider adding a tablespoon of honey or maple syrup to the melted chocolate. Additionally, for a festive touch, sprinkle some colored sprinkles or edible glitter on top before the chocolate sets.
Store these clusters in an airtight container at room temperature or in the refrigerator for longer shelf life.
