

The holiday season is all about gathering with loved ones and sharing delicious meals.
With these 10 cozy Christmas lunch recipes, hosting a crowd becomes a joyful breeze.
From herb-roasted turkey breast to sweet potato and pecan casserole, there’s something to please every palate.
Add in the aromas of baked ham with maple glaze and garlic butter green beans, and your festive menu is set.
Let’s explore these delightful recipes that will make your Christmas lunch a truly special occasion.
Baked Ham With Maple Glaze
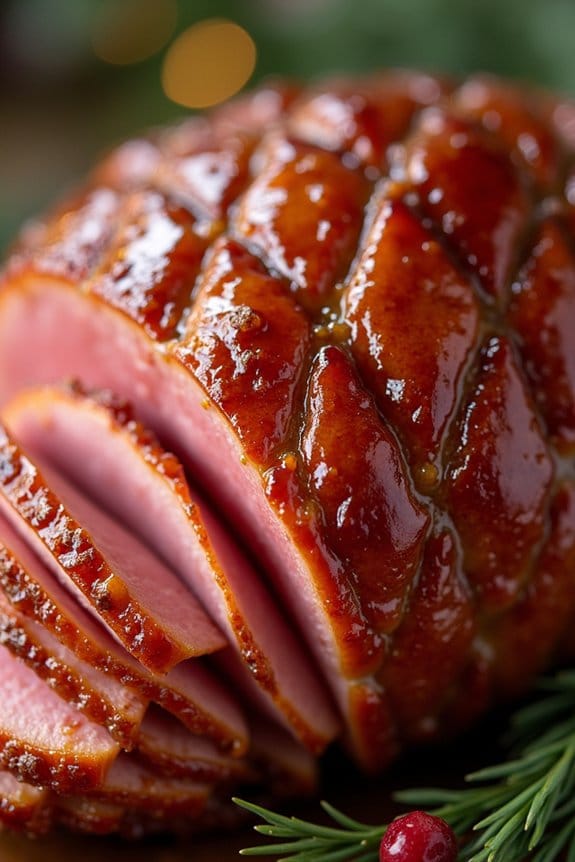
Baked Ham With Maple Glaze is a classic holiday dish that combines the rich, savory flavor of ham with the sweet and slightly smoky taste of pure maple syrup. This dish is perfect for a cozy Christmas lunch, providing a centerpiece that’s both impressive and incredibly delicious.
The glaze complements the natural saltiness of the ham, creating a delightful contrast that will have your guests coming back for seconds. As it bakes, the maple glaze caramelizes, creating a beautiful, glossy finish on the ham that’s as visually appealing as it’s tasty.
The process of preparing Baked Ham With Maple Glaze is simple yet rewarding. With a few quality ingredients and a bit of patience, you can create a succulent dish that’s perfect for the festive season.
The aroma of the baking ham will fill your home, adding to the warm and inviting atmosphere of your Christmas celebration. Whether you’re hosting a large family gathering or a more intimate lunch, this recipe serves 4-6 people and is sure to be a hit at your table.
Ingredients:
- 1 fully cooked bone-in ham (about 4-6 pounds)
- 1 cup pure maple syrup
- 1/2 cup brown sugar
- 2 tablespoons Dijon mustard
- 1/4 cup apple cider vinegar
- 1 teaspoon ground cinnamon
- 1/2 teaspoon ground cloves
- 1/2 teaspoon ground allspice
Instructions:
1. Preheat the Oven: Begin by preheating your oven to 325°F (165°C). This will guarantee that the ham cooks evenly and the glaze caramelizes perfectly.
2. Prepare the Ham: Place the ham on a rack in a roasting pan. Score the surface of the ham in a diamond pattern using a sharp knife, making sure not to cut too deep. This step allows the glaze to penetrate the ham, enhancing its flavor.
3. Make the Glaze: In a small saucepan over medium heat, combine the maple syrup, brown sugar, Dijon mustard, apple cider vinegar, cinnamon, cloves, and allspice. Stir the mixture until the sugar is dissolved and the glaze is smooth.
Allow it to simmer for about 5 minutes, then remove from heat.
4. Apply the Glaze: Generously brush the glaze over the surface of the ham, making sure to get it into the scored areas. Reserve a portion of the glaze for basting during the cooking process.
5. Bake the Ham: Place the ham in the preheated oven and bake for 1 1/2 to 2 hours, or until the internal temperature reaches 140°F (60°C). Baste the ham with the reserved glaze every 30 minutes to keep it moist and flavorful.
6. Rest and Serve: Once cooked, remove the ham from the oven and let it rest for about 15 minutes before slicing. This allows the juices to redistribute, guaranteeing each slice is tender and juicy. Slice and serve the ham warm, drizzled with any remaining glaze.
Extra Tips: When selecting a ham, opt for one that’s labeled as “fully cooked” to save time and guarantee perfect results. If you prefer a thicker glaze, continue to simmer it until it reaches your desired consistency.
You can also substitute the apple cider vinegar with orange juice for a citrusy twist. Remember to use a meat thermometer to check the internal temperature to avoid overcooking. Enjoy your cozy Christmas lunch with this delicious Baked Ham With Maple Glaze, and savor the festive flavors it brings to your table.
Creamy Potato Gratin
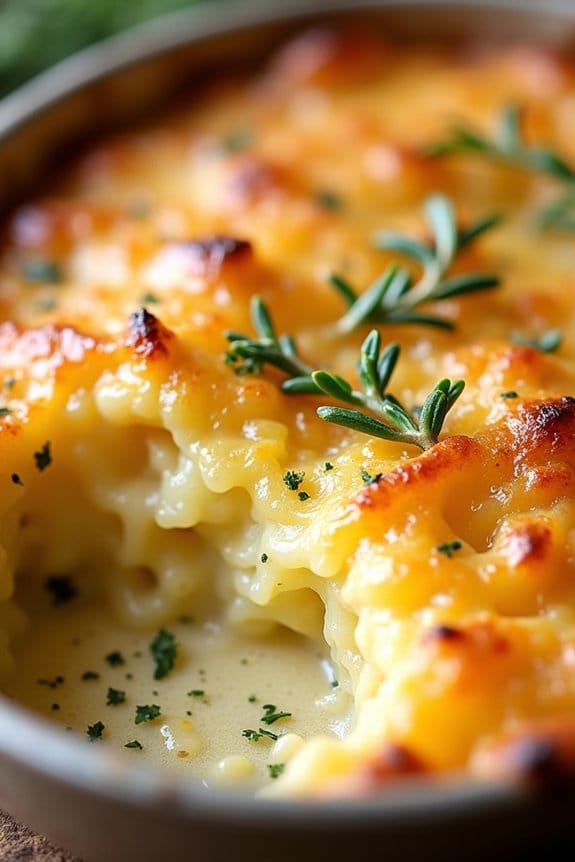
Creamy Potato Gratin is the ultimate comfort food that makes for a perfect addition to your cozy Christmas lunch. This dish is rich, indulgent, and wonderfully flavorful, combining layers of tender potatoes with a luscious creamy sauce and a golden, cheesy crust. The key to this recipe is selecting the right type of potatoes, such as Yukon Golds or Russets, which hold up well during baking and absorb the creamy sauce beautifully.
Whether you’re hosting a small family gathering or a festive holiday feast, this potato gratin is sure to be a crowd-pleaser. The creaminess of the gratin comes from a blend of heavy cream and milk, which is infused with garlic, thyme, and a hint of nutmeg to enhance the flavor of the dish. Topped with a generous layer of Gruyère cheese, this gratin develops a crispy, irresistible crust as it bakes.
The result is a harmonious balance of textures and flavors that complement any main course, from roasted turkey to honey-glazed ham. Easy to prepare and effortlessly elegant, this Creamy Potato Gratin is an essential dish to incorporate in your Christmas lunch menu.
Ingredients (Serves 4-6 people):
- 2 pounds Yukon Gold or Russet potatoes
- 2 cups heavy cream
- 1 cup whole milk
- 2 cloves garlic, minced
- 1 tablespoon fresh thyme leaves
- 1/4 teaspoon ground nutmeg
- Salt and pepper to taste
- 1 1/2 cups shredded Gruyère cheese
- 2 tablespoons unsalted butter, for greasing
Cooking Instructions:
- Preheat the Oven: Set your oven to 350°F (175°C) to guarantee it’s ready to bake the gratin.
- Prepare the Potatoes: Peel and thinly slice the potatoes to about 1/8-inch thickness. Uniform slices ensure even cooking.
- Infuse the Cream: In a saucepan, combine the heavy cream, milk, minced garlic, fresh thyme, nutmeg, salt, and pepper. Bring to a gentle simmer over medium heat, stirring occasionally. Once infused, remove from heat.
- Assemble the Gratin: Grease a 9×13-inch baking dish with butter. Arrange a layer of potato slices in the bottom, slightly overlapping each other. Pour a portion of the infused cream mixture over the potatoes and sprinkle with Gruyère cheese.
- Layer and Repeat: Continue layering the potatoes, cream mixture, and cheese until all ingredients are used, finishing with a generous layer of cheese on top.
- Bake the Gratin: Cover the dish with foil and bake for 45 minutes. Remove the foil and bake for an additional 30 minutes or until the potatoes are tender and the top is golden brown.
- Rest and Serve: Allow the gratin to rest for 10-15 minutes before serving. This helps the dish to set and makes it easier to slice.
Extra Tips:
For an even richer flavor, consider adding caramelized onions or cooked bacon between the layers of potatoes. If you prefer a stronger cheese flavor, you can substitute Gruyère with a sharp cheddar or a combination of cheeses.
To guarantee the potatoes cook evenly, try to slice them as uniformly as possible, and if you have a mandoline slicer, it’s the perfect tool for this task. Adjust the seasoning to taste, and feel free to add a pinch of cayenne pepper for a subtle kick.
Herb-Roasted Turkey Breast
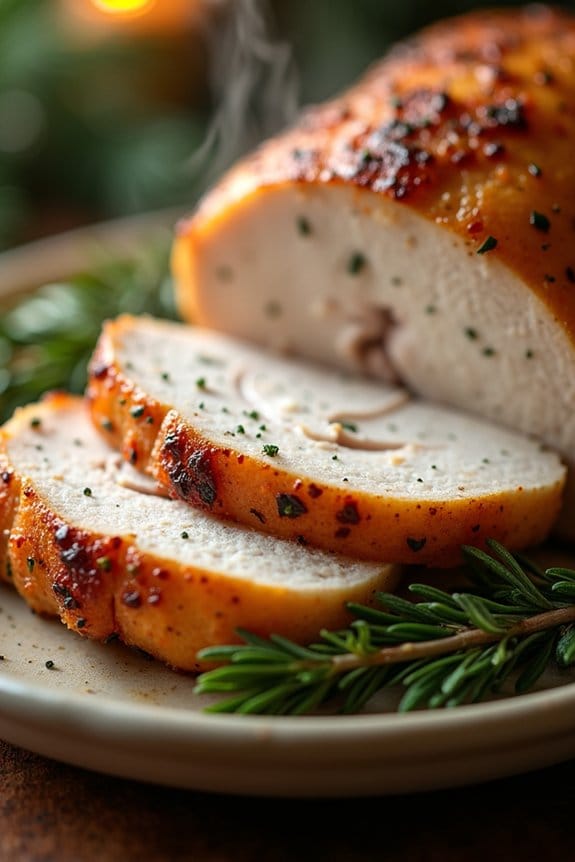
The holiday season is the perfect time to gather with family and friends, sharing delightful meals that bring warmth and joy. Herb-Roasted Turkey Breast is a wonderful centerpiece for your Christmas lunch, combining tender, juicy meat with the aromatic flavors of fresh herbs. This dish is ideal for those who prefer a lighter option to the traditional whole turkey, making it a perfect choice for a cozy gathering of 4-6 people.
This recipe focuses on simplicity and flavor, ensuring that even novice cooks can create a show-stopping main course without the stress. By using a combination of fresh herbs and a few pantry staples, you’ll bring out the natural goodness of the turkey breast while filling your home with the comforting aroma of Christmas. Serve this with your favorite sides, and you’ll have a meal that feels both special and satisfying.
Ingredients (Serves 4-6):
- 1 (3-4 pound) boneless turkey breast, skin-on
- 3 tablespoons olive oil
- 2 teaspoons salt
- 1 teaspoon black pepper
- 1 tablespoon fresh rosemary, finely chopped
- 1 tablespoon fresh thyme, finely chopped
- 1 tablespoon fresh sage, finely chopped
- 4 cloves garlic, minced
- 1 lemon, zested and juiced
- 1 cup chicken broth
Cooking Instructions:
- Preparation: Preheat your oven to 350°F (175°C). Rinse the turkey breast under cold water and pat it dry with paper towels. This helps the skin crisp up during roasting.
- Herb Mixture: In a small bowl, combine the olive oil, salt, pepper, rosemary, thyme, sage, minced garlic, lemon zest, and lemon juice. Mix well to form a paste.
- Season the Turkey: Gently loosen the skin of the turkey breast by sliding your fingers underneath. Spread half of the herb mixture directly onto the meat under the skin. Rub the remaining mixture over the top of the skin.
- Roasting: Place the turkey breast in a roasting pan or a baking dish, skin side up. Pour the chicken broth into the bottom of the pan to keep the meat moist and to create a flavorful base for gravy, if desired.
- Cook: Roast the turkey in the preheated oven for about 1.5 to 2 hours, or until a meat thermometer inserted into the thickest part of the breast reads 165°F (74°C). Baste the turkey with the pan juices every 30 minutes to enhance flavor and moisture.
- Rest: Once cooked, remove the turkey from the oven and let it rest for at least 15 minutes before slicing. This allows the juices to redistribute, ensuring each slice is succulent and tender.
Extra Tips:
For an even more flavorful turkey, consider preparing the herb mixture and marinating the turkey breast the night before. This allows the flavors to penetrate deeper into the meat.
If you prefer a crispier skin, increase the oven temperature to 375°F (190°C) for the last 15 minutes of roasting. Remember to always let the turkey rest before carving—this is essential for juicy meat.
Finally, if you have leftovers, they make great sandwiches or can be added to a hearty salad. Enjoy your cozy Christmas lunch with this delightful dish!
Sweet Potato and Pecan Casserole
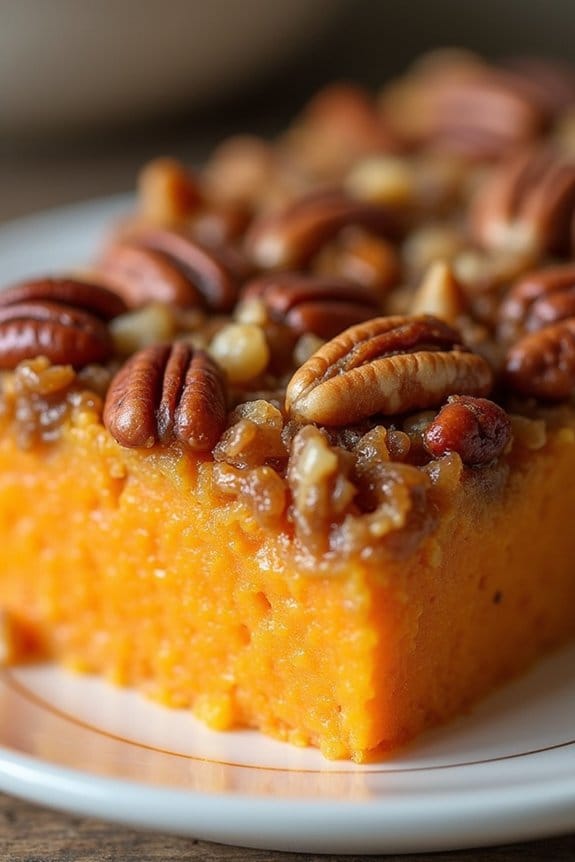
The Sweet Potato and Pecan Casserole is a delightful holiday side dish that perfectly complements any Christmas lunch spread. It’s known for its wonderful blend of creamy sweet potatoes and crunchy pecans, making it both a comforting and texturally pleasing dish.
This casserole is often a crowd favorite due to its harmonious balance of sweet and nutty flavors, which are enhanced by aromatic spices. Whether you’re hosting a large family gathering or a cozy lunch for a few, this dish is sure to impress your guests with its rich taste and appealing presentation.
The casserole begins with roasted sweet potatoes, which are then mashed to a smooth consistency. This base is enriched with butter, milk, and brown sugar, creating a luscious and flavorful mixture. The topping features a delightful combination of pecans and brown sugar, adding a crunchy texture that contrasts beautifully with the creamy interior.
The Sweet Potato and Pecan Casserole isn’t only a treat for the palate but also a feast for the eyes, with its vibrant orange hue and golden topping. This recipe serves 4-6 people, making it ideal for an intimate Christmas lunch.
Ingredients:
- 4 large sweet potatoes
- 1/2 cup unsalted butter, melted
- 1/3 cup milk
- 1/2 cup brown sugar
- 1 teaspoon vanilla extract
- 1/2 teaspoon ground cinnamon
- 1/4 teaspoon ground nutmeg
- 1/2 teaspoon salt
- 1 cup pecans, chopped
- 1/2 cup all-purpose flour
- 1/2 cup brown sugar (for topping)
- 1/4 cup unsalted butter, melted (for topping)
Cooking Instructions:
- Preheat the oven to 350°F (175°C). Prepare a 9×13-inch baking dish by lightly greasing it with butter or non-stick cooking spray.
- Roast the sweet potatoes: Wash the sweet potatoes thoroughly. Pierce each sweet potato several times with a fork. Place them on a baking sheet and roast in the preheated oven for about 45-50 minutes or until they’re fork-tender.
- Mash the sweet potatoes: Remove the sweet potatoes from the oven and let them cool slightly. Once cool enough to handle, peel the skins off and place the flesh into a large mixing bowl. Use a potato masher or an electric mixer to mash the sweet potatoes until smooth.
- Prepare the sweet potato mixture: Add the melted butter, milk, brown sugar, vanilla extract, cinnamon, nutmeg, and salt to the mashed sweet potatoes. Mix until well combined and the mixture is creamy and smooth.
- Transfer to baking dish: Pour the sweet potato mixture into the prepared baking dish, spreading it evenly with a spatula.
- Make the pecan topping: In a separate bowl, combine the chopped pecans, flour, brown sugar, and melted butter. Stir the mixture until it has a crumbly texture.
- Top the casserole: Evenly sprinkle the pecan topping mixture over the sweet potato layer in the baking dish.
- Bake the casserole: Place the casserole back in the oven and bake for 25-30 minutes, or until the topping is golden brown and crisp.
- Serve: Allow the casserole to cool for a few minutes before serving. Enjoy it warm as a delicious side dish.
Extra Tips:
When preparing the Sweet Potato and Pecan Casserole, make sure to roast the sweet potatoes thoroughly until they’re very tender; this will guarantee that they mash smoothly and create a creamy base.
If you prefer a sweeter casserole, you can increase the amount of brown sugar slightly or add a drizzle of maple syrup to the sweet potato mixture. To save time, the sweet potatoes can be cooked and mashed a day ahead and stored in the refrigerator until you’re ready to assemble and bake the casserole.
Finally, for an extra touch, consider adding a sprinkle of sea salt or a dash of cayenne pepper to the topping to balance the sweetness with a hint of savory or spice.
Garlic Butter Green Beans
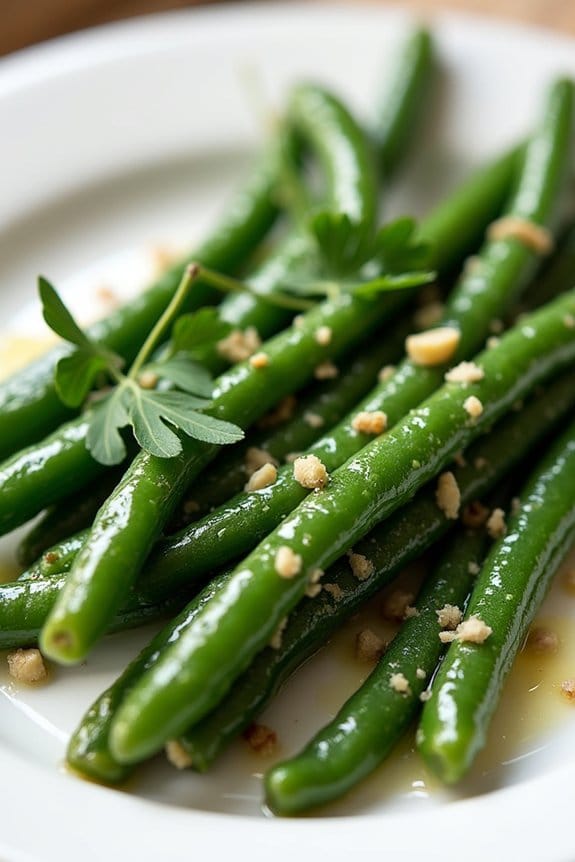
Garlic Butter Green Beans are a delightful side dish that perfectly complements any holiday meal. These vibrant green beans are cooked to perfection and coated with a rich garlic butter sauce, adding a burst of flavor that’s both savory and satisfying. Ideal for your cozy Christmas lunch, this dish isn’t only delicious but also incredibly easy to prepare, allowing you to focus on enjoying the festive day with family and friends.
The beauty of Garlic Butter Green Beans lies in their simplicity and the way the ingredients come together to enhance the natural flavors of the beans. Fresh green beans are blanched to retain their bright color and crisp texture, then tossed in a fragrant garlic butter sauce that’s seasoned with a hint of salt and pepper. The result is a dish that’s as pleasing to the eyes as it’s to the palate, making it a must-have on your Christmas table.
Ingredients (serves 4-6):
- 1 pound fresh green beans, trimmed
- 3 tablespoons unsalted butter
- 3 cloves garlic, minced
- Salt, to taste
- Pepper, to taste
- 1 tablespoon lemon juice (optional)
- 1 tablespoon chopped fresh parsley (optional, for garnish)
Cooking Instructions:
- Prepare the Green Beans: Rinse the green beans under cold water and trim the ends. Set them aside while you prepare the rest of the ingredients.
- Blanch the Green Beans: Fill a large pot with water and bring it to a boil. Add a pinch of salt and then the green beans. Let them boil for about 3-4 minutes, until they’re bright green and tender-crisp.
- Ice Bath: Immediately transfer the blanched green beans to a bowl filled with ice water. This will stop the cooking process and help maintain their vibrant color. Leave them in the ice bath for at least 5 minutes, then drain and set aside.
- Prepare the Garlic Butter Sauce: In a large skillet, melt the butter over medium heat. Add the minced garlic and sauté for about 1 minute, until fragrant. Be careful not to burn the garlic.
- Combine and Season: Add the drained green beans to the skillet with the garlic butter. Toss them well to guarantee they’re evenly coated. Season with salt and pepper to taste. If using, add the lemon juice for a hint of brightness.
- Garnish and Serve: Transfer the green beans to a serving platter. Garnish with chopped fresh parsley if desired. Serve immediately while warm.
Extra Tips:
For the best results, choose fresh, firm green beans that snap easily when bent. This indicates their freshness and will guarantee a crisp texture after cooking.
If you prefer a bit more flavor, you can add a sprinkle of grated Parmesan cheese on top before serving. Additionally, preparing the garlic butter sauce just before serving guarantees the best flavor, as the garlic can become bitter if cooked too far in advance.
Enjoy this simple yet delicious side dish that brings a touch of elegance to your Christmas lunch.
Cranberry and Orange Relish
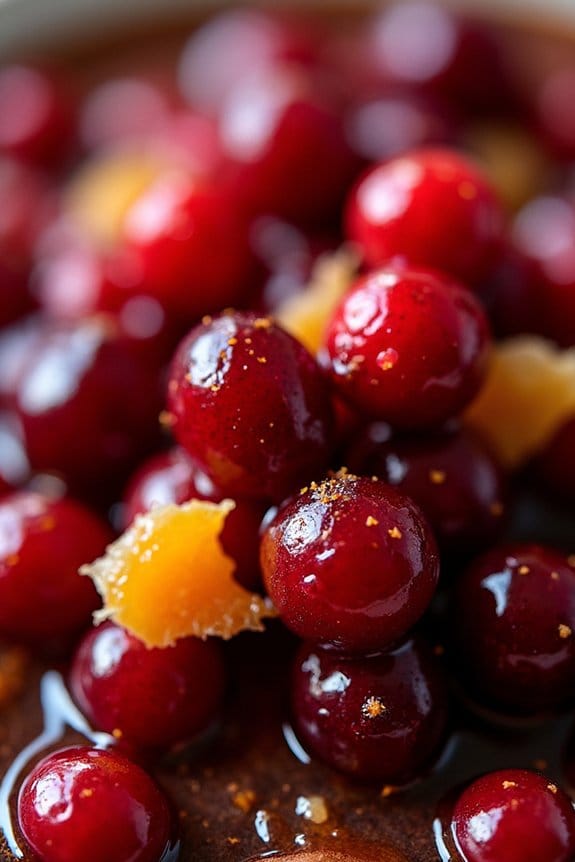
Cranberry and Orange Relish is a delightful addition to any Christmas lunch, offering a burst of fresh, citrusy flavor that complements a variety of festive dishes. This tangy condiment is a vibrant blend of cranberries and oranges, sweetened to perfection with sugar and spiced with a hint of cinnamon.
It’s an easy-to-make recipe that can be prepared ahead of time, allowing you to focus on the main course and other sides on the day of your Christmas celebration. The relish isn’t only visually appealing with its deep red color but also incredibly nutritious, packed with antioxidants from the cranberries and Vitamin C from the oranges.
Whether served alongside roast turkey, ham, or even spooned over desserts like cheesecake, this Cranberry and Orange Relish is sure to be a hit at your holiday table. The balance of sweet and tart flavors makes it a versatile accompaniment that enhances the traditional flavors of a Christmas lunch.
Ingredients for 4-6 servings:
- 3 cups fresh cranberries
- 1 large orange, zested and juiced
- 1/2 cup granulated sugar
- 1/4 cup water
- 1/2 teaspoon ground cinnamon
- Pinch of salt
Cooking Instructions:
- Prepare the Ingredients: Start by rinsing the cranberries under cold water and discarding any that are soft or damaged. Zest the orange and then juice it, making sure you remove any seeds.
- Combine Ingredients: In a medium saucepan, combine the cranberries, orange zest, orange juice, granulated sugar, water, ground cinnamon, and a pinch of salt. Stir the mixture to guarantee all the ingredients are well combined.
- Cook the Relish: Place the saucepan over medium heat and bring the mixture to a simmer. Stir occasionally to prevent sticking, and allow the cranberries to start popping and softening. This usually takes about 10-12 minutes.
- Adjust Consistency: Once the cranberries have mostly burst and the mixture has thickened, you can adjust the consistency. If you prefer a smoother relish, use a potato masher or the back of a spoon to crush any remaining whole cranberries.
- Cool and Serve: Remove the saucepan from heat and let the relish cool to room temperature. The relish will continue to thicken as it cools. Once cooled, transfer it to a serving bowl and refrigerate until ready to serve. The relish can be made a day in advance to allow the flavors to meld.
Extra Tips:
For an added depth of flavor, consider adding a splash of Grand Marnier or another orange liqueur to the mixture while it simmers. If you prefer your relish on the sweeter side, you can increase the sugar incrementally to your taste.
If you’re using frozen cranberries, make sure to thaw them before starting the recipe. This relish can be stored in an airtight container in the refrigerator for up to a week, making it an excellent make-ahead dish for the busy holiday season.
Cheesy Broccoli Bake

Cheesy Broccoli Bake is a comforting and delightful addition to your Christmas lunch menu, offering a creamy, cheesy experience that’s sure to please the whole family. This dish combines the wholesome goodness of fresh broccoli with a rich, velvety cheese sauce, baked to golden perfection.
It’s a perfect side dish that pairs well with any holiday main course, bringing vibrant color and flavor to your festive table.
The beauty of this recipe lies in its simplicity and the use of common ingredients that you likely already have in your kitchen. The combination of tender broccoli and indulgent cheese makes for a dish that’s both satisfying and nutritious.
Not only is it easy to prepare, but it also allows for some flexibility regarding the types of cheese and seasonings, making it a versatile choice for any gathering.
Ingredients (Serves 4-6 people):
- 1 large head of broccoli, cut into florets
- 2 cups shredded cheddar cheese
- 1 cup milk
- 3 tablespoons butter
- 3 tablespoons all-purpose flour
- 1 teaspoon garlic powder
- 1/2 teaspoon onion powder
- Salt and pepper to taste
- 1/2 cup breadcrumbs
- 1 tablespoon olive oil
Cooking Instructions:
1. Prepare the Broccoli: Preheat your oven to 375°F (190°C). Bring a pot of salted water to a boil and blanch the broccoli florets for about 3 minutes. Drain and set aside.
2. Make the Cheese Sauce: In a medium saucepan, melt the butter over medium heat. Stir in the flour, garlic powder, and onion powder to form a paste. Cook for 1-2 minutes, then slowly whisk in the milk, ensuring no lumps remain.
Cook until the sauce thickens, about 5 minutes. Remove from heat and stir in 1 1/2 cups of the shredded cheddar cheese. Season with salt and pepper to taste.
3. Assemble the Bake: In a large baking dish, arrange the blanched broccoli evenly. Pour the cheese sauce over the broccoli, ensuring it’s well coated.
4. Add the Topping: In a small bowl, combine the breadcrumbs with the remaining 1/2 cup of cheddar cheese and olive oil. Sprinkle this mixture evenly over the top of the broccoli and cheese.
5. Bake: Place the baking dish in the preheated oven and bake for 20-25 minutes, or until the cheese is bubbly and the top is golden brown.
Extra Tips:
For a more robust flavor, consider adding a pinch of nutmeg to the cheese sauce, which complements the richness of the cheese beautifully.
If you prefer a bit of spice, a dash of cayenne pepper can add a nice kick. To make the dish even more hearty, you can add cooked bacon pieces or sliced mushrooms to the broccoli before baking.
Always taste the cheese sauce before pouring it over the broccoli to adjust the seasoning to your preference.
Honey-Glazed Carrots
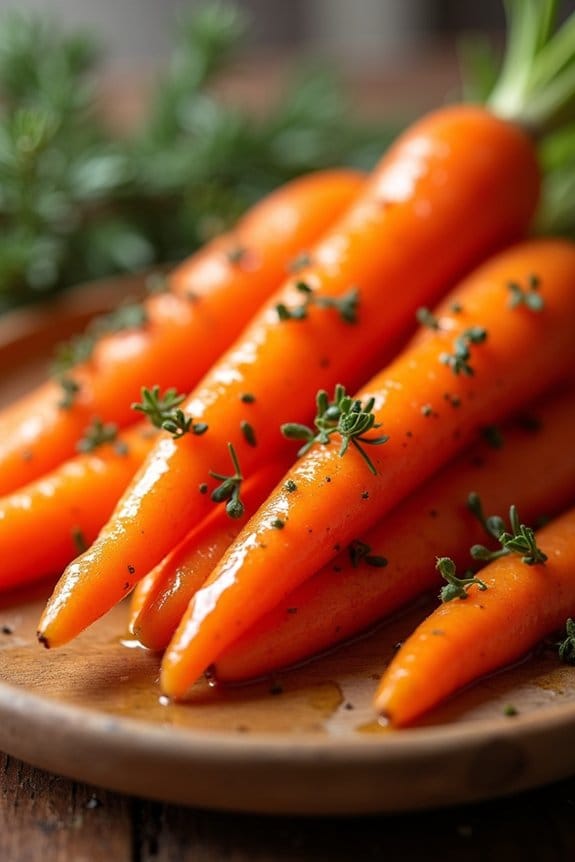
Indulge your senses this holiday season with a delightful dish of Honey-Glazed Carrots. These tender, sweet, and slightly caramelized carrots are the perfect accompaniment to any Christmas lunch. Their vibrant color and rich flavor will brighten up your festive spread, while the simplicity of the recipe guarantees that you spend less time in the kitchen and more time with your loved ones.
This recipe serves 4-6 people, making it an ideal side dish for a cozy family gathering. The combination of honey and butter creates a luscious glaze that enhances the natural sweetness of the carrots, while a hint of thyme and a touch of lemon juice add a rejuvenating balance. Perfectly cooked to a tender-crisp texture, these Honey-Glazed Carrots will have everyone asking for seconds.
Ingredients:
- 2 pounds of carrots, peeled and cut into 2-inch pieces
- 3 tablespoons unsalted butter
- 3 tablespoons honey
- 1 teaspoon salt
- 1/2 teaspoon black pepper
- 1 tablespoon fresh lemon juice
- 1 teaspoon fresh thyme leaves (optional)
Cooking Instructions:
- Prepare the Carrots: Start by washing and peeling the carrots. Cut them into uniform 2-inch pieces, guaranteeing they cook evenly.
- Melt the Butter: In a large skillet over medium heat, add the unsalted butter. Allow it to melt completely and just begin to foam.
- Add Carrots: Once the butter is ready, add the prepared carrots to the skillet. Stir to coat them evenly with the melted butter.
- Add Honey and Seasonings: Pour the honey over the carrots and season with salt and black pepper. Stir well to guarantee the carrots are fully coated with the honey and seasonings.
- Cook the Carrots: Reduce the heat to low-medium and cover the skillet with a lid. Allow the carrots to cook for about 15-20 minutes, stirring occasionally, until they’re tender and the glaze has slightly thickened.
- Add Finishing Touches: Remove the skillet from the heat and stir in the fresh lemon juice. If desired, sprinkle the fresh thyme leaves over the carrots for added flavor.
- Serve: Transfer the honey-glazed carrots to a serving dish and serve warm as a delicious side to your Christmas lunch.
Extra Tips:
For an extra burst of flavor, consider adding a pinch of cinnamon or nutmeg during the cooking process.
If you prefer a more savory dish, substitute the honey with maple syrup for a richer taste.
Guarantee not to overcook the carrots; they should be tender yet maintain a slight crunch.
If your glaze becomes too thick, add a splash of water or more lemon juice to loosen it up.
Finally, always taste and adjust the seasonings before serving to suit your preferences. Enjoy your festive meal!
Savory Bread Stuffing
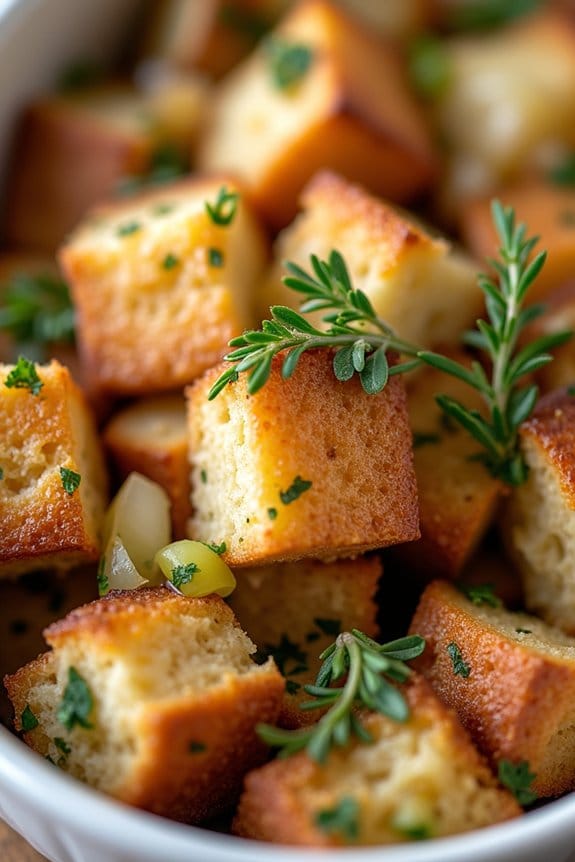
There’s nothing quite as comforting and satisfying as a well-made stuffing during the festive season. This Savory Bread Stuffing is the quintessential side dish for your Cozy Christmas Lunch. With a perfect balance of flavors and textures, this stuffing combines the aromatic richness of herbs with the hearty goodness of bread, making it an ideal accompaniment for your holiday meal. Its warm and inviting flavors are sure to make your Christmas lunch even more special.
Whether you’re serving a traditional roast or a vegetarian spread, this stuffing adapts beautifully with its versatile taste. The recipe provides a delightful harmony of soft, moist interior and a slightly crispy exterior, making each bite a joyous experience. This savory bread stuffing is designed to serve 4-6 people, guaranteeing everyone at your table gets a generous helping.
Ingredients for 4-6 servings:
- 1 loaf of day-old bread (about 8 cups), cubed
- 1 cup unsalted butter
- 2 cups diced onions
- 1 1/2 cups diced celery
- 3 cloves garlic, minced
- 1/4 cup chopped fresh parsley
- 1 tablespoon chopped fresh sage
- 1 tablespoon chopped fresh thyme
- 1 tablespoon chopped fresh rosemary
- Salt and pepper to taste
- 2 1/2 to 3 cups chicken or vegetable broth
- 2 large eggs, beaten
Cooking Instructions:
- Preheat and Prepare Bread: Preheat the oven to 350°F (175°C). Spread the cubed bread evenly on a baking sheet. Toast in the oven for about 10-15 minutes until it’s lightly golden and dry. Remove from the oven and set aside to cool.
- Sauté Vegetables: In a large skillet, melt the butter over medium heat. Add the onions and celery, sautéing until they’re soft and translucent, about 8-10 minutes. Stir in the garlic and cook for another minute.
- Mix Herbs and Seasonings: Add the parsley, sage, thyme, and rosemary to the skillet. Season with salt and pepper, and stir well to combine. Let the mixture cook for another 2-3 minutes to allow the flavors to meld.
- Combine Ingredients: In a large mixing bowl, combine the toasted bread cubes with the sautéed vegetable and herb mixture. Gradually add the chicken or vegetable broth, making sure the bread absorbs the liquid without becoming soggy. The amount of broth may vary, so add it slowly.
- Incorporate Eggs: Once the mixture is evenly moistened, add the beaten eggs and gently fold them into the stuffing to bind the ingredients together.
- Bake the Stuffing: Transfer the stuffing mixture into a greased baking dish. Cover with foil and bake in the preheated oven for 30 minutes. Remove the foil and bake for an additional 15-20 minutes until the top is golden brown and crisp.
Extra Tips:
For a richer flavor, consider adding cooked sausage or diced apples to the stuffing mixture. If you prefer a more textured stuffing, use a combination of different bread types such as whole wheat or sourdough.
Always taste and adjust the seasoning before baking to guarantee the perfect balance of flavors. Finally, if you like a moister stuffing, use more broth and cover it with foil for a longer portion of the baking time. Enjoy this festive treat as part of your Cozy Christmas Lunch!
Classic Caesar Salad
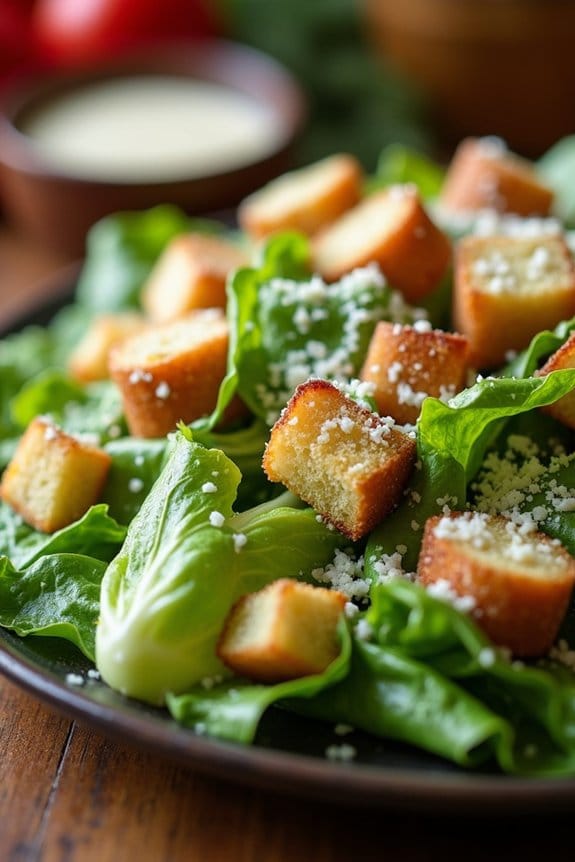
A Classic Caesar Salad is a timeless dish that brings together crisp romaine lettuce, crunchy croutons, and a rich, creamy dressing made with anchovies, garlic, and Parmesan cheese.
This salad, perfect for a cozy Christmas lunch, offers a delightful contrast in textures and flavors, making it a favorite among salad lovers. Originating from Tijuana, Mexico, in the 1920s, this salad has stood the test of time and continues to be a crowd-pleaser during festive occasions.
This recipe serves 4-6 people and is ideal as a light starter or a side dish to complement your Christmas lunch spread. The key to a memorable Caesar Salad lies in its dressing, which should be made from scratch for the best flavor.
The anchovies add a subtle depth of flavor, while the Parmesan infuses the dressing with a savory, umami kick. Coupled with homemade croutons, this salad promises to be a hit at your Christmas table.
Ingredients:
- 2 large heads of romaine lettuce
- 1 cup croutons (preferably homemade)
- 1/2 cup freshly grated Parmesan cheese
- 1/2 cup mayonnaise
- 2 tablespoons lemon juice
- 1 tablespoon Dijon mustard
- 4 anchovy fillets, minced
- 2 cloves garlic, minced
- 1/4 cup extra-virgin olive oil
- Salt and freshly ground black pepper, to taste
Instructions:
- Prepare the Lettuce: Begin by washing and thoroughly drying the romaine lettuce. Tear the leaves into bite-sized pieces and place them in a large salad bowl.
- Make the Dressing: In a medium bowl, whisk together mayonnaise, lemon juice, and Dijon mustard until smooth. Add the minced anchovy fillets and garlic, continuing to whisk until well combined.
- Incorporate Olive Oil: Gradually drizzle in the olive oil while whisking continuously to emulsify the dressing. Season with salt and freshly ground black pepper to taste.
- Assemble the Salad: Pour the dressing over the prepared romaine lettuce and toss gently to guarantee the leaves are evenly coated.
- Add Toppings: Sprinkle the croutons and half of the grated Parmesan cheese over the salad. Toss lightly once more to distribute the toppings.
- Serve: Transfer the salad to a serving platter or individual plates. Garnish with the remaining Parmesan cheese and a few extra croutons for presentation.
Extra Tips:
For a more robust flavor in your Caesar dressing, you can adjust the amount of anchovies and garlic according to your preference.
If you prefer a creamier consistency, consider adding a tablespoon of Greek yogurt to the dressing. Homemade croutons can be made by tossing cubed bread with olive oil, salt, and pepper, then baking them in a 375°F oven until golden brown.
