

As Christmas approaches, my mind is filled with cozy potluck recipes that are just perfect for gathering loved ones around the table. Think warm, gooey spinach artichoke dip and honey-glazed ham sliders that melt in your mouth. There are also cranberry brie bites with just the right amount of tartness. It’s like a holiday feast in every bite. I can’t wait to share more details with you.
Cheesy Spinach and Artichoke Dip
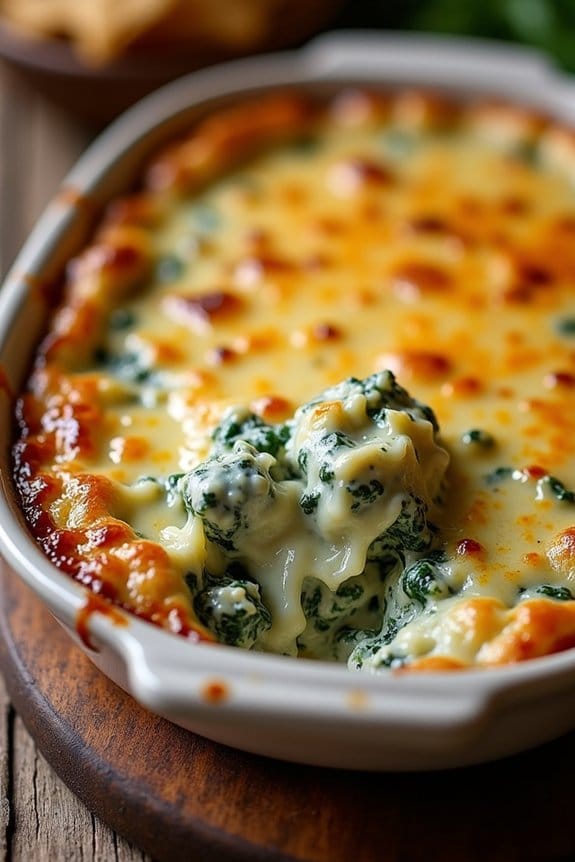
This Cheesy Spinach and Artichoke Dip is the perfect appetizer to bring to your cozy Christmas party potluck. Rich, creamy, and packed with flavor, this dip combines the tanginess of artichokes with the earthiness of spinach, all enveloped in a lush cheese blend. It’s guaranteed to be a hit amongst your friends and family, and can be served with a variety of dippers, such as tortilla chips, sliced baguette, or fresh vegetables.
Ideal for serving 4-6 people, this dish is easy to prepare and can be made ahead of time, saving you the stress of last-minute preparations. The combination of cheeses guarantees a gooey, melty texture that pairs beautifully with the robust flavors of the vegetables. Not only is this dip a crowd-pleaser, but it’s also a great way to start your festive gathering with a touch of comfort and indulgence.
Let’s explore the ingredients and the cooking process to create this delightful holiday treat.
Ingredients:
- 1 cup frozen spinach, thawed and drained
- 1 cup canned artichoke hearts, drained and chopped
- 1 cup cream cheese, softened
- 1/2 cup sour cream
- 1/4 cup mayonnaise
- 1 cup grated mozzarella cheese
- 1/2 cup grated Parmesan cheese
- 2 cloves garlic, minced
- 1/2 teaspoon salt
- 1/4 teaspoon black pepper
- 1/4 teaspoon red pepper flakes (optional)
Cooking Instructions:
- Preheat the Oven: Start by preheating your oven to 350°F (175°C). This guarantees that your dip will cook evenly and achieve the perfect gooey texture.
- Prepare the Spinach and Artichokes: Squeeze out any excess moisture from the thawed spinach. This step is essential to prevent the dip from becoming watery. Chop the artichoke hearts into small, bite-sized pieces.
- Mix the Base: In a large mixing bowl, combine the softened cream cheese, sour cream, and mayonnaise. Whisk them together until smooth and creamy.
- Add the Vegetables and Cheese: Stir in the spinach, artichoke hearts, grated mozzarella, Parmesan cheese, minced garlic, salt, black pepper, and red pepper flakes. Mix well to confirm all ingredients are evenly distributed.
- Transfer to Baking Dish: Spoon the mixture into a baking dish or an oven-safe skillet. Spread it out evenly to promote uniform cooking.
- Bake the Dip: Place the baking dish in the preheated oven. Bake for 25-30 minutes, or until the top is bubbly and golden brown.
- Serve Hot: Once done, remove from the oven and let it cool for a few minutes before serving. Pair with your favorite dippers and enjoy!
Extra Tips:
For an even richer flavor, consider adding a touch of lemon zest to brighten up the dish. If you prefer a spicier kick, increase the red pepper flakes or add a dash of hot sauce.
To make this dish ahead of time, you can prepare the dip and store it in the refrigerator overnight, then bake it fresh when you’re ready to serve. Additionally, for a slightly less indulgent version, you may substitute Greek yogurt for the sour cream and use low-fat cream cheese.
Honey Glazed Ham Sliders

Honey Glazed Ham Sliders are the perfect bite-sized treat for your cozy Christmas party potluck. These delightful sliders feature sweet and savory ham, topped with a luscious honey glaze, nestled between soft, buttery rolls. The balance of flavors guarantees a crowd-pleaser, making them an ideal addition to any festive gathering.
With minimal prep time and simple ingredients, you can create these sliders in no time, allowing you to focus on enjoying the company of your loved ones.
The heart of these sliders lies in the honey glaze, which combines the sweetness of honey with a hint of tanginess from Dijon mustard and apple cider vinegar. This glaze not only enhances the flavor of the ham but also adds a beautiful caramelized finish.
Serve these sliders warm for the best experience, as the aroma of freshly baked rolls and the sweet glaze envelops the room, creating an inviting atmosphere for your guests.
Ingredients (Serves 4-6 people):
- 1 pound of cooked ham, thinly sliced
- 12 slider rolls
- 1/2 cup of honey
- 2 tablespoons of Dijon mustard
- 2 tablespoons of apple cider vinegar
- 1/4 cup of unsalted butter, melted
- 1 tablespoon of poppy seeds
- 1 teaspoon of garlic powder
- 1 teaspoon of onion powder
- Salt and pepper to taste
Cooking Instructions:
- Preheat the oven: Set your oven to 350°F (175°C) to get it ready for baking the sliders.
- Prepare the glaze: In a small bowl, mix together the honey, Dijon mustard, and apple cider vinegar. Stir until the ingredients are well-combined, creating a smooth glaze.
- Assemble the sliders: Slice the slider rolls in half horizontally and place the bottom halves in a baking dish. Layer the sliced ham evenly over the rolls, then drizzle half of the honey glaze over the ham.
- Top the sliders: Place the top halves of the rolls over the ham. Brush the melted butter over the tops of the rolls. Sprinkle the poppy seeds, garlic powder, onion powder, salt, and pepper evenly over the buttered tops.
- Bake: Cover the baking dish with aluminum foil and bake in the preheated oven for 15 minutes. Remove the foil and bake for an additional 5-7 minutes, or until the tops are golden brown and crisp.
- Serve: Remove from the oven and let the sliders cool slightly. Drizzle the remaining honey glaze over the tops before serving.
Extra Tips:
To guarantee your sliders stay moist and flavorful, cover them with foil during the initial baking period to trap in steam. This step helps the honey glaze penetrate the ham and keeps the rolls soft.
For a touch of spice, consider adding a pinch of cayenne pepper to the glaze. Additionally, you can prepare the sliders ahead of time and refrigerate them; just bake them fresh before serving to maintain their delightful texture and aroma.
Cranberry Brie Bites

Cranberry Brie Bites are a delightful addition to any cozy Christmas party potluck. These little morsels combine the creamy richness of Brie cheese with the tart sweetness of cranberry sauce, all nestled in a flaky puff pastry shell. They’re perfect for both adults and kids, offering a festive burst of flavor in every bite.
Whether you’re hosting or attending a holiday gathering, these bites are sure to impress your guests with their elegant appearance and delicious taste. This recipe is designed for a serving size of 4-6 people, making it ideal for small gatherings. The preparation is simple and requires minimal ingredients, but the result is a sophisticated appetizer that’s as pleasing to the eye as it’s to the palate.
With just a few steps, you’ll have a tray of warm, gooey Cranberry Brie Bites ready to serve, creating the perfect start to any holiday celebration.
Ingredients (Serves 4-6):
- 1 sheet of puff pastry (thawed if frozen)
- 4 ounces of Brie cheese
- 1/4 cup of cranberry sauce
- 1 egg (beaten, for egg wash)
- Flour (for dusting)
Cooking Instructions:
- Preheat the Oven: Begin by preheating your oven to 375°F (190°C). This guarantees your oven is at the right temperature when you’re ready to bake the bites.
- Prepare the Puff Pastry: Lightly dust your work surface with flour. Roll out the puff pastry sheet to smooth any creases and slightly thin it out. Cut the pastry into 12 equal squares.
- Prepare the Brie: Cut the Brie cheese into 12 small pieces. Each piece should be roughly the size of a teaspoon, enough to fit snugly within the puff pastry square.
- Assemble the Bites: Place each puff pastry square into a mini muffin tin, pressing gently into the bottom and sides. Add a piece of Brie to each square, followed by a small spoonful of cranberry sauce on top.
- Seal and Brush: Gather the corners of the puff pastry square over the filling to form a neat parcel. Press lightly to seal. Brush each pastry top with the beaten egg to guarantee a golden, glossy finish once baked.
- Bake: Place the muffin tin in the preheated oven and bake for 15-20 minutes, or until the pastry is puffed and golden brown.
- Cool and Serve: Remove the bites from the oven and allow them to cool for a few minutes in the tin before transferring to a serving platter. Serve warm for the best flavor experience.
Extra Tips:
When preparing Cranberry Brie Bites, using high-quality Brie will elevate the taste considerably, so choose a Brie that you enjoy eating on its own.
If you prefer a bit of a crunch, consider adding a few chopped pecans or walnuts on top of the cranberry sauce before sealing the pastry. For an added festive touch, sprinkle a little fresh rosemary on top before serving.
Finally, make sure to work quickly with the puff pastry while it’s still cold, as it can become difficult to handle at room temperature.
Loaded Mashed Potato Casserole

Loaded Mashed Potato Casserole is a comforting dish that combines the creaminess of mashed potatoes with the savory flavors of cheese, bacon, and scallions. Perfect for a cozy Christmas party potluck, this casserole is a crowd-pleaser that will leave your guests asking for seconds.
Its rich, hearty taste and appealing texture make it an ideal side dish that pairs well with a variety of main courses, from roasted meats to vegetarian options.
The beauty of the Loaded Mashed Potato Casserole lies in its simplicity and the capability to prepare it ahead of time. This makes it a fantastic choice for holiday gatherings when you want to spend more time with loved ones and less time in the kitchen.
With just a few ingredients and easy-to-follow steps, you can create a dish that embodies comfort and joy, epitomizing the spirit of the holiday season.
Ingredients (Serves 4-6):
- 2 pounds of potatoes, peeled and cubed
- 1 cup of sour cream
- 1/2 cup of milk
- 1/2 cup of unsalted butter
- 1 cup of shredded cheddar cheese
- 6 slices of bacon, cooked and crumbled
- 1/4 cup of chopped scallions
- Salt and pepper to taste
Cooking Instructions:
- Preheat the Oven: Start by preheating your oven to 350°F (175°C). This will guarantee that your casserole bakes evenly once it’s assembled.
- Boil the Potatoes: Place the peeled and cubed potatoes in a large pot. Cover them with cold water and add a pinch of salt. Bring to a boil over medium-high heat and cook until the potatoes are tender, about 15-20 minutes.
- Prepare the Mashed Potatoes: Drain the cooked potatoes and return them to the pot. Add the sour cream, milk, and butter. Mash until smooth and creamy. Season with salt and pepper to taste.
- Assemble the Casserole: Spread the mashed potatoes evenly in a greased 9×13-inch baking dish. Sprinkle the shredded cheddar cheese and crumbled bacon over the top.
- Bake the Casserole: Place the baking dish in the preheated oven and bake for 20-25 minutes, or until the cheese is melted and slightly golden.
- Add Finishing Touches: Remove the casserole from the oven and sprinkle the chopped scallions over the top. Allow it to cool for a few minutes before serving.
Extra Tips:
For added flavor, consider mixing in some garlic powder or onion powder with the mashed potatoes. If you like a bit of heat, a dash of cayenne pepper or smoked paprika can elevate the taste.
To save time, you can cook the potatoes and assemble the casserole a day in advance, then pop it in the oven when you’re ready to serve.
Savory Sausage Stuffed Mushrooms

Transform your holiday gathering into a festive feast with these delightful Savory Sausage Stuffed Mushrooms. A perfect blend of spicy sausage, creamy cheeses, and aromatic herbs, these bite-sized appetizers are certain to steal the show at your Christmas party potluck.
The earthy flavor of the mushrooms pairs beautifully with the robust sausage filling, creating a harmonious balance that will have your guests reaching for seconds. This dish isn’t only delicious but also incredibly easy to prepare, making it an ideal choice for a stress-free holiday celebration.
Whether you’re hosting or contributing to a potluck, these stuffed mushrooms are both convenient and impressive. With a serving size that comfortably feeds 4-6 people, this recipe guarantees there’s enough to go around, leaving everyone satisfied and merry.
Ingredients (Serves 4-6):
- 24 large white or cremini mushrooms
- 1 pound bulk Italian sausage
- 1/2 cup cream cheese, softened
- 1/2 cup grated Parmesan cheese
- 1/4 cup breadcrumbs
- 2 tablespoons chopped fresh parsley
- 2 cloves garlic, minced
- 1/4 teaspoon black pepper
- 1/4 teaspoon dried thyme
- 2 tablespoons olive oil
Cooking Instructions:
- Prepare the Mushrooms: Preheat your oven to 375°F (190°C). Carefully clean the mushrooms with a damp paper towel to remove any dirt. Remove the stems and set them aside. Arrange the mushroom caps on a baking sheet, stem side up.
- Cook the Sausage: In a skillet over medium heat, add the olive oil. Once hot, add the sausage. Break it apart with a spatula, cooking until completely browned and no longer pink. Drain any excess fat and remove from heat.
- Make the Filling: Chop the reserved mushroom stems finely. In a large bowl, combine the cooked sausage, chopped stems, cream cheese, Parmesan cheese, breadcrumbs, parsley, garlic, black pepper, and thyme. Mix well until the ingredients are fully incorporated and the mixture is creamy.
- Stuff the Mushrooms: Using a spoon, generously fill each mushroom cap with the sausage mixture, pressing it firmly into the caps.
- Bake the Mushrooms: Place the stuffed mushrooms in the preheated oven and bake for 20-25 minutes, or until the mushrooms are tender and the tops are golden brown.
- Serve: Remove from the oven and allow to cool slightly before serving. Arrange on a platter and garnish with extra parsley if desired.
Extra Tips:
When selecting mushrooms, opt for ones that are firm and free of blemishes for the best results. For a spicier kick, consider using hot Italian sausage or adding a pinch of red pepper flakes to the filling.
If you’d like to prepare these ahead of time, stuff the mushrooms and refrigerate them until you’re ready to bake. This makes them an even more convenient option for busy holiday schedules. Enjoy the savory delight, and watch them disappear off the platter!
Creamy Tomato Basil Soup

There’s nothing quite as comforting on a cold winter’s day as a steaming bowl of soup, and this Creamy Tomato Basil Soup is the perfect addition to any cozy Christmas party potluck.
Combining the rich flavors of tomatoes with the aromatic essence of fresh basil, this soup is both simple to prepare and incredibly satisfying. The creamy texture adds a touch of indulgence, making it a crowd-pleaser for both kids and adults alike.
This recipe serves 4-6 people and is an excellent make-ahead option for holiday gatherings. It pairs beautifully with crusty bread or a grilled cheese sandwich, adding a heartwarming touch to your festive celebrations.
Whether you’re hosting a large family gathering or an intimate get-together, this soup will warm hearts and fill tummies with its delightful taste and aroma.
Ingredients:
- 2 tablespoons olive oil
- 1 medium onion, chopped
- 3 cloves garlic, minced
- 2 (28-ounce) cans of whole peeled tomatoes
- 1 teaspoon sugar
- 2 cups vegetable broth
- 1 cup heavy cream
- 1/4 cup fresh basil leaves, chopped
- Salt and pepper to taste
- Optional: Grated Parmesan cheese for garnish
Instructions:
- Prepare the Base: In a large pot, heat the olive oil over medium heat. Add the chopped onion and sauté until it’s translucent, about 5 minutes. Stir in the minced garlic and cook for another minute, until fragrant.
- Add Tomatoes and Simmer: Pour in the canned tomatoes, including the juices. Use a wooden spoon to break the tomatoes apart slightly. Add the sugar and vegetable broth to the pot, stirring to combine. Bring the mixture to a boil, then reduce the heat and let it simmer for about 20 minutes, allowing the flavors to meld.
- Blend the Soup: After simmering, remove the pot from heat. Use an immersion blender to puree the soup until smooth. If you prefer a chunkier texture, blend only some of the soup to your desired consistency.
- Add Cream and Basil: Return the pot to low heat. Stir in the heavy cream and chopped basil, mixing until well combined. Allow the soup to warm through for another 5 minutes. Taste and season with salt and pepper as needed.
- Serve: Ladle the soup into bowls and, if desired, garnish with freshly grated Parmesan cheese and a few extra basil leaves.
Extra Tips:
For a more robust flavor, consider roasting fresh tomatoes before adding them to the soup. Simply slice them in half, drizzle with olive oil, and roast in the oven until they’re slightly charred. This adds a depth of flavor that can enhance the soup’s richness.
If you don’t have an immersion blender, you can use a regular blender, but be sure to blend in batches and allow the soup to cool slightly to avoid any hot splatters.
Finally, this soup can be made a day in advance and reheated gently on the stove, as the flavors will continue to develop over time.
Classic Deviled Eggs With a Twist

Deviled eggs are a staple at any potluck or party, but this version adds a delightful twist that will surprise and delight your guests. By incorporating a touch of tangy mustard, fresh herbs, and a hint of spice, these deviled eggs become a standout appetizer. The creamy yolk filling paired with the smooth egg white provides the perfect contrast in texture and flavor, making them irresistible.
Whether you’re an experienced cook or a novice in the kitchen, this recipe is simple to follow and will guarantee your dish is the star of the potluck.
The key to these deviled eggs lies in the balance of flavors and the quality of ingredients. Fresh eggs are essential, as they’re easier to peel and provide a better texture. The twist in this recipe comes from the addition of Dijon mustard and a dash of hot sauce, giving the traditional deviled egg a modern kick.
With the festive season in mind, these eggs aren’t only tasty but also visually appealing when garnished with a sprinkle of paprika and fresh chives, adding a pop of color to your holiday spread.
Ingredients (Serves 4-6):
- 6 large eggs
- 3 tablespoons mayonnaise
- 1 teaspoon Dijon mustard
- 1 teaspoon apple cider vinegar
- 1/4 teaspoon salt
- 1/4 teaspoon black pepper
- A dash of hot sauce (to taste)
- 1 tablespoon finely chopped fresh chives
- Paprika for garnish
Cooking Instructions:
- Boil the Eggs: Place the eggs in a single layer in a saucepan and cover with water, about an inch above the eggs. Bring the water to a boil over medium-high heat. Once boiling, remove from heat, cover, and let the eggs sit for 12 minutes.
- Cool and Peel the Eggs: After 12 minutes, transfer the eggs to a bowl of ice water to cool for about 5 minutes. Once cooled, gently tap each egg on a hard surface and peel under running water to remove the shell smoothly.
- Prepare the Filling: Slice each egg in half lengthwise and carefully remove the yolks, placing them in a medium bowl. Arrange the egg whites on a serving platter.
- Mix the Filling: Mash the egg yolks with a fork until they’re crumbly. Add the mayonnaise, Dijon mustard, apple cider vinegar, salt, pepper, and hot sauce. Mix until smooth and creamy. Adjust seasoning as needed.
- Fill the Egg Whites: Using a spoon or a piping bag, fill the cavity of each egg white with the yolk mixture. Be generous to guarantee each egg is well-filled.
- Garnish and Serve: Finish by sprinkling the filled eggs with paprika and fresh chives for a festive touch. Serve them chilled or at room temperature.
Extra Tips:
For perfectly smooth and creamy filling, guarantee the yolk mixture is well-mashed and free of lumps. If you prefer a spicier kick, increase the amount of hot sauce or add a pinch of cayenne pepper.
To save time on presentation, use a piping bag with a decorative tip to fill the eggs, creating an elegant look. If you make these eggs ahead of time, store them covered in the refrigerator and garnish them just before serving for the best presentation.
Holiday Spiced Nuts
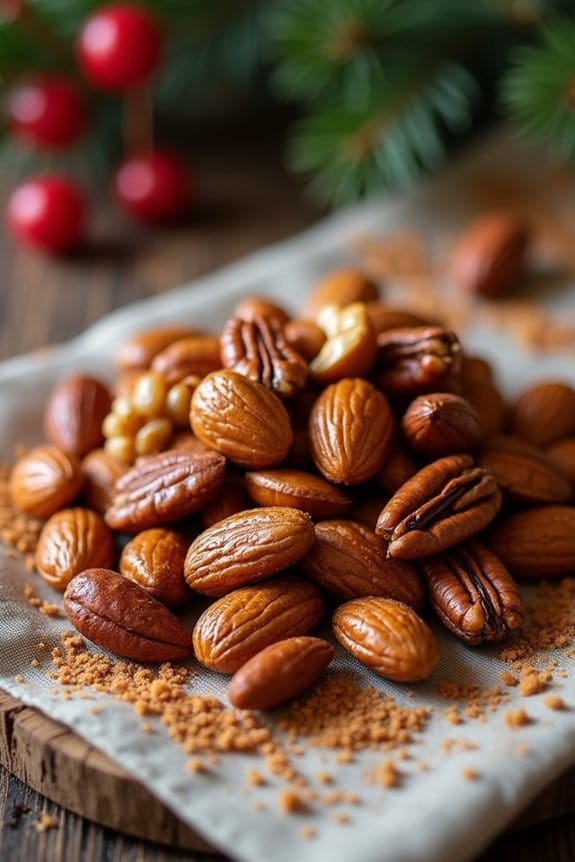
Holiday Spiced Nuts are a delightful and savory treat perfect for your Christmas party potluck. This flavorful mix of sweet and spicy nuts won’t only tantalize your taste buds but also add a festive touch to your holiday spread.
These nuts are roasted to perfection, offering a crunchy and aromatic snack that pairs well with a glass of mulled wine or cider. Whether you’re hosting a gathering or attending one, these spiced nuts are certain to be a hit with your guests.
The beauty of this recipe lies in its simplicity and adaptability. You can easily customize the spice blend to cater to your preferences, making it either more spicy or sweet. The combination of seasonal spices such as cinnamon, nutmeg, and cayenne pepper creates a warm and inviting aroma that fills your kitchen as the nuts roast.
Make a batch ahead of time and store them in an airtight container for a quick and easy holiday snack that you can bring out whenever needed.
Ingredients for 4-6 servings:
- 2 cups mixed nuts (almonds, cashews, pecans, walnuts)
- 2 tablespoons unsalted butter
- 1/4 cup brown sugar
- 1 tablespoon honey
- 1 teaspoon ground cinnamon
- 1/2 teaspoon ground nutmeg
- 1/4 teaspoon cayenne pepper
- 1/2 teaspoon salt
- 1 teaspoon vanilla extract
Cooking Instructions:
- Preheat the Oven: Begin by preheating your oven to 350°F (175°C). Line a baking sheet with parchment paper to prevent sticking and facilitate easy cleanup.
- Melt the Butter and Combine Ingredients: In a small saucepan over low heat, melt the unsalted butter. Once melted, remove from heat and stir in the brown sugar, honey, ground cinnamon, nutmeg, cayenne pepper, salt, and vanilla extract. Mix well until all ingredients are fully combined and the sugar has dissolved.
- Coat the Nuts: Place the mixed nuts in a large mixing bowl. Pour the spiced butter mixture over the nuts and toss until the nuts are evenly coated.
- Spread and Roast: Spread the coated nuts in a single layer on the prepared baking sheet. Guarantee they’re evenly distributed for uniform roasting. Place the baking sheet in the preheated oven.
- Bake the Nuts: Roast the nuts in the oven for 15-20 minutes, stirring halfway through to guarantee even cooking. Keep an eye on them to prevent burning, as ovens can vary in temperature.
- Cool and Serve: Once the nuts are golden brown and aromatic, remove the baking sheet from the oven. Allow the nuts to cool completely on the baking sheet. They’ll become crispier as they cool. Once cooled, transfer the spiced nuts to a serving dish or an airtight container for storage.
Extra Tips:
For a more intense flavor, consider adding a pinch of ground cloves or allspice to the spice mix. If you prefer a less spicy snack, reduce the amount of cayenne pepper or omit it altogether.
For a fun holiday twist, try adding a handful of dried cranberries or chopped candied ginger after the nuts have cooled. These spiced nuts make a wonderful gift, too—just package them in a decorative jar and tie with a festive ribbon for a thoughtful homemade present.
Festive Fruit and Nut Cheese Ball
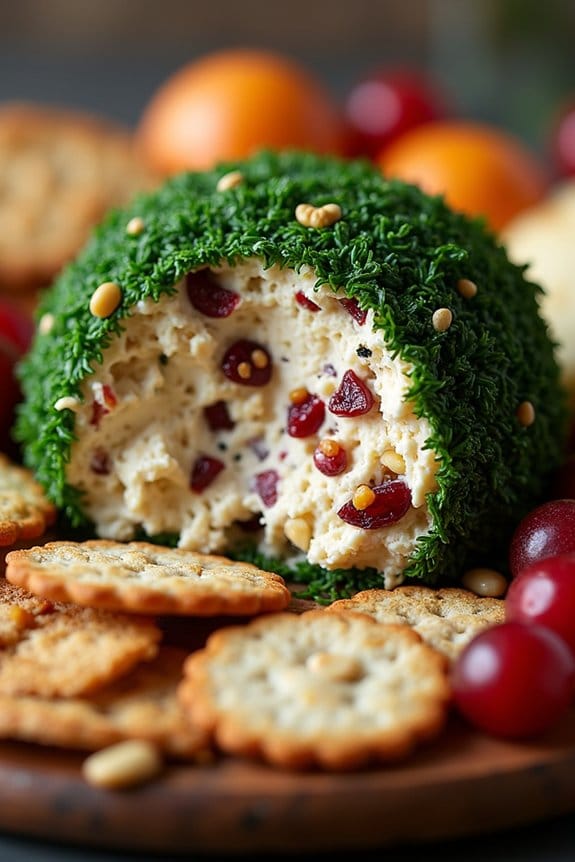
A Festive Fruit and Nut Cheese Ball is the perfect addition to your Cozy Christmas Party Potluck. Not only is it aesthetically pleasing, adorned with a colorful array of dried fruits and nuts, but it also delivers a delightful blend of creamy, sweet, and savory flavors.
This cheese ball is simple to prepare, making it an ideal choice for a stress-free holiday gathering. It’s sure to be a crowd-pleaser, offering a sophisticated taste that pairs well with a variety of crackers and breads.
The beauty of this dish lies in its versatility and the ease with which it can be customized. You can choose your favorite nuts and dried fruits to create a unique blend that suits your palate. Whether you’re hosting an intimate gathering or attending a large potluck, this recipe, designed for 4-6 servings, can easily be adjusted to cater to a larger group.
The cheese ball can be made ahead of time, ensuring that you can enjoy your own party without the last-minute rush.
Ingredients for 4-6 people:
- 8 oz cream cheese, softened
- 1 cup shredded sharp cheddar cheese
- 1/2 cup dried cranberries
- 1/2 cup chopped walnuts
- 1/4 cup chopped pecans
- 1/4 cup chopped dried apricots
- 1/4 cup fresh parsley, chopped
- 1 tablespoon honey
- 1 teaspoon garlic powder
- 1/2 teaspoon salt
- 1/4 teaspoon black pepper
- Assorted crackers and bread for serving
Cooking Instructions:
- Prepare the Mixture: In a large mixing bowl, combine the softened cream cheese and shredded cheddar cheese. Use a hand mixer or a sturdy spatula to blend them together until smooth.
- Add Flavorings: Stir in the honey, garlic powder, salt, and black pepper. Mix until the ingredients are well incorporated and the mixture is creamy.
- Incorporate the Fruits and Nuts: Fold in the dried cranberries, chopped walnuts, pecans, and dried apricots. Make sure the fruits and nuts are evenly distributed throughout the cheese mixture.
- Shape the Cheese Ball: Lay a piece of plastic wrap on the counter. Transfer the cheese mixture onto the wrap and use your hands to shape it into a ball. Wrap the ball tightly in the plastic wrap to help maintain its shape.
- Chill the Cheese Ball: Place the wrapped cheese ball in the refrigerator for at least 2 hours, or until it’s firm. This will make it easier to handle and help the flavors meld together.
- Coat the Cheese Ball: Once chilled, remove the cheese ball from the refrigerator and unwrap it. Roll the ball in the chopped fresh parsley to create a festive green coating.
- Serve: Place the cheese ball on a serving platter and surround it with an assortment of crackers and bread. Serve immediately or keep refrigerated until ready to serve.
Extra Tips:
For a more pronounced flavor, consider toasting the nuts lightly before adding them to the cheese mixture. This will enhance their natural oils and bring out a richer taste.
If you prefer a spicier kick, add a pinch of cayenne pepper or some finely chopped jalapeños to the cheese mixture. Remember to let the cheese ball sit at room temperature for about 15 minutes before serving to allow it to soften slightly, making it easier to spread.
Enjoy the festive flavors and the compliments from your guests!
Chocolate Peppermint Bark

Indulge in the festive spirit with this delightful Chocolate Peppermint Bark, a perfect treat for your cozy Christmas party potluck. This recipe combines rich, smooth chocolate with the invigorating crunch of peppermint, creating a mouthwatering holiday dessert that’s both simple to make and utterly delicious.
Whether you’re an experienced home cook or just beginning your culinary journey, this recipe is sure to impress your guests and spread holiday cheer.
This Chocolate Peppermint Bark serves 4-6 people, making it an ideal potluck contribution. The layered chocolate and peppermint candies create a beautiful marbled effect, and the contrasting textures make it a truly satisfying treat. Not only is this dessert visually appealing, but it also captures the essence of the holiday season in every bite.
Gather your ingredients, and let’s get started on crafting this festive favorite.
Ingredients:
- 12 oz semi-sweet chocolate chips
- 12 oz white chocolate chips
- 1/2 teaspoon peppermint extract
- 1/2 cup crushed candy canes or peppermint candies
- 1 teaspoon vegetable oil
Cooking Instructions:
- Prepare the Baking Sheet: Line a baking sheet with parchment paper to prevent sticking and make the bark easy to remove once set.
- Melt the Semi-Sweet Chocolate: In a microwave-safe bowl, combine the semi-sweet chocolate chips and 1/2 teaspoon of vegetable oil. Microwave in 30-second increments, stirring between each, until the chocolate is completely melted and smooth.
- Spread the Chocolate Layer: Pour the melted semi-sweet chocolate onto the prepared baking sheet, spreading it evenly with a spatula to form a thin layer. Allow it to cool and become firm, either at room temperature or in the fridge.
- Melt the White Chocolate: In another microwave-safe bowl, melt the white chocolate chips with the remaining 1/2 teaspoon of vegetable oil using the same microwave technique as before. Stir in the peppermint extract until well combined.
- Spread the White Chocolate Layer: Once the semi-sweet chocolate layer has set, pour the melted white chocolate over it. Use a spatula to spread it evenly across the top.
- Add the Peppermint Crunch: Immediately sprinkle the crushed candy canes or peppermint candies over the top of the white chocolate layer, pressing down lightly to confirm they adhere.
- Set the Bark: Allow the bark to cool and harden completely, either at room temperature or in the refrigerator.
- Break into Pieces: Once fully set, remove the bark from the parchment paper and break it into pieces of your desired size.
Extra Tips:
For the best results, use high-quality chocolate to confirm a smooth texture and rich flavor. When melting chocolate, be cautious not to overheat it, as this can cause it to seize and become grainy.
If you prefer a different flavor, feel free to substitute the peppermint extract with a flavor of your choice, such as orange or almond. Store any leftover bark in an airtight container to keep it fresh and crisp.
This recipe also makes a lovely homemade gift when wrapped in festive packaging. Enjoy the festive flavors and holiday spirit this Chocolate Peppermint Bark brings to your celebrations!
