
I’ve stumbled upon some delightful Christmas truffle recipes that are both easy to whip up and look truly gourmet. Picture yourself indulging in classic dark chocolate or the festive flair of white chocolate peppermint. Each recipe is a sensory delight, perfect for impressing guests or sharing as a thoughtful gift. Plus, these truffles capture the holiday spirit in every bite. Curious about the mouthwatering combinations I’ve found?
Classic Dark Chocolate Truffles
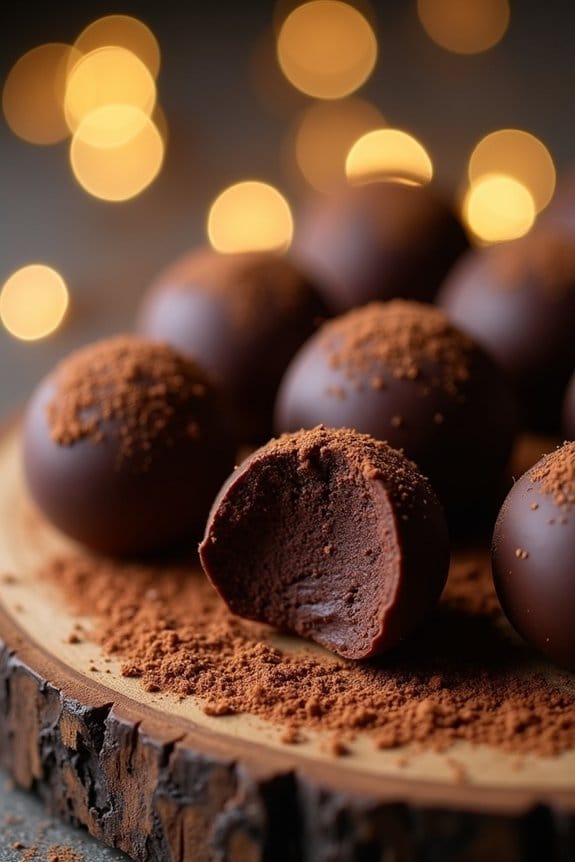
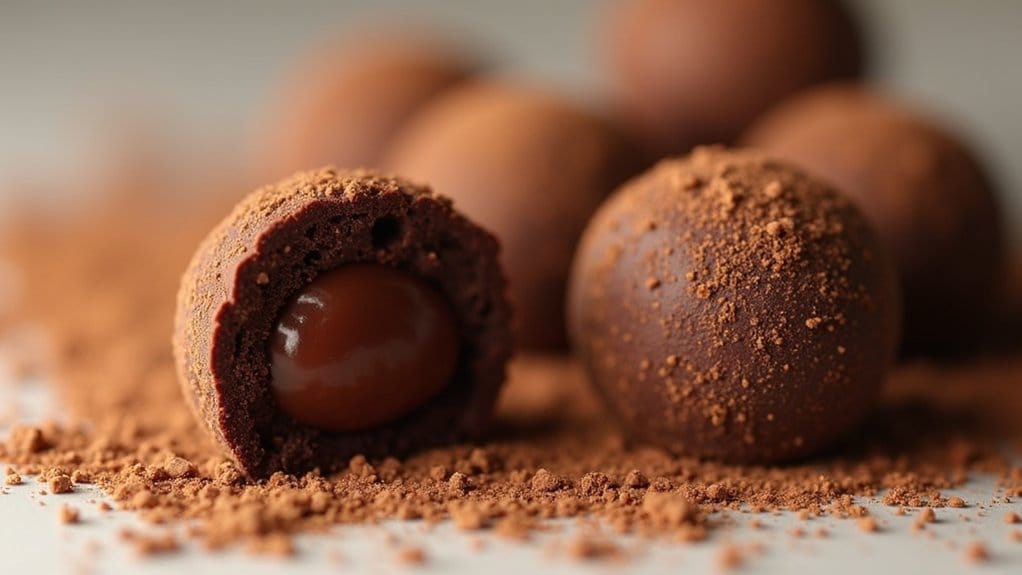
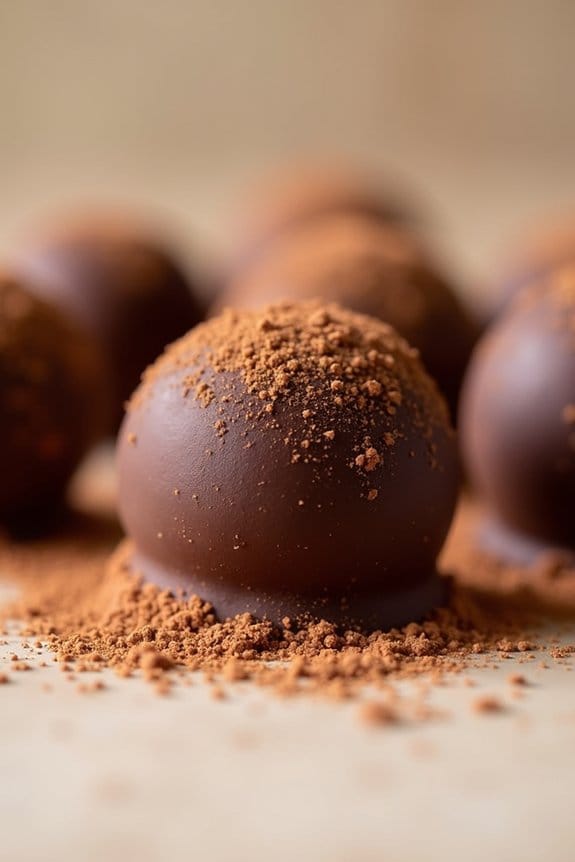
Indulge in the decadence of homemade Classic Dark Chocolate Truffles this holiday season. These rich and velvety treats are the epitome of festive indulgence, perfect for gifting or enjoying with family and friends. The smooth, creamy center of these truffles is enveloped in a delicate, crisp layer of cocoa powder, providing a luxurious contrast that melts in your mouth.
Whether you savor them with a cup of coffee or a glass of wine, these truffles are sure to bring joy and warmth to your Christmas celebrations. Creating these delightful chocolate truffles is a rewarding experience that transforms simple ingredients into a gourmet delicacy. Making them from scratch allows you to select high-quality chocolate and customize the flavors to your liking.
Not only are these truffles a reflection of the art of confectionery, but they also embody the spirit of giving, as they make a heartfelt, homemade gift. Gather your ingredients, put on some holiday music, and let the magic of chocolate-making fill your kitchen with warmth and cheer.
Ingredients (serves 4-6):
- 8 ounces of high-quality dark chocolate (70% cocoa)
- 1/2 cup heavy cream
- 1 teaspoon pure vanilla extract
- 1 tablespoon unsalted butter, softened
- 1/2 cup unsweetened cocoa powder
Cooking Instructions:
- Prepare the Chocolate: Begin by finely chopping the dark chocolate into small pieces. This will guarantee that it melts evenly when combined with the cream.
- Heat the Cream: In a small saucepan, gently heat the heavy cream over medium-low heat until it just begins to simmer. Be careful not to let it come to a boil, as this can cause the cream to scald.
- Melt the Chocolate: Place the chopped chocolate into a heatproof bowl. Pour the hot cream over the chocolate and let it sit for about 2 minutes. This resting period allows the chocolate to soften.
- Mix Until Smooth: After 2 minutes, gently stir the cream and chocolate together using a spatula or a whisk. Continue stirring until the mixture is smooth and fully incorporated. Add the vanilla extract and butter, and stir until the butter is melted and the mixture is silky.
- Chill the Ganache: Cover the bowl with plastic wrap and refrigerate for at least 2 hours, or until the ganache is firm enough to shape.
- Shape the Truffles: Once the ganache is set, use a small melon baller or a teaspoon to scoop out small portions of the mixture. Roll each portion between your palms to form a smooth ball.
- Coat with Cocoa Powder: Place the unsweetened cocoa powder in a shallow dish. Roll each truffle in the cocoa powder until well coated. Shake off any excess and place the truffles on a baking sheet lined with parchment paper.
- Serve or Store: Serve the truffles immediately or store them in an airtight container in the refrigerator for up to a week. Allow them to come to room temperature before serving for the best flavor and texture.
Extra Tips:
When making Classic Dark Chocolate Truffles, using high-quality chocolate is essential, as it directly influences the flavor and texture of the final product. If you prefer, you can infuse the cream with additional flavors like orange zest or a splash of liqueur before adding it to the chocolate for a unique twist.
When shaping the truffles, work quickly to prevent the ganache from melting in your hands, and consider wearing food-safe gloves for easier handling. These truffles can also be coated in chopped nuts or shredded coconut for added texture and flavor. Enjoy the process and the rich, indulgent rewards it brings!
White Chocolate Peppermint Truffles
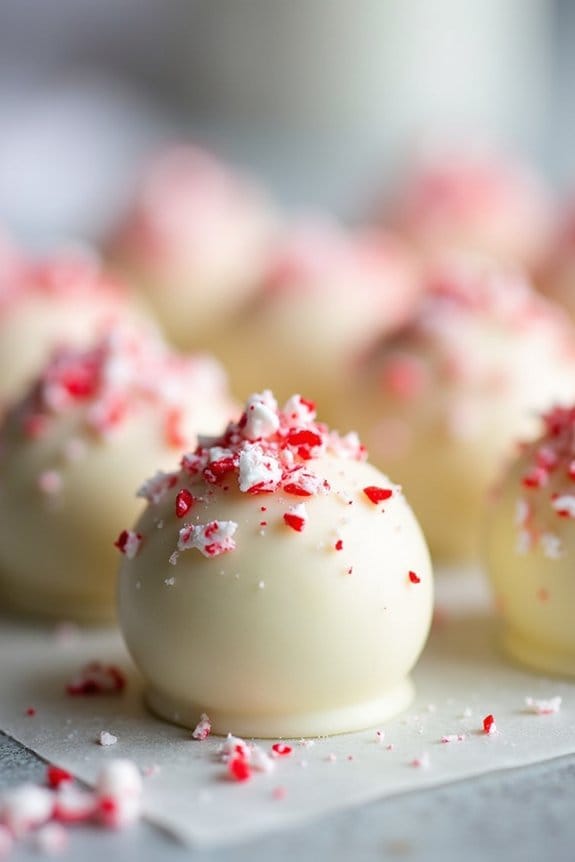
Indulge in the sweet and rejuvenating flavors of White Chocolate Peppermint Truffles this holiday season. These delightful treats combine the rich, creamy taste of white chocolate with the cool, invigorating hint of peppermint, creating a festive dessert that’s perfect for Christmas.
Whether you’re hosting a holiday gathering or simply looking for a homemade gift, these truffles are sure to impress with their melt-in-your-mouth texture and elegant appearance. Perfect for sharing, this recipe yields approximately 20-24 truffles, making it ideal for serving a gathering of 4-6 people.
The preparation process is straightforward, requiring only a few ingredients and minimal effort, yet the results are absolutely decadent. Prepare these truffles in advance and store them in the refrigerator for a quick, ready-to-serve dessert that captures the spirit of the season.
Ingredients:
- 12 ounces white chocolate, finely chopped
- 1/3 cup heavy cream
- 1 teaspoon peppermint extract
- 1/3 cup crushed peppermint candies or candy canes
- 1/2 cup confectioners’ sugar (for rolling)
- Optional: edible glitter or sprinkles for decoration
Cooking Instructions:
- Melt the Chocolate: In a heatproof bowl, combine the finely chopped white chocolate and heavy cream. Place the bowl over a pot of simmering water (double boiler method) and stir gently until the chocolate is completely melted and smooth. Verify that the bottom of the bowl doesn’t touch the water to prevent overheating.
- Add Flavoring: Once the chocolate mixture is smooth, remove it from heat. Stir in the peppermint extract, mixing well to distribute the flavor evenly throughout the ganache.
- Chill the Mixture: Transfer the chocolate mixture to a shallow dish and cover it with plastic wrap. Refrigerate for at least 2 hours, or until the ganache is firm enough to scoop and shape.
- Shape the Truffles: Once chilled, use a small spoon or a melon baller to scoop out portions of the ganache. Roll each portion between your palms to form smooth, round truffles.
- Coat the Truffles: Place the confectioners’ sugar and crushed peppermint candies in separate shallow bowls. Roll each truffle first in the confectioners’ sugar to create a smooth base layer, then roll them in the crushed peppermint candies for a festive coating.
- Decorate and Serve: If desired, sprinkle edible glitter or other festive decorations on top of the truffles for an extra touch of holiday magic. Arrange the truffles on a serving platter and enjoy.
Extra Tips:
For best results, confirm that your working environment is cool and dry, as the truffles can become sticky in warm conditions. If the ganache becomes too soft while shaping, return it to the refrigerator for a few minutes to firm up again.
The truffles can be stored in an airtight container in the refrigerator for up to one week. When serving, allow them to sit at room temperature for a few minutes to enhance their creamy texture. Enjoy these truffles as a delightful conclusion to your holiday feast or as a sweet snack throughout the festive season.
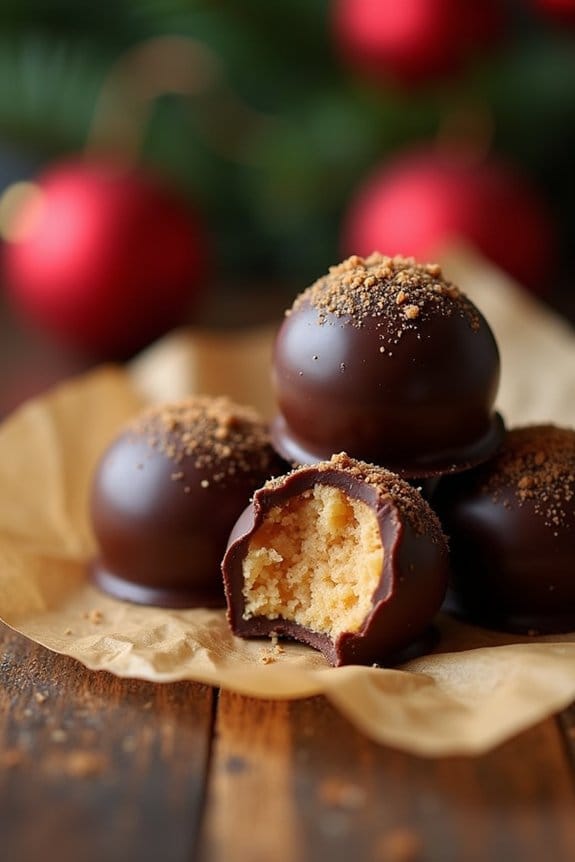
Gingerbread Spice Truffles
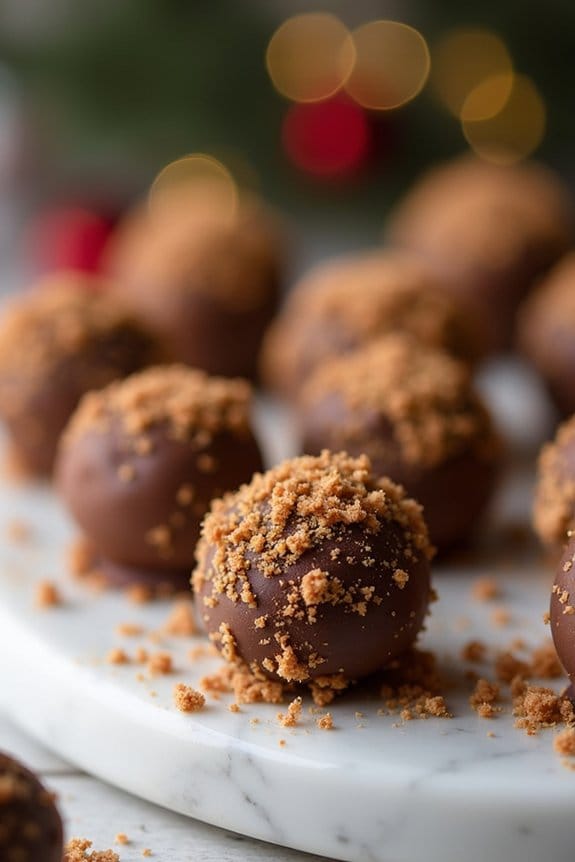
Gingerbread Spice Truffles are a delightful Christmas treat that brings together the warm, festive flavors of gingerbread in a rich, creamy truffle. These delicacies are perfect for holiday gatherings or as a homemade gift for friends and family. The combination of spices with a smooth chocolate center makes them utterly irresistible and a definite hit with everyone who tries them.
The process of making these truffles isn’t only rewarding but also surprisingly simple, allowing you to enjoy a gourmet confection without the need for advanced culinary skills. With ingredients that are easily available and steps that are straightforward, this recipe will allow you to create a batch of these delectable treats to share with 4-6 people, spreading holiday cheer with every bite.
Ingredients:
- 12 oz semi-sweet chocolate, finely chopped
- 1/2 cup heavy cream
- 1/4 cup unsalted butter
- 1/4 cup molasses
- 1 tsp ground ginger
- 1 tsp ground cinnamon
- 1/2 tsp ground nutmeg
- 1/4 tsp ground cloves
- 1/4 tsp salt
- 1 tsp vanilla extract
- 1 cup crushed gingerbread cookies (for coating)
Cooking Instructions:
- Prepare the Chocolate Mixture:
- Place the finely chopped semi-sweet chocolate in a medium-sized heatproof bowl. Set it aside while you prepare the cream mixture.
- Heat the Cream and Butter:
- In a small saucepan, combine the heavy cream, unsalted butter, molasses, ground ginger, ground cinnamon, ground nutmeg, ground cloves, and salt. Heat the mixture over medium heat, stirring occasionally, until it just begins to simmer. Don’t let it boil.
- Combine with Chocolate:
- Pour the hot cream mixture over the chopped chocolate. Let it sit for about 2 minutes to allow the chocolate to melt. Then, add the vanilla extract and gently stir until the mixture is smooth and well combined.
- Chill the Mixture:
- Cover the bowl with plastic wrap and refrigerate for about 2 hours, or until the mixture is firm enough to scoop but not too hard.
- Shape the Truffles:
- Using a small cookie scoop or a spoon, scoop out small portions of the chilled chocolate mixture and roll them into balls between your palms. The truffles should be about 1 inch in diameter.
- Coat with Gingerbread Crumbs:
- Roll each truffle in the crushed gingerbread cookies until evenly coated. Place the coated truffles on a baking sheet lined with parchment paper.
- Set the Truffles:
- Place the baking sheet in the refrigerator for about 30 minutes to allow the truffles to set completely before serving.
Extra Tips:
For the best results, use high-quality chocolate as it will greatly affect the flavor and texture of your truffles. If you prefer a stronger spice profile, you can adjust the quantity of spices to your taste.
Additionally, if the truffle mixture becomes too hard to scoop after chilling, let it sit at room temperature for a few minutes to soften slightly. Finally, make sure that the gingerbread cookies are finely crushed to provide a uniform coating on the truffles. Enjoy these festive treats as a delightful end to your holiday celebrations!
Eggnog Truffles
Eggnog Truffles are a delightful holiday treat that combines the creamy, spiced flavors of eggnog with rich, decadent chocolate. These bite-sized sweets are perfect for Christmas gatherings or as a festive homemade gift. The smooth texture of the truffle center is complemented by a coating of chocolate, creating a luxurious taste that captures the essence of the holiday season.
Whether you enjoy them with a cup of hot cocoa by the fire or share them with loved ones, Eggnog Truffles will undoubtedly add a touch of magic to your Christmas celebrations.
Making Eggnog Truffles is a straightforward process that requires only a few ingredients and a bit of patience. The key to achieving the perfect truffle texture is to allow the mixture to set properly before shaping them into balls. Once you’ve mastered the basic technique, you can experiment with different coatings or add-ins, such as crushed nuts or a dusting of cinnamon, to personalize your truffles.
This recipe yields enough truffles to serve 4-6 people, making it perfect for a small holiday gathering or an intimate gift exchange.
Ingredients (Serves 4-6):
- 1 cup white chocolate chips
- 1/4 cup eggnog
- 1/4 teaspoon ground nutmeg
- 1/4 teaspoon ground cinnamon
- 1/2 teaspoon vanilla extract
- 1 tablespoon unsalted butter
- 8 ounces semi-sweet chocolate, for coating
Instructions:
- Prepare the Truffle Mixture: In a medium saucepan, combine the white chocolate chips, eggnog, nutmeg, cinnamon, vanilla extract, and butter. Place the saucepan over low heat, stirring constantly until the chocolate is fully melted and the mixture is smooth.
- Chill the Mixture: Transfer the mixture to a shallow dish and cover it with plastic wrap. Place it in the refrigerator for at least 2 hours, or until it’s firm enough to handle. The longer you chill it, the easier it will be to shape the truffles.
- Shape the Truffles: Once the mixture is firm, use a melon baller or a small spoon to scoop out portions of the mixture. Roll each portion into a ball using the palms of your hands. Place the truffle balls on a baking sheet lined with parchment paper.
- Melt the Coating Chocolate: In a microwave-safe bowl, melt the semi-sweet chocolate in 30-second intervals, stirring between each, until the chocolate is smooth and fully melted.
- Coat the Truffles: Dip each truffle ball into the melted chocolate, assuring it’s completely covered. Use a fork to lift the truffle out of the chocolate, letting any excess drip off, and place it back onto the parchment-lined baking sheet.
- Set the Truffles: Allow the chocolate coating to set by leaving the truffles at room temperature, or place them in the refrigerator for quicker setting.
Extra Tips:
When making Eggnog Truffles, verify that the eggnog is at room temperature before incorporating it with the chocolate to prevent the chocolate from seizing. If you find that the truffle mixture is too soft to shape even after chilling, you can chill it further until it’s firm enough.
For a decorative finish, sprinkle a little extra nutmeg or cinnamon on top of the truffles before the coating sets. These truffles can be stored in an airtight container in the refrigerator for up to a week, maintaining their freshness and flavor.
Red Velvet Cake Truffles
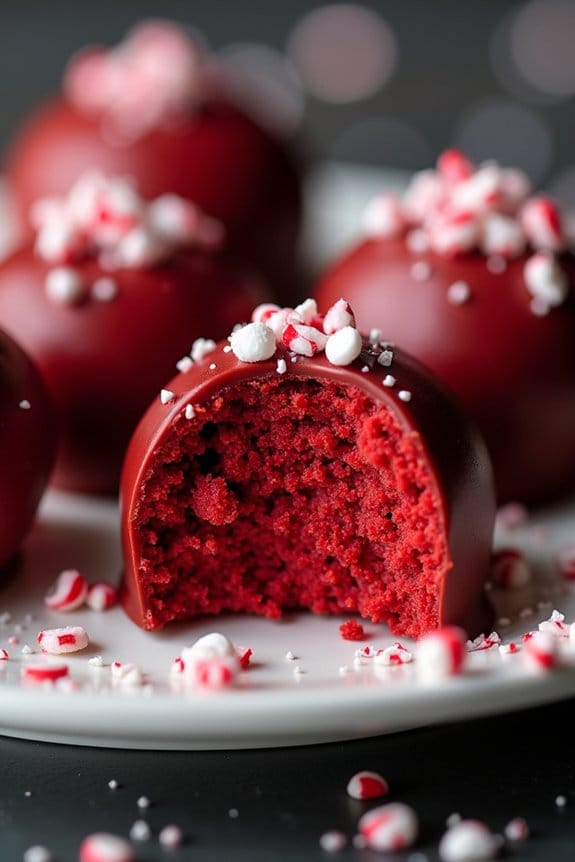
Red Velvet Cake Truffles are the perfect indulgence for the holiday season. With their rich and velvety texture, combined with a creamy frosting and a decadent chocolate coating, these truffles are a festive treat that everyone will love. Not only are they deliciously addictive, but they also make for a beautiful homemade gift or a delightful addition to your Christmas dessert table.
Whether you’re a novice baker or a seasoned pro, these truffles are simple to make and require only a few ingredients, guaranteeing you can whip them up without much hassle.
The key to these delightful truffles lies in the perfect balance of flavors and textures. The classic red velvet cake, known for its subtle cocoa flavor and vibrant red hue, pairs beautifully with a smooth cream cheese frosting. Once the cake is crumbled and mixed with the frosting, the mixture is shaped into bite-sized truffles, which are then dipped in a luscious chocolate coating.
This recipe yields approximately 24-30 truffles, making it perfect for serving a small gathering of 4-6 people.
Ingredients:
- 1 box red velvet cake mix (plus ingredients needed to bake the cake, usually eggs, oil, and water)
- 1 cup cream cheese frosting
- 2 cups semi-sweet chocolate chips or candy melts
- 1 tablespoon vegetable oil
- Sprinkles or crushed candy canes for decoration (optional)
Instructions:
- Bake the Cake: Prepare the red velvet cake according to the instructions on the box. Once baked, allow the cake to cool completely. It’s important for the cake to be cool to the touch to avoid melting the frosting when combined.
- Crumble the Cake: Once the cake has cooled, use your hands or a food processor to crumble it into fine crumbs. Make sure there are no large chunks as they’ll prevent the truffles from forming properly.
- Mix with Frosting: In a large mixing bowl, combine the cake crumbs with the cream cheese frosting. Mix until well incorporated and the mixture is pliable but not too sticky. This will be the base for your truffles.
- Shape the Truffles: Scoop out small portions of the mixture (about a tablespoon each) and roll them into balls using your hands. Place the formed balls on a baking sheet lined with parchment paper.
- Chill the Truffles: Place the baking sheet with the truffle balls in the refrigerator for at least 30 minutes. This will firm them up and make them easier to dip in chocolate.
- Prepare the Chocolate Coating: In a microwave-safe bowl, melt the chocolate chips or candy melts with the vegetable oil. Heat in 30-second increments, stirring in between, until completely smooth and melted.
- Dip the Truffles: Using a fork or dipping tool, dip each chilled truffle ball into the melted chocolate, guaranteeing it’s fully coated. Allow any excess chocolate to drip off before placing the truffle back on the parchment paper. If desired, sprinkle the top with sprinkles or crushed candy canes before the chocolate sets.
- Set the Coating: Allow the chocolate coating to set completely. You can speed up this process by placing the truffles in the refrigerator for about 15 minutes.
Extra Tips:
For a smoother dipping process, guarantee that your chocolate isn’t too thick; adding a bit of vegetable oil can help achieve the right consistency. If you find the cake mixture too sticky to handle, slightly chilling it before rolling can make it easier to work with.
Additionally, feel free to experiment with different types of chocolate or decorations to suit your taste or to match the festive theme. Enjoy your delicious Red Velvet Cake Truffles as a sweet holiday indulgence!
Cranberry Pistachio Truffles
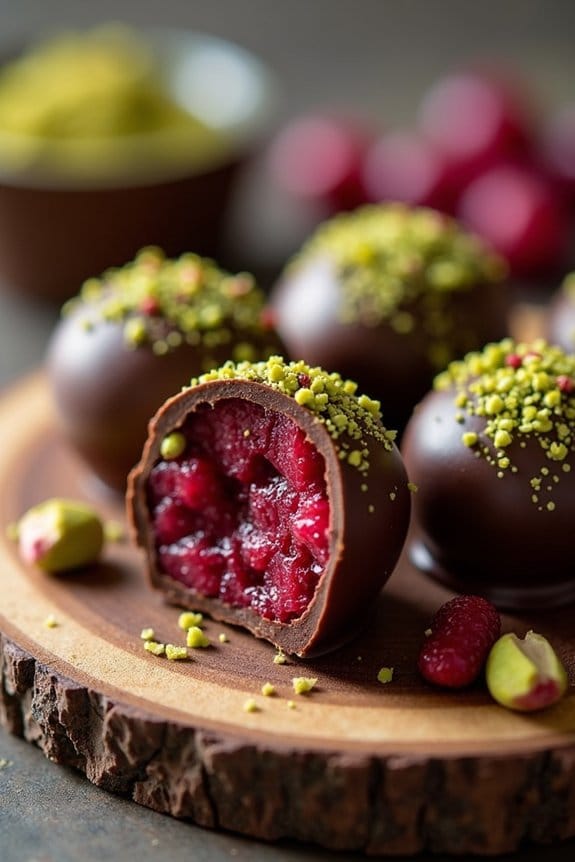
Cranberry Pistachio Truffles are an elegant and festive treat perfect for the holiday season. These delightful truffles combine the tartness of dried cranberries with the rich, nutty flavor of pistachios, all wrapped in a smooth, creamy chocolate ganache. The combination not only provides a burst of flavor but also offers a visually appealing contrast with the vibrant green of the pistachios and the deep red of the cranberries.
Ideal for gift-giving or as a sweet addition to your holiday dessert table, these truffles are bound to impress your family and friends.
Making these truffles isn’t only simple but also a fun and rewarding activity. The process involves creating a luscious ganache, forming the mixture into balls, and coating them with a crunchy layer of pistachios. With a serving size of 4-6 people, this recipe guarantees that there are plenty of truffles to go around.
Whether you’re an experienced baker or a novice in the kitchen, you’ll find that these Cranberry Pistachio Truffles are both manageable and enjoyable to prepare.
Ingredients for 4-6 servings:
- 8 ounces good quality dark chocolate, chopped
- 1/2 cup heavy cream
- 1 teaspoon vanilla extract
- 1/4 cup dried cranberries, finely chopped
- 1/4 cup pistachios, finely chopped
- Additional pistachios for rolling (about 1/4 cup)
Cooking Instructions:
- Prepare the Ganache: In a medium-sized heatproof bowl, place the chopped dark chocolate. In a small saucepan, heat the heavy cream over medium heat until it just begins to simmer. Don’t let it boil. Pour the hot cream over the chopped chocolate and let it sit for about 2 minutes to allow the chocolate to melt.
- Mix the Ganache: Stir the chocolate and cream mixture slowly until the chocolate is fully melted and the mixture is smooth and glossy. Add the vanilla extract and stir to combine.
- Add Cranberries and Chill: Gently fold the finely chopped dried cranberries into the ganache. Cover the bowl with plastic wrap and refrigerate for about 1-2 hours, or until the ganache is firm enough to handle.
- Shape the Truffles: Once the ganache is firm, use a small spoon or a melon baller to scoop out small portions of the ganache. Roll each portion between your palms to form a smooth ball.
- Coat with Pistachios: Spread the additional finely chopped pistachios on a plate. Roll each truffle ball in the pistachios until fully coated, pressing gently to confirm the pistachios adhere to the truffles.
- Serve or Store: Place the finished truffles on a tray. They can be served immediately or stored in an airtight container in the refrigerator for up to a week.
Extra Tips:
When making Cranberry Pistachio Truffles, it’s important to use good quality chocolate as it greatly affects the flavor and texture of the truffles. Confirm that the ganache is completely firm before rolling to make handling easier.
If the ganache becomes too soft while shaping, return it to the refrigerator for a few minutes. For an extra decorative touch, consider drizzling the truffles with melted white chocolate before serving.
Salted Caramel Truffles

Indulge in the exquisite blend of sweet and salty with these Salted Caramel Truffles, a perfect treat for the festive season. These decadent delights combine the rich, buttery flavor of caramel with a hint of sea salt, creating an irresistible treat that’s both luxurious and comforting.
Perfect for holiday gifting or as a special dessert for your own celebrations, these truffles are bound to impress your family and friends.
Crafting these truffles requires a bit of patience and precision, but the end result is well worth the effort. With a creamy caramel center encased in a smooth chocolate shell, each bite offers a delightful contrast of textures and flavors.
This recipe yields approximately 24 truffles, making it ideal for serving 4-6 people or for sharing with loved ones at your next holiday gathering.
Ingredients for Salted Caramel Truffles (Serves 4-6):
- 1 cup granulated sugar
- 6 tablespoons unsalted butter, cubed
- 1/2 cup heavy cream
- 1 teaspoon sea salt, plus extra for garnish
- 8 ounces bittersweet chocolate, finely chopped
- 2 tablespoons unsweetened cocoa powder (optional for dusting)
Cooking Instructions:
- Make the Caramel: Begin by heating the granulated sugar in a medium saucepan over medium heat. Stir constantly until the sugar melts and turns into a deep amber color. This should take about 5-7 minutes.
- Add Butter: Carefully add the cubed butter to the melted sugar, whisking constantly until fully combined. Be cautious, as the mixture will bubble vigorously.
- Incorporate Cream: Slowly pour in the heavy cream while continuing to whisk. Allow the mixture to boil for 1 minute before removing from heat. Stir in the teaspoon of sea salt and allow the caramel to cool slightly.
- Prepare Chocolate: While the caramel cools, melt the bittersweet chocolate in a heatproof bowl set over a pot of simmering water (double boiler method) or in the microwave in 30-second intervals, stirring between each interval.
- Form the Truffles: Once the caramel has cooled enough to handle, use a teaspoon to scoop small amounts and roll into balls. Place them on a parchment-lined baking sheet and freeze for 15 minutes to firm.
- Coat with Chocolate: Dip each caramel ball into the melted chocolate using a fork or skewer, making sure it’s fully coated. Allow excess chocolate to drip off before placing back on the parchment.
- Chill and Garnish: Let the truffles set in the refrigerator for about 30 minutes. Before serving, sprinkle a small pinch of sea salt on each truffle for garnish. Optionally, dust with cocoa powder for an extra touch.
Extra Tips:
When making the caramel, keep a close eye on the sugar as it can burn quickly once it starts to melt. Use a light-colored saucepan if possible, so you can monitor the color change more effectively.
Additionally, confirm your butter and cream are at room temperature to prevent the caramel from seizing when added. If your truffles start to soften while coating, return them to the freezer for a few minutes before continuing.
Enjoy these truffles within a week, storing them in an airtight container in the refrigerator.
Matcha Green Tea Truffles
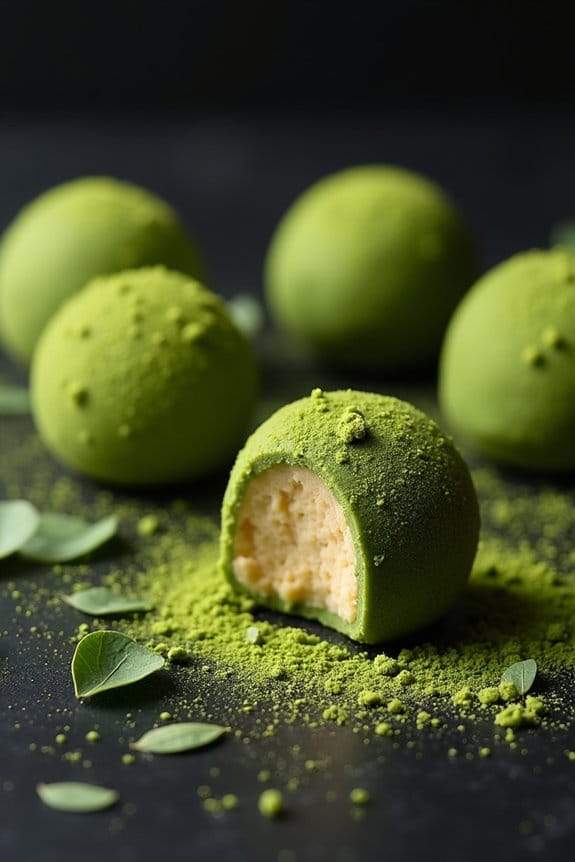
Matcha Green Tea Truffles are a delightful twist on the classic chocolate truffle, infusing the earthy and slightly bitter flavors of matcha with the creamy richness of white chocolate. These truffles make for a sophisticated and festive treat, perfect for sharing during the Christmas season.
The vibrant green hue of matcha adds a festive touch, making them an eye-catching addition to any holiday dessert platter. Not only are they visually appealing, but they also offer a unique taste experience that’s both decadent and invigorating.
Preparing Matcha Green Tea Truffles is a simple yet rewarding process. The key to achieving the perfect truffle is balancing the sweetness of white chocolate with the subtle bitterness of matcha powder.
These truffles are perfect for a serving size of 4-6 people, making them ideal for small gatherings or as a thoughtful homemade gift. With just a few ingredients and some patience, you’ll be able to create these elegant treats that are sure to impress your family and friends.
Ingredients (for 4-6 servings):
- 200g white chocolate, chopped
- 60ml heavy cream
- 15g unsalted butter
- 1 tablespoon matcha green tea powder (plus extra for dusting)
- 1 teaspoon vanilla extract
- A pinch of salt
Cooking Instructions:
- Prepare the Chocolate Mixture: Begin by placing the chopped white chocolate in a heatproof bowl. In a small saucepan, heat the heavy cream over medium heat until it just begins to simmer. Don’t let it boil. Remove the cream from the heat and pour it over the white chocolate. Let it sit for a minute to allow the chocolate to melt.
- Mix the Ingredients: Stir the chocolate and cream mixture until smooth and fully combined. Add the unsalted butter, vanilla extract, and salt, and continue stirring until the butter has melted completely.
- Incorporate the Matcha: Sift the matcha green tea powder over the chocolate mixture to avoid lumps, then stir it in until completely blended. The mixture should be smooth and have a uniform green color.
- Chill the Mixture: Cover the bowl with plastic wrap and refrigerate for at least 2 hours, or until the mixture is firm enough to handle.
- Shape the Truffles: Once the mixture is firm, use a small spoon or melon baller to scoop out portions of the chocolate. Roll each portion between your palms to form small, even balls. If the mixture becomes too soft, return it to the refrigerator to firm up again.
- Dust with Matcha: Sift extra matcha powder onto a plate. Roll each truffle in the matcha powder to coat them evenly, giving them a lovely green finish.
- Serve or Store: Place the finished truffles in an airtight container and refrigerate until ready to serve. Allow them to sit at room temperature for a few minutes before serving to enhance their flavor.
Extra Tips:
When working with white chocolate, verify that you use a high-quality brand, as it melts more smoothly and combines better with the other ingredients.
If you find that the matcha flavor is too strong or too subtle for your taste, adjust the amount of matcha powder accordingly. Truffles can be stored in the refrigerator for up to a week, making them a great make-ahead treat for your holiday festivities.
If you want to get creative, try adding a pinch of cinnamon or ginger to the mixture for an extra layer of flavor.
Coconut Snowball Truffles
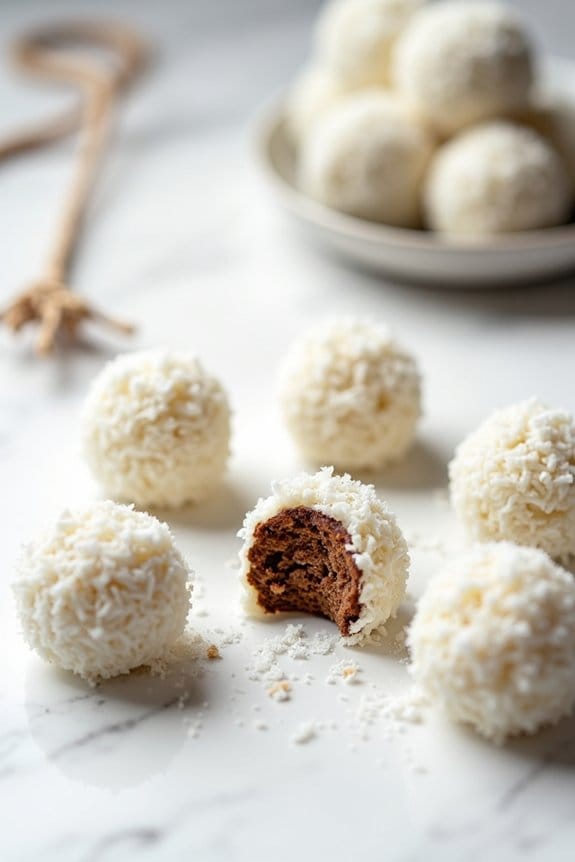
Coconut Snowball Truffles are a delightful holiday treat that combines a rich, creamy center with a snowy coconut coating. These truffles are perfect for gifting or serving as a sweet ending to your festive feast. The combination of coconut and white chocolate creates a luscious melt-in-your-mouth experience, while the hint of vanilla adds a layer of warmth and depth to each bite.
With their elegant appearance and delectable flavor, these Coconut Snowball Truffles are certain to become a staple in your Christmas dessert repertoire.
Making these truffles is surprisingly simple and requires just a few ingredients that come together beautifully. The process involves creating a smooth and creamy mixture that’s chilled, rolled into balls, and then coated in shredded coconut to give them the appearance of snowballs. They can be prepared in advance, making them a convenient option for holiday entertaining.
Whether you’re an experienced cook or a beginner, you’ll find that this recipe is both fun and rewarding to make.
Ingredients for Coconut Snowball Truffles (Serves 4-6):
- 1 cup white chocolate chips
- 1/4 cup heavy cream
- 1 teaspoon vanilla extract
- 1 cup shredded coconut, unsweetened
- 1/4 cup powdered sugar
- 1/4 cup unsalted butter, softened
Instructions:
- Melt the Chocolate: In a heatproof bowl, combine the white chocolate chips and heavy cream. Place the bowl over a pot of simmering water to create a double boiler. Stir continuously until the chocolate is completely melted and the mixture is smooth.
- Mix the Ingredients: Remove the bowl from heat and let it cool slightly. Stir in the vanilla extract and softened butter until well combined. The mixture should be glossy and creamy.
- Chill the Mixture: Cover the bowl with plastic wrap and place it in the refrigerator for about 1-2 hours, or until the mixture is firm enough to handle.
- Prepare the Coating: On a plate, mix the shredded coconut and powdered sugar together. This will be the coating for your truffles.
- Form the Truffles: Once the chocolate mixture is firm, use a teaspoon or small cookie scoop to portion out small amounts. Roll each portion into a ball using your hands.
- Coat the Truffles: Roll each ball in the coconut and powdered sugar mixture until it’s fully covered. The coconut should adhere nicely to the truffle, creating a snowball effect.
- Chill and Serve: Place the coated truffles on a baking sheet lined with parchment paper. Refrigerate for at least 30 minutes to set before serving.
Extra Tips:
When preparing Coconut Snowball Truffles, verify that all ingredients are at room temperature before mixing. This helps achieve a smooth and even texture.
If the mixture becomes too soft while rolling, return it to the refrigerator for a few minutes to firm up again. For a touch of added flavor, consider incorporating a small amount of almond extract or a pinch of sea salt into the chocolate mixture.
To make the truffles even more special, try drizzling some melted dark chocolate over the top once they’re set. Enjoy these truffles chilled and savor the festive flavors of the season!
Spiced Rum Truffles
Indulge in the festive spirit with these decadent Spiced Rum Truffles, a perfect treat to enjoy during the holiday season. These truffles combine the rich, creamy texture of chocolate with the warming notes of spiced rum, offering a tantalizing taste sensation that’s sure to be a hit at any Christmas gathering.
With their enticing aroma and luxurious flavor, these truffles make for a wonderful homemade gift or a delightful addition to your holiday dessert table.
Crafting these truffles is a simple yet rewarding process that allows you to infuse the rich flavors of rum and spices into luscious chocolate ganache. The delicate balance of sweetness and warmth in these truffles is achieved by carefully selecting the right blend of spices and the finest quality rum.
Whether you’re a seasoned chocolatier or a novice in the kitchen, this recipe will guide you through each step to create a batch of perfectly spiced, melt-in-your-mouth truffles.
Ingredients (Serves 4-6)
- 200g dark chocolate (70% cocoa), finely chopped
- 100ml heavy cream
- 2 tablespoons spiced rum
- 1 tablespoon unsalted butter
- 1 teaspoon vanilla extract
- 1/2 teaspoon ground cinnamon
- 1/4 teaspoon ground nutmeg
- 1/4 teaspoon ground ginger
- Cocoa powder, for dusting
Instructions
- Prepare the Chocolate Base: Place the finely chopped dark chocolate in a heatproof bowl and set aside. In a small saucepan, warm the heavy cream over medium heat until it just begins to simmer. Avoid boiling to prevent the cream from curdling.
- Combine Ingredients: Pour the hot cream over the chopped chocolate. Allow it to sit for a minute to let the chocolate begin to melt. Stir gently with a spatula or whisk until the mixture is smooth and glossy.
- Add Flavors: Stir in the spiced rum, unsalted butter, vanilla extract, ground cinnamon, nutmeg, and ginger until all ingredients are thoroughly combined. Confirm the butter is fully melted and incorporated into the mixture.
- Chill the Mixture: Cover the bowl with plastic wrap or a lid and refrigerate for about 2 hours, or until the mixture is firm enough to scoop and shape.
- Shape the Truffles: Once the ganache is set, use a small cookie scoop or a teaspoon to portion out small amounts of the mixture. Roll each portion between your palms to form a smooth, round ball.
- Coat the Truffles: Place the cocoa powder in a shallow dish. Roll each truffle in the cocoa powder, confirming they’re evenly coated. This step not only adds a touch of elegance but also prevents the truffles from sticking together.
- Serve or Store: Arrange the finished truffles on a platter to serve immediately, or store them in an airtight container in the refrigerator for up to one week.
Extra Tips
When making Spiced Rum Truffles, it’s vital to use high-quality chocolate, as this will greatly impact the final taste and texture. If you prefer a milder rum flavor, consider reducing the amount of rum slightly, or choose a less robust variety.
Additionally, for a more personalized touch, you can experiment with different spices or even add a pinch of sea salt to enhance the flavors. To achieve a smoother ganache, confirm that all ingredients are at room temperature before combining, and avoid over-stirring, which can introduce air bubbles.
Enjoy these truffles with a cup of coffee or a glass of your favorite holiday beverage to enhance their festive allure.
