

A vegetarian Christmas lunch can be every bit as delightful and satisfying as the traditional feast. Picture a Hearty Mushroom Wellington filling the kitchen with its rich aroma. Marvel at the vibrant colors of a Festive Roasted Vegetable Tart on the table. These dishes highlight the season’s best ingredients while adding a unique twist to holiday dining. Ready to explore more festive flavors?
Hearty Mushroom Wellington
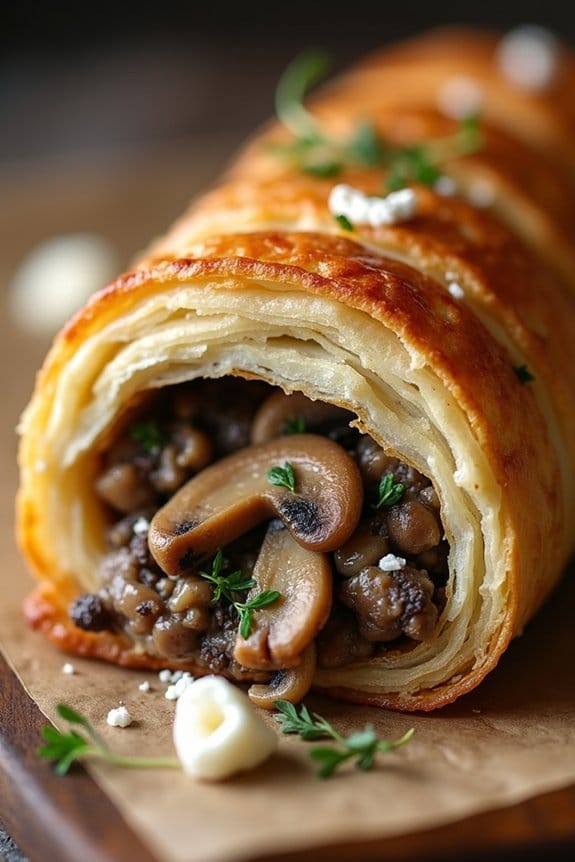
Mushroom Wellington is a delightful vegetarian twist on the classic beef Wellington, offering a rich and savory dish perfect for a Christmas lunch. The hearty filling is made with a medley of mushrooms, flavored with herbs and wrapped in a flaky puff pastry. This dish not only satisfies vegetarians but also impresses meat-lovers with its robust flavors and elegant presentation.
It’s an excellent centerpiece for a festive meal, bringing warmth and indulgence to your holiday table.
The key to this recipe is the combination of earthy mushrooms, aromatic herbs, and the buttery crust of the pastry. The mushrooms are sautéed to enhance their natural umami flavor, while the herbs add a layer of freshness that complements the richness of the dish. The puff pastry encases the filling, creating a beautiful golden crust that crackles with every bite.
This Mushroom Wellington is sure to be a hit, providing a delicious and satisfying alternative to traditional meat-based holiday dishes.
Ingredients (Serves 4-6):
- 2 tablespoons olive oil
- 1 onion, finely chopped
- 2 cloves garlic, minced
- 500g mixed mushrooms, finely chopped
- 1 tablespoon fresh thyme leaves
- 1 tablespoon fresh rosemary, finely chopped
- Salt and pepper, to taste
- 1 tablespoon balsamic vinegar
- 100g spinach, wilted and excess water squeezed out
- 100g goat cheese or vegan cheese (optional)
- 1 packet (320g) ready-rolled puff pastry
- 1 egg, beaten (or plant-based milk for vegan option)
Cooking Instructions:
- Prepare the Filling: Heat olive oil in a large skillet over medium heat. Add the chopped onion and sauté until translucent, about 5 minutes. Stir in the garlic and cook for another minute until fragrant.
- Cook the Mushrooms: Add the mixed mushrooms to the skillet, cooking until they release their moisture and begin to brown, about 10 minutes. Stir occasionally to ascertain they cook evenly.
- Season the Filling: Add the thyme, rosemary, salt, and pepper to the mushrooms. Pour in the balsamic vinegar and cook for another 2 minutes, allowing the flavors to meld together.
- Combine Ingredients: Remove the skillet from heat and stir in the wilted spinach. If using, crumble and mix in the goat cheese. Set the mixture aside to cool slightly.
- Prepare the Pastry: Preheat your oven to 200°C (400°F). Roll out the puff pastry on a lightly floured surface. Place the mushroom mixture in the center of the pastry, shaping it into a log.
- Wrap the Wellington: Fold the pastry over the filling, sealing the edges by pressing them together. Trim any excess pastry and ascertain the seam is on the bottom. Transfer the Wellington to a baking sheet lined with parchment paper.
- Glaze and Bake: Brush the pastry with the beaten egg or plant-based milk for a golden finish. Make a few slashes on top of the pastry to allow steam to escape. Bake in the preheated oven for 25-30 minutes or until the pastry is golden brown and flaky.
- Serve: Allow the Wellington to cool slightly before slicing. Serve warm, garnished with fresh herbs or accompanied by a side salad.
Extra Tips:
When making Mushroom Wellington, ascertain the mushroom filling isn’t too wet, as excess moisture can make the pastry soggy. If needed, cook the mushrooms a bit longer to evaporate extra liquid.
For added flavor, you can incorporate a splash of white wine during the mushroom cooking process. Ascertain the pastry is well-sealed to prevent any filling from escaping during baking. If substituting the cheese, consider using a vegan cheese or omitting it altogether for a dairy-free version.
Stuffed Acorn Squash With Quinoa and Cranberries
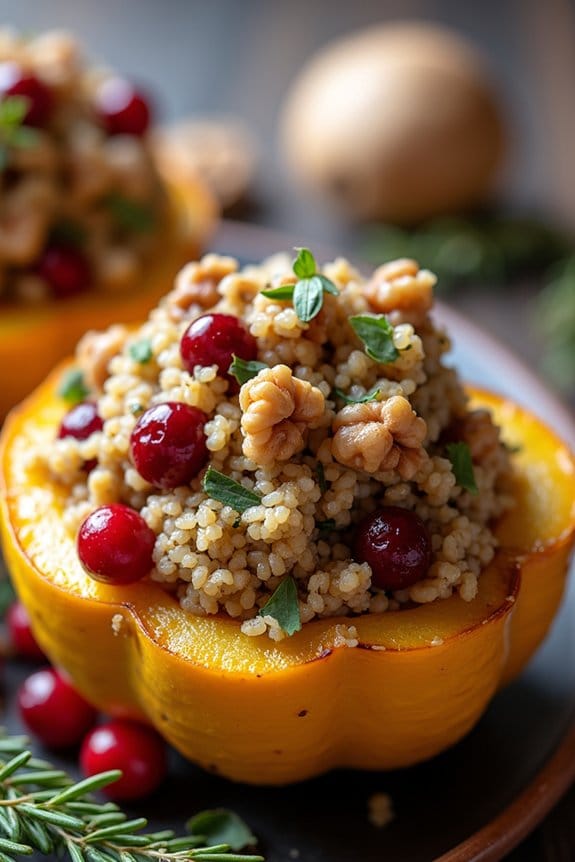
This recipe is both simple and versatile, allowing you to tweak the ingredients to suit your taste preferences. The quinoa and cranberry stuffing is complemented by crunchy walnuts and aromatic herbs, creating a symphony of flavors and textures that will delight your guests.
The acorn squash serves as a natural bowl, holding the flavorful filling, and adds a touch of sweetness to every bite. Whether you’re serving it as a main course or a side, this dish is sure to impress and satisfy everyone at the table.
Ingredients (Serves 4-6)
- 3 medium acorn squashes
- 1 cup quinoa, rinsed
- 2 cups vegetable broth
- 1 cup fresh cranberries
- 1/2 cup walnuts, chopped
- 1 small onion, diced
- 2 cloves garlic, minced
- 1 teaspoon dried thyme
- 1 teaspoon dried sage
- Salt and pepper to taste
- 2 tablespoons olive oil
- Optional: fresh parsley for garnish
Cooking Instructions
1. Prepare the Squash: Preheat your oven to 400°F (200°C). Cut each acorn squash in half lengthwise and remove the seeds. Brush the cut sides with a tablespoon of olive oil and sprinkle with salt and pepper.
Place them cut-side down on a baking sheet lined with parchment paper. Roast in the oven for 25-30 minutes or until the flesh is tender and easily pierced with a fork.
2. Cook the Quinoa: While the squash is roasting, bring the vegetable broth to a boil in a medium saucepan. Add the rinsed quinoa, reduce the heat to low, cover, and simmer for about 15 minutes or until the quinoa is cooked and the broth is absorbed.
Remove from heat and let it sit covered for an additional 5 minutes.
3. Prepare the Filling: In a large skillet, heat the remaining tablespoon of olive oil over medium heat. Add the diced onion and garlic, and sauté for 2-3 minutes until the onion is translucent.
Stir in the cranberries, walnuts, thyme, and sage. Cook for another 5 minutes until the cranberries start to soften.
4. Combine Ingredients: Fluff the cooked quinoa with a fork and add it to the skillet with the cranberry mixture. Stir well to combine and season with salt and pepper to taste.
5. Stuff the Squash: Once the acorn squash halves are roasted, remove them from the oven and turn them over. Spoon the quinoa mixture into each squash half, packing it gently.
Return the stuffed squash to the oven and bake for an additional 10 minutes to allow the flavors to meld.
6. Serve: Remove from the oven and let cool slightly before serving. Garnish with fresh parsley if desired.
Extra Tips
When selecting acorn squash, look for ones with a firm exterior and a deep green color for the best flavor. If fresh cranberries are unavailable, you can substitute with dried cranberries, but reduce the amount slightly to balance the sweetness.
Feel free to customize the stuffing by adding your favorite seasonal vegetables or nuts. To make it even more festive, consider adding a sprinkle of feta or goat cheese before the final bake for an additional layer of flavor.
Festive Roasted Vegetable Tart
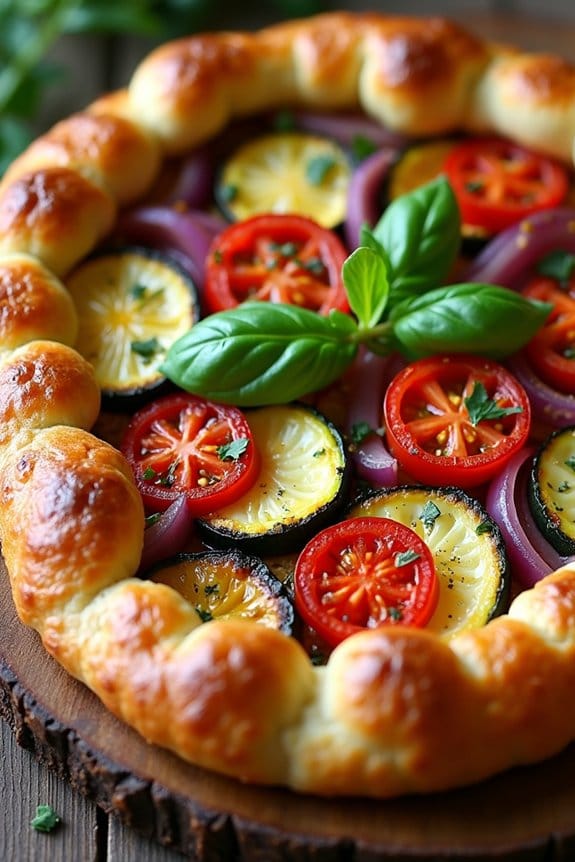
This Festive Roasted Vegetable Tart is a delightful addition to your Christmas lunch menu, offering a colorful and flavorful centerpiece for your vegetarian guests. The tart combines a medley of seasonal vegetables roasted to perfection, layered over a creamy and tangy cheese base, all encased in a crisp, flaky pastry.
This dish not only looks impressive but also captures the essence of the holiday with its vibrant colors and comforting flavors. Perfect for serving 4-6 people, this tart is both hearty and elegant, making it an ideal choice for a festive gathering.
Whether you serve it as a main dish or a sumptuous side, the Festive Roasted Vegetable Tart is sure to captivate with its rich taste and beautiful presentation. The combination of roasted vegetables like bell peppers, zucchini, and cherry tomatoes, along with the savory cheese and herb-infused pastry, makes this dish a standout at any Christmas table.
Ingredients:
- 1 sheet of puff pastry, thawed
- 2 tablespoons olive oil
- 1 red bell pepper, sliced
- 1 yellow bell pepper, sliced
- 1 zucchini, sliced
- 1 red onion, sliced
- 1 cup cherry tomatoes, halved
- 1 tablespoon balsamic vinegar
- Salt and pepper, to taste
- 1 cup ricotta cheese
- 1/2 cup grated Parmesan cheese
- 1 egg, beaten
- 2 teaspoons dried Italian herbs (such as basil, oregano, and thyme)
- Fresh basil leaves for garnish
Cooking Instructions:
- Preheat the Oven: Preheat your oven to 400°F (200°C). Line a baking sheet with parchment paper.
- Prepare the Vegetables: In a large bowl, combine the sliced bell peppers, zucchini, red onion, and cherry tomatoes. Drizzle with olive oil, balsamic vinegar, salt, and pepper. Toss everything together to guarantee the vegetables are evenly coated.
- Roast the Vegetables: Spread the vegetables in a single layer on the prepared baking sheet. Roast in the preheated oven for 20-25 minutes, or until they’re tender and slightly caramelized. Remove from the oven and set aside.
- Prepare the Pastry Base: Roll out the puff pastry on a lightly floured surface to fit a 9-inch tart pan. Press the pastry into the pan, trimming any excess edges. Prick the base with a fork to prevent it from puffing up during baking.
- Make the Cheese Filling: In a medium bowl, mix together the ricotta cheese, Parmesan cheese, beaten egg, and Italian herbs. Spread this mixture evenly over the prepared pastry base.
- Assemble the Tart: Arrange the roasted vegetables over the cheese filling, spreading them out evenly to cover the entire tart.
- Bake the Tart: Place the tart in the oven and bake for 25-30 minutes, or until the pastry is golden brown and the cheese filling is set.
- Garnish and Serve: Remove the tart from the oven and allow it to cool slightly. Garnish with fresh basil leaves before slicing and serving.
Extra Tips:
For a more intense flavor, consider adding a few cloves of roasted garlic to the vegetable mix. You can also experiment with different types of cheese, such as feta or goat cheese, for a unique twist.
If you prefer a gluten-free option, substitute the puff pastry with a gluten-free pastry shell. Serve the tart warm or at room temperature, accompanied by a fresh green salad for a complete and satisfying meal.
Creamy Butternut Squash Risotto
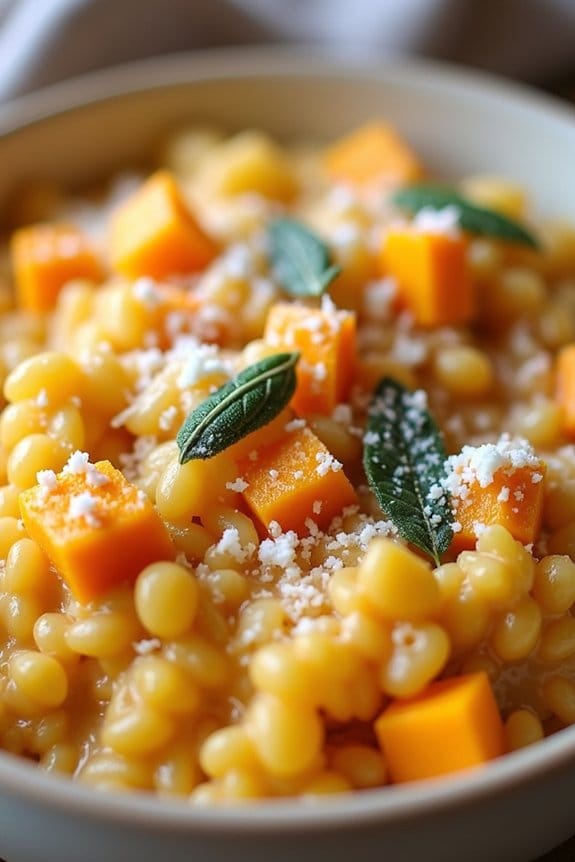
Creamy Butternut Squash Risotto is a comforting and delicious dish that embodies the spirit of a vegetarian Christmas lunch. This risotto combines the rich, nutty flavors of roasted butternut squash with the creamy, velvety texture of arborio rice, creating a dish that’s both satisfying and festive. The subtle hints of sage and garlic enhance the sweetness of the squash, while a touch of Parmesan cheese adds a savory depth, making this risotto a perfect centerpiece for your holiday table.
Preparing this risotto requires a bit of patience and attention, as the key to its creaminess is the gradual addition of warm broth, which allows the rice to release its starches and develop its signature texture. The result is a dish that not only delights with its taste but also impresses with its elegant presentation. Whether you’re hosting a vegetarian Christmas lunch or simply looking to add a hearty vegetarian dish to your festive menu, this Creamy Butternut Squash Risotto is sure to be a crowd-pleaser.
Ingredients (Serves 4-6):
- 1 medium butternut squash, peeled and diced
- 2 tablespoons olive oil
- Salt and black pepper, to taste
- 6 cups vegetable broth
- 1 tablespoon unsalted butter
- 1 medium onion, finely chopped
- 2 cloves garlic, minced
- 1 1/2 cups arborio rice
- 1/2 cup dry white wine
- 1/2 cup grated Parmesan cheese
- 1/4 cup chopped fresh sage leaves
- Optional: extra Parmesan cheese and fresh sage leaves for garnish
Instructions:
- Roast the Butternut Squash: Preheat your oven to 400°F (200°C). Place the diced butternut squash on a baking sheet, drizzle with olive oil, and season with salt and pepper. Toss to coat evenly and roast in the oven for 25-30 minutes, or until tender and slightly caramelized. Set aside.
- Prepare the Broth: In a saucepan, heat the vegetable broth over low heat and keep it warm throughout the cooking process.
- Sauté the Aromatics: In a large, heavy-bottomed pot, melt the butter over medium heat. Add the chopped onion and cook until translucent, about 5 minutes. Stir in the minced garlic and cook for another minute until fragrant.
- Toast the Rice: Add the arborio rice to the pot, stirring frequently, until the grains are lightly toasted and coated with the butter, about 2-3 minutes.
- Deglaze with Wine: Pour in the white wine, stirring constantly, until it’s mostly absorbed by the rice.
- Cook the Risotto: Begin adding the warm broth to the rice, one ladleful at a time, stirring frequently and allowing each addition to be absorbed before adding the next. This process should take about 18-20 minutes, until the rice is tender but still has a slight bite.
- Incorporate the Squash and Cheese: Once the rice is cooked, gently fold in the roasted butternut squash, Parmesan cheese, and chopped sage. Stir until the cheese is melted and the risotto is creamy. Adjust the seasoning with salt and pepper to taste.
- Serve and Garnish: Serve the risotto immediately, garnished with extra Parmesan cheese and fresh sage leaves if desired.
Extra Tips: To guarantee a perfectly creamy risotto, it’s important to stir the rice frequently as you add the broth. This helps release the starches from the rice, contributing to the risotto’s signature texture. If you prefer a slightly more textured squash, reserve a portion of the roasted pieces to fold in at the very end. Additionally, if you don’t have fresh sage, you can use dried sage, but remember that it’s more potent, so use it sparingly.
Spinach and Ricotta Stuffed Shells
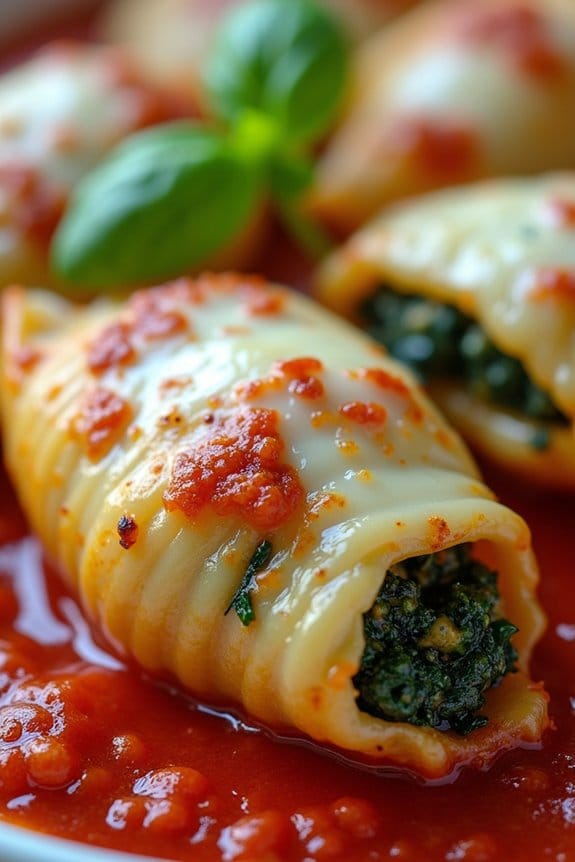
Spinach and Ricotta Stuffed Shells are a delightful vegetarian dish that’s perfect for a festive Christmas lunch. This dish isn’t only visually appealing, with its vibrant green spinach and creamy ricotta filling nestled within delicate pasta shells, but it also offers a rich and comforting flavor profile.
The combination of the creamy filling with a robust tomato sauce creates a harmonious blend that will satisfy both vegetarians and meat-lovers alike. This recipe brings out the best in simple ingredients, allowing the natural flavors of spinach and ricotta to shine through.
The stuffed shells are baked to perfection, creating a crispy layer of melted cheese on top, while maintaining a soft and tender interior. This dish is a wonderful centerpiece for your Christmas table, bringing warmth and joy to your holiday gathering.
Ingredients (Serves 4-6):
- 20-24 jumbo pasta shells
- 2 cups ricotta cheese
- 2 cups fresh spinach, chopped
- 1 cup grated Parmesan cheese
- 1 egg
- 2 cups mozzarella cheese, shredded
- 3 cups marinara sauce
- 2 cloves garlic, minced
- 1 tablespoon olive oil
- Salt and pepper to taste
- Fresh basil leaves, for garnish
Cooking Instructions:
- Preheat oven: Begin by preheating your oven to 375°F (190°C).
- Cook pasta shells: Boil a large pot of salted water and cook the jumbo pasta shells according to the package instructions until al dente. Drain and set them aside to cool slightly.
- Prepare the filling: In a large mixing bowl, combine the ricotta cheese, chopped spinach, 1/2 cup of Parmesan cheese, the egg, minced garlic, salt, and pepper. Mix until well incorporated.
- Stuff the shells: Carefully fill each pasta shell with the ricotta and spinach mixture. Be generous with the filling but ascertain the shells remain intact.
- Assemble the dish: Spread 1 cup of marinara sauce evenly over the bottom of a baking dish. Arrange the stuffed shells in a single layer over the sauce.
- Top with sauce and cheese: Pour the remaining marinara sauce over the shells, making sure they’re well covered. Sprinkle the shredded mozzarella cheese and the remaining Parmesan cheese over the top.
- Bake: Cover the baking dish with aluminum foil and bake in the preheated oven for 25 minutes. Remove the foil and bake for an additional 10-15 minutes, or until the cheese is melted and bubbly.
- Garnish and serve: Remove from the oven and let it cool slightly. Garnish with fresh basil leaves before serving.
Extra Tips:
For an extra burst of flavor, consider adding a pinch of nutmeg to the ricotta filling, which complements the spinach wonderfully. If you prefer a slightly spicy kick, a sprinkle of red pepper flakes on top before baking can add some heat.
Make sure to taste your filling and adjust the seasoning before stuffing the shells to ascertain a balanced flavor. Additionally, if preparing in advance, the stuffed shells can be assembled a day ahead and stored in the refrigerator, making it a stress-free option for a busy Christmas day.
Holiday Spiced Cauliflower Roast
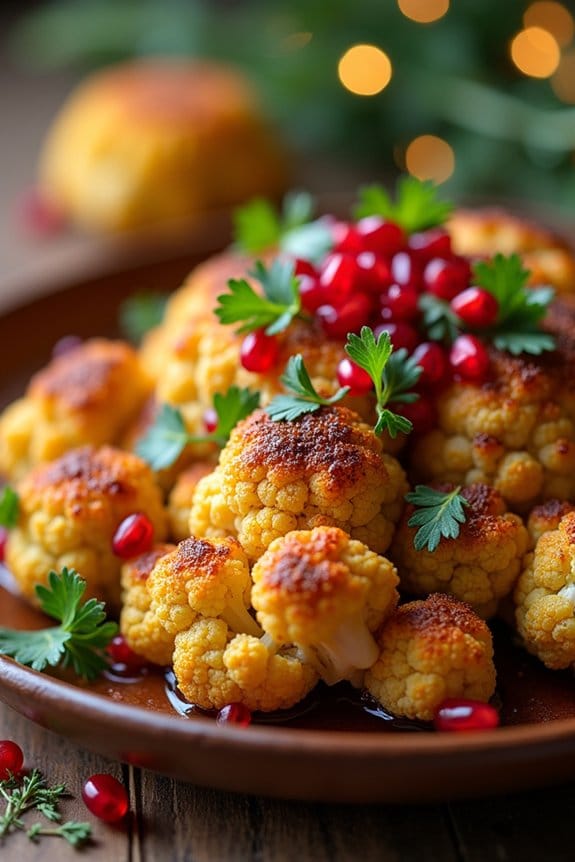
This Holiday Spiced Cauliflower Roast is a delightful centerpiece for a vegetarian Christmas lunch. The cauliflower, with its hearty texture, absorbs a delicious blend of spices and herbs, making it a flavorful and satisfying dish. Roasted until tender and golden, the cauliflower takes on a beautiful caramelization that enhances its natural sweetness. The aromatic spices provide a festive touch, infusing the dish with warmth and depth, perfect for a special holiday meal.
This recipe is designed to serve 4-6 people, making it an ideal addition to your Christmas table. It’s not only visually impressive but also easy to prepare, allowing you to spend more time with your loved ones rather than in the kitchen. Pair it with your favorite sides and a revitalizing salad for a complete, wholesome meal that will please both vegetarians and meat-eaters alike.
Ingredients:
- 1 large cauliflower head
- 3 tablespoons olive oil
- 1 tablespoon maple syrup
- 1 teaspoon ground cinnamon
- 1 teaspoon ground cumin
- 1/2 teaspoon smoked paprika
- 1/2 teaspoon ground coriander
- 1/4 teaspoon ground nutmeg
- Salt and pepper to taste
- 2 cloves garlic, minced
- 1 tablespoon lemon juice
- 1 tablespoon fresh thyme leaves
- 1 tablespoon chopped fresh parsley (for garnish)
- Pomegranate seeds (for garnish)
Cooking Instructions:
- Preheat the oven: Set your oven to 400°F (200°C) and line a baking sheet with parchment paper to prevent sticking.
- Prepare the cauliflower: Remove the leaves and trim the stem of the cauliflower so that it can sit flat. Rinse the cauliflower under cold water and pat it dry with a paper towel.
- Make the spice mixture: In a small bowl, mix together the olive oil, maple syrup, ground cinnamon, ground cumin, smoked paprika, ground coriander, ground nutmeg, minced garlic, lemon juice, salt, and pepper.
- Season the cauliflower: Place the cauliflower on the prepared baking sheet. Brush the spice mixture evenly over the entire surface of the cauliflower, making sure to get into all the crevices.
- Roast the cauliflower: Place the baking sheet in the preheated oven and roast for 35-45 minutes, or until the cauliflower is tender and golden brown on the outside. You can check for doneness by inserting a fork into the center; it should go in easily.
- Finish and garnish: Once roasted, remove the cauliflower from the oven and let it cool for a few minutes. Transfer it to a serving platter and sprinkle fresh thyme leaves, chopped parsley, and pomegranate seeds over the top for garnish.
Extra Tips:
For a more robust flavor, you can marinate the cauliflower in the spice mixture for 1-2 hours before roasting. If you prefer a bit of heat, add a pinch of cayenne pepper to the spice mix.
Additionally, if your cauliflower head is particularly large, you may need to adjust the roasting time slightly to make sure it cooks through completely. Serve this dish warm, along with a drizzle of tahini sauce or a squeeze of extra lemon juice for added brightness.
Pomegranate and Walnut-Stuffed Cabbage Rolls
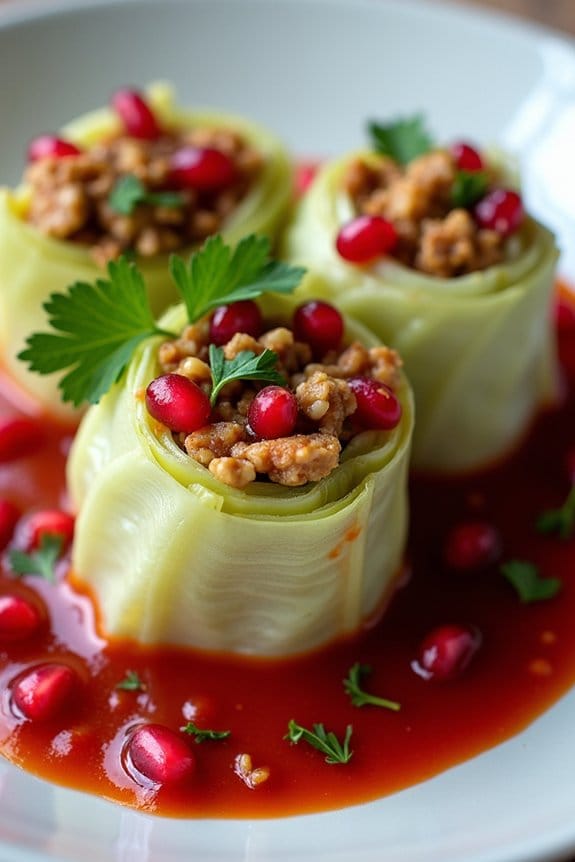
Pomegranate and Walnut-Stuffed Cabbage Rolls are a delightful and festive dish perfect for a vegetarian Christmas lunch. This dish combines the earthy flavors of walnuts with the sweet and tangy taste of pomegranate seeds, all wrapped up in tender cabbage leaves.
The stuffing is a rich mixture of grains, nuts, and spices that will leave your guests delighted and satisfied. These cabbage rolls not only look beautiful on the plate but also offer a unique taste experience that blends Middle Eastern influences with traditional holiday flavors.
This recipe is perfect for those who wish to serve a sophisticated, plant-based main course, and it can easily be prepared ahead of time. The rolls are served with a simple tomato sauce that complements the nutty and fruity stuffing.
Whether you’re a seasoned vegetarian or just looking to try something new for your holiday meal, Pomegranate and Walnut-Stuffed Cabbage Rolls are sure to impress.
Ingredients (Serves 4-6):
- 1 large head of cabbage
- 1 cup cooked quinoa
- 1 cup walnuts, finely chopped
- 1 cup pomegranate seeds
- 1 small onion, finely chopped
- 2 cloves garlic, minced
- 1 tablespoon olive oil
- 1 teaspoon ground cinnamon
- 1 teaspoon ground cumin
- Salt and pepper to taste
- 1 can (15 oz) tomato sauce
- 1 tablespoon lemon juice
- Fresh parsley for garnish
Instructions:
- Prepare the Cabbage:
- Carefully remove the outer leaves of the cabbage and blanch them in boiling water for about 2-3 minutes until they’re pliable. Drain and set aside to cool.
- Make the Stuffing:
- In a pan, heat olive oil over medium heat. Add the chopped onion and garlic, sautéing until they’re soft and translucent.
- Add the walnuts, cooked quinoa, pomegranate seeds, cinnamon, cumin, salt, and pepper. Stir well to combine and let it cook for an additional 2-3 minutes. Remove from heat and let cool slightly.
- Stuff the Cabbage Leaves:
- Place a cabbage leaf on a clean surface and spoon about 2 tablespoons of the stuffing onto the center. Fold the sides over the filling and roll up tightly, tucking in the edges as you go. Repeat with the remaining leaves and stuffing.
- Cook the Cabbage Rolls:
- Preheat your oven to 350°F (175°C).
- Place the cabbage rolls seam-side down in a baking dish. Pour the tomato sauce over the rolls, ensuring they’re well covered. Drizzle with lemon juice.
- Cover the dish with foil and bake for 30-35 minutes, or until the rolls are heated through and the sauce is bubbling.
- Serve:
- Remove from the oven and let cool slightly before serving. Garnish with fresh parsley and additional pomegranate seeds if desired.
Extra Tips:
When choosing a cabbage, look for one that has large, unblemished leaves, as they’ll be easier to fill and roll. If the leaves are particularly thick at the stem, you might want to trim them a bit to make rolling easier.
Be sure not to overstuff the cabbage leaves, as this can make them difficult to roll and cause them to burst during cooking. If you prefer a more intense flavor, you can add a touch of smoked paprika to the stuffing mixture.
For a complete meal, consider serving these rolls with a side of roasted vegetables or a light salad.
Rich and Creamy Chestnut Soup

Rich and Creamy Chestnut Soup is an exquisite choice for a vegetarian Christmas lunch, offering a blend of hearty flavors and a velvety texture that will surely impress your guests. This elegant soup showcases the natural sweetness of chestnuts, enhanced by aromatic herbs and creamy accents, creating a luxurious starter that sets the tone for a festive feast.
Whether you’re seeking to create a cozy atmosphere or simply want to introduce a new favorite to your holiday menu, this chestnut soup is a delightful option that combines simplicity with sophistication.
The process of making this soup is straightforward yet rewarding. It begins with roasting chestnuts to bring out their rich flavors, which are then simmered with a variety of ingredients to build depth. The final touch of cream adds a silky smoothness that perfectly complements the earthy notes of the chestnuts.
Although it requires some preparation, the result is a harmonious blend of flavors that will warm the hearts of your loved ones, making it a cherished part of your Christmas celebration.
Ingredients for 4-6 servings:
- 500g fresh chestnuts (or pre-cooked vacuum-packed chestnuts)
- 2 tablespoons olive oil
- 1 onion, finely chopped
- 2 cloves garlic, minced
- 1 large carrot, diced
- 2 sticks celery, diced
- 1 liter vegetable stock
- 1 bay leaf
- 1 teaspoon fresh thyme leaves
- 150ml heavy cream
- Salt and black pepper to taste
- Fresh parsley, chopped, for garnish
Cooking Instructions:
- Prepare the Chestnuts: If using fresh chestnuts, preheat your oven to 200°C (400°F). Score the chestnuts with a small ‘X’ on the flat side using a sharp knife. Place them on a baking tray and roast for 20-25 minutes until the skins peel back and they’re tender. Once roasted, peel away the shells and set the chestnuts aside. If using pre-cooked chestnuts, skip this step.
- Sauté the Vegetables: Heat the olive oil in a large pot over medium heat. Add the chopped onion, garlic, carrot, and celery, and sauté for about 5-7 minutes until the vegetables are softened and lightly golden.
- Simmer with Stock: Add the roasted chestnuts, bay leaf, and thyme to the pot. Pour in the vegetable stock and stir well. Bring the mixture to a boil, then reduce the heat to low, cover, and let it simmer for about 30 minutes to allow the flavors to meld together.
- Blend the Soup: Remove the bay leaf from the pot. Using an immersion blender, puree the soup until it’s smooth and creamy. Alternatively, you can carefully transfer the soup to a blender in batches and blend until smooth.
- Add Cream and Season: Stir in the heavy cream and season the soup with salt and black pepper to taste. Let the soup simmer for another 5 minutes to guarantee everything is well combined and heated through.
- Serve and Garnish: Ladle the rich and creamy chestnut soup into bowls, garnishing each with a sprinkle of fresh parsley. Serve hot and enjoy the comforting flavors.
Extra Tips:
For an extra depth of flavor, consider adding a splash of dry white wine to the sautéed vegetables before adding the stock. This will enhance the overall taste of the soup.
If you prefer a thicker consistency, reduce the amount of vegetable stock slightly or simmer the soup for a longer period until it reaches your desired thickness.
For a vegan version, substitute the heavy cream with coconut cream or a plant-based cream alternative.
Finally, if time is a constraint, pre-cooked vacuum-packed chestnuts are a great time-saver without compromising on flavor.
Maple-Glazed Brussels Sprouts and Carrots
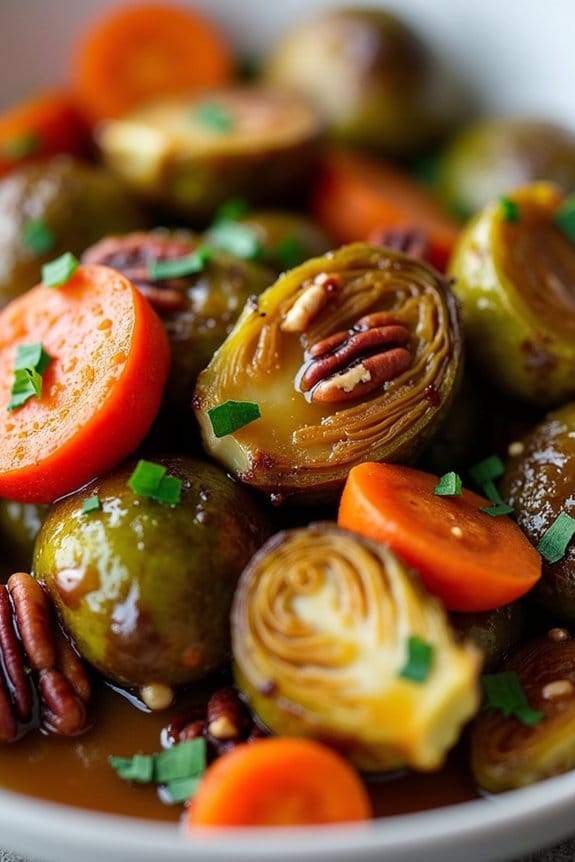
Preparing a festive vegetarian dish like Maple-Glazed Brussels Sprouts and Carrots can transform your Christmas lunch into a delightful and vibrant celebration of flavors. This recipe combines the earthy taste of Brussels sprouts with the natural sweetness of carrots, all enhanced by a luscious maple glaze. The result is a dish that’s not only visually appealing but also a perfect balance of sweet and savory, making it a standout on any holiday table.
The secret to this recipe lies in the glazing process, which involves roasting the vegetables to create a crispy exterior while maintaining a tender interior. This method allows the natural sugars in the maple syrup to caramelize, adding a depth of flavor that complements the vegetables beautifully. Whether you’re serving a purely vegetarian Christmas meal or simply looking to add a delicious side dish, these Maple-Glazed Brussels Sprouts and Carrots are sure to impress your guests.
Ingredients for 4-6 servings:
- 1 pound Brussels sprouts, trimmed and halved
- 1 pound carrots, peeled and cut into sticks
- 3 tablespoons olive oil
- Salt to taste
- Pepper to taste
- 1/4 cup pure maple syrup
- 2 tablespoons balsamic vinegar
- 1 tablespoon Dijon mustard
- 2 cloves garlic, minced
- 1/4 teaspoon red pepper flakes (optional)
- 1/4 cup chopped pecans (optional)
- Fresh parsley, chopped for garnish
Cooking Instructions:
- Preheat the Oven: Preheat your oven to 400°F (200°C) to make sure it’s hot enough to roast the vegetables evenly.
- Prepare the Vegetables: In a large bowl, combine the halved Brussels sprouts and carrot sticks. Drizzle with olive oil, then sprinkle with salt and pepper. Toss the vegetables to make certain they’re evenly coated with the oil and seasoning.
- Roast the Vegetables: Spread the seasoned Brussels sprouts and carrots out on a large baking sheet in a single layer. Roast in the preheated oven for 20-25 minutes, stirring halfway through, until they’re tender and beginning to caramelize.
- Make the Maple Glaze: While the vegetables are roasting, prepare the glaze. In a small bowl, whisk together the maple syrup, balsamic vinegar, Dijon mustard, minced garlic, and red pepper flakes until well combined.
- Glaze the Vegetables: Once the vegetables are roasted, remove them from the oven and drizzle the maple glaze over them. Toss gently to make sure the vegetables are evenly coated. Return to the oven and roast for an additional 5-10 minutes until the glaze is sticky and the vegetables are caramelized.
- Add the Finishing Touches: If desired, sprinkle the roasted vegetables with chopped pecans for added crunch and a touch of nutty flavor. Garnish with freshly chopped parsley to add a burst of color and freshness.
Extra Tips:
When preparing this dish, it’s important to make certain that the Brussels sprouts and carrots are cut to a similar size to promote even cooking. If you prefer a spicier dish, you can increase the amount of red pepper flakes or add a dash of cayenne pepper to the glaze.
For a nut-free version, simply omit the pecans. This recipe can also be easily doubled for larger gatherings, making it a versatile option for any holiday meal.
Pear and Gorgonzola Salad With Candied Pecans
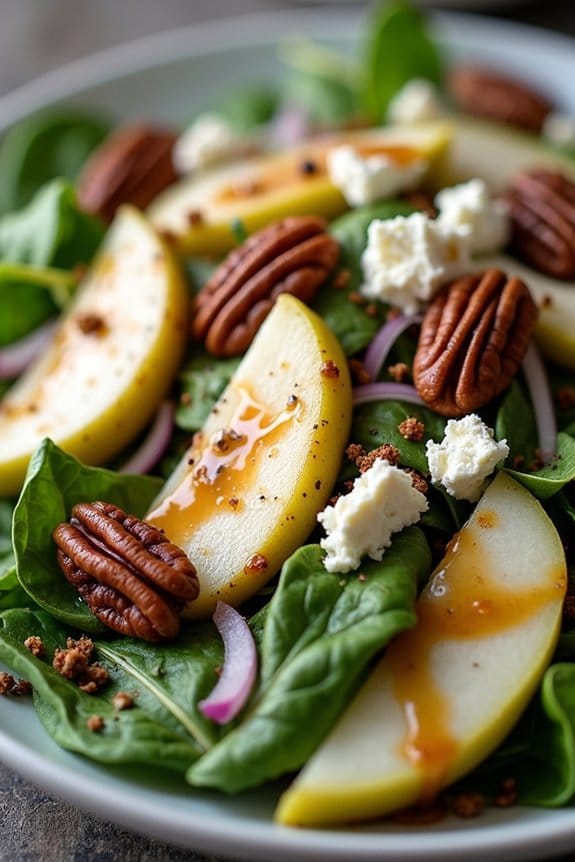
The Pear and Gorgonzola Salad with Candied Pecans is a delightful addition to any vegetarian Christmas lunch. It combines the sweet and juicy flavor of ripe pears with the creamy and tangy taste of Gorgonzola cheese, while candied pecans add a delicious crunch to the salad.
This dish isn’t only visually appealing but also offers a burst of flavors that’s certain to impress your guests. It’s light yet satisfying, making it an ideal first course or side dish for your festive meal.
This salad is perfect for a serving size of 4-6 people and can be prepared in less than 30 minutes. To guarantee that your salad remains fresh and vibrant, it’s best to prepare the dressing and candied pecans ahead of time and assemble the salad just before serving.
The combination of textures and flavors in this dish is truly remarkable, and the hint of sweetness from the candied pecans perfectly complements the savory elements, creating a harmonious balance that will delight your taste buds.
Ingredients:
- 2 ripe pears, thinly sliced
- 1/2 cup crumbled Gorgonzola cheese
- 1/2 cup candied pecans
- 6 cups mixed salad greens (such as arugula, spinach, and frisée)
- 1/4 cup red onion, thinly sliced
- 2 tablespoons balsamic vinegar
- 1 tablespoon olive oil
- Salt and freshly ground black pepper to taste
Cooking Instructions:
- Prepare the Candied Pecans: In a small skillet over medium heat, add 1/2 cup of pecans and 2 tablespoons of sugar. Stir continuously until the sugar melts and coats the pecans, about 3-5 minutes. Remove from heat and spread the pecans on parchment paper to cool.
- Make the Dressing: In a small bowl, whisk together 2 tablespoons of balsamic vinegar, 1 tablespoon of olive oil, salt, and freshly ground black pepper. Adjust seasoning according to your taste.
- Assemble the Salad: In a large salad bowl, combine 6 cups of mixed salad greens, thinly sliced red onion, and pear slices. Toss gently to mix.
- Add Toppings: Sprinkle the crumbled Gorgonzola cheese and cooled candied pecans over the salad.
- Dress the Salad: Drizzle the balsamic dressing over the salad just before serving. Toss the salad gently to guarantee even distribution of the dressing.
- Serve: Transfer the salad to a serving platter or individual plates and serve immediately.
Extra Tips:
For the best flavor, use ripe but firm pears so they hold their shape and don’t turn mushy in the salad. If you prefer a milder cheese, you can substitute the Gorgonzola with blue cheese or feta.
To add an extra layer of flavor, consider adding a handful of dried cranberries or sliced apples to the salad. Additionally, if you wish to make this dish vegan, you can omit the cheese or use a plant-based alternative.
Finally, to save time on the day of your Christmas lunch, make the candied pecans a day in advance and store them in an airtight container.
Decadent Chocolate Yule Log

The Decadent Chocolate Yule Log is a classic dessert that adds a touch of elegance to any vegetarian Christmas lunch. Known for its rich chocolate flavor, this dessert is as much a feast for the eyes as it’s for the palate.
The Yule Log, or Bûche de Noël as it’s traditionally called, is a rolled sponge cake filled with a creamy chocolate filling and coated with a luscious chocolate ganache. It’s often decorated to resemble a log, making it a festive centerpiece for your holiday table. Perfect for serving 4-6 people, this dessert is sure to impress your guests with its stunning presentation and melt-in-your-mouth taste.
Creating this showstopper involves crafting a light and fluffy sponge cake, which is then rolled around a smooth and velvety chocolate filling. The exterior is enveloped in a rich ganache, enhancing the chocolate flavor and providing a glossy finish. This dessert requires some attention to detail, but the result is well worth the effort.
Whether you’re a seasoned baker or a novice in the kitchen, following these steps will help you create a Decadent Chocolate Yule Log that’s as delicious as it’s beautiful.
Ingredients (Serves 4-6):
- 4 large eggs, separated
- 100g granulated sugar
- 50g all-purpose flour
- 30g unsweetened cocoa powder
- 1 teaspoon baking powder
- 1/4 teaspoon salt
- 1 teaspoon vanilla extract
- 200ml heavy cream
- 150g dark chocolate, chopped
- 50g unsalted butter
- 150g confectioners’ sugar
- 1 teaspoon instant coffee granules (optional)
- Icing sugar for dusting
- Fresh berries or edible decorations for garnish
Instructions:
- Preheat and Prepare: Preheat your oven to 180°C (350°F). Line a 10×15 inch (25×38 cm) jelly roll pan with parchment paper, making sure it covers the entire base and sides. This will prevent the cake from sticking and ease the rolling process.
- Mix Dry Ingredients: In a bowl, sift together the flour, cocoa powder, baking powder, and salt. This guarantees that the ingredients are well combined and free of lumps.
- Beat Egg Yolks: In a separate large bowl, beat the egg yolks with 50g of the sugar until the mixture is thick, pale, and creamy. Stir in the vanilla extract.
- Whisk Egg Whites: In another clean bowl, whisk the egg whites until soft peaks form. Gradually add the remaining 50g of sugar, continuing to whisk until stiff peaks form.
- Combine Mixtures: Gently fold the dry ingredients into the egg yolk mixture, followed by one-third of the egg whites to lighten the batter. Carefully fold in the remaining egg whites, making sure you maintain as much air as possible for a light sponge.
- Bake the Sponge: Pour the batter into the prepared pan, spreading it evenly. Bake for 10-12 minutes or until the sponge springs back when touched lightly.
- Roll the Cake: While the cake is still warm, place a clean kitchen towel dusted with icing sugar over the sponge and carefully roll it up from the short edge with the towel inside. Allow it to cool completely in this rolled position.
- Prepare Chocolate Filling: Heat 100ml of the heavy cream in a saucepan until it begins to simmer. Remove from heat and add half the chopped chocolate, stirring until the chocolate has melted and the mixture is smooth. Let it cool slightly.
- Fill the Cake: Unroll the cooled sponge and spread the chocolate filling evenly over the surface. Reroll the cake without the towel and set aside.
- Make Chocolate Ganache: Heat the remaining 100ml of cream with the butter until the butter melts. Remove from heat, add the rest of the chopped chocolate and coffee granules, and stir until smooth. Let it cool until slightly thickened.
- Coat the Yule Log: Spread the ganache over the rolled cake, using a spatula to create a bark-like texture. You can use a fork to add additional texture if desired.
- Decorate and Serve: Dust the Yule Log with icing sugar to resemble snow. Garnish with fresh berries or edible decorations to enhance its festive appearance. Chill for at least 30 minutes before serving.
Extra Tips:
When making the sponge cake, it’s essential to fold the egg whites into the batter gently to avoid deflating them, which could result in a dense cake.
If your cake cracks slightly during rolling, don’t worry—this can be concealed with the ganache. For added flavor, consider incorporating a dash of rum or orange zest into the chocolate filling.
Remember to chill the Yule Log before serving to allow the flavors to meld and the ganache to set beautifully. Enjoy the process, and have fun decorating your creation!
