
The festive season is fast approaching, and it’s time to plan a Christmas lunch that will wow your guests. I’ve put together a list of 12 recipes that are perfect for making everyone feel extra special around the table. From a mouthwatering Herb-Roasted Turkey Breast with Cranberry Glaze to a satisfying Vegan Mushroom Wellington, there’s something for every taste. Whether you’re a culinary pro or just starting out, these recipes are easy to follow. Let’s take a look at what’s on the menu.
Herb-Roasted Turkey Breast With Cranberry Glaze
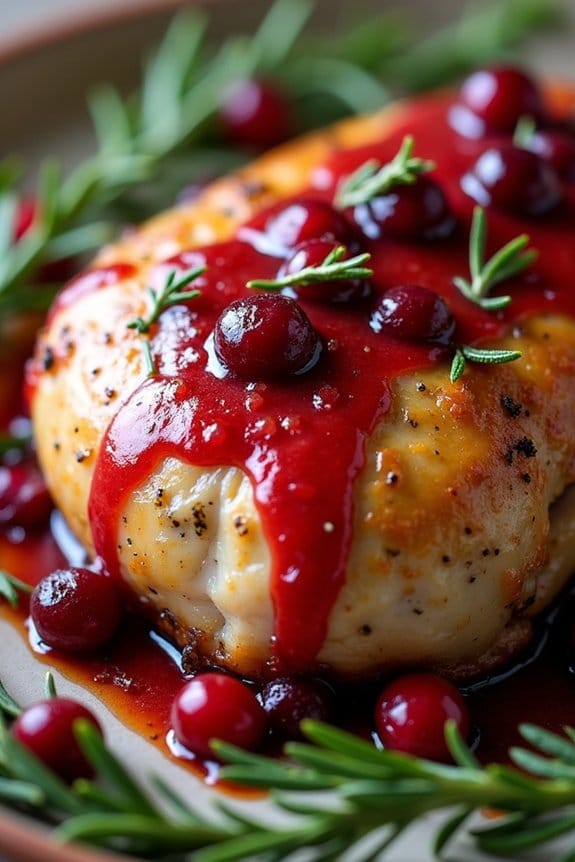
Herb-Roasted Turkey Breast With Cranberry Glaze is a delightful centerpiece for your Christmas lunch. This dish combines tender, juicy turkey breast with the sweet and tangy flavors of a cranberry glaze, all elevated by a medley of aromatic herbs.
It’s not only a feast for the taste buds but also a visually stunning addition to your holiday table. This recipe focuses on simplicity and flavor, allowing you to prepare a festive meal without spending all day in the kitchen.
The herb-roasted turkey breast is seasoned with a blend of fresh herbs and spices, guaranteeing that each bite is infused with flavor. The cranberry glaze adds a vibrant color and a touch of sweetness, perfectly complementing the savory notes of the turkey.
This recipe serves 4-6 people, making it ideal for a small gathering or a cozy family meal. With a few simple ingredients and some careful preparation, you’ll be able to create a dish that’s sure to impress your guests.
Ingredients (Serves 4-6):
- 1 (3-4 pounds) boneless turkey breast
- 2 tablespoons olive oil
- 1 tablespoon fresh rosemary, chopped
- 1 tablespoon fresh thyme, chopped
- 1 tablespoon fresh sage, chopped
- 1 teaspoon garlic powder
- Salt and pepper to taste
- 1 cup fresh cranberries
- 1/2 cup orange juice
- 1/4 cup honey
- 1 teaspoon cornstarch
- 1 tablespoon water
Cooking Instructions:
- Preheat the Oven: Preheat your oven to 375°F (190°C).
- Prepare the Herb Mixture: In a small bowl, combine the olive oil, rosemary, thyme, sage, garlic powder, salt, and pepper. Mix until well combined.
- Season the Turkey: Rub the herb mixture evenly over the entire surface of the turkey breast. Make sure to get the herbs under the skin for maximum flavor.
- Roast the Turkey: Place the seasoned turkey breast on a roasting pan. Roast in the preheated oven for about 1.5 to 2 hours, or until the internal temperature reaches 165°F (74°C).
- Prepare the Cranberry Glaze: While the turkey is roasting, combine the cranberries, orange juice, and honey in a small saucepan. Cook over medium heat until the cranberries begin to pop and break down.
- Thicken the Glaze: In a small bowl, mix the cornstarch with water to create a slurry. Add this to the cranberry mixture and stir until the glaze thickens. Remove from heat and set aside.
- Glaze the Turkey: About 15 minutes before the turkey is done, brush the cranberry glaze over the turkey breast. Return to the oven to finish roasting.
- Rest and Serve: Once cooked, remove the turkey from the oven and let it rest for 10-15 minutes before slicing. Serve with additional cranberry glaze on the side.
Extra Tips:
For the best results, use a meat thermometer to ascertain your turkey breast reaches the perfect temperature without overcooking.
If you prefer a smoother glaze, strain the cranberry mixture before adding the cornstarch slurry. Feel free to adjust the sweetness of the glaze by adding more or less honey to suit your taste.
For a more robust flavor, marinate the turkey breast in the herb mixture for a few hours or overnight, if time permits.
Vegan Mushroom Wellington
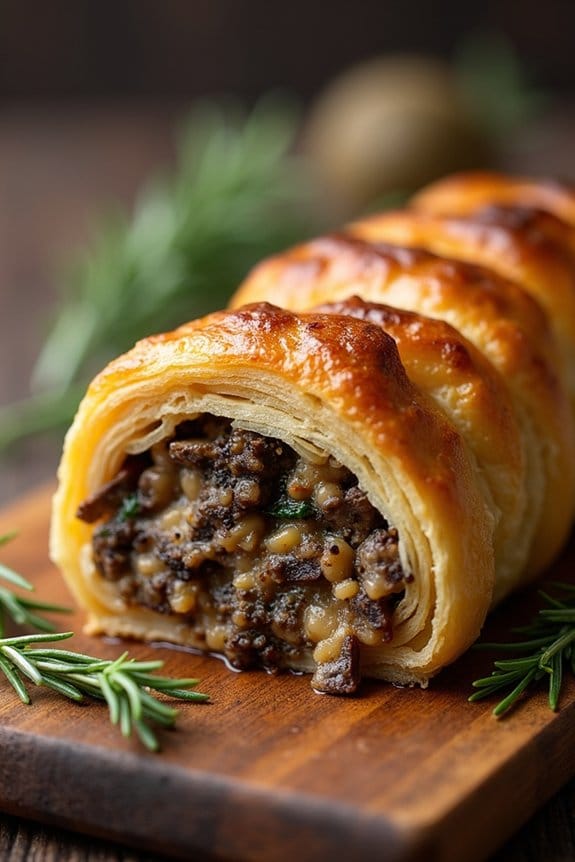
Vegan Mushroom Wellington is a delightful and savory dish perfect for a festive Christmas lunch. This plant-based version of the classic Beef Wellington features a rich and flavorful mushroom duxelles wrapped in flaky puff pastry. The combination of earthy mushrooms, fragrant herbs, and buttery pastry creates a dish that’s both satisfying and impressive, making it a great centerpiece for a holiday gathering.
Not only is it delicious, but it’s also a great option for those who are looking to enjoy a cruelty-free holiday meal. This recipe serves 4-6 people and is sure to please both vegans and non-vegans alike. The preparation involves creating a savory mushroom filling that’s wrapped in a golden, crisp pastry shell.
With careful preparation and a bit of patience, you’ll create a dish that’s not only visually stunning but also bursting with flavor and texture. Whether you’re serving it as the main course or as part of a larger spread, Vegan Mushroom Wellington is sure to be a hit at your Christmas table.
Ingredients (serves 4-6):
- 2 tablespoons olive oil
- 1 onion, finely chopped
- 2 cloves garlic, minced
- 500g (about 1 lb) mixed mushrooms, finely chopped
- 1 tablespoon fresh thyme leaves
- 1 tablespoon fresh rosemary, chopped
- Salt and pepper, to taste
- 2 tablespoons soy sauce
- 100g (about 3.5 oz) walnuts, toasted and chopped
- 1 tablespoon Dijon mustard
- 500g (about 1 lb) vegan puff pastry
- Flour, for dusting
- Almond milk or other plant milk, for brushing
Cooking Instructions:
- Prepare the Mushroom Filling:
- Heat the olive oil in a large pan over medium heat. Add the chopped onion and garlic, and sauté until the onion is translucent.
- Add the finely chopped mushrooms to the pan. Cook for about 10-15 minutes, stirring occasionally, until the mushrooms release their moisture and become golden brown.
- Stir in the thyme, rosemary, salt, and pepper, and cook for another 2 minutes to combine the flavors.
- Add the soy sauce and chopped walnuts to the mushroom mixture. Cook for another 2 minutes, then remove from heat and stir in the Dijon mustard. Allow the mixture to cool.
- Assemble the Wellington:
- Preheat your oven to 200°C (400°F). Line a baking sheet with parchment paper.
- On a lightly floured surface, roll out the vegan puff pastry into a rectangle large enough to encase the mushroom filling.
- Spoon the cooled mushroom mixture onto the center of the pastry, shaping it into a log. Fold the pastry over the filling, sealing the edges by pressing them together. Trim off any excess pastry and place the Wellington seam-side down on the prepared baking sheet.
- Bake the Wellington:
- Brush the top of the Wellington with almond milk to help it brown. Use a sharp knife to score the top lightly, creating a decorative pattern.
- Bake in the preheated oven for 25-30 minutes, or until the pastry is golden brown and crispy.
- Serve:
- Allow the Wellington to cool slightly before slicing. Serve warm, garnished with fresh herbs if desired.
Extra Tips:
To guarantee the best results, make sure the mushroom filling is well-cooked and dry before wrapping it in pastry to prevent sogginess. If you prefer a richer flavor, consider adding a splash of vegan red wine to the mushrooms as they cook.
Allowing the Wellington to rest briefly after baking will make slicing easier and help maintain its structure. Remember, the key to a perfect Wellington is in the wrapping; verify the pastry is sealed properly to avoid any filling leakage during baking.
Honey-Glazed Ham With Pineapple
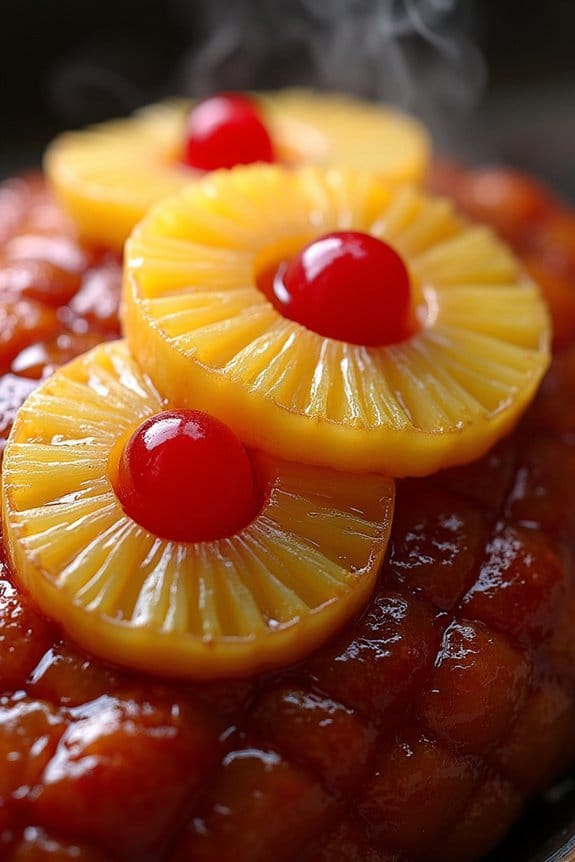
Honey-Glazed Ham With Pineapple is a classic holiday dish that brings a delightful combination of sweet and savory flavors to your Christmas table. This dish pairs the salty richness of ham with the tangy sweetness of pineapple, all enhanced by a sticky honey glaze.
It’s perfect for a festive lunch, offering a warm and hearty meal that will leave your guests satisfied and impressed. The process of preparing Honey-Glazed Ham With Pineapple involves marinating the ham in a flavorful glaze and then baking it to perfection, while the pineapple adds a tropical twist.
This recipe serves 4-6 people, making it ideal for a small gathering of family and friends. The aromatic spices and sweet glaze fill your home with an inviting aroma that perfectly complements the holiday spirit.
Ingredients:
- 1 pre-cooked ham (about 4-5 pounds)
- 1 cup honey
- 1/2 cup brown sugar
- 1/4 cup Dijon mustard
- 1/4 cup apple cider vinegar
- 1/2 teaspoon ground cloves
- 1 can (20 ounces) pineapple slices in juice
- 1/4 cup maraschino cherries (optional)
- Toothpicks
Cooking Instructions:
1. Preheat the Oven: Begin by preheating your oven to 325°F (165°C), ensuring that it’s ready for the ham once prepared.
2. Prepare the Glaze: In a medium saucepan over medium heat, combine the honey, brown sugar, Dijon mustard, apple cider vinegar, and ground cloves. Stir the mixture until the sugar has dissolved and the glaze is smooth.
Allow it to simmer for about 5 minutes, then remove from heat and let it cool slightly.
3. Prepare the Ham: Score the surface of the ham in a diamond pattern using a sharp knife. This helps the glaze to penetrate the ham, adding more flavor. Place the ham in a roasting pan.
4. Apply the Glaze: Pour half of the glaze over the ham, making sure to cover all surfaces. Reserve the remaining glaze for basting during roasting.
5. Add the Pineapple and Cherries: Arrange the pineapple slices over the ham, securing each slice with a toothpick. If using, place a maraschino cherry in the center of each pineapple slice and secure with a toothpick.
6. Roast the Ham: Place the ham in the preheated oven and bake for about 1.5 to 2 hours. Baste the ham with the reserved glaze every 30 minutes to keep it moist and flavorful.
7. Finish and Serve: Once the ham reaches an internal temperature of 140°F (60°C), remove it from the oven. Let it rest for about 10 minutes before slicing and serving with the warm pineapple and cherries.
Extra Tips:
For an even richer flavor, you can marinate the ham in the glaze overnight in the refrigerator. Be sure to bring it to room temperature before baking.
If you prefer a caramelized finish, you can broil the ham for the last 5 minutes of cooking. Keep an eye on it to prevent burning. Additionally, save any leftover glaze to drizzle over the ham when serving, adding an extra burst of flavor to each bite.
Classic Beef Wellington
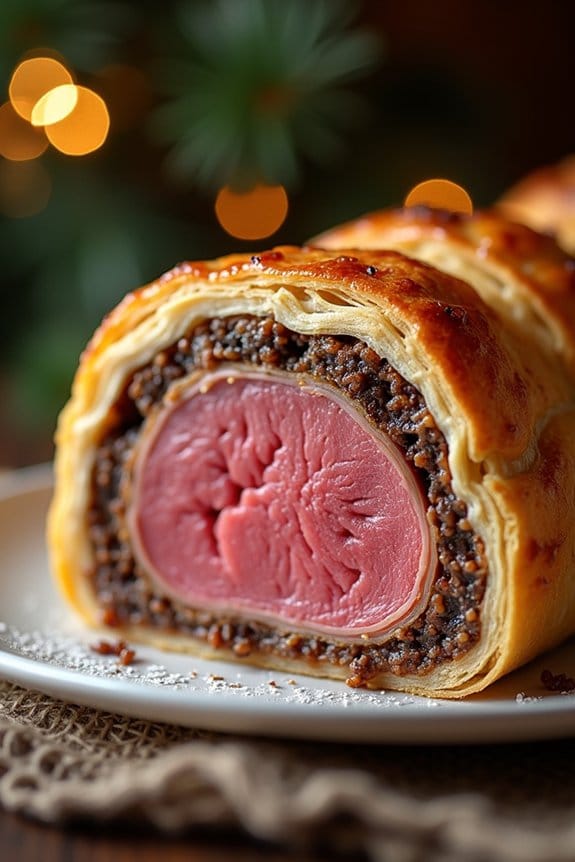
Classic Beef Wellington is a timeless dish that never fails to impress, making it the perfect centerpiece for a festive Christmas lunch. This elegant dish features a tender beef fillet wrapped in a buttery puff pastry, complemented by mushroom duxelles and delicate layers of prosciutto. The combination of flavors and textures is simply exquisite, providing a luxurious treat for the holiday table.
Whether you’re hosting a small family gathering or a larger celebration, Beef Wellington is sure to be a show-stopper that delights your guests and leaves them wanting more.
To create the perfect Beef Wellington, it’s vital to pay attention to each component, from the quality of the beef to the richness of the mushroom filling. The preparation may seem intricate, but by following these detailed steps, you’ll be able to master this classic recipe with ease.
With a little patience and precision, you’ll soon be serving a beautifully golden and flaky Beef Wellington that’s as delicious as it’s visually stunning.
Ingredients for 4-6 servings:
- 2 pounds beef tenderloin, trimmed
- Salt and freshly ground black pepper, to taste
- 2 tablespoons olive oil
- 10 ounces cremini or button mushrooms, finely chopped
- 1 tablespoon unsalted butter
- 2 cloves garlic, minced
- 1 tablespoon fresh thyme leaves
- 12 slices prosciutto
- 2 tablespoons Dijon mustard
- 14 ounces puff pastry (store-bought or homemade)
- 1 egg, beaten (for egg wash)
- Flour, for dusting
Instructions:
1. Prepare the Beef: Season the beef tenderloin generously with salt and pepper. Heat olive oil in a large skillet over high heat. Sear the beef on all sides until well-browned, about 4-5 minutes total. Remove from the skillet and let it cool. Brush the cooled beef with Dijon mustard, then set aside.
2. Make the Mushroom Duxelles: In the same skillet, melt butter over medium heat. Add the finely chopped mushrooms, garlic, and thyme. Cook until the mushrooms release their moisture and become golden brown, about 10 minutes. Season with salt and pepper, then let the mixture cool completely.
3. Wrap with Prosciutto: Lay a large piece of plastic wrap on a flat surface. Arrange the prosciutto slices on the plastic wrap, slightly overlapping, to form a rectangle. Spread the cooled mushroom mixture evenly over the prosciutto. Place the beef at one end of the prosciutto layer, then carefully roll it up using the plastic wrap, making sure the beef is completely covered by the prosciutto and mushrooms.
Twist the ends of the plastic wrap tightly to form a cylinder, then refrigerate for at least 30 minutes.
4. Prepare the Puff Pastry: Roll out the puff pastry on a lightly floured surface to a rectangle large enough to enclose the beef. Remove the beef from the plastic wrap and place it at one end of the pastry. Roll up the beef in the pastry, sealing the edges with a bit of egg wash. Trim any excess pastry and tuck the ends under the roll. Brush the entire pastry with egg wash to guarantee a golden finish.
5. Bake the Wellington: Preheat the oven to 400°F (200°C). Place the wrapped beef on a baking sheet lined with parchment paper. Bake for 25-30 minutes or until the pastry is golden brown and the internal temperature of the beef reaches 125°F (51°C) for medium-rare. Let it rest for 10-15 minutes before slicing.
6. Serve: Slice the Beef Wellington into thick slices and serve immediately, making sure each portion includes the layers of pastry, prosciutto, and beef.
Extra Tips:
To make sure the beef is perfectly cooked, use a meat thermometer to check the internal temperature. For a more intense flavor, you can add a splash of wine or brandy to the mushroom duxelles during cooking.
If you’re using store-bought puff pastry, make certain it’s thawed but still cold to prevent it from becoming sticky. Finally, resting the Wellington after baking is significant, as it allows the juices to redistribute, making sure the beef remains juicy and tender.
Roasted Vegetable Tart With Goat Cheese
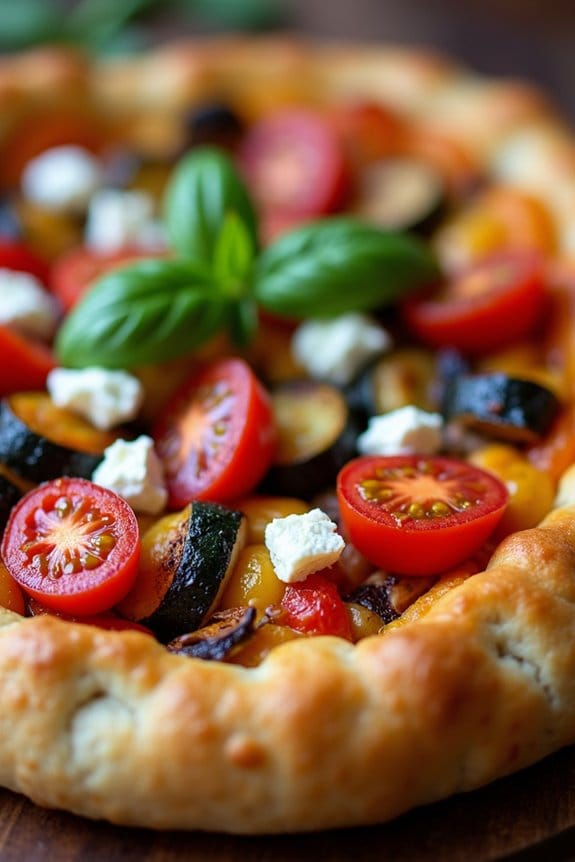
Roasted Vegetable Tart With Goat Cheese is a delightful dish that combines the earthy flavors of roasted vegetables with the creamy tang of goat cheese, all nestled in a flaky pastry crust. It’s an excellent centerpiece for a Christmas lunch, offering a burst of color and flavor that will impress your guests.
This dish isn’t only visually appealing but also packed with nutrients, making it a healthy choice for the festive season.
This tart is versatile and can accommodate various vegetables depending on what’s in season or your personal preference. The combination of roasted bell peppers, zucchini, mushrooms, and cherry tomatoes creates a vibrant and satisfying filling. The goat cheese adds a rich, creamy texture and a subtle tang that complements the sweetness of the roasted vegetables.
Perfect for serving 4-6 people, this dish is sure to become a holiday favorite.
Ingredients for 4-6 servings:
- 1 sheet puff pastry
- 2 tablespoons olive oil
- 1 red bell pepper, sliced
- 1 yellow bell pepper, sliced
- 1 zucchini, sliced
- 1 cup mushrooms, sliced
- 1 cup cherry tomatoes, halved
- 2 cloves garlic, minced
- Salt and pepper to taste
- 4 ounces goat cheese, crumbled
- 2 tablespoons fresh basil, chopped
- 1 egg, beaten (for egg wash)
Cooking Instructions:
- Preheat the Oven: Begin by preheating your oven to 400°F (200°C). This guarantees that your tart will bake evenly and develop a nice, golden crust.
- Prepare the Vegetables: In a large mixing bowl, combine the sliced bell peppers, zucchini, mushrooms, and cherry tomatoes. Add the olive oil, minced garlic, salt, and pepper, then toss to coat the vegetables evenly.
- Roast the Vegetables: Spread the vegetable mixture in a single layer on a baking sheet. Roast in the preheated oven for about 20 minutes, or until the vegetables are slightly tender and caramelized. Remove from the oven and set aside to cool slightly.
- Prepare the Puff Pastry: On a lightly floured surface, roll out the puff pastry to fit a tart pan or a baking sheet. Transfer the pastry to the pan, trimming any excess edges. Prick the bottom with a fork to prevent it from puffing up during baking.
- Assemble the Tart: Spread the roasted vegetables evenly over the puff pastry. Sprinkle the crumbled goat cheese over the top. Brush the edges of the pastry with the beaten egg to give it a glossy finish.
- Bake the Tart: Place the tart in the oven and bake for 20-25 minutes, or until the pastry is golden brown and crisp.
- Garnish and Serve: Once baked, remove the tart from the oven and let it cool slightly. Sprinkle with fresh basil before slicing and serving.
Extra Tips:
For a more robust flavor, consider adding a sprinkle of balsamic glaze over the vegetables before roasting. You can also experiment with different herbs like thyme or rosemary for added depth.
If you have leftover vegetables, they can be stored in the refrigerator and used in a salad or as a topping for bruschetta. Remember that the key to a successful tart is confirming the vegetables are well-roasted and the pastry is crisp, so keep an eye on them as they bake.
Maple-Glazed Root Vegetables

Maple-Glazed Root Vegetables are the perfect side dish for a festive Christmas lunch. This recipe combines the earthy flavors of root vegetables with the sweet richness of maple syrup, creating a harmonious balance that complements any main course. The natural sweetness of the syrup caramelizes the vegetables, giving them a beautiful golden glaze and enhancing their flavors. Not only is this dish delicious, but it’s also incredibly easy to prepare, making it a stress-free addition to your holiday menu.
The beauty of this dish lies in its versatility. You can use any combination of root vegetables you prefer, such as carrots, parsnips, sweet potatoes, and turnips. This recipe serves 4-6 people, making it ideal for a family gathering or a small Christmas party. The key is to cut the vegetables into uniform pieces to guarantee even cooking. With a few simple steps, you can transform basic root vegetables into a stunning and flavorful accompaniment for your Christmas feast.
Ingredients (Serves 4-6):
- 3 large carrots
- 2 parsnips
- 2 sweet potatoes
- 2 turnips
- 3 tablespoons olive oil
- 1/4 cup pure maple syrup
- 1 teaspoon salt
- 1/2 teaspoon black pepper
- 1 teaspoon fresh thyme leaves (optional)
- 1 tablespoon chopped fresh parsley (for garnish)
Cooking Instructions:
- Preheat the Oven: Begin by preheating your oven to 400°F (200°C). This guarantees that the oven is hot enough to properly roast and caramelize the vegetables.
- Prepare the Vegetables: Peel the carrots, parsnips, sweet potatoes, and turnips. Cut them into evenly sized chunks, approximately 1-inch in size, for consistent cooking.
- Season the Vegetables: In a large mixing bowl, combine the chopped vegetables. Drizzle with olive oil, then add salt, pepper, and fresh thyme leaves if using. Toss the vegetables until they’re evenly coated with the oil and seasonings.
- Glaze with Maple Syrup: Add the maple syrup to the bowl and toss again to guarantee each piece is coated with the syrup. This will create the delicious glaze as the vegetables roast.
- Roast the Vegetables: Spread the seasoned and glazed vegetables in a single layer on a large baking sheet. This spacing is important to allow proper air circulation and even roasting. Place the baking sheet in the preheated oven.
- Bake and Turn: Roast the vegetables for about 25-30 minutes. Halfway through the cooking time, use a spatula to turn the vegetables to guarantee they brown evenly on all sides.
- Check for Doneness: The vegetables are done when they’re tender and caramelized. A fork should easily pierce through them. If needed, roast for an additional 5-10 minutes.
- Serve: Once cooked, remove the baking sheet from the oven. Transfer the maple-glazed root vegetables to a serving platter and garnish with chopped fresh parsley for a pop of color and added freshness.
Extra Tips:
To guarantee the best results, make sure not to overcrowd the baking sheet, as this can cause the vegetables to steam instead of roast, preventing them from caramelizing properly. If you have more vegetables than can fit comfortably, consider using two baking sheets.
Additionally, feel free to experiment with different herbs such as rosemary or sage to complement the sweet flavors of the maple syrup. For added depth, you can also sprinkle a pinch of cinnamon or nutmeg over the vegetables before roasting. Enjoy this delightful side dish that captures the essence of the holiday season!
Garlic Mashed Potatoes With Chives

Garlic Mashed Potatoes With Chives is a classic side dish that’s perfect for any Christmas lunch. This creamy, flavorful dish combines the smooth texture of russet potatoes with the aromatic punch of garlic and the fresh, subtle taste of chives.
It’s a comforting addition to your holiday spread, providing a warm and hearty complement to any main course, whether it’s roasted turkey, ham, or a vegetarian option. The dish is easy to prepare and can be made ahead of time, allowing you to focus on other aspects of your festive meal.
The key to making perfect Garlic Mashed Potatoes With Chives lies in balancing the flavors and achieving the right consistency. The garlic should be roasted to bring out its sweetness, which blends beautifully with the buttery potatoes.
Meanwhile, the chives offer a hint of onion-like flavor without overpowering the dish. Using a combination of milk and butter guarantees the potatoes are creamy and smooth, making them irresistible to anyone at the table. This recipe serves 4-6 people, making it an ideal choice for a family gathering or a small holiday party.
Ingredients
- 2 pounds russet potatoes, peeled and cubed
- 4 cloves garlic, peeled
- 1/2 cup unsalted butter, divided
- 1/2 cup whole milk
- Salt and pepper to taste
- 1/4 cup chopped fresh chives
Cooking Instructions
- Prepare the Potatoes and Garlic: Begin by placing the peeled and cubed potatoes in a large pot. Add the peeled garlic cloves and cover them with cold water. Bring the pot to a boil over medium-high heat, then reduce to a simmer. Cook for about 15-20 minutes, or until the potatoes are fork-tender.
- Drain and Mash: Once the potatoes and garlic are cooked, drain them thoroughly in a colander. Return the potatoes and garlic to the pot, allowing any excess moisture to evaporate.
- Add Butter and Milk: Add 1/4 cup of butter to the hot potatoes. Begin mashing with a potato masher or ricer until the mixture is mostly smooth. Gradually add the milk, continuing to mash until the desired creamy consistency is achieved.
- Season and Flavor: Season the mashed potatoes with salt and pepper to taste. Stir in the remaining 1/4 cup of butter and mix until well incorporated. Fold in the chopped chives, reserving a small amount for garnish, if desired.
- Serve: Transfer the mashed potatoes to a serving dish. Garnish with the reserved chives and serve hot alongside your main course.
Extra Tips
For an even richer flavor, consider using half-and-half or cream instead of whole milk. If you prefer a chunkier texture, mash the potatoes less thoroughly.
When boiling the potatoes, start them in cold water to guarantee even cooking. Roasting the garlic beforehand can also enhance its flavor, adding a sweet and mellow taste to the dish.
If the mashed potatoes need reheating, do so gently over low heat, adding a splash of milk to maintain their creaminess.
Spinach and Ricotta Stuffed Shells

Spinach and Ricotta Stuffed Shells are a delightful and hearty dish perfect for a festive Christmas lunch. This Italian-inspired recipe combines creamy ricotta cheese, nutritious spinach, and a blend of savory herbs stuffed into pasta shells and baked with a rich tomato sauce.
It’s a comforting meal that not only pleases the palate but also adds a touch of elegance to your holiday table. The combination of flavors and textures in this dish offers a satisfying balance, making it a wonderful main course for vegetarians and meat-eaters alike.
This recipe serves 4-6 people and is ideal for sharing with family and friends during the holiday season. The preparation process involves a few simple steps to create a delicious and memorable meal. With a little bit of effort, you can bring a taste of Italy to your Christmas lunch, delighting your guests with a warm and flavorful dish.
Let’s explore the ingredients and steps needed to make this crowd-pleaser.
Ingredients:
- 20-24 large pasta shells
- 2 tablespoons olive oil
- 1 onion, finely chopped
- 2 cloves garlic, minced
- 10 ounces fresh spinach
- 1 cup ricotta cheese
- 1 cup shredded mozzarella cheese
- 1/2 cup grated Parmesan cheese
- 1 egg
- 1 teaspoon dried oregano
- 1 teaspoon dried basil
- Salt and pepper to taste
- 3 cups marinara sauce
- Fresh basil leaves for garnish (optional)
Instructions:
- Cook the Pasta Shells: In a large pot of salted boiling water, cook the pasta shells until al dente, according to package instructions. Drain and set aside to cool slightly.
- Prepare the Filling: In a large skillet, heat olive oil over medium heat. Add the chopped onion and minced garlic, sautéing until the onion becomes translucent. Add the fresh spinach and cook until wilted. Remove from heat and let it cool slightly.
- Mix the Cheese Filling: In a large mixing bowl, combine the ricotta cheese, half of the mozzarella, half of the Parmesan, the egg, dried oregano, dried basil, and the sautéed spinach mixture. Stir well until all ingredients are fully incorporated. Season with salt and pepper to taste.
- Stuff the Shells: Preheat your oven to 375°F (190°C). Spread 1 cup of marinara sauce over the bottom of a 9×13-inch baking dish. Fill each cooked pasta shell with a generous spoonful of the ricotta-spinach mixture and arrange them in the baking dish.
- Assemble the Dish: Pour the remaining marinara sauce over the stuffed shells, ensuring they’re well-covered. Sprinkle the remaining mozzarella and Parmesan cheese over the top.
- Bake: Cover the dish with aluminum foil and bake in the preheated oven for 25 minutes. Remove the foil and bake for an additional 10-15 minutes until the cheese is golden brown and bubbly.
- Serve: Remove from the oven and let it rest for a few minutes before serving. Garnish with fresh basil leaves if desired.
Extra Tips:
For best results, make sure to cook the pasta shells just until al dente, as they’ll continue to cook in the oven. If you’re short on time, you can prepare the filling a day in advance and keep it refrigerated until you’re ready to assemble the dish.
When selecting ricotta cheese, opt for a good-quality, creamy version for the best flavor and texture. Finally, feel free to customize the filling by adding ingredients such as sautéed mushrooms or roasted red peppers for additional depth of flavor.
Lemon and Herb Roasted Salmon
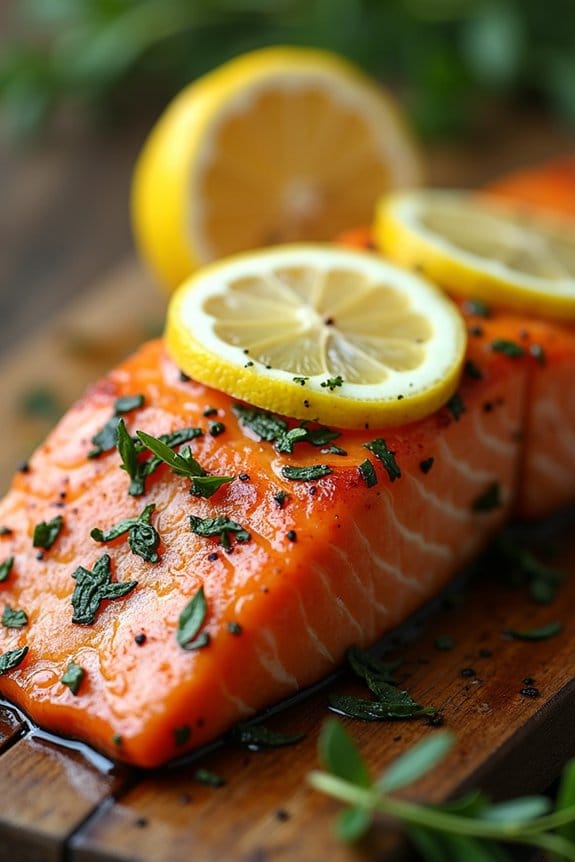
Lemon and Herb Roasted Salmon is a delightful centerpiece for your Christmas lunch, offering a fresh and flavorful alternative to traditional holiday meats. This dish combines the rich, buttery texture of salmon with the bright and zesty flavors of lemon and a fragrant blend of herbs. The result is a succulent, aromatic entrée that’s sure to impress your guests while being relatively easy to prepare.
Perfect for a festive meal, this recipe highlights the natural flavors of the salmon, allowing the lemon and herbs to enhance rather than overpower the dish.
In addition to its exquisite taste, Lemon and Herb Roasted Salmon is also a healthy choice for your Christmas feast. Salmon is packed with omega-3 fatty acids, protein, and essential nutrients. This recipe pairs beautifully with a variety of sides, such as roasted vegetables or a fresh green salad, to create a well-rounded and satisfying meal.
Whether you’re a seasoned cook or a culinary novice, this recipe is straightforward enough to guarantee a stress-free holiday cooking experience.
Ingredients (serves 4-6 people):
- 2 pounds (approximately 1 kg) salmon fillet, skin-on
- 1 large lemon, thinly sliced
- 4 cloves garlic, minced
- 3 tablespoons olive oil
- 1 tablespoon fresh dill, chopped
- 1 tablespoon fresh parsley, chopped
- 1 tablespoon fresh thyme, chopped
- Salt and pepper to taste
- Lemon wedges, for serving
Cooking Instructions:
- Preheat the Oven: Start by preheating your oven to 400°F (200°C). This guarantees that the salmon cooks evenly and gets a nice crisp on the outside.
- Prepare the Salmon: Place the salmon fillet on a large, rimmed baking sheet lined with parchment paper. Pat the salmon dry with paper towels to remove excess moisture, which will help the skin crisp up.
- Season the Salmon: In a small bowl, combine the minced garlic, olive oil, dill, parsley, thyme, salt, and pepper. Mix until well combined. Rub this herb mixture evenly over the top of the salmon fillet, making sure to cover it generously.
- Add Lemon Slices: Arrange the thin lemon slices over the top of the salmon. The lemon not only adds flavor but also keeps the fish moist during roasting.
- Roast the Salmon: Place the baking sheet in the preheated oven and roast the salmon for about 15-20 minutes, or until the salmon is opaque and flakes easily with a fork. Cooking time may vary slightly depending on the thickness of the fillet.
- Serve: Remove the salmon from the oven and let it rest for a few minutes. Transfer the salmon to a serving platter and garnish with additional lemon wedges. Serve immediately with your choice of sides.
Extra Tips:
To enhance the flavor even further, consider marinating the salmon in the herb mixture for up to an hour before cooking. This allows the flavors to penetrate the fish more deeply.
If you prefer a bit of a kick, add a pinch of red pepper flakes to the herb mixture for some heat. Additionally, be mindful not to overcook the salmon, as it can become dry. Keep an eye on the cooking time, and remember that the fish will continue to cook slightly after being removed from the oven.
Enjoy your festive and flavorful Lemon and Herb Roasted Salmon!
Gluten-Free Stuffing With Sausage and Apples
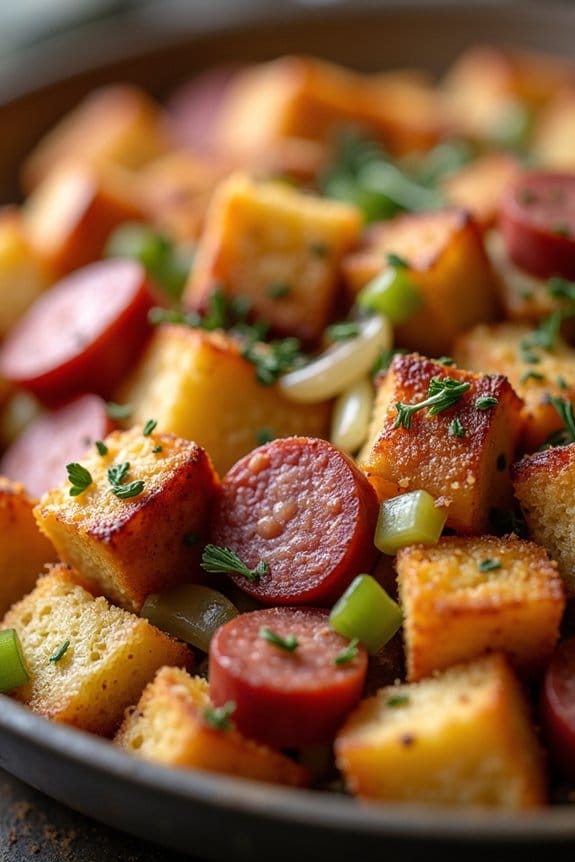
Gluten-Free Stuffing With Sausage and Apples is a delicious and hearty dish that’s perfect for your Christmas lunch. This stuffing combines the savory flavors of sausage with the sweet and tart taste of apples, creating a balance of flavors that will delight your guests.
It’s made using gluten-free bread, ensuring that even those with dietary restrictions can enjoy this traditional holiday favorite. The dish is aromatic and flavorful, thanks to the inclusion of herbs and spices that give it a seasonal touch.
Whether you’re preparing a feast for a large family or a more intimate gathering, this gluten-free stuffing is sure to be a highlight of your meal. It’s simple to make and can be prepared in advance, allowing you to focus on other aspects of your holiday celebration.
The combination of textures, from the crunchy bread to the juicy apples and savory sausage, makes every bite an experience to savor. This recipe serves 4-6 people, making it ideal for a small to medium-sized gathering.
Ingredients:
- 8 cups gluten-free bread cubes
- 1 pound gluten-free sausage, casings removed
- 2 large apples, cored and diced
- 1 large onion, chopped
- 2 celery stalks, chopped
- 2 cloves garlic, minced
- 1/2 cup chicken or vegetable broth
- 2 tablespoons unsalted butter
- 1 teaspoon dried sage
- 1 teaspoon dried thyme
- 1/2 teaspoon salt
- 1/4 teaspoon black pepper
Instructions:
- Preheat the Oven: Start by preheating your oven to 350°F (175°C). Lightly grease a baking dish and set it aside.
- Prepare the Bread Cubes: Spread the gluten-free bread cubes on a baking sheet and toast in the preheated oven for about 10 minutes or until they’re dry and slightly golden. Remove from the oven and let them cool.
- Cook the Sausage: In a large skillet over medium heat, cook the sausage until it’s browned and cooked through, breaking it into smaller pieces with a wooden spoon. Once done, remove the sausage from the skillet and set it aside.
- Sauté Vegetables and Apples: In the same skillet, melt the butter over medium heat. Add the chopped onion, celery, and garlic, and sauté until the vegetables are soft, about 5 minutes. Stir in the diced apples and cook for an additional 3-4 minutes until the apples are slightly tender.
- Combine Ingredients: In a large mixing bowl, combine the toasted bread cubes, cooked sausage, and the sautéed vegetable and apple mixture. Add the dried sage, thyme, salt, and black pepper. Pour the chicken or vegetable broth over the mixture and gently toss until everything is well combined. The mixture should be moist but not soggy.
- Bake the Stuffing: Transfer the stuffing mixture to the prepared baking dish. Cover with foil and bake in the preheated oven for 25 minutes. Remove the foil and bake for an additional 10-15 minutes or until the top is golden brown.
- Serve: Remove the stuffing from the oven and let it cool for a few minutes before serving. Enjoy your Gluten-Free Stuffing With Sausage and Apples as a savory side dish to your Christmas meal.
Extra Tips: When selecting gluten-free bread, opt for a variety that’s sturdy and can hold up well during baking to avoid a mushy texture. You can prepare the bread cubes and sausage a day ahead to save time on the day of your gathering.
If you prefer a vegetarian version, simply omit the sausage and use a vegetable-based sausage alternative. Adjust the seasoning to taste, and feel free to add nuts or cranberries for an extra festive touch.
Cranberry and Pecan Wild Rice Pilaf

Cranberry and Pecan Wild Rice Pilaf is a delightful and festive side dish that’s perfect for a Christmas lunch. This dish combines the nutty flavor of wild rice with the sweet and tart taste of cranberries, and the rich, buttery crunch of pecans.
The pilaf isn’t only delicious but also visually appealing, with its vibrant colors and contrasting textures. It’s a dish that can stand on its own or complement a variety of main courses, making it a versatile addition to your holiday table.
Preparing this pilaf is relatively simple, yet it delivers complex flavors that are sure to impress your guests. The wild rice is cooked to perfection, absorbing the flavors of broth and aromatic herbs, while the cranberries and pecans add layers of taste and texture.
This recipe serves 4-6 people, making it ideal for a family gathering or a festive celebration.
Ingredients for 4-6 servings:
- 1 cup wild rice
- 2 cups vegetable broth or chicken broth
- 1/2 cup dried cranberries
- 1/2 cup chopped pecans
- 1 small onion, finely chopped
- 2 cloves garlic, minced
- 2 tablespoons olive oil
- 1 tablespoon butter
- 1 tablespoon fresh thyme leaves (or 1 teaspoon dried thyme)
- Salt and pepper to taste
- 2 tablespoons chopped fresh parsley
Cooking Instructions:
- Prepare the Rice: Rinse the wild rice under cold water to remove any excess starch. In a medium saucepan, combine the wild rice with the vegetable or chicken broth. Bring to a boil, then reduce the heat to low, cover, and simmer for about 45-50 minutes or until the rice is tender and has absorbed most of the liquid.
- Sauté Aromatics: While the rice is cooking, heat olive oil and butter in a large skillet over medium heat. Add the chopped onion and sauté until it becomes translucent, approximately 5 minutes. Stir in the minced garlic and cook for an additional minute until fragrant.
- Add Cranberries and Pecans: Add the dried cranberries and chopped pecans to the skillet, stirring them into the onion and garlic mixture. Cook for 2-3 minutes, allowing the cranberries to plump up and the pecans to become slightly toasted.
- Combine and Season: Once the rice is cooked, add it to the skillet with the cranberry and pecan mixture. Stir in the fresh thyme leaves and season with salt and pepper to taste. Cook everything together for another 2-3 minutes, allowing the flavors to meld.
- Finish the Dish: Remove the skillet from the heat and stir in the chopped fresh parsley. Taste and adjust seasoning if necessary. Transfer the pilaf to a serving dish and serve warm.
Extra Tips:
For an even richer flavor, consider toasting the pecans in a dry skillet before adding them to the dish. This will enhance their nuttiness.
If you prefer a sweeter touch, you can soak the cranberries in a bit of orange juice before adding them to the skillet. This will add a subtle citrusy sweetness to the pilaf.
Additionally, if you’re using a broth with high sodium content, adjust the salt accordingly to avoid over-seasoning.
Enjoy your festive Cranberry and Pecan Wild Rice Pilaf!
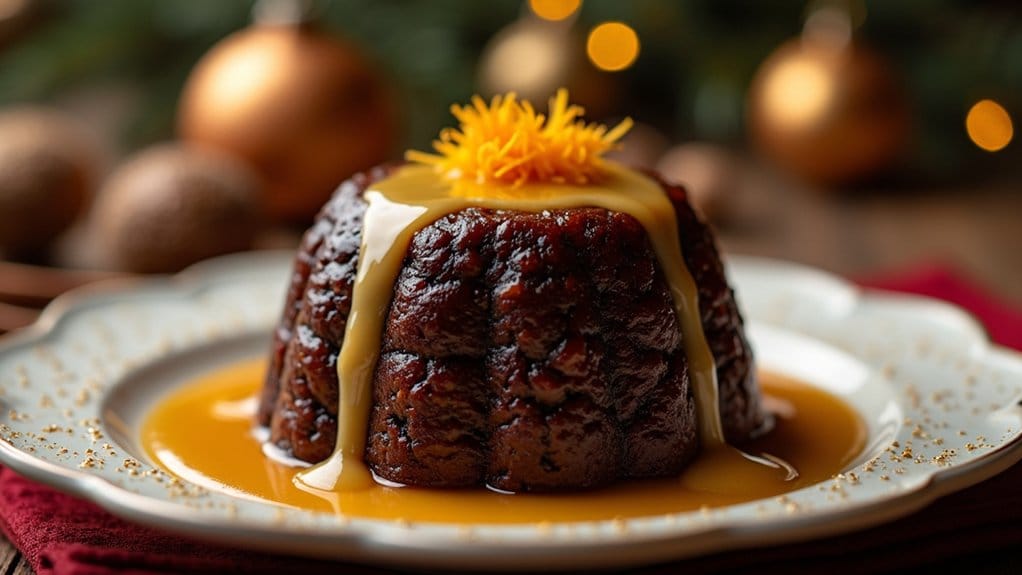
Traditional Christmas Pudding With Brandy Sauce
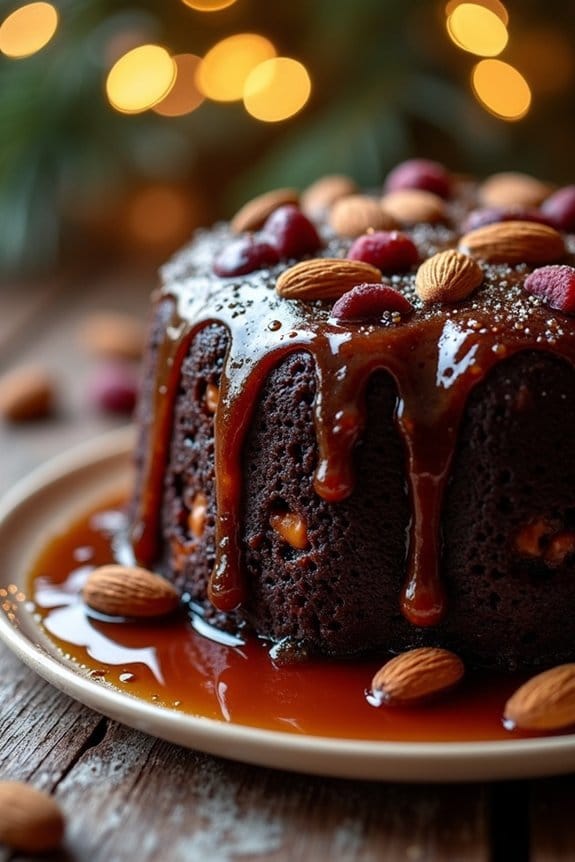
Christmas pudding is a classic holiday dessert that has been enjoyed for centuries. This rich, dense, and fruity pudding is packed with a variety of dried fruits, nuts, and spices, all tied together with the deep flavors of molasses and brandy. Traditionally made well in advance of Christmas Day to allow the flavors to mature, this pudding is a guaranteed way to bring festive warmth to your holiday table.
Paired with a smooth and decadent brandy sauce, this dish is a delightful end to any Christmas meal.
The process of making a traditional Christmas pudding is a labor of love that involves steaming the pudding for several hours. This might seem intimidating at first, but the end result is truly worth the effort. The pudding is best made in advance, allowing the flavors to develop and intensify over time.
Once ready, the pudding is served warm, drizzled with a luscious brandy sauce that adds a luxurious touch. Gather your family and friends and enjoy this timeless treat that captures the essence of Christmas.
Ingredients (Serves 4-6):
*For the Christmas Pudding:*
- 150g raisins
- 150g sultanas
- 100g currants
- 50g mixed peel
- 1 small apple, peeled, cored, and grated
- 100g suet (or vegetarian suet)
- 100g fresh breadcrumbs
- 75g plain flour
- 100g brown sugar
- 1 tsp mixed spice
- ½ tsp ground cinnamon
- ¼ tsp ground nutmeg
- 50g chopped almonds
- 2 large eggs
- 1 tbsp black treacle
- Zest of 1 orange
- 150ml brandy (plus extra for soaking)
- Butter (for greasing)
For the Brandy Sauce:
- 50g butter
- 50g plain flour
- 500ml milk
- 50g caster sugar
- 4 tbsp brandy
Cooking Instructions:
- Prepare the Fruit Mix: In a large bowl, combine the raisins, sultanas, currants, and mixed peel. Pour over enough brandy to cover the fruits and let them soak overnight. This will guarantee the fruit is plump and flavorful.
- Mix the Dry Ingredients: In another bowl, mix together the breadcrumbs, flour, brown sugar, mixed spice, cinnamon, nutmeg, and chopped almonds.
- Combine Ingredients: Add the grated apple, suet, and orange zest to the dry ingredients. Stir in the soaked fruit along with any remaining brandy. Mix well to combine.
- Add Wet Ingredients: Beat the eggs in a small bowl and add them to the mixture along with the black treacle. Stir until everything is thoroughly mixed.
- Prepare the Pudding Basin: Grease a 1.2-liter pudding basin with butter. Spoon the pudding mixture into the basin, pressing down firmly. Cover with a double layer of greaseproof paper and a layer of foil, securing it with string.
- Steam the Pudding: Place the pudding basin in a large saucepan. Fill the pan with water to reach halfway up the sides of the basin. Cover the pan and simmer gently for 6 hours, checking the water level occasionally and topping up as necessary.
- Make the Brandy Sauce: While the pudding is steaming, melt the butter in a saucepan over medium heat. Stir in the flour and cook for 1-2 minutes. Gradually whisk in the milk until smooth, then add the sugar and continue to stir until the sauce thickens. Remove from heat and stir in the brandy.
- Serve the Pudding: Once steamed, let the pudding cool slightly before turning it out onto a serving plate. Serve warm with a generous drizzle of brandy sauce.
Extra Tips:
For the best flavor, make the pudding several weeks in advance and store it in a cool, dry place. You can occasionally feed it with brandy to keep it moist and enhance the flavors.
Reheat the pudding by steaming it for about 1-2 hours before serving. If you prefer a non-alcoholic version, substitute the brandy with orange juice.
When serving, you can also flambé the pudding by gently heating a little brandy, pouring it over the top, and igniting it for a spectacular presentation.
