
The holiday season is the perfect time to sprinkle a little extra joy into lunch with adorable, festive recipes for kids. Picture your little ones’ faces lighting up as they see a snowman-shaped pizza or a reindeer sandwich on their plates. These meals are more than just tasty treats; they’re about creating cherished memories together. Want to make lunchtime feel like a holiday celebration everyone will love? Let’s explore these delightful recipes.
Reindeer Sandwiches
Reindeer Sandwiches are a delightful and festive way to bring the holiday spirit to your kids’ lunchboxes. These sandwiches aren’t only adorable but also nutritious, making them a perfect midday meal during the Christmas season. With a combination of whole-grain bread, healthy spreads, and fun toppings, these sandwiches will be a hit with the little ones.
Plus, they’re easy to make, so you can even get the kids involved in the preparation process.
These sandwiches are crafted to resemble reindeer faces, complete with pretzel antlers and an olive nose. The ingredients are simple, yet they come together to create a whimsical meal that will brighten any child’s day. With this recipe, you’ll be able to make enough Reindeer Sandwiches to serve 4-6 people, making it perfect for a small gathering or a family lunch.
Ingredients for 4-6 Servings:
- 8-12 slices of whole-grain bread
- 1 cup of cream cheese or peanut butter
- 1/2 cup of strawberry or raspberry jam
- 12-18 small pretzel twists
- 12-18 black olives
- 12-18 small cherry tomatoes or red grapes
- 12-18 candy eyes or sliced black olives for eyes
Cooking Instructions:
- Prepare the Base: Begin by laying out the slices of whole-grain bread. If the bread is too thick, you may trim the edges to make the sandwiches easier to shape and eat.
- Spread the Filling: On half of the bread slices, spread a generous layer of cream cheese or peanut butter. Next, add a thin layer of strawberry or raspberry jam on top of the spread to add a sweet contrast.
- Assemble the Sandwiches: Place the remaining slices of bread on top to create full sandwiches. Press them gently to guarantee they stick together but be careful not to squeeze out the filling.
- Cut into Shapes: Using a large cookie cutter or a sharp knife, carefully cut each sandwich into a circle. This will serve as the reindeer’s face.
- Add the Antlers: Break the pretzel twists into halves and insert them into the top of the sandwich to create the antlers. Confirm they’re secure but not too deeply inserted.
- Decorate the Face: Place a black olive or cherry tomato at the bottom center of each sandwich to form the nose. Add candy eyes or small slices of black olives above the nose to create the eyes.
- Serve and Enjoy: Arrange the Reindeer Sandwiches on a festive platter and serve them to your kids for a fun and healthy Christmas lunch.
Extra Tips:
To make the Reindeer Sandwiches even more fun, consider using different spreads like almond butter or hazelnut spread to cater to your kids’ tastes. You can also experiment with different types of bread, such as rye or sourdough, for added flavor.
If you’re planning to make these sandwiches in advance, keep the sandwich bases in the refrigerator and add the decorative elements just before serving to keep them fresh and crisp.
Finally, involve your kids in the process by letting them add the antlers and facial features; it’s a great way to make them more enthusiastic about eating their lunch!
Snowman-Shaped Pizzas

Snowman-Shaped Pizzas are a delightful and festive treat that will bring joy to your children’s lunchtime during the holiday season. These adorable and edible snowmen aren’t only fun to make but also delicious to eat. The combination of homemade or store-bought pizza dough, fresh tomato sauce, gooey mozzarella cheese, and your choice of toppings offers a creative twist on traditional pizza that kids will love.
Plus, the snowman shape adds an element of whimsy and excitement to mealtime. Creating Snowman-Shaped Pizzas is an engaging activity that you can enjoy with your little ones. The process is simple enough for kids to participate in, allowing them to decorate their snowmen with their favorite toppings.
This recipe is perfect for a family lunch or a fun holiday gathering with friends. With a serving size that accommodates 4-6 people, you’ll have enough snowmen to go around, making it a perfect centerpiece for your Christmas lunch table.
Ingredients (for 4-6 people):
- 2 lb pizza dough (homemade or store-bought)
- 1 cup tomato sauce
- 2 cups shredded mozzarella cheese
- Pepperoni slices
- Black olives
- Red bell pepper
- Green bell pepper
- Olive oil
- Dried oregano
- Cornmeal (for dusting)
Instructions:
- Prepare the Dough: Preheat your oven to 425°F (220°C). Divide the pizza dough into 4-6 equal portions. Dust a clean surface with cornmeal and roll each portion into three different-sized circles (small, medium, and large) to form the body of the snowman.
- Assemble the Snowmen: On a baking sheet lined with parchment paper, place the large circle at the bottom, the medium on top of it, and the smallest circle on top to create the snowman shape. Gently press the edges where the circles meet to adhere them together.
- Add the Sauce and Cheese: Spread a thin layer of tomato sauce over each snowman, leaving a little border around the edges. Sprinkle shredded mozzarella cheese generously over the sauce.
- Decorate the Snowmen: Use pepperoni slices for buttons and a mouth, black olives for eyes, and cut pieces of red bell pepper for a nose. Use slices of green bell pepper to create a scarf or hat for your snowman. Get creative with your arrangements!
- Bake the Pizzas: Drizzle a little olive oil over the pizzas and sprinkle with dried oregano. Bake in the preheated oven for 12-15 minutes, or until the crust is golden brown and the cheese is bubbly and melted.
- Cool and Serve: Once cooked, remove the pizzas from the oven and let them cool slightly before serving. This will help prevent any burning from the hot cheese.
Extra Tips:
When shaping the dough, make sure the circles aren’t too thick to guarantee even cooking. If you prefer, you can use pre-made pizza bases and cut them into the required shapes.
Feel free to get creative with the toppings; try using different vegetables or meats to suit your children’s tastes. It’s also a great opportunity to introduce them to new flavors and ingredients.
Remember to have fun with the process and encourage the kids to design their own snowman faces, adding a personal touch to their meal.
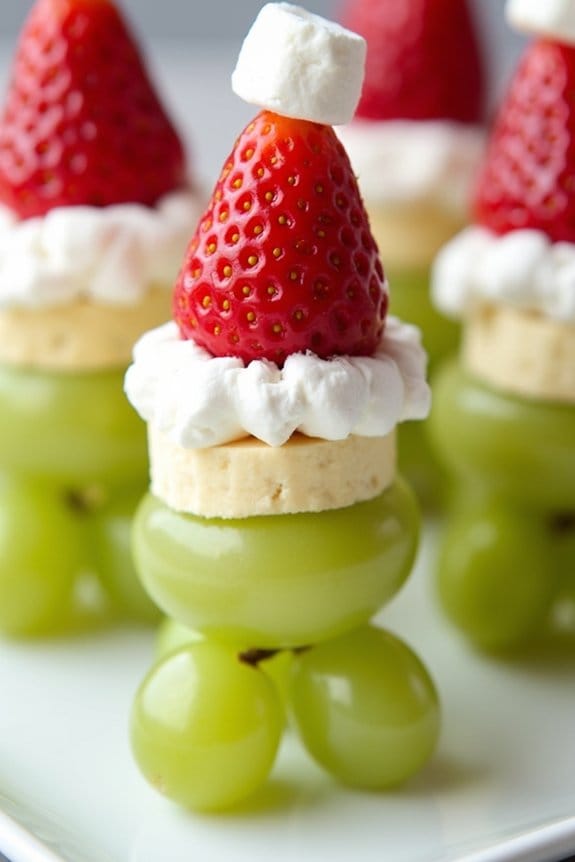
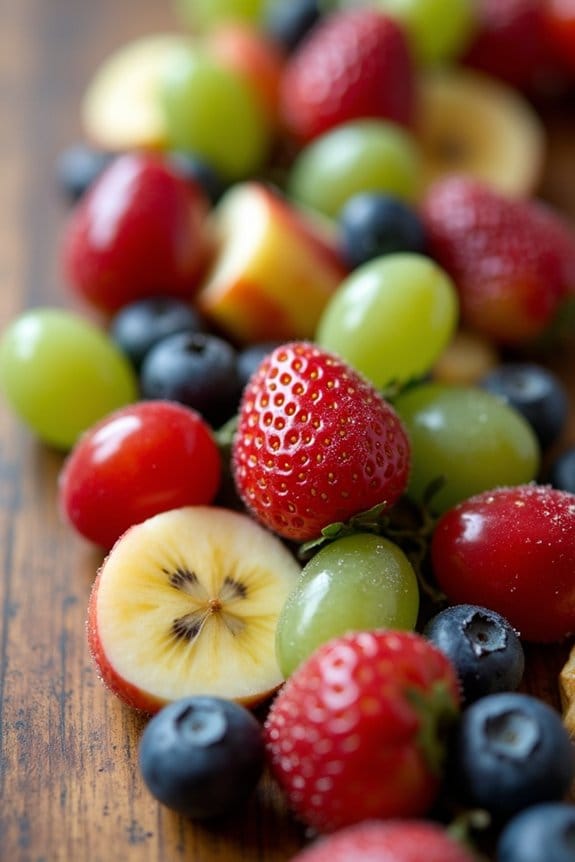
Santa Hat Fruit Cones
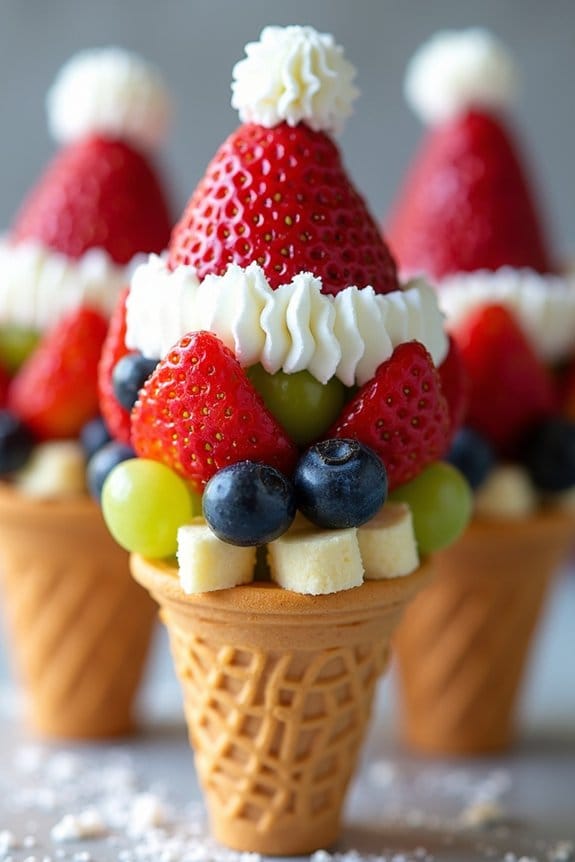
Looking to add a touch of festive fun to your child’s lunch? Santa Hat Fruit Cones are an adorable and healthy addition that will surely delight kids of all ages. This recipe combines the natural sweetness of fruits with a playful presentation, making it a perfect holiday treat. The vibrant colors of the fruits resemble Santa’s iconic hat, bringing a cheerful vibe to any Christmas gathering or lunchtime spread.
In addition to being visually appealing, these Santa Hat Fruit Cones are also quick and easy to make. With just a few simple ingredients, you can whip up this dish in no time, providing a nutritious snack that’s both fun and festive. Ideal for serving 4-6 people, this recipe is perfect for playdates, family gatherings, or as a surprise in your child’s lunchbox.
Let’s plunge into the ingredients and steps needed to create these delightful fruit cones.
Ingredients for 4-6 servings:
- 4-6 waffle cones
- 1 cup strawberries, hulled and sliced
- 1 cup banana slices
- 1 cup green grapes
- 1 cup blueberries
- 1 cup mini marshmallows
- 1 cup whipped cream
Instructions:
- Prepare the Fruits: Wash all the fruits thoroughly. Hull and slice the strawberries, slice the bananas, and keep the grapes and blueberries whole. This will guarantee that the fruits are ready to be assembled quickly.
- Fill the Cones: Take the waffle cones and start filling them with a mix of the prepared fruits. Begin with a layer of banana slices at the bottom to provide a stable base.
- Add the Red Santa Hat Layer: Arrange the strawberry slices on top of the bananas, ensuring they form a conical shape resembling Santa’s hat.
- Garnish with Blueberries and Grapes: Add a few blueberries and grapes around the strawberries to add a burst of color and flavor.
- Finish with Marshmallows: Place a mini marshmallow at the tip of the strawberry cone to mimic the pom-pom of Santa’s hat.
- Top with Whipped Cream: Add a dollop of whipped cream around the base of the strawberry layer to resemble the white fur trim of Santa’s hat.
Extra Tips:
To keep the bananas from browning, you can lightly brush them with lemon juice before assembling the cones. This will help maintain their freshness and appearance.
When selecting fruits, opt for the ripest and most vibrant ones to enhance both the taste and visual appeal. If you want to make this treat more indulgent, consider drizzling a bit of chocolate sauce over the fruits before adding the whipped cream.
Finally, these fruit cones are best served immediately to maintain their crispness and freshness. Enjoy creating this festive treat with your little ones and watch their faces light up with joy!
Christmas Tree Quesadillas
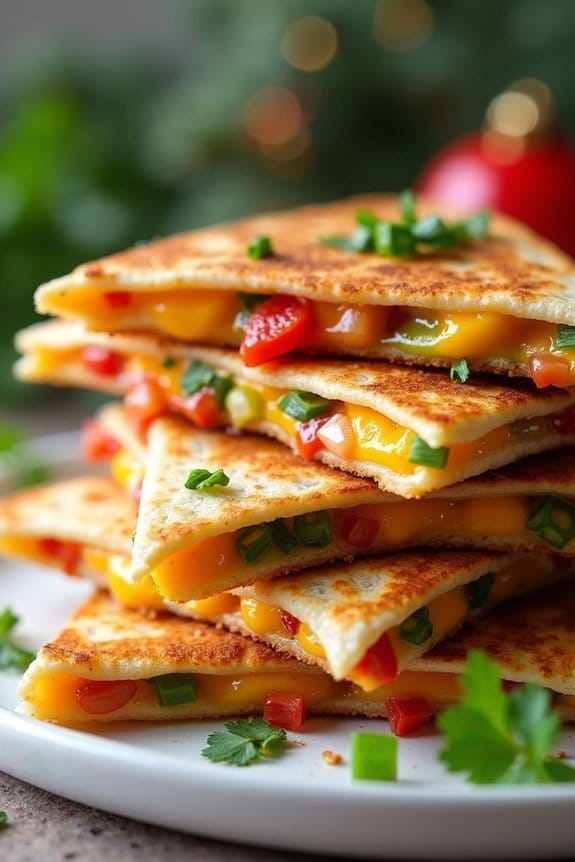
Add a festive twist to your holiday table with these delightful Christmas Tree Quesadillas! Perfect for kids and the young at heart, these quesadillas aren’t only adorable but also delicious and easy to make.
Whether you’re hosting a festive lunch or just looking for a fun way to get children excited about their food, these Christmas Tree Quesadillas are sure to be a hit. The quesadillas are shaped like Christmas trees, filled with a cheesy and flavorful mixture that will have kids reaching for seconds.
The vibrant colors of the ingredients mimic the look of a decorated Christmas tree, adding a touch of whimsy to the meal. Plus, they’re simple enough that kids can help with the preparation, making it a fun holiday activity for the entire family.
Ingredients (Serves 4-6):
- 6 large flour tortillas
- 2 cups shredded mozzarella cheese
- 1 cup shredded cheddar cheese
- 1 cup cooked and shredded chicken (optional)
- 1/2 cup chopped bell peppers (green and red)
- 1/2 cup chopped green onions
- 1/4 cup chopped cilantro
- Sour cream, for serving
- Salsa, for serving
- Olive oil or non-stick cooking spray
Instructions:
- Preheat and Prepare: Preheat your oven to 350°F (175°C). Line a baking sheet with parchment paper or lightly grease it with olive oil or non-stick cooking spray.
- Cut the Tortillas: Using cookie cutters or a sharp knife, cut each tortilla into the shape of a Christmas tree. Aim to get 2-3 trees out of each tortilla, depending on the size of your cutter or stencil.
- Assemble the Quesadillas: On half of the tortilla trees, sprinkle a layer of mozzarella cheese, followed by cheddar cheese. Add a layer of shredded chicken (if using), chopped bell peppers, green onions, and cilantro.
- Top and Seal: Place another tortilla tree on top of each assembled quesadilla. Press down gently to seal the edges.
- Bake the Quesadillas: Arrange the quesadillas on the prepared baking sheet. Bake in the preheated oven for 8-10 minutes or until the cheese is melted and the tortillas are lightly golden.
- Serve: Remove from the oven and let cool slightly. Serve with a side of sour cream and salsa for dipping.
Extra Tips:
For an extra festive flair, use different colored bell peppers to mimic Christmas lights on the trees. You can also add a sprinkle of paprika or chili powder for a bit of spice.
If you don’t have a cookie cutter, you can make a stencil from cardboard to cut your tortillas into tree shapes. Encourage kids to decorate their trees with the toppings of their choice, making it a fun and interactive meal-time activity.
Jolly Grinch Kabobs
Jolly Grinch Kabobs are a delightful and festive treat that brings the holiday spirit to your dining table. Perfect for kids and adults alike, these kabobs are inspired by the mischievous character from Dr. Seuss’s “How the Grinch Stole Christmas!” They make for a fun and healthy snack option during the holiday season, combining fresh fruits and a touch of sweetness from marshmallows. The vibrant colors and playful presentation will surely capture the attention of your little ones, making them enthusiastic to enjoy this nutritious snack.
Creating Jolly Grinch Kabobs isn’t just about making a delicious treat; it’s also an engaging activity that you can enjoy with your children. These kabobs are easy to assemble and require no cooking, making them perfect for getting the kids involved in the kitchen. With just a few simple ingredients, you can create a visually appealing and tasty dish that celebrates the whimsy and joy of Christmas. This recipe serves 4-6 people, making it ideal for small gatherings or family lunches.
Ingredients (serving size: 4-6 people):
- 1 cup green grapes
- 1 cup strawberries
- 1 large banana
- 12 mini marshmallows
- 12 wooden skewers (or toothpicks)
Instructions:
- Prepare the Ingredients:
- Wash the green grapes and strawberries thoroughly. Pat them dry with a paper towel.
- Hull the strawberries by removing the green leafy tops.
- Peel the banana and slice it into 12 equal-sized rounds.
- Assemble the Kabobs:
- Take a wooden skewer and begin by sliding a grape onto the skewer, pushing it towards the bottom. This represents the Grinch’s head.
- Next, add a banana slice to represent the Grinch’s face.
- Follow with a hulled strawberry, pointed side up, to act as the Grinch’s Santa hat.
- Finally, place a mini marshmallow at the top of the skewer to complete the Santa hat.
- Repeat the Process:
- Continue assembling the rest of the skewers following the same sequence: grape, banana slice, strawberry, and mini marshmallow.
- Arrange the completed Grinch Kabobs on a serving platter.
- Serve and Enjoy:
- Present the Jolly Grinch Kabobs to your guests. Watch as they delight in the whimsical design and enjoy the fresh flavors.
For the best results, use ripe but firm fruits to guarantee they hold well on the skewers. You can prepare the kabobs a few hours in advance and store them in the refrigerator until you’re ready to serve. If you’re using toothpicks instead of skewers, you may need to adjust the size of the fruit pieces accordingly. To add an extra festive touch, consider using decorative skewers or toothpicks.
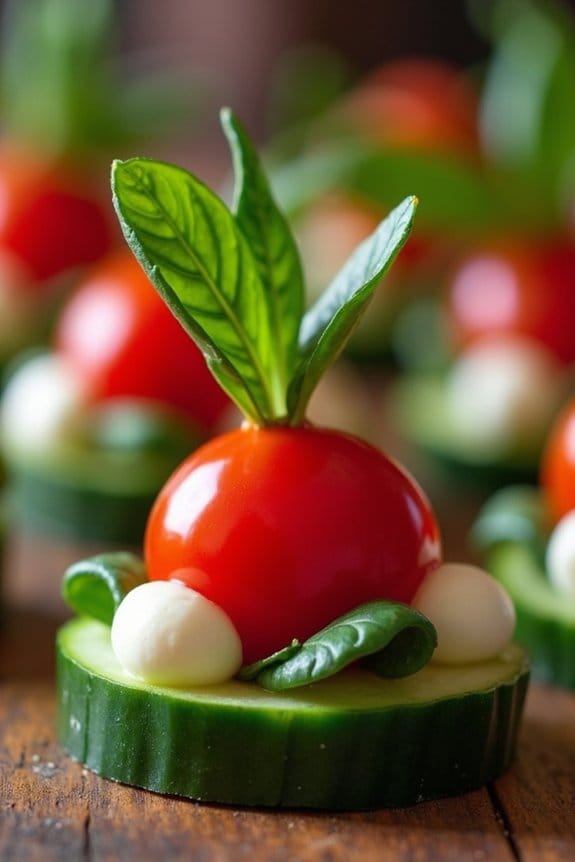
Festive Veggie Cups

These veggie cups are simple to prepare and can be made ahead of time, saving you the hassle during the busy holiday season.
They’re also a wonderful option for creative engagement with your children—let them help prepare the ingredients, and they’ll be more excited to eat what they’ve helped create.
This recipe serves 4-6 people, making it ideal for small gatherings or family lunches.
Ingredients (Serves 4-6):
- 6 small clear plastic cups or mini mason jars
- 1 cup cherry tomatoes, halved
- 1 cup cucumber, diced
- 1 cup bell peppers (red, yellow, green), diced
- 1 cup carrots, cut into thin sticks
- 1 cup broccoli florets
- 1/2 cup hummus or ranch dressing
- 1/4 cup black olives, sliced
- 1/4 cup shredded cheese (optional)
- Fresh basil or parsley leaves for garnish
Instructions:
1. Prepare the Vegetables: Wash all vegetables thoroughly. Cut the cherry tomatoes in half and dice the cucumbers and bell peppers into small, bite-sized pieces.
Peel the carrots and slice them into thin sticks. Cut the broccoli into small florets.
2. Layer the Veggie Cups: Begin by adding a spoonful of hummus or ranch dressing at the bottom of each cup. This will serve as the dipping sauce and base layer for the veggies.
3. Add the Vegetables: Start layering the vegetables over the dressing. Place a few carrot sticks vertically along the sides of the cup, followed by a mix of diced cucumbers and bell peppers.
Add a few cherry tomato halves and broccoli florets.
4. Top with Extras: Scatter sliced black olives and, if desired, a sprinkle of shredded cheese over the top of the veggies in each cup. This adds an extra burst of flavor and color.
5. Garnish and Serve: Finish each cup with a fresh basil or parsley leaf for a festive touch. Arrange the cups on a platter and serve cold as a revitalizing appetizer or side dish.
Extra Tips:
For a more interactive experience, consider setting up a veggie cup station where kids can choose their own vegetables and toppings.
This not only makes it fun but also encourages them to try new ingredients. Be sure to prepare the veggies in kid-friendly sizes to make them easy to grab and eat.
If you’re preparing these cups in advance, keep them refrigerated until serving to maintain freshness.
Additionally, if using dips like hummus or ranch, check for any dietary restrictions or preferences your guests may have.
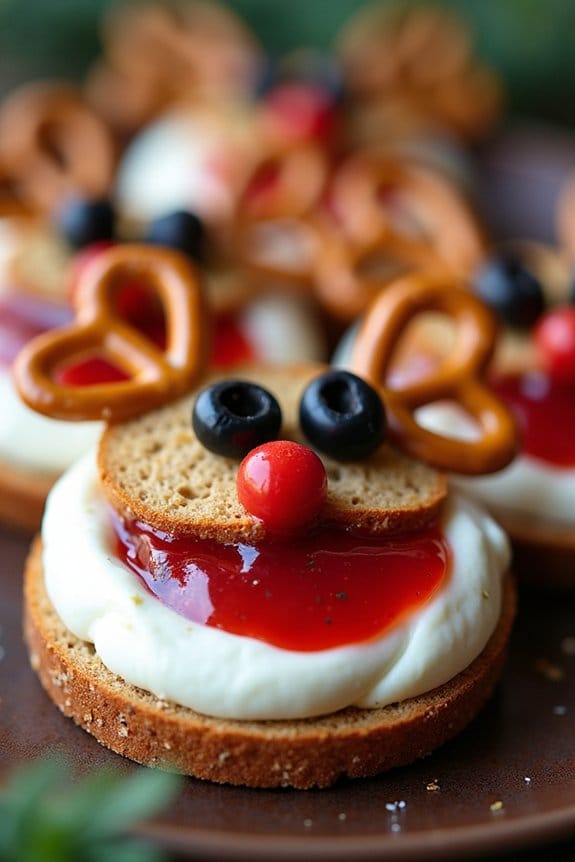
Rudolph’s Red-Nosed Bagels
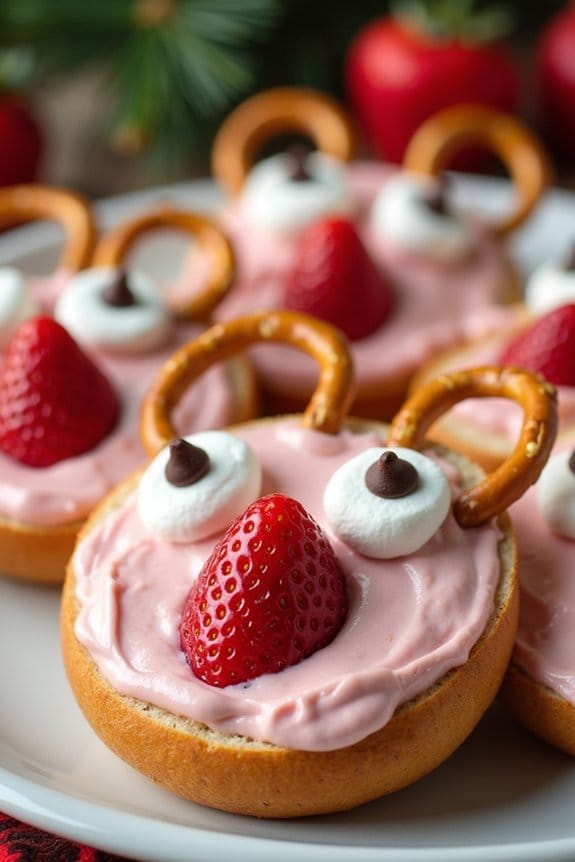
Transform a simple bagel into a festive delight with this Rudolph’s Red-Nosed Bagels recipe. Perfect for a kid-friendly Christmas lunch, these bagels aren’t only adorable but also deliciously fun to make. With a few creative twists, you can bring Rudolph and his shiny red nose to the table, sure to spark joy and excitement among little ones.
This recipe is great for a serving size of 4-6 people, making it ideal for a family meal or a small holiday gathering. By using a combination of bagels, cream cheese, and some crafty toppings, you can create a memorable and magical dining experience. Whether you’re hosting a Christmas party for the kids or simply looking to add some holiday spirit to lunch, these Rudolph bagels are the perfect choice.
Ingredients for 4-6 servings:
- 6 plain bagels
- 1 cup of cream cheese
- 12 pretzel twists
- 12 mini chocolate chips
- 6 large strawberries
- 6 large marshmallows
- Red food coloring (optional)
Cooking Instructions:
- Prepare the Bagels: Begin by slicing each bagel in half. If desired, lightly toast the bagel halves to your preferred level of crispness. This step is optional but helps in creating a sturdier base for your toppings.
- Create the Cream Cheese Base: In a small bowl, mix the cream cheese with a few drops of red food coloring if you want to give it a festive pink hue. Spread an even layer of cream cheese over each bagel half, creating a smooth surface for the decorations.
- Assemble Rudolph’s Face: Cut the strawberries in half lengthwise to make Rudolph’s nose. Place a strawberry half at the bottom center of each bagel half for the nose. Position two mini chocolate chips above the nose to represent Rudolph’s eyes.
- Add the Antlers: Break the pretzel twists carefully into smaller pieces to form antlers. Insert two pieces into the top of each bagel half to resemble Rudolph’s antlers. Make sure they’re securely positioned.
- Finish with Marshmallow Accents: Slice the large marshmallows into thin circles and place them on the bagel around the chocolate chip eyes to mimic the whites of Rudolph’s eyes. This step enhances the facial features and adds a fun, edible detail.
- Presentation: Arrange the completed Rudolph’s Red-Nosed Bagels on a festive platter. Serve immediately to enjoy the crunchy, creamy, and sweet combination of flavors.
Extra Tips:
For an extra festive touch, consider using whole grain or multigrain bagels for added texture and nutrition. If your kids enjoy a sweeter version, you can drizzle a bit of honey or maple syrup over the cream cheese before adding the toppings.
Confirm the pretzels are inserted gently to prevent breaking, and feel free to get creative with other toppings like sliced fruits or nuts to personalize Rudolph’s look. Enjoy making memories in the kitchen with this delightful holiday recipe!
Holiday Star Sandwiches
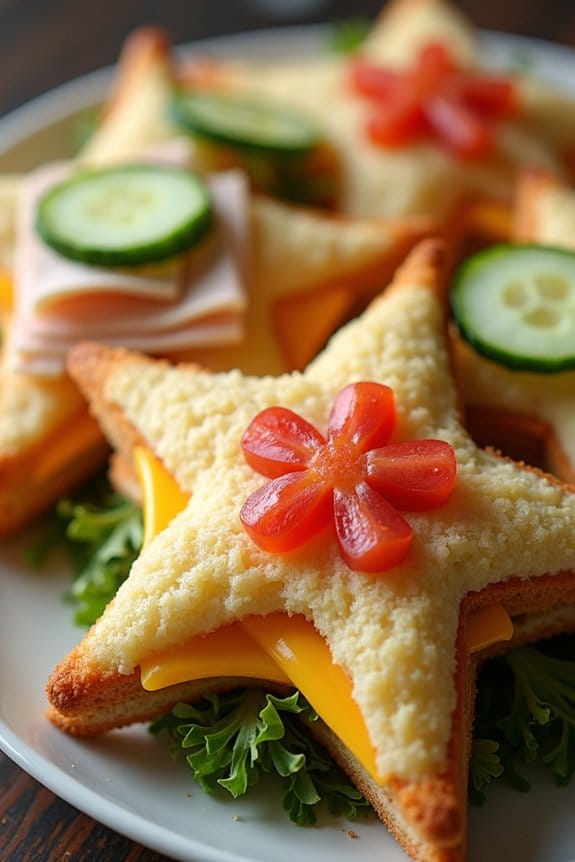
Bring some festive cheer to your kids’ lunch boxes with these delightful Holiday Star Sandwiches. Perfect for a Christmas-themed meal, these sandwiches are both fun to make and delicious to eat. With their starry shape and colorful fillings, they’re sure to capture the imagination of children and make a merry addition to any holiday gathering.
This recipe is designed to serve 4-6 people, making it perfect for a small group or family. The versatility of the Holiday Star Sandwiches allows you to customize them with your kids’ favorite ingredients. You can opt for classic fillings like turkey and cheese, or get creative with a variety of spreads and toppings.
The star shape is achieved using a star-shaped cookie cutter, which adds a whimsical touch to your holiday table. These sandwiches aren’t only a feast for the taste buds but also a visual delight that embodies the spirit of Christmas.
Ingredients (serves 4-6):
- 12 slices of whole wheat or white bread
- 1/2 pound of sliced turkey or ham
- 6 slices of cheddar cheese
- 1/2 cup of mayonnaise
- 1/4 cup of mustard
- 1 small cucumber, thinly sliced
- 1 small tomato, thinly sliced
- 1/2 cup of lettuce leaves
- Salt and pepper to taste
- Butter or margarine for spreading
Instructions:
- Prepare the Bread: Start by laying out the slices of bread on a clean working surface. Using a star-shaped cookie cutter, carefully cut star shapes out of each slice. Save the crusts for another use, such as breadcrumbs.
- Spread the Condiments: In a small bowl, mix the mayonnaise and mustard until well combined. Spread a thin layer of this mixture on one side of each star-shaped bread piece.
- Assemble the Sandwiches: Place a slice of turkey or ham on half of the bread stars, followed by a slice of cheddar cheese. Add a few slices of cucumber, tomato, and a lettuce leaf to each sandwich. Sprinkle a little salt and pepper to taste.
- Complete the Sandwiches: Top each assembled star with another star-shaped bread slice, condiment side down. Gently press down to secure the fillings.
- Serve: Arrange the Holiday Star Sandwiches on a festive platter. Serve immediately, or cover and refrigerate until ready to serve.
Extra Tips:
For an even more festive presentation, consider using different types of bread for a colorful effect, such as rye or pumpernickel. You can also substitute the fillings based on your children’s preferences or dietary restrictions.
If preparing these sandwiches in advance, keep them covered in the refrigerator to maintain freshness and prevent the bread from drying out. For a fun twist, involve the kids in the sandwich-making process—they’ll love cutting out the star shapes and assembling their own sandwiches!
North Pole Pretzel Rods

Create a magical holiday treat with North Pole Pretzel Rods, a delightful addition to any Christmas lunch for kids. These whimsical snacks aren’t only fun to make but also fun to eat, with a perfect combination of sweet and salty flavors. They resemble tiny North Poles with their festive decoration, making them a hit among children and a charming addition to your holiday spread.
These North Pole Pretzel Rods are easy to prepare and allow room for creativity, as you can customize them with various toppings and colors. Perfect for little hands, they’re an ideal treat for kids to help make, making it a fun family activity. Whether served as a dessert or a sweet snack, these pretzel rods will certainly bring joy and excitement to your Christmas table.
Ingredients for 4-6 Servings:
- 12 pretzel rods
- 1 cup white chocolate chips
- 1 tablespoon coconut oil
- Red food coloring
- Assorted festive sprinkles (red and white, snowflakes, stars, etc.)
- Mini marshmallows
Cooking Instructions:
- Prepare the Chocolate Coating: In a microwave-safe bowl, combine the white chocolate chips and coconut oil. Microwave in 30-second intervals, stirring in between, until the chocolate is smooth and fully melted. Stir in a few drops of red food coloring to achieve a vibrant red hue, reminiscent of a candy cane or North Pole.
- Dip the Pretzel Rods: Lay a piece of parchment paper on a flat surface. Dip each pretzel rod about two-thirds of the way into the melted red chocolate, twirling it gently to coat evenly.
- Add the Toppings: While the chocolate is still wet, sprinkle the coated section with your choice of festive sprinkles, making certain they stick to the chocolate. Place each coated pretzel rod on the parchment paper to set.
- Finish with a Marshmallow: Press a mini marshmallow onto the tip of each pretzel rod, using a little bit of melted chocolate as “glue” if necessary. This will create the illusion of a snowy North Pole.
- Let Them Set: Allow the pretzel rods to sit at room temperature or refrigerate them for about 15-20 minutes, until the chocolate has fully set and hardened.
Extra Tips:
For a more personalized touch, experiment with other colors and toppings, such as crushed candy canes or edible glitter, to make each pretzel rod unique.
If you’re making these with kids, consider setting up a topping station where they can choose their own decorations.
Additionally, verify that the chocolate isn’t too hot when dipping, as this can cause it to become too runny and not adhere to the pretzel properly.
Finally, if you have any leftover melted chocolate, drizzle it over the pretzels for an extra decorative flair.
Gingerbread Man Pancakes
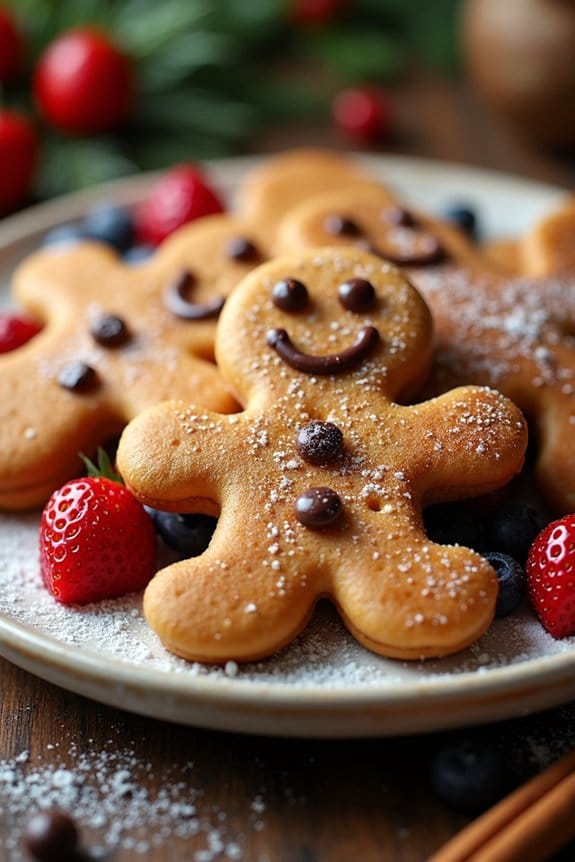
Gingerbread Man Pancakes are a delightful and festive treat that’s perfect for adding some holiday cheer to your family’s Christmas morning breakfast. These adorable pancakes aren’t only fun to make with kids, but they also bring the warm and spicy flavors of traditional gingerbread cookies to your breakfast table.
With a hint of cinnamon, ginger, and molasses, these pancakes are certain to become a family favorite during the holiday season. Not only do Gingerbread Man Pancakes taste fantastic, but they also provide a wonderful opportunity for creativity.
Children will love helping to decorate these pancakes with icing, chocolate chips, or fruit to bring their gingerbread men to life. Serve these pancakes with a dollop of whipped cream or a drizzle of maple syrup for an extra touch of sweetness. This recipe yields enough for 4-6 people, making it ideal for a family breakfast or brunch.
Ingredients
- 1 ½ cups all-purpose flour
- 1 tablespoon baking powder
- 1 teaspoon ground ginger
- 1 teaspoon ground cinnamon
- ¼ teaspoon ground nutmeg
- ¼ teaspoon ground cloves
- ½ teaspoon salt
- 2 tablespoons granulated sugar
- 2 large eggs
- 1 cup milk
- 3 tablespoons unsalted butter, melted
- ¼ cup molasses
- 1 teaspoon vanilla extract
- Butter or oil for cooking
- Icing, chocolate chips, or fruit for decorating
Instructions
- Prepare the Dry Ingredients: In a large mixing bowl, whisk together the flour, baking powder, ground ginger, ground cinnamon, ground nutmeg, ground cloves, salt, and granulated sugar until well combined.
- Mix the Wet Ingredients: In another bowl, beat the eggs lightly, then add the milk, melted butter, molasses, and vanilla extract. Whisk until the mixture is smooth and the molasses is fully incorporated.
- Combine Mixtures: Pour the wet ingredients into the dry ingredients. Stir gently with a whisk or spoon until just combined. Be careful not to overmix; a few lumps are okay.
- Heat the Pan: Heat a nonstick skillet or griddle over medium heat. Lightly grease with butter or oil.
- Cook the Pancakes: Pour about ¼ cup of batter onto the skillet for each pancake. Use a gingerbread man-shaped cookie cutter to shape the batter if desired. Cook until the pancakes have bubbles on the surface and the edges appear set, about 2-3 minutes.
- Flip and Finish Cooking: Carefully flip the pancakes and cook for another 1-2 minutes on the other side, until golden brown and cooked through.
- Decorate: Once cooked, remove the pancakes from the skillet and let them cool slightly. Decorate with icing, chocolate chips, or fruit to create gingerbread man faces and details.
Extra Tips
For the best results, verify the skillet is adequately heated before cooking the pancakes to prevent them from sticking. If you’re using a cookie cutter for shaping, make sure to coat it with a bit of oil to prevent the batter from sticking.
You can also make the pancake batter a day ahead and store it in the refrigerator overnight to save time on a busy morning. If you’re looking to add some extra flair, consider adding a touch of orange zest to the batter for a fresh, citrusy twist.
Christmas Lights Fruit Garland
Creating a festive atmosphere at your Christmas lunch table can be as simple as serving a delightful Christmas Lights Fruit Garland. This colorful dish isn’t only a feast for the eyes but also a healthy treat that kids will love. By using a variety of vibrant fruits, you can mimic the appearance of twinkling Christmas lights, adding a whimsical touch to your holiday spread.
Perfect for little hands, this edible garland will keep children entertained and excited about healthy eating during the festive season. The Christmas Lights Fruit Garland is easy to prepare and offers a fun way to get kids involved in the kitchen. Encourage your little helpers to choose their favorite fruits and help string them onto skewers or toothpicks.
This interactive snack is perfect for a serving size of 4-6 people and can be adjusted to suit any number of guests. Whether you’re hosting a family gathering or simply want to surprise your kids with a special lunch, this recipe is sure to bring smiles and festive cheer.
Ingredients for 4-6 Servings:
- 1 cup red grapes
- 1 cup green grapes
- 1 cup strawberries
- 1 cup blueberries
- 1 banana
- 1 kiwi
- 1 pear
- 1 apple
- String or skewers
- Lemon juice (to prevent browning)
Cooking Instructions:
- Prepare the Fruits: Start by washing all the fruits thoroughly. Peel the banana and kiwi, and then slice them into thick rounds. Core the apple and pear and slice them into bite-sized chunks. Hull the strawberries and cut them in half if they’re large.
- Prevent Browning: To keep the apple, pear, and banana slices from browning, brush them lightly with lemon juice. This will help maintain their fresh look on the garland.
- Assemble the Garland: Take a string or skewer and start threading the fruits in a random order to mimic the colorful lights. Alternate between the different fruits to create a vibrant and varied pattern. Confirm you leave a little space between each piece so that it resembles a string of Christmas lights.
- Repeat the Process: Continue threading the fruits until you’ve used up all your prepared fruit or reached the desired length of your garland.
- Present and Serve: Once the garland is complete, lay it across a festive platter or hang it as a decoration on the table. Let the kids pick their favorite pieces directly from the garland.
Extra Tips:
When selecting fruits for your Christmas Lights Fruit Garland, opt for a mix of colors and shapes to enhance the visual appeal. Make sure to use firm fruits that can hold their shape well on skewers or string.
If you’re using string, consider using a needle with a large eye to help thread the fruits more easily. For a more interactive experience, you could provide each child with their own skewer or piece of string to create personal mini-garlands. This not only makes the activity more fun but also allows for a personalized touch to each child’s lunch.
Elf Hat Cheese Snacks
Get ready to delight your little ones this holiday season with these adorable Elf Hat Cheese Snacks. Perfect for a Christmas lunch, these snacks aren’t only cute but also incredibly easy to make.
Combining the creamy taste of cheese with the fresh crunch of vegetables, these snacks are bound to be a hit with kids. Shaped like little elf hats, they bring a touch of whimsy to the table, making lunchtime both fun and festive.
These Elf Hat Cheese Snacks are a creative way to incorporate healthy ingredients into your child’s meal while still keeping it exciting. With just a few simple ingredients, you can prepare a colorful and nutritious dish that captures the magic of Christmas.
Ideal for a serving size of 4-6 people, these snacks can be quickly assembled and are perfect for any holiday gathering or for a special lunch treat at home.
Ingredients (Serving size: 4-6 people):
- 12 cherry tomatoes
- 1 cup of mini mozzarella balls
- 6 slices of cucumber
- Fresh basil leaves
- Toothpicks
- Salt and pepper to taste
Instructions:
- Prepare the Ingredients: Begin by washing all your vegetables thoroughly. Cut each cherry tomato in half. Slice the cucumber into 1/4 inch thick rounds, making sure you have enough for the base of each elf hat.
- Assemble the Elf Hats: Take a toothpick and start by skewering one mini mozzarella ball. Follow this with one basil leaf, folding it if necessary to fit. Next, add a half cherry tomato, cut side down, to form the top of the elf hat.
- Create the Base: Lay a cucumber slice flat on a serving platter. Stand the assembled elf hat upright on the cucumber slice by gently pressing the bottom of the toothpick into the cucumber to secure it.
- Season and Serve: Once all the elf hats are assembled, lightly sprinkle them with salt and pepper to enhance the flavor. Arrange them neatly on your serving plate and they’re ready to serve!
Extra Tips:
When selecting mozzarella balls, opt for the smallest size available to guarantee they balance well with the cherry tomatoes. If you can’t find mini mozzarella balls, you can cut larger mozzarella balls into smaller pieces.
Additionally, if the elf hats are having trouble standing upright, try using a slightly thicker slice of cucumber for better stability. For a sweeter touch, consider using grape tomatoes instead of cherry tomatoes.
This recipe can easily be adjusted to suit your taste preferences or dietary needs by experimenting with different herbs or cheese.
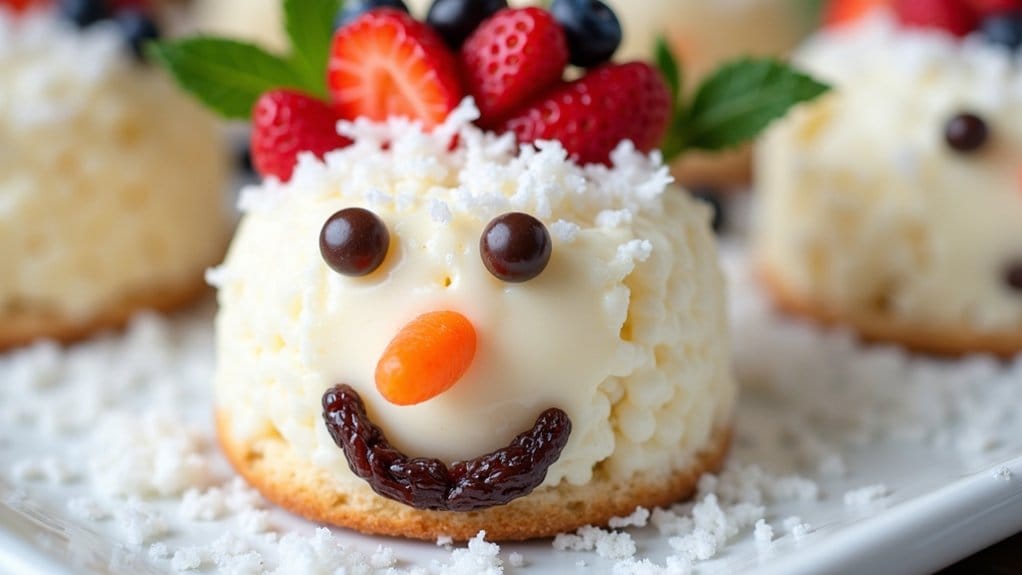
Frosty the Snowman Rice Cakes
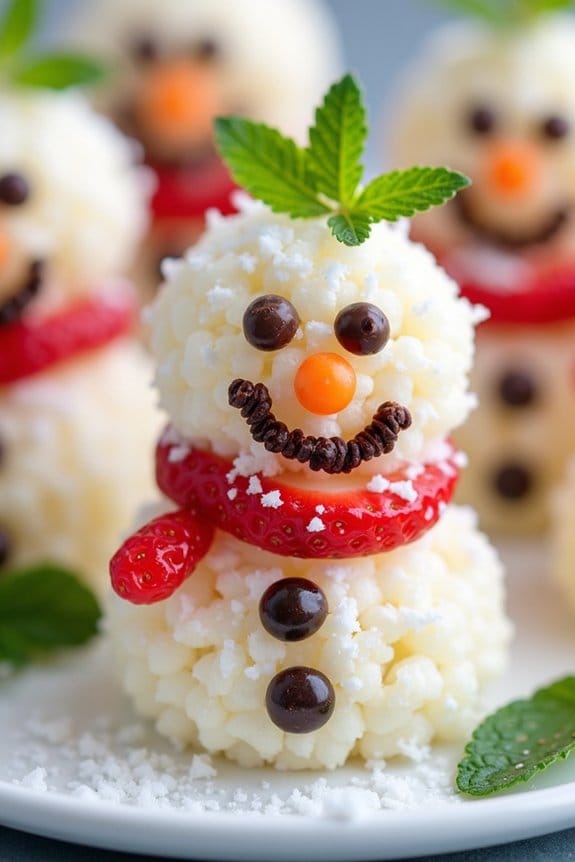
Frosty the Snowman Rice Cakes are an adorable and fun way to bring a touch of Christmas cheer to lunchtime. Perfect for kids, these delightful rice cakes aren’t only cute but also nutritious, providing a balanced snack or light meal. Combining the simplicity of rice cakes with creative toppings, this recipe transforms ordinary ingredients into a festive treat that will surely bring a smile to any child’s face.
The soft, snow-like appearance of the rice cakes paired with colorful decorations will make them a hit at any holiday gathering or family meal. This recipe is designed to be easy and quick, making it perfect for busy parents or guardians who want to add a bit of holiday magic to their children’s meals without spending hours in the kitchen.
The following recipe will serve 4-6 people, providing enough Frosty the Snowman Rice Cakes for everyone to enjoy. These rice cakes aren’t only visually appealing but also customizable, allowing you to adjust toppings according to your child’s preferences or dietary needs.
Ingredients for 4-6 Servings
- 8-12 plain rice cakes
- 1 cup cream cheese, softened
- 1 tablespoon honey
- 12 mini chocolate chips
- 6 baby carrots, cut into small pieces
- 1/4 cup raisins
- 1/2 cup shredded coconut
- 1/2 cup sliced strawberries
- 1/4 cup blueberries
- Fresh mint leaves (optional, for garnish)
Cooking Instructions
- Prepare the Cream Cheese Mix: In a medium bowl, combine the softened cream cheese and honey. Mix well until smooth and creamy. This will be used as the “snow” for your snowman.
- Assemble the Rice Cakes: Spread a generous layer of the cream cheese mixture over each rice cake, ensuring that the top is completely covered. This will form the base of your snowman’s face and body.
- Create Frosty’s Face: For each rice cake, place two mini chocolate chips as eyes near the top center. Below the eyes, add a small piece of baby carrot as the nose to create Frosty’s face.
- Add the Smile: Use raisins to form a smiling mouth beneath the carrot nose. You can create a curved line or a simple smiley face, depending on personal preference.
- Decorate the Hat and Scarf: For the hat, place a few slices of strawberry along the top edge of the rice cake. To create a scarf, layer additional strawberry slices or blueberries along the bottom portion of the rice cake.
- Sprinkle Coconut for Snow: Lightly sprinkle shredded coconut over the entire rice cake to give Frosty a snowy appearance. If desired, add a few mint leaves for a festive touch.
Extra Tips
To enhance the holiday spirit, consider using different colored fruits to add variety and vibrancy to your Frosty the Snowman Rice Cakes. You can use kiwi, mango, or pineapple for a tropical twist.
If you prefer a vegan option, substitute the cream cheese with a plant-based version and honey with maple syrup or agave. These rice cakes are best served fresh, but you can prepare the cream cheese mixture ahead of time and store it in the fridge until ready to assemble.
Encourage kids to participate in the decorating process for a fun and interactive experience!
