
If you’re anything like me, the holiday season is the perfect excuse to bake up a storm. I’ve gathered 12 delightful Christmas recipes that are easy enough for beginners and exciting for seasoned bakers. From classic sugar cookies to rich peppermint bark brownies, there’s something for everyone. Picture your home filled with the warm scent of cinnamon swirl bread or the joy of decorating festive gingerbread men. Ready to find your new favorite holiday treat?
Classic Sugar Cookies

Sugar cookies are a timeless treat, especially around the holiday season. Known for their sweet simplicity, these cookies aren’t only delicious but also versatile. They can be decorated to suit any occasion, making them a delightful addition to your Christmas baking repertoire. Whether you’re crafting them with loved ones or preparing them as gifts, sugar cookies offer a fun and tasty way to celebrate the season.
The beauty of classic sugar cookies lies in their buttery, tender crumb and slightly crisp edges, making them a favorite among both children and adults. The process of rolling out the dough, cutting out festive shapes, and decorating them with colorful icing and sprinkles isn’t only enjoyable but also a great way to bring the family together. With this recipe, you’ll be able to create a batch of sugar cookies that are perfect for sharing or savoring on your own.
Ingredients (serving size: 4-6 people):
- 2 ¾ cups all-purpose flour
- 1 teaspoon baking soda
- ½ teaspoon baking powder
- 1 cup unsalted butter, softened
- 1 ½ cups granulated sugar
- 1 large egg
- 1 teaspoon vanilla extract
- ½ teaspoon almond extract (optional)
- 3-4 tablespoons milk (for adjusting dough consistency if needed)
- Assorted colored icing and sprinkles for decorating
Cooking Instructions:
- Preheat the Oven: Begin by preheating your oven to 375°F (190°C). This guarantees your oven is at the right temperature for baking once your cookies are ready to go in.
- Prepare the Dry Ingredients: In a medium-sized bowl, whisk together the all-purpose flour, baking soda, and baking powder. Set this mixture aside as it will be added to the wet ingredients later.
- Cream the Butter and Sugar: In a large mixing bowl, beat the softened butter and granulated sugar together with an electric mixer on medium speed until the mixture is light and fluffy, about 2-3 minutes.
- Add Egg and Extracts: Mix in the egg, vanilla extract, and almond extract (if using) into the butter and sugar mixture. Beat until everything is well combined.
- Combine Wet and Dry Ingredients: Gradually add the dry ingredient mixture to the wet ingredients, mixing on low speed until just combined. If the dough feels too dry, add milk one tablespoon at a time until the dough holds together.
- Chill the Dough: Divide the dough into two portions, wrap them in plastic wrap, and refrigerate for at least 1 hour. Chilling the dough helps prevent the cookies from spreading too much while baking.
- Roll Out the Dough: After chilling, roll out one portion of the dough on a lightly floured surface to about ¼ inch thickness. Keep the other portion in the refrigerator until ready to use.
- Cut Out Shapes: Use cookie cutters to cut out desired shapes and place them on a baking sheet lined with parchment paper, spaced about 1 inch apart.
- Bake the Cookies: Bake in the preheated oven for 8-10 minutes, or until the edges just start to turn golden. Remove from the oven and allow the cookies to cool on the baking sheet for a few minutes before transferring them to a wire rack to cool completely.
- Decorate: Once the cookies are completely cool, decorate them with icing and sprinkles as desired. Allow the icing to set before serving or storing.
Extra Tips:
When making sugar cookies, it’s important to use room temperature butter for easy creaming with the sugar. This helps achieve the right texture for the dough.
Be careful not to overwork the dough when mixing or rolling it out, as this can lead to tough cookies. Additionally, if you’re using multiple baking sheets, bake one sheet at a time in the center of the oven for even cooking.
Finally, always verify your cookies are completely cool before decorating to prevent the icing from melting. Enjoy your beautifully decorated and delicious sugar cookies!
Festive Gingerbread Men
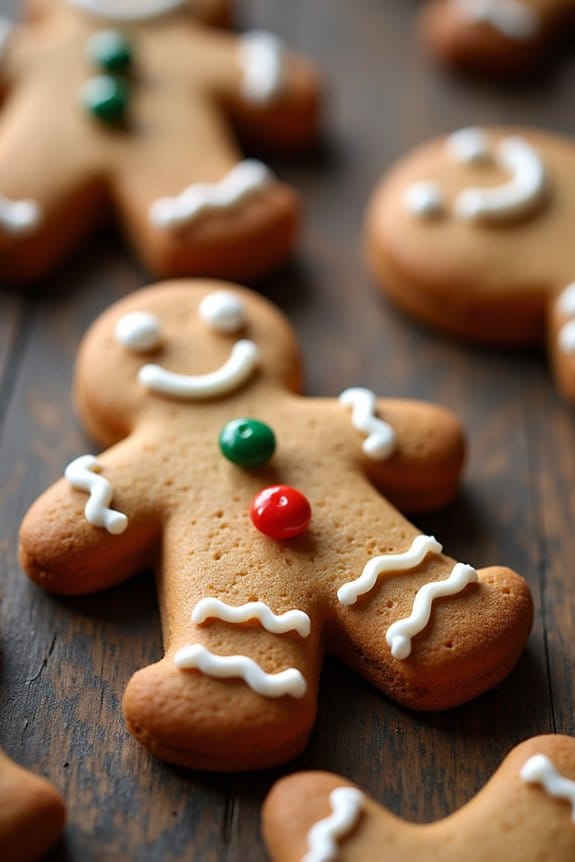
The holiday season is the perfect time to try your hand at baking some delightful Festive Gingerbread Men. Known for their aromatic spices and charming appearance, these cookies aren’t only fun to make but also serve as a wonderful treat to share with family and friends.
With this recipe, you can create a batch of gingerbread men that are crisp on the outside and tender on the inside, filling your home with the warm scent of ginger, cinnamon, and cloves. Perfect for a serving size of 4-6 people, this recipe invites you to get creative with decorating your gingerbread men once they’re baked and cooled.
Whether you prefer classic designs with icing buttons or more elaborate outfits, the possibilities are endless. Let’s get started on crafting these delightful holiday cookies!
Ingredients
- 3 cups all-purpose flour
- 3/4 teaspoon baking soda
- 1 tablespoon ground ginger
- 1 tablespoon ground cinnamon
- 1/2 teaspoon ground cloves
- 1/2 teaspoon salt
- 1/4 teaspoon finely ground black pepper
- 1/2 cup (1 stick) unsalted butter, room temperature
- 1/2 cup packed dark-brown sugar
- 1 large egg
- 1/2 cup unsulfured molasses
- 2 teaspoons vanilla extract
- Icing and assorted candies for decoration
Cooking Instructions
1. Prepare the dry ingredients: In a large bowl, whisk together the flour, baking soda, ginger, cinnamon, cloves, salt, and black pepper. Set aside.
2. Cream the butter and sugar: In a separate large mixing bowl, use an electric mixer to beat the butter and brown sugar on medium speed until the mixture is light and fluffy, about 2 minutes.
3. Add wet ingredients: Beat in the egg, molasses, and vanilla extract until well combined.
4. Combine wet and dry ingredients: Gradually add the flour mixture to the wet ingredients, mixing on low speed until a dough forms.
Divide the dough into two portions, wrap each in plastic wrap, and refrigerate for at least 1 hour or until firm.
5. Preheat the oven: Heat your oven to 350°F (175°C) and line baking sheets with parchment paper.
6. Roll out the dough: On a lightly floured surface, roll out one portion of dough to a thickness of about 1/8 inch. Use gingerbread man cookie cutters to cut out shapes, and transfer them to the prepared baking sheets, spacing them about 1 inch apart.
7. Bake: Bake in the preheated oven for 8-10 minutes, or until the edges are firm and the centers are set.
Let the cookies cool on the baking sheets for 5 minutes before transferring them to wire racks to cool completely.
8. Decorate: Once the cookies are completely cool, use icing and candies to decorate your gingerbread men to your liking.
Extra Tips
To guarantee your Festive Gingerbread Men maintain their shape while baking, make sure the dough is well chilled before cutting out the shapes.
If you find the dough becomes too soft while shaping, you can return it to the refrigerator for a few minutes. Additionally, be sure to watch the baking time closely, as the edges can brown quickly, especially if the cookies are rolled out too thin.
Enjoy your gingerbread men with a warm mug of cocoa or milk for the perfect holiday treat!
Peppermint Bark Brownies
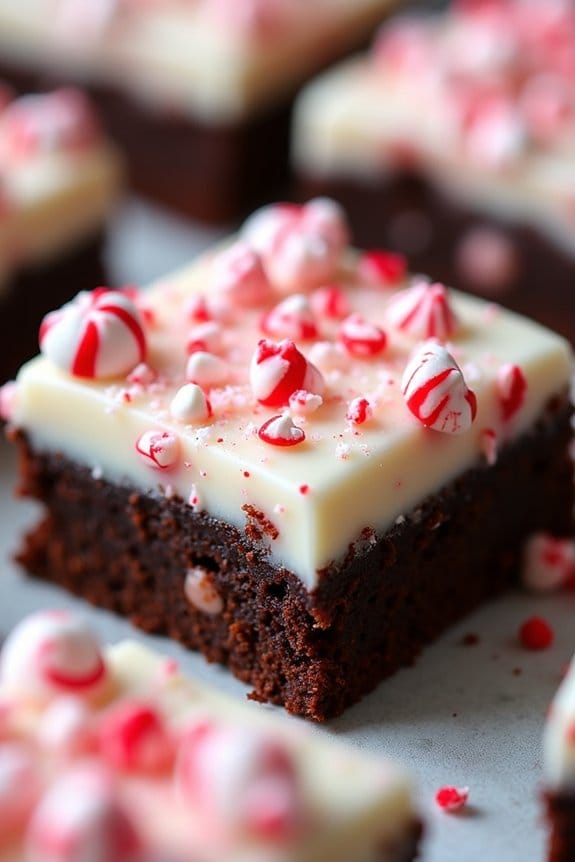
The holiday season is the perfect time to indulge in festive treats, and nothing says Christmas quite like the combination of chocolate and peppermint. Peppermint Bark Brownies are a delightful twist on the classic brownie, featuring a rich, fudgy base layered with creamy white chocolate and topped with crunchy peppermint candies. This dessert isn’t only a feast for the taste buds but also a visual delight, making it an ideal centerpiece for your holiday dessert table.
These brownies are perfect for serving at Christmas gatherings or as a homemade gift for friends and family. The recipe is designed to serve 4-6 people, making it suitable for small parties or intimate family dinners. With just a few simple ingredients and steps, you can create a show-stopping dessert that captures the essence of the season.
Ingredients (serves 4-6):
- 1 cup unsalted butter
- 1 cup granulated sugar
- 1 cup brown sugar
- 1 cup all-purpose flour
- 1 cup cocoa powder
- 4 large eggs
- 1 teaspoon vanilla extract
- 1/2 teaspoon salt
- 1 cup semi-sweet chocolate chips
- 1 cup white chocolate chips
- 1/2 cup crushed peppermint candies
Instructions:
- Preheat and Prepare: Begin by preheating your oven to 350°F (175°C). Line an 8×8 inch baking pan with parchment paper, leaving an overhang on the sides to easily lift the brownies out once baked.
- Melt the Butter: In a medium saucepan over low heat, melt the unsalted butter. Once melted, remove from the heat and stir in the granulated sugar and brown sugar until well combined.
- Mix the Wet Ingredients: Let the butter and sugar mixture cool slightly, then add in the eggs one at a time, beating well after each addition. Stir in the vanilla extract.
- Combine Dry Ingredients: In a separate bowl, whisk together the flour, cocoa powder, and salt. Gradually add the dry ingredients to the wet mixture, stirring until just combined.
- Add Chocolate Chips: Fold in the semi-sweet chocolate chips, making certain they’re evenly distributed throughout the batter.
- Bake the Brownies: Pour the batter into the prepared baking pan, spreading it evenly. Bake in the preheated oven for about 30-35 minutes, or until a toothpick inserted into the center comes out with just a few moist crumbs.
- Prepare the Peppermint Bark Layer: While the brownies are cooling, melt the white chocolate chips in a microwave-safe bowl in 30-second intervals, stirring between each, until smooth.
- Top with Peppermint: Spread the melted white chocolate over the cooled brownies in an even layer. Immediately sprinkle the crushed peppermint candies on top, pressing them gently into the chocolate.
- Set and Serve: Allow the peppermint bark layer to set completely at room temperature or in the refrigerator before slicing the brownies into squares and serving.
Extra Tips:
To guarantee the perfect texture, avoid overmixing the brownie batter once the dry ingredients are incorporated, as this can result in a denser texture.
Additionally, if you prefer a bit more peppermint flavor, consider adding a few drops of peppermint extract to the brownie batter.
For a fun presentation, you can cut the brownies into various festive shapes using cookie cutters.
Remember that these brownies can be stored in an airtight container for up to a week, making them a convenient make-ahead option for holiday entertaining.
Easy Almond Biscotti
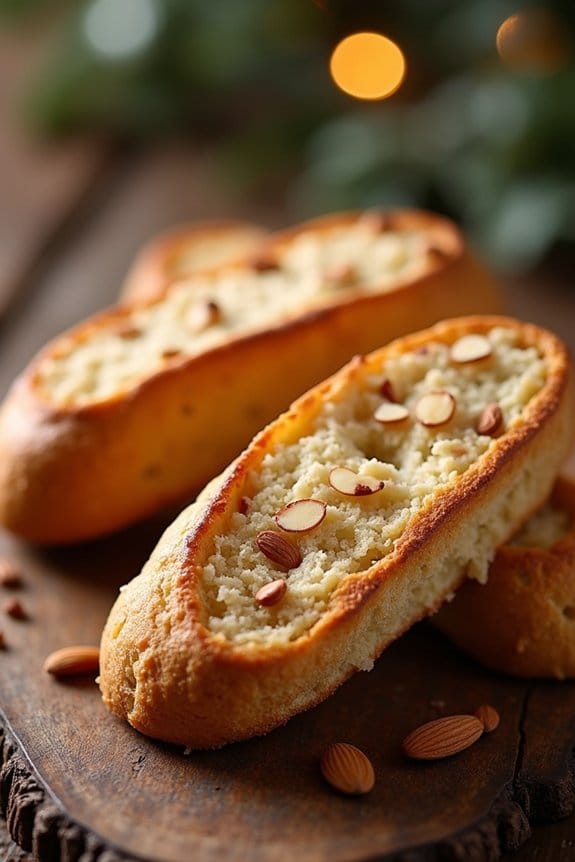
Almond biscotti is a delightful Italian treat that’s perfect for the holiday season. These twice-baked cookies are known for their crunchy texture and are delicious on their own or dunked in a warm cup of coffee or tea. This easy almond biscotti recipe is perfect for beginners and seasoned bakers alike, offering a simple way to add a touch of Italy to your Christmas baking repertoire. The combination of almonds and a hint of vanilla creates a warm, inviting aroma that will fill your kitchen with the spirit of the holidays.
Whether you’re hosting a holiday gathering or looking for a homemade gift idea, these biscotti are sure to impress. Biscotti are incredibly versatile and can be customized with other flavors like chocolate chips, dried cranberries, or orange zest. However, the classic almond version remains a favorite for many. This recipe serves 4-6 people and makes a perfect batch of biscotti to share with family and friends or to keep for yourself as a special treat during the festive season.
Ingredients:
- 2 cups all-purpose flour
- 1 cup granulated sugar
- 1 teaspoon baking powder
- 1/2 teaspoon salt
- 3 large eggs
- 1 teaspoon vanilla extract
- 1 teaspoon almond extract
- 1 cup whole almonds, toasted and coarsely chopped
Instructions:
- Preheat the Oven: Start by preheating your oven to 350°F (175°C). Line a baking sheet with parchment paper or a silicone baking mat to prevent sticking.
- Mix Dry Ingredients: In a medium-sized bowl, whisk together the all-purpose flour, granulated sugar, baking powder, and salt until well combined.
- Prepare Wet Ingredients: In a separate large bowl, beat the eggs using an electric mixer or a whisk until they become light and frothy. Add the vanilla extract and almond extract to the eggs, mixing until fully incorporated.
- Combine Ingredients: Gradually add the dry ingredients to the wet mixture, stirring until a dough begins to form. Fold in the toasted and chopped almonds, making certain they’re evenly distributed throughout the dough.
- Shape the Dough: Divide the dough in half and transfer it to the prepared baking sheet. Shape each portion into a log approximately 12 inches long and 3 inches wide, ensuring there’s enough space between the logs for spreading during baking.
- First Bake: Place the baking sheet in the preheated oven and bake for 25-30 minutes, or until the logs are golden brown and firm to the touch. Remove from the oven and allow them to cool for about 10 minutes.
- Slice and Second Bake: Once cooled enough to handle, use a serrated knife to slice the logs into 1/2 inch thick slices. Lay the slices cut side down on the baking sheet. Return them to the oven and bake for an additional 15-20 minutes, flipping halfway through, until the biscotti are dry and crisp.
- Cool Completely: Remove the biscotti from the oven and transfer to a wire rack to cool completely. They’ll continue to harden as they cool.
Extra Tips:
For an extra touch of flavor, consider adding a teaspoon of orange zest to the dough for a citrusy twist. If you prefer softer biscotti, reduce the second baking time by a few minutes.
Make certain your almonds are toasted for a richer flavor, and if you need to save time, pre-sliced or slivered almonds work well too. Store your biscotti in an airtight container to maintain their crispiness for up to two weeks. Enjoy these delightful cookies as a light dessert or a sweet snack with your favorite holiday beverage.
Cinnamon Swirl Bread

The key to a perfect Cinnamon Swirl Bread lies in the quality of ingredients and the patience in allowing the dough to rise. The bread features a beautiful swirl of cinnamon sugar, making each slice a visual and flavorful delight. While the process takes some time, each step is straightforward and designed to guarantee success.
For a serving size of 4-6 people, this recipe will guide you through creating a loaf that’s soft, sweet, and full of holiday cheer.
Ingredients (Serving Size: 4-6 people):
- 3 1/4 cups all-purpose flour
- 1/4 cup granulated sugar
- 1 teaspoon salt
- 2 1/4 teaspoons active dry yeast
- 1 cup warm milk (110°F/45°C)
- 1/4 cup unsalted butter, melted
- 1 large egg
- 1/3 cup sugar (for the cinnamon swirl)
- 2 tablespoons ground cinnamon
- 2 tablespoons unsalted butter, softened (for the cinnamon swirl)
Cooking Instructions:
- Prepare the Dough: In a large mixing bowl, combine the flour, sugar, and salt. In a smaller bowl, dissolve the yeast in the warm milk and let it sit for about 5 minutes until frothy. Add the melted butter and egg to the milk mixture, then pour into the dry ingredients. Stir until a dough forms.
- Knead and Rise: Turn the dough onto a floured surface and knead for about 8-10 minutes until it’s smooth and elastic. Place the dough in a lightly greased bowl, cover with a damp cloth, and let it rise in a warm place for about 1-2 hours, or until doubled in size.
- Prepare the Cinnamon Swirl: In a small bowl, mix together sugar and cinnamon. Set aside.
- Roll and Fill: Once the dough has risen, roll it out on a floured surface into a rectangle about 9×14 inches. Spread the softened butter over the surface, then evenly sprinkle the cinnamon sugar mixture on top.
- Shape the Bread: Starting from one of the short ends, tightly roll the dough into a log. Place it seam side down in a greased 9×5 inch loaf pan. Cover and let it rise again for about 30-45 minutes.
- Bake: Preheat your oven to 350°F (175°C). Once the bread has risen, bake in the preheated oven for 30-35 minutes, or until golden brown and a toothpick inserted into the center comes out clean.
- Cool and Serve: Remove the bread from the oven and let it cool in the pan for about 10 minutes. Then, transfer it to a wire rack to cool completely before slicing.
Extra Tips:
For the best results, verify that all ingredients are at room temperature before starting. If you prefer a slightly sweeter bread, you can increase the amount of sugar in the cinnamon filling.
To maintain the bread’s freshness, store it in an airtight container at room temperature for up to three days or freeze it for longer storage. When serving, consider toasting slices and spreading them with butter or cream cheese for an extra indulgent treat.
Chocolate-Dipped Shortbread
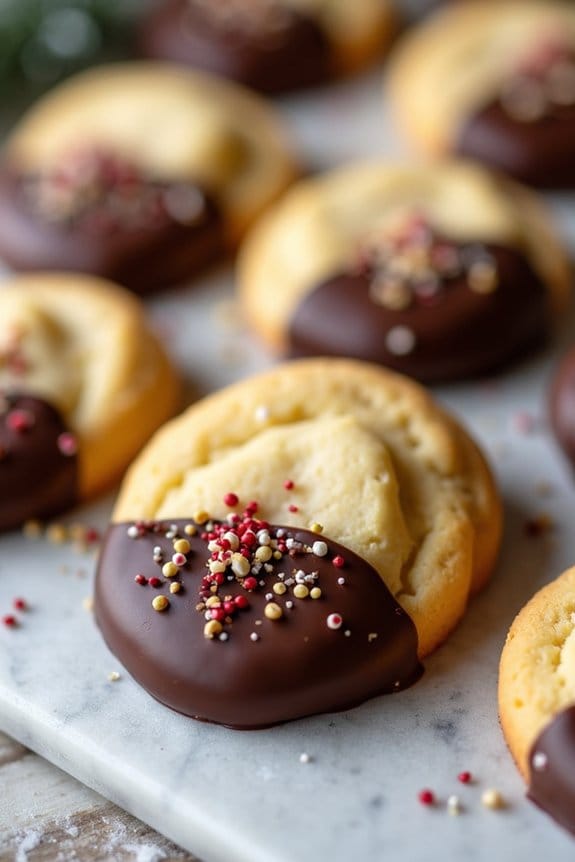
Indulge in the delightful combination of buttery shortbread and rich chocolate with this Christmas treat. Chocolate-dipped shortbread cookies are perfect for holiday gatherings or as a homemade gift for friends and family. The tender shortbread base, made from simple, high-quality ingredients, is complemented by a luscious layer of melted chocolate. This recipe guarantees that every bite delivers a satisfying crunch followed by a creamy, sweet finish.
This recipe yields approximately 24-30 cookies, making it perfect for serving 4-6 people. The process involves crafting a classic shortbread dough, baking until golden, and then dipping each cooled cookie into melted chocolate. The result is a festive, elegant cookie that’s sure to become a holiday favorite. Enjoy these cookies with a cup of tea or coffee, or serve them as part of a dessert platter at your next Christmas gathering.
Ingredients:
- 1 cup unsalted butter, softened
- 1/2 cup granulated sugar
- 1 teaspoon vanilla extract
- 2 cups all-purpose flour
- 1/4 teaspoon salt
- 8 ounces semi-sweet or dark chocolate, chopped
- Sprinkles or crushed nuts (optional, for decoration)
Instructions:
- Prepare the Dough: In a large mixing bowl, cream together the softened butter and granulated sugar until light and fluffy. Add the vanilla extract and mix until combined.
- Form the Dough: Gradually add the all-purpose flour and salt to the creamed mixture, mixing until the dough comes together. The dough should be soft but not sticky.
- Chill the Dough: Shape the dough into a disk, wrap it in plastic wrap, and refrigerate for at least 30 minutes to firm up. This will make it easier to roll out.
- Preheat and Roll: Preheat your oven to 350°F (175°C). On a lightly floured surface, roll out the dough to about 1/4-inch thickness. Cut into desired shapes using cookie cutters.
- Bake: Place the cookies on a parchment-lined baking sheet. Bake in the preheated oven for 10-12 minutes, or until the edges are just beginning to turn golden. Allow the cookies to cool completely on a wire rack.
- Melt Chocolate: In a heatproof bowl, melt the chopped chocolate over a double boiler or in the microwave in 30-second intervals, stirring until smooth.
- Dip and Decorate: Dip each cookie halfway into the melted chocolate, letting the excess drip back into the bowl. Place the dipped cookies on parchment paper and, if desired, sprinkle with decorative sprinkles or crushed nuts before the chocolate sets.
- Set the Chocolate: Allow the cookies to sit at room temperature or in the refrigerator until the chocolate has fully hardened.
Extra Tips:
For the best flavor, use high-quality butter and chocolate. These ingredients are the stars of the recipe, and their quality will shine through in the final product. If the dough is too crumbly, add a teaspoon of milk to help bind it.
When melting chocolate, be careful not to overheat it as it can seize; low, gentle heat is best. Finally, be creative with your decorations – crushed candy canes, edible glitter, or even a drizzle of white chocolate can add a festive touch to your cookies. Enjoy your Chocolate-Dipped Shortbread with loved ones during this holiday season!
Cranberry Orange Scones
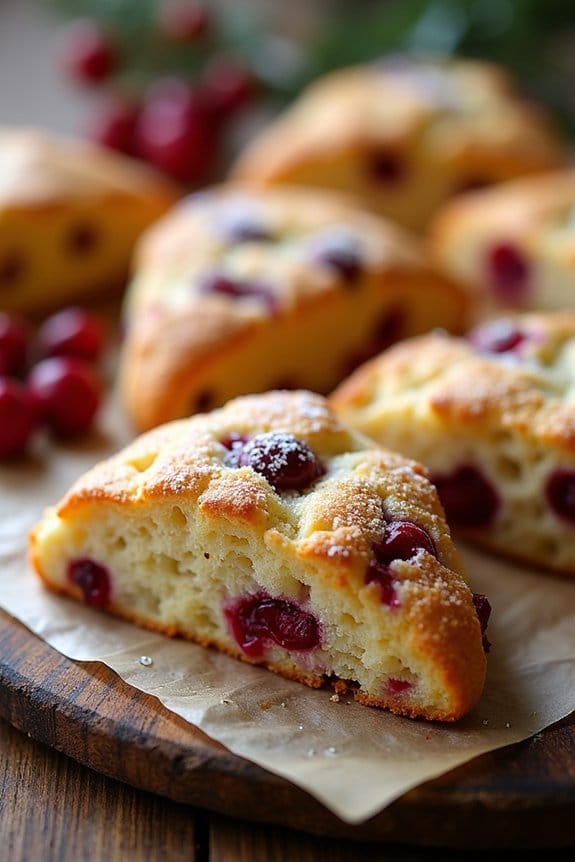
Cranberry Orange Scones are the perfect treat to enjoy during the holiday season. These scones are a delightful combination of tangy cranberries and zesty orange, resulting in a tender, flavorful pastry that pairs beautifully with your morning coffee or afternoon tea.
The fragrant aroma of freshly baked scones will fill your home with festive cheer, making them an ideal addition to your Christmas baking repertoire. This recipe yields 4-6 servings, making it perfect for a small gathering or family breakfast.
The scones are quick to prepare and bake, allowing you to focus on other holiday preparations. The ingredients are easily accessible, and the method is straightforward, guaranteeing that even novice bakers can achieve delectable results.
Ingredients:
- 2 cups all-purpose flour
- 1/3 cup granulated sugar
- 1 tablespoon baking powder
- 1/2 teaspoon salt
- 1/2 cup unsalted butter, chilled and cubed
- 1 cup fresh cranberries, roughly chopped
- Zest of 1 orange
- 2/3 cup heavy cream
- 1 large egg
- 1 teaspoon vanilla extract
- 1 tablespoon milk (for brushing)
- Additional sugar for sprinkling
Instructions:
- Preheat the Oven: Start by preheating your oven to 400°F (200°C). Line a baking sheet with parchment paper or a silicone baking mat.
- Mix Dry Ingredients: In a large bowl, whisk together the all-purpose flour, granulated sugar, baking powder, and salt until well combined.
- Cut in the Butter: Add the chilled, cubed butter to the dry ingredients. Using a pastry cutter or your fingertips, blend the butter into the mixture until it resembles coarse crumbs.
- Add Cranberries and Orange Zest: Gently fold in the chopped cranberries and orange zest, making sure they’re evenly distributed throughout the flour mixture.
- Combine Wet Ingredients: In a separate bowl, whisk together the heavy cream, egg, and vanilla extract until smooth.
- Form the Dough: Pour the wet mixture into the dry ingredients and stir until just combined. The dough will be slightly sticky.
- Shape the Scones: Turn the dough onto a lightly floured surface and gently knead it a few times to bring it together. Pat the dough into a round disc, about 1 inch thick. Cut the disc into 8 wedges and transfer them to the prepared baking sheet.
- Prepare for Baking: Brush the tops of the scones with milk and sprinkle them with additional sugar for a sweet, crunchy topping.
- Bake the Scones: Place the scones in the preheated oven and bake for 15-18 minutes, or until they’re golden brown. Once baked, remove them from the oven and allow them to cool slightly on a wire rack before serving.
Extra Tips:
To guarantee your Cranberry Orange Scones turn out perfectly, make sure your butter is cold before incorporating it into the flour. This helps create a flaky texture.
Additionally, when mixing the dough, be careful not to overwork it, as this can result in tough scones. If you prefer a glaze instead of a sugar topping, mix powdered sugar with a bit of orange juice and drizzle it over the cooled scones for an extra burst of citrus flavor.
Enjoy these scones warm or at room temperature for the best taste experience.
Eggnog Cupcakes
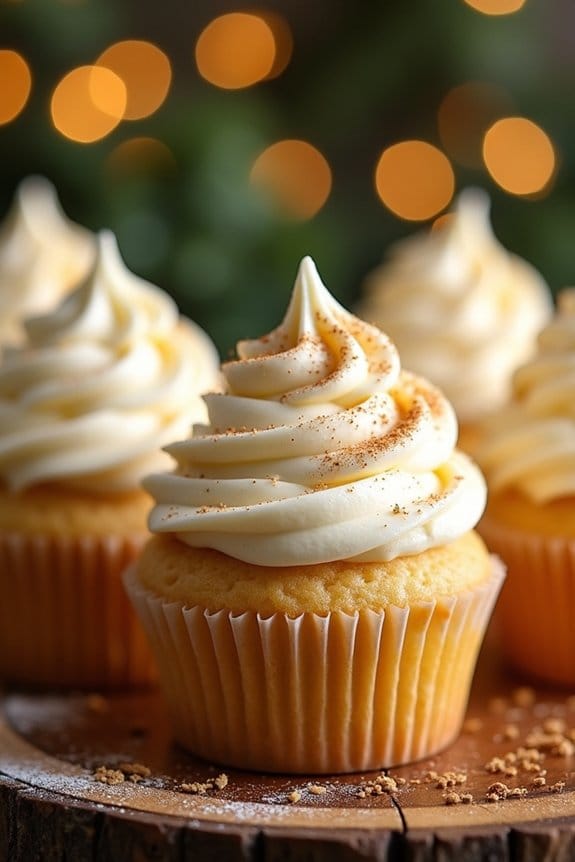
Eggnog cupcakes are a delightful and festive treat that perfectly encapsulate the flavors of the holiday season. They combine the rich, creamy taste of traditional eggnog with the light, fluffy texture of a cupcake, making them a perfect addition to any holiday gathering.
Whether you’re hosting a Christmas party or simply looking to indulge in a seasonal dessert, these cupcakes are guaranteed to impress both kids and adults alike.
The recipe for eggnog cupcakes is straightforward and requires a few simple ingredients, most of which you probably already have in your kitchen. With a hint of nutmeg and a dash of rum extract, these cupcakes carry the classic flavor of eggnog, but in a form that’s easy to serve and enjoy.
Topping them with a creamy eggnog frosting takes these cupcakes to the next level, assuring that each bite is as satisfying as the last.
Ingredients (Serves 4-6):
For the Cupcakes:
- 1 1/4 cups all-purpose flour
- 1/2 teaspoon baking powder
- 1/4 teaspoon baking soda
- 1/4 teaspoon salt
- 1/2 teaspoon ground nutmeg
- 1/2 cup unsalted butter, softened
- 1 cup granulated sugar
- 2 large eggs
- 1 teaspoon vanilla extract
- 1 1/4 cups eggnog
For the Frosting:
- 1/2 cup unsalted butter, softened
- 3 cups powdered sugar
- 1/4 cup eggnog
- 1/2 teaspoon vanilla extract
- 1/2 teaspoon rum extract
- Ground nutmeg, for garnish
Cooking Instructions:
- Preheat the Oven: Begin by preheating your oven to 350°F (175°C). Line a cupcake pan with paper liners to prepare for the batter.
- Mix Dry Ingredients: In a medium-sized bowl, whisk together the all-purpose flour, baking powder, baking soda, salt, and ground nutmeg. Set this mixture aside as you work on the wet ingredients.
- Cream Butter and Sugar: In a large mixing bowl, cream together the softened butter and granulated sugar using an electric mixer on medium speed until the mixture is light and fluffy. This should take about 2-3 minutes.
- Add Eggs and Vanilla: Add the eggs one at a time, beating well after each addition. Then, mix in the vanilla extract until fully incorporated.
- Combine with Dry Ingredients: Gradually add the dry ingredients to the wet mixture, alternating with the eggnog. Begin and end with the dry ingredients, mixing until just combined. Be careful not to overmix.
- Fill the Cupcake Liners: Spoon the batter into the prepared cupcake liners, filling each about 2/3 full.
- Bake: Place the cupcake pan in the preheated oven and bake for 20-25 minutes, or until a toothpick inserted into the center of a cupcake comes out clean. Allow the cupcakes to cool completely on a wire rack.
- Prepare the Frosting: In a clean mixing bowl, beat the softened butter until creamy. Gradually add the powdered sugar, mixing on low speed until combined. Then, add the eggnog, vanilla extract, and rum extract, beating until the frosting is smooth and fluffy.
- Frost the Cupcakes: Once the cupcakes are completely cool, spread or pipe the frosting onto each cupcake. Sprinkle a pinch of ground nutmeg on top of the frosting for garnish.
Extra Tips:
For an extra festive touch, consider adding a small sprinkle of cinnamon or a few holiday-themed sprinkles on top of the frosting.
If you prefer a stronger rum flavor, you can increase the amount of rum extract in the frosting. Confirm that your butter is at room temperature for both the batter and frosting to achieve the best consistency.
If you find the frosting is too thick, you can add a little more eggnog, one tablespoon at a time, until the desired consistency is reached. Enjoy these cupcakes with a warm cup of eggnog or coffee for a truly seasonal treat!
Spiced Molasses Cookies

Spiced Molasses Cookies are a delightful holiday treat that perfectly embody the warmth and coziness of the Christmas season. With their rich, deep flavor profile, these cookies are a harmonious blend of spices and the robust sweetness of molasses, making them a perennial favorite for holiday baking.
Their chewy texture and fragrant aroma will fill your kitchen with the comforting scents of ginger, cinnamon, and cloves, instantly evoking memories of festive gatherings and joyful celebrations.
These cookies aren’t only delicious but also simple to make, making them a great choice for both novice and experienced bakers. They’re perfect for serving at holiday parties, gifting to friends and family, or simply enjoying with a cup of warm tea or coffee.
This recipe yields enough cookies to serve 4-6 people, making it ideal for small gatherings or as a sweet indulgence for your loved ones.
Ingredients:
- 2 1/4 cups all-purpose flour
- 1 teaspoon baking soda
- 1/2 teaspoon salt
- 1 teaspoon ground ginger
- 1 teaspoon ground cinnamon
- 1/2 teaspoon ground cloves
- 1/4 teaspoon ground nutmeg
- 3/4 cup unsalted butter, softened
- 1 cup packed dark brown sugar
- 1 large egg
- 1/4 cup molasses
- 1 teaspoon vanilla extract
- Granulated sugar for rolling
Instructions:
- Preheat and Prepare: Preheat your oven to 350°F (175°C). Line two baking sheets with parchment paper or silicone baking mats to prevent sticking.
- Mix Dry Ingredients: In a medium-sized bowl, whisk together the flour, baking soda, salt, ginger, cinnamon, cloves, and nutmeg. Set aside.
- Cream Butter and Sugar: In a large mixing bowl, use an electric mixer to beat the softened butter and brown sugar together on medium speed until the mixture is light and fluffy, about 2 minutes.
- Add Wet Ingredients: Add the egg, molasses, and vanilla extract to the butter mixture. Beat on medium speed until fully combined, scraping down the sides of the bowl as necessary.
- Combine Mixtures: Gradually add the dry ingredients to the wet ingredients, mixing on low speed until just combined. Be careful not to overmix.
- Form Cookie Dough Balls: Using a tablespoon or small ice cream scoop, shape the dough into 1-inch balls. Roll each ball in granulated sugar until coated.
- Bake Cookies: Place the cookie dough balls on the prepared baking sheets, spacing them about 2 inches apart. Bake in the preheated oven for 10-12 minutes, or until the edges are set and the tops have cracked slightly.
- Cool Cookies: Remove from the oven and allow the cookies to cool on the baking sheets for 5 minutes before transferring them to a wire rack to cool completely.
Extra Tips:
For a more intense flavor, consider chilling the cookie dough for at least an hour before baking; this allows the spices to meld and develop further.
If you prefer softer cookies, opt for a slightly shorter baking time. These cookies can be stored in an airtight container at room temperature for up to a week, or freeze them for longer shelf life.
If you want to add a festive touch, consider drizzling the cookies with a simple glaze made from powdered sugar and milk once they’ve cooled.
Red Velvet Christmas Cake
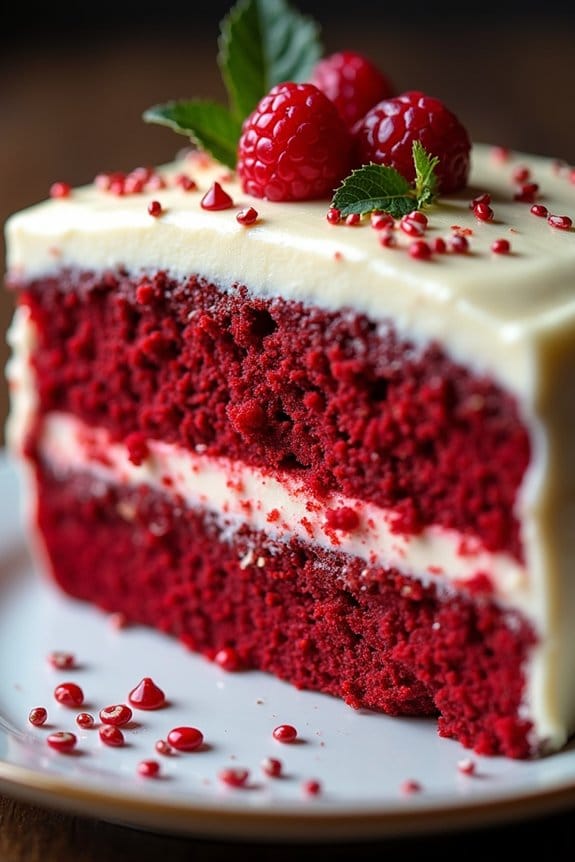
Red Velvet Christmas Cake is a festive and decadent dessert that brings a vibrant pop of color to your holiday table. This cake is a twist on the classic red velvet, enhanced with seasonal spices and a creamy, rich frosting that melts in your mouth. Perfect for Christmas gatherings, this cake not only looks stunning but also offers a delightful balance of flavors with its moist, tender crumb and subtle cocoa undertones.
The beauty of Red Velvet Christmas Cake lies in its simplicity and elegance. With a few additional ingredients to evoke the holiday spirit, such as cinnamon and nutmeg, this cake becomes a show-stopping centerpiece. Whether you’re a seasoned baker or a beginner, this recipe is straightforward and rewarding, resulting in a cake that’s sure to impress your family and friends. Designed to serve 4-6 people, it’s perfect for intimate holiday celebrations.
Ingredients (Serves 4-6):
- 2 1/2 cups all-purpose flour
- 1 1/2 cups granulated sugar
- 1 teaspoon baking soda
- 1 teaspoon salt
- 1 teaspoon cocoa powder
- 1 teaspoon ground cinnamon
- 1/2 teaspoon ground nutmeg
- 1 1/2 cups vegetable oil
- 1 cup buttermilk, room temperature
- 2 large eggs, room temperature
- 2 tablespoons red food coloring
- 1 teaspoon vanilla extract
- 1 teaspoon white vinegar
- 8 oz cream cheese, softened
- 1/2 cup unsalted butter, softened
- 4 cups powdered sugar
- 1 teaspoon vanilla extract
Instructions:
- Preheat the Oven: Preheat your oven to 350°F (175°C). Grease and flour two 9-inch round cake pans, then line the bottoms with parchment paper to guarantee easy removal.
- Mix Dry Ingredients: In a medium bowl, sift together the flour, sugar, baking soda, salt, cocoa powder, cinnamon, and nutmeg. This guarantees even distribution of the dry ingredients and removes any lumps.
- Combine Wet Ingredients: In a large bowl, whisk together the vegetable oil, buttermilk, eggs, red food coloring, vanilla extract, and white vinegar until fully combined. The vinegar helps activate the baking soda, giving the cake its signature texture.
- Create the Batter: Gradually add the dry ingredients to the wet ingredients, mixing on low speed until just combined. Be careful not to overmix, as this can result in a dense cake.
- Bake the Cakes: Divide the batter evenly between the prepared pans. Bake for 25-30 minutes, or until a toothpick inserted in the center comes out clean. Let the cakes cool in the pans for 10 minutes before transferring them to a wire rack to cool completely.
- Prepare the Frosting: In a large bowl, beat the cream cheese and butter together until smooth. Gradually add the powdered sugar, one cup at a time, beating until fluffy. Stir in the vanilla extract to enhance the flavor.
- Assemble the Cake: Once the cakes are completely cool, place one layer on a serving plate. Spread a generous amount of frosting on top, then place the second layer on top. Frost the top and sides of the cake with the remaining frosting.
Extra Tips:
For the best results, make sure all your ingredients are at room temperature before you begin. This helps in achieving a smoother batter and prevents the cake from becoming too dense.
If you’re looking to add a little extra flair, consider decorating the top of the cake with holiday-themed sprinkles or fresh berries. Additionally, allow the cake to chill for at least an hour before serving to let the flavors meld together and make slicing easier.
Enjoy your festive Red Velvet Christmas Cake as a delightful conclusion to your holiday feast!
Lemon Snowball Cookies
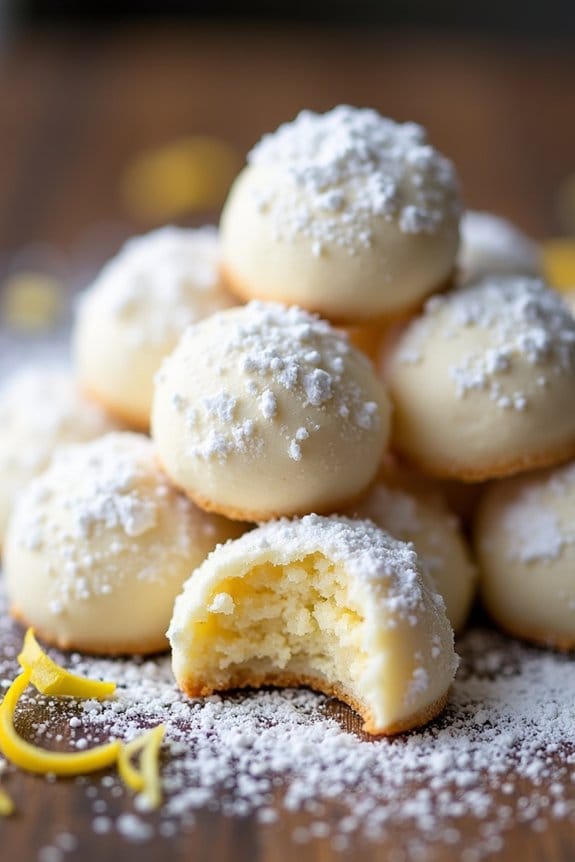
Lemon Snowball Cookies are a delightful treat perfect for the holiday season. These cookies are tender, buttery, and packed with a revitalizing lemon flavor that’s sure to brighten any holiday cookie platter. Their light, airy texture and snow-dusted appearance make them as festive as they’re delicious. Perfect for sharing with family and friends, these cookies are a wonderful addition to your Christmas baking repertoire.
The key to achieving the perfect Lemon Snowball Cookie is to use fresh lemon zest and juice, which provides a bright and tangy contrast to the rich, buttery base. These cookies are rolled in powdered sugar twice: once when they’re warm to allow the sugar to adhere, and again after they’ve cooled to give them their signature snowball appearance. Enjoy these cookies with a hot cup of tea or as a sweet conclusion to a holiday meal.
Ingredients (Serves 4-6):
- 1 cup unsalted butter, softened
- 1/2 cup powdered sugar (plus extra for dusting)
- 1 teaspoon vanilla extract
- 2 tablespoons fresh lemon juice
- 1 tablespoon lemon zest
- 2 1/4 cups all-purpose flour
- 1/4 teaspoon salt
Cooking Instructions:
- Preheat the oven: Start by preheating your oven to 350°F (175°C) to make sure it reaches the correct temperature by the time your cookie dough is ready.
- Cream the butter and sugar: In a large mixing bowl, use an electric mixer to cream together the softened butter and 1/2 cup of powdered sugar until the mixture is light and fluffy.
- Add flavorings: Mix in the vanilla extract, fresh lemon juice, and lemon zest until well combined. These ingredients give the cookies their distinct lemon flavor.
- Combine dry ingredients: In a separate bowl, whisk together the all-purpose flour and salt. Gradually add the dry ingredients to the wet ingredients, mixing until just combined and a dough forms.
- Shape the cookies: Scoop tablespoon-sized portions of dough and roll them into balls. Place the balls on a baking sheet lined with parchment paper, leaving some space between each cookie.
- Bake the cookies: Bake in the preheated oven for 12-15 minutes, or until the bottoms are lightly golden. The tops should remain pale to maintain their snowball appearance.
- First sugar coating: Remove the cookies from the oven and allow them to cool slightly for about 5 minutes. While still warm, roll each cookie in powdered sugar, making sure they’re evenly coated.
- Cool and coat again: Allow the cookies to cool completely on a wire rack. Once cooled, roll them in powdered sugar a second time for a thicker, snowy coating.
Extra Tips: When zesting the lemon, avoid the white pith beneath the skin, as it can impart a bitter taste. For an even more pronounced lemon flavor, consider adding a little more zest or a drop of lemon extract.
If you’re making these cookies in advance, store them in an airtight container to maintain their freshness. They also freeze well; just be sure to re-roll them in powdered sugar before serving if the coating has absorbed any moisture during storage.
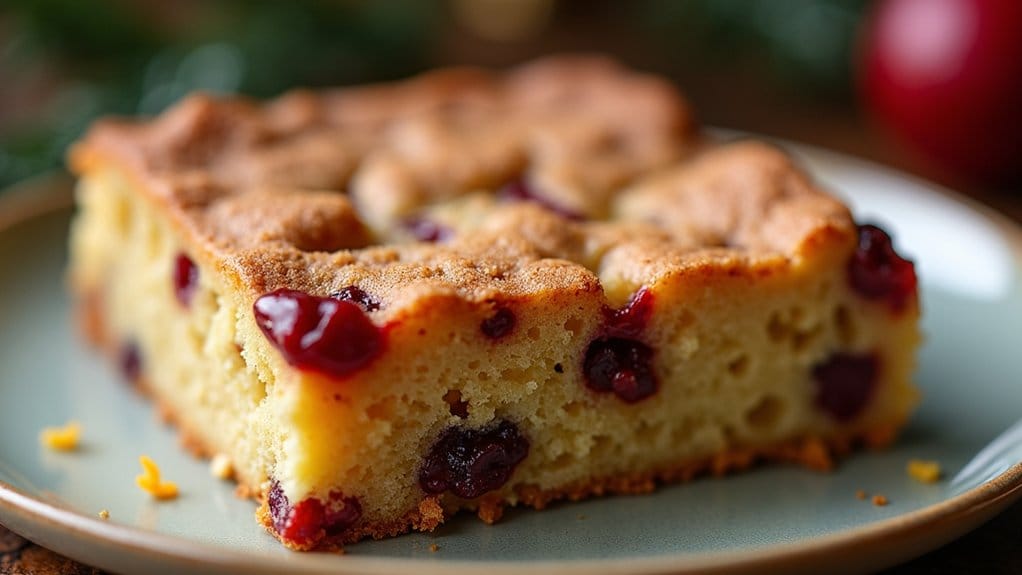
Holiday Fruitcake Bars
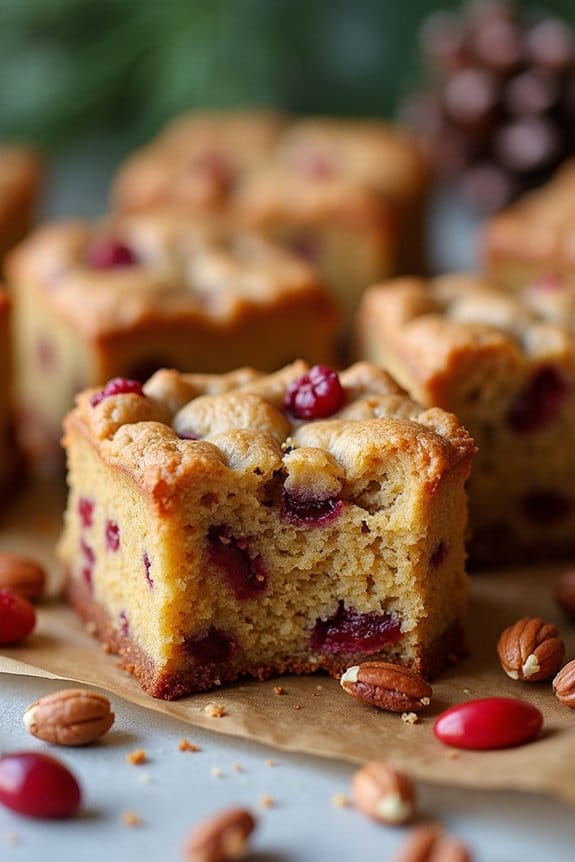
Indulge in the festive flavors of the season with these delightful Holiday Fruitcake Bars. Perfect for sharing with family and friends, these bars are a modern twist on the classic fruitcake, combining a variety of dried fruits and nuts into a deliciously moist and flavorful treat.
Ideal for holiday gatherings or as a sweet gift, these bars are certain to become a favorite in your holiday baking repertoire. This recipe is designed to serve 4-6 people and brings together the rich, spiced flavors that are synonymous with the holiday season.
By using a blend of dried fruits and nuts, these bars offer a complex taste profile that’s both traditional and excitingly new. Easy to make and even easier to enjoy, these Holiday Fruitcake Bars are certain to bring joy to your festive celebrations.
Ingredients for 4-6 Servings:
- 1 cup all-purpose flour
- 1/2 teaspoon baking powder
- 1/4 teaspoon salt
- 1/2 teaspoon ground cinnamon
- 1/4 teaspoon ground nutmeg
- 1/2 cup unsalted butter, softened
- 1/2 cup brown sugar, packed
- 2 large eggs
- 1 teaspoon vanilla extract
- 1 cup mixed dried fruits (such as raisins, currants, cherries, and apricots), chopped
- 1/2 cup mixed nuts (such as walnuts, pecans, and almonds), chopped
- 2 tablespoons orange juice
- 1 tablespoon orange zest
Cooking Instructions:
- Preheat the Oven: Begin by preheating your oven to 350°F (175°C). Line an 8×8-inch baking pan with parchment paper, leaving an overhang on the sides to easily lift the bars out once baked.
- Prepare the Dry Ingredients: In a medium-sized bowl, whisk together the flour, baking powder, salt, cinnamon, and nutmeg. Set aside.
- Cream the Butter and Sugar: In a large mixing bowl, beat the softened butter and brown sugar together using an electric mixer on medium speed until the mixture is light and fluffy, approximately 3-4 minutes.
- Add the Wet Ingredients: Add the eggs, one at a time, mixing well after each addition. Stir in the vanilla extract, orange juice, and orange zest until the ingredients are fully incorporated.
- Combine with Dry Ingredients: Gradually add the dry ingredients to the wet mixture, stirring until just combined. Be careful not to overmix.
- Fold in Fruits and Nuts: Gently fold in the chopped dried fruits and nuts until they’re evenly distributed throughout the batter.
- Bake the Bars: Pour the batter into the prepared baking pan, spreading it evenly with a spatula. Bake in the preheated oven for 25-30 minutes, or until a toothpick inserted into the center comes out clean.
- Cool and Serve: Allow the bars to cool in the pan for about 10 minutes. Use the parchment overhang to lift them out and transfer to a wire rack to cool completely. Once cooled, cut into bars and enjoy.
Extra Tips:
For the best results, confirm that all ingredients are at room temperature before you begin. This helps the ingredients to blend together more smoothly, resulting in a better texture for your fruitcake bars.
Additionally, feel free to customize the dried fruits and nuts to suit your personal preferences or dietary needs. If you want to make the bars extra special, consider drizzling a little melted white chocolate over the top for added sweetness and visual appeal.
