
The holiday season is just around the corner, and that means it’s time to start planning those festive menus. Pies are always a hit, and this year we have some dreamy options to share. From a classic apple pie with a festive twist to a melt-in-your-mouth chocolate peppermint pie, there’s something for everyone. These pies not only satisfy your sweet tooth, but they also bring loved ones together around the table. Curious to see which pie will be the star of your holiday feast?
Classic Apple Pie With a Festive Twist
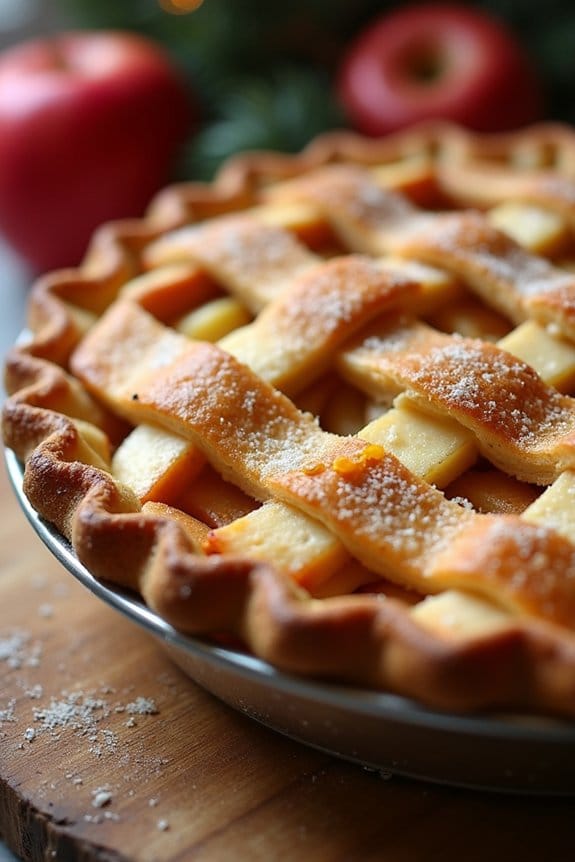
There’s nothing quite like the comforting aroma of a freshly baked apple pie to evoke the spirit of the holiday season. This Classic Apple Pie With a Festive Twist takes the traditional favorite and gives it a delightful holiday makeover with the addition of warm seasonal spices and a hint of citrus zest. The result is a deliciously fragrant pie that perfectly balances the sweetness of apples with the spicy undertones of cinnamon, nutmeg, and cloves, making it an ideal centerpiece for your Christmas dessert table.
Whether you’re an experienced baker or trying your hand at pie-making for the first time, this recipe is straightforward and satisfying. The flaky, buttery crust pairs beautifully with the soft, tender apple filling, creating a harmonious blend of textures and flavors. This recipe serves 4-6 people, making it perfect for a cozy family gathering or an intimate holiday celebration.
Ingredients:
- 2 1/2 cups all-purpose flour
- 1 teaspoon salt
- 1 tablespoon granulated sugar
- 1 cup unsalted butter, chilled and cubed
- 6-8 tablespoons ice water
- 6 large apples (such as Granny Smith or Honeycrisp), peeled, cored, and sliced
- 3/4 cup granulated sugar
- 1/4 cup light brown sugar
- 1 tablespoon all-purpose flour
- 1 teaspoon ground cinnamon
- 1/2 teaspoon ground nutmeg
- 1/4 teaspoon ground cloves
- Zest of 1 orange
- 1 tablespoon lemon juice
- 1 teaspoon vanilla extract
- 1 egg, beaten (for egg wash)
- Sugar for sprinkling on top
Instructions:
1. Prepare the Crust: In a large mixing bowl, combine 2 1/2 cups all-purpose flour, 1 teaspoon salt, and 1 tablespoon granulated sugar. Add the chilled, cubed butter and use a pastry cutter or your fingers to cut the butter into the flour until the mixture resembles coarse crumbs. Gradually add ice water, one tablespoon at a time, mixing just until a dough forms.
Divide the dough in half, shape each half into a disk, wrap in plastic wrap, and refrigerate for at least 1 hour.
2. Prepare the Filling: In another large bowl, toss the sliced apples with 3/4 cup granulated sugar, 1/4 cup light brown sugar, 1 tablespoon flour, cinnamon, nutmeg, cloves, orange zest, lemon juice, and vanilla extract. Mix well to guarantee the apples are evenly coated with the spices and sugars.
3. Preheat the Oven: Preheat your oven to 425°F (220°C) to make sure it’s hot enough to bake the pie crust to a crisp golden brown.
4. Roll Out the Dough: On a lightly floured surface, roll out one disk of dough into a circle large enough to fit a 9-inch pie pan with some overhang. Carefully transfer the rolled dough to the pie pan, pressing it gently against the sides and bottom.
5. Assemble the Pie: Pour the apple mixture into the prepared crust, mounding it slightly in the center. Roll out the second disk of dough and place it over the apples. Trim excess dough, leaving a 1-inch overhang. Fold the edges under and crimp decoratively. Cut several slits in the top crust to allow steam to escape.
6. Apply Egg Wash and Sugar: Brush the top crust with the beaten egg and sprinkle with sugar to create a beautiful, glossy finish once baked.
7. Bake the Pie: Place the pie on a baking sheet and bake in the preheated oven for 20 minutes. Then, reduce the oven temperature to 375°F (190°C) and bake for an additional 35 to 45 minutes, or until the crust is golden brown and the filling is bubbly. If the edges of the crust begin to brown too quickly, cover them with foil.
8. Cool and Serve: Allow the pie to cool on a wire rack for at least 2 hours before serving to make certain the filling sets properly. Slice and enjoy your festive apple pie with a scoop of vanilla ice cream or a dollop of whipped cream, if desired.
Extra Tips:
For the best results, use a mix of sweet and tart apples to add depth of flavor to your pie. Granny Smith and Honeycrisp apples are a popular combination.
Make sure your butter is well-chilled before incorporating it into the flour mixture to achieve a flaky crust. If you find your dough is too sticky while rolling, simply dust your work surface and rolling pin with a bit more flour.
To avoid a soggy bottom crust, you can preheat a baking sheet in the oven and place the pie on it to help crisp up the base during baking. Enjoy your delightful Classic Apple Pie With a Festive Twist!
Decadent Chocolate Peppermint Pie
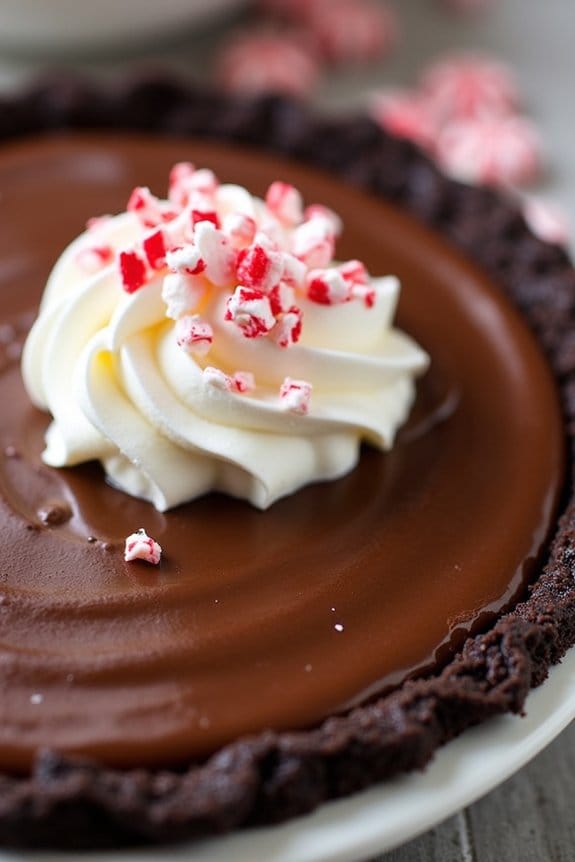
The Decadent Chocolate Peppermint Pie is an indulgent dessert that perfectly encapsulates the festive spirit of the holiday season. A delightful blend of rich chocolate and invigorating peppermint, this pie is sure to become a favorite at your Christmas gatherings.
The creamy chocolate filling is offset by the coolness of peppermint, creating a harmonious balance of flavors that’s both soothing and energizing. With a buttery chocolate crust, this pie offers a perfect combination of textures from the crisp base to the luscious filling.
Ideal for serving 4-6 people, this pie is perfect for sharing with family and friends. It makes for a stunning centerpiece on your dessert table and is guaranteed to impress your guests with both its taste and presentation.
Whether you’re an experienced baker or trying your hand at pie-making for the first time, this Decadent Chocolate Peppermint Pie is a rewarding recipe that’s worth every effort. Gather your ingredients and follow the instructions below to create a memorable dessert for your holiday celebrations.
Ingredients (Serves 4-6):
- 1 1/2 cups chocolate wafer cookies, crushed
- 1/3 cup unsalted butter, melted
- 1 cup heavy cream
- 8 ounces semi-sweet chocolate, chopped
- 1 teaspoon peppermint extract
- 1/2 teaspoon vanilla extract
- 1/4 cup granulated sugar
- 3 large eggs
- Whipped cream, for garnish (optional)
- Crushed peppermint candies, for garnish (optional)
Instructions:
- Prepare the Crust: Preheat your oven to 350°F (175°C). In a mixing bowl, combine the crushed chocolate wafer cookies and melted butter. Stir until the mixture resembles wet sand. Press the mixture firmly into the bottom and up the sides of a 9-inch pie dish to form the crust.
- Bake the Crust: Place the pie dish in the preheated oven and bake for about 10 minutes until the crust is set and slightly firm. Remove from the oven and let it cool completely on a wire rack.
- Make the Filling: In a medium saucepan, heat the heavy cream over medium heat until it begins to simmer. Remove from heat and add the chopped semi-sweet chocolate. Let it sit for a minute to melt, then whisk until smooth and fully combined.
- Flavor the Filling: Stir in the peppermint extract, vanilla extract, and granulated sugar into the chocolate mixture. Mix until the sugar is dissolved and the extracts are evenly distributed.
- Incorporate the Eggs: Lightly beat the eggs in a separate bowl, then gradually whisk them into the chocolate mixture until fully incorporated. Verify the mixture is smooth and glossy.
- Fill the Crust: Pour the chocolate filling into the cooled crust, spreading it evenly with a spatula.
- Bake the Pie: Return the filled pie to the oven and bake for about 20-25 minutes, or until the filling is just set around the edges but slightly jiggly in the center.
- Cool and Garnish: Allow the pie to cool to room temperature before transferring it to the refrigerator to chill for at least 2 hours. Before serving, garnish with whipped cream and sprinkle with crushed peppermint candies for an extra festive touch.
Extra Tips: Confirm that the chocolate filling is smooth and lump-free by whisking it thoroughly before pouring it into the crust. When incorporating the eggs, add them gradually to prevent curdling, and whisk continuously.
To achieve clean slices, use a sharp knife dipped in hot water, wiping the blade between cuts. This pie can also be prepared a day in advance, making it a convenient choice for busy holiday preparations.
Creamy Eggnog Custard Pie
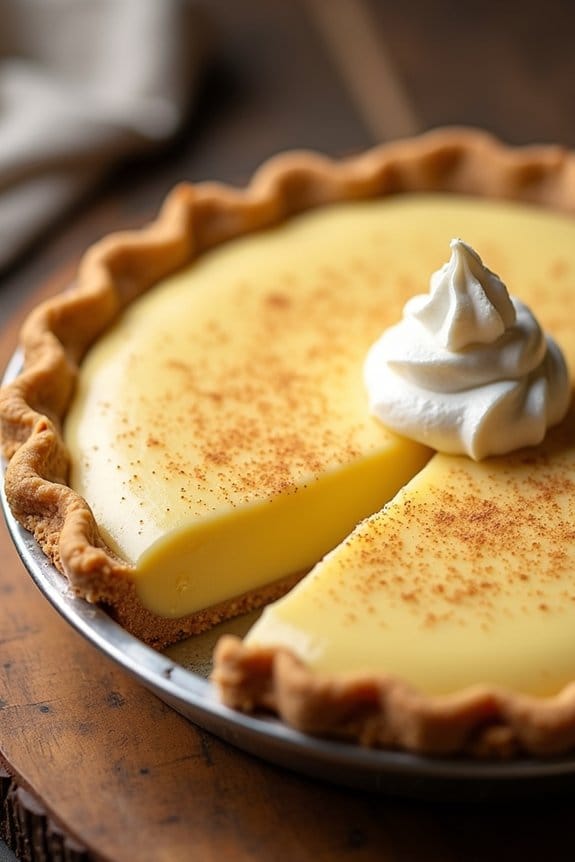
Here’s a complete recipe for a delicious Creamy Eggnog Custard Pie that’s perfect for the holiday season. This pie is a delightful blend of rich, creamy custard with the warm, comforting flavors of eggnog and nutmeg.
It’s the perfect dessert to impress your guests with its smooth texture and festive taste. This recipe serves 4-6 people, making it an ideal choice for a small gathering or family dinner.
Whether you’re an experienced baker or trying your hand at pie-making for the first time, this recipe is straightforward and satisfying. Follow the steps below to create a festive and indulgent treat that will undoubtedly become a holiday favorite.
Ingredients:
- 1 pre-made pie crust (9-inch)
- 1 1/2 cups eggnog
- 3/4 cup granulated sugar
- 1/4 cup cornstarch
- 1/2 teaspoon ground nutmeg
- 1/4 teaspoon salt
- 3 large egg yolks
- 1 tablespoon unsalted butter
- 1 teaspoon vanilla extract
- Whipped cream (optional, for serving)
- Ground cinnamon (optional, for garnish)
Cooking Instructions:
1. Preheat and Prepare Pie Crust: Preheat your oven to 350°F (175°C). Place the pre-made pie crust in a 9-inch pie dish. Use a fork to prick the bottom of the crust to prevent bubbling during baking.
Bake in the preheated oven for 10-12 minutes or until lightly golden. Remove from oven and let cool.
2. Mix Dry Ingredients: In a medium saucepan, combine the granulated sugar, cornstarch, ground nutmeg, and salt. Stir well to make sure the ingredients are evenly distributed.
3. Whisk Egg Yolks and Eggnog: In a separate bowl, whisk together the egg yolks and eggnog until smooth. Gradually add this mixture to the dry ingredients in the saucepan, whisking continuously to avoid lumps.
4. Cook the Custard: Place the saucepan over medium heat. Cook the mixture, stirring constantly, until it thickens and comes to a gentle boil. This should take about 5-7 minutes.
Once thickened, remove from heat.
5. Add Butter and Vanilla: Stir in the unsalted butter and vanilla extract until the butter is completely melted and the mixture is smooth.
6. Assemble the Pie: Pour the custard filling into the baked pie crust, spreading it evenly. Allow the pie to cool at room temperature for about 1 hour.
Then, transfer it to the refrigerator to chill for at least 2 hours, or until fully set.
7. Serve: Once the pie is set, slice it into wedges. Serve with a dollop of whipped cream on top and a sprinkle of ground cinnamon, if desired.
Extra Tips:
For the best results, make sure to use high-quality eggnog, as its flavor greatly influences the final taste of the pie.
If you prefer a stronger nutmeg flavor, feel free to add an extra pinch. This pie can be made a day in advance, allowing the flavors to meld together beautifully.
To prevent the pie crust from becoming soggy, make certain the custard is fully cooled before chilling. Enjoy your creamy eggnog custard pie with a hot cup of coffee or tea for a cozy holiday treat!
Spiced Gingerbread Cheesecake Pie

Experience the warm spices of gingerbread combined with the creamy richness of cheesecake in this delightful Spiced Gingerbread Cheesecake Pie. Perfect for the holiday season, this pie brings together a medley of flavors that capture the essence of Christmas in every bite.
The gingerbread crust, infused with molasses and spices, provides the perfect foundation for a luscious cheesecake filling that’s both fragrant and flavorful. Topped with a hint of whipped cream and a dusting of cinnamon, this dessert is bound to be a showstopper on your holiday table.
This recipe serves 4-6 people, making it an ideal choice for intimate holiday gatherings. Whether you’re a seasoned baker or a novice in the kitchen, this recipe is designed to guide you through creating a festive masterpiece. It’s a delightful way to end a holiday meal and impress your guests with its elegant presentation and unforgettable taste.
Ingredients:
- 1 1/4 cups gingerbread cookie crumbs
- 1/4 cup unsalted butter, melted
- 1 tablespoon granulated sugar
- 16 ounces cream cheese, softened
- 1/2 cup brown sugar, packed
- 1/4 cup molasses
- 2 large eggs
- 1 teaspoon vanilla extract
- 1 teaspoon ground ginger
- 1 teaspoon ground cinnamon
- 1/4 teaspoon ground nutmeg
- 1/4 teaspoon ground cloves
- 1 cup heavy whipping cream
- 2 tablespoons powdered sugar
- Ground cinnamon, for dusting
Cooking Instructions:
- Prepare the Crust: Preheat your oven to 350°F (175°C). In a medium bowl, combine the gingerbread cookie crumbs, melted butter, and granulated sugar. Mix until the crumbs are evenly coated with butter. Press the mixture into the bottom and up the sides of a 9-inch pie pan to form an even crust. Bake for 8-10 minutes, then set aside to cool.
- Make the Cheesecake Filling: In a large mixing bowl, beat the softened cream cheese and brown sugar together until smooth and creamy. Add the molasses, eggs, vanilla extract, ground ginger, cinnamon, nutmeg, and cloves. Mix until all ingredients are fully incorporated and the mixture is smooth.
- Assemble the Pie: Pour the cheesecake filling into the cooled gingerbread crust. Spread it evenly with a spatula.
- Bake the Pie: Place the pie in the preheated oven and bake for 35-40 minutes, or until the center is set and the edges are lightly golden. Remove from the oven and let it cool at room temperature for about 30 minutes, then refrigerate for at least 4 hours or overnight to set completely.
- Prepare the Whipped Cream: In a separate bowl, whip the heavy whipping cream with powdered sugar until soft peaks form. This will take about 3-5 minutes with an electric mixer on medium speed.
- Serve: Before serving, spread or pipe the whipped cream over the pie. Lightly dust with ground cinnamon for an added festive touch.
Extra Tips:
For the best results, verify the cream cheese is at room temperature before mixing; this will help achieve a smoother filling. You can make this pie a day in advance, allowing the flavors to meld beautifully overnight.
If you don’t have gingerbread cookies for the crust, gingersnap cookies are an excellent substitute. Additionally, when serving, use a warm knife for cleaner slices, and consider adding a dash of nutmeg to the whipped cream for extra spice. Enjoy your holiday baking!
Cranberry Orange Meringue Pie
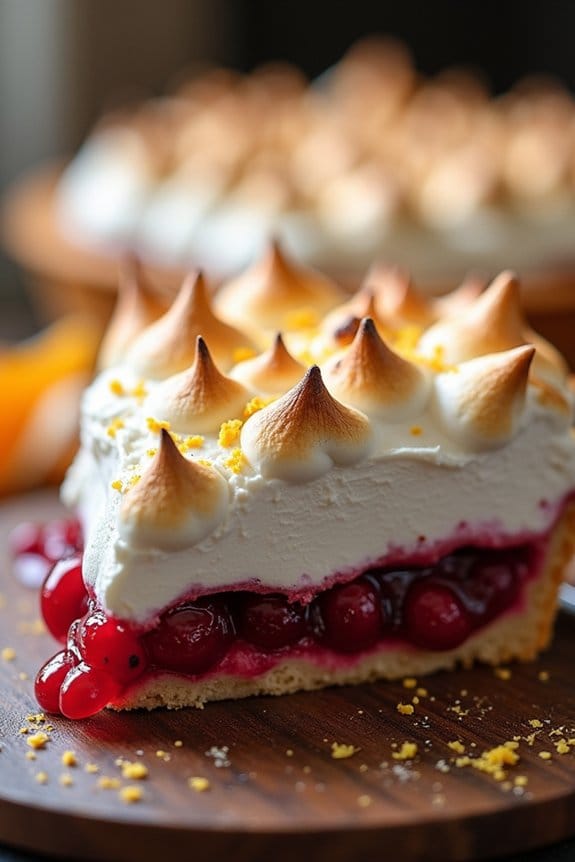
Cranberry Orange Meringue Pie is a delightful twist on the traditional lemon meringue pie, perfect for adding a festive touch to your holiday dessert table. This pie combines the tartness of cranberries with the invigorating zest of oranges, topped with a light and fluffy meringue that’s beautifully browned to perfection. The vibrant colors and flavors make it a standout dish for Christmas gatherings, and it’s sure to become a favorite with your family and friends.
The process of making Cranberry Orange Meringue Pie involves preparing a buttery pie crust, a tangy cranberry-orange filling, and a sweet meringue topping. The pie’s filling is a perfect balance of sweet and tart, while the meringue adds an airy sweetness that complements the robust flavors of the fruit. Whether you’re a seasoned baker or trying your hand at pie-making for the first time, this recipe offers a rewarding experience with a stunning and delicious result.
Ingredients for 4-6 servings:
- 1 pre-baked 9-inch pie crust
- 2 cups fresh or frozen cranberries
- 1 cup granulated sugar
- 1/4 cup freshly squeezed orange juice
- 1 tablespoon orange zest
- 3 tablespoons cornstarch
- 1/4 teaspoon salt
- 1/2 cup water
- 3 large egg yolks
- 2 tablespoons unsalted butter
For the Meringue:
- 3 large egg whites
- 1/4 teaspoon cream of tartar
- 1/2 cup granulated sugar
- 1/2 teaspoon vanilla extract
Cooking Instructions:
- Prepare the Cranberry Orange Filling:
- In a medium saucepan, combine the cranberries, 3/4 cup of granulated sugar, orange juice, orange zest, cornstarch, salt, and water. Cook over medium heat, stirring frequently until the mixture comes to a boil and thickens, about 5-7 minutes.
- Reduce the heat and simmer for another 3-5 minutes until the cranberries have burst and the mixture is thick. Remove from the heat.
- Finish the Filling:
- In a separate bowl, whisk together the egg yolks. Gradually add about 1/2 cup of the hot cranberry mixture to the yolks, whisking constantly to temper them.
- Return the tempered yolks to the saucepan with the remaining cranberry mixture and cook for an additional 2 minutes while stirring continuously. Remove from heat and stir in the butter until fully melted and incorporated.
- Assemble the Pie:
- Pour the cranberry orange filling into the pre-baked pie crust, smoothing the top with a spatula. Set aside to cool slightly while you prepare the meringue.
- Make the Meringue:
- In a clean mixing bowl, beat the egg whites and cream of tartar on medium speed until soft peaks form. Gradually add the remaining 1/2 cup of sugar, one tablespoon at a time, increasing the speed to high and beating until the egg whites are glossy and form stiff peaks. Beat in the vanilla extract.
- Top the Pie with Meringue:
- Spoon the meringue over the cranberry filling, spreading it to the edges of the crust to seal. Use the back of a spoon to create peaks and swirls on the meringue.
- Bake the Pie:
- Preheat your oven to 350°F (175°C). Bake the pie for 10-12 minutes, or until the meringue is golden brown. Remove from the oven and let cool at room temperature for at least 1 hour before serving.
Extra Tips:
When making meringue, make sure that your mixing bowl and beaters are completely clean and free of any grease, which can prevent the egg whites from whipping properly. Use room temperature eggs for better volume and stability in your meringue.
Additionally, sealing the meringue to the crust edges prevents it from weeping by trapping moisture out. This pie can be made a day in advance; just store it in a cool place, but avoid covering it tightly with plastic wrap to maintain the meringue’s texture.
Maple Pecan Pie With a Hint of Bourbon
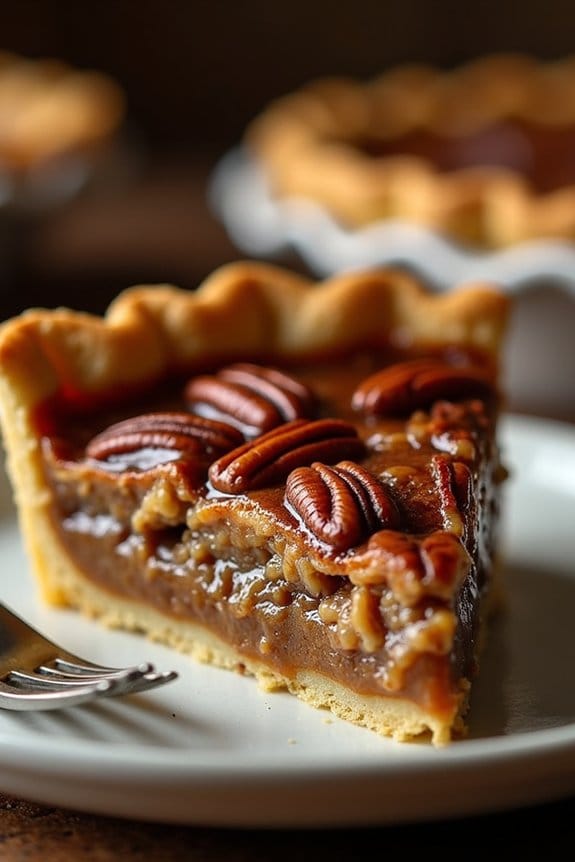
Maple Pecan Pie with a Hint of Bourbon is a delightful twist on the classic pecan pie, adding a rich depth with the inclusion of maple syrup and bourbon. This pie is perfect for adding a touch of sophistication to your holiday dessert table. The combination of toasted pecans, maple syrup, and bourbon creates a luxurious filling that sits atop a buttery, flaky crust, making it a memorable dessert for any Christmas celebration.
The pie’s filling is simple to prepare but results in an impressive and flavorful dessert that will surely please your guests. The bourbon enhances the natural sweetness of the maple syrup and pecans, providing a slight warmth and complexity that elevates the traditional flavor profile.
Whether you’re an experienced baker or a novice in the kitchen, this Maple Pecan Pie with a Hint of Bourbon is a must-try recipe that’s certain to become a staple in your holiday dessert repertoire.
Ingredients (serves 4-6):
- 1 unbaked 9-inch pie crust
- 1 cup pure maple syrup
- 1/2 cup packed brown sugar
- 3 large eggs
- 2 tablespoons unsalted butter, melted
- 2 tablespoons bourbon
- 1 teaspoon vanilla extract
- 1/4 teaspoon salt
- 1 1/2 cups pecan halves
Instructions:
- Preheat the Oven: Begin by preheating your oven to 350°F (175°C). This guarantees that the oven is at the right temperature when you’re ready to bake the pie.
- Prepare the Pie Crust: Roll out your pie dough and fit it into a 9-inch pie plate. Trim and crimp the edges as desired. Place the crust in the refrigerator to chill while you prepare the filling.
- Make the Filling: In a large mixing bowl, whisk together the maple syrup, brown sugar, eggs, melted butter, bourbon, vanilla extract, and salt until smooth and well combined.
- Add the Pecans: Stir the pecan halves into the maple syrup mixture, ensuring they’re fully coated with the filling.
- Assemble the Pie: Pour the pecan filling into the prepared pie crust, spreading the pecans evenly across the surface.
- Bake the Pie: Place the pie on the middle rack of the preheated oven and bake for 50-60 minutes, or until the filling is set around the edges but still slightly jiggly in the center. The pie will continue to set as it cools.
- Cool the Pie: Remove the pie from the oven and allow it to cool completely on a wire rack. This will take about 2-3 hours. The pie can also be made a day ahead and stored in the refrigerator until ready to serve.
Extra Tips:
For the best results, use high-quality pure maple syrup; avoid pancake syrup, as it won’t provide the same depth of flavor.
Toasting the pecans slightly before adding them to the filling can enhance their natural nuttiness. If you prefer a stronger bourbon flavor, you can increase the amount slightly, but be careful not to overpower the other flavors.
Additionally, when serving, consider topping each slice with a dollop of freshly whipped cream or a scoop of vanilla ice cream for an extra indulgent treat.
White Chocolate Raspberry Swirl Pie
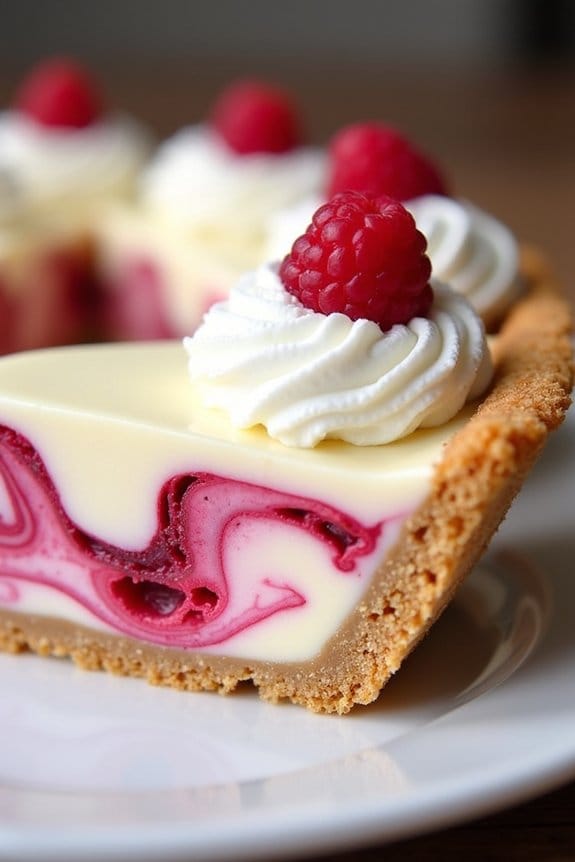
Indulge in the luxurious flavors of the White Chocolate Raspberry Swirl Pie, a perfect addition to your festive Christmas dessert table. This pie combines the creamy richness of white chocolate with the tartness of raspberries, creating a delightful contrast that’s both visually stunning and delectably delicious.
The smooth texture of the white chocolate filling is beautifully complemented by the vibrant raspberry swirls, making each bite a symphony of flavors. Perfect for serving 4-6 people, this pie isn’t only a treat for the taste buds but also a feast for the eyes.
The preparation involves creating a simple yet flavorful crust, followed by a luscious white chocolate filling and a homemade raspberry sauce for swirling. With a little patience and attention to detail, this pie will surely become a holiday favorite, winning over the hearts of your family and guests.
Ingredients for 4-6 servings:
- 1 1/2 cups graham cracker crumbs
- 1/4 cup granulated sugar
- 1/2 cup unsalted butter, melted
- 1 cup fresh or frozen raspberries
- 2 tablespoons water
- 1/4 cup granulated sugar (for raspberry sauce)
- 1 tablespoon cornstarch
- 12 oz white chocolate chips
- 8 oz cream cheese, softened
- 1/2 cup heavy cream
- 1 teaspoon vanilla extract
Cooking Instructions:
1. Prepare the Crust: Preheat your oven to 350°F (175°C). In a mixing bowl, combine the graham cracker crumbs, 1/4 cup of granulated sugar, and melted butter. Mix until the crumbs are evenly coated with butter.
Press the mixture firmly into the bottom and up the sides of a 9-inch pie pan to form the crust. Bake for 8-10 minutes or until lightly golden. Let it cool completely.
2. Make the Raspberry Sauce: In a small saucepan over medium heat, combine the raspberries, water, 1/4 cup of granulated sugar, and cornstarch. Stir continuously until the mixture starts to thicken and reaches a sauce-like consistency (~5-7 minutes).
Strain through a fine-mesh sieve to remove seeds. Set aside to cool.
3. Prepare the White Chocolate Filling: Melt the white chocolate chips in a heatproof bowl set over a pot of simmering water (double boiler method) or microwave in 30-second intervals, stirring in between, until smooth. Let cool slightly.
In a large bowl, beat the softened cream cheese until smooth, then gradually mix in the melted white chocolate. Add the heavy cream and vanilla extract, continuing to beat until the mixture is fluffy and well combined.
4. Assemble the Pie: Pour the white chocolate filling into the prepared crust, spreading evenly. Drizzle the raspberry sauce over the top of the filling.
Use a knife or toothpick to gently swirl the sauce into the filling, creating a marbled effect. Be careful not to over-mix the swirls.
5. Chill the Pie: Cover the pie with plastic wrap or aluminum foil and refrigerate for at least 4 hours, or until set. For best results, let it chill overnight.
Extra Tips:
For a perfectly smooth filling, verify that the cream cheese is fully softened to avoid lumps in the mixture. If you prefer a sweeter pie, you can adjust the sugar level in the raspberry sauce to taste.
When swirling the raspberry sauce, less is more; a gentle hand will create beautiful patterns without overpowering the white chocolate. To save time, the pie crust can be prepared a day in advance and stored in the refrigerator.
Enjoy this pie chilled for a rejuvenating, creamy treat!
Silky Salted Caramel Pie
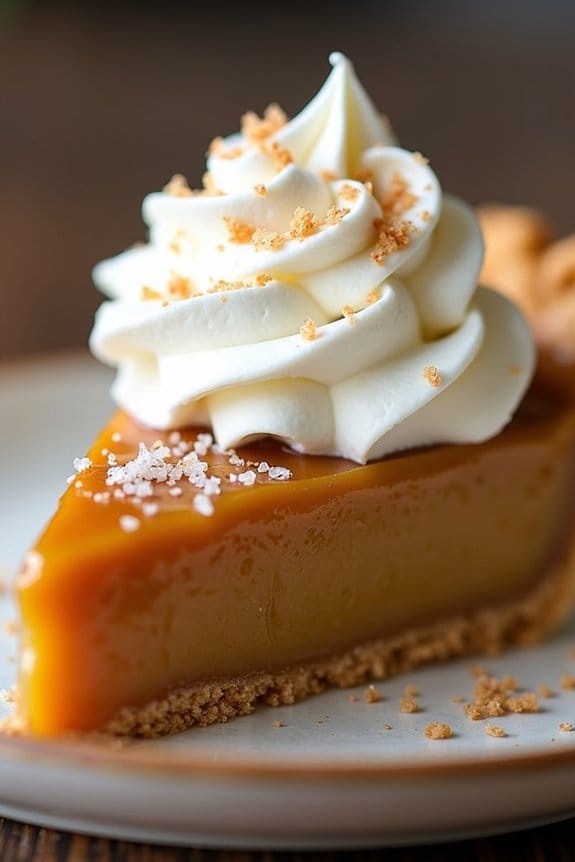
Silky Salted Caramel Pie is a decadent dessert that brings together the rich, buttery flavor of caramel with a perfectly salty finish. This pie is perfect for those who love a balance of sweet and salty, with a smooth and creamy texture that melts in your mouth.
It’s an ideal treat for the holiday season, offering a luxurious twist on traditional pies. Made with a buttery crust and a luscious filling, this pie is bound to impress your guests and become a new Christmas favorite.
The pie begins with a homemade graham cracker crust that provides a delightful crunch to complement the creamy filling. The filling itself is a silky mixture of caramel, cream, and a hint of vanilla, creating a velvety texture that pairs beautifully with the subtle saltiness. Topped with a sprinkle of flaky sea salt, this dessert is both elegant and indulgent.
Whether you’re a seasoned baker or trying your hand at making pies for the first time, this Silky Salted Caramel Pie is a delightful challenge that yields impressive results.
Ingredients (serving size: 4-6 people):
- 1 1/2 cups graham cracker crumbs
- 1/4 cup granulated sugar
- 1/2 cup unsalted butter, melted
- 1 cup granulated sugar (for caramel)
- 6 tablespoons unsalted butter (for caramel)
- 1/2 cup heavy cream
- 1 teaspoon pure vanilla extract
- 1/2 teaspoon sea salt (plus extra for topping)
- 1 cup heavy cream (for topping)
- 2 tablespoons confectioners’ sugar
Instructions:
1. Prepare the Crust: Preheat your oven to 350°F (175°C). In a medium bowl, combine the graham cracker crumbs and 1/4 cup of granulated sugar. Stir in the melted butter until the mixture resembles wet sand.
Press the mixture evenly into a 9-inch pie pan, making certain the bottom and sides are well covered. Bake for 10 minutes until lightly golden, then set aside to cool.
2. Make the Caramel Filling: In a medium saucepan over medium heat, melt 1 cup of granulated sugar, stirring continuously until it turns a deep amber color. Carefully add 6 tablespoons of butter, stirring until fully melted.
Slowly pour in 1/2 cup of heavy cream while stirring continuously until the mixture is smooth. Remove from heat and stir in the vanilla extract and 1/2 teaspoon of sea salt. Allow the caramel to cool slightly.
3. Assemble the Pie: Pour the cooled caramel filling into the prepared crust, smoothing the top with a spatula. Refrigerate the pie for at least 2 hours, or until the filling is set.
4. Prepare the Whipped Cream Topping: In a large mixing bowl, beat 1 cup of heavy cream with 2 tablespoons of confectioners’ sugar until soft peaks form. Spread the whipped cream over the set caramel filling.
5. Garnish and Serve: Just before serving, sprinkle a pinch of sea salt over the whipped cream topping for an added touch of flavor. Slice and serve chilled.
Extra Tips: When making the caramel, keep a close eye on the sugar as it melts to prevent burning. It can go from perfect to burnt very quickly.
Use a heavy-bottomed saucepan to ensure even heat distribution. If your caramel seizes up when you add the cream, don’t worry—just keep stirring and it should smooth out. For a more intense flavor, consider using a high-quality sea salt for garnishing.
This pie can be made a day ahead, allowing the flavors to meld beautifully.
Nutty Almond Joy Pie
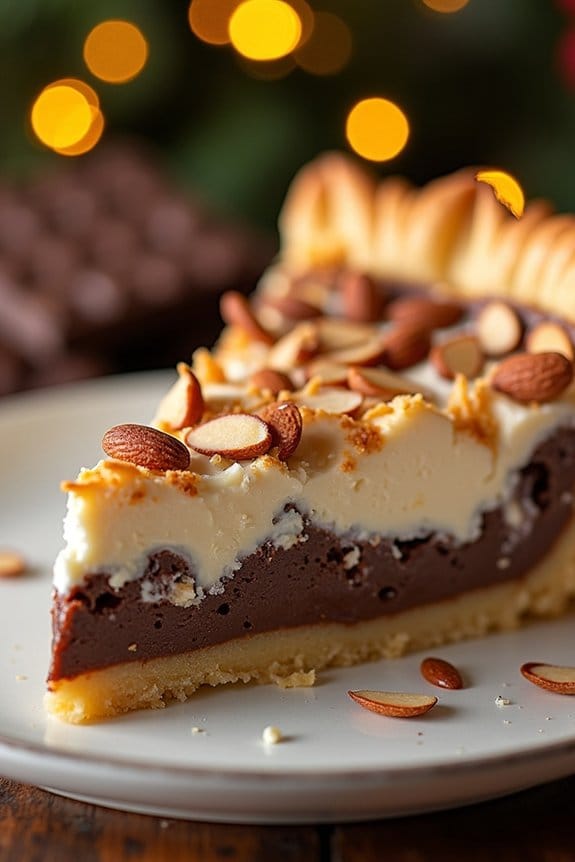
Indulge in the delightful combination of flavors with this Nutty Almond Joy Pie, perfect for a festive Christmas dessert. Inspired by the classic candy bar, this pie features a creamy coconut filling, a rich chocolate layer, and a crunchy almond topping. It’s a show-stopping dessert that will have your guests asking for seconds.
The pie isn’t only visually appealing but also fills your home with the sweet aroma of chocolate and coconut, making it an ideal centerpiece for your holiday table.
Whether you’re a seasoned baker or a novice in the kitchen, this Nutty Almond Joy Pie is straightforward to prepare and guarantees a delicious outcome. The prep time is minimal, allowing you to spend more time with your loved ones during the holiday season.
With its heavenly combination of textures and flavors, this pie is sure to become a new Christmas tradition in your household.
Ingredients for 4-6 servings:
- 1 pre-made pie crust (9-inch)
- 1 1/2 cups of sweetened shredded coconut
- 1 cup of semi-sweet chocolate chips
- 1 cup of slivered almonds
- 1/2 cup of sweetened condensed milk
- 1 teaspoon of vanilla extract
- 1/4 teaspoon of almond extract
- 1/4 teaspoon of salt
- 2 eggs
- 2 tablespoons of butter, melted
Cooking Instructions:
- Preheat the Oven: Start by preheating your oven to 350°F (175°C). This guarantees that your pie cooks evenly and the crust turns golden brown.
- Prepare the Pie Crust: Place the pre-made pie crust in a 9-inch pie dish. Press it firmly into the dish and crimp the edges for an attractive finish. Set aside while you prepare the filling.
- Mix the Coconut Filling: In a large mixing bowl, combine the sweetened shredded coconut, condensed milk, vanilla extract, almond extract, salt, and melted butter. Mix well until all ingredients are fully incorporated.
- Add Eggs: Crack the eggs into the coconut mixture and stir thoroughly. The eggs help bind the filling and give it a custard-like consistency.
- Assemble the Pie: Pour the coconut filling into the prepared pie crust, spreading it evenly. Sprinkle the chocolate chips over the top, followed by an even layer of slivered almonds.
- Bake the Pie: Place the pie on the middle rack of the preheated oven. Bake for 25-30 minutes or until the edges are golden brown and the center is set. A slight jiggle in the middle is okay as it will firm up as it cools.
- Cool and Serve: Allow the pie to cool to room temperature before serving. This guarantees that the filling sets properly and the flavors meld together beautifully.
Extra Tips:
For an enhanced flavor, consider toasting the slivered almonds before using them as a topping. This will bring out a deeper, nuttier flavor that complements the coconut and chocolate beautifully.
If you prefer a less sweet pie, you can reduce the amount of sweetened condensed milk or opt for unsweetened coconut. Additionally, serve the pie with a dollop of whipped cream or a scoop of vanilla ice cream for an extra treat.
Enjoy your Nutty Almond Joy Pie and the joy it brings this holiday season!
Luscious Lemon Snow Pie
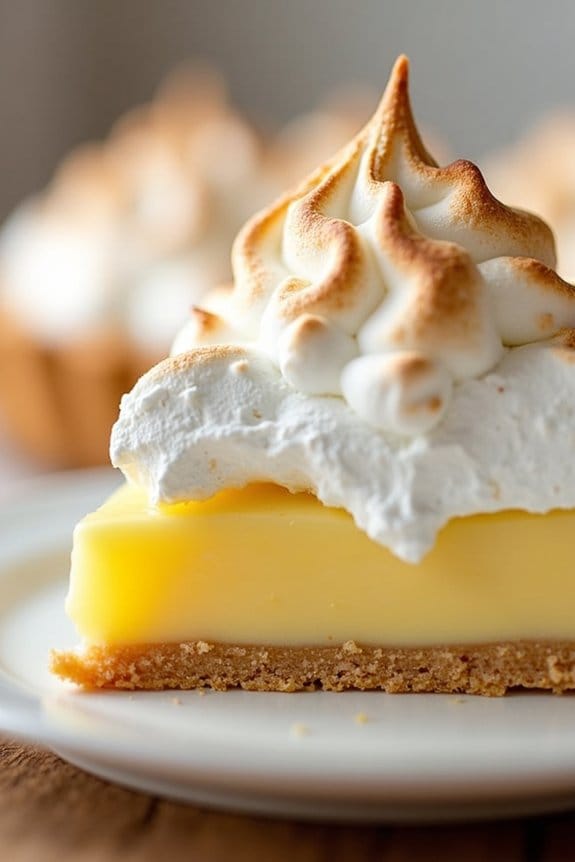
The Luscious Lemon Snow Pie is a delightful treat perfect for a festive Christmas gathering. Its invigorating citrus flavor, paired with a light and fluffy texture, makes it a crowd-pleaser that stands out among the usual holiday sweets. This pie combines the tartness of lemon with a creamy filling and a crisp graham cracker crust, topped with a snowy meringue that gives it its name.
Whether you’re hosting a party or simply want to offer your family a special dessert, this pie is sure to impress with its vibrant taste and elegant appearance.
Preparing the Luscious Lemon Snow Pie requires a little time and patience, but the end result is worth every effort. This recipe serves 4-6 people, making it ideal for an intimate holiday dinner or a small gathering. The process involves creating a buttery graham cracker crust, whipping up a smooth lemon filling, and crowning it all with a fluffy meringue that’s baked to perfection.
With this recipe, you’ll have a pie that not only looks stunning but tastes heavenly as well.
Ingredients:
- 1 ½ cups graham cracker crumbs
- 6 tablespoons unsalted butter, melted
- ¼ cup granulated sugar
- 1 can (14 ounces) sweetened condensed milk
- ½ cup freshly squeezed lemon juice
- 1 tablespoon lemon zest
- 4 large egg yolks
- 4 large egg whites
- ¼ teaspoon cream of tartar
- ½ cup granulated sugar (for meringue)
Cooking Instructions:
- Prepare the Crust: Preheat your oven to 350°F (175°C). In a medium bowl, combine graham cracker crumbs, melted butter, and ¼ cup of granulated sugar. Mix until the crumbs are evenly coated. Press the mixture firmly into the bottom and up the sides of a 9-inch pie pan. Bake the crust for 10 minutes, then let it cool.
- Make the Filling: In a large bowl, whisk together the sweetened condensed milk, lemon juice, lemon zest, and egg yolks until smooth and well combined. Pour the lemon mixture into the cooled crust, smoothing the top with a spatula.
- Prepare the Meringue: In a clean, dry bowl, beat the egg whites with an electric mixer on medium speed until foamy. Add the cream of tartar and continue to beat until soft peaks form. Gradually add the ½ cup of granulated sugar, one tablespoon at a time, beating on high speed until stiff peaks form.
- Assemble the Pie: Gently spread the meringue over the lemon filling, making sure it covers the filling completely and sealing it to the crust edges to prevent shrinking. Use the back of a spoon to create peaks and swirls for an attractive finish.
- Bake the Pie: Place the pie in the oven and bake for 12-15 minutes, or until the meringue is golden brown. Remove from the oven and let it cool to room temperature. Refrigerate for at least 2 hours before serving to allow the pie to set properly.
Extra Tips:
For the best results, make certain that your mixing bowls and beaters are completely clean and free from any grease when making the meringue, as any residue can prevent the egg whites from whipping properly.
If possible, use fresh lemons rather than bottled juice to achieve the most vibrant flavor. Additionally, when separating the eggs, be careful not to get any yolk in the whites, as this can also affect the meringue’s ability to form peaks.
Finally, for a twist, consider adding a hint of vanilla extract to the meringue for an extra layer of flavor.
Rich Mocha Cream Pie
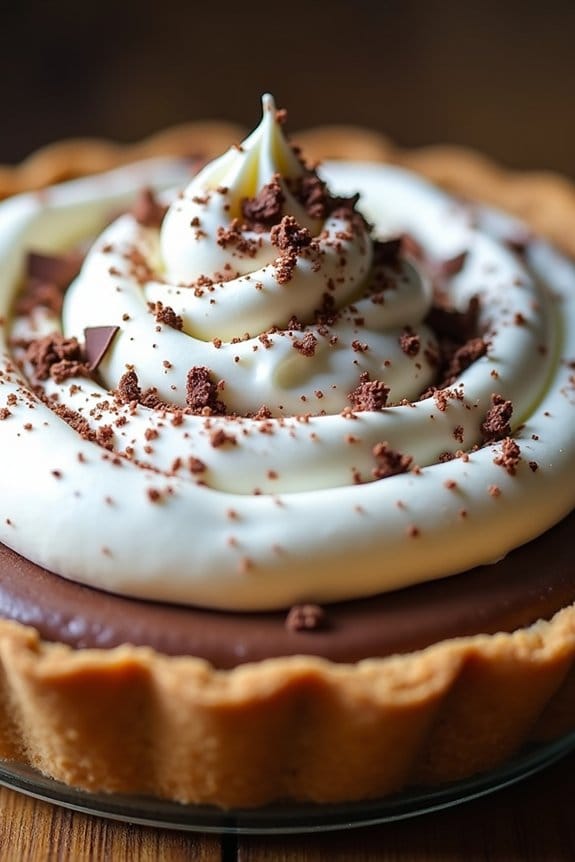
Indulge in the decadent flavors of a Rich Mocha Cream Pie this holiday season. This sumptuous dessert combines the smooth, rich taste of chocolate with the bold notes of coffee, creating an irresistible treat that’s perfect for Christmas gatherings.
The silky mocha filling is nestled in a buttery, flaky pie crust and topped with a generous layer of whipped cream, offering a delightful contrast of textures. Whether you’re serving it at a festive dinner or as a sweet finish to a holiday brunch, this pie is sure to become a beloved favorite.
This recipe for Rich Mocha Cream Pie serves 4 to 6 people, making it an ideal choice for intimate gatherings or a cozy family dessert. The preparation involves creating a homemade pie crust, a luscious mocha filling, and a light whipped cream topping.
With a bit of attention to detail and a love for all things chocolate and coffee, you’ll have a show-stopping dessert that’s as beautiful as it’s delicious.
Ingredients:
- 1 9-inch pie crust (homemade or store-bought)
- 1 cup granulated sugar
- 3 tablespoons cornstarch
- 2 tablespoons unsweetened cocoa powder
- 1/4 teaspoon salt
- 2 cups whole milk
- 3 large egg yolks, lightly beaten
- 2 tablespoons instant coffee granules
- 1 teaspoon vanilla extract
- 2 tablespoons unsalted butter
- 1 cup heavy whipping cream
- 2 tablespoons powdered sugar
- Chocolate shavings or curls for garnish (optional)
Instructions:
- Prepare the Pie Crust:
- Preheat your oven to 375°F (190°C).
- Roll out the pie dough to fit a 9-inch pie pan. Line the pan with the dough, trimming any excess from the edges.
- Prick the bottom of the crust with a fork to prevent bubbling. Line the crust with parchment paper and fill with pie weights or dried beans.
- Bake for 15 minutes, then remove the weights and parchment. Bake for an additional 5 to 7 minutes until the crust is golden brown. Let it cool completely.
- Make the Mocha Filling:
- In a medium saucepan, whisk together sugar, cornstarch, cocoa powder, and salt.
- Gradually whisk in the milk until smooth. Place the saucepan over medium heat and cook, stirring constantly, until the mixture thickens and comes to a boil.
- In a small bowl, combine the egg yolks. Gradually whisk in a small amount of the hot milk mixture to temper the eggs, then slowly pour the egg mixture back into the saucepan, whisking continuously.
- Cook for 2 more minutes, stirring constantly, until the filling thickens further.
- Remove from heat and stir in the instant coffee granules, vanilla extract, and butter until smooth.
- Pour the filling into the cooled pie crust and smooth the top. Let it cool to room temperature, then refrigerate for at least 4 hours, or until set.
- Prepare the Whipped Cream Topping:
- In a chilled mixing bowl, beat the heavy whipping cream with an electric mixer until soft peaks form.
- Gradually add the powdered sugar and continue to beat until stiff peaks form.
- Spread the whipped cream over the chilled mocha filling. Garnish with chocolate shavings or curls if desired.
Extra Tips:
For the perfect Rich Mocha Cream Pie, make sure that the pie crust is fully cooled before adding the filling to prevent it from becoming soggy.
When making the mocha filling, continuous stirring is vital to prevent lumps and guarantee a silky texture. If you’re a coffee enthusiast, you can enhance the coffee flavor by adding a little more instant coffee granules to taste.
Finally, for a decorative touch, use a vegetable peeler to create chocolate curls from a bar of chocolate, adding an elegant finish to your pie.
Festive Red Velvet Pie
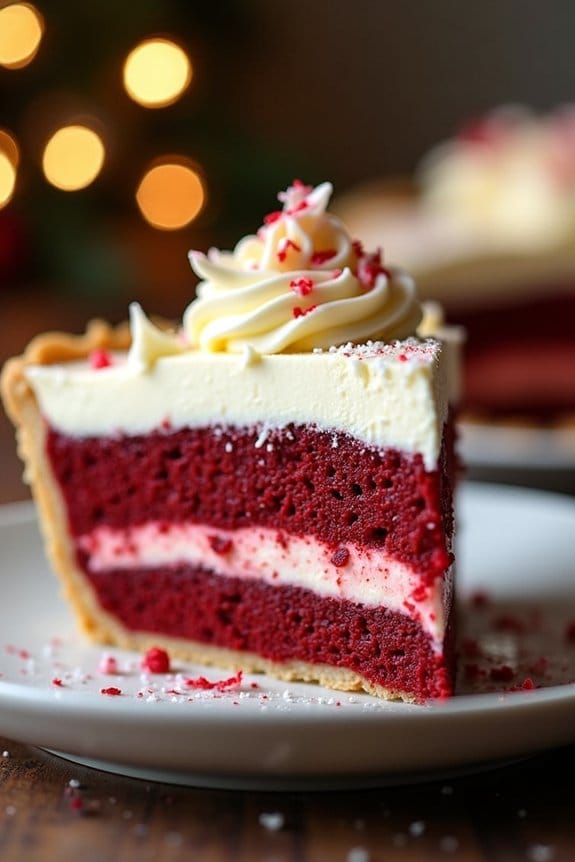
The holiday season is the perfect time to indulge in delicious and beautiful desserts, and a Festive Red Velvet Pie is a stunning addition to any Christmas spread. This pie combines the rich and velvety flavors of the classic red velvet cake with a creamy pie filling, creating a decadent dessert that captures the spirit of the holidays.
With its vibrant red color and creamy texture, this pie not only tastes divine but also adds a festive touch to your dining table. The smooth cream cheese layer complements the subtly chocolatey red velvet filling, making it an irresistible treat for family and friends.
Whether you’re hosting a large Christmas gathering or enjoying a cozy dinner with loved ones, this Festive Red Velvet Pie is sure to impress. The recipe is straightforward, yet yields a luscious dessert that embodies the warmth and joy of the holiday season.
The contrast of the red velvet filling against a crisp crust, topped with a light cream cheese layer, makes each slice a delightful experience. Best of all, this recipe serves 4-6 people, making it perfect for sharing during the festive season.
Ingredients (serves 4-6):
- 1 pre-made 9-inch pie crust
- 1 cup granulated sugar
- 2 tablespoons unsweetened cocoa powder
- 1/2 cup unsalted butter, softened
- 2 large eggs
- 1 cup buttermilk
- 2 tablespoons red food coloring
- 1 teaspoon vanilla extract
- 1 teaspoon white vinegar
- 1 teaspoon baking soda
- 8 ounces cream cheese, softened
- 1/2 cup powdered sugar
- 1 teaspoon vanilla extract (for cream cheese layer)
Cooking Instructions:
- Preheat and Prepare: Preheat your oven to 350°F (175°C). Roll out your pre-made pie crust and gently fit it into a 9-inch pie dish. Trim any excess dough and crimp the edges as desired. Set aside.
- Mix Red Velvet Filling: In a large mixing bowl, combine the granulated sugar and cocoa powder. Add the softened butter and mix until creamy. Beat in the eggs one at a time until well combined. Stir in the buttermilk, red food coloring, and vanilla extract until you have a smooth batter.
- Activate Leavening Agents: In a small bowl, combine the white vinegar and baking soda. The mixture will fizz. Quickly fold this mixture into the red velvet batter, ensuring it’s evenly distributed.
- Bake the Pie: Pour the red velvet batter into the prepared pie crust. Place the pie in the preheated oven and bake for about 30-35 minutes, or until the center is set and a toothpick inserted comes out clean. Remove from the oven and allow to cool completely.
- Prepare Cream Cheese Layer: In a separate bowl, beat the softened cream cheese until smooth. Gradually add the powdered sugar and vanilla extract, mixing until the mixture is creamy and free of lumps.
- Assemble the Pie: Once the pie has cooled completely, spread the cream cheese mixture evenly over the top of the red velvet filling. Use a spatula to smooth out the surface.
- Chill and Serve: Refrigerate the pie for at least 2 hours, allowing the flavors to meld together and the cream cheese layer to set. Slice and serve chilled.
Extra Tips:
For an extra festive touch, consider garnishing your Festive Red Velvet Pie with white chocolate shavings or a sprinkle of edible glitter. If you prefer a homemade pie crust, feel free to use your favorite recipe for a personalized touch.
When mixing the red velvet batter, be sure to incorporate the food coloring well to achieve a vibrant red hue. Finally, it’s vital to let the pie cool completely before adding the cream cheese layer to prevent it from melting. Enjoy this delightful dessert as the perfect sweet ending to your holiday celebrations!
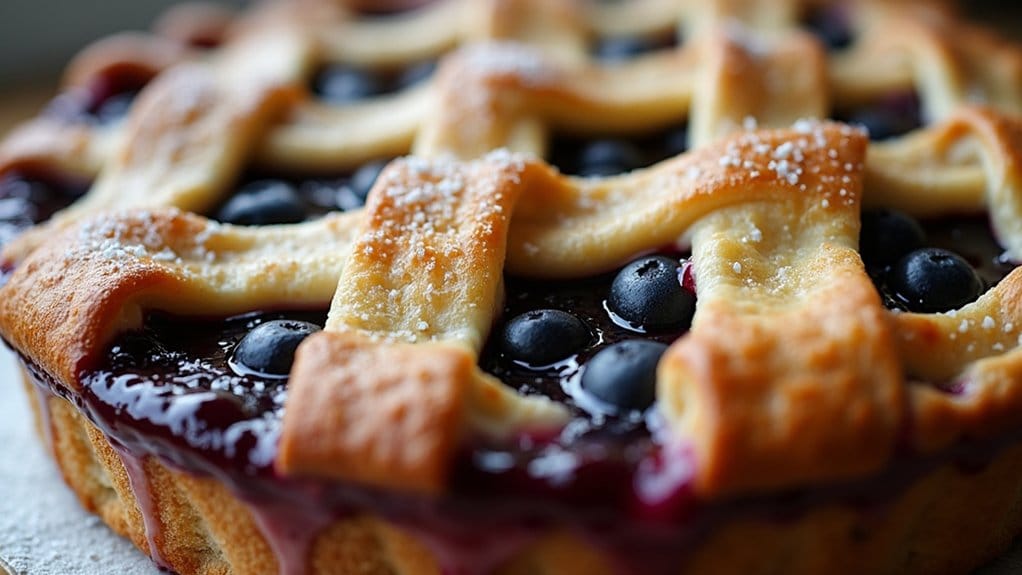
Winter Wonderland Blueberry Pie
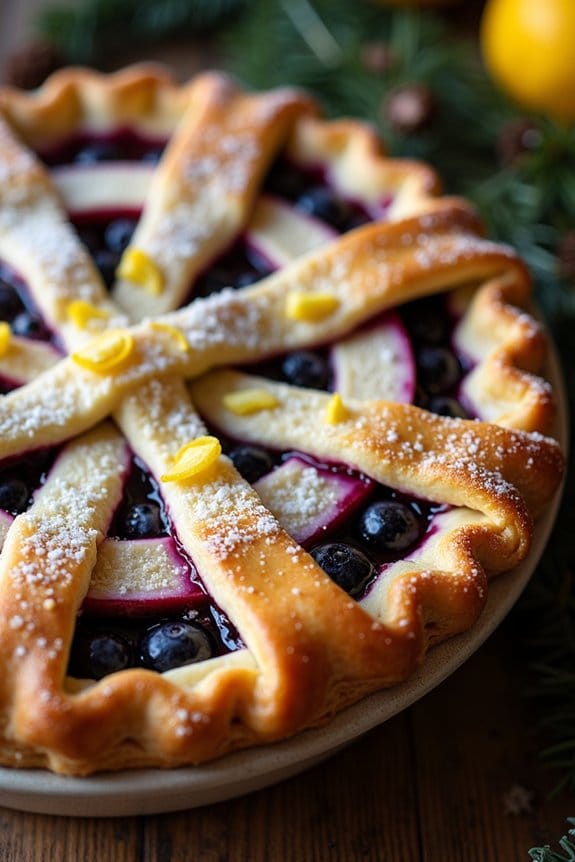
Winter Wonderland Blueberry Pie is a festive and delightful treat perfect for the holiday season. This pie combines the sweet and tart flavors of fresh blueberries with a hint of lemon zest, all encased in a flaky, buttery crust. With its vibrant color and rich taste, this pie will surely become a favorite at your Christmas gatherings, providing a wintery aesthetic that complements the holiday table.
This blueberry pie isn’t only visually stunning but also incredibly satisfying to make. The process involves creating a homemade pie crust and filling it with a luscious blueberry mixture that’s bursting with flavor. Whether you’re an experienced baker or trying your hand at pie-making for the first time, this Winter Wonderland Blueberry Pie promises to be a rewarding and delicious experience.
Ingredients for 4-6 servings:
- 2 cups all-purpose flour
- 1 teaspoon salt
- 1 tablespoon granulated sugar
- 1 cup unsalted butter, chilled and cubed
- 4-6 tablespoons ice water
- 4 cups fresh blueberries
- 3/4 cup granulated sugar
- 3 tablespoons cornstarch
- 1 tablespoon lemon juice
- Zest of 1 lemon
- 1 teaspoon vanilla extract
- 1/4 teaspoon ground cinnamon
- 1 large egg (for egg wash)
- Coarse sugar, for sprinkling
Cooking Instructions:
1. Prepare the Pie Crust: In a large bowl, mix the flour, salt, and sugar. Add the cubed butter and use a pastry cutter or your fingers to blend until the mixture resembles coarse crumbs. Gradually add ice water, one tablespoon at a time, mixing until the dough comes together.
Divide the dough into two discs, wrap in plastic wrap, and refrigerate for at least 1 hour.
2. Make the Blueberry Filling: In a medium-sized bowl, combine the blueberries, sugar, cornstarch, lemon juice, lemon zest, vanilla extract, and cinnamon. Toss gently to coat the blueberries evenly. Set aside to allow the flavors to meld.
3. Roll Out the Dough: Preheat your oven to 375°F (190°C). On a lightly floured surface, roll out one disc of dough to fit a 9-inch pie pan. Carefully transfer the rolled dough into the pan, trimming any excess overhang.
Roll out the second disc for the top crust or create lattice strips if you prefer a lattice top.
4. Assemble the Pie: Pour the blueberry filling into the prepared crust, spreading it evenly. Top with the second crust or lattice strips, sealing the edges by crimping them together. Beat the egg and brush it over the top crust for a golden finish. Sprinkle coarse sugar for added texture and sweetness.
5. Bake the Pie: Place the pie on a baking sheet to catch any drips and bake in the preheated oven for 45-50 minutes, or until the crust is golden brown and the filling is bubbly. If the edges brown too quickly, cover them with foil.
6. Cool and Serve: Allow the pie to cool on a wire rack for at least 2 hours before serving. This will help the filling set properly. Serve warm or at room temperature for the best flavor.
Extra Tips:
For an even flakier crust, make sure your butter is very cold before incorporating it into the flour. You can also freeze the butter for a few minutes before starting the dough.
When adding water to the dough, use just enough to bring it together without making it sticky. If fresh blueberries are unavailable, frozen ones can be used, but increase the cornstarch slightly to account for extra moisture.
Finally, letting the pie cool completely is vital for the filling to firm up, making it easier to slice and serve.
