

As the holiday season approaches, I’m always excited to find festive treats that align with my health goals. This year, I’ve come across a delightful collection of healthy Christmas desserts. Think dark chocolate avocado truffles and guilt-free gingerbread cookies. These recipes use wholesome ingredients, perfect for satisfying a sweet tooth while staying mindful. Curious to explore more?
Dark Chocolate Avocado Truffles
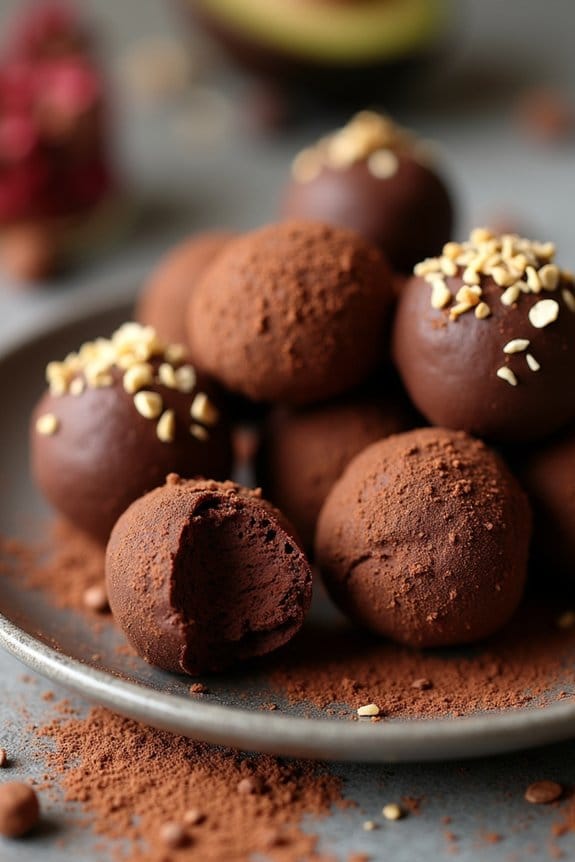
Dark Chocolate Avocado Truffles are a delicious and healthy indulgence perfect for the holiday season. These truffles combine the creamy texture of ripe avocados with rich dark chocolate, creating a decadent treat that’s both satisfying and guilt-free. By replacing traditional butter or cream with avocado, this recipe lowers the calorie content while providing an abundance of heart-healthy fats and antioxidants.
The subtle sweetness from the chocolate pairs beautifully with the smoothness of the avocado, resulting in a truffle that melts in your mouth. Not only are these truffles a healthier alternative to traditional holiday sweets, but they’re also incredibly simple to make. With just a few ingredients, you can whip up a batch of these indulgent bites in no time.
Whether you’re hosting a festive gathering or simply looking for a sweet treat to enjoy with family, these Dark Chocolate Avocado Truffles are sure to impress. Plus, they make for an elegant homemade gift that conveys warmth and thoughtfulness.
Ingredients (serving size: 4-6 people):
- 2 ripe avocados
- 200g dark chocolate (70% cacao or higher)
- 1 teaspoon vanilla extract
- 1/4 teaspoon salt
- 2 tablespoons unsweetened cocoa powder
- Optional toppings: crushed nuts, shredded coconut, or cacao nibs
Cooking Instructions:
- Prepare the Avocados: Slice the avocados in half, remove the pits, and scoop the flesh into a mixing bowl. Mash the avocado with a fork until it’s smooth and free of lumps.
- Melt the Chocolate: Break the dark chocolate into small pieces and melt it using a double boiler or microwave. If using a microwave, heat the chocolate in 30-second intervals, stirring in between, until the chocolate is fully melted and smooth.
- Combine Ingredients: Add the melted chocolate to the mashed avocado. Mix in the vanilla extract and salt. Stir the mixture until all ingredients are thoroughly combined and the texture is smooth.
- Chill the Mixture: Cover the bowl with plastic wrap and refrigerate for about 30 minutes to an hour, or until the mixture is firm enough to handle.
- Form the Truffles: Once the mixture has set, use a spoon or melon baller to scoop small portions of the chocolate avocado mixture. Roll them between your palms to form small balls.
- Coat the Truffles: Roll each truffle in cocoa powder to coat the surface. If desired, roll them in additional toppings like crushed nuts, shredded coconut, or cacao nibs for extra flavor and texture.
- Serve or Store: Place the finished truffles on a plate or in a container. Store them in the refrigerator until ready to serve. They should be kept chilled to maintain their shape and texture.
Extra Tips:
When making Dark Chocolate Avocado Truffles, verify your avocados are ripe for the best creamy texture. Overripe or under-ripe avocados can affect the final consistency.
If you’re using a microwave to melt the chocolate, be cautious not to overheat it, as chocolate burns easily and can develop a grainy texture. For a touch of holiday flair, consider adding a pinch of cinnamon or cayenne pepper to the cocoa powder before rolling the truffles, adding a subtle warmth and spice.
Finally, these truffles can be stored in an airtight container in the refrigerator for up to a week, making them a convenient make-ahead dessert option.
Coconut Snowball Energy Bites
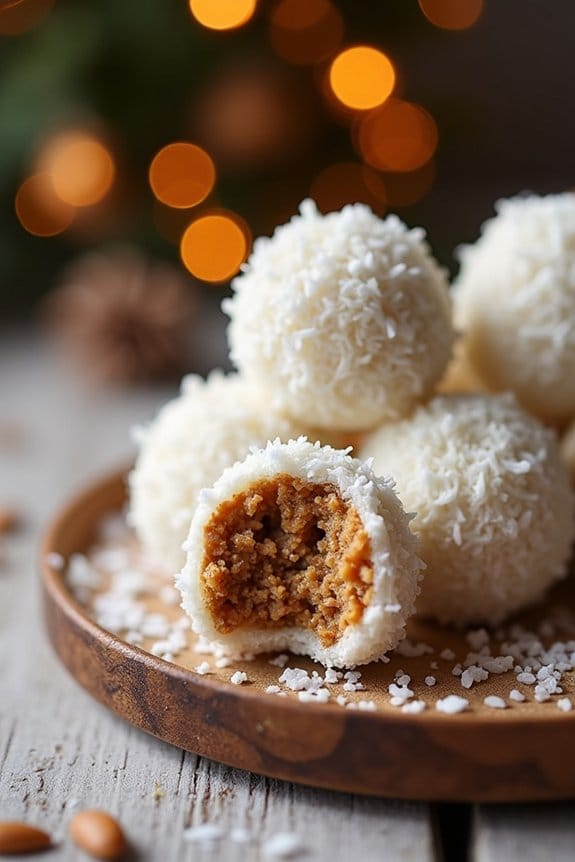
Coconut Snowball Energy Bites are the perfect healthy treat to grace your holiday dessert table this Christmas. These delightful bites aren’t only deliciously festive but also packed with wholesome ingredients that provide a burst of energy. Made with natural sweeteners and healthy fats, these energy bites are a guilt-free indulgence that will satisfy your sweet tooth while keeping your health goals on track.
Whether you’re hosting a holiday party or looking for a quick snack to keep you energized during the bustling season, these Coconut Snowball Energy Bites are sure to be a hit.
Perfectly sized for easy snacking, these energy bites are easy to prepare and require no baking, making them a convenient option for busy holiday schedules. The combination of shredded coconut, nuts, and dates creates a chewy texture that’s both satisfying and nourishing. The subtle sweetness from the honey or maple syrup balances out the rich flavors, and the hint of vanilla adds a warm, comforting aroma.
These bites are also versatile, allowing you to customize them with your favorite add-ins like chocolate chips or dried fruit, making them a versatile addition to your holiday dessert repertoire.
Ingredients for 4-6 servings:
- 1 cup shredded unsweetened coconut, plus more for rolling
- 1/2 cup almonds
- 1/2 cup cashews
- 1 cup pitted Medjool dates
- 2 tablespoons coconut oil
- 2 tablespoons honey or maple syrup
- 1 teaspoon vanilla extract
- Pinch of salt
Cooking Instructions:
- Prepare the Ingredients: Begin by measuring out all your ingredients. Pit the dates if they aren’t already pitted, and set aside.
- Blend the Nuts: In a food processor, combine the almonds and cashews. Pulse until the nuts are finely chopped but not turned into a paste. Transfer the chopped nuts to a bowl and set aside.
- Combine the Dates and Coconut Oil: In the same food processor (no need to clean it), add the pitted dates and coconut oil. Blend until the dates form a paste-like consistency.
- Mix the Ingredients: Add the chopped nuts, shredded coconut, honey or maple syrup, vanilla extract, and salt to the food processor with the date mixture. Pulse until all the ingredients are well combined and the mixture holds together when pressed.
- Shape the Bites: Using your hands, roll tablespoons of the mixture into small balls. If the mixture is too sticky, lightly dampen your hands with water to prevent sticking.
- Roll in Coconut: Spread the extra shredded coconut on a plate. Roll each energy bite in the coconut until fully coated. This step not only adds flavor but also gives the bites their snowball-like appearance.
- Chill the Bites: Place the coconut-coated energy bites on a baking sheet or plate lined with parchment paper. Chill in the refrigerator for at least 30 minutes to firm up before serving.
Extra Tips:
For best results, use fresh, moist Medjool dates as they help bind the mixture together more effectively. If your dates are dry, soak them in warm water for about 10 minutes and drain before using.
To add variety, you can incorporate different nuts or seeds, or even include a handful of mini chocolate chips for a chocolatey twist. Store these Coconut Snowball Energy Bites in an airtight container in the refrigerator for up to a week or freeze them for up to a month. Enjoy them as a quick snack or a delightful treat during the festive season!
Spiced Pear and Almond Tart
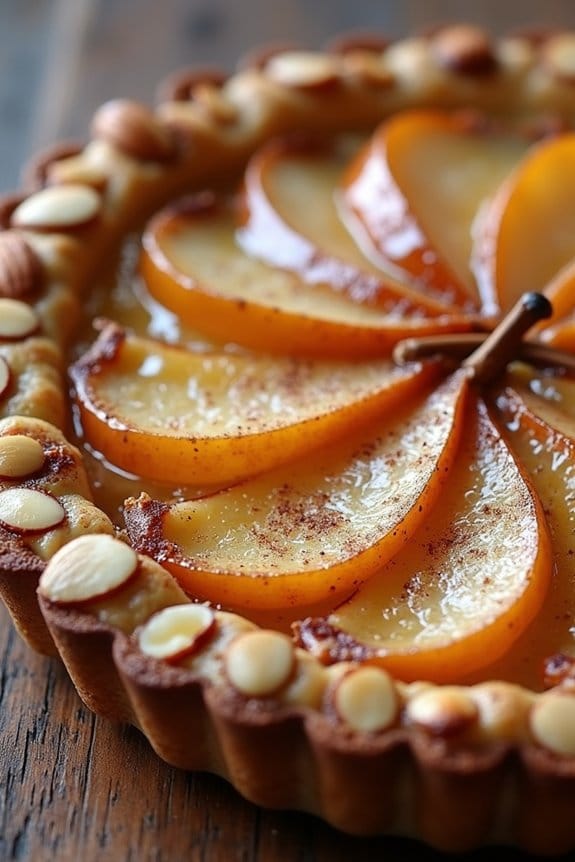
Spiced Pear and Almond Tart is a delightful and healthy dessert option that captures the cozy flavors of the holiday season. This elegant tart features a buttery almond crust, a luscious almond filling, and tender spiced pears that are beautifully arranged on top. It’s the perfect balance of sweetness and spice, and makes for a stunning centerpiece at any festive gathering.
The combination of pears and almonds not only creates a harmonious flavor profile but also offers nutritional benefits, as both ingredients are rich in fiber and vitamins. Creating this tart is a rewarding experience, as it allows you to incorporate fresh, seasonal produce into your holiday menu in a creative way.
The pears are spiced with cinnamon and nutmeg, providing warmth and depth to the dish, while the almond base adds a nutty richness that complements the fruit perfectly. This dessert isn’t only visually appealing but also satisfying in taste, making it a crowd-pleaser for family and friends. With a few simple steps, you can create a beautiful and delicious Spiced Pear and Almond Tart that everyone will enjoy.
Ingredients (Serves 4-6):
- 1 1/4 cups almond flour
- 1/4 cup all-purpose flour
- 1/4 cup granulated sugar
- 1/4 teaspoon salt
- 1/2 cup unsalted butter, chilled and cubed
- 1 large egg
- 1 teaspoon vanilla extract
- 3 ripe pears, peeled, cored, and sliced
- 1 tablespoon lemon juice
- 1 teaspoon ground cinnamon
- 1/4 teaspoon ground nutmeg
- 1/4 cup honey
- 1/4 cup sliced almonds
Instructions:
- Prepare the Tart Crust: In a large mixing bowl, combine almond flour, all-purpose flour, granulated sugar, and salt. Cut in the chilled butter using a pastry cutter or your fingers until the mixture resembles coarse crumbs.
- Form the Dough: Add the egg and vanilla extract to the flour mixture. Mix until the dough comes together and forms a ball. Wrap the dough in plastic wrap and refrigerate for at least 30 minutes.
- Preheat the Oven: Preheat your oven to 350°F (175°C). While the oven is heating, remove the dough from the refrigerator and let it sit at room temperature for a few minutes to soften slightly.
- Roll Out the Dough: On a lightly floured surface, roll out the dough to fit a 9-inch tart pan. Carefully transfer the dough to the pan, pressing it into the bottom and up the sides. Trim any excess dough.
- Prepare the Pears: In a medium bowl, toss the pear slices with lemon juice, ground cinnamon, and ground nutmeg. This will prevent browning and infuse the pears with warm spices.
- Assemble the Tart: Spread the almond filling evenly over the crust. Arrange the spiced pear slices on top in a decorative pattern, slightly overlapping them.
- Bake the Tart: Drizzle honey over the pears and sprinkle with sliced almonds. Bake the tart in the preheated oven for 35-40 minutes, or until the pears are tender and the crust is golden.
- Cool and Serve: Allow the tart to cool in the pan for about 10 minutes before transferring it to a wire rack to cool completely. Serve warm or at room temperature.
Extra Tips:
When selecting pears for this tart, choose ones that are firm but ripe for the best texture and flavor. Bartlett or Anjou pears work particularly well.
If you prefer a sweeter tart, consider adding a pinch of ground ginger to the spice mix for a little extra kick. Additionally, to guarantee an even bake, place the tart on the middle rack of the oven and rotate it halfway through the baking time.
This Spiced Pear and Almond Tart pairs beautifully with a dollop of Greek yogurt or a scoop of vanilla ice cream for a truly indulgent yet healthy treat.
Vegan Gingerbread Cookies
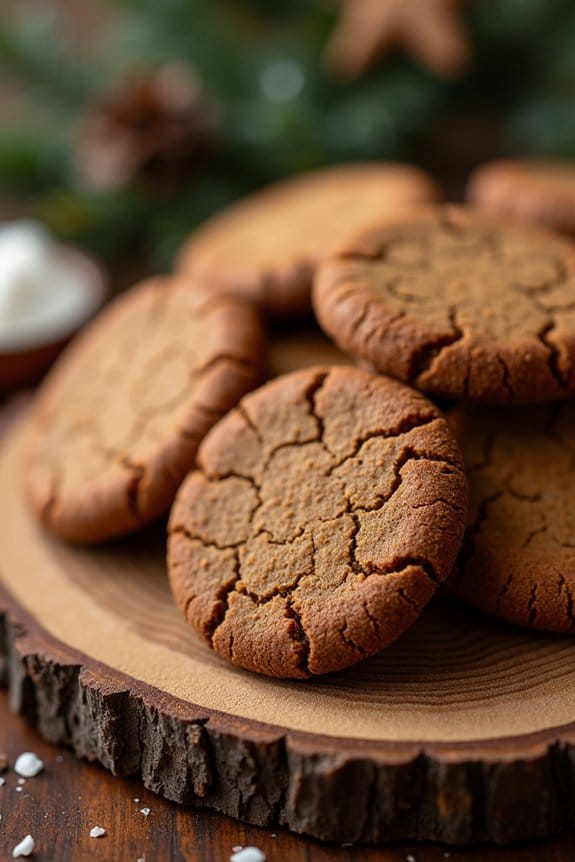
Vegan Gingerbread Cookies are a delightful and healthier twist on the classic holiday favorite. These cookies maintain the warm, spicy flavors of traditional gingerbread while being entirely plant-based, making them perfect for those following a vegan diet or anyone looking to try something new this holiday season.
The aroma of ginger, cinnamon, and molasses wafting through your kitchen is sure to evoke the cozy spirit of Christmas, and the ease of this recipe means you can whip up a batch without any fuss.
These cookies aren’t only delicious but also versatile; you can decorate them with vegan icing or enjoy them plain with a cup of hot tea or cocoa. They’re perfect for sharing with family and friends during festive gatherings or as a thoughtful homemade gift.
Making vegan gingerbread cookies is an enjoyable activity for all ages, and you can get creative with different shapes using cookie cutters. This recipe yields about 24 cookies, making it ideal for serving 4-6 people.
Ingredients:
- 2 1/4 cups all-purpose flour
- 1/2 cup coconut oil, solidified
- 1/2 cup coconut sugar
- 1/4 cup molasses
- 1/4 cup unsweetened almond milk
- 1 teaspoon vanilla extract
- 1 teaspoon baking soda
- 1/2 teaspoon baking powder
- 1 tablespoon ground ginger
- 1 teaspoon ground cinnamon
- 1/4 teaspoon ground nutmeg
- 1/4 teaspoon ground cloves
- 1/4 teaspoon salt
Instructions:
- Preheat the Oven: Start by preheating your oven to 350°F (175°C). Line two baking sheets with parchment paper to prevent the cookies from sticking.
- Mix the Dry Ingredients: In a medium-sized bowl, whisk together the flour, baking soda, baking powder, ginger, cinnamon, nutmeg, cloves, and salt. This guarantees that all the spices and leavening agents are evenly distributed.
- Cream the Coconut Oil and Sugar: In a large mixing bowl, use an electric mixer to cream the solidified coconut oil and coconut sugar until the mixture is light and fluffy. This should take about 2-3 minutes.
- Add Wet Ingredients: Stir in the molasses, almond milk, and vanilla extract into the creamed coconut oil and sugar. Mix until well combined.
- Combine Wet and Dry Ingredients: Gradually add the dry ingredient mixture to the wet ingredients, stirring until a dough forms. The dough should be slightly sticky but firm enough to roll out. If it’s too sticky, add a bit more flour, one tablespoon at a time.
- Roll Out the Dough: Lightly flour a clean surface and roll out the dough to about 1/4 inch thickness. Use cookie cutters to cut out desired shapes and place them onto the prepared baking sheets, leaving a little space between each cookie.
- Bake the Cookies: Bake in the preheated oven for 8-10 minutes or until the edges are firm and the cookies are slightly puffed. Remove from the oven and allow them to cool on the baking sheets for a few minutes before transferring to wire racks to cool completely.
- Decorate (Optional): Once cooled, you can decorate your cookies with vegan icing or any other toppings of your choice.
Extra Tips:
For a more intense ginger flavor, you can increase the ground ginger by an additional half teaspoon. If you prefer a softer cookie, reduce the baking time by a minute or two, but keep a close eye on them to prevent underbaking.
If the dough becomes too warm and sticky while rolling, pop it in the fridge for 10-15 minutes to firm up. These cookies can be stored in an airtight container for up to a week, making them a great make-ahead treat for the holiday season.
Cranberry Orange Oat Bars
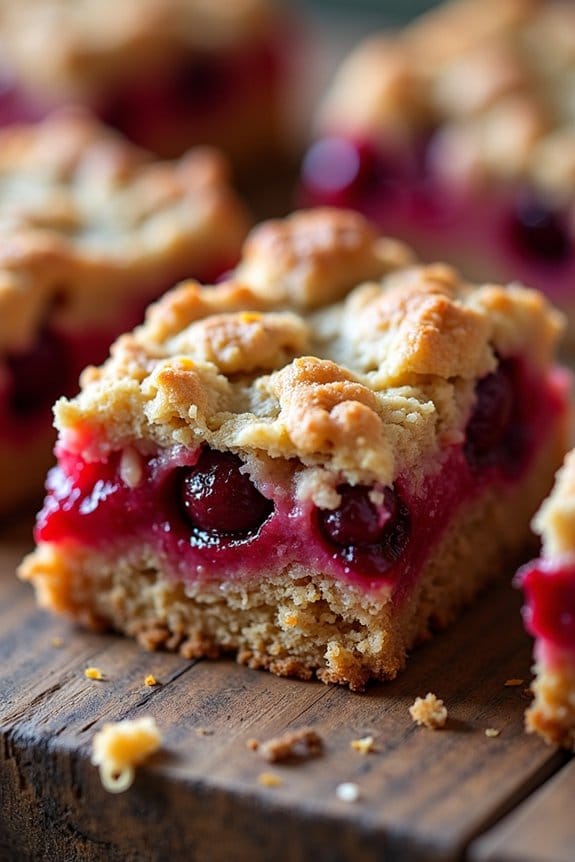
Cranberry Orange Oat Bars are the perfect festive treat to enjoy during the holiday season. With their delightful combination of tangy cranberries and invigorating orange zest, these bars aren’t only delicious but also a healthier alternative to traditional holiday desserts. Made with wholesome oats and natural sweeteners, they’re both nutritious and satisfying.
Whether you’re looking for a dessert to serve at your Christmas gathering or simply want a special treat to accompany a warm cup of tea, these bars are sure to please everyone.
These bars aren’t only easy to make but also versatile enough to customize according to your taste preferences. You can add a scoop of vanilla ice cream or a dollop of Greek yogurt on top for an extra touch of indulgence. Plus, they make a great homemade gift when wrapped in festive paper and tied with a ribbon.
Now, let’s plunge into the recipe for Cranberry Orange Oat Bars, serving 4-6 people.
Ingredients:
- 1 cup fresh or frozen cranberries
- 1/2 cup orange juice
- Zest of 1 orange
- 1/4 cup honey or maple syrup
- 1 cup rolled oats
- 1/2 cup whole wheat flour
- 1/4 cup almond flour
- 1/2 teaspoon baking soda
- 1/4 teaspoon salt
- 1/2 teaspoon ground cinnamon
- 1/3 cup coconut oil, melted
- 1 teaspoon vanilla extract
Cooking Instructions:
- Preheat Your Oven: Start by preheating your oven to 350°F (175°C). This guarantees that your oven is ready and at the perfect temperature when your bars are prepared.
- Prepare the Cranberry Mixture: In a small saucepan, combine the cranberries, orange juice, orange zest, and honey or maple syrup. Cook over medium heat, stirring occasionally, until the cranberries have burst and the mixture has thickened, about 10 minutes. Remove from heat and set aside to cool slightly.
- Mix the Dry Ingredients: In a large mixing bowl, combine the rolled oats, whole wheat flour, almond flour, baking soda, salt, and ground cinnamon. Stir until all the dry ingredients are well mixed.
- Combine Wet Ingredients: In a separate bowl, mix the melted coconut oil and vanilla extract. Pour this mixture into the dry ingredients, stirring until the mixture is crumbly and well combined.
- Assemble the Bars: Line an 8×8 inch baking dish with parchment paper. Press half of the oat mixture firmly into the bottom of the prepared dish, creating an even layer. Spread the cranberry mixture evenly over the crust, then sprinkle the remaining oat mixture on top, pressing lightly to adhere.
- Bake: Place the baking dish in the preheated oven and bake for 25-30 minutes, or until the top is golden brown and firm. Remove from the oven and let cool in the dish before cutting into bars.
- Serve: Once cooled, cut the bars into squares and serve. Enjoy them on their own or with your favorite toppings.
Extra Tips:
For a gluten-free version, substitute the whole wheat flour with gluten-free all-purpose flour. If you prefer a sweeter bar, you can increase the amount of honey or maple syrup to taste.
These bars can be stored in an airtight container at room temperature for up to three days or refrigerated for up to a week. They also freeze well, so you can make them ahead of time and enjoy them throughout the holiday season.
Banana Nice Cream With Cinnamon
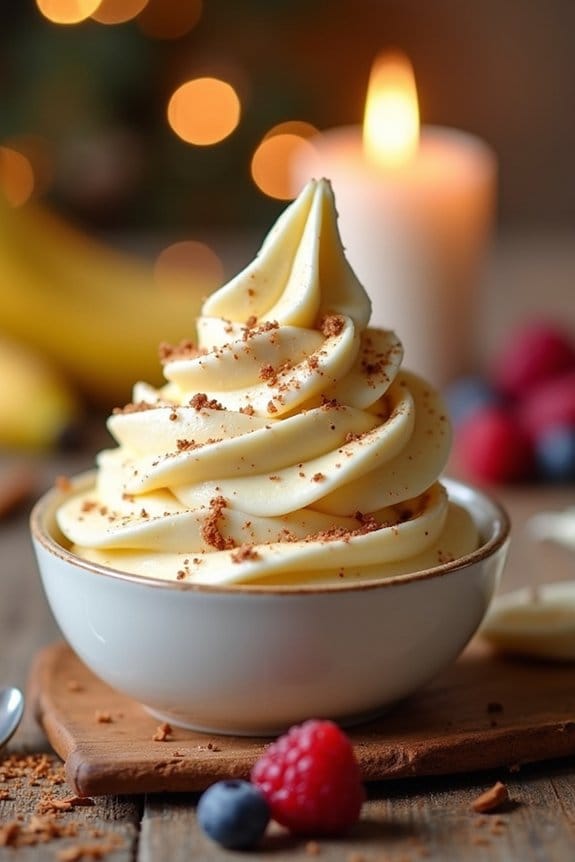
Banana Nice Cream With Cinnamon is a delightful and healthy dessert option that’s perfect for the holiday season. Made with just a few simple ingredients, this frozen treat is both creamy and satisfying without any added sugars or dairy. The natural sweetness of ripe bananas combined with the warm, aromatic flavor of cinnamon creates a dessert that feels indulgent yet is good for you.
This nice cream is an excellent choice for those looking to enjoy a guilt-free dessert during Christmas gatherings. This recipe isn’t only delicious but also incredibly easy to make. By using a blender or food processor, you can quickly transform frozen bananas into a smooth and creamy dessert. It’s a great way to use up ripe bananas, and the addition of cinnamon adds a festive twist to the classic banana flavor.
Whether you’re serving it as a standalone dessert or as a topping for other holiday treats, Banana Nice Cream With Cinnamon is sure to be a hit with family and friends.
Ingredients (Servings: 4-6 people)
- 6 ripe bananas, peeled and sliced
- 2 teaspoons ground cinnamon
- 1 teaspoon vanilla extract
- Pinch of salt
- Optional toppings: chopped nuts, shredded coconut, or fresh berries
Instructions
- Freeze the Bananas: Start by slicing the ripe bananas into thin rounds. Place the slices in a single layer on a baking sheet or in a freezer-safe container. Freeze the banana slices for at least 2 hours or until fully frozen.
- Prepare the Blender: Once the bananas are frozen, remove them from the freezer and let them sit at room temperature for about 5 minutes to soften slightly. This will make blending easier.
- Blend the Ingredients: Add the frozen banana slices, ground cinnamon, vanilla extract, and a pinch of salt into a high-powered blender or food processor. Blend on high speed until the mixture becomes smooth and creamy. You may need to stop occasionally to scrape down the sides of the blender or use a tamper to help the ingredients blend evenly.
- Adjust Consistency: If the nice cream is too thick, you can add a small amount of almond milk or water to reach your desired consistency. Blend again until smooth.
- Serve and Enjoy: Once the mixture is creamy and smooth, scoop the nice cream into bowls. For an extra festive touch, top with your choice of optional toppings such as chopped nuts, shredded coconut, or fresh berries.
Extra Tips
For the best results, make sure your bananas are ripe, as they’ll impart the most sweetness to the nice cream. You can prepare the banana slices in advance and keep them stored in the freezer, allowing you to whip up this dessert at a moment’s notice.
If you prefer a more pronounced cinnamon flavor, feel free to adjust the amount of cinnamon according to your taste. Finally, if you’re planning to make this dessert ahead of time, you can store the blended nice cream in an airtight container in the freezer. Just give it a few minutes to soften before serving.
Almond Butter Brownies
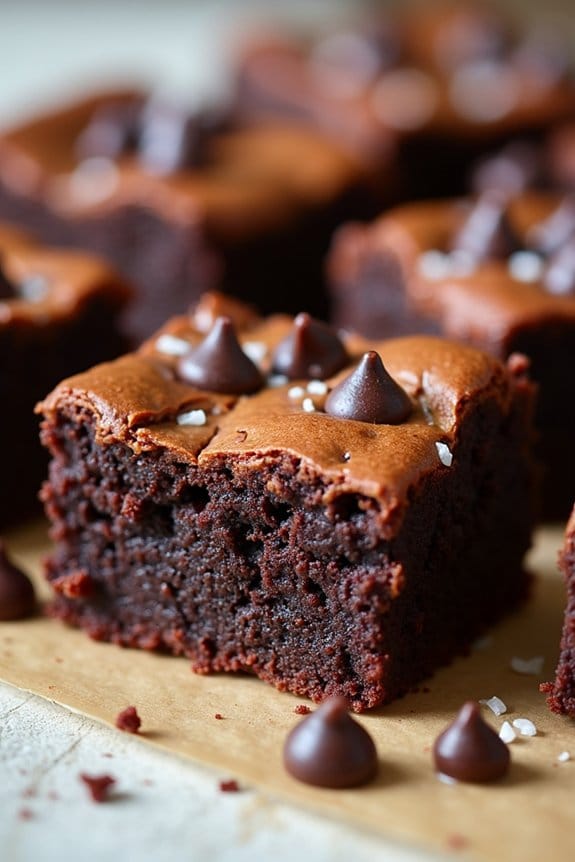
Indulge in the rich, decadent flavor of Almond Butter Brownies, a healthier holiday treat that you and your loved ones can enjoy guilt-free. These brownies are crafted with wholesome ingredients, striking the perfect balance between a gooey chocolate texture and the nutty essence of almond butter.
Almond Butter Brownies aren’t only a delightful addition to your Christmas dessert table, but they’re also a nutritious option, packed with protein and healthy fats. This recipe is designed to satisfy your sweet tooth while being mindful of your health goals during the festive season.
Made with naturally sweetened ingredients and free from refined sugars, these brownies are a great option for a holiday treat that doesn’t compromise on flavor. The following recipe yields enough for 4-6 people, making it ideal for small family gatherings or intimate holiday celebrations.
Ingredients (Serves 4-6):
- 1 cup almond butter
- 1/2 cup unsweetened cocoa powder
- 1/3 cup honey or maple syrup
- 1/4 cup unsweetened applesauce
- 2 large eggs
- 1 teaspoon vanilla extract
- 1/2 teaspoon baking soda
- 1/4 teaspoon salt
- 1/3 cup dark chocolate chips (optional)
Cooking Instructions:
- Preheat the Oven: Begin by preheating your oven to 350°F (175°C). This guarantees that your brownies cook evenly and achieve the perfect texture.
- Prepare the Baking Pan: Line an 8×8 inch baking pan with parchment paper or lightly grease it with cooking spray to prevent the brownies from sticking.
- Mix Wet Ingredients: In a large mixing bowl, combine the almond butter, honey or maple syrup, applesauce, eggs, and vanilla extract. Whisk together until the mixture is smooth and well-blended.
- Add Dry Ingredients: Gradually add the unsweetened cocoa powder, baking soda, and salt to the wet mixture. Stir until all the ingredients are fully incorporated and the batter is smooth without any lumps.
- Fold in Chocolate Chips: If you’re using dark chocolate chips, gently fold them into the batter until they’re evenly distributed.
- Pour and Spread: Pour the brownie batter into the prepared baking pan. Use a spatula to spread it evenly across the pan, ensuring that the batter is level at the top.
- Bake: Place the baking pan in the preheated oven and bake for approximately 20-25 minutes. Check for doneness by inserting a toothpick into the center; it should come out with a few moist crumbs but not wet batter.
- Cool and Serve: Once baked, remove the brownies from the oven and allow them to cool in the pan for about 10 minutes. Then, lift them out using the parchment paper and transfer to a wire rack to cool completely before cutting into squares.
Extra Tips:
For an extra touch of holiday flair, consider sprinkling a pinch of sea salt over the top of the brownies before baking to enhance the chocolate flavor.
Additionally, you can customize these brownies by adding chopped nuts, such as almonds or walnuts, for added texture. When storing leftovers, keep them in an airtight container at room temperature for up to three days, or refrigerate for a longer shelf life.
Pomegranate Chia Seed Pudding
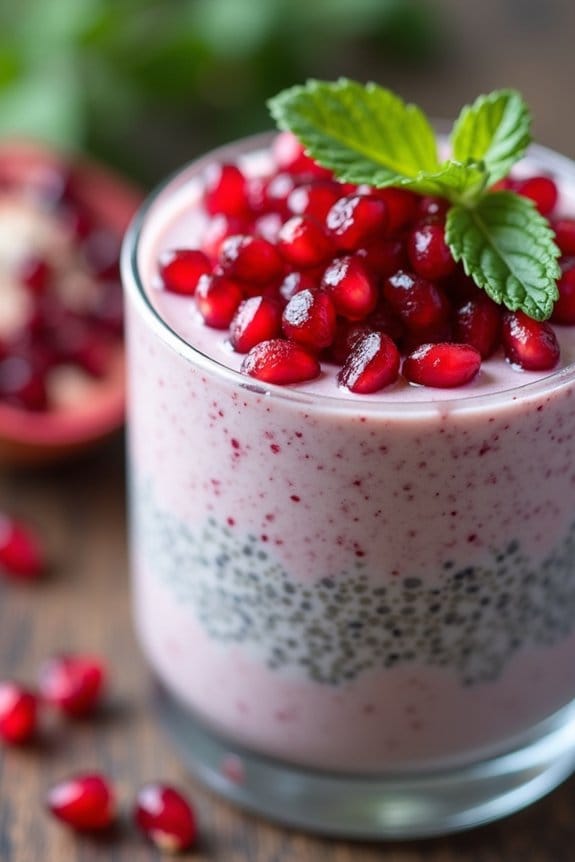
Pomegranate Chia Seed Pudding is a delightful and healthy dessert that combines the rich flavors of pomegranate with the creamy texture of chia seeds. This invigorating pudding is perfect for a festive Christmas treat, providing a burst of flavor and nutrition.
Chia seeds are packed with omega-3 fatty acids, fiber, and protein, making them a nutritious addition to any dessert. The sweet and slightly tart pomegranate arils add a festive touch that makes this dish a must-have for your holiday table.
This pudding isn’t only delicious but also incredibly easy to make. It requires minimal preparation and can be made ahead of time, freeing you up for other holiday activities. The natural sweetness of the pomegranate juice, combined with the creamy texture of the chia seeds, creates a satisfying dessert that everyone will love.
Serve this pudding in individual cups or bowls for a beautiful presentation that will impress your guests. This recipe serves 4-6 people.
Ingredients:
- 1 cup pomegranate juice
- 1 cup unsweetened almond milk (or any milk of choice)
- 1/4 cup pure maple syrup
- 1 teaspoon vanilla extract
- 1/2 cup chia seeds
- 1/2 cup pomegranate arils (seeds)
- Fresh mint leaves for garnish (optional)
Instructions:
- Combine Liquids: In a medium-sized mixing bowl, combine the pomegranate juice, almond milk, pure maple syrup, and vanilla extract. Whisk together until all ingredients are well incorporated.
- Add Chia Seeds: Slowly add the chia seeds to the liquid mixture while whisking continuously to prevent clumping. Verify that the seeds are evenly distributed throughout the mixture.
- Refrigerate: Cover the bowl with plastic wrap or a lid and place it in the refrigerator. Allow the mixture to sit for at least 4 hours, or preferably overnight. During this time, the chia seeds will absorb the liquid and expand, creating a pudding-like consistency.
- Stir Pudding: After the pudding has set, give it a good stir to verify the chia seeds are evenly distributed. If the pudding appears too thick, you can add a bit more almond milk to reach your desired consistency.
- Serve: Divide the pudding into individual serving cups or bowls. Top each serving with a generous amount of pomegranate arils. Garnish with fresh mint leaves if desired.
- Enjoy: Serve chilled, and enjoy the invigorating flavors of this healthy Christmas dessert!
Extra Tips:
For a creamier texture, consider blending the pudding mixture before refrigerating. This will break down the chia seeds slightly and create a smoother consistency.
If you prefer a sweeter dessert, you can adjust the amount of maple syrup to taste. Additionally, you can experiment with different types of milk, such as coconut or cashew milk, to add unique flavors to your pudding.
Remember to stir the pudding well before serving to verify even distribution of chia seeds and flavors.
Peppermint Mocha Energy Balls

Peppermint Mocha Energy Balls are a delightful and healthy festive treat that perfectly encapsulate the flavors of the holiday season. These bite-sized morsels aren’t only packed with energizing ingredients but also provide a satisfying blend of chocolate, coffee, and peppermint.
They’re perfect for a quick snack, a holiday party treat, or even as a thoughtful homemade gift. Without the need for baking, these energy balls are quick and easy to make, allowing you to enjoy more time with family and friends during the busy holiday season.
This recipe is designed to serve 4-6 people, making about 12-18 energy balls depending on the size you choose to roll them. The combination of nuts, dates, cocoa, and peppermint extracts results in a rich and indulgent taste without the added sugar and calories found in traditional holiday desserts. The coffee element adds a subtle mocha depth, enhancing the overall flavor profile.
Let’s explore the ingredient list and step-by-step guide to creating these delicious Peppermint Mocha Energy Balls.
Ingredients (for 4-6 servings):
- 1 cup pitted dates
- 1 cup raw almonds
- 1/4 cup cocoa powder
- 1 tablespoon instant coffee granules
- 1 teaspoon peppermint extract
- 1/2 teaspoon vanilla extract
- A pinch of salt
- 1-2 tablespoons water (as needed)
- Optional: crushed peppermint candies for garnish
Instructions:
- Prepare the Ingredients: Begin by confirming that your dates are pitted. If they’re a bit dry, soak them in warm water for about 10 minutes to soften them. Drain and set aside.
- Process the Dry Ingredients: In a food processor, combine the almonds, cocoa powder, instant coffee granules, and a pinch of salt. Pulse until the mixture resembles a fine crumb. This will guarantee that the almonds are evenly distributed and provide a smooth texture.
- Add the Dates: Add the pitted dates to the food processor along with the peppermint and vanilla extracts. Process the mixture until it starts to come together. It should be sticky enough to hold its shape when pressed. If the mixture is too dry, add 1-2 tablespoons of water, one at a time, to achieve the desired consistency.
- Form the Energy Balls: Once the mixture is ready, use your hands to roll it into balls about 1 inch in diameter. For an extra festive touch, you can roll these balls in crushed peppermint candies to coat them lightly.
- Chill and Serve: Place the energy balls on a tray lined with parchment paper and refrigerate for at least 30 minutes. This will help them firm up and enhance the flavor. Serve chilled and enjoy!
Extra Tips:
To guarantee the best texture for your Peppermint Mocha Energy Balls, make sure the dates are moist enough. If they’re too dry, soaking them beforehand is essential.
You can adjust the intensity of the peppermint flavor by adding more or less peppermint extract according to your taste preference. Additionally, these energy balls can be stored in an airtight container in the refrigerator for up to a week, making them a convenient make-ahead option for holiday gatherings.
If you prefer a nuttier flavor, you can toast the almonds lightly before processing them, which will add a deeper, roasted taste to your energy balls.
Date and Walnut Chocolate Fudge
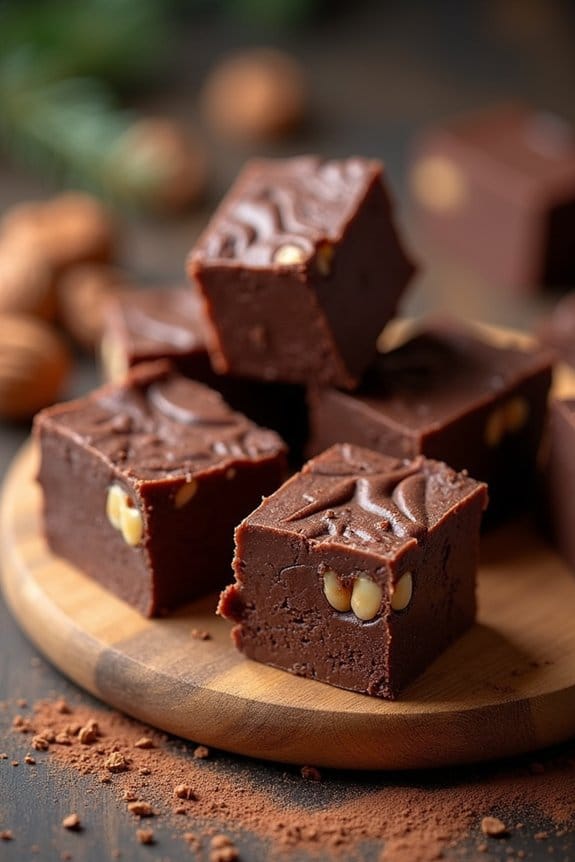
Date and Walnut Chocolate Fudge is a deliciously rich and healthy dessert option, perfect for adding a touch of sweetness to your Christmas festivities without the guilt. This fudge is naturally sweetened with dates and is complemented by the earthy crunch of walnuts, making it a crowd-pleaser for those who prefer a healthier treat.
The addition of dark chocolate not only enhances the flavors but also brings in antioxidants, making this fudge a nutritious indulgence during the holiday season. This recipe is ideal for serving 4-6 people and is incredibly simple to prepare, requiring just a few ingredients and minimal effort.
The combination of dates and walnuts provides a natural sweetness and texture, while dark chocolate provides the rich, decadent taste that makes this fudge so irresistible. It’s a perfect option to offer as a dessert at your Christmas gatherings, and is sure to satisfy your guests’ sweet tooth while keeping the holiday spirit alive.
Ingredients (serving size: 4-6 people):
- 1 cup pitted Medjool dates
- 1 cup raw walnuts
- 1/2 cup dark chocolate chips (at least 70% cocoa)
- 1 tablespoon coconut oil
- 1 teaspoon vanilla extract
- A pinch of sea salt
Cooking Instructions:
- Prepare the Dates: Begin by soaking the pitted dates in warm water for about 10 minutes. This will soften them, making them easier to blend into a smooth paste. After soaking, drain the dates and set them aside.
- Blend the Base: In a food processor, combine the soaked dates and walnuts. Pulse until the mixture is well combined and forms a sticky, cohesive dough-like texture. Scrape down the sides as needed to guarantee everything is evenly mixed.
- Melt the Chocolate: In a small saucepan over low heat, melt the dark chocolate chips together with the coconut oil. Stir continuously to prevent burning and promote a smooth consistency. Once melted, remove from heat.
- Combine Ingredients: Add the melted chocolate, vanilla extract, and a pinch of sea salt to the date and walnut mixture in the food processor. Process again until everything is fully incorporated and smooth.
- Shape the Fudge: Line a small baking dish or loaf pan with parchment paper. Transfer the fudge mixture into the pan, spreading it evenly and pressing down firmly with a spatula to compact it into a uniform layer.
- Chill to Set: Place the pan in the refrigerator for at least 2 hours, or until the fudge is firm and set. This will guarantee a perfect texture when cutting into squares.
- Serve: Once set, remove the fudge from the pan using the edges of the parchment paper. Cut into small squares and serve chilled. Store any leftovers in the refrigerator.
Extra Tips: For an added festive touch, consider sprinkling crushed walnuts or a dusting of cocoa powder on top of the fudge before chilling. If you prefer a sweeter fudge, you can adjust the level of sweetness by adding a tablespoon of maple syrup or honey to the mixture.
Additionally, be sure to use high-quality dark chocolate to maximize the flavor and health benefits. This fudge can also be made ahead of time and stored in the refrigerator, making it a convenient option for stress-free holiday entertaining.
Gluten-Free Apple Crisp
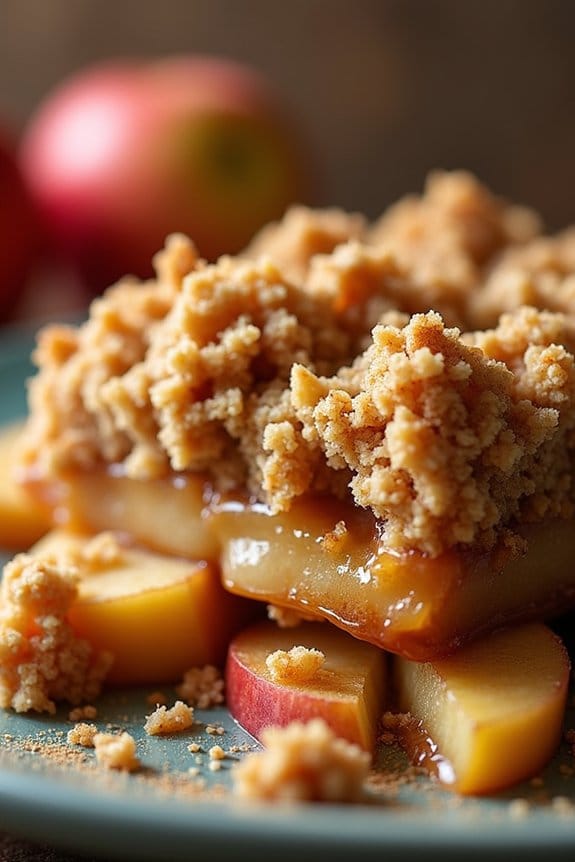
Gluten-Free Apple Crisp is a delightful and healthy dessert option perfect for the Christmas season. This dish combines tender baked apples with a crispy, nutty topping, creating a comforting and flavorful treat that everyone can enjoy, regardless of dietary restrictions. The sweet aroma of cinnamon and baked apples fills the air as it bakes, making it an ideal dessert for cozy holiday gatherings.
With simple, wholesome ingredients, this gluten-free apple crisp is both easy to prepare and a crowd-pleaser.
This recipe serves 4-6 people and is made with a combination of fresh apples and a crisp topping that’s completely gluten-free. By using gluten-free oats and almond flour, the traditional apple crisp is transformed into a delicious dessert that retains all the classic flavors and textures.
Whether you’re serving it as a standalone treat or pairing it with a scoop of dairy-free ice cream, this gluten-free apple crisp is bound to become a favorite at your holiday table.
Ingredients:
- 6 medium-sized apples (Granny Smith or Honeycrisp preferred)
- 1 tablespoon lemon juice
- 1/4 cup coconut sugar
- 1 teaspoon ground cinnamon
- 1/4 teaspoon ground nutmeg
- 1 cup gluten-free rolled oats
- 1/2 cup almond flour
- 1/3 cup chopped pecans or walnuts
- 1/3 cup coconut oil, melted
- 1/4 cup maple syrup
- 1 teaspoon vanilla extract
- Pinch of salt
Cooking Instructions:
- Preheat the Oven: Start by preheating your oven to 350°F (175°C) to guarantee it’s ready for baking once the preparation is complete.
- Prepare the Apples: Peel, core, and slice the apples into thin wedges. Place them in a large mixing bowl and drizzle with lemon juice to prevent browning. Add coconut sugar, cinnamon, and nutmeg, then toss to coat the apples evenly.
- Make the Crisp Topping: In a separate bowl, combine gluten-free rolled oats, almond flour, chopped nuts, melted coconut oil, maple syrup, vanilla extract, and a pinch of salt. Stir until the mixture is well combined and crumbly.
- Assemble the Dish: Spread the prepared apples evenly in a 9×13-inch baking dish. Sprinkle the crisp topping over the apples, ensuring even distribution for a consistent crunchy layer.
- Bake: Place the baking dish in the preheated oven and bake for 35-40 minutes, or until the topping is golden brown and the apples are tender when pierced with a fork.
- Cool and Serve: Allow the baked apple crisp to cool for at least 10 minutes before serving. This will help the topping firm up and make it easier to serve.
Extra Tips:
For the best results, choose apples that are firm and slightly tart, such as Granny Smith or Honeycrisp, to balance the sweetness of the topping. If you prefer a sweeter crisp, you can adjust the amount of coconut sugar or maple syrup to your liking.
This dessert can be prepared in advance and reheated just before serving, making it a convenient option for holiday gatherings. To guarantee the topping remains crispy, store any leftovers in an airtight container at room temperature.
Enjoy your gluten-free apple crisp with a dollop of whipped coconut cream or a scoop of your favorite dairy-free ice cream for an extra indulgent treat.
Matcha Coconut Macaroons

Indulge in a blissful fusion of flavors and textures with these delectable Matcha Coconut Macaroons. Perfect for a healthy Christmas dessert, these macaroons bring together the earthy tones of matcha green tea with the tropical sweetness of coconut. Not only are they a treat for your taste buds, but they also offer a delightful green hue that captures the festive spirit.
Whether you’re hosting a holiday gathering or looking for a guilt-free treat to enjoy at home, these macaroons are certain to impress.
Made with simple, wholesome ingredients, these Matcha Coconut Macaroons are gluten-free and can easily be made vegan by using aquafaba instead of egg whites. The combination of shredded coconut, creamy coconut milk, and vibrant matcha powder creates a chewy, sweet, and slightly earthy dessert.
With a preparation time of around 30 minutes and a serving size of 4-6 people, these macaroons are a quick and easy way to add a healthy twist to your holiday dessert table.
Ingredients (Serves 4-6):
- 2 cups unsweetened shredded coconut
- 2 tablespoons matcha green tea powder
- 1/2 cup coconut milk
- 1/4 cup maple syrup
- 1 teaspoon vanilla extract
- 1/4 teaspoon salt
- 2 large egg whites (or 1/2 cup aquafaba for a vegan version)
Cooking Instructions:
- Preheat the Oven: Begin by preheating your oven to 325°F (165°C). Line a baking sheet with parchment paper to prevent sticking.
- Mix Dry Ingredients: In a large mixing bowl, combine the unsweetened shredded coconut, matcha green tea powder, and salt. Mix well to guarantee the matcha powder is evenly distributed throughout the coconut.
- Prepare Wet Mixture: In a separate bowl, whisk together the coconut milk, maple syrup, and vanilla extract until smooth. If using egg whites, beat them until they form soft peaks in a clean, dry bowl, or use aquafaba as a substitute by whipping it to the same consistency.
- Combine Mixtures: Gently fold the coconut milk mixture into the dry ingredients, ensuring the coconut is fully coated. Then, carefully fold in the beaten egg whites or whipped aquafaba, taking care not to deflate them.
- Shape Macaroons: Using a tablespoon or small cookie scoop, drop heaping spoonfuls of the mixture onto the prepared baking sheet, spacing them about an inch apart.
- Bake: Place the baking sheet in the preheated oven and bake for 18-20 minutes, or until the edges of the macaroons are golden brown.
- Cool: Remove the macaroons from the oven and let them cool on the baking sheet for about 5 minutes. Then transfer them to a wire rack to cool completely.
Extra Tips:
For a more pronounced matcha flavor, you can increase the amount of matcha powder to 3 tablespoons. Confirm that the coconut milk is well mixed before adding to the other ingredients to prevent separation.
If you find the mixture too dry to hold together, add a bit more coconut milk, a tablespoon at a time, until it reaches the desired consistency. Store any leftover macaroons in an airtight container at room temperature for up to a week.
Enjoy these delightful treats with a warm cup of tea or as a sweet addition to your holiday dessert platter!
Raspberry Chia Jam Thumbprint Cookies
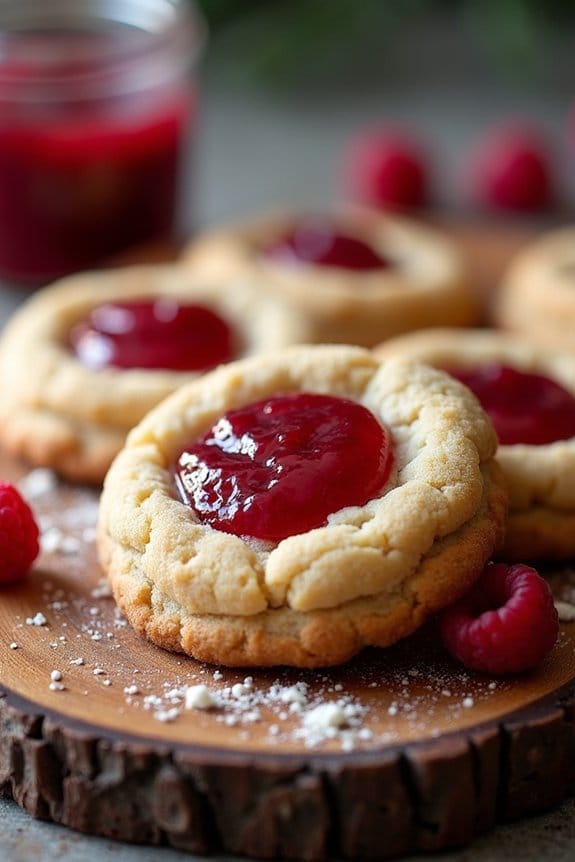
Raspberry Chia Jam Thumbprint Cookies are a delightful and healthy twist on a classic holiday treat. These cookies aren’t only delicious but also pack a nutritional punch with the inclusion of chia seeds and fresh raspberries. The thumbprint cookies have a tender, buttery base made with almond flour and are filled with a homemade raspberry chia jam that adds a burst of flavor and color.
Perfect for those who want to indulge in a sweet treat without the guilt, these cookies are gluten-free, refined sugar-free, and contain healthy fats. The raspberry chia jam is simple to make and can also be enjoyed on toast or yogurt. The chia seeds not only thicken the jam but also add fiber, omega-3 fatty acids, and protein.
The cookies themselves are easy to prepare and require no special equipment, making them an ideal choice for holiday baking with the family. Serve these cookies at your holiday gatherings, and they’re sure to be a hit with both kids and adults alike.
Ingredients for Raspberry Chia Jam Thumbprint Cookies (Serves 4-6):
- 1 cup fresh raspberries
- 2 tablespoons honey or maple syrup
- 1 tablespoon chia seeds
- 1 teaspoon vanilla extract
- 2 cups almond flour
- 1/4 cup coconut oil, melted
- 1/4 cup honey or maple syrup
- 1 teaspoon vanilla extract
- 1/4 teaspoon salt
Cooking Instructions:
- Prepare the Raspberry Chia Jam:
- In a small saucepan, combine the raspberries and 2 tablespoons of honey or maple syrup. Cook over medium heat, stirring frequently, until the raspberries break down and the mixture begins to bubble, about 5 minutes.
- Remove the saucepan from the heat and stir in the chia seeds and 1 teaspoon of vanilla extract. Mix well and let the jam sit for about 10 minutes to thicken. Once thickened, transfer the jam to a bowl and let it cool completely.
- Make the Cookie Dough:
- Preheat your oven to 350°F (175°C) and line a baking sheet with parchment paper.
- In a large mixing bowl, combine the almond flour, melted coconut oil, 1/4 cup of honey or maple syrup, 1 teaspoon of vanilla extract, and salt. Stir until the mixture forms a cohesive dough.
- Shape the Cookies:
- Roll tablespoon-sized portions of the dough into balls and place them on the prepared baking sheet, spacing them about 2 inches apart.
- Use your thumb or the back of a teaspoon to press a small indentation into the center of each dough ball, forming a well for the jam.
- Fill and Bake:
- Fill each indentation with about 1/2 teaspoon of the prepared raspberry chia jam.
- Bake the cookies in the preheated oven for 10-12 minutes, or until the edges are lightly golden. Remove from the oven and let the cookies cool on the baking sheet for 5 minutes before transferring them to a wire rack to cool completely.
Extra Tips:
For the best results, make sure the chia jam is completely cooled before filling the cookies to prevent it from spreading too much during baking. If you prefer a smoother jam, you can blend the raspberry mixture before adding the chia seeds.
These cookies can be stored in an airtight container at room temperature for up to 3 days or in the refrigerator for up to a week. You can also experiment with different berry jams, such as strawberry or blueberry, to create a variety of flavors for your holiday cookie platter.
Pumpkin Spice Cheesecake Bites
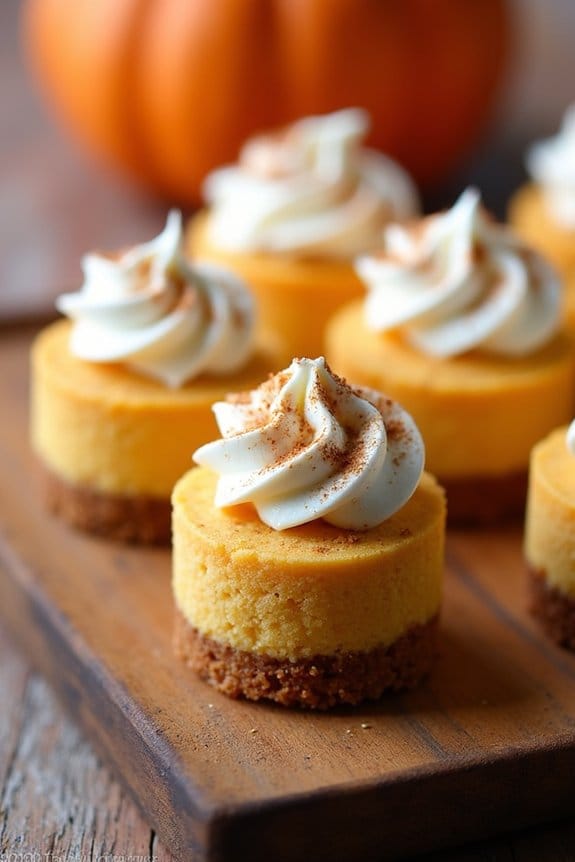
Pumpkin Spice Cheesecake Bites are a delightful and healthy dessert option for your Christmas celebration. These creamy, bite-sized treats combine the rich flavors of pumpkin and classic cheesecake with a hint of warm spices, making them perfect for the holiday season. Not only are they delicious, but they also provide a healthier alternative to traditional desserts, allowing you to indulge without the guilt.
Whether you serve them at a festive gathering or enjoy them as a special treat, these bites are bound to be a hit with everyone. Perfect for a serving size of 4-6 people, these Pumpkin Spice Cheesecake Bites are simple to prepare and require no baking. The creamy texture and the spice-infused crust make them irresistible, while the use of healthier ingredients guarantees they fit into your holiday diet plan.
By using alternatives like Greek yogurt and almond flour, these bites maintain their creamy consistency and rich flavor without compromising on nutrition. Enjoy these bites at any time of the day as a quick snack or as a sweet finish to your Christmas dinner.
Ingredients:
- 1 cup almond flour
- 3 tablespoons coconut oil, melted
- 1 tablespoon maple syrup
- 1 teaspoon ground cinnamon
- 1 cup canned pumpkin puree
- 8 ounces reduced-fat cream cheese, softened
- 1/4 cup Greek yogurt
- 1/4 cup honey
- 1 teaspoon vanilla extract
- 1 teaspoon pumpkin pie spice
- A pinch of salt
Cooking Instructions:
- Prepare the Crust: In a bowl, combine the almond flour, melted coconut oil, maple syrup, and ground cinnamon. Mix until the ingredients are well combined and the texture is crumbly.
- Press the Crust: Line a muffin tin with paper liners. Evenly distribute the crust mixture into each liner, pressing down firmly with the back of a spoon to form a solid base. Place the tin in the refrigerator to chill while you prepare the filling.
- Make the Filling: In a large mixing bowl, blend together the pumpkin puree, softened cream cheese, Greek yogurt, honey, vanilla extract, pumpkin pie spice, and a pinch of salt. Use an electric mixer to ascertain the filling is smooth and creamy.
- Assemble the Bites: Remove the muffin tin from the refrigerator. Spoon the pumpkin cheesecake filling over the prepared crusts, filling each liner to the top.
- Chill and Set: Place the muffin tin back in the refrigerator and let the cheesecake bites set for at least 2 hours, or until firm.
- Serve and Enjoy: Once set, remove the bites from the muffin tin and peel away the paper liners. Arrange them on a platter and serve immediately or store them in the refrigerator until ready to eat.
Extra Tips:
For an added touch of festive flair, consider topping each cheesecake bite with a small dollop of whipped cream or a sprinkle of additional pumpkin pie spice before serving. If you find the filling mixture too thick, you can add a tablespoon of milk to achieve your desired consistency.
Lemon Blueberry Yogurt Parfaits
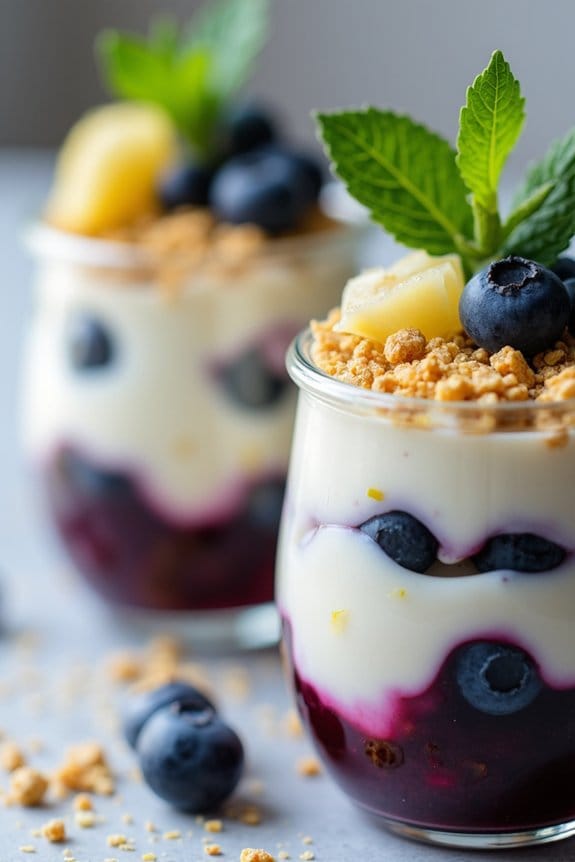
Indulge in a delightful and healthy holiday treat with our Lemon Blueberry Yogurt Parfaits. These parfaits are perfect for celebrating Christmas with a revitalizing twist. They combine the tangy flavors of lemon and the sweetness of blueberries with the creamy richness of Greek yogurt. This dessert isn’t only delicious but also nourishing, making it an excellent choice for those who want to enjoy the festive season without straying too far from their health goals.
These Lemon Blueberry Yogurt Parfaits are a simple yet elegant dessert that can be prepared in advance, allowing you to spend more time enjoying the holiday festivities. With layers of yogurt, fresh blueberries, and a hint of lemon zest, each spoonful is a burst of flavor that will leave you and your guests wanting more.
Whether you serve them as a light dessert or a special breakfast treat, these parfaits are sure to impress.
Ingredients (Serves 4-6):
- 3 cups of Greek yogurt (plain or vanilla)
- 1 cup of fresh blueberries
- 2 tablespoons of honey
- 1 teaspoon of vanilla extract
- Zest of 1 lemon
- 1/2 cup of granola (optional)
- Fresh mint leaves for garnish (optional)
Instructions:
- Prepare the Yogurt Mixture: In a mixing bowl, combine the Greek yogurt with honey, vanilla extract, and the lemon zest. Stir until the ingredients are well incorporated and the mixture is smooth.
- Assemble the Parfaits: Take 4-6 serving glasses or jars and start by adding a spoonful of the yogurt mixture at the bottom of each glass. Add a layer of fresh blueberries over the yogurt.
- Repeat the Layers: Continue layering with more yogurt followed by another layer of blueberries. Repeat this process until the glasses are full, ending with a layer of yogurt on top.
- Add the Toppings: If desired, sprinkle some granola on top of the final yogurt layer for added texture. Garnish with fresh mint leaves for a touch of color and added aroma.
- Chill the Parfaits: Place the parfaits in the refrigerator for at least 30 minutes before serving. This allows the flavors to meld together and the parfaits to set.
Extra Tips:
For a more intense lemon flavor, consider adding a few drops of lemon juice to the yogurt mixture. If you prefer your parfaits to be less sweet, you can reduce the amount of honey or substitute it with agave syrup or maple syrup.
Additionally, feel free to experiment with other fruits such as raspberries or strawberries for a different flavor profile. If you’re making these parfaits ahead, keep the granola separate and add it just before serving to maintain its crunchiness.
