

As Halloween approaches, I’m beyond excited to share some easy and creative recipes that will add a spooky twist to your gatherings. Picture Witch’s Finger Breadsticks poking out of a cauldron, Mummy Hot Dogs wrapped in flaky pastry, and Pumpkin Deviled Eggs with ghoulish faces. These festive dishes are not only visually enchanting but also simple to prepare. Are you ready to make your Halloween feast an unforgettable experience? Let’s get started with these fun and festive ideas!
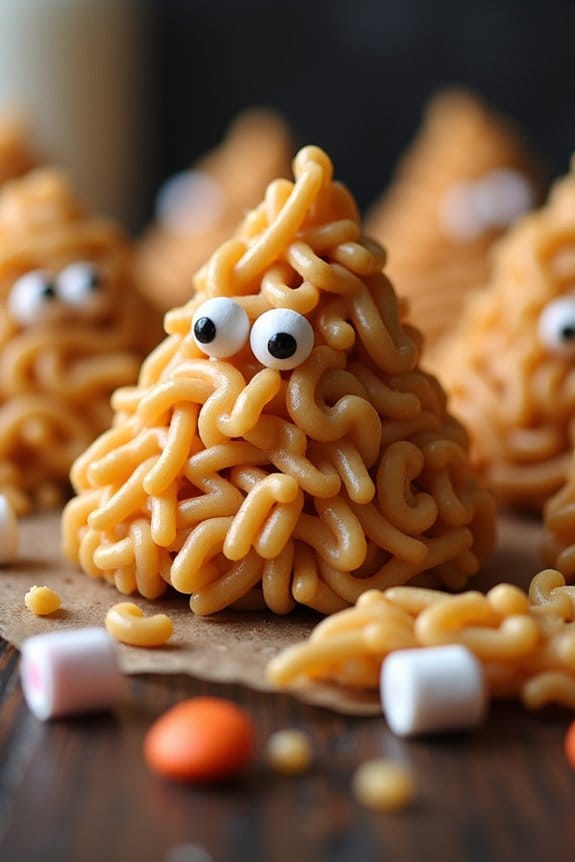
Witch’s Finger Breadsticks

Witch’s Finger Breadsticks are the perfect eerie addition to your Halloween spread, providing a fun twist on the classic breadstick. These spooky snacks aren’t only easy to make but are sure to impress both kids and adults at your Halloween party. Shaped to resemble gnarly witch fingers, they’re both delicious and visually striking, making them an excellent centerpiece for your themed festivities.
Perfectly eerie Witch’s Finger Breadsticks add a fun twist and impress at your Halloween party.
Crafting these Witch’s Finger Breadsticks is a great way to get creative in the kitchen while also guaranteeing everyone has a frightfully good time. Made from simple dough, these breadsticks are shaped and decorated with almonds to achieve the realistic look of a witch’s finger. Whether served alone or with a side of marinara sauce for dipping, these breadsticks are bound to be a hit.
Ingredients for 4-6 People:
- 2 1/4 teaspoons active dry yeast
- 1 cup warm water (about 110°F or 45°C)
- 2 tablespoons olive oil
- 1 1/2 teaspoons salt
- 3 cups all-purpose flour
- 1/4 cup grated Parmesan cheese
- 1 tablespoon dried oregano
- 1 tablespoon dried rosemary
- 1/2 cup blanched almonds
- 1 egg (for egg wash)
- Red food coloring (optional)
Cooking Instructions:
- Prepare the Dough: In a large mixing bowl, dissolve the active dry yeast in warm water. Let it sit for about 5 minutes until it becomes frothy. This step guarantees the yeast is active and will help the dough rise properly.
- Mix Ingredients: Add olive oil and salt to the yeast mixture. Gradually stir in the all-purpose flour, Parmesan cheese, oregano, and rosemary. Mix until a dough begins to form. The Parmesan and herbs add flavor and aroma to the breadsticks.
- Knead the Dough: Transfer the dough to a lightly floured surface and knead it for about 5-7 minutes until it’s smooth and elastic. Proper kneading develops the gluten, which gives the breadsticks their chewy texture.
- First Rise: Place the dough in a lightly oiled bowl, cover it with a damp cloth, and let it rise in a warm place for about 1 hour or until it doubles in size. This rise allows the dough to become airy and light.
- Shape the Breadsticks: Punch down the risen dough and divide it into 20-25 equal pieces. Roll each piece into a thin log, about 5 inches long, resembling a finger. To create knuckles, gently press down in two spots along each log.
- Add Almond Nails: Press a blanched almond onto one end of each log to mimic a fingernail. This adds an eerie touch, making the breadsticks look like fingers.
- Prepare for Baking: Preheat your oven to 375°F (190°C). Line a baking sheet with parchment paper and place the shaped breadsticks on it. Beat the egg with a little water to make an egg wash and brush it lightly over each breadstick for a golden finish.
- Bake: Bake in the preheated oven for 15-20 minutes or until the breadsticks are golden brown. If desired, use red food coloring on a small brush to add a touch of “blood” around the almond nails for extra spookiness.
Extra Tips:
For a more intense flavor, you can add garlic powder or onion powder to the dough before kneading.
If you prefer a softer breadstick, cover them with a clean kitchen towel as they cool. This will trap the steam and soften the crust.
If you want to make these ahead of time, they can be stored in an airtight container for up to two days, or freeze them and reheat before serving.
Enjoy your creepy, crunchy Witch’s Finger Breadsticks!
Mummy Hot Dogs

Mummy Hot Dogs are a fun and spooky treat perfect for Halloween parties or a festive dinner at home. These hot dogs wrapped in crescent roll dough offer a whimsical twist on the classic pigs in a blanket, making them an ideal choice for a Halloween-themed menu. Not only are they adorable and easy to make, but they also provide a tasty option that both kids and adults will love.
Whether you’re hosting a Halloween bash or simply looking for a creative dinner idea, Mummy Hot Dogs are certain to be a hit. This dish requires minimal ingredients and preparation time, making it a convenient option for busy families or last-minute gatherings.
The key to making these hot dogs look like mummies lies in the way you wrap the dough, leaving small gaps to mimic bandages and creating a space for the “eyes.” Once baked, these mummies come to life with a golden-brown crust and a hint of mystery. Serve them with your favorite condiments, and you’re all set for a frightfully delicious experience.
Ingredients (Serving size: 4-6 people)
- 1 can of crescent roll dough
- 8 hot dogs
- Mustard or ketchup (for eyes)
- Cooking spray or parchment paper
Cooking Instructions
- Preheat the Oven: Begin by preheating your oven to 375°F (190°C). This guarantees that your mummy hot dogs will bake evenly and achieve a nice golden color.
- Prepare the Dough: Unroll the crescent roll dough on a clean surface. Separate it into individual triangles and then cut each triangle into thin strips using a knife or pizza cutter. These strips will become the mummy bandages.
- Wrap the Hot Dogs: Take a hot dog and start wrapping it with the dough strips, leaving small gaps to create a bandaged effect. Make sure to leave a small area unwrapped for the face. Repeat this process for all the hot dogs.
- Arrange on Baking Sheet: Lightly spray a baking sheet with cooking spray or line it with parchment paper to prevent sticking. Arrange the wrapped hot dogs on the sheet, ensuring they’re spaced evenly.
- Bake: Place the baking sheet in the preheated oven and bake for 12-15 minutes, or until the dough is golden brown and cooked through.
- Add Eyes: Once baked, remove the hot dogs from the oven and let them cool slightly. Using a toothpick or the tip of a small spoon, add two dots of mustard or ketchup onto the face area of each mummy to create eyes.
- Serve: Serve the Mummy Hot Dogs warm with additional mustard or ketchup on the side for dipping.
Extra Tips
When wrapping the hot dogs, try to vary the spacing and angle of the dough strips to create a more authentic mummy appearance. If you’re using thick hot dogs, it might be helpful to stretch the dough slightly to ensure proper coverage.
Additionally, if you’re serving these at a party, consider setting up a “decorate your own” station where guests can personalize their mummies with various condiments or even use small edible decorations for eyes. For those who prefer a spicier kick, jalapeño slices can be added to the eye area before baking to create a unique twist on the traditional mummy hot dog.
Pumpkin Deviled Eggs

Pumpkin Deviled Eggs are a delightful twist on the classic appetizer, perfect for adding a festive touch to your Halloween gathering.
These tasty treats combine the creamy richness of deviled eggs with the seasonal essence of pumpkin, creating a unique and flavorful snack that’s bound to be a hit at any autumn event.
With their fun and spooky presentation, Pumpkin Deviled Eggs not only taste delicious but also bring a dash of Halloween spirit to your table.
This recipe serves 4-6 people, making it an ideal choice for a small to medium-sized party or gathering.
The combination of traditional deviled egg ingredients with pumpkin puree and spices offers a savory yet subtly sweet flavor profile that will intrigue your guests.
Whether you’re hosting a Halloween bash or simply looking to try something new, these Pumpkin Deviled Eggs are a must-try.
Ingredients:
- 6 large eggs
- 1/4 cup canned pumpkin puree
- 2 tablespoons mayonnaise
- 1 teaspoon Dijon mustard
- 1/2 teaspoon ground cinnamon
- 1/4 teaspoon nutmeg
- Salt and pepper to taste
- Paprika for garnish
- Chives or green onions for garnish
Instructions:
- Boil the Eggs: Place the eggs in a pot and cover them with water. Bring the water to a boil over medium-high heat. Once boiling, cover the pot with a lid, turn off the heat, and let the eggs sit for 10-12 minutes.
- Prepare the Eggs: After the eggs have finished cooking, transfer them to a bowl of ice water to cool for about 5 minutes. Once cooled, peel the eggs carefully and slice them in half lengthwise.
- Make the Filling: Remove the yolks from the egg halves and place them in a mixing bowl. Add the pumpkin puree, mayonnaise, Dijon mustard, cinnamon, nutmeg, salt, and pepper. Mash the mixture with a fork until smooth and well combined.
- Fill the Egg Whites: Spoon or pipe the pumpkin yolk mixture back into the egg white halves. Be generous with the filling to guarantee each egg is packed with flavor.
- Garnish and Serve: Lightly sprinkle paprika over the filled eggs for a touch of color. Add small pieces of chives or green onions on top to resemble pumpkin stems, enhancing the visual appeal of your dish.
Extra Tips:
When making Pumpkin Deviled Eggs, it’s important to ascertain that the yolk mixture is smooth to achieve a creamy texture.
Using a piping bag can give a more polished look, but a spoon works just as well if you’re aiming for a rustic presentation.
Experiment with the seasoning to suit your taste; a dash more cinnamon or a hint of cayenne can add an interesting twist.
Finally, consider using organic or locally sourced eggs for the best flavor and quality. Enjoy your festive creation!
Monster Eyeball Soup
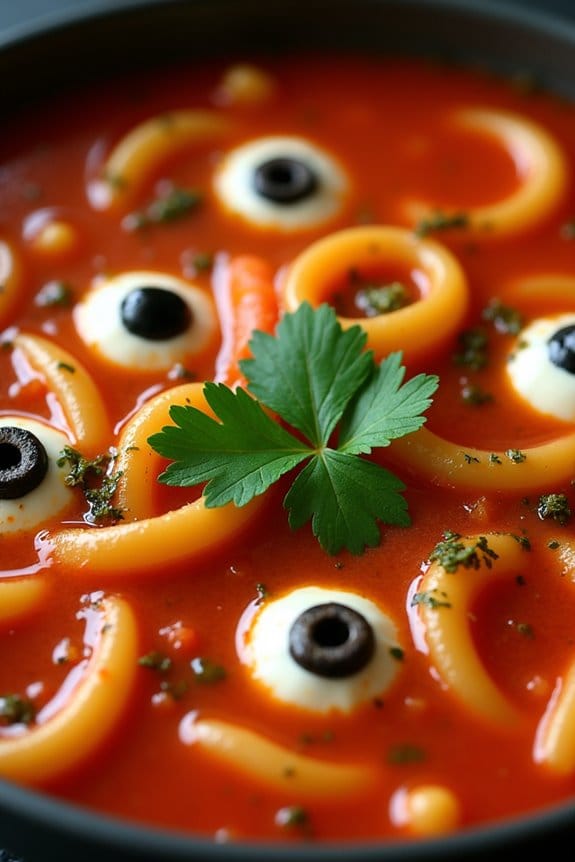
Looking to add a spooky twist to your Halloween menu? Monster Eyeball Soup is a perfect choice to thrill and chill your guests. This eerie dish combines a rich, flavorful broth with creepy, yet delicious, “eyeballs” made from mozzarella and olives. The soup isn’t only visually striking but also packed with nutrients and bursting with flavors that are perfect for a chilly autumn evening.
Prepare to surprise and delight your family and friends with this fun and easy-to-make dish. Monster Eyeball Soup is designed to serve 4-6 people, making it ideal for a small Halloween gathering. The blend of vibrant colors and unique textures will make it a centerpiece at your party, while the savory aroma fills your kitchen with the comforting scent of home-cooked goodness.
The vibrant colors and unique textures make Monster Eyeball Soup a spooky Halloween centerpiece.
Ingredients (Serves 4-6):
- 1 tablespoon olive oil
- 1 medium onion, finely chopped
- 2 cloves garlic, minced
- 4 cups chicken or vegetable broth
- 1 can (14 ounces) diced tomatoes
- 1 teaspoon dried basil
- 1 teaspoon dried oregano
- Salt and pepper to taste
- 1 cup small pasta (such as orzo or ditalini)
- 12 mini mozzarella balls (bocconcini)
- 12 black or green olives, pitted and halved
- Fresh parsley for garnish
Cooking Instructions:
- Prepare the Base: Heat the olive oil in a large pot over medium heat. Add the chopped onion and sauté until it becomes translucent, about 5 minutes. Stir in the minced garlic and cook for another minute until fragrant.
- Simmer the Broth: Pour in the chicken or vegetable broth, canned diced tomatoes, basil, oregano, salt, and pepper. Bring the mixture to a boil, then reduce the heat and let it simmer for about 15 minutes to allow the flavors to meld.
- Cook the Pasta: While the broth is simmering, cook the pasta in a separate pot according to package instructions until al dente. Drain and set aside.
- Create the Eyeballs: To make the “eyeballs,” take each mini mozzarella ball and gently press a halved olive into the center, with the cut side facing up. Adjust the olives so they resemble pupils.
- Assemble the Soup: Once the broth has simmered, add the cooked pasta to the pot. Stir to combine, then gently place the mozzarella “eyeballs” on top of the soup.
- Garnish and Serve: Ladle the soup into bowls, making certain each serving gets a few “eyeballs.” Garnish with fresh parsley for a touch of color and serve immediately.
Extra Tips:
For a vegetarian version, simply use vegetable broth instead of chicken broth. If you want to add more depth to the soup, consider roasting the tomatoes beforehand for a smoky flavor.
Feel free to adjust the amount of garlic and herbs to suit your taste preferences. Additionally, if you’re preparing this soup ahead of time, wait to add the mozzarella “eyeballs” until just before serving to make certain they maintain their shape and spooky appearance.
Spooky Spider Web Dip
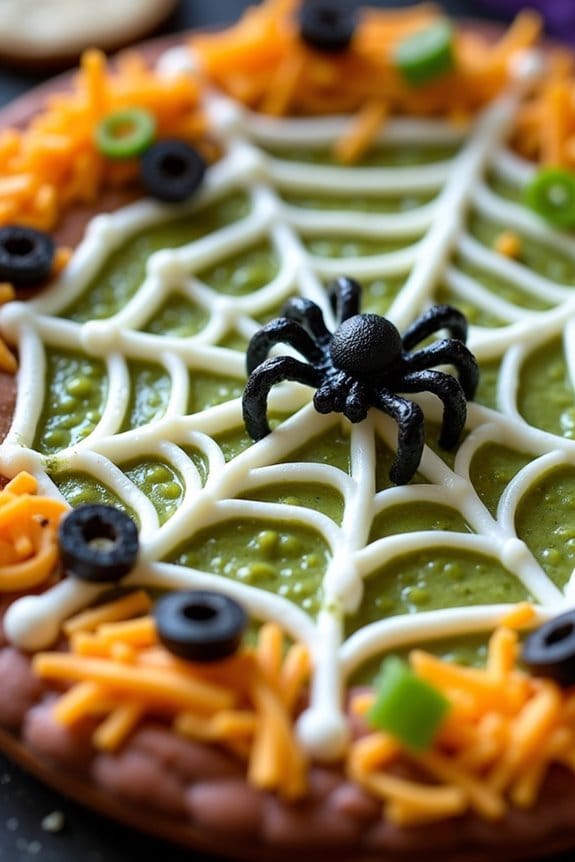
The Spooky Spider Web Dip is a delicious and visually striking addition to any Halloween party spread. This dip combines the creamy goodness of a layered taco dip with the eerie aesthetic of a spider web, making it both a feast for the eyes and the palate. Perfect for entertaining a group of 4-6 people, this dish offers a fun and festive way to enjoy classic party flavors with a spooky twist.
Ideal for those who enjoy a bit of creativity in their culinary endeavors, the Spooky Spider Web Dip not only tastes great but also serves as a centerpiece that will surely impress your guests. With layers of refried beans, guacamole, sour cream, and cheese, this dip has a little something for everyone. The spider web design is crafted using sour cream, and you can even add a tiny, edible spider on top for the full effect.
Ingredients for Spooky Spider Web Dip (serving size: 4-6 people):
- 2 cups of refried beans
- 1 packet of taco seasoning
- 2 cups of guacamole
- 1 cup sour cream (divided)
- 1 cup shredded cheddar cheese
- 1 cup salsa
- 1/2 cup sliced black olives
- 1/4 cup chopped green onions
- Tortilla chips for serving
- Optional: small edible spider decoration
Cooking Instructions:
- Prepare the Beans Layer: In a medium bowl, mix the refried beans with the taco seasoning until well combined. Spread this mixture evenly in the bottom of a shallow serving dish, such as a pie plate or a small casserole dish.
- Add the Guacamole Layer: Gently spread the guacamole over the refried beans layer, making sure it covers the beans entirely.
- Create the Sour Cream Web: Take 1/2 cup of sour cream and scoop it into a small sandwich bag. Snip off a tiny corner of the bag to create a piping bag. Pipe concentric circles over the guacamole layer, starting from the center of the dish to the outer edges.
- Design the Web: Using a toothpick, gently drag lines from the center of the circle to the edges, creating a web-like design in the sour cream.
- Final Toppings: Sprinkle the shredded cheddar cheese evenly over the web. Spoon salsa over the cheese layer and top with sliced black olives and chopped green onions for garnish.
- Spider Placement: If using, place the edible spider decoration on top of the web for an extra spooky touch.
- Serve: Pair the dip with a bowl of tortilla chips for dipping and enjoy the reactions from your guests as they admire your culinary creativity.
Extra Tips:
For best results, prepare the dip just before serving to guarantee the guacamole stays fresh and green. If you need to make it ahead of time, press a piece of plastic wrap directly onto the surface of the guacamole layer to minimize browning.
Additionally, if you’re feeling adventurous, you can make your own guacamole from scratch for a more personalized touch. Finally, remember that the spider web design doesn’t have to be perfect; its charm lies in its homemade appeal.
Ghostly Pizza Bagels
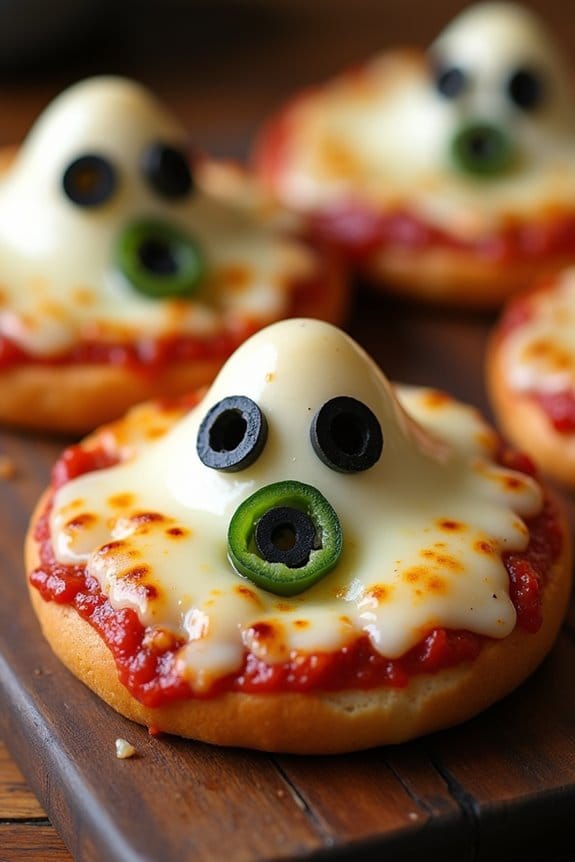
Looking to add a spooky twist to your next Halloween gathering? Ghostly Pizza Bagels are the perfect treat! These delightful mini pizzas not only capture the Halloween spirit with their ghostly appearance but are also simple to make and delicious to eat.
They’re a hit with both kids and adults, making them an excellent choice for a festive party or a fun family dinner. With just a few ingredients and some creativity, you can whip up these hauntingly cute snacks in no time.
Ghostly Pizza Bagels combine the classic flavors of a pizza with the playful spirit of Halloween. The base of each “ghost” is a soft bagel half, topped with tangy tomato sauce, gooey mozzarella cheese, and a variety of spooky toppings like olives and bell peppers to create the ghostly faces.
This recipe is versatile, allowing you to customize each bagel to suit your taste preferences while maintaining a hauntingly fun presentation.
Ingredients for Ghostly Pizza Bagels (Serves 4-6)
- 6 plain bagels, halved
- 1 cup pizza or marinara sauce
- 2 cups shredded mozzarella cheese
- 12 black olives, sliced
- 1 green bell pepper, cut into small pieces
- 1 small onion, thinly sliced
- 1 tablespoon olive oil
- Salt and pepper to taste
Cooking Instructions
- Preheat the Oven: Begin by preheating your oven to 375°F (190°C). This guarantees that your bagels will bake evenly and develop a nice, crispy texture.
- Prepare the Bagels: Lay the bagel halves cut-side up on a baking sheet lined with parchment paper. Drizzle a small amount of olive oil over each bagel half to enhance the flavor and crispness.
- Add Tomato Sauce: Spread a generous tablespoon of pizza or marinara sauce on each bagel half, making sure to cover the entire surface for a delicious, tangy base.
- Layer with Cheese: Sprinkle a layer of shredded mozzarella cheese over the sauce, ensuring each bagel half is well-covered. The cheese will melt and create the ghostly appearance.
- Create Ghostly Faces: Use the black olive slices for the eyes and the green bell pepper pieces for the mouth to create spooky ghost faces on each bagel. For extra detail, use thin onion slices for additional facial features.
- Bake: Place the baking sheet in the preheated oven and bake the bagels for 10-12 minutes, or until the cheese is melted and bubbly with a slight golden hue.
- Serve: Once baked, carefully remove the bagels from the oven and let them cool slightly before serving. Arrange them on a platter for a festive presentation.
Extra Tips
For an added layer of flavor, consider using a flavored bagel such as garlic or onion. You can also experiment with different types of cheese, like cheddar or provolone, to give your Ghostly Pizza Bagels a unique taste.
If you’re serving these at a party, prepare the toppings ahead of time so guests can assemble their own ghostly creations. Remember, the key to these spooky snacks is creativity, so feel free to mix and match toppings to create a variety of ghostly faces.
Jalapeño Popper Mummies

Looking to spice up your Halloween party with a delicious and fun appetizer? Jalapeño Popper Mummies are the perfect treat to get everyone in the spooky spirit. These delectable bites combine the fiery kick of jalapeños with creamy cheese filling, all wrapped up in a flaky, golden crust that resembles a mummy. Not only do they look adorable and festive, but they also pack a flavorful punch that will have your guests coming back for more.
Jalapeño Popper Mummies are a great addition to any Halloween spread or any occasion where you want to impress with a themed treat. They’re simple to prepare and can be made in advance, allowing you to focus on other party preparations. Whether you’re hosting a Halloween bash or just want to enjoy a fun cooking project with the family, these mummies are sure to delight both kids and adults alike. Here’s how you can make enough for a serving size of 4-6 people.
Ingredients:
- 8 large jalapeño peppers
- 8 ounces cream cheese, softened
- 1 cup shredded cheddar cheese
- 1/2 teaspoon garlic powder
- 1/2 teaspoon onion powder
- 1/4 teaspoon salt
- 1/4 teaspoon black pepper
- 1 package refrigerated crescent roll dough
- 16 small candy eyeballs
Instructions:
- Preheat the Oven: Begin by preheating your oven to 400°F (200°C). This will guarantee that it’s at the right temperature when your mummies are ready to bake.
- Prepare the Jalapeños: Slice each jalapeño pepper in half lengthwise and remove the seeds and membranes. This will create a boat-like shape to hold the filling. If you prefer a milder flavor, make sure to remove all the seeds.
- Make the Filling: In a medium bowl, mix together the softened cream cheese, shredded cheddar cheese, garlic powder, onion powder, salt, and black pepper until well combined. This creamy mixture will balance the heat of the jalapeños.
- Stuff the Peppers: Using a spoon, fill each jalapeño half with the cheese mixture, mounding the filling slightly above the edge of the pepper.
- Wrap with Dough: Unroll the crescent roll dough and separate it into individual strips. Wrap one strip around each stuffed jalapeño half, leaving a small gap for the candy eyeballs. The dough should resemble mummy bandages.
- Bake the Mummies: Place the wrapped jalapeños on a baking sheet lined with parchment paper. Bake in the preheated oven for 12-15 minutes, or until the dough is golden brown and crispy.
- Add the Eyes: Once out of the oven, let the mummies cool slightly, then press two candy eyeballs into the exposed filling of each jalapeño. This will give them their final spooky touch.
Extra Tips:
For an extra crispy texture, you can brush the wrapped jalapeños with a bit of melted butter before baking.
If you’re preparing these ahead of time, stuff and wrap the jalapeños, then refrigerate until you’re ready to bake. This allows you to serve them fresh and warm.
Finally, if you have guests who might be sensitive to spicy foods, consider using mini sweet peppers instead of jalapeños for a milder version of this fun treat.
Creepy Crawly Pasta Salad

Creepy Crawly Pasta Salad is the perfect addition to your Halloween menu, offering a delightful combination of flavors with a spooky twist. This dish isn’t only visually fun but also incredibly tasty, making it a hit with both kids and adults. The pasta salad is adorned with “creepy crawlies” made of olives and cherry tomatoes, nestled among colorful vegetables that mimic a witch’s garden.
A spooky yet scrumptious Halloween treat, sure to captivate both kids and adults alike.
Whether you’re hosting a Halloween party or simply looking to surprise your family with an eerie meal, this dish is sure to impress. The key to this recipe is to balance the fun Halloween theme with a delicious taste that will leave your guests asking for more. The pasta serves as the base, while the fresh vegetables add crunch and nutrition.
The olives and cherry tomatoes are transformed into tiny spiders, adding a dash of creativity and spookiness to the dish. This Creepy Crawly Pasta Salad isn’t only easy to prepare but can also be made ahead of time, allowing you to enjoy the festivities without worrying about last-minute preparations.
Ingredients (Serves 4-6):
- 12 ounces rotini pasta
- 1 cup cherry tomatoes
- 1 cup black olives
- 1/2 cup sliced green olives
- 1 red bell pepper
- 1 yellow bell pepper
- 1 cucumber
- 1/2 cup shredded carrots
- 1/4 cup red onion, finely chopped
- 1 cup Italian dressing
- Salt and pepper to taste
- 1 tablespoon olive oil
Instructions:
- Cook the Pasta: In a large pot of boiling salted water, cook the rotini pasta until al dente according to package instructions. Drain the pasta and rinse it under cold water to stop the cooking process. Drizzle with olive oil to prevent sticking and set aside.
- Prepare the Creepy Crawlies: Slice the cherry tomatoes in half. For the spider effect, cut some black olives in half for the bodies, and slice others into thin strips to create legs. Arrange the olive halves and strips on top of the cherry tomato halves to resemble spiders. Repeat this process for the desired number of creepy crawlies.
- Chop the Vegetables: Dice the red and yellow bell peppers and cucumber into small, bite-sized pieces. Combine them with shredded carrots and finely chopped red onion in a large mixing bowl.
- Mix the Salad: Add the cooked pasta to the bowl of vegetables. Gently toss everything together to combine.
- Add the Dressing: Pour the Italian dressing over the pasta and vegetables, tossing everything until well coated. Season with salt and pepper to taste.
- Assemble the Dish: Transfer the pasta salad to a serving bowl or platter. Arrange the prepared olive and cherry tomato creepy crawlies on top of the salad for a spooky presentation.
- Chill and Serve: Cover the pasta salad and refrigerate for at least 30 minutes to allow the flavors to meld. Serve chilled and watch your guests enjoy the creepy creation!
Extra Tips:
For an added Halloween touch, consider using colored pasta, such as black squid ink pasta or pumpkin-shaped pasta, to enhance the festive theme. If you’re preparing the salad in advance, keep the dressing separate and mix it in just before serving to prevent the pasta from absorbing too much liquid.
Additionally, feel free to experiment with different vegetables or add protein like grilled chicken or tofu for a heartier dish.
Bloody Mary Shrimp Cocktail

Looking to add a spine-chilling twist to your Halloween party menu? The Bloody Mary Shrimp Cocktail is a perfect choice to thrill your guests! This dish combines the classic flavors of a Bloody Mary cocktail with succulent shrimp, creating a tantalizing appetizer that’s both spooky and sophisticated.
The vibrant red sauce, reminiscent of a blood-curdling horror scene, is perfect for setting the mood at any Halloween gathering. Not only is this dish visually striking, but it also offers a delightful burst of flavors that will have your guests reaching for more.
Ideal for serving a crowd of 4-6 people, the Bloody Mary Shrimp Cocktail is easy to prepare and can be made ahead of time, allowing you to focus on your other Halloween festivities. This recipe brings together the freshness of seafood with the tangy and spicy notes of a Bloody Mary, making it a versatile dish that can be enjoyed by all.
Whether you’re a fan of seafood or simply looking to impress with a creative and thematic dish, this recipe is sure to be a hit at your Halloween celebration.
Ingredients (serving size: 4-6 people)
- 1 pound large shrimp, peeled and deveined
- 2 cups tomato juice
- 1/4 cup vodka
- 2 tablespoons lemon juice
- 1 tablespoon Worcestershire sauce
- 1 tablespoon horseradish
- 1 teaspoon hot sauce
- 1 teaspoon celery salt
- 1 teaspoon black pepper
- 1 tablespoon chopped fresh dill
- Lemon wedges, for garnish
- Celery sticks, for garnish
- Optional: 1/4 cup diced celery or pickles for added crunch
Cooking Instructions
1. Prepare the Shrimp: Start by boiling a pot of salted water. Add the shrimp and cook for about 2-3 minutes until they turn pink and opaque. Drain the shrimp and immediately plunge them into a bowl of ice water to stop the cooking process.
Once cooled, drain and pat them dry with paper towels.
2. Make the Bloody Mary Sauce: In a large mixing bowl, combine the tomato juice, vodka, lemon juice, Worcestershire sauce, horseradish, hot sauce, celery salt, and black pepper. Whisk together until all the ingredients are well-blended.
Adjust the seasoning to taste, adding more hot sauce for extra heat if desired.
3. Combine Shrimp and Sauce: Gently toss the cooked shrimp with the Bloody Mary sauce, ensuring each shrimp is well-coated. If using, add diced celery or pickles for an additional crunch.
4. Chill the Cocktail: Cover the bowl with plastic wrap and refrigerate for at least 30 minutes, allowing the flavors to meld together.
5. Serve the Dish: Once chilled, transfer the shrimp cocktail to a serving dish. Garnish with fresh dill, lemon wedges, and celery sticks for an extra festive touch. Serve immediately for best flavor.
Extra Tips
When preparing this dish, consider using fresh shrimp for the best flavor and texture. If fresh shrimp isn’t available, frozen shrimp can be used, but make sure to thaw them completely before cooking.
Adjust the level of spiciness in the Bloody Mary sauce according to your guests’ preferences by modifying the amount of hot sauce or horseradish. For a more intense flavor, you can marinate the shrimp in the sauce overnight.
Finally, presentation is key for this visually stunning dish, so consider serving it in a large martini glass or a hollowed-out pumpkin for an added Halloween flair.
Vampire Bat Wings

Halloween is the perfect time to get creative with your culinary skills and impress your friends and family with some spooky treats. One of the most popular Halloween-themed dishes is Vampire Bat Wings. These tantalizing treats aren’t only visually appealing but also pack a punch of flavor that will have everyone at your party coming back for more. The deep, dark color of the wings, achieved by a special marinade, adds a touch of eerie elegance to any Halloween spread.
Vampire Bat Wings are typically made using chicken wings, which are marinated in a mixture of soy sauce, balsamic vinegar, and spices to create a rich, dark hue. The wings are then baked until they’re perfectly crispy on the outside while remaining juicy on the inside. This recipe is designed to serve 4-6 people, making it an ideal choice for a small Halloween gathering. Whether you’re hosting a party or simply looking to enjoy a themed dinner with your family, these Vampire Bat Wings are sure to make your Halloween memorable.
Create a spooky feast with Vampire Bat Wings that are crispy outside and juicy inside, perfect for Halloween gatherings.
Ingredients (Serves 4-6)
- 2 pounds of chicken wings
- 1/2 cup soy sauce
- 1/4 cup balsamic vinegar
- 2 tablespoons honey
- 1 tablespoon olive oil
- 1 teaspoon garlic powder
- 1 teaspoon onion powder
- 1 teaspoon smoked paprika
- 1/2 teaspoon cayenne pepper
- Salt and black pepper to taste
- Fresh parsley for garnish (optional)
Cooking Instructions
- Prepare the Chicken Wings:
- Begin by washing the chicken wings under cold water and patting them dry with paper towels. This guarantees that the marinade adheres well to the wings.
- Make the Marinade:
- In a large mixing bowl, combine the soy sauce, balsamic vinegar, honey, olive oil, garlic powder, onion powder, smoked paprika, cayenne pepper, salt, and black pepper. Whisk these ingredients together until well blended.
- Marinate the Wings:
- Add the chicken wings to the bowl with the marinade, making sure each wing is well coated. Cover the bowl with plastic wrap and refrigerate for at least 2 hours, or overnight for best results. This allows the flavors to penetrate the wings thoroughly.
- Preheat the Oven:
- Preheat your oven to 400°F (200°C). Line a baking sheet with aluminum foil or parchment paper for easy cleanup.
- Bake the Wings:
- Remove the wings from the marinade and arrange them in a single layer on the prepared baking sheet. Bake in the preheated oven for 35-40 minutes, turning the wings halfway through cooking to guarantee even browning.
- Finish and Serve:
- Once the wings are cooked through and have a crispy, dark exterior, remove them from the oven. Arrange the Vampire Bat Wings on a serving platter and garnish with fresh parsley if desired. Serve immediately while hot.
Extra Tips
For an even deeper color, you can add a few drops of black food coloring to the marinade. This will enhance the spooky appearance of the wings.
If you prefer to grill the wings instead of baking them, preheat your grill to medium-high heat and cook the wings for about 20-25 minutes, turning occasionally. Make sure to use a meat thermometer to verify the wings reach an internal temperature of 165°F (74°C) to confirm they’re fully cooked.
Enjoy these Vampire Bat Wings with a side of creamy ranch or blue cheese dressing for dipping.
Graveyard Chocolate Pudding Cups
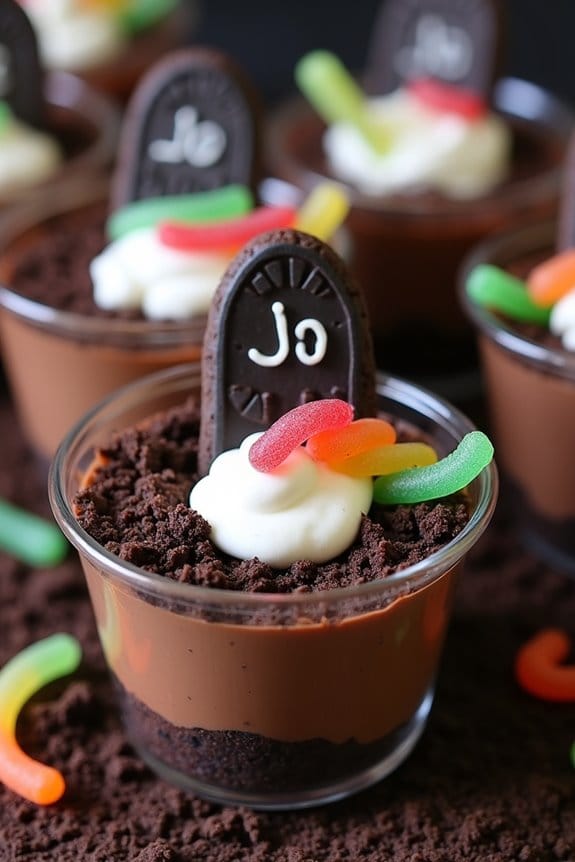
Graveyard Chocolate Pudding Cups are a spooky, delicious treat perfect for any Halloween celebration. These fun and easy-to-make desserts will delight both kids and adults alike. With chocolate pudding serving as the “dirt,” crushed cookies as the “soil,” and creative decorations like cookie tombstones and gummy worms, these pudding cups are both a visual and gustatory treat.
Whether you’re hosting a Halloween party or simply looking for a festive dessert to enjoy at home, Graveyard Chocolate Pudding Cups are sure to be a hit.
Not only do these pudding cups look impressive, but they’re also simple to prepare, requiring just a few ingredients and minimal time. The incorporation of various textures, from creamy pudding to crunchy cookies, makes each spoonful an exciting experience.
Plus, the decoration possibilities are endless, allowing you to get creative and involve kids in the process. With a serving size of 4-6 people, this recipe is perfect for a small gathering or family treat.
Ingredients (Serves 4-6):
- 2 cups of milk
- 1 package (3.9 oz) instant chocolate pudding mix
- 1 package (12 oz) of chocolate sandwich cookies
- 1 cup whipped topping
- 1 package (7 oz) gummy worms
- 6 oval-shaped cookies (like Milano) for tombstones
- Black decorating gel
Cooking Instructions:
- Prepare the Pudding: In a medium-sized bowl, whisk together the milk and instant chocolate pudding mix for about 2 minutes, or until well combined and thickened. Let the pudding sit for about 5 minutes to fully set.
- Crush the Cookies: Place the chocolate sandwich cookies in a large resealable plastic bag and use a rolling pin to crush them into fine crumbs. This will create the “soil” texture for the pudding cups.
- Assemble the Cups: Divide the prepared pudding evenly among 4-6 clear serving cups. Layer the crushed cookies on top of the pudding, filling each cup to the brim.
- Add Whipped Topping: Spoon a dollop of whipped topping onto each pudding cup, slightly off-center to mimic a freshly dug grave.
- Create Tombstones: Write spooky or silly epitaphs on the oval-shaped cookies using black decorating gel. Carefully insert one “tombstone” into each pudding cup, standing upright in the whipped topping.
- Decorate with Gummy Worms: Arrange a few gummy worms on top of the cookie crumbs, allowing them to hang over the sides of the cups for a creepy, realistic effect.
Extra Tips:
For an even more authentic graveyard look, use green-tinted coconut flakes as “grass” around your tombstones. You can also experiment with different cookie flavors or pudding varieties to suit your taste.
If you’re preparing these in advance, store the pudding cups in the refrigerator without the gummy worms and tombstones, adding them just before serving to maintain their texture and appearance.
Frankenstein Rice Krispie Treats

Frankenstein Rice Krispie Treats are a fun and spooky twist on the classic dessert, perfect for any Halloween gathering. These treats combine the gooey, marshmallow flavor you love with a creative, monster-themed design that both kids and adults will enjoy.
Not only are they delicious, but they also add a festive touch to your Halloween spread with their bright green color and playful decorations.
These treats are surprisingly easy to make and require just a few simple ingredients. The whole family can get involved in the decorating process, making it a fun and interactive activity.
These Frankenstein Rice Krispie Treats serve 4-6 people, making them a great option for small parties or family gatherings. Get ready to impress your guests with these monstrously delicious snacks!
Ingredients:
- 3 tablespoons unsalted butter
- 1 package (10 oz) mini marshmallows
- 6 cups crispy rice cereal
- Green food coloring
- 1 cup semi-sweet chocolate chips, melted
- Edible candy eyes
- Black decorating gel
- Pretzel sticks
Instructions:
- Prepare the Pan: Start by lining a 9×13-inch baking dish with parchment paper or lightly greasing it with cooking spray. This will help prevent the treats from sticking to the pan.
- Melt the Butter and Marshmallows: In a large saucepan over medium heat, melt 3 tablespoons of unsalted butter. Add the mini marshmallows and stir continuously until they’re completely melted and smooth.
- Add Food Coloring: Once the marshmallows are melted, remove the saucepan from heat and add a few drops of green food coloring. Stir until the color is evenly distributed. Adjust the color as needed to achieve your desired shade of green.
- Mix in the Cereal: Gradually add the crispy rice cereal to the melted marshmallow mixture, stirring well to guarantee all the cereal is coated.
- Press into Pan: Transfer the mixture to the prepared baking dish. Using a spatula lightly coated with cooking spray, press the mixture evenly into the pan. Allow it to cool completely.
- Cut and Decorate: Once cooled, remove the block of treats from the pan and cut it into rectangles. Dip the top of each rectangle into the melted chocolate to create Frankenstein’s hair. Attach two edible candy eyes onto the chocolate while it’s still wet.
- Add Features: Use the black decorating gel to draw a mouth and any other features you like. Break pretzel sticks in half and insert them into the sides of the treats for Frankenstein’s neck bolts.
- Set and Serve: Allow the chocolate and decorations to set before serving. These treats can be stored in an airtight container for a few days if needed.
Extra Tips: For best results, work quickly when adding the cereal to the marshmallow mixture to avoid it cooling and becoming difficult to combine.
When pressing the mixture into the pan, a piece of wax paper or slightly wet hands can help to smooth the surface without sticking. If you want to experiment, try adding a few drops of vanilla extract or a pinch of salt for extra flavor.
Finally, get creative with the decorations – add scars or different expressions to make each Frankenstein unique!
Candy Corn Parfait

Candy Corn Parfait is a delightful and festive treat perfect for Halloween celebrations. This layered dessert mimics the colors of the classic candy corn using simple ingredients like vanilla pudding, whipped cream, and orange gelatin. It’s an ideal treat for both kids and adults, combining flavors and textures that are sure to please everyone at your Halloween gathering.
Not only is it visually appealing, but it also offers a sweet and creamy taste that captures the essence of the season.
Preparing a Candy Corn Parfait is straightforward and doesn’t require any advanced cooking skills. The dish is a no-bake dessert that can be assembled in advance, making it convenient for those busy with other Halloween preparations. Each layer represents the iconic candy corn colors, starting with a yellow base, followed by an orange middle, and topped with a white layer.
With this easy recipe, you’ll be able to make a serving size for 4-6 people, ensuring there’s enough to share.
Ingredients for 4-6 People:
- 2 cups of vanilla pudding
- 1 package (3 oz) of orange-flavored gelatin
- 1 cup of boiling water
- 1 cup of cold water
- 1 cup of whipped cream
- 1 cup of candy corn, for garnish
- 6 parfait glasses or clear cups
Cooking Instructions:
- Prepare the Gelatin: In a medium-sized bowl, dissolve the orange-flavored gelatin in 1 cup of boiling water. Stir until completely dissolved, then add 1 cup of cold water and mix well. Refrigerate the gelatin for about 1 hour or until it starts to thicken but isn’t fully set.
- Layer the Pudding: Divide the vanilla pudding evenly among the 6 parfait glasses, creating the bottom yellow layer. Smooth the top with a spoon for an even base.
- Add the Gelatin Layer: Once the gelatin is thickened, spoon it gently over the pudding layer in each glass, forming the orange middle layer. Return the glasses to the refrigerator and allow the gelatin to set completely for about 2 hours.
- Top with Whipped Cream: Once the gelatin is fully set, top each parfait with a generous dollop of whipped cream to create the top white layer. Make sure the whipped cream is evenly distributed across all glasses.
- Garnish with Candy Corn: Finish off your parfaits by garnishing each glass with a few pieces of candy corn. This not only enhances the visual appeal but also ties the theme together.
Extra Tips:
For a more refined presentation, consider using a piping bag to add the whipped cream layer. This will give it a smooth and professional look.
If you prefer homemade whipped cream over store-bought, simply whip 1 cup of heavy cream with 2 tablespoons of sugar and a teaspoon of vanilla extract until peaks form.
Additionally, if you want to add a bit more texture, consider including a layer of crushed graham crackers between the pudding and gelatin layers. This will give the parfait a nice crunch.
Remember to serve the parfaits chilled for the best taste and consistency. Enjoy your Candy Corn Parfait!
Haunted Haystack Cookies
Halloween is the perfect time to get creative in the kitchen, and what better way to embrace the spooky spirit than with Haunted Haystack Cookies? These no-bake treats aren’t only fun to make but also deliciously addictive.
With a crunchy base of chow mein noodles and a sweet coating of butterscotch and peanut butter, these cookies are bound to be a hit at any Halloween party. Their eerie appearance, resembling little haystacks or spooky nests, makes them a fantastic addition to your Halloween spread, delighting both kids and adults alike.
Whether you’re hosting a Halloween bash or just want to enjoy a themed treat at home, Haunted Haystack Cookies are quick and easy to prepare. With minimal ingredients and no baking required, they offer a simple yet scrumptious way to celebrate the season.
Perfect for a serving size of 4-6 people, these cookies can be whipped up in less than 30 minutes, leaving you plenty of time to enjoy the festivities. Gather your ingredients and let the hauntingly sweet fun begin!
Ingredients
- 1 cup butterscotch chips
- 1/2 cup creamy peanut butter
- 2 cups chow mein noodles
- 1/2 cup mini marshmallows
- 1/4 cup candy eyes or small round candies for decoration
Instructions
- Melt the Butterscotch Mixture: In a medium-sized saucepan over low heat, melt the butterscotch chips and peanut butter together. Stir continuously until the mixture is smooth and fully combined. Be careful not to overheat, as this could cause the butterscotch to seize.
- Combine with Noodles: Remove the saucepan from the heat and add the chow mein noodles to the melted butterscotch mixture. Gently fold the noodles into the mixture until they’re evenly coated. Make sure all noodles are covered for maximum flavor and structure.
- Add Marshmallows: Stir in the mini marshmallows, mixing just until they’re incorporated. The marshmallows will add a chewy texture and a bit of ghostly white to your haystacks.
- Form the Haystacks: Line a baking sheet with parchment paper. Using a tablespoon, scoop out portions of the mixture and place them onto the prepared baking sheet. Shape them into small mounds or nests, pressing them lightly to guarantee they stick together.
- Decorate: Before the haystacks set, press candy eyes or small round candies onto the cookies to create spooky faces or add a little extra Halloween flair.
- Cool and Set: Allow the haystacks to cool at room temperature for about 15-20 minutes, or until they’re firm enough to handle. Once set, they’re ready to serve!
Extra Tips
For an even spookier touch, consider adding a few drops of food coloring to the butterscotch mixture before combining it with the noodles. This can give your haystacks a more colorful or eerie appearance.
If you’re making these cookies in advance, store them in an airtight container at room temperature for up to a week. For a nut-free version, substitute the peanut butter with sunflower seed butter. Enjoy crafting your Haunted Haystack Cookies and let your imagination run wild with decorations!
Black Cat Cupcakes

Black Cat Cupcakes are a spooktacular treat perfect for any Halloween gathering. These cupcakes are as delicious as they’re adorable, combining rich chocolate flavors with a whimsical design that captures the essence of the holiday.
Whether you’re hosting a party or simply want to surprise your family with a festive dessert, these black cat-themed cupcakes are certain to be a hit. With their chocolatey base and creative decorations, they offer a delightful mix of taste and visual appeal.
The recipe for Black Cat Cupcakes is straightforward and fun, making it a great activity to enjoy with kids or friends. The chocolate cupcakes form the base, topped with a smooth and creamy frosting. The decorations transform these simple cupcakes into charming black cats, complete with candy eyes, licorice whiskers, and chocolate ears.
The result is a batch of cupcakes that aren’t only scrumptious but also creatively engaging. This recipe serves approximately 4-6 people, perfect for a small Halloween gathering.
Ingredients:
- 1 cup all-purpose flour
- 1/2 cup unsweetened cocoa powder
- 1 cup granulated sugar
- 1/2 teaspoon baking soda
- 1/4 teaspoon baking powder
- 1/4 teaspoon salt
- 1/2 cup unsalted butter, melted
- 2 large eggs
- 1 teaspoon vanilla extract
- 1/2 cup buttermilk
- 1 cup chocolate frosting
- 12 chocolate wafers or cookies (for ears)
- Black licorice strings (for whiskers)
- Candy eyes (available at baking stores)
- Black food coloring (optional)
Instructions:
- Preheat and Prep: Preheat your oven to 350°F (175°C). Line a muffin tin with 12 cupcake liners.
- Mix Dry Ingredients: In a large bowl, whisk together the flour, cocoa powder, sugar, baking soda, baking powder, and salt until well combined.
- Combine Wet Ingredients: In a separate bowl, beat together the melted butter, eggs, and vanilla extract until smooth. Stir in the buttermilk until everything is well mixed.
- Combine Wet and Dry Mixtures: Gradually add the wet ingredients to the dry ingredients, mixing until just combined. Be careful not to overmix, as this can make the cupcakes dense.
- Bake the Cupcakes: Divide the batter evenly among the prepared cupcake liners, filling each about two-thirds full. Bake for 18-20 minutes or until a toothpick inserted into the center of a cupcake comes out clean. Allow them to cool completely on a wire rack before decorating.
- Frost the Cupcakes: Once the cupcakes are cool, spread a generous amount of chocolate frosting on each one. For a more pronounced black cat look, you can mix a few drops of black food coloring into the frosting.
- Decorate: Place two candy eyes on each cupcake. Break the chocolate wafers in half and insert them into the frosting to create the cat ears. Cut the licorice strings into small pieces and arrange them as whiskers on the sides of the eyes.
- Finish and Serve: Confirm all decorations are securely placed and serve your delightful Black Cat Cupcakes to your guests.
Extra Tips:
When making Black Cat Cupcakes, confirm that the cupcakes are completely cooled before applying the frosting; otherwise, the frosting may melt and ruin the decoration.
If you can’t find candy eyes, you can use small chocolate chips or white icing dots with a black center for a homemade version. To make your cupcakes even more festive, consider using Halloween-themed liners or adding a sprinkle of edible glitter. These little touches can make your cupcakes even more special for the occasion!
