
As Halloween draws near, the excitement of creating delightful treats at home fills the air. Picture spooky spider cupcakes with rich chocolate frosting and candy spiders, or ghostly marshmallow pops with charming faces. How about crafting mummy hot dogs or vampire bat wings for a savory twist? Each treat promises simplicity and festive flair. Ready to bring these creations to life? Let’s get started!
Spooky Spider Cupcakes

Spooky Spider Cupcakes are the perfect treat to serve at any Halloween gathering. These creepy yet delightful cupcakes combine rich chocolate flavors with a playful, spooky design. The cupcakes are topped with a luscious chocolate frosting and decorated with candy spiders, making them not only a treat for the taste buds but also a visual feast.
Whether you’re hosting a party or looking for a fun baking project to enjoy with family and friends, these cupcakes are certain to be a hit.
Creating Spooky Spider Cupcakes is an enjoyable process that allows you to channel your creativity while preparing a delicious dessert. The base of the cupcake is a moist chocolate cake, which is then generously topped with a creamy frosting. The spiders are crafted from chocolate candies and licorice, adding a whimsical touch to your Halloween spread.
Craft delectable spider-themed cupcakes and delight in both creativity and flavor for a spooky Halloween treat.
This recipe yields 12 cupcakes, making it ideal for a serving size of 4-6 people, guaranteeing everyone can enjoy more than one of these ghoulish delights.
Ingredients:
- 1 cup all-purpose flour
- 1 cup granulated sugar
- 1/2 cup unsweetened cocoa powder
- 1 teaspoon baking powder
- 1/2 teaspoon baking soda
- 1/4 teaspoon salt
- 1/2 cup milk
- 1/4 cup vegetable oil
- 1 teaspoon vanilla extract
- 1 large egg
- 1/2 cup boiling water
- 1 cup butter (softened)
- 2 cups powdered sugar
- 1/4 cup unsweetened cocoa powder (for frosting)
- 2 tablespoons milk (for frosting)
- 12 large chocolate candies (for spider bodies)
- 24 small chocolate candies (for spider eyes)
- 24 pieces of black licorice (for spider legs)
Instructions:
- Prepare the Oven and Pan: Preheat your oven to 350°F (175°C) and line a 12-cup muffin pan with cupcake liners.
- Mix Dry Ingredients: In a large bowl, combine the flour, granulated sugar, cocoa powder, baking powder, baking soda, and salt. Whisk together until well blended.
- Add Wet Ingredients: Add the milk, vegetable oil, vanilla extract, and egg to the dry ingredients. Mix with an electric mixer on medium speed until all ingredients are well combined.
- Incorporate Boiling Water: Carefully add the boiling water to the batter, mixing slowly. The batter will be thin, but this is expected.
- Bake the Cupcakes: Pour the batter evenly into the prepared cupcake liners. Bake for 18-20 minutes or until a toothpick inserted into the center of a cupcake comes out clean. Allow them to cool completely.
- Prepare the Frosting: In a medium bowl, beat the softened butter until creamy. Gradually add powdered sugar and cocoa powder, alternating with the milk. Beat on medium speed until smooth and fluffy.
- Frost the Cupcakes: Once the cupcakes are cooled, generously frost the tops using a spatula or piping bag.
- Decorate with Spiders: Place one large chocolate candy on each cupcake as the spider body. Use small chocolate candies for eyes, and cut the black licorice into small pieces to create legs, pressing them gently into the frosting.
Extra Tips:
For an extra spooky effect, consider using red or orange food coloring to tint the frosting or adding edible glitter for added sparkle.
If you prefer, you can use store-bought frosting to save time. Additionally, verify your licorice is fresh and pliable; this makes it easier to cut and shape into spider legs.
Finally, allow your cupcakes to cool completely before decorating to prevent the frosting from melting.
Ghostly Marshmallow Pops
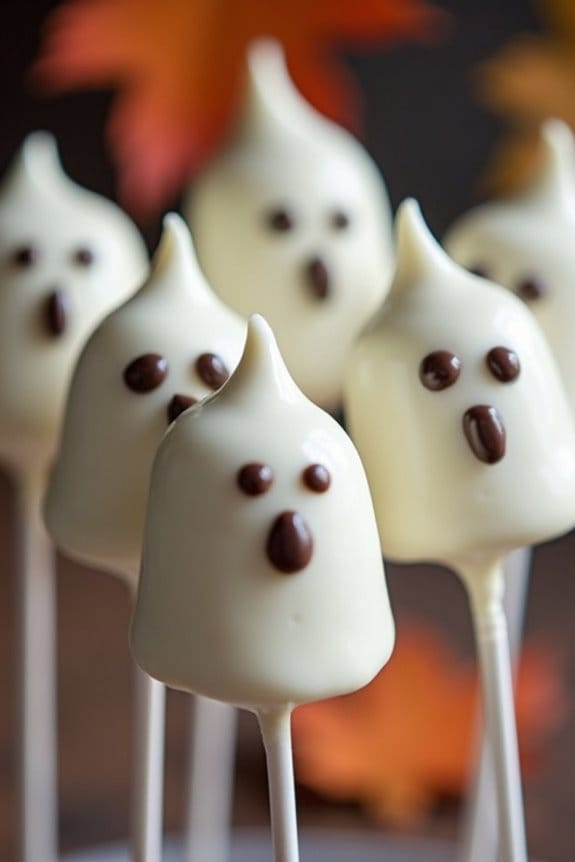
Create a spooktacular treat this Halloween with Ghostly Marshmallow Pops! These delightful, easy-to-make treats are perfect for Halloween parties, trick-or-treating snacks, or simply enjoying with family and friends. With their adorable ghostly appearance and delicious taste, these marshmallow pops are bound to be a hit with both kids and adults.
With just a few ingredients and a little bit of creativity, you can whip up these ghostly goodies in no time. Ghostly Marshmallow Pops combine fluffy marshmallows with smooth white chocolate to create a hauntingly sweet experience. The pops are then decorated with spooky faces using edible markers or melted chocolate, allowing you to personalize each ghost to your liking.
Whether you’re a seasoned chef or a beginner in the kitchen, this recipe is fun and straightforward, making it an excellent choice for getting everyone involved in the Halloween festivities.
Ingredients (Serves 4-6):
- 12 large marshmallows
- 12 lollipop sticks or skewers
- 1 cup of white chocolate chips
- 2 teaspoons of coconut oil
- Edible black marker or melted dark chocolate for decorating
- Wax or parchment paper
Instructions:
- Prepare the Marshmallows: Begin by inserting a lollipop stick or skewer into each marshmallow, guaranteeing that it’s securely placed but not poking through the other side. This will help you easily dip and handle the marshmallows during the decorating process.
- Melt the White Chocolate: In a microwave-safe bowl, combine the white chocolate chips and coconut oil. Microwave in 30-second intervals, stirring each time, until the chocolate is completely melted and smooth. Be careful not to overheat as this can burn the chocolate.
- Coat the Marshmallows: Dip each marshmallow into the melted white chocolate, turning it to guarantee even coverage. Once coated, gently shake off any excess chocolate and place the marshmallow pop onto a sheet of wax or parchment paper to set. Repeat this process for all marshmallows.
- Decorate Your Ghosts: Once the chocolate coating has set and is firm to the touch, use an edible black marker or melted dark chocolate to draw spooky ghost faces on each marshmallow pop. Get creative with different expressions to give each ghost its own unique personality.
- Allow to Set: Let the decorated marshmallow pops sit for about 15 minutes to confirm that all decorations are fully dry and set before serving.
Extra Tips:
For an extra touch of fun, you can add sprinkles or edible glitter to the ghosts before the chocolate sets for a sparkling effect. If you prefer not to use coconut oil, you can substitute it with vegetable oil to achieve the same smooth consistency in the melted chocolate.
These Ghostly Marshmallow Pops can be made a day in advance and stored in an airtight container at room temperature, making them a convenient option for busy party preparations. Enjoy your hauntingly delicious treats!
Witch Hat Cookies

Witch Hat Cookies are a fun and festive Halloween treat that will delight both kids and adults. These charming cookies aren’t only easy to make but also perfect for adding a bit of spooky flair to your Halloween party or gathering. With a combination of crunchy cookies, smooth chocolate, and colorful decorations, these witch hat cookies are certain to become a Halloween favorite.
The base of the witch hat is made from a simple sugar cookie, while the pointed top is crafted from a chocolate kiss. The result is a whimsical and delicious treat that captures the spirit of Halloween. Whether you’re hosting a party or just looking to create some culinary magic at home, these witch hat cookies are a delightful and easy-to-make addition to any Halloween celebration.
Ingredients (serving size: 4-6 people)
- 1 package of round sugar cookies (about 24 cookies)
- 24 chocolate kisses, unwrapped
- 1 cup of semi-sweet chocolate chips
- 1 tablespoon of unsalted butter
- 1 tube of orange or green icing
- Halloween sprinkles (optional)
Cooking Instructions
- Prepare the Cookies: Arrange the round sugar cookies on a large baking sheet or flat surface. Confirm they’re evenly spaced and ready to be decorated.
- Melt the Chocolate: In a microwave-safe bowl, combine the semi-sweet chocolate chips with the unsalted butter. Microwave in 30-second intervals, stirring in between, until the chocolate is fully melted and smooth.
- Attach the Kisses: Using a small spoon or a piping bag, place a small dollop of melted chocolate in the center of each sugar cookie. Immediately press a chocolate kiss onto the melted chocolate, guaranteeing it sticks securely to the cookie.
- Decorate the Hat Rim: Once all the kisses are attached, use the orange or green icing to pipe a ring around the base of each chocolate kiss where it meets the cookie. This creates the hat’s rim and adds a pop of Halloween color.
- Add Sprinkles: If desired, sprinkle some Halloween-themed sprinkles onto the icing before it sets. This adds an extra festive touch to the witch hats.
- Allow to Set: Let the cookies sit at room temperature until the chocolate and icing have fully set. This usually takes about 30 minutes to an hour.
Extra Tips
To guarantee that the chocolate kisses adhere well, make sure the cookies are completely flat and the chocolate is adequately melted and smooth.
If you’re short on time, you can speed up the setting process by placing the cookies in the refrigerator for 15-20 minutes.
Additionally, feel free to experiment with different icing colors or sprinkle types to customize the cookies to your liking.
These cookies are a great project to make with kids, as they can easily create their own spooky masterpieces with minimal supervision. Enjoy your bewitching treats!
Monster Eyeball Pasta
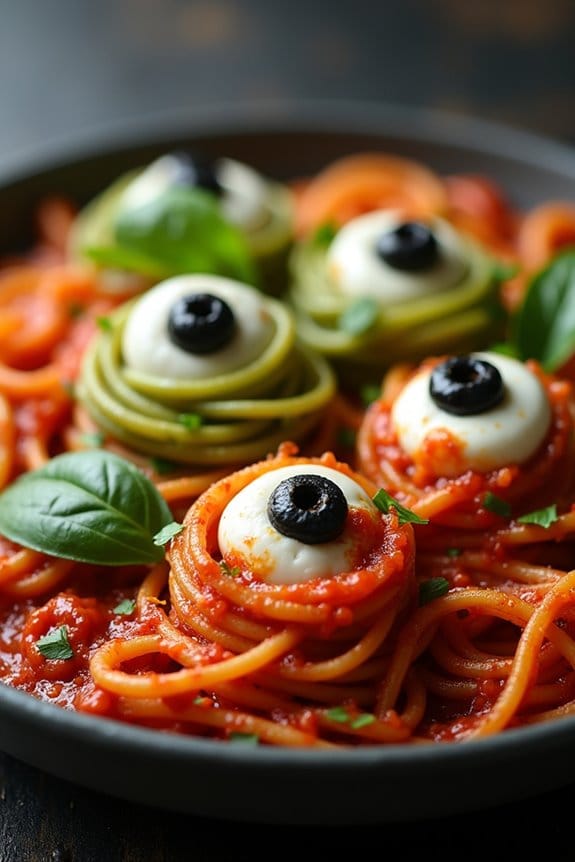
Monster Eyeball Pasta is a fun and spooky dish perfect for Halloween festivities. This eerie creation combines the familiar comfort of pasta with a creative twist that will thrill both the young and the young at heart. With strands of pasta dyed in ghastly colors and topped with creepy eyeballs made from cheese and olives, this dish is sure to be a hit at any Halloween gathering. The vibrant appearance and savory flavors promise to make this meal both a visual treat and a delicious delight.
The preparation of Monster Eyeball Pasta is straightforward, making it an excellent choice for a family-friendly cooking activity. The dish uses ingredients that are easy to find and simple to prepare, ensuring that even novice cooks can successfully bring this spooky creation to life. The eyeballs, which are the star of the dish, are crafted from mozzarella balls and sliced black olives, giving the pasta an extra layer of flavor and a striking appearance.
Let’s get started on this monstrously fun meal that serves 4-6 people.
Ingredients:
- 1 pound of spaghetti or linguine
- 2 tablespoons olive oil
- 2-3 drops of green or black food coloring (optional)
- Salt and pepper to taste
- 1 cup of marinara sauce
- 12-18 small mozzarella balls (ciliegine)
- 1 can of sliced black olives
- Fresh basil leaves for garnish (optional)
Cooking Instructions:
- Cook the Pasta: Begin by bringing a large pot of salted water to a boil. Add the spaghetti or linguine and cook according to the package instructions until al dente. If you want to add a spooky twist, add a few drops of green or black food coloring to the boiling water and stir until the pasta is evenly colored.
- Prepare the Sauce: While the pasta is cooking, heat the olive oil in a large pan over medium heat. Add the marinara sauce and allow it to simmer for about 5 minutes, stirring occasionally. Season with salt and pepper to taste.
- Assemble the Eyeballs: For the eyeballs, take the mozzarella balls and press a slice of black olive into the center of each one to create a pupil. Set them aside.
- Combine and Serve: Drain the pasta and add it to the pan with the marinara sauce, tossing until the pasta is well coated. Transfer the pasta to a serving dish or individual plates, and arrange the mozzarella eyeballs on top. Garnish with fresh basil leaves if desired.
- Presentation: For added spookiness, use tongs to twist the pasta into eerie mounds before placing the eyeballs on top.
Extra Tips:
For an even more vibrant presentation, you can experiment with different food coloring shades to match your Halloween theme. If you prefer a bit of heat, consider adding red pepper flakes to the marinara sauce for a spicy kick. Additionally, if fresh mozzarella balls are unavailable, you can use regular mozzarella and cut it into small pieces.
Finally, to save time, you can prepare the eyeballs a few hours in advance and store them in the refrigerator until you’re ready to serve the pasta.
Pumpkin Patch Brownies

Pumpkin Patch Brownies are the perfect Halloween treat, combining the rich, fudgy texture of classic brownies with the festive charm of a pumpkin patch. These brownies are adorned with cute, edible decorations that make them look like mini pumpkin patches, complete with candy pumpkins and green frosting vines. Not only are they a feast for the eyes, but their decadent chocolate flavor, enhanced by a hint of pumpkin spice, makes them irresistible to both kids and adults alike.
Perfect for a Halloween party or a fun baking activity with family and friends, Pumpkin Patch Brownies are certain to impress. Whether you’re a seasoned baker or a beginner looking to try something new, this recipe is straightforward and enjoyable to prepare. With a serving size suitable for 4-6 people, these brownies can be shared or savored over several days. Gather your ingredients and get ready to create a deliciously spooky treat!
Ingredients (for 4-6 people):
- 1 cup unsalted butter
- 1 cup granulated sugar
- 1 cup brown sugar
- 4 large eggs
- 1 teaspoon vanilla extract
- 1 cup all-purpose flour
- 1 cup unsweetened cocoa powder
- 1 teaspoon baking powder
- 1/2 teaspoon salt
- 1 teaspoon pumpkin spice
- 1/2 cup chocolate chips
- Green frosting (store-bought or homemade)
- Candy pumpkins (such as mellowcreme pumpkins)
Instructions:
- Preheat the Oven: Begin by preheating your oven to 350°F (175°C). Grease a 9×13 inch baking pan or line it with parchment paper to guarantee the brownies don’t stick.
- Prepare the Batter: In a large mixing bowl, melt the butter in the microwave or on the stovetop. Add the granulated sugar and brown sugar to the melted butter, whisking until smooth. Incorporate the eggs one at a time, beating well after each addition. Stir in the vanilla extract.
- Combine Dry Ingredients: In a separate bowl, sift together the flour, cocoa powder, baking powder, salt, and pumpkin spice. Gradually add the dry ingredients to the wet ingredients, mixing until just combined. Avoid over-mixing to keep the brownies tender.
- Add Chocolate Chips: Fold in the chocolate chips with a spatula, ensuring they’re evenly distributed throughout the batter.
- Bake the Brownies: Pour the batter into the prepared baking pan and spread it evenly. Bake in the preheated oven for 25-30 minutes, or until a toothpick inserted into the center comes out with a few moist crumbs but not wet batter.
- Cool and Decorate: Allow the brownies to cool completely in the pan. Once cooled, cut them into squares. Use the green frosting to pipe vine patterns on top of each brownie square. Finish by placing a candy pumpkin on each piece to create the pumpkin patch look.
Extra Tips:
When making Pumpkin Patch Brownies, make sure the brownies are completely cool before attempting to decorate them. This guarantees that the frosting doesn’t melt or slide off.
If you don’t have pumpkin spice on hand, you can create your own by mixing cinnamon, nutmeg, and a touch of ginger. To make the brownies extra festive, consider adding some orange sprinkles or edible glitter for a touch of sparkle.
Additionally, if you want a more intense pumpkin flavor, you can include a tablespoon of pumpkin puree in the batter, but make sure to adjust the flour slightly to maintain the right consistency. Enjoy your Halloween baking and the delicious results!
Mummy Hot Dogs

Mummy Hot Dogs are a fun and spooky treat perfect for Halloween gatherings. These playful snacks transform ordinary hot dogs into ghoulish delights by wrapping them in buttery crescent roll dough to resemble mummies. Their charming appearance makes them a hit with kids and adults alike, and they’re easy to prepare, making them an ideal choice for festive parties or a themed dinner.
With just a few ingredients and minimal prep time, you can whip up these creative snacks that deliver both flavor and fun.
The key to making Mummy Hot Dogs is using crescent roll dough to create the mummy’s “bandages.” As they bake, the dough turns golden brown and flakey, providing a delicious contrast to the savory hot dog inside. You can add small dabs of mustard or ketchup for eyes, giving each mummy a quirky personality. This recipe serves 4-6 people, making it suitable for a cozy family gathering or a small Halloween party.
Ingredients for 4-6 servings:
- 8 hot dogs
- 1 package of refrigerated crescent roll dough
- Mustard or ketchup for decorating
Cooking Instructions:
- Preheat the oven: Start by preheating your oven to 375°F (190°C). This guarantees that your Mummy Hot Dogs will bake evenly and achieve the perfect texture.
- Prepare the crescent dough: Unroll the crescent roll dough and separate it into triangles. Then, using a knife or kitchen scissors, cut each triangle into thin strips, approximately 1/4 inch wide. These strips will be used to wrap around the hot dogs to create the mummy bandages.
- Wrap the hot dogs: Take one hot dog and start wrapping the strips of dough around it, leaving a small space near the top for the mummy’s face. You can overlap the strips and vary the spacing to give each mummy a unique look. Repeat this process for all the hot dogs.
- Bake: Place the wrapped hot dogs on a baking sheet lined with parchment paper or a silicone baking mat. Bake in the preheated oven for about 12-15 minutes, or until the dough is golden brown and cooked through.
- Decorate: Once baked, remove the hot dogs from the oven and let them cool slightly. Use a small dab of mustard or ketchup to create eyes on the exposed part of the hot dog to complete the mummy look.
Extra Tips:
For a more creative twist, you can use different types of sausages or cheese-filled hot dogs for added flavor.
If you want to make your Mummy Hot Dogs ahead of time, prepare them up until the baking step, and store them in the refrigerator. When you’re ready to serve, simply bake them as instructed.
Be sure to keep an eye on them while baking, as ovens can vary, and you don’t want them to become too crisp. Finally, serve with a variety of dipping sauces to cater to different taste preferences and add an extra layer of enjoyment to your Halloween feast.
Graveyard Dirt Cups
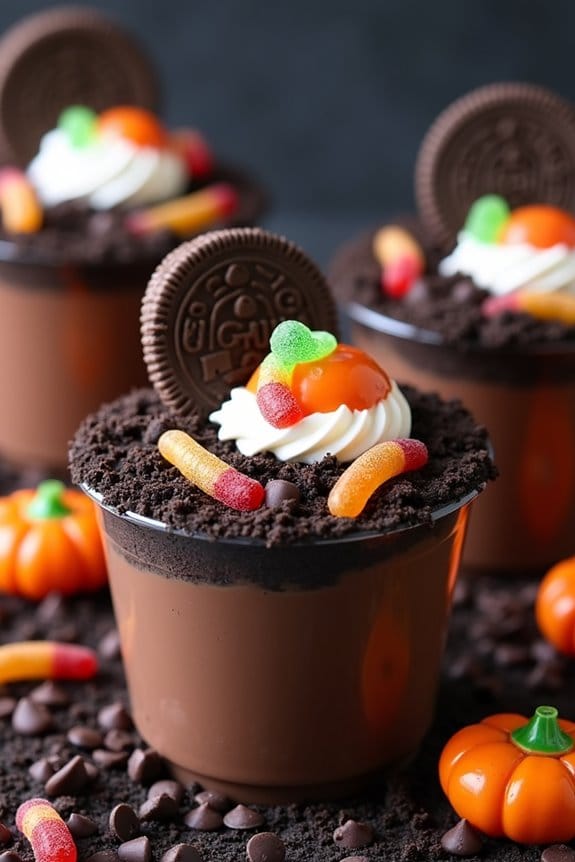
Graveyard Dirt Cups are a fun and spooky treat perfect for any Halloween gathering. These no-bake desserts aren’t only easy to make, but they also offer a delightful combination of creamy pudding, crunchy cookie crumbles, and sweet gummy decorations. The overall presentation gives the illusion of a haunted graveyard, complete with headstones and eerie edible elements that will surely impress your guests.
Whether you’re hosting a Halloween party or simply looking to enjoy a themed dessert with family, Graveyard Dirt Cups are an ideal choice that can be prepared in advance.
This recipe is designed to serve 4-6 people, making it a great option for small gatherings or family treats. The layers of chocolate pudding and crushed chocolate cookies mimic the look of dirt, while gummy worms add a playful touch. You can customize the toppings with candy pumpkins, marshmallow ghosts, or even use edible markers to write on cookie “headstones” for an extra spooky effect.
With minimal preparation time and ingredients, these Graveyard Dirt Cups are a convenient and creative way to celebrate Halloween.
Ingredients:
- 2 cups of cold milk
- 1 package (3.9 ounces) instant chocolate pudding mix
- 1 package (14.3 ounces) chocolate sandwich cookies
- 1 package (8 ounces) whipped topping, thawed
- Gummy worms or other gummy candies for decoration
- Chocolate chips or candy pumpkins for decoration
- Optional: Milano cookies or similar for headstones
Instructions:
- Prepare the Pudding: In a large mixing bowl, whisk together the cold milk and the instant chocolate pudding mix. Stir until the mixture is smooth and begins to thicken, about 2 minutes. Let the pudding sit in the refrigerator to set while you prepare other components.
- Crush the Cookies: Place the chocolate sandwich cookies into a plastic zip-top bag. Use a rolling pin to crush the cookies into fine crumbs, resembling dirt. Alternatively, you can pulse them in a food processor until they reach the desired consistency.
- Layer the Dirt Cups: In individual cups or small glass jars, start by adding a layer of the chocolate pudding at the bottom. Top the pudding with a generous layer of crushed cookies to create the “dirt” effect. Repeat the layers until the cups are filled, finishing with a layer of cookie crumbs on top.
- Add Whipped Topping: Gently fold the whipped topping into the remaining pudding mixture until combined. Spoon a dollop on top of each cup to create a layer of “grass” or “fog.”
- Decorate the Graveyard: Insert gummy worms into the “dirt” so they appear to be crawling out. Add candy pumpkins, chocolate chips, or any other spooky candies you desire. For headstones, use Milano cookies or similar, and write on them with an edible marker before placing them into the cups.
- Chill Before Serving: Allow the Graveyard Dirt Cups to chill in the refrigerator for at least 30 minutes before serving. This will help the flavors meld and the dessert to set properly.
Extra Tips:
For a more festive look, consider using clear cups or jars so the layers are visible, adding to the graveyard effect. If you’re making these for a larger group, you can easily double or triple the ingredients.
Feel free to get creative with decorations; marshmallow ghosts, candy bones, or crushed graham crackers for a lighter “sand” layer can add unique touches. If you’re short on time, store-bought chocolate pudding cups can be used instead of making your own, allowing you to assemble the dessert even faster.
Vampire Bat Wings

Transform your Halloween party into a spooktacular feast with these delicious Vampire Bat Wings. Perfectly seasoned and baked to crispy perfection, these chicken wings will delight both kids and adults alike. Their dark, savory coating mimics the eerie appearance of bat wings, making them a standout dish at any Halloween gathering.
The key to achieving their ghoulish look is a unique blend of spices and a touch of food coloring, creating an unforgettable dish that’s both visually striking and irresistibly tasty.
These Vampire Bat Wings offer a balance of sweet and spicy flavors, thanks to the addition of dark soy sauce, honey, and a hint of chili. The garlic and ginger add depth to the marinade, infusing the wings with a rich aroma. Whether served as an appetizer or the main attraction, these wings are sure to be a hit.
Pair them with a creamy dipping sauce, like blue cheese or ranch, to enhance the flavors even more. This recipe serves 4-6 people, making it ideal for a mid-sized gathering or family dinner.
Ingredients:
- 3 pounds of chicken wings
- 1/2 cup dark soy sauce
- 1/4 cup honey
- 2 tablespoons vegetable oil
- 4 cloves garlic, minced
- 1 tablespoon fresh ginger, grated
- 1 tablespoon chili paste or sriracha (optional for spice)
- Black gel food coloring
- Salt and pepper to taste
- Fresh parsley for garnish (optional)
Instructions:
- Preheat the Oven: Set your oven to 400°F (200°C) to guarantee it’s hot enough to crisp up the wings.
- Prepare the Marinade: In a large mixing bowl, combine the dark soy sauce, honey, vegetable oil, minced garlic, grated ginger, and chili paste. Mix until the ingredients are well incorporated.
- Color the Marinade: Add a few drops of black gel food coloring to the marinade. Stir until the color is evenly distributed, adding more if necessary to achieve a dark, bat-like appearance.
- Marinate the Wings: Place the chicken wings in a resealable plastic bag or a large bowl. Pour the marinade over the wings, ensuring they’re fully coated. Seal the bag or cover the bowl with plastic wrap. Let the wings marinate in the refrigerator for at least 2 hours, or overnight for best results.
- Bake the Wings: Line a baking sheet with parchment paper or aluminum foil for easy cleanup. Arrange the marinated wings on the sheet, leaving space between each wing. Bake in the preheated oven for 25-30 minutes, flipping halfway through, until the wings are cooked through and have a crispy exterior.
- Serve: Once cooked, remove the wings from the oven and let them rest for a few minutes. Garnish with freshly chopped parsley if desired. Serve with your choice of dipping sauces.
Extra Tips:
For a smokier flavor, consider grilling the wings instead of baking them. If using food coloring isn’t preferred, you can substitute with a mix of dark soy sauce and balsamic glaze for a naturally darker appearance.
Always verify the chicken is cooked to an internal temperature of at least 165°F (74°C) for safe consumption. Adjust the spice level by adding more or less chili paste according to your preference. Finally, make sure the wings are well spaced on the baking sheet to allow them to crisp up evenly.
Creepy Crawly Deviled Eggs
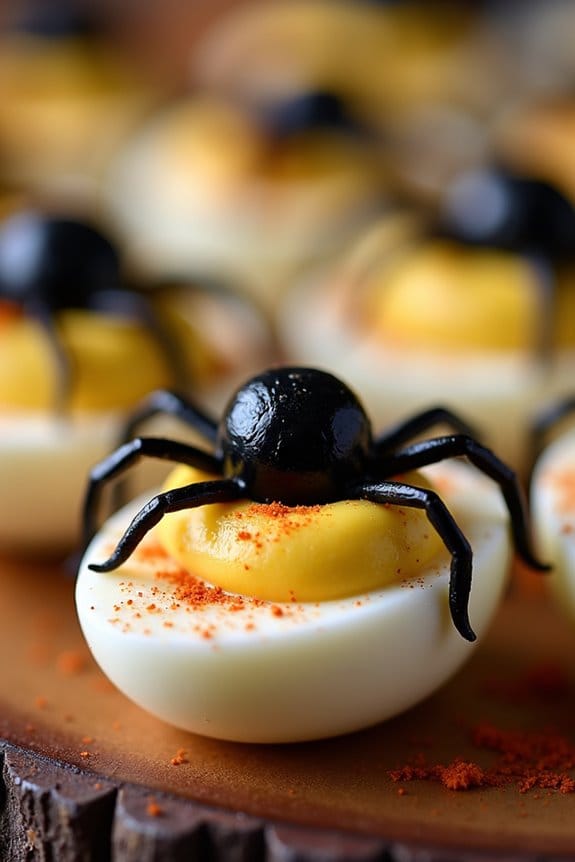
Transform your Halloween spread with these Creepy Crawly Deviled Eggs, a spooky twist on the classic party appetizer. Perfect for a themed gathering, these eggs feature a devilish filling and are topped with black olive spiders that are sure to give your guests a delightful scare.
The smooth, savory filling is balanced by the briny, slightly bitter taste of the black olives, creating a delicious combination that’s as tasty as it’s visually striking. These deviled eggs aren’t only fun to make but are also a treat for the eyes, adding a touch of eerie elegance to your Halloween table.
With a serving size suitable for 4-6 people, this recipe is ideal for a small gathering or a family Halloween dinner. Whether you’re hosting a party or simply enjoying a festive meal at home, these Creepy Crawly Deviled Eggs will definitely be a hit.
Ingredients (serving size: 4-6 people):
- 6 large eggs
- 3 tablespoons mayonnaise
- 1 teaspoon Dijon mustard
- 1 teaspoon white vinegar
- Salt and pepper to taste
- Paprika for garnish
- 12 black olives (pitted)
Cooking Instructions:
- Boil the Eggs: Place the eggs in a saucepan and cover them with cold water. Bring the water to a rolling boil over medium-high heat. Once boiling, remove the saucepan from the heat, cover it, and let the eggs sit for 10-12 minutes.
- Cool and Peel the Eggs: Drain the hot water and transfer the eggs to a bowl of ice water. Allow them to cool for about 5 minutes. Once cooled, gently crack and peel the eggs.
- Prepare the Filling: Slice each egg in half lengthwise. Carefully remove the yolks and place them in a small mixing bowl. Set the whites aside on a serving platter.
- Make the Deviled Mixture: Mash the yolks with a fork until they’re crumbly. Add the mayonnaise, Dijon mustard, vinegar, salt, and pepper. Mix everything until smooth and creamy.
- Fill the Egg Whites: Spoon or pipe the yolk mixture back into the hollowed-out egg whites. Sprinkle a light dusting of paprika over the top of each filled egg for added color and flavor.
- Create the Olive Spiders: Slice the olives in half. Use one half for the spider body, and thinly slice the other half lengthwise to make the spider legs. Arrange the olive pieces on top of each deviled egg to resemble a spider perched on its web.
- Serve and Enjoy: Arrange the Creepy Crawly Deviled Eggs on a festive platter and serve them at your Halloween gathering.
Extra Tips:
To guarantee perfectly peeled eggs, it’s helpful to use eggs that are a few days old rather than fresh eggs. The air pocket between the shell and the egg increases over time, making them easier to peel.
Additionally, if you prefer a spicier filling, consider adding a dash of hot sauce or a pinch of cayenne pepper to the yolk mixture. For a more dramatic presentation, you can use green or purple food coloring in the yolk mixture to give the filling a more ghoulish hue.
Frankenstein Rice Krispie Treats
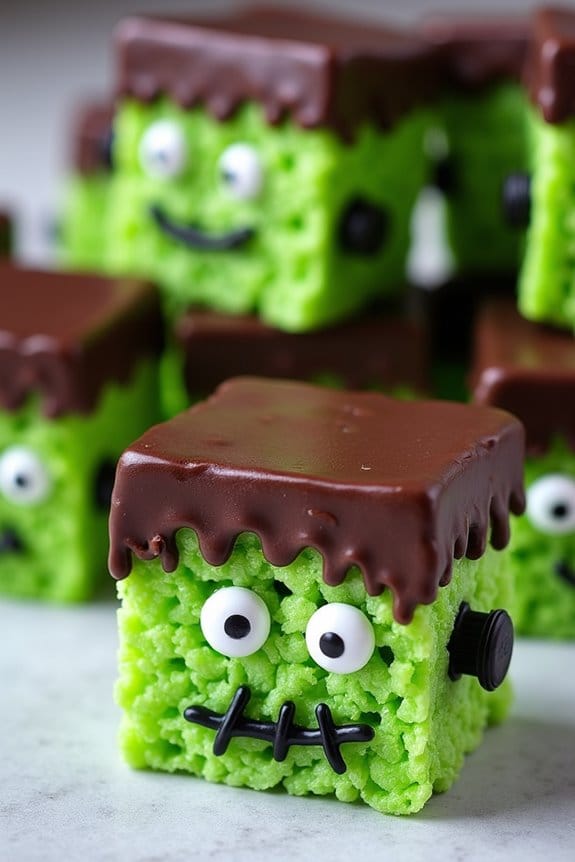
Frankenstein Rice Krispie Treats are a fun and festive way to celebrate Halloween with friends and family. These spooky treats aren’t only delicious but also a creative project that both kids and adults will enjoy making together. The classic Rice Krispie treat is given a ghoulish makeover with a monster-green hue and chocolate details that bring the iconic Frankenstein monster to life. Perfect for Halloween parties or a themed dessert table, these treats are sure to be a crowd-pleaser.
Made with simple ingredients, these Frankenstein Rice Krispie Treats come together quickly and can be customized with different toppings or decorations to fit your Halloween theme. The key is to use food coloring to achieve that perfect shade of green and melted chocolate for the monster’s facial features. This recipe makes enough treats for 4-6 people, making it an ideal batch size for small gatherings or a family night in.
Ingredients:
- 6 cups of Rice Krispies cereal
- 10 ounces of marshmallows
- 3 tablespoons of unsalted butter
- Green food coloring
- 1 cup of semi-sweet chocolate chips
- 1/4 cup of white candy melts
- Black icing or gel pen
- Candy eyes (optional)
- Cooking spray or butter (for greasing)
Cooking Instructions:
- Prepare the Pan: Start by greasing a 9×13-inch baking pan with cooking spray or butter. This will prevent the treats from sticking to the pan when you press them in later.
- Melt the Butter and Marshmallows: In a large pot, melt the butter over low heat. Once the butter is completely melted, add the marshmallows. Stir continuously until the marshmallows are fully melted and smooth.
- Add Food Coloring: Remove the pot from the heat and add green food coloring to the marshmallow mixture. Stir well until you achieve the desired shade of green. Remember, the color will lighten slightly once you add the cereal.
- Mix in Cereal: Gradually add the Rice Krispies cereal to the pot. Stir until the cereal is evenly coated with the green marshmallow mixture.
- Press into Pan: Transfer the mixture into the prepared baking pan. Use a buttered spatula or wax paper to press the mixture evenly into the pan. Allow it to cool and set for about 30 minutes.
- Cut into Shapes: Once set, lift the treats out of the pan and place them on a cutting board. Cut the treats into rectangles or squares, depending on your preference.
- Melt Chocolate: In a microwave-safe bowl, melt the chocolate chips in 30-second intervals, stirring after each interval until smooth. Do the same with the white candy melts in a separate bowl.
- Decorate the Treats: Dip the top edge of each treat into the melted chocolate to create Frankenstein’s hair. Use the black icing or gel pen to draw a mouth and stitches. Attach candy eyes using a small dab of melted chocolate or icing. Use the white candy melts to add any additional features, such as bolts on the side of the head.
- Allow to Set: Let the decorated treats sit at room temperature or in the refrigerator until the chocolate and decorations are set.
Extra Tips:
When making Frankenstein Rice Krispie Treats, it’s important to work quickly once the marshmallows are melted to guarantee the mixture doesn’t harden before you press it into the pan.
You can adjust the green food coloring to your liking, but remember to add it gradually to avoid making the mix too dark.
When decorating, consider using various edible decorations like colored sprinkles or small candies to add more personality to your Frankenstein.
If you don’t have candy eyes, you can use white chocolate chips with a dot of black icing for a similar effect.
Bloody Finger Breadsticks

Transform your Halloween party into a spooktacular event with these eerie Bloody Finger Breadsticks. These sinister snacks aren’t only a delight to the eyes but also a treat to the taste buds. Shaped like creepy fingers and accented with a tangy marinara sauce that mimics blood, these breadsticks are sure to be a hit with both kids and adults. The combination of soft bread, crunchy almond nails, and flavorful sauce will leave your guests both thrilled and satisfied.
This fun and easy-to-make recipe are perfect for a gathering of 4-6 people. The preparation involves crafting simple bread dough into finger-like shapes, complete with knuckle lines and almond slivers to resemble nails. Once baked to golden perfection, these breadsticks are served with a side of marinara sauce for dipping, enhancing both the taste and the eerie appearance of the dish. Let’s get started on creating these spooky delights!
Ingredients (Serving size: 4-6 people):
- 1 package (13.8 oz) refrigerated pizza dough
- 24 whole raw almonds
- 1 egg, beaten
- 1 tablespoon water
- 1 teaspoon garlic powder
- 1 teaspoon Italian seasoning
- 1/2 cup marinara sauce
Cooking Instructions:
- Preheat the Oven: Begin by preheating your oven to 375°F (190°C). Line a baking sheet with parchment paper to guarantee the breadsticks don’t stick and for easy cleanup.
- Prepare the Dough: Unroll the refrigerated pizza dough onto a lightly floured surface. Use a sharp knife or pizza cutter to slice the dough into 24 strips, each about 1/2 inch wide and 4 inches long.
- Shape the Fingers: Take each dough strip and roll it gently to smooth out the edges. Pinch one end of the strip to form the fingertip, and press an almond into the tip to resemble a fingernail.
- Create Knuckles: Use a knife to make several shallow cuts in the middle of the dough strip to create the appearance of knuckles. This adds to the realistic look of the fingers.
- Season and Brush: In a small bowl, combine the beaten egg and water. Brush each breadstick with this egg wash. Sprinkle the garlic powder and Italian seasoning evenly over the breadsticks for added flavor.
- Bake the Breadsticks: Place the prepared breadsticks on the lined baking sheet, leaving some space between each one. Bake in the preheated oven for about 12-15 minutes, or until they’re golden brown and cooked through.
- Serve: Warm the marinara sauce in a small saucepan or microwave it until heated through. Serve the Bloody Finger Breadsticks with the warm marinara sauce on the side for dipping.
Extra Tips:
When crafting the finger shapes, be creative with the knuckle lines and finger curves to give each breadstick a unique and creepy appearance. If the dough seems too sticky to work with, lightly dust your hands and the work surface with flour.
For an extra touch of realism, use a bit of red food coloring on the almond nails to enhance the bloody effect. Finally, these breadsticks are best enjoyed fresh out of the oven but can be reheated in a warm oven if needed. Enjoy your spine-chilling Halloween treat!
Ghoulish Guacamole Dip
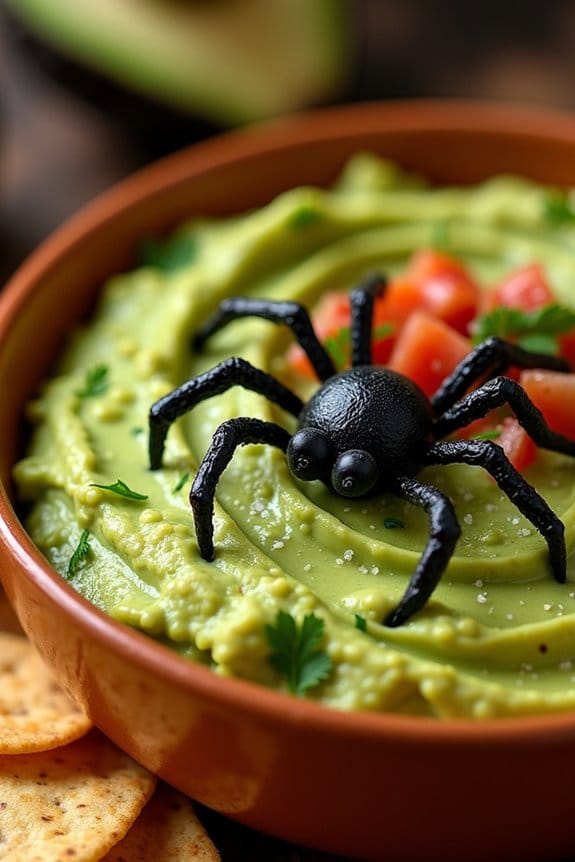
Ghoulish Guacamole Dip is the perfect addition to your Halloween spread, bringing a spooky twist to a classic favorite. This vibrant green dip not only provides a delicious and healthy snack option but also adds an eerie element to your Halloween party table. With a few creative touches, you can transform traditional guacamole into a festive and fun dish that guests of all ages will enjoy.
Whether you’re hosting a party or just looking for a unique snack to celebrate the holiday, this recipe is sure to impress. The creamy texture of avocados paired with the tangy lime juice and fresh cilantro creates a flavorful base for this Halloween-themed treat.
By adding some cleverly placed garnishes, such as olive spiders or tortilla chip tombstones, you can easily elevate the spooky factor of this dish. The Ghoulish Guacamole Dip isn’t only easy to prepare but also allows you to release your creativity in the kitchen.
Get ready to delight your taste buds and wow your guests with this hauntingly delicious appetizer.
Ingredients for Ghoulish Guacamole Dip (Serves 4-6):
- 4 ripe avocados
- 1 lime, juiced
- 1 teaspoon salt
- 1/2 cup diced onion
- 3 tablespoons chopped fresh cilantro
- 2 roma tomatoes, diced
- 1 teaspoon minced garlic
- 1 pinch ground cayenne pepper (optional)
- Black olives (for decoration)
- Tortilla chips (for serving)
Cooking Instructions:
- Prepare the Avocados: Begin by cutting the avocados in half, removing the pit, and scooping the flesh into a medium-sized bowl. Use a fork or a potato masher to mash the avocados to your desired consistency, whether you prefer it chunky or smooth.
- Add the Lime and Salt: Squeeze the juice of one lime over the mashed avocados. This not only adds flavor but also helps to prevent the guacamole from browning. Sprinkle in the teaspoon of salt and mix well to guarantee the flavors are evenly distributed.
- Incorporate the Vegetables and Herbs: Stir in the diced onion, chopped cilantro, and diced roma tomatoes. These ingredients add texture and a burst of freshness to the dip. If you like a bit of heat, add the cayenne pepper to taste.
- Enhance with Garlic: Add the minced garlic to the mixture, stirring thoroughly to blend all the flavors together for a rich, aromatic guacamole.
- Decorate for Halloween: To give your guacamole a spooky touch, slice black olives to create small “spiders” or other creepy shapes. Arrange these on top of the guacamole to create a Halloween-themed design.
- Chill and Serve: Once decorated, cover the guacamole with plastic wrap, pressing it directly onto the surface to prevent oxidation. Chill in the refrigerator for at least 30 minutes. Serve with tortilla chips for dipping, and enjoy your Ghoulish Guacamole Dip!
Extra Tips:
When preparing your Ghoulish Guacamole Dip, make sure to select ripe avocados that yield slightly to gentle pressure. This will guarantee a creamy texture that blends well with the other ingredients.
If your avocados aren’t ripe enough, place them in a brown paper bag with a banana to speed up the ripening process. Additionally, if you want to make the dip ahead of time, placing the avocado pits in the guacamole while storing can help prolong its freshness.
Finally, have fun with the decorations—use your imagination to create a truly ghoulish presentation!
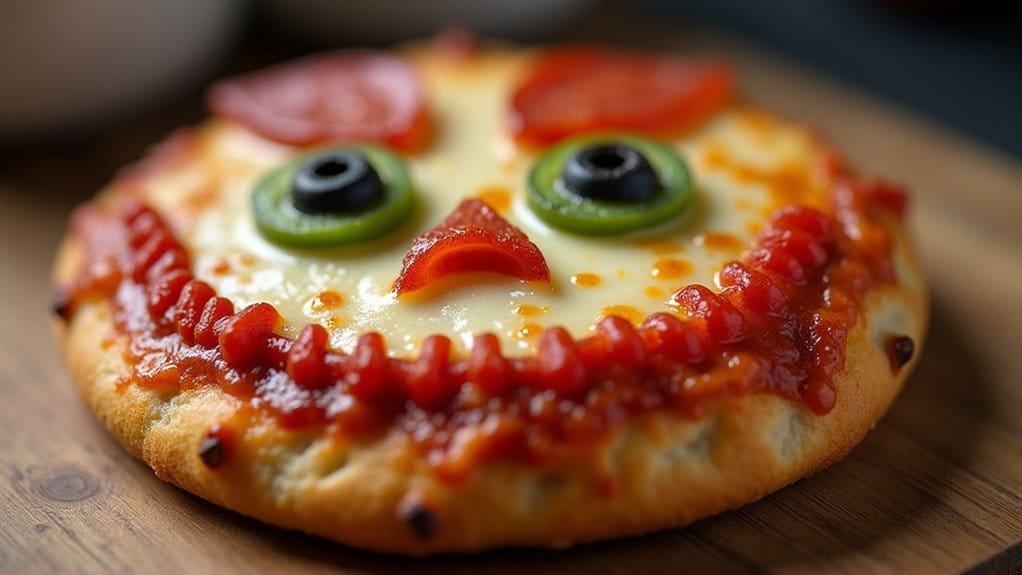
Haunted Pizza Faces

The key to making Haunted Pizza Faces is to use simple, fresh ingredients and let your imagination run wild. Whether you’re crafting a creepy monster or a friendly ghost, each pizza can be customized to reflect your Halloween spirit. The base is a classic pizza crust, topped with a rich tomato sauce and gooey mozzarella cheese. From there, the sky is the limit with toppings like olives, bell peppers, pepperoni, and more to create spooky expressions. Kids and adults alike will love assembling these pizzas and then devouring their deliciously haunting creations.
Ingredients for Haunted Pizza Faces (Serves 4-6):
- 6 mini pizza crusts
- 1 cup tomato pizza sauce
- 2 cups shredded mozzarella cheese
- 1/2 cup sliced black olives
- 1/2 cup sliced green olives
- 1/2 cup sliced bell peppers (red, green, or yellow)
- 1/2 cup pepperoni slices
- 1/4 cup sliced mushrooms
- 1/4 cup sweetcorn (optional)
- 1 tablespoon olive oil
- 1 teaspoon dried oregano
Cooking Instructions:
- Preheat the Oven: Start by preheating your oven to 450°F (232°C). This guarantees that the pizzas cook evenly and the crust becomes crispy.
- Prepare the Pizza Bases: Place the mini pizza crusts on a baking sheet. Brush each crust lightly with olive oil to prevent them from becoming soggy and to add flavor.
- Spread the Sauce: Evenly spread a layer of tomato pizza sauce over each mini pizza crust. Be careful not to add too much to avoid a soggy base.
- Add the Cheese: Sprinkle a generous amount of mozzarella cheese over the sauce on each pizza. Make sure the cheese covers the sauce completely for a melty, cheesy topping.
- Create the Haunted Faces: Use the olives, bell peppers, pepperoni, and other toppings to design eerie faces. For example, use olives for eyes, pepperoni for mouths, and bell peppers for teeth or eyebrows.
- Season the Pizzas: Sprinkle a pinch of dried oregano over each pizza for added flavor.
- Bake the Pizzas: Place the baking sheet in the preheated oven and bake for 10-12 minutes, or until the cheese is bubbly and the edges of the crust are golden brown.
- Cool and Serve: Remove the pizzas from the oven and let them cool for a few minutes before serving. This will prevent burns and allow the toppings to set.
Extra Tips:
When making Haunted Pizza Faces, encourage everyone to be creative with their toppings to create unique and fun designs.
If you want to save time, use pre-made pizza crusts or dough. For a healthier option, consider using whole wheat or gluten-free crusts.
You can also substitute the tomato sauce with a white sauce for a different flavor profile.
Finally, make sure to supervise children during the topping process, as the knives used for cutting vegetables can be sharp.
Enjoy the frightful fun of creating and eating these deliciously spooky pizzas!
