
With Halloween just around the corner, it’s time to whip up some spooktacular treats that will charm your guests and add a dash of fun to your festivities. Get ready to turn your kitchen into a hub of creativity with easy Spider Cookies and Monster Eyeball Pretzels. These treats are perfect for entertaining little ghosts and grown-up goblins alike. They’re simple to make yet oh-so-impressive. Let’s bring a touch of kitchen magic to your Halloween celebration!
Spooky Spider Cookies
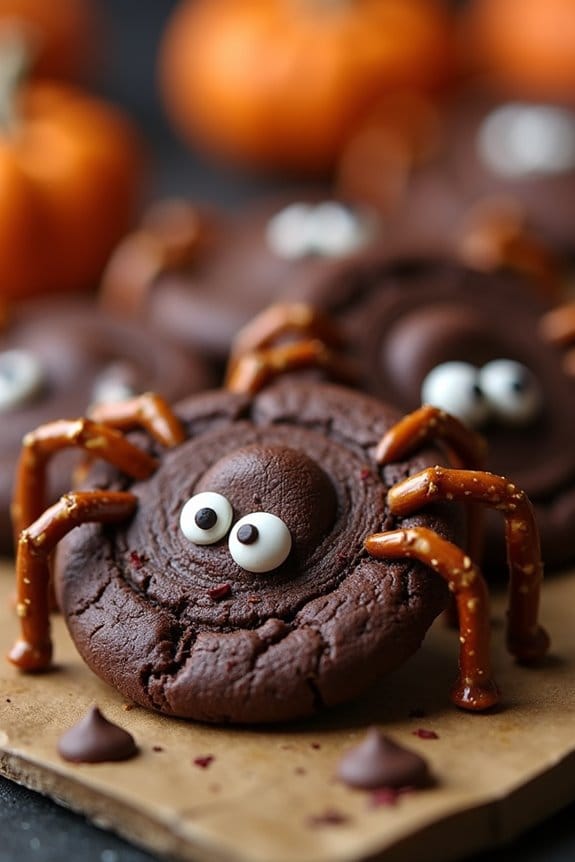
Spooky Spider Cookies are the perfect Halloween treat to add a creepy yet delicious twist to your festive celebrations. These eerie delights aren’t only fun to make but also tantalize the taste buds with their rich chocolatey flavor and decorative, spider-like appearance.
Spooky Spider Cookies offer a creepy yet tasty twist for Halloween celebrations, perfect for delighting both kids and adults.
Whether you’re hosting a Halloween party or simply want to enjoy some themed baking with your family, these cookies are bound to be a hit with both kids and adults alike.
The Spooky Spider Cookies are crafted to resemble little spiders, complete with mini chocolate chip eyes and pretzel legs that give them their distinct and spooky look. The base of the cookie is a soft, chewy chocolate cookie that provides a delightful contrast to the crunchy pretzel legs.
These cookies are finished off with a drizzle of melted chocolate to enhance their flavor and appearance. With a serving size fit for 4-6 people, you’ll have plenty to share or to indulge in yourself.
Ingredients:
- 1 cup unsalted butter, softened
- 1 cup granulated sugar
- 1 cup packed brown sugar
- 2 large eggs
- 2 teaspoons vanilla extract
- 2 1/4 cups all-purpose flour
- 3/4 cup unsweetened cocoa powder
- 1 teaspoon baking soda
- 1/2 teaspoon salt
- 1 cup mini chocolate chips
- 24-30 mini pretzel sticks, broken into thirds
- 1/2 cup additional mini chocolate chips for eyes
- 1/4 cup melted chocolate, for drizzling
Cooking Instructions:
- Preheat and Prep: Preheat your oven to 350°F (175°C) and line a baking sheet with parchment paper to prevent the cookies from sticking and guarantee even baking.
- Cream the Butter and Sugars: In a large mixing bowl, cream together the softened butter, granulated sugar, and brown sugar until the mixture is light and fluffy. This should take about 3-4 minutes with an electric mixer on medium speed.
- Add Eggs and Vanilla: Beat in the eggs one at a time, making sure each is well incorporated before adding the next. Stir in the vanilla extract until fully blended.
- Mix Dry Ingredients: In a separate bowl, whisk together the flour, cocoa powder, baking soda, and salt. Gradually add the dry ingredients to the wet ingredients, mixing until just combined.
- Stir in Chocolate Chips: Fold in the mini chocolate chips to distribute them evenly throughout the dough.
- Shape the Cookies: Scoop tablespoons of dough onto the prepared baking sheet, spacing them about 2 inches apart. Use your fingers to slightly flatten each dough ball.
- Bake: Bake in the preheated oven for 10-12 minutes, or until the edges are set but the centers still appear soft. Remove from the oven and let cool on the baking sheet for 5 minutes before transferring to a wire rack.
- Decorate: While the cookies are still warm, press 6 pretzel sticks into the sides of each cookie to resemble spider legs. Use a small amount of melted chocolate to attach two mini chocolate chips on top of each cookie for eyes.
- Drizzle and Cool: Drizzle the remaining melted chocolate over the cookies to add a finishing touch. Allow the cookies to cool completely on the wire rack before serving.
Extra Tips:
For an extra spooky effect, consider using red or green candy-coated chocolates for the spider eyes instead of mini chocolate chips.
If you want the pretzel legs to be extra secure, you can insert them slightly into the cookie dough before baking. Additionally, adjusting the baking time by a minute or two can give you either a chewier or crisper cookie based on your personal preference.
Be sure to keep an eye on the cookies towards the end of the baking time, as ovens can vary and you don’t want them to overbake.
Monster Eyeball Pretzels
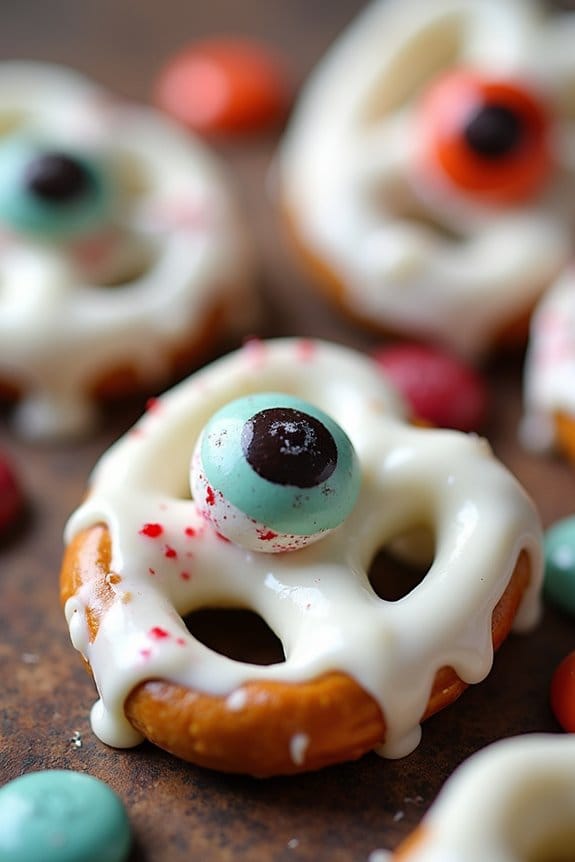
Monster Eyeball Pretzels are a spooky and fun treat, perfect for Halloween parties or just to add a dash of creepy to your festive season. These delightful snacks are a blend of salty and sweet, utilizing pretzels as the base and candy to create an eerie eyeball effect. They aren’t only easy to make but also a hit with kids and adults alike, making them a great addition to your Halloween snack table.
These Monster Eyeball Pretzels aren’t only visually appealing but also delicious. With a combination of crunchy pretzels, creamy chocolate, and colorful candy eyes, they’re bound to disappear quickly. The recipe is simple enough for kids to participate in, creating a fun family activity. The following ingredients will make enough Monster Eyeball Pretzels to serve 4-6 people, ensuring everyone gets to enjoy the spooky goodness.
Ingredients:
- 24 mini pretzel twists
- 1 cup white chocolate chips or candy melts
- 24 candy eyeballs
- 24 milk chocolate M&Ms or similar colored candies
- Optional: red gel icing for veins
Cooking Instructions:
- Prepare Your Work Area: Line a baking sheet with parchment paper. This will prevent the pretzels from sticking and make cleanup easier.
- Melt the Chocolate: In a microwave-safe bowl, melt the white chocolate chips or candy melts. Heat in 20-second intervals, stirring between each, until smooth and fully melted.
- Dip the Pretzels: Using a fork, dip each mini pretzel twist into the melted white chocolate, ensuring it’s fully coated. Let the excess chocolate drip off, then place the coated pretzel onto the prepared baking sheet.
- Place the Candy: Immediately after placing the pretzel on the baking sheet, press a milk chocolate M&M into the center of the pretzel. Press gently so that the M&M sticks but doesn’t slip off.
- Add the Eyeballs: While the chocolate is still soft, place a candy eyeball on top of each M&M, pressing lightly to adhere.
- Optional Decoration: If desired, use red gel icing to draw thin lines from the center outwards to create a bloodshot effect on the eyeballs.
- Set the Pretzels: Allow the pretzels to sit at room temperature or place them in the refrigerator for about 15-20 minutes to let the chocolate harden completely.
Extra Tips:
To save time, you can use pre-made candy melts that are specifically designed for melting and coating, as they tend to set faster and more evenly than standard chocolate chips.
If you’re making these treats with kids, prepare the chocolate melting step yourself to avoid any risk of burns.
Be sure to work quickly when assembling the eyeballs, as the chocolate can harden before you finish placing all the decorative elements.
Adjust the amount of red gel icing according to how spooky you want your Monster Eyeballs to appear. Enjoy these ghoulish delights!
Mummy Hot Dogs

Mummy Hot Dogs are a fun and festive treat perfect for Halloween gatherings. These spooky snacks are an easy-to-make recipe that both kids and adults will enjoy. The combination of a classic hot dog wrapped in a buttery, flaky crescent roll mimics a mummy’s bandages, making them a visually appealing dish that will add a touch of whimsy to your Halloween spread.
Whether you’re hosting a Halloween party or just looking for a creative way to celebrate the holiday with your family, Mummy Hot Dogs are guaranteed to be a hit.
The preparation of Mummy Hot Dogs is straightforward and requires minimal ingredients. The hot dogs are wrapped in strips of crescent dough to create the appearance of a mummy, and small edible eyes can be added for a fun finishing touch. With just a few simple steps, you can have a platter of these delicious and festive treats ready to serve in no time.
They’re perfect for serving as appetizers, finger foods, or a main dish for a Halloween-themed meal.
Ingredients (serving size: 4-6 people):
- 8 hot dogs
- 1 can of crescent roll dough
- 16 small edible candy eyes (optional)
- Mustard or ketchup (for serving)
Cooking Instructions:
- Preheat the Oven: Begin by preheating your oven to 375°F (190°C). This guarantees that the crescent dough will bake evenly and develop a nice golden-brown color.
- Prepare the Crescent Dough: Unroll the crescent roll dough and separate it into four rectangles. Pinch the perforations to seal them, creating solid sheets of dough.
- Cut the Dough: Using a knife or pizza cutter, slice each rectangle into thin strips, approximately 1/4 inch wide. These strips will serve as the mummy’s bandages.
- Wrap the Hot Dogs: Take one hot dog and start wrapping it with the dough strips. Leave a small gap at one end for the face and wrap the remaining dough around the hot dog, overlapping slightly to create a bandaged effect. Repeat this process for each hot dog.
- Bake the Mummy Hot Dogs: Place the wrapped hot dogs on a baking sheet lined with parchment paper. Bake them in the preheated oven for 12-15 minutes, or until the dough is golden brown and fully cooked.
- Add Eyes (optional): Once the hot dogs have cooled slightly, use small dots of mustard or ketchup to adhere the candy eyes to the face area of each mummy.
- Serve: Arrange the Mummy Hot Dogs on a platter and serve them warm with mustard or ketchup for dipping.
Extra Tips:
For an added touch of spookiness, consider using pretzel sticks as arms by inserting them into the sides of the hot dogs before baking. If you can’t find candy eyes, small dots of mustard or ketchup can be used to create eyes directly on the hot dog.
This recipe is versatile and can easily be adapted for dietary preferences by using turkey dogs or plant-based hot dogs. To prevent the dough from uncurling while baking, make sure the ends are tucked securely under the hot dogs.
Enjoy your Halloween celebration with these delightful Mummy Hot Dogs!
Witch Hat Cupcakes

Witch Hat Cupcakes are a delightful and whimsical addition to any Halloween celebration. These enchanting treats combine the flavors of rich chocolate cupcakes with the creative touch of a witch’s hat made from a chocolate cookie base and a sugar cone. Perfect for serving at a Halloween party or as a fun baking activity with kids, these cupcakes not only taste delicious but also add a festive and spooky charm to your dessert table.
Creating Witch Hat Cupcakes involves baking moist chocolate cupcakes, preparing a creamy frosting, and assembling the witch hat on top. The result is a visually appealing dessert that captures the essence of Halloween with its clever design. The recipe yields enough cupcakes to serve 4-6 people, making it an excellent choice for a small gathering or family treat.
Ingredients (serving size: 4-6 people):
- 1 cup all-purpose flour
- 1/2 cup unsweetened cocoa powder
- 1 teaspoon baking powder
- 1/2 teaspoon baking soda
- 1/4 teaspoon salt
- 3/4 cup granulated sugar
- 1/2 cup unsalted butter, softened
- 2 large eggs
- 1 teaspoon vanilla extract
- 1/2 cup buttermilk
- 6 chocolate wafer cookies
- 6 sugar cones
- 1 cup chocolate chips, melted
- 1 cup vanilla frosting (store-bought or homemade)
- Orange and green food coloring
- Sprinkles or edible glitter (optional)
Cooking Instructions:
- Prepare the Cupcake Batter: Preheat your oven to 350°F (175°C) and line a muffin tin with cupcake liners. In a medium bowl, whisk together the flour, cocoa powder, baking powder, baking soda, and salt. Set aside.
- Mix Wet Ingredients: In a large mixing bowl, cream together the sugar and butter until light and fluffy. Add the eggs one at a time, beating well after each addition. Stir in the vanilla extract.
- Combine Ingredients: Gradually add the dry ingredients to the wet ingredients, alternating with the buttermilk. Mix until just combined.
- Bake Cupcakes: Divide the batter evenly among the cupcake liners, filling each about two-thirds full. Bake in the preheated oven for 18-20 minutes, or until a toothpick inserted into the center comes out clean. Allow the cupcakes to cool completely on a wire rack.
- Prepare Witch Hats: Dip the open end of each sugar cone in the melted chocolate chips, letting any excess drip off. Attach each cone to a chocolate wafer cookie to form a hat. Set aside to harden.
- Color and Apply Frosting: Divide the vanilla frosting into two bowls. Tint one bowl with orange food coloring and the other with green. Frost the cooled cupcakes with the orange frosting, then place a witch hat on top of each cupcake.
- Decorate: Use the green frosting to pipe a band around the base of each witch hat. Add sprinkles or edible glitter for a magical touch, if desired.
Extra Tips:
For an extra burst of flavor, consider adding a teaspoon of cinnamon or espresso powder to the cupcake batter to enhance the chocolate taste.
When creating the witch hats, make sure the chocolate is slightly cooled but still fluid to prevent the cone from slipping off the cookie.
If you’re in a hurry, you can use pre-made cupcakes and simply focus on creating the witch hat toppers.
These cupcakes can be made a day in advance and stored in an airtight container, making them a convenient option for party planning.
Candy Corn Marshmallow Pops
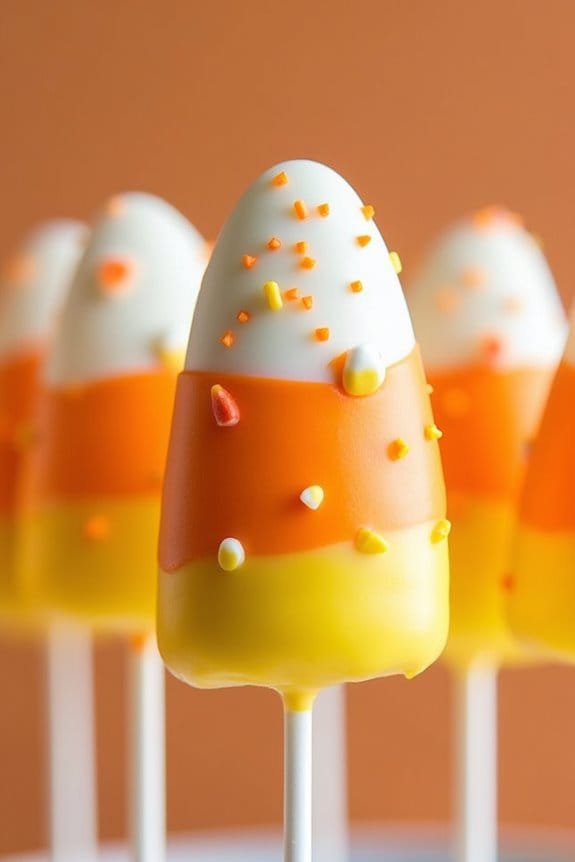
Candy Corn Marshmallow Pops are a delightful and festive treat perfect for Halloween celebrations. These cute and colorful pops combine the sweet flavors of marshmallows and candy corn, offering a fun twist on traditional holiday candies. They’re incredibly easy to make and are sure to be a hit at any Halloween party or gathering.
With just a few ingredients and simple steps, you can create a spooky and sweet snack that both kids and adults will love. The marshmallow pops aren’t only delicious but also make for a fun and engaging activity to do with family or friends. You can customize them with different decorations or colors to suit your Halloween theme.
Plus, they make for a great gift or party favor when wrapped individually in cellophane bags. This recipe serves 4-6 people, making it ideal for small gatherings or as part of a larger Halloween spread.
Ingredients (for 4-6 servings):
- 1 bag of large marshmallows
- 1 cup of white chocolate chips
- 1 cup of yellow candy melts
- 1 cup of orange candy melts
- 24 lollipop sticks
- Candy corn for decoration
- Sprinkles (optional)
Cooking Instructions:
- Prepare the Marshmallows: Insert a lollipop stick into each marshmallow, ensuring it’s stable and doesn’t fall off. Arrange them on a tray lined with parchment paper for easy cleanup.
- Melt the White Chocolate: In a microwave-safe bowl, melt the white chocolate chips in 30-second intervals, stirring in between until smooth and fully melted. Be careful not to overheat.
- Dip the Marshmallows: Dip each marshmallow into the melted white chocolate, covering it completely. Allow any excess chocolate to drip off before placing them back on the parchment paper.
- Melt the Candy Melts: Melt the yellow and orange candy melts in separate bowls using the same method as the chocolate chips. Stir until smooth.
- Decorate with Candy Melts: Dip the top third of each marshmallow into the yellow candy melt, then dip the middle section into the orange candy melt, leaving the bottom white to mimic the colors of candy corn.
- Add Decorations: While the candy coating is still wet, press a candy corn onto each marshmallow pop and add sprinkles if desired. This adds an extra festive touch to the pops.
- Let Them Set: Allow the marshmallow pops to set completely at room temperature or in the refrigerator until the candy coating is firm to the touch.
Extra Tips:
For best results, make sure all the candy melts and chocolate are melted to a smooth consistency before dipping the marshmallows. If the candy melts start to harden while you’re working, simply reheat them in the microwave for a few seconds.
To make the pops more stable, you can use a drop of melted chocolate to secure the marshmallow to the stick before dipping. Also, for a fun twist, try using different colored candy melts or adding edible glitter for a spooky sparkle. Enjoy these marshmallow pops as a delightful addition to your Halloween festivities!
Ghostly Bananas
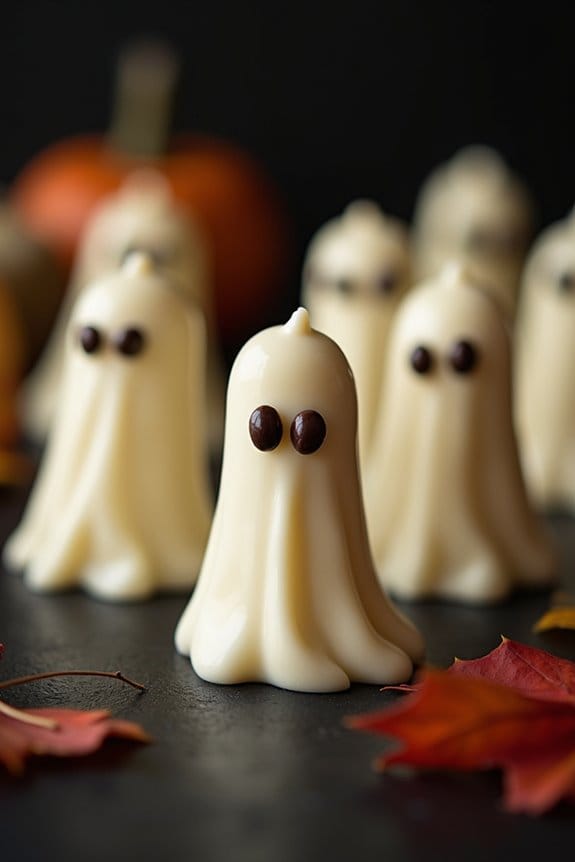
Celebrate Halloween with a spooky treat that’s as delightful to look at as it’s to eat: Ghostly Bananas. This fun and easy-to-make dessert is perfect for a Halloween party or a festive snack. Ghostly Bananas combine the natural sweetness of bananas with a touch of white chocolate to create an eerie, ghost-like appearance.
They’re not only delicious but also a healthier alternative to traditional candy, making them a great option for kids and adults alike.
To prepare Ghostly Bananas, all you need are a few simple ingredients. The bananas serve as the base, while white chocolate adds a creamy coating. Mini chocolate chips or edible candy eyes give each banana a ghoulish personality. These ghostly treats can be made in advance, allowing you to enjoy the Halloween festivities without any last-minute stress.
With just a little bit of creativity, you can transform ordinary bananas into a spooky snack that’s sure to impress.
Ingredients (Serves 4-6 people):
- 6 ripe bananas
- 2 cups white chocolate chips
- 1 tablespoon coconut oil (optional)
- Mini chocolate chips or edible candy eyes
Instructions:
- Prepare the Bananas: Begin by peeling the bananas and cutting them in half crosswise. Each banana should yield two ghostly treats. Place the halved bananas on a baking sheet lined with parchment paper, flat side down.
- Melt the White Chocolate: In a microwave-safe bowl, combine the white chocolate chips with the coconut oil. Microwave in 30-second intervals, stirring after each interval, until the chocolate is completely melted and smooth. The coconut oil helps the chocolate melt smoothly and provides a shiny finish.
- Dip the Bananas: Once the chocolate is melted, carefully dip each banana half into the chocolate, ensuring it’s fully coated. Allow any excess chocolate to drip off before placing the chocolate-covered bananas back on the parchment paper.
- Add the Eyes: Before the chocolate sets, press two mini chocolate chips or edible candy eyes into the chocolate to create the ghost’s eyes. Position them towards the top of the banana to make them look more ghostly.
- Chill the Bananas: Transfer the baking sheet to the refrigerator and let the bananas chill for about 30 minutes, or until the chocolate has hardened completely.
- Serve and Enjoy: Once the chocolate has set, your Ghostly Bananas are ready to be served. Arrange them on a spooky platter and enjoy these frightfully fun treats!
Extra Tips:
For an even spookier effect, you can use dark chocolate for the eyes instead of mini chocolate chips, giving the ghosts a more dramatic look.
If you’re making these treats with kids, let them get creative by adding other decorations, like sprinkles or colored sugar, to customize their ghostly creations.
It’s important to work quickly when dipping the bananas, as the chocolate can start to set, especially if your kitchen is cool. If the chocolate begins to harden, simply reheat it in the microwave for a few seconds to restore its fluidity.
Enjoy these Ghostly Bananas as a festive and healthier alternative to sugary Halloween candies!
Vampire Teeth Apple Bites
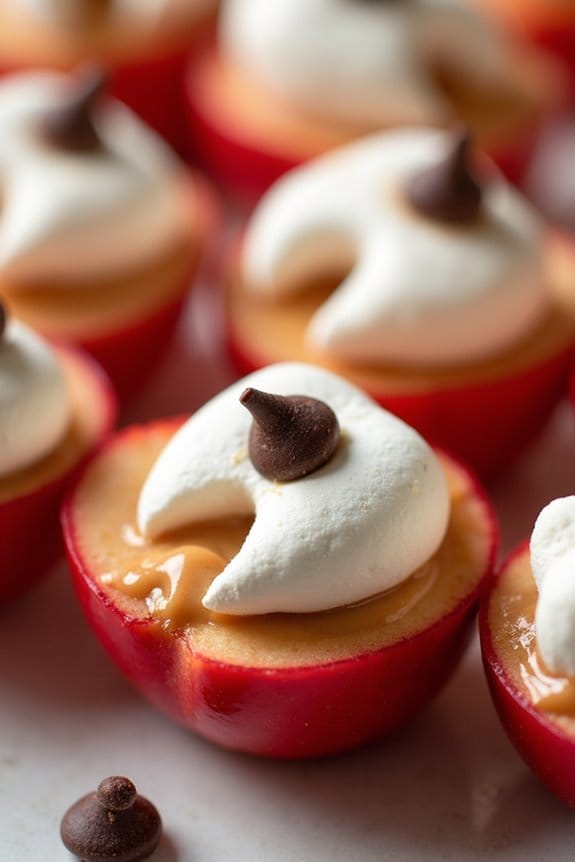
Vampire Teeth Apple Bites are a fun and festive treat perfect for Halloween gatherings. These spooky snacks aren’t only easy to make but also a healthier alternative to traditional Halloween candy. Combining the crispness of apples with the sweetness of marshmallows, these treats are sure to be a hit with both kids and adults. They can be whipped up quickly and are a great way to get creative in the kitchen.
To create these frightfully delightful bites, you’ll need just a few simple ingredients. The combination of red apples, peanut butter, and mini marshmallows creates the perfect balance of flavors and textures. The apples form the base for the “teeth,” while the peanut butter acts as the “gums.” The mini marshmallows serve as the “teeth,” completing this playful and delicious snack. This recipe makes enough for 4-6 people, guaranteeing that there’s plenty to go around for your Halloween party.
Ingredients (Serves 4-6):
- 2 red apples
- 1/2 cup peanut butter
- 1/2 cup mini marshmallows
- 1 tablespoon lemon juice
- Optional: 1 tablespoon mini chocolate chips
Instructions:
- Prepare the Apples: Begin by washing and drying the apples thoroughly. Core the apples and cut them into quarters. Then, slice each quarter into four wedges to create the “lips” for the vampire teeth. To prevent the apples from browning, brush each slice with a little lemon juice.
- Assemble the Teeth: Spread a thin layer of peanut butter on one side of each apple slice. This acts as the adhesive for the marshmallow “teeth” and adds a nice creamy texture.
- Add the Teeth: Place mini marshmallows along the peanut butter-covered side of half the apple slices. Arrange them so they resemble jagged, crooked teeth. Press gently to confirm they stick well.
- Complete the Bite: Take another apple slice and press it on top of the marshmallow-covered slice, peanut butter side down, to create a “mouth.” Confirm the marshmallows are visible and resemble vampire teeth.
- Optional Decoration: For an extra spooky touch, you can use mini chocolate chips as “fangs” by poking them into the marshmallows.
- Serve: Arrange the Vampire Teeth Apple Bites on a platter and serve immediately. They’re best enjoyed fresh for maximum crunch.
Extra Tips: When selecting apples, choose firmer varieties like Fuji or Honeycrisp to guarantee that the slices maintain their shape and crunch. If you or your guests have peanut allergies, consider using sunflower seed butter or almond butter as an alternative. Additionally, these treats are best served shortly after preparation to avoid any discoloration of the apples. If making in advance, store them in an airtight container in the refrigerator to keep them fresh.
Frankenstein Rice Krispie Treats
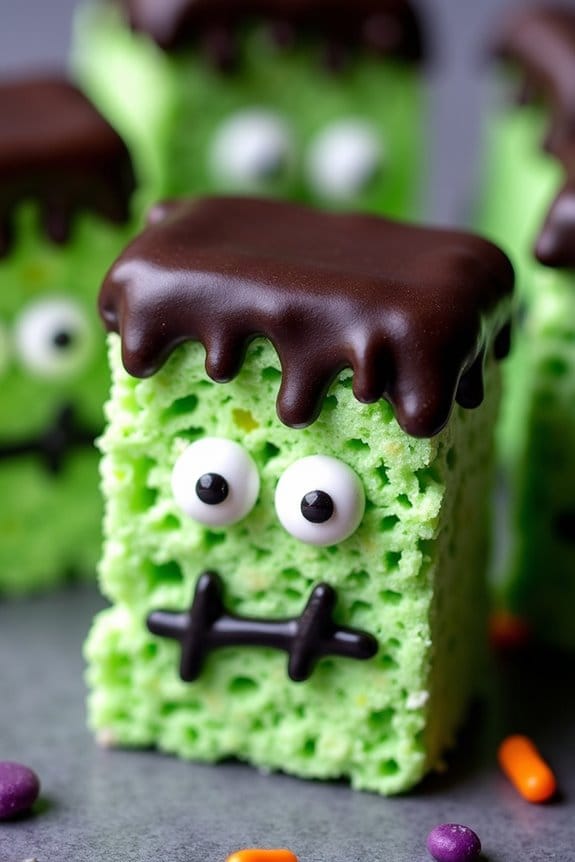
Frankenstein Rice Krispie Treats are a spooktacular addition to any Halloween party, certain to delight both children and adults alike. These treats aren’t only deliciously sweet and crunchy but also incredibly fun to make and decorate.
Combining the classic taste of Rice Krispie treats with a festive Halloween twist, you’ll transform this simple dessert into ghoulish green monsters complete with candy eyes and chocolate hair. Whether you’re hosting a Halloween bash or just looking for a fun kitchen activity, these treats are perfect for bringing a little spooky joy to your table.
Creating these Frankenstein Rice Krispie Treats is a wonderful activity that you can enjoy with the whole family. The recipe is straightforward, and the decorating process allows for plenty of creativity, letting each family member add their own unique touch to their monster.
This recipe serves 4-6 people, making it ideal for a small gathering or for sharing with classmates or coworkers. With minimal ingredients and a short preparation time, you’ll have creepy, cute, and tasty treats ready in no time.
Ingredients (Serves 4-6 people):
- 3 tablespoons butter
- 1 package (10 oz.) mini marshmallows
- 6 cups Rice Krispies cereal
- Green food coloring
- 1 cup semisweet chocolate chips
- Candy eyes
- Black decorating gel or icing
- Optional: sprinkles or additional candies for decoration
Cooking Instructions:
- Prepare the Pan: Begin by greasing a 9×13 inch baking dish with butter or non-stick cooking spray. This will prevent the treats from sticking to the pan.
- Melt Butter and Marshmallows: In a large saucepan over low heat, melt the butter. Add in the mini marshmallows and stir continuously until they’re completely melted and smooth.
- Color the Mixture: Once the marshmallows are melted, remove the saucepan from heat and add green food coloring. Stir well until you achieve the desired shade of green that will resemble Frankenstein’s skin.
- Mix with Cereal: Pour the marshmallow mixture over the Rice Krispies cereal in a large mixing bowl. Stir until the cereal is evenly coated with the green marshmallow mixture.
- Transfer and Flatten: Transfer the mixture into the prepared baking dish. Use a buttered spatula or wax paper to press and flatten the mixture evenly in the pan.
- Cut into Rectangles: Allow the treats to cool for at least 30 minutes. Once set, cut them into rectangles to form the base of each Frankenstein face.
- Melt Chocolate: In a microwave-safe bowl, melt the chocolate chips in 30-second intervals, stirring in between, until smooth.
- Decorate: Dip one edge of each rectangle into the melted chocolate to create Frankenstein’s hair. Attach candy eyes using a bit of melted chocolate as glue. Use black decorating gel to draw a mouth and any other facial features desired.
- Set and Serve: Allow the chocolate to set before serving. Enjoy your monstrously fun treats!
Extra Tips:
To make your Frankenstein Rice Krispie Treats even more exciting, consider using different colored candies and gels for varied expressions and features.
If you want to enhance the appearance of Frankenstein’s bolts, use mini marshmallows or small pretzel sticks inserted on the sides of each treat. Additionally, make sure to press the treats firmly into the pan to guarantee they hold their shape during cutting and decorating.
Enjoy experimenting with different designs, and most importantly, have fun with the process!
Halloween Oreo Bats
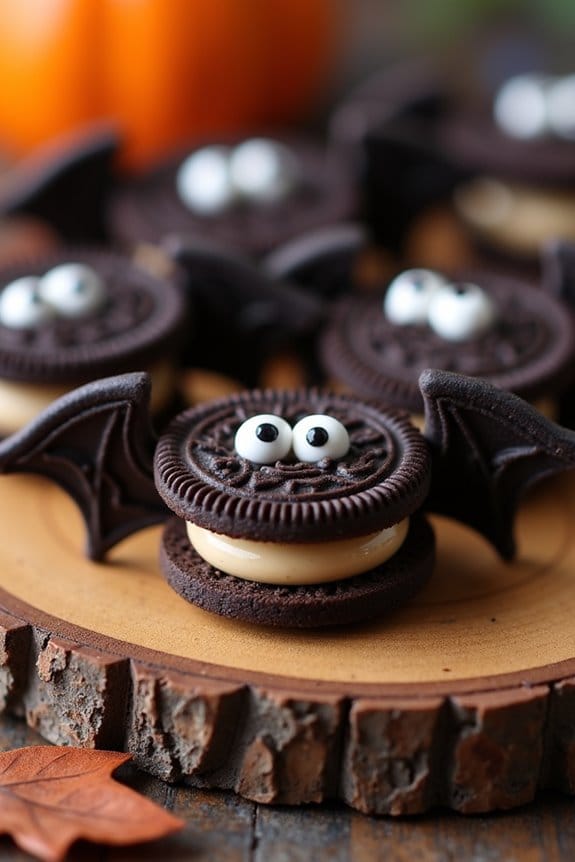
Halloween Oreo Bats are a delightful and spooky treat perfect for celebrating Halloween with family and friends. These adorable little bats are made using Oreo cookies, creating a delicious combination of chocolatey goodness and creamy filling. They aren’t only fun to make, but they also add a festive touch to any Halloween party.
Adorable Halloween Oreo Bats add a festive flair with their chocolatey and creamy goodness.
Easy enough for kids to help with, these Oreo Bats are certain to be a hit with people of all ages. This recipe is designed to serve 4-6 people, making it an ideal choice for small gatherings or for a cute treat to hand out to trick-or-treaters. The ingredients are simple and can often be found in your pantry.
With just a little bit of creativity and a few easy steps, you’ll have a plate of Halloween Oreo Bats that look like they flew straight out of a Halloween storybook.
Ingredients (for 4-6 servings)
- 12 Oreo cookies (or any similar sandwich cookies)
- 24 edible candy eyes
- 6 mini Reese’s Peanut Butter Cups
- 6 tablespoons of chocolate frosting or melted chocolate
- Black food coloring gel (optional, for extra spookiness)
Cooking Instructions
- Prepare the Oreos: Start by twisting apart the Oreo cookies carefully so that the cream stays on one side. You’ll need both sides of the cookie to make the bat wings.
- Create the Bat Wings: Break one of the uncreamed cookie halves in half to create two wings. Repeat this step for all 12 cookies.
- Assemble the Body: Take a mini Reese’s Peanut Butter Cup and use a small dab of chocolate frosting or melted chocolate on the bottom to stick it to the center of the cream side of the Oreo. This will be the body of the bat.
- Attach the Wings: Use chocolate frosting or melted chocolate to attach the half cookie pieces (wings) to either side of the Reese’s cup. Confirm they’re well-positioned to look like bat wings.
- Add the Eyes: Use a small amount of frosting or melted chocolate to affix two candy eyes onto the top of the Reese’s cup, giving your bat its spooky eyes.
- Optional Decoration: For added spooky effect, you can use black food coloring gel to draw on the wings or add details to the bat’s face.
- Set and Serve: Allow the bats to set at room temperature for a few minutes to confirm the chocolate holds everything in place. Once set, your Halloween Oreo Bats are ready to serve.
Extra Tips
When making Halloween Oreo Bats, be gentle when twisting the Oreo cookies apart to keep the cream side intact. If any cookies break, don’t worry – you can use extra chocolate frosting or melted chocolate to mend them.
If you find the edible candy eyes hard to find, you can substitute them with small, round candies or use colored icing to draw eyes. Also, if working with children, consider using a butter knife or spoon for spreading the frosting to keep things safe and straightforward.
Enjoy creating and eating these spooky treats!
Pumpkin Patch Brownies
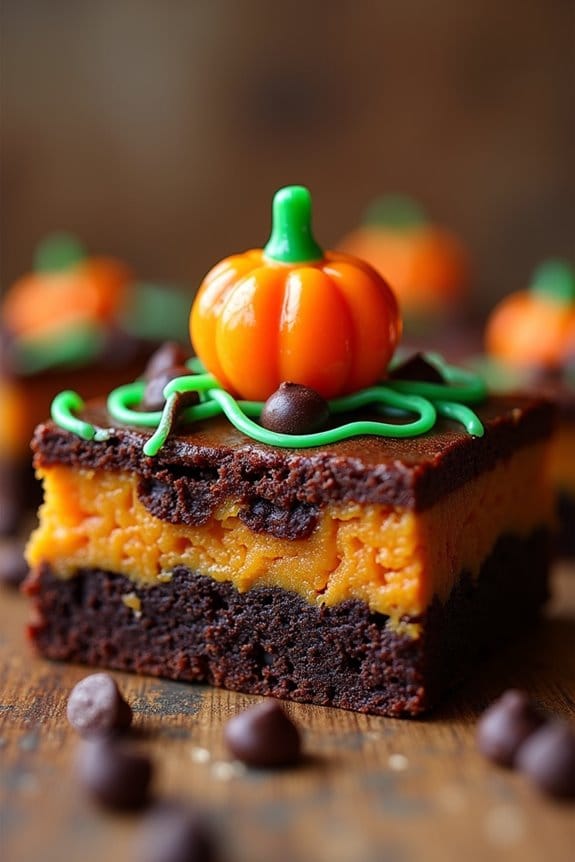
Pumpkin Patch Brownies are a delightful Halloween treat that combines the rich, chocolatey goodness of classic brownies with the seasonal flavors of pumpkin. These brownies are perfect for any spooky gathering or Halloween party, offering a unique twist on the traditional dessert. The use of pumpkin not only brings a festive flair to the dish but also adds a moist texture and subtle spiciness that beautifully complements the chocolate.
With a marbled effect on top, these brownies are as visually appealing as they’re delicious, making them a hit with both kids and adults alike.
These brownies are easy to prepare and require just a few simple ingredients that you may already have in your pantry. The recipe is designed to serve 4-6 people, making it ideal for a small gathering. Whether you’re hosting a Halloween bash or simply want to indulge in a seasonal treat, Pumpkin Patch Brownies are sure to satisfy your cravings. Below, you’ll find the list of ingredients and step-by-step instructions to create this delectable dessert.
Ingredients (Serves 4-6):
- 1 cup all-purpose flour
- 1/2 cup unsweetened cocoa powder
- 1 teaspoon baking powder
- 1/2 teaspoon salt
- 1/2 cup unsalted butter, melted
- 1 cup granulated sugar
- 2 large eggs
- 1 teaspoon vanilla extract
- 1/2 cup pumpkin puree
- 1/2 teaspoon ground cinnamon
- 1/4 teaspoon ground nutmeg
- 1/4 teaspoon ground ginger
- 1/4 cup chocolate chips (optional)
- Green icing or frosting (for decoration)
- Candy pumpkins (for decoration)
Instructions:
- Preheat the Oven: Begin by preheating your oven to 350°F (175°C). Line an 8×8-inch baking pan with parchment paper, allowing some overhang for easy removal.
- Mix Dry Ingredients: In a medium bowl, whisk together the flour, cocoa powder, baking powder, and salt. Set aside.
- Combine Wet Ingredients: In a large bowl, combine the melted butter and sugar, whisking until smooth. Add the eggs and vanilla extract, mixing well to incorporate.
- Prepare Pumpkin Mixture: In a separate small bowl, combine the pumpkin puree with the ground cinnamon, nutmeg, and ginger. Stir until the spices are evenly distributed.
- Combine and Layer: Gradually add the dry ingredients to the wet mixture, stirring until just combined. Pour half of the brownie batter into the prepared baking pan. Spread the pumpkin mixture over the batter, then top with the remaining brownie batter. Use a knife to swirl the layers together, creating a marbled effect.
- Add Chocolate Chips: If desired, sprinkle chocolate chips over the top of the batter for an extra chocolatey touch.
- Bake: Place the pan in the preheated oven and bake for 25-30 minutes, or until a toothpick inserted into the center comes out with a few moist crumbs. Avoid overbaking to keep the brownies fudgy.
- Cool and Decorate: Allow the brownies to cool completely in the pan on a wire rack. Once cooled, use the parchment paper overhang to lift the brownies out of the pan. Decorate with green icing to resemble vines and place candy pumpkins on top to complete the pumpkin patch look.
Extra Tips:
Ensure the butter is fully melted and slightly cooled before mixing with the sugar to avoid cooking the eggs. For an even more festive presentation, consider using Halloween-themed cookie cutters to shape the brownies into fun designs.
If you don’t have candy pumpkins available, you can use orange M&Ms or candy corn as an alternative decoration. Finally, for a spicier kick, you can adjust the spices to your liking or add a pinch of cloves for extra depth.
Enjoy your Pumpkin Patch Brownies with a scoop of vanilla ice cream for a delightful dessert experience!
Bloody Finger Breadsticks

Halloween is a time for spooky fun and creative treats, and Bloody Finger Breadsticks are the perfect addition to your Halloween party spread. These terrifyingly tasty breadsticks resemble severed fingers, adding a gory and delicious touch to your table. Made from soft dough and topped with a “bloody” marinara sauce, they’re both visually striking and delightfully appetizing.
Halloween calls for spooky delicacies, and Bloody Finger Breadsticks are a gory, delicious addition to your party spread.
The secret to making these breadsticks look like realistic fingers is in the details. With careful shaping, strategic placement of almond slices for nails, and a generous coating of sauce, you’ll have your guests both horrified and enthusiastic to dig in. This recipe makes enough for a serving size of 4-6 people, guaranteeing everyone gets a taste of the spooky fun.
Ingredients:
- 1 package of refrigerated pizza dough
- 24 whole blanched almonds
- 1/4 cup marinara sauce
- 1 tablespoon olive oil
- 1 teaspoon garlic powder
- 1 teaspoon Italian seasoning
- Salt to taste
Instructions:
- Preheat and Prepare: Preheat your oven to 375°F (190°C) and line a baking sheet with parchment paper to prevent sticking.
- Roll the Dough: On a lightly floured surface, roll out the pizza dough into a rectangle about 1/4 inch thick. Use a sharp knife or pizza cutter to slice the dough into 24 thin strips, each approximately 4-5 inches long.
- Shape the Fingers: Lightly oil your hands and roll each strip into a finger-like shape. Pinch the dough in two places to create knuckle impressions, and use the edge of a knife to make small lines on the knuckles for a realistic effect.
- Add the Nails: Press an almond into one end of each dough strip to create a fingernail. Confirm the almond is securely embedded in the dough.
- Season the Fingers: Mix the olive oil, garlic powder, Italian seasoning, and a pinch of salt in a small bowl. Brush the mixture over each breadstick for flavor and to help them brown nicely.
- Bake: Place the breadsticks on the prepared baking sheet, ensuring they aren’t touching. Bake in the preheated oven for 12-15 minutes, or until golden brown.
- Finish with Sauce: Once baked, remove the breadsticks from the oven and let them cool slightly. Serve with marinara sauce either drizzled over for a bloody effect or on the side for dipping.
Extra Tips:
For an even more realistic appearance, consider using food coloring to add slight variations in color and texture to the dough.
Be sure to keep an eye on the breadsticks while baking to prevent them from over-browning, which can make them look less like fingers.
If you want to prepare them ahead of time, you can shape the breadsticks and refrigerate them until you’re ready to bake. Just make sure to bring them to room temperature before putting them in the oven for even cooking.
Skeleton Bone Pretzels

Skeleton Bone Pretzels are the perfect Halloween treat to spook and delight your friends and family. These eerie yet delicious snacks are a creative twist on traditional pretzels, designed to resemble skeleton bones, making them an ideal addition to your Halloween spread. Made with simple ingredients, these bone-shaped pretzels aren’t only fun to eat but also easy to make. With their salty, crunchy exterior and soft, chewy interior, they’re sure to be a hit at any Halloween gathering.
Whether you’re hosting a Halloween party or simply want to surprise your family with a themed snack, Skeleton Bone Pretzels are a great choice. They can be served on their own or paired with a variety of dips like cheese sauce, mustard, or even a creamy spinach dip to enhance their flavor. Perfect for a serving size of 4-6 people, these pretzels are guaranteed to add a touch of spooky fun to your Halloween festivities.
Ingredients for Skeleton Bone Pretzels (Serves 4-6):
- 1 ½ cups warm water (110-115°F)
- 1 packet active dry yeast (2 ¼ teaspoons)
- 1 tablespoon granulated sugar
- 4 cups all-purpose flour
- 1 teaspoon salt
- 2/3 cup baking soda
- 10 cups water
- 1 large egg, beaten
- Coarse sea salt, for sprinkling
Cooking Instructions:
- Prepare the Dough: In a large mixing bowl, combine the warm water, yeast, and sugar. Stir gently and let it sit for about 5 minutes until the mixture becomes frothy, indicating the yeast is activated.
- Mix the Dough: Add the flour and salt to the yeast mixture. Mix with a wooden spoon or dough hook attachment on a stand mixer until the dough begins to come together.
- Knead the Dough: Transfer the dough to a lightly floured surface and knead for about 5-7 minutes until it’s smooth and elastic. Alternatively, you can knead the dough using a stand mixer with a dough hook attachment.
- First Rise: Place the kneaded dough in a lightly oiled bowl, cover it with a clean towel or plastic wrap, and let it rise in a warm place for about 1 hour, or until it has doubled in size.
- Preheat Oven and Prepare Water Bath: Preheat your oven to 450°F (232°C). Line two baking sheets with parchment paper. In a large pot, bring 10 cups of water and the baking soda to a boil.
- Shape the Pretzels: Once the dough has risen, punch it down and divide it into 12 equal pieces. Roll each piece into a rope about 12 inches long and shape into a bone by twisting each end into a knot and leaving the middle straight.
- Boil the Pretzels: Working in batches, carefully drop the pretzel bones into the boiling water bath for 30 seconds. Remove with a slotted spoon and place them on the prepared baking sheets.
- Egg Wash and Salt: Brush each boiled pretzel bone with the beaten egg and sprinkle with coarse sea salt.
- Bake: Bake in the preheated oven for 12-15 minutes until the pretzels are golden brown.
- Cool and Serve: Allow the pretzels to cool slightly on a wire rack before serving them warm or at room temperature.
Extra Tips:
For an extra spooky effect, consider using black or red food coloring in the dough to make your Skeleton Bone Pretzels more visually striking.
If you’re looking for a more pronounced flavor, you can add garlic powder or onion powder to the dough before kneading.
Additionally, if you want a softer pretzel, opt for a shorter baking time; for a crispier texture, bake them a little longer.
Enjoy these tasty treats as is, or experiment with different dipping sauces to find your favorite combination.
Creepy Crawly Jello Cups

Creepy Crawly Jello Cups are a spine-chilling delight perfect for your Halloween festivities. These delightful desserts combine the wiggly fun of jello with the playful eeriness of gummy worms, creating a treat that will both thrill and chill your guests. Not only are they scrumptious, but these jello cups are also visually enchanting, making them a perfect centerpiece for a Halloween party spread. The vibrant colors and squirmy creatures are sure to capture the imaginations of both children and adults alike.
This recipe is straightforward and easy to prepare, making it an ideal choice for those who want to whip up something festive without spending hours in the kitchen. The Creepy Crawly Jello Cups can be made ahead of time, allowing you to focus on other aspects of your Halloween celebration. With a little creativity in presentation, you can elevate these simple treats into a memorable Halloween experience. Whether you’re hosting a spooky party or simply want to surprise your family with a fun dessert, these jello cups are a guaranteed hit.
Ingredients (Serves 4-6):
- 2 packages (3 ounces each) of flavored gelatin (e.g., lime or grape for a spooky color)
- 2 cups boiling water
- 2 cups cold water
- 1 package (10 ounces) of gummy worms
- 6 clear plastic cups or small glass dessert dishes
- Whipped cream (optional, for topping)
Instructions:
- Prepare the Gelatin: Begin by boiling 2 cups of water. Once boiling, remove the water from the heat and dissolve the gelatin powder by stirring it into the hot water until completely dissolved. This typically takes about 2 minutes.
- Add Cold Water: After the gelatin has dissolved, add 2 cups of cold water to the mixture. Stir well to guarantee the gelatin is evenly mixed and set aside.
- Pour into Cups: Carefully pour the gelatin mixture into each of the clear plastic cups, filling them about three-quarters full. This will allow room for expansion and any additional toppings you might want to add later.
- Add Gummy Worms: Before the gelatin begins to set, add 2-3 gummy worms into each cup. Push some worms halfway into the jello so they appear to be crawling out. This will give your cups the desired creepy effect.
- Chill: Place the cups in the refrigerator and let them set for at least 4 hours, or until the jello is firm. This can be done a day in advance if needed.
- Serve: Once the jello has set, you can top each cup with a dollop of whipped cream if desired. Add a gummy worm on top for an extra touch of creepiness before serving.
Extra Tips:
For an added layer of spookiness, consider using a mix of different flavored and colored gelatin to create a multicolored effect. You can also experiment with different types of gummy candies, like bugs or eyeballs, to enhance the Halloween theme.
If you want to create a more sophisticated look, try using glass cups or bowls for serving. Finally, remember to keep the jello cups refrigerated until just before serving to maintain their firmness and presentation.
Haunted House Popcorn Mix
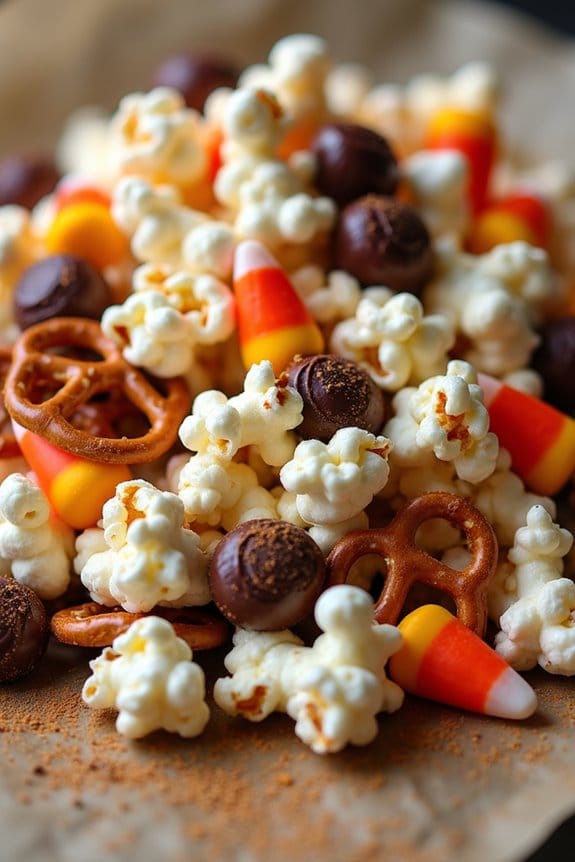
Are you ready to spook up your Halloween snack game with a deliciously eerie treat? Haunted House Popcorn Mix is the perfect combination of sweet, salty, and spooky flavors that will thrill and chill your taste buds. This delightful mix is ideal for Halloween parties, movie nights, or simply as a festive treat to share with family and friends.
With just a few ingredients and a little creativity, you can whip up this ghoulishly good snack that’s guaranteed to be a hit with goblins of all ages.
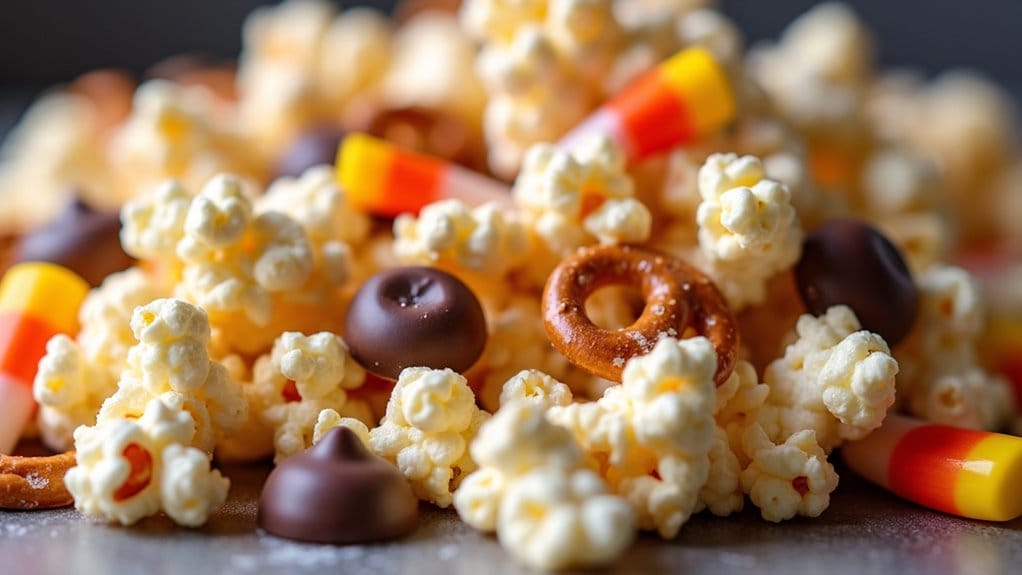
In this recipe, we combine buttery popcorn with a medley of candy and spices to create a symphony of flavors and textures. The mix is adorned with candy corn, chocolate candies, and pretzels, all tied together with a drizzle of white chocolate. Perfect for serving 4-6 people, this Haunted House Popcorn Mix is as fun to make as it’s to eat.
So, gather your ingredients and let’s get ready to conjure up some Halloween magic in the kitchen!
Ingredients for 4-6 People:
- 10 cups of popped popcorn
- 1 cup of candy corn
- 1 cup of mini pretzels
- 1 cup of chocolate candies (such as M&M’s)
- 1 cup of white chocolate chips
- 1 tablespoon of unsalted butter
- 1 teaspoon of pumpkin spice
- 1/2 teaspoon of salt
Cooking Instructions:
- Prepare the Popcorn: Begin by popping your popcorn. If using stovetop popcorn, heat a large pot with a tablespoon of oil over medium heat, add the popcorn kernels, cover, and shake occasionally until all kernels are popped. For convenience, microwave popcorn can also be used. Set the popcorn aside in a large mixing bowl.
- Melt the White Chocolate: In a microwave-safe bowl, combine the white chocolate chips and unsalted butter. Microwave in 30-second intervals, stirring between each interval, until the chocolate is completely melted and smooth.
- Combine the Ingredients: Pour the melted white chocolate over the popcorn. Sprinkle the pumpkin spice and salt over the mixture, then toss to confirm the popcorn is evenly coated.
- Add the Mix-Ins: Gently fold in the candy corn, mini pretzels, and chocolate candies. Stir until all components are well distributed throughout the mix.
- Cool and Serve: Spread the popcorn mixture out on a baking sheet lined with parchment paper. Allow the mix to cool for about 15 minutes, letting the chocolate set. Once cooled, transfer the Haunted House Popcorn Mix to a serving bowl and enjoy your spooky snack!
Extra Tips:
For an extra festive touch, consider adding edible glitter or colored sprinkles to the mix before the chocolate sets. You can also customize the mix according to your preferences, such as using dark chocolate instead of white chocolate or adding nuts for extra crunch.
If you’re making this treat ahead of time, store it in an airtight container to maintain its freshness and crunch. Enjoy playing with different flavor combinations to keep this spooky snack fresh and exciting for years to come!
