

As the holiday season approaches, I love searching for dishes that bring joy and nourishment to the table. Think of the delightful aroma of Herb-Crusted Salmon paired with the sweet notes of Honey-Glazed Carrots. Each dish, from vibrant Cranberry Quinoa Salad to indulgent Dark Chocolate Avocado Mousse, offers a symphony of flavors. Curious about how these recipes can transform your festive gatherings into a feast everyone can savor? Let’s explore this collection of easy, healthy Christmas recipes perfect for a crowd.
Roasted Brussels Sprouts With Pomegranate Seeds

Roasted Brussels Sprouts With Pomegranate Seeds is a delightful and healthy dish perfect for your Christmas table. This recipe combines the earthy flavors of roasted Brussels sprouts with the sweet-tart burst of pomegranate seeds, creating a dish that’s both festive and nutritious.
Suitable for a serving size of 4-6 people, this dish isn’t only beautiful to look at but also easy to prepare, making it a great addition to your holiday menu.
Brussels sprouts are rich in vitamins and minerals, and when roasted, they develop a deliciously crispy exterior with a tender interior. The addition of pomegranate seeds adds a vibrant color and a juicy pop that complements the roasted sprouts perfectly. The result is a dish that isn’t only pleasing to the palate but also visually stunning, making it a showstopper at any Christmas gathering.
Ingredients:
- 1 ½ pounds Brussels sprouts, trimmed and halved
- 2 tablespoons olive oil
- Salt and freshly ground black pepper, to taste
- ½ cup pomegranate seeds
- 2 tablespoons balsamic glaze
- ¼ cup chopped walnuts (optional)
Instructions:
- Prepare the Brussels Sprouts: Preheat your oven to 400°F (200°C). Start by washing the Brussels sprouts thoroughly, then trim the ends and remove any yellowed outer leaves. Cut them in half to guarantee even cooking.
- Season the Sprouts: In a large bowl, toss the halved Brussels sprouts with olive oil, salt, and freshly ground black pepper. Make sure each sprout is well coated with oil for maximum roasting.
- Roast the Sprouts: Spread the seasoned Brussels sprouts in a single layer on a baking sheet. Roast in the preheated oven for about 25-30 minutes, stirring halfway through, until they’re golden brown and crispy on the edges.
- Prepare the Garnish: While the sprouts are roasting, deseed the pomegranate if you haven’t already. Collect about ½ cup of pomegranate seeds and set them aside.
- Combine and Serve: Once the Brussels sprouts are roasted to your liking, remove them from the oven. Drizzle the balsamic glaze over the sprouts, then sprinkle with the pomegranate seeds and chopped walnuts (if using). Toss gently to combine all the flavors.
- Final Touch: Transfer the roasted Brussels sprouts to a serving platter. Serve warm and enjoy the festive burst of flavors.
Extra Tips:
For a more caramelized finish, make sure that the Brussels sprouts are spread out on the baking sheet without overlapping. Overcrowding can lead to steaming rather than roasting.
You can prepare the pomegranate seeds a day in advance to save time on the day of serving. If you prefer a sweeter dish, you can increase the amount of balsamic glaze.
Adjust the seasoning according to your taste, and feel free to add a sprinkle of parmesan cheese for an extra layer of flavor.
Cranberry Quinoa Salad With Orange Vinaigrette

Cranberry Quinoa Salad With Orange Vinaigrette is a delightful and invigorating side dish perfect for your holiday table. This colorful salad combines the nutty flavor of quinoa with the tartness of cranberries and the sweetness of an orange vinaigrette, making it a festive choice for a healthy Christmas meal.
The salad can be prepared in advance, allowing you more time to focus on other holiday preparations, and it will surely impress your guests with its vibrant colors and balanced flavors.
This recipe serves 4-6 people and isn’t only easy to prepare but also packed with nutrients. Quinoa is a great source of protein and fiber, while cranberries add a boost of antioxidants. The orange vinaigrette ties everything together with a tangy and slightly sweet dressing, enhancing the natural flavors of the ingredients.
Whether you’re looking to add a fresh and healthy option to your Christmas dinner or simply want to try something new, this Cranberry Quinoa Salad With Orange Vinaigrette is an excellent choice.
Ingredients:
- 1 cup quinoa
- 2 cups water
- 1/2 cup dried cranberries
- 1/4 cup chopped pecans
- 1/4 cup chopped fresh parsley
- 1/4 cup crumbled feta cheese
- 1 large orange, juiced (about 1/4 cup juice)
- 1 tablespoon orange zest
- 2 tablespoons olive oil
- 1 tablespoon apple cider vinegar
- 1 tablespoon honey
- Salt and pepper to taste
Instructions:
1. Cook the Quinoa: Rinse the quinoa under cold water using a fine mesh strainer. In a medium saucepan, combine the quinoa and water. Bring to a boil over medium-high heat, then reduce the heat to low and cover. Simmer for about 15 minutes, or until all the water is absorbed and the quinoa is tender.
Remove from heat and let it sit, covered, for an additional 5 minutes. Fluff the quinoa with a fork and set aside to cool.
2. Prepare the Orange Vinaigrette: In a small bowl, whisk together the orange juice, orange zest, olive oil, apple cider vinegar, and honey until well combined. Season the vinaigrette with salt and pepper to taste.
3. Assemble the Salad: In a large mixing bowl, combine the cooked quinoa, dried cranberries, chopped pecans, fresh parsley, and crumbled feta cheese. Pour the orange vinaigrette over the salad and gently toss until all ingredients are well coated with the dressing.
4. Chill and Serve: Cover the salad and refrigerate for at least 30 minutes to allow the flavors to meld. Serve chilled or at room temperature, garnishing with additional parsley or orange zest if desired.
Extra Tips:
For a more robust flavor, consider toasting the pecans in a dry skillet over medium heat for a few minutes until they’re fragrant. This will enhance their nuttiness and add an extra layer of flavor to the salad.
If you prefer a sweeter salad, you can increase the amount of honey in the dressing. Additionally, feel free to experiment with other ingredients like adding diced apples or pomegranate seeds for added texture and flavor. This salad is quite versatile and can be adjusted to suit your taste preferences.
Herb-Crusted Salmon With Lemon and Dill
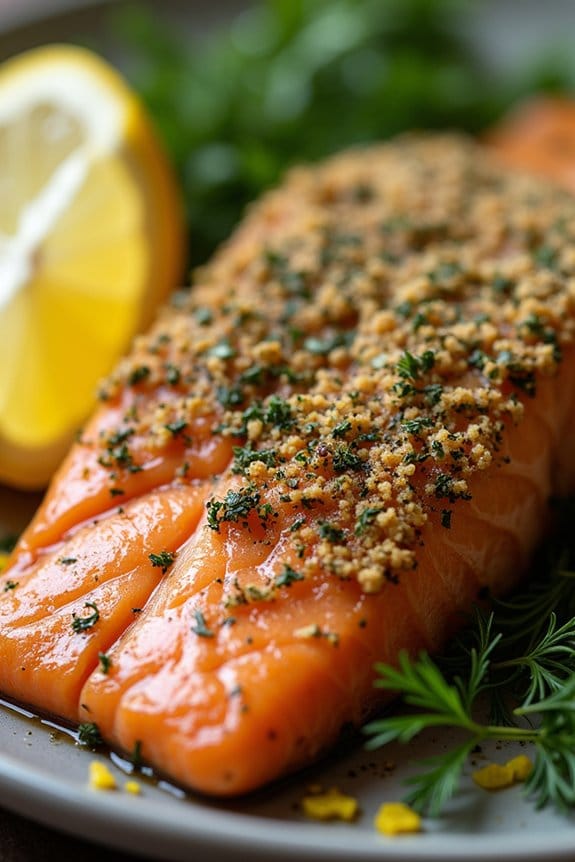
Herb-Crusted Salmon With Lemon and Dill is a delicious and healthy dish that’s perfect for Christmas gatherings. This recipe combines the rich, buttery flavor of salmon with a fresh, aromatic herb crust, enhanced by the zesty notes of lemon and the subtle sweetness of dill. Not only is this dish packed with flavor, but it also provides a great source of Omega-3 fatty acids and essential nutrients, making it a nutritious addition to your holiday table.
The preparation of this dish is simple yet stunning, offering an elegant presentation that’s sure to impress your guests. The herb crust adds a delightful texture to the tender salmon, while the lemon and dill work together to enhance the fish’s natural flavors. This recipe serves 4-6 people, making it an ideal main course for a small holiday gathering. Read on to discover the ingredients and step-by-step instructions to create this festive and wholesome dish.
Ingredients:
- 4-6 salmon fillets (about 6 ounces each)
- 1 cup panko breadcrumbs
- 1 tablespoon fresh dill, finely chopped
- 1 tablespoon fresh parsley, finely chopped
- 1 tablespoon fresh thyme, finely chopped
- Zest of 1 lemon
- 2 tablespoons olive oil
- Salt and pepper to taste
- Lemon wedges, for serving
Cooking Instructions:
- Preheat the Oven: Start by preheating your oven to 400°F (200°C). This will guarantee that it’s hot enough to cook the salmon evenly and help the crust become crispy.
- Prepare the Herb Crust: In a mixing bowl, combine the panko breadcrumbs, chopped dill, parsley, thyme, and lemon zest. Mix thoroughly to guarantee the herbs and zest are evenly distributed throughout the breadcrumbs.
- Season the Salmon: Pat the salmon fillets dry with paper towels to remove any excess moisture. Season both sides of each fillet with salt and pepper to taste.
- Coat the Salmon: Drizzle olive oil over the top of the salmon fillets. Press the herb and breadcrumb mixture onto the top side of each fillet, ensuring it adheres well and forms an even layer.
- Bake the Salmon: Place the coated salmon fillets on a baking sheet lined with parchment paper or a lightly greased baking dish. Bake in the preheated oven for 12-15 minutes, or until the salmon is cooked through and flakes easily with a fork. The crust should be golden brown and crispy.
- Serve: Remove the salmon from the oven and let it rest for a couple of minutes. Serve with lemon wedges on the side for an extra burst of citrus flavor.
Extra Tips:
For an added depth of flavor, you can include a teaspoon of Dijon mustard in the herb crust mixture. This will give the crust a slight tanginess that complements the salmon beautifully.
Additionally, be sure to use fresh herbs for the best flavor and aroma. If fresh herbs aren’t available, you can substitute with dried herbs, but remember that dried herbs are more concentrated, so use about a teaspoon of each.
Finally, keep an eye on the salmon while baking to prevent overcooking, as it can become dry. The goal is a tender, juicy fillet with a perfectly crisp crust.
Stuffed Bell Peppers With Quinoa and Black Beans
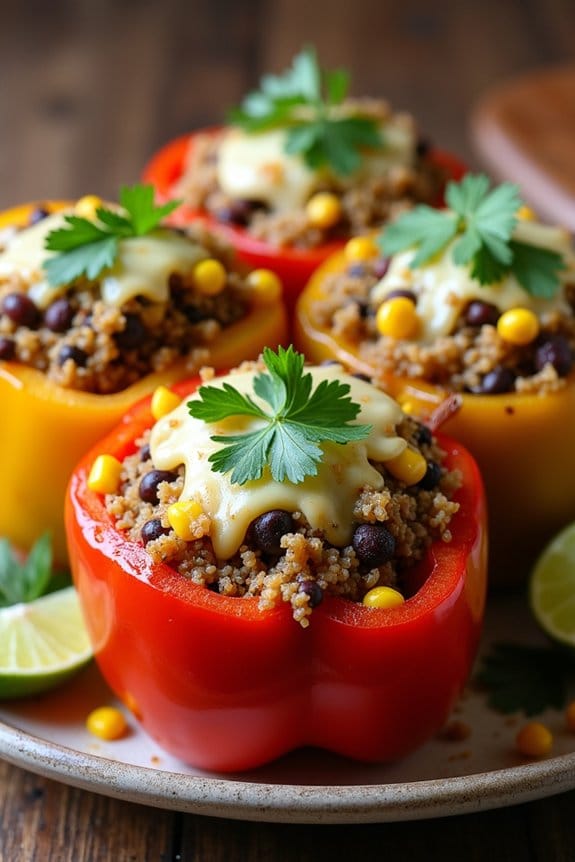
Stuffed Bell Peppers with Quinoa and Black Beans is a delightful and nutritious dish perfect for adding a vibrant twist to your Christmas feast. This recipe isn’t only healthy but also packed with flavors and textures that appeal to both vegetarians and meat-eaters alike. The combination of quinoa and black beans provides a hearty, protein-rich filling, while the bell peppers add a sweet and tangy crunch.
This dish isn’t only festive but also versatile, allowing you to enjoy a guilt-free meal that’s colorful and satisfying. Ideal for 4-6 servings, this recipe is designed to cater to a small family gathering or a cozy Christmas dinner with friends. The stuffed bell peppers can be a wonderful main course or a side dish, depending on how you choose to serve them.
The spices and herbs used in the filling offer a warm, comforting aroma that fills the kitchen, contributing to the holiday spirit. Let’s explore the ingredients and steps needed to prepare this delightful dish.
Ingredients:
- 6 large bell peppers (any color)
- 1 cup quinoa
- 2 cups vegetable broth
- 1 can (15 oz) black beans, rinsed and drained
- 1 cup corn kernels (fresh or frozen)
- 1 small red onion, diced
- 2 cloves garlic, minced
- 1 teaspoon ground cumin
- 1 teaspoon smoked paprika
- 1 teaspoon chili powder
- 1/4 teaspoon cayenne pepper (optional)
- Salt and pepper to taste
- 1 cup shredded cheese (cheddar, Monterey Jack, or vegan cheese)
- 1/4 cup fresh cilantro, chopped
- 2 tablespoons olive oil
- Lime wedges for garnish
Instructions:
1. Preheat the Oven: Preheat your oven to 375°F (190°C). This guarantees that it’s hot enough to bake the stuffed peppers evenly.
2. Prepare the Quinoa: Rinse the quinoa under cold water. In a medium saucepan, combine the quinoa and vegetable broth. Bring to a boil, then reduce to a simmer, cover, and cook for about 15 minutes or until the quinoa is fluffy and the liquid is absorbed. Set aside.
3. Prepare the Bell Peppers: While the quinoa cooks, cut the tops off the bell peppers and remove the seeds and membranes. Lightly brush the outside of the peppers with olive oil and place them in a baking dish.
4. Cook the Filling: In a large skillet, heat 1 tablespoon of olive oil over medium heat. Add the diced onion and cook until translucent, about 3-4 minutes. Add the garlic and cook for another minute.
Stir in the black beans, corn, cooked quinoa, cumin, smoked paprika, chili powder, cayenne pepper (if using), salt, and pepper. Cook for 5 minutes, stirring occasionally.
5. Stuff the Peppers: Spoon the quinoa mixture into each bell pepper, packing it tightly. Top each stuffed pepper with shredded cheese.
6. Bake the Peppers: Cover the baking dish with foil and bake in the preheated oven for 30 minutes. Remove the foil and bake for an additional 10-15 minutes until the peppers are tender and the cheese is melted and bubbly.
7. Garnish and Serve: Remove the stuffed peppers from the oven and let them cool for a few minutes. Garnish with chopped cilantro and serve with lime wedges on the side.
Extra Tips:
When selecting bell peppers, choose ones that are similar in size so they cook evenly. You can prepare the quinoa filling a day in advance to save time on the day of cooking.
Feel free to customize the filling with additional ingredients like diced tomatoes, jalapeños, or different types of beans. For a vegan version, simply omit the cheese or use a plant-based alternative. Enjoy your festive, healthy Stuffed Bell Peppers with Quinoa and Black Beans as a centerpiece at your holiday table!
Cauliflower Mashed Potatoes With Garlic and Chives
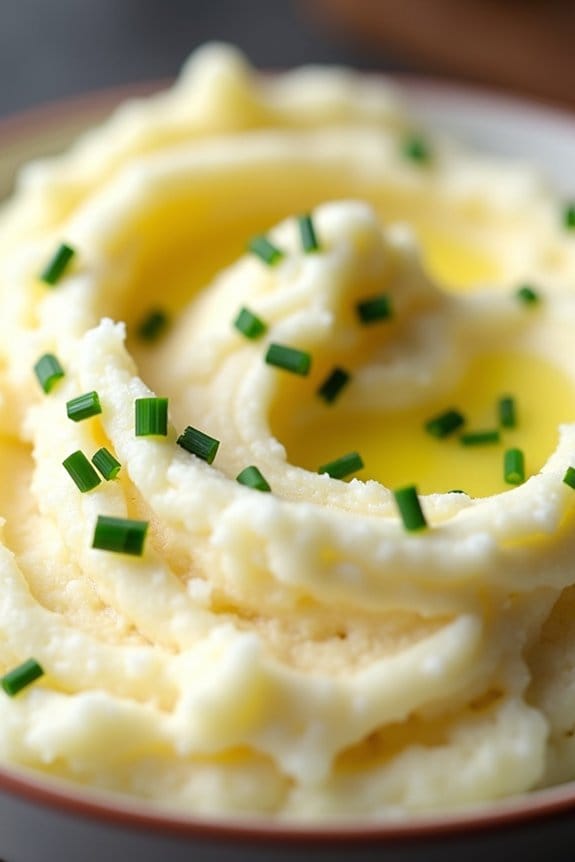
Cauliflower Mashed Potatoes With Garlic and Chives is a delicious and healthy alternative to traditional mashed potatoes, perfect for a festive Christmas dinner. This dish offers a creamy texture and rich flavor, with the added benefit of being lower in carbs and calories.
The cauliflower is blended to perfection, providing a fluffy and smooth base, while the garlic and chives add a savory touch that’s irresistible. Ideal for serving 4-6 people, this recipe is a great way to incorporate more vegetables into your holiday meal without sacrificing taste.
It’s simple to prepare and can be made ahead of time, allowing you to focus on enjoying the festivities with your loved ones. Whether you’re catering to dietary preferences or just looking to try something new, Cauliflower Mashed Potatoes With Garlic and Chives is sure to be a hit at your Christmas table.
Ingredients:
- 1 large head of cauliflower
- 3 cloves garlic, minced
- 1/4 cup unsalted butter
- 1/4 cup sour cream
- 1/4 cup grated Parmesan cheese
- Salt and pepper to taste
- 2 tablespoons chopped fresh chives
Instructions:
- Prepare the Cauliflower: Start by cutting the cauliflower into florets. Rinse them thoroughly under cold water and drain well.
- Cook the Cauliflower: Fill a large pot with water and bring it to a boil. Add the cauliflower florets and cook for 8-10 minutes, or until they’re tender when pierced with a fork. Drain the cauliflower and let it sit for a few minutes to release some of the steam.
- Sauté the Garlic: In a small pan, melt the butter over medium heat. Add the minced garlic and sauté for about 2 minutes, or until the garlic is fragrant but not browned.
- Blend the Ingredients: Transfer the cooked cauliflower to a food processor. Add the sautéed garlic and butter, sour cream, and Parmesan cheese. Blend until smooth and creamy. You may need to scrape down the sides of the processor a few times to guarantee everything is well mixed.
- Season the Mash: Taste the mashed cauliflower and season with salt and pepper as desired. Blend again briefly to incorporate the seasonings.
- Garnish and Serve: Transfer the cauliflower mash to a serving bowl. Sprinkle the chopped chives on top for a burst of color and flavor. Serve warm.
Extra Tips:
For an extra creamy texture, make sure to drain the cauliflower well after boiling and before blending. Too much moisture can make the mash too watery.
If you prefer a richer taste, you can substitute the sour cream with heavy cream or add more Parmesan cheese. Feel free to experiment with additional herbs such as parsley or rosemary for a different flavor profile.
This dish can be made a day in advance and reheated in the oven or microwave, making it a convenient option for holiday preparations.
Honey-Glazed Carrots With Thyme

Honey-Glazed Carrots With Thyme is a delightful side dish that captures the essence of the holiday season. This dish combines the natural sweetness of carrots with the warm, aromatic flavors of honey and fresh thyme, resulting in a savory-sweet symphony that perfectly complements any Christmas meal.
The carrots are gently cooked until tender and then glazed in a beautiful honey-thyme mixture, making them not only a treat for the taste buds but also a visually appealing addition to your festive table.
This recipe isn’t only delicious but also packed with nutrients, as carrots are an excellent source of beta-carotene, fiber, vitamin K1, and antioxidants. The simplicity of the ingredients lets the natural flavors shine, while the preparation method guarantees that the carrots remain the star of the dish.
Perfect for serving 4-6 people, this recipe is a must-try for anyone looking to bring a touch of elegance and health to their Christmas feast.
Ingredients:
- 2 pounds of carrots, peeled and cut into sticks
- 3 tablespoons of honey
- 2 tablespoons of olive oil
- 1 tablespoon of fresh thyme leaves, or 1 teaspoon of dried thyme
- Salt and pepper, to taste
- 2 tablespoons of unsalted butter
- 1 tablespoon of lemon juice
- Fresh thyme sprigs, for garnish (optional)
Instructions:
- Prepare the Carrots: Begin by peeling the carrots and cutting them into uniform sticks, approximately 4-5 inches in length. This guarantees they cook evenly.
- Blanch the Carrots: Bring a large pot of salted water to a boil. Add the carrot sticks to the boiling water and cook for about 4-5 minutes until they’re slightly tender but still firm. Drain the carrots and immediately transfer them to a bowl of ice water to halt the cooking process. Once cooled, drain and set aside.
- Combine Honey and Thyme: In a small bowl, whisk together the honey, olive oil, and thyme until well combined. This mixture will serve as the glaze for the carrots.
- Sauté the Carrots: In a large skillet, melt the butter over medium heat. Add the drained carrots to the skillet and sauté for about 5 minutes, stirring occasionally, until they start to lightly brown.
- Glaze the Carrots: Pour the honey-thyme mixture over the sautéed carrots. Toss to guarantee the carrots are evenly coated with the glaze. Cook for an additional 3-4 minutes, stirring frequently, until the glaze thickens and the carrots are tender.
- Season and Serve: Add salt and pepper to taste, and stir in the lemon juice for a hint of freshness. Transfer the honey-glazed carrots to a serving dish and garnish with fresh thyme sprigs if desired. Serve warm.
Extra Tips:
To enhance the flavor of the dish, consider using a variety of carrots, such as rainbow carrots, which will add a burst of color to your table.
If using dried thyme, remember that its flavor is more concentrated than fresh thyme, so adjust accordingly to avoid overpowering the dish.
Additionally, when sautéing, keep a close eye on the carrots to prevent them from burning, as the honey can caramelize quickly.
This dish can also be prepared in advance and gently reheated before serving, making it a convenient option for busy holiday schedules.
Balsamic Roasted Vegetables With Rosemary
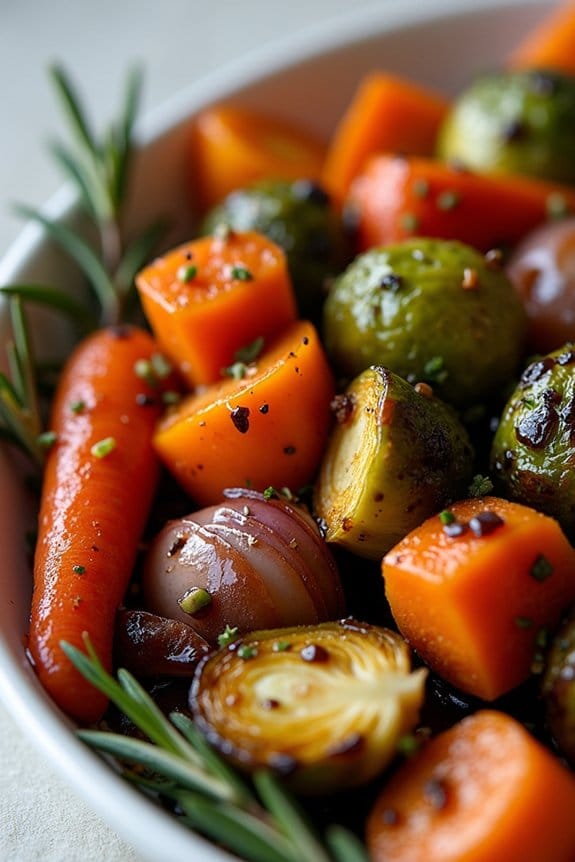
Balsamic Roasted Vegetables With Rosemary is a delightful and healthy addition to your Christmas dinner table. This dish combines the earthy flavors of root vegetables with the tangy sweetness of balsamic vinegar and the aromatic notes of fresh rosemary.
It’s a perfect side dish that complements the richness of holiday mains and brings a burst of color and flavor to your spread. Roasting the vegetables enhances their natural sweetness and creates a caramelized exterior, making them irresistible.
This recipe isn’t only delicious but also easy to prepare, making it a stress-free option during the busy holiday season. The combination of vegetables can be adjusted according to your preference or what’s available, allowing for flexibility and creativity.
The use of balsamic vinegar adds a depth of flavor without the need for excess fats, keeping the dish light and healthy. Suitable for a serving size of 4-6 people, this dish is sure to impress your guests with its simplicity and taste.
Ingredients:
- 2 cups of baby carrots
- 2 cups of brussels sprouts, halved
- 2 cups of cubed butternut squash
- 2 cups of red onion, cut into wedges
- 1/4 cup of olive oil
- 1/4 cup of balsamic vinegar
- 2 tablespoons of fresh rosemary, chopped
- Salt to taste
- Black pepper to taste
Cooking Instructions:
- Preheat the Oven: Preheat your oven to 400°F (200°C) to guarantee that it’s hot enough to roast the vegetables evenly.
- Prepare the Vegetables: Wash all the vegetables thoroughly. Halve the brussels sprouts, cube the butternut squash, and cut the red onion into wedges. Keep the baby carrots whole or halve them if they’re larger.
- Mix the Dressing: In a small bowl, whisk together the olive oil, balsamic vinegar, chopped rosemary, salt, and black pepper until well combined.
- Combine Vegetables and Dressing: Place all the prepared vegetables in a large mixing bowl. Pour the balsamic mixture over the vegetables and toss until they’re evenly coated.
- Arrange for Roasting: Spread the vegetables in a single layer on a large baking sheet. Confirm there’s enough space between them to allow for even roasting.
- Roast the Vegetables: Place the baking sheet in the preheated oven and roast for 25-30 minutes, or until the vegetables are tender and caramelized. Stir the vegetables halfway through the cooking time to guarantee they cook evenly.
- Serve: Once roasted, remove the vegetables from the oven and transfer them to a serving platter. Garnish with additional fresh rosemary if desired and serve warm.
Extra Tips:
For the best results, try to cut the vegetables into similar sizes to guarantee even cooking. If you prefer a bit of a kick, consider adding a pinch of red pepper flakes to the balsamic mixture.
To save time, you can prepare the vegetables and dressing in advance, storing them separately in the refrigerator until you’re ready to roast. Adjust the seasoning to your taste preference, and feel free to experiment with different vegetable combinations to make this dish uniquely yours.
Spinach and Feta Stuffed Chicken Breast
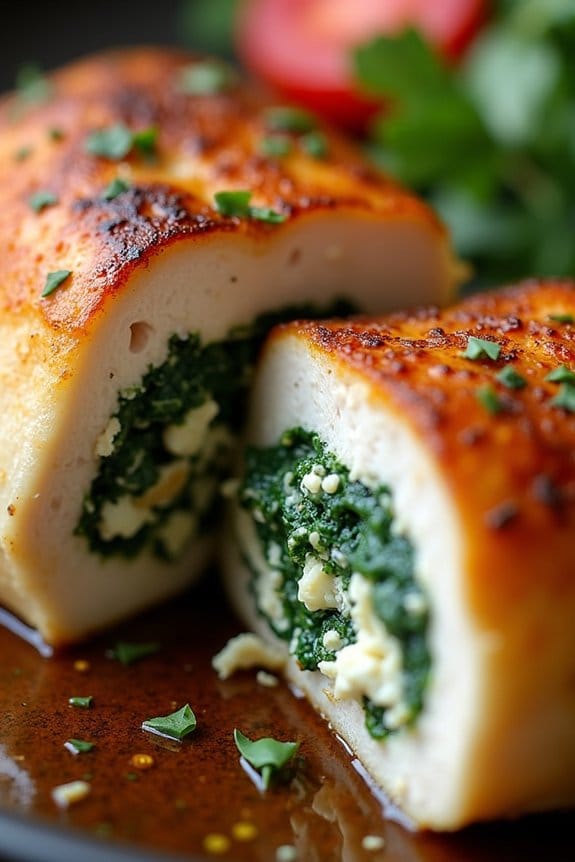
Spinach and Feta Stuffed Chicken Breast is a delightful and healthy addition to your Christmas menu. This dish combines the savory flavors of feta cheese with the nutritious goodness of spinach, all wrapped up in juicy chicken breasts. Perfect for a festive gathering, this recipe not only looks impressive but is also relatively simple to prepare, allowing you to spend more time with your loved ones and less time in the kitchen.
By incorporating spinach and feta, you’re adding a dose of vitamins A and K, calcium, and protein to your meal, making it both delicious and nutritious. The combination of these ingredients creates a flavorful stuffing that keeps the chicken moist and tender. Ideal for a serving size of 4-6 people, this dish can be complemented with a side of roasted vegetables or a fresh salad to complete your holiday feast.
Ingredients for 4-6 servings:
- 4 large boneless, skinless chicken breasts
- 1 cup fresh spinach, chopped
- 1 cup crumbled feta cheese
- 2 cloves garlic, minced
- 1 teaspoon dried oregano
- 1 teaspoon dried basil
- Salt and pepper to taste
- 2 tablespoons olive oil
- Toothpicks or kitchen twine
Cooking Instructions:
- Preheat the Oven: Begin by preheating your oven to 375°F (190°C). This guarantees that it reaches the ideal temperature by the time you’re ready to bake the chicken.
- Prepare the Stuffing: In a medium bowl, mix together the chopped spinach, crumbled feta cheese, minced garlic, dried oregano, and dried basil. Season the mixture with a pinch of salt and pepper to taste. Stir until all the ingredients are well combined.
- Prepare the Chicken Breasts: Rinse the chicken breasts under cold water and pat them dry with paper towels. Using a sharp knife, carefully slice each chicken breast horizontally to create a pocket, being cautious not to cut all the way through.
- Stuff the Chicken: Spoon an equal amount of the spinach and feta mixture into each pocket of the chicken breasts. Secure the openings with toothpicks or tie them with kitchen twine to guarantee the stuffing stays inside during cooking.
- Sear the Chicken: Heat olive oil in a large oven-safe skillet over medium-high heat. Add the stuffed chicken breasts to the skillet and sear for about 3-4 minutes on each side, until golden brown.
- Bake the Chicken: Transfer the skillet to the preheated oven and bake for 20-25 minutes, or until the chicken is cooked through and reaches an internal temperature of 165°F (74°C).
- Rest and Serve: Allow the chicken to rest for a few minutes before removing the toothpicks or twine. Serve the Spinach and Feta Stuffed Chicken Breast hot, alongside your choice of sides.
Extra Tips:
For a burst of extra flavor, consider adding sun-dried tomatoes or fresh herbs like parsley to the stuffing mixture.
When slicing the chicken to create the pocket, take care to make even cuts to guarantee the stuffing is evenly distributed.
If you’re short on time, the stuffing can be prepared in advance and stored in the refrigerator until you’re ready to use it.
Additionally, using an oven-safe skillet for searing and baking the chicken minimizes the number of dishes, making cleanup easier.
Sweet Potato and Kale Casserole
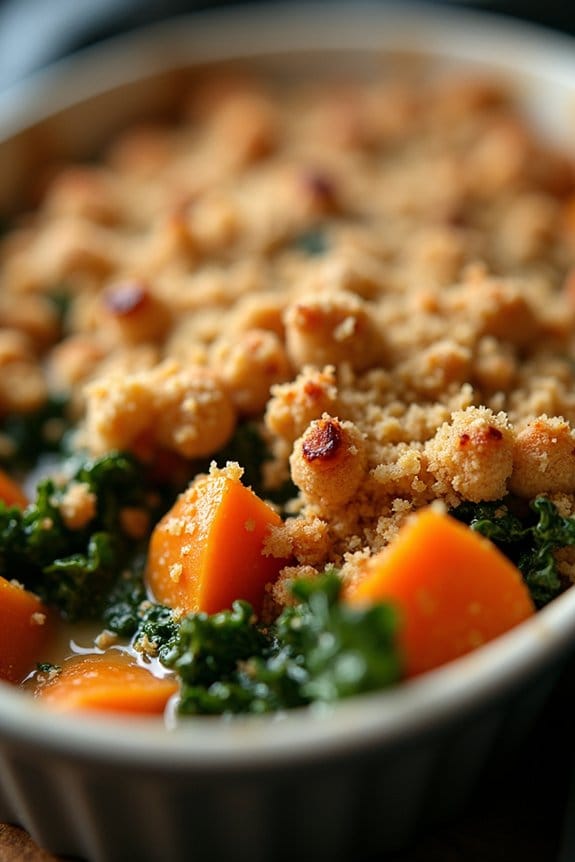
Sweet Potato and Kale Casserole is a delicious and nutritious dish perfect for adding a healthy touch to your Christmas menu. This comforting casserole combines the natural sweetness of sweet potatoes with the earthy flavor of kale, resulting in a delightful balance of taste and texture. The creamy sauce and savory toppings make it a standout dish that’s sure to please everyone at the holiday table.
This recipe isn’t only healthy but also easy to prepare, allowing you to spend more time enjoying the festivities with your loved ones. By incorporating nutrient-rich ingredients like sweet potatoes and kale, this casserole is packed with vitamins, minerals, and antioxidants. Sweet potatoes are a great source of fiber and vitamin A, while kale is rich in vitamin C and calcium.
This dish serves 4-6 people and can easily be doubled to accommodate larger gatherings. Whether you’re looking to add a healthy option to your traditional Christmas spread or simply want to try something new, this Sweet Potato and Kale Casserole is a must-try recipe.
Ingredients:
- 3 medium sweet potatoes, peeled and cubed
- 1 bunch kale, stems removed and roughly chopped
- 1 medium onion, chopped
- 2 cloves garlic, minced
- 2 tablespoons olive oil
- 1 cup low-sodium vegetable broth
- 1/2 cup unsweetened almond milk
- 1 teaspoon thyme
- 1 teaspoon rosemary
- Salt and pepper to taste
- 1/2 cup grated Parmesan cheese (optional)
- 1/4 cup breadcrumbs
- Cooking spray
Cooking Instructions:
- Preheat the oven: Set your oven to 375°F (190°C) to prepare for baking the casserole.
- Prepare the sweet potatoes: In a large pot, add the cubed sweet potatoes and cover them with water. Bring to a boil, then reduce the heat and simmer for about 10-15 minutes, or until the sweet potatoes are tender. Drain well and set aside.
- Sauté kale and onions: In a large skillet, heat the olive oil over medium heat. Add the chopped onion and sauté until it becomes translucent, about 5 minutes. Add the minced garlic and chopped kale, and cook until the kale is wilted, about 3-4 minutes. Season with salt, pepper, thyme, and rosemary.
- Create the sauce: In a small saucepan, combine the vegetable broth and almond milk. Heat over medium heat until warm, then slowly whisk in the Parmesan cheese (if using) until melted and smooth.
- Assemble the casserole: In a greased 9×13 inch baking dish, layer the cooked sweet potatoes and sautéed kale mixture. Pour the warm sauce evenly over the top.
- Add toppings: In a small bowl, mix the breadcrumbs with a bit of olive oil. Sprinkle the breadcrumb mixture evenly over the casserole for a crunchy topping.
- Bake: Place the casserole in the preheated oven and bake for 25-30 minutes, or until the top is golden brown and the sauce is bubbling.
- Cool and serve: Allow the casserole to cool for a few minutes before serving, giving the flavors time to meld together.
Extra Tips:
For added flavor, consider adding a pinch of nutmeg to the sauce—it complements the sweetness of the potatoes beautifully. If you want to make a vegan version, simply skip the Parmesan cheese or substitute it with a vegan cheese alternative.
This casserole can be prepared a day in advance and stored in the refrigerator; just reheat it in the oven before serving. Additionally, feel free to experiment with other herbs or spices to suit your personal taste preferences. Enjoy your healthy and festive Sweet Potato and Kale Casserole!
Almond-Crusted Baked Cod
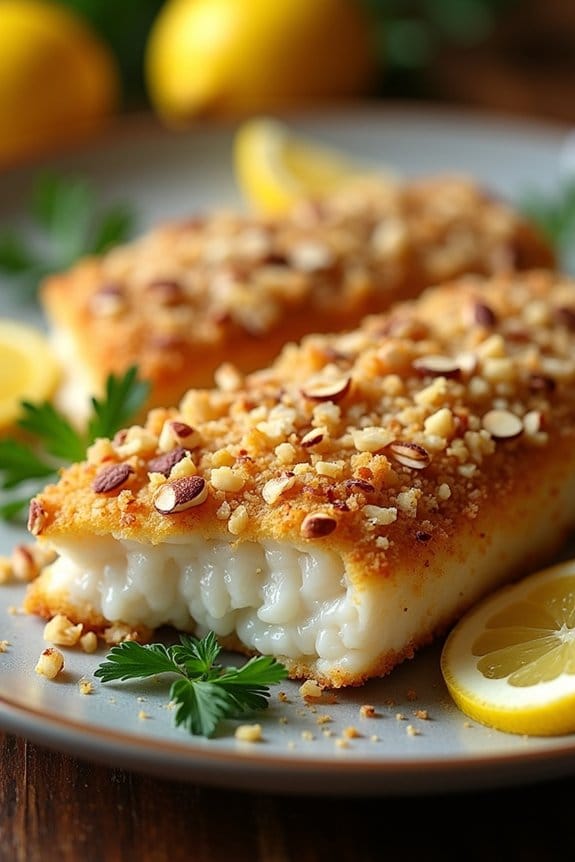
Almond-Crusted Baked Cod is a delightful and nutritious dish that’s perfect for a healthy Christmas dinner. This recipe combines the mild, flaky texture of cod with a crunchy, nutty almond crust, creating a dish that’s both satisfying and light. The cod is baked to perfection, guaranteeing that it remains moist and tender, while the almond crust provides a delicious contrast in texture. This dish not only looks impressive on the table but is also packed with protein and healthy fats, making it a great choice for those looking to maintain a balanced diet during the festive season.
The preparation of Almond-Crusted Baked Cod is straightforward, requiring minimal ingredients and effort while delivering maximum flavor. The use of fresh herbs and lemon juice enhances the natural taste of the fish, making it a revitalizing and vibrant option for a holiday meal. This recipe can easily serve 4-6 people, making it ideal for a family gathering or an intimate dinner with friends. Serve it alongside your favorite seasonal vegetables or a crisp salad for a complete and wholesome meal.
Ingredients (for 4-6 servings):
- 4-6 cod fillets (about 6-8 ounces each)
- 1 cup almond flour
- 1/2 cup chopped almonds
- 2 tablespoons fresh parsley, chopped
- 1 teaspoon lemon zest
- 1/2 teaspoon garlic powder
- Salt and pepper to taste
- 2 tablespoons olive oil
- 2 tablespoons Dijon mustard
- 1 lemon, cut into wedges
Cooking Instructions:
- Preheat the Oven: Begin by preheating your oven to 400°F (200°C). This will guarantee that the oven is hot enough to bake the cod evenly and develop a crispy almond crust.
- Prepare the Almond Crust: In a medium-sized bowl, combine the almond flour, chopped almonds, fresh parsley, lemon zest, garlic powder, salt, and pepper. Mix these ingredients thoroughly to create a uniform almond crust mixture.
- Coat the Cod Fillets: Pat the cod fillets dry with a paper towel to remove any excess moisture. This will help the coating adhere better. Brush each fillet with a light layer of Dijon mustard, which acts as a flavorful adhesive for the almond crust.
- Apply the Almond Crust: Press the almond mixture onto the top of each cod fillet, guaranteeing that the surface is evenly covered. The mustard should help the crust stick to the fish.
- Bake the Cod: Place the coated cod fillets on a baking sheet lined with parchment paper or lightly greased with olive oil. Drizzle a little more olive oil over the top of the fillets to help them brown, then bake in the preheated oven for 12-15 minutes, or until the fish flakes easily with a fork and the crust is golden brown.
- Serve: Once cooked, remove the cod from the oven and let it rest for a few minutes. Serve with lemon wedges on the side for an extra burst of revitalization.
Extra Tips:
When selecting cod fillets, opt for ones that are firm and have a fresh, mild scent. If fresh cod is unavailable, high-quality frozen cod can be used as well. Thaw the fish completely and pat it dry before applying the crust.
To add variety, consider incorporating other herbs like dill or thyme into the almond crust mix. Additionally, you can substitute the cod with other white fish such as haddock or halibut, if desired.
Dark Chocolate Avocado Mousse

Dark Chocolate Avocado Mousse is a delightful and healthy dessert option that’s perfect for the Christmas season. This rich and creamy mousse uses ripe avocados as its base, providing a velvety texture without the need for heavy cream or butter. The dark chocolate not only adds an indulgent flavor but also brings in antioxidants, making this a guilt-free treat for any festive gathering.
The combination of avocados and dark chocolate creates a harmonious balance between the natural sweetness of the fruit and the intense flavor of cocoa. This mousse isn’t only easy to prepare but also serves as an excellent make-ahead dessert for holiday parties. The result is a luxurious and sophisticated dessert that will impress your guests while keeping things healthy.
Ingredients for 4-6 servings:
- 3 ripe avocados
- 150 grams of dark chocolate (70% cocoa or higher)
- 1/4 cup unsweetened cocoa powder
- 1/4 cup honey or maple syrup
- 1 teaspoon vanilla extract
- A pinch of sea salt
- Fresh berries or mint leaves (optional, for garnish)
Cooking Instructions:
- Prepare the Avocados: Begin by cutting the avocados in half, removing the pits, and scooping the flesh into a blender or food processor. Verify the avocados are ripe for a smoother consistency.
- Melt the Chocolate: Break the dark chocolate into small pieces and melt it in a microwave-safe bowl or using a double boiler. If using a microwave, heat in 30-second intervals, stirring in between, until fully melted. Set aside to cool slightly.
- Blend Ingredients: Add the melted chocolate, cocoa powder, honey or maple syrup, vanilla extract, and a pinch of sea salt to the blender with the avocados. Blend on high until the mixture is smooth and creamy, scraping down the sides as needed to verify everything is well incorporated.
- Adjust Sweetness: Taste the mousse and adjust the sweetness according to your preference by adding more honey or syrup if desired. Blend again briefly to mix any additional sweetener.
- Chill the Mousse: Transfer the mousse into serving dishes or ramekins and refrigerate for at least 1-2 hours to set. The chilling process helps enhance the flavors and firm up the texture.
- Serve and Garnish: Once chilled, serve the mousse with optional garnishes such as fresh berries or mint leaves to add a festive touch.
Extra Tips:
When selecting avocados, choose ones that yield slightly to gentle pressure – this indicates ripeness. If you’re making the mousse ahead of time, it can be stored in the refrigerator for up to two days.
Before serving, you may want to let the mousse sit at room temperature for a few minutes to soften slightly. For an added depth of flavor, consider adding a dash of espresso powder or a sprinkle of sea salt flakes just before serving.
