
As the holiday season approaches, our sweet tooth starts tingling for festive treats. But who has time for complicated recipes? Enter these no-bake delights like Chocolate Coconut Snowballs and Lemon Raspberry Cheesecake Cups. They’ll satisfy your cravings without the need to even touch the oven. With simple ingredients and easy steps, these recipes offer a perfect blend of flavor and convenience.
Chocolate Coconut Snowballs
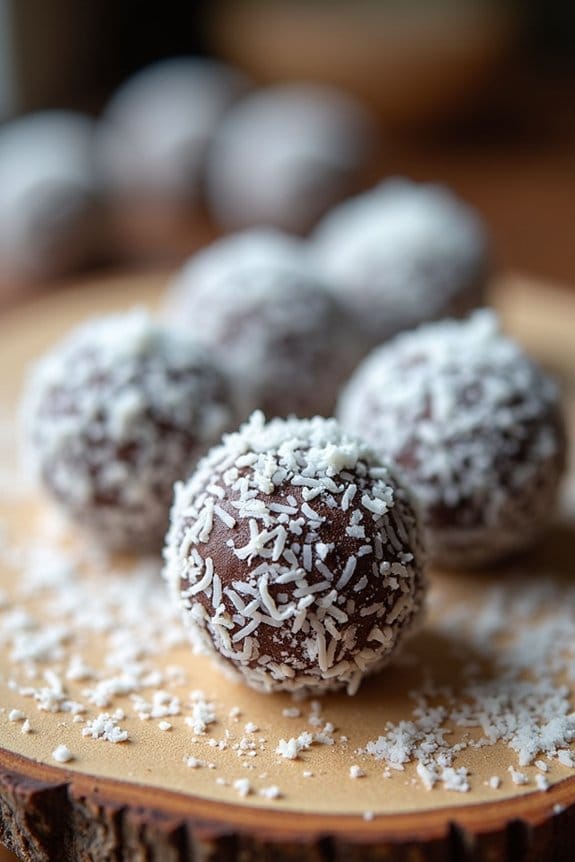
Chocolate Coconut Snowballs are the perfect treat for the festive season, combining rich chocolate flavors with the tropical hint of coconut. These no-bake delights aren’t only delicious but also healthy, making them a guilt-free indulgence during Christmas. The combination of natural ingredients guarantees that each bite is packed with flavor and texture, offering a chewy center surrounded by a coating of shredded coconut that resembles a snowball.
Whether you’re serving them at a holiday gathering or simply enjoying them with a cup of hot cocoa, these snowballs are sure to be a hit.
What makes this recipe even better is its simplicity and the fact that it requires no baking. In just a few easy steps, you can whip up these treats without the need for an oven, making it a perfect choice for those busy holiday schedules. The recipe uses wholesome ingredients like dates and nuts to create a naturally sweet flavor profile that pairs beautifully with the cocoa and coconut. This not only makes them healthier compared to traditional sugary desserts but also makes them suitable for various dietary preferences.
Ingredients (Serving Size: 4-6 people):
- 1 cup pitted dates
- 1 cup unsweetened shredded coconut, divided
- 1/2 cup raw almonds
- 1/4 cup cocoa powder
- 1/2 teaspoon vanilla extract
- A pinch of salt
- 2 tablespoons coconut oil, melted
Instructions:
- Prepare the Ingredients: Begin by placing the pitted dates in a bowl of warm water to soak for about 10 minutes. This softens them, making them easier to blend. Drain the dates thoroughly once softened.
- Blend the Base: In a food processor, combine the soaked dates, 1/2 cup of shredded coconut, almonds, cocoa powder, vanilla extract, and a pinch of salt. Pulse the mixture until it becomes a well-blended, sticky dough. The almonds should be finely chopped, but a few small chunks add a nice texture.
- Shape the Snowballs: Scoop about a tablespoon of the mixture and roll it into a ball using your hands. The warmth of your hands will help shape the mixture easily. Continue this process until all the dough is used up.
- Coat with Coconut: Pour the remaining 1/2 cup of shredded coconut onto a plate. Roll each ball in the shredded coconut until it’s fully coated. This gives the snowballs their signature snow-dusted appearance.
- Chill the Snowballs: Place the coated snowballs on a tray lined with parchment paper and refrigerate them for at least 30 minutes. This helps them firm up and enhances the flavors.
Extra Tips:
For an extra festive touch, consider adding a sprinkle of cinnamon or nutmeg to the dough for a warm, holiday spice. If you prefer a nuttier flavor, experiment by substituting almonds with walnuts or pecans.
The snowballs can be stored in an airtight container in the fridge for up to a week, making them a convenient make-ahead option for your holiday gatherings. To add a fun twist, you can also dip the snowballs halfway in melted dark chocolate before rolling them in coconut for an extra layer of indulgence.
Almond Butter Fudge Bites
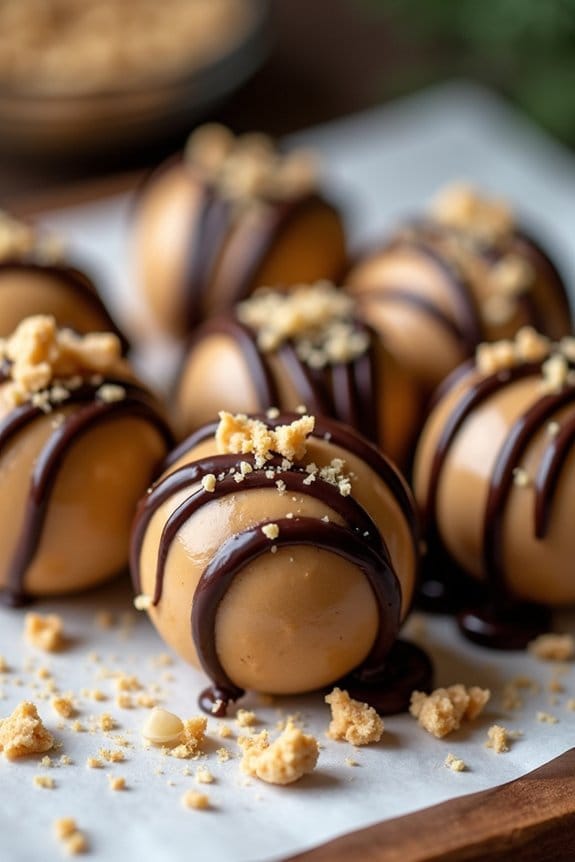
Almond Butter Fudge Bites are a delightful and healthy no-bake dessert perfect for the festive Christmas season. These bites are rich, creamy, and packed with the nutty flavor of almond butter, making them an irresistible treat for anyone with a sweet tooth.
Not only are they simple to make, but they also cater to those who prefer gluten-free and vegan options, adding a touch of indulgence to your holiday spread. This no-bake recipe is a great way to enjoy a sweet treat without the fuss of baking, and it’s an excellent option if you’re looking to prepare something in advance.
With just a handful of ingredients, you can whip up these delicious fudge bites in under 20 minutes, leaving you more time to enjoy the holiday festivities. The following recipe serves 4-6 people.
Ingredients:
- 1 cup almond butter
- 1/4 cup coconut oil
- 1/4 cup pure maple syrup
- 1 teaspoon vanilla extract
- 1/4 teaspoon salt
- 1/3 cup almond flour
- 1/4 cup dark chocolate chips (optional for garnish)
- 1/4 cup crushed almonds (optional for garnish)
Instructions:
- Prepare the Base: In a medium saucepan, combine the almond butter, coconut oil, and pure maple syrup. Place the saucepan over medium heat and stir continuously until the mixture is smooth and well combined. This should take about 3-4 minutes.
- Add Flavor: Remove the saucepan from the heat and stir in the vanilla extract and salt. Mix well to guarantee the flavors are evenly distributed throughout the mixture.
- Incorporate Almond Flour: Gradually add the almond flour to the mixture, stirring continuously until it forms a thick, fudge-like consistency. This will help give structure to your fudge bites.
- Shape the Bites: Line a baking sheet with parchment paper. Using a spoon or small cookie scoop, portion out the mixture onto the parchment paper. Aim to make about 12-16 small balls, depending on your preferred size.
- Garnish (Optional): If desired, melt the dark chocolate chips in a microwave-safe bowl in 30-second increments, stirring in between until fully melted. Drizzle the melted chocolate over the fudge bites and sprinkle with crushed almonds for an added crunch.
- Chill: Place the baking sheet in the refrigerator for at least 1 hour, or until the fudge bites are firm and set.
Extra Tips: To ascertain the best texture, use smooth almond butter rather than chunky. If your almond butter is too thick, you can microwave it for a few seconds to make it easier to mix.
For those with nut allergies, consider using sunflower seed butter as an alternative. Additionally, storing the fudge bites in an airtight container in the refrigerator will keep them fresh for up to a week, making them a convenient make-ahead dessert option for your holiday gatherings.
Peppermint Chocolate Bark

Indulge in the festive spirit with a delightful and healthy twist on a classic favorite — Peppermint Chocolate Bark. This no-bake dessert is perfect for the Christmas season, combining rich dark chocolate with a revitalizing hint of peppermint, making it a delightful treat for family gatherings or holiday parties.
The best part? It’s incredibly easy to prepare, requiring minimal ingredients and no oven time, guaranteeing you can spend more time enjoying the holidays with your loved ones.
This recipe yields a deliciously satisfying bark that serves 4-6 people, making it perfect for sharing. The smooth, velvety texture of the dark chocolate complements the crispness of the peppermint, making each bite a festive and invigorating experience.
Whether you’re a seasoned cook or a beginner, this recipe is simple to follow and promises a beautiful, homemade treat that everyone will love.
Ingredients:
- 12 oz dark chocolate (70% cacao or higher)
- 1/2 teaspoon peppermint extract
- 1/3 cup crushed peppermint candies or candy canes
- 1 tablespoon coconut oil
- Optional: 1/4 cup chopped nuts (almonds or walnuts)
Instructions:
- Prepare the Ingredients: Begin by gathering all your ingredients. Crush the peppermint candies or candy canes by placing them in a sealed plastic bag and using a rolling pin to break them into small pieces.
- Melt the Chocolate: In a microwave-safe bowl, combine the dark chocolate and coconut oil. Microwave in 30-second intervals, stirring in between, until the chocolate is completely melted and smooth. Alternatively, you can melt the chocolate using a double boiler on the stove.
- Add Peppermint Extract: Once the chocolate is melted, stir in the peppermint extract. Mix thoroughly to confirm the extract is evenly distributed throughout the chocolate.
- Spread the Chocolate: Line a baking sheet with parchment paper. Pour the chocolate mixture onto the sheet and use a spatula to spread it evenly to your desired thickness.
- Add Toppings: Sprinkle the crushed peppermint candies evenly over the top of the chocolate. If using, sprinkle the chopped nuts as well, pressing them gently into the chocolate to ensure they stick.
- Chill the Bark: Place the baking sheet in the refrigerator for about 30-45 minutes, or until the chocolate has completely set and hardened.
- Break into Pieces: Once the bark is firm, remove it from the refrigerator. Use your hands to break it into irregular pieces of your desired size.
Extra Tips:
When making Peppermint Chocolate Bark, confirm your chocolate is high quality, as it greatly impacts the final taste. If you prefer a more textured bark, consider adding other toppings like dried fruits or seeds.
Maintain a consistent thickness when spreading the chocolate to guarantee even setting. Store any leftover bark in an airtight container in a cool, dry place to maintain its freshness and prevent it from melting. Enjoy your festive creation!
No-Bake Gingerbread Energy Balls

No-Bake Gingerbread Energy Balls are a delightful and healthy treat perfect for the holiday season. These energy balls capture the classic flavors of gingerbread cookies with a nutritious twist, using wholesome ingredients and requiring no baking whatsoever.
Perfect for those who want to enjoy the festive flavors of Christmas without indulging in heavy desserts, these energy balls are quick to prepare and great for sharing with family and friends. They’re naturally sweetened and packed with spices that not only taste amazing but also offer health benefits like boosting metabolism and aiding digestion.
These No-Bake Gingerbread Energy Balls come together in just minutes and require only a food processor and a few pantry staples. Ideal for a serving size of 4-6 people, this recipe is a wonderful choice for anyone looking to add a homemade touch to their holiday celebrations without spending too much time in the kitchen.
With their chewy texture and rich, spiced flavor, these energy balls will surely become a favorite festive snack that everyone will love.
Ingredients for 4-6 servings:
- 1 cup rolled oats
- 1 cup pitted Medjool dates
- 1/2 cup almond butter
- 1 teaspoon vanilla extract
- 1 tablespoon molasses
- 1 teaspoon ground cinnamon
- 1 teaspoon ground ginger
- 1/4 teaspoon ground nutmeg
- 1/8 teaspoon ground cloves
- A pinch of salt
- 2 tablespoons chia seeds (optional)
Instructions:
- Prepare the Dates: Begin by soaking the pitted Medjool dates in warm water for about 10 minutes. This will soften them and make them easier to blend. After soaking, drain the water completely.
- Process the Ingredients: In a food processor, add the rolled oats and pulse until they form a fine flour-like consistency. Then, add the soaked dates, almond butter, vanilla extract, molasses, ground cinnamon, ground ginger, ground nutmeg, ground cloves, and salt. If you’re using chia seeds, add them as well.
- Blend the Mixture: Process all the ingredients together until they form a sticky, cohesive dough. You may need to scrape down the sides of the processor a couple of times to guarantee everything is evenly mixed.
- Shape the Energy Balls: Once the mixture is ready, use your hands to roll small portions of the dough into balls, about 1 inch in diameter. You should be able to make approximately 16-20 energy balls, depending on the size.
- Chill the Energy Balls: Place the energy balls on a baking sheet lined with parchment paper and refrigerate them for at least 20 minutes. This will help them firm up and enhance the flavors.
- Serve and Enjoy: After chilling, serve the No-Bake Gingerbread Energy Balls on a festive platter. They can be stored in an airtight container in the fridge for up to a week, making them a perfect make-ahead option.
Extra Tips: For an added festive touch, you can roll the energy balls in shredded coconut or crushed nuts before chilling them. If you prefer a sweeter treat, consider adding a tablespoon of maple syrup to the mixture.
These energy balls can also be customized with different spices according to your taste preference. If the dough feels too dry, add a teaspoon of water at a time until the desired consistency is achieved. Enjoy these treats as a healthy snack or dessert during your holiday gatherings!
Cranberry Pistachio Bites
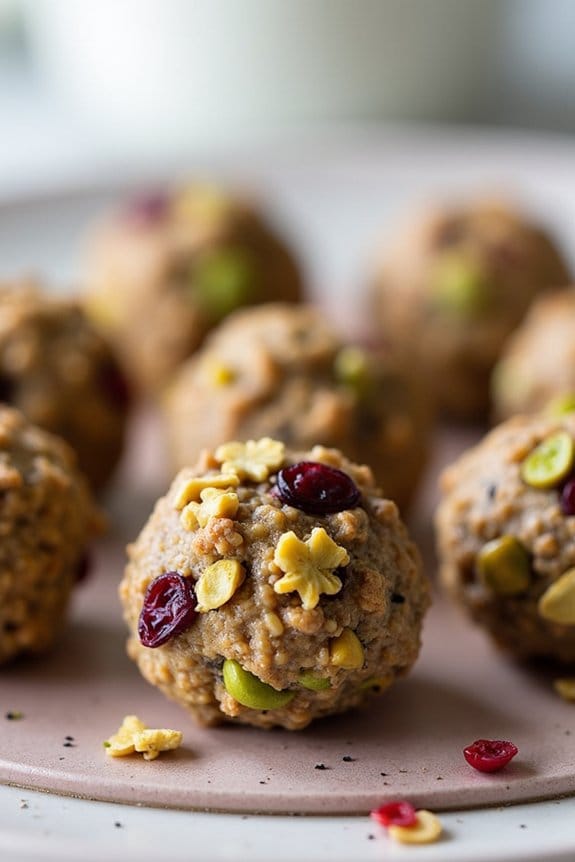
Cranberry Pistachio Bites are a delightful and healthy no-bake dessert option that adds a festive touch to your Christmas celebrations. These little bites are perfect for those looking to indulge in something sweet without the guilt. Made with wholesome ingredients, these bites are packed with flavors from tart cranberries and nutty pistachios, offering a burst of holiday cheer in every bite.
They aren’t only easy to make but also convenient to prepare ahead of time, making them an ideal choice for busy holiday gatherings. The combination of dried cranberries and pistachios creates a beautiful contrast of red and green, making these bites visually appealing and perfect for Christmas.
The natural sweetness of the dates binds everything together while providing a chewy texture. Whether you’re hosting a party or looking for a healthy snack to enjoy at home, these Cranberry Pistachio Bites are a must-try this holiday season. Here’s how you can make this delicious treat for a serving size of 4-6 people.
Ingredients:
- 1 cup pitted Medjool dates
- 1 cup dried cranberries
- 1 cup shelled pistachios
- 1/2 cup rolled oats
- 1 tablespoon chia seeds
- 1/2 teaspoon vanilla extract
- 1/4 teaspoon salt
Instructions:
- Prepare the Ingredients: Start by ensuring all your ingredients are ready. Pit the dates if they aren’t already pitted, and measure out the cranberries, pistachios, oats, chia seeds, vanilla extract, and salt.
- Blend the Mixture: In a food processor, combine the pitted dates, dried cranberries, and pistachios. Pulse the mixture until it forms a coarse texture. Add the rolled oats, chia seeds, vanilla extract, and salt. Blend until the mixture becomes sticky and holds together when pressed.
- Shape the Bites: Once the mixture is well combined, use your hands to roll small portions of the mixture into bite-sized balls. Aim for about 1-inch in diameter for each bite. If the mixture is too sticky, dampen your hands slightly to help shape the bites more easily.
- Chill the Bites: Place the Cranberry Pistachio Bites on a plate or tray and refrigerate them for at least 30 minutes. This will allow them to firm up and hold their shape better.
- Serve and Enjoy: After chilling, the bites are ready to serve. Arrange them on a festive platter for a beautiful presentation.
Extra Tips: To enhance the flavor, you can toast the pistachios lightly before adding them to the food processor. This will bring out a deeper, nuttier taste. If you prefer a sweeter bite, consider adding a tablespoon of honey or maple syrup to the mixture.
Store any leftover bites in an airtight container in the fridge for up to a week or freeze them for longer storage. These Cranberry Pistachio Bites are versatile and can be customized with your favorite nuts or dried fruits for a personal touch.
Cashew Coconut Date Bars
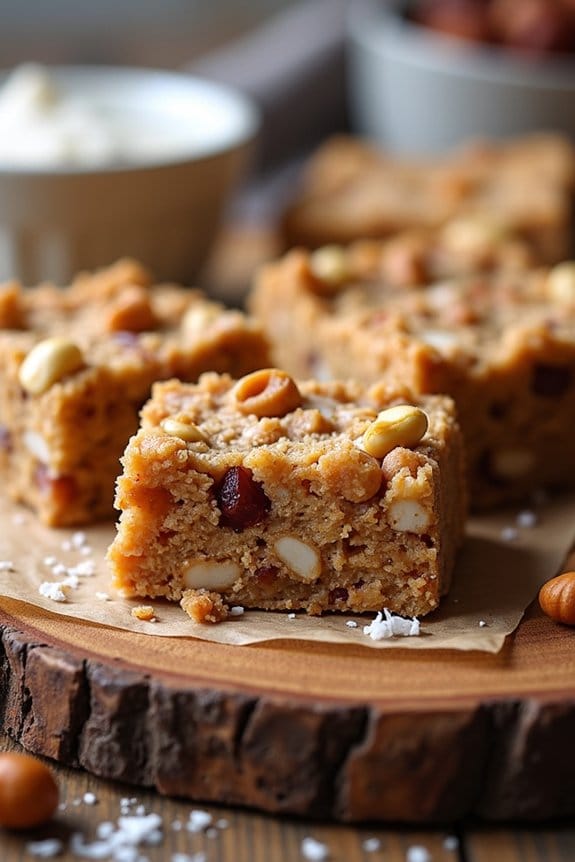
Cashew Coconut Date Bars are a delightful no-bake dessert that combines the natural sweetness of dates with the nutty flavors of cashews and the tropical hint of coconut. This healthy treat is perfect for the holiday season when you want to indulge without the guilt.
The beauty of these bars lies in their simplicity and the nutritious ingredients that provide energy and satisfy sweet cravings. These bars are perfect for a festive gathering or a wholesome snack. By using natural ingredients and avoiding processed sugars, you aren’t only creating a dessert that tastes good but also one that’s good for your health.
The blend of cashews, coconut, and dates provides a rich source of fiber, healthy fats, and essential nutrients. Enjoy these Cashew Coconut Date Bars as a part of your holiday celebration or any time you need a quick, healthy treat.
Ingredients (Serves 4-6):
- 1 cup cashews
- 1 cup pitted Medjool dates
- 1/2 cup unsweetened shredded coconut
- 1 tablespoon coconut oil
- 1 teaspoon vanilla extract
- A pinch of salt
Instructions:
- Prepare the Ingredients: Begin by gathering all your ingredients. Confirm the dates are pitted and the cashews are unsalted for the best results in flavor and texture.
- Blend the Mixture: In a food processor, combine the cashews, Medjool dates, shredded coconut, coconut oil, vanilla extract, and salt. Blend until the mixture becomes well combined and sticks together when pressed between your fingers. You may need to stop occasionally to scrape down the sides of the processor to confirm even mixing.
- Line the Baking Dish: Take an 8×8 inch baking dish and line it with parchment paper. This will prevent the bars from sticking to the dish and make it easier to remove them once they’re set.
- Press the Mixture: Transfer the blended mixture into the prepared baking dish. Use a spatula or the back of a spoon to press the mixture firmly and evenly into the bottom of the dish.
- Chill the Bars: Place the dish in the refrigerator for at least 2 hours, or until the mixture is firm and set. This chilling process is essential as it allows the bars to hold their shape when cut.
- Cut and Serve: Once the mixture is set, remove the dish from the refrigerator. Lift the parchment paper to take the bars out of the dish and transfer them to a cutting board. Cut into squares or bars of your desired size and serve.
Extra Tips:
To enhance the flavor of these Cashew Coconut Date Bars, consider toasting the shredded coconut lightly before adding it to the mixture. This will add an extra depth of flavor to the bars.
If you find the mixture too dry, add an additional tablespoon of coconut oil or a few more dates to achieve the desired consistency. These bars can be stored in an airtight container in the refrigerator for up to a week, making them a convenient option for make-ahead holiday treats.
For an extra festive touch, sprinkle a bit of cinnamon or nutmeg on top before serving.
Festive Fruit and Nut Clusters
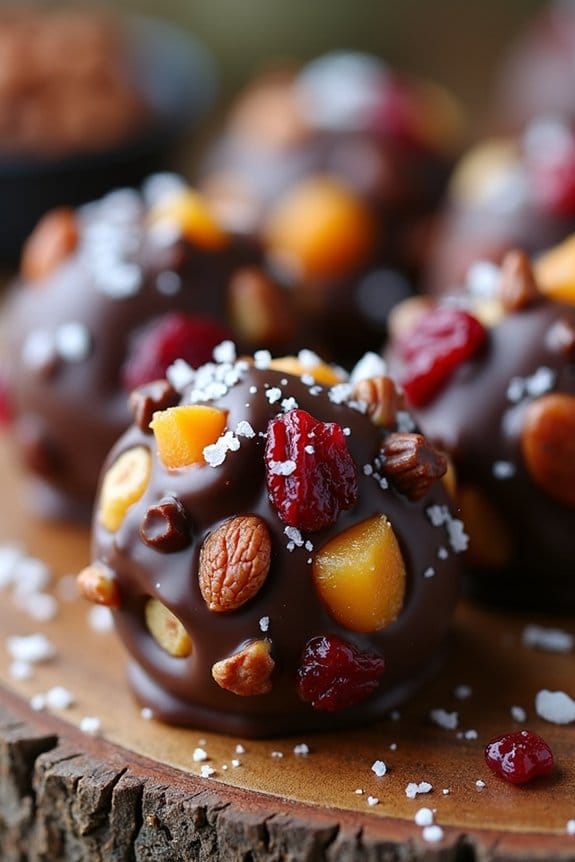
Festive Fruit and Nut Clusters are the perfect healthy no-bake Christmas dessert that brings together a delightful mix of flavors and textures. These clusters aren’t only delicious but also incredibly easy to make, requiring no oven time at all. The combination of dried fruits and nuts provide a natural sweetness and a satisfying crunch, making them an ideal treat for holiday gatherings or as a homemade gift for friends and family. Plus, they’re packed with nutrients, making them a guilt-free indulgence you can enjoy throughout the festive season.
These clusters can be easily customized with your favorite fruits and nuts, allowing you to tailor them to your personal tastes or dietary preferences. Whether you prefer the tangy burst of dried cranberries or the rich flavor of roasted almonds, there’s plenty of room for creativity. The recipe makes enough for 4-6 people, making it perfect for sharing or storing for later enjoyment. With just a few ingredients and minimal effort, you’ll have a batch of these delightful treats ready in no time.
Ingredients (Serves 4-6):
- 1 cup of mixed nuts (such as almonds, walnuts, and pecans)
- 1 cup of mixed dried fruits (such as cranberries, apricots, and raisins)
- 1/2 cup of shredded coconut
- 1/2 cup of dark chocolate chips or chunks
- 2 tablespoons of honey or maple syrup
- 1 teaspoon of vanilla extract
- A pinch of sea salt
Instructions:
- Prepare the Ingredients: Start by gathering all the ingredients and chopping the nuts and dried fruits into smaller, bite-sized pieces. This will guarantee that the clusters hold together well and have a good mix of flavors in each bite.
- Melt the Chocolate: In a microwave-safe bowl, melt the dark chocolate chips or chunks in 30-second intervals, stirring in between, until fully melted and smooth. Alternatively, you can melt the chocolate using a double boiler on the stove.
- Mix the Ingredients: In a large mixing bowl, combine the chopped nuts, dried fruits, shredded coconut, and sea salt. Pour the melted chocolate over the mixture, followed by the honey or maple syrup and vanilla extract. Stir everything together until all the ingredients are well coated with chocolate.
- Form the Clusters: Line a baking tray with parchment paper. Using a spoon, drop small mounds of the mixture onto the tray, shaping them into clusters. Make sure they’re spaced apart to prevent sticking together.
- Chill the Clusters: Place the tray in the refrigerator for about 1-2 hours, or until the clusters have set and the chocolate is firm. If you’re short on time, you can also place them in the freezer for a quicker set.
- Serve and Enjoy: Once set, remove the clusters from the parchment paper and serve them on a festive plate. They can be stored in an airtight container in the refrigerator for up to two weeks.
Extra Tips: To make your Festive Fruit and Nut Clusters even more special, try experimenting with different types of nuts and fruits to find your perfect combination. For added flavor, consider toasting the nuts beforehand for a deeper, nuttier taste. If you wish to make the clusters more indulgent, drizzle a little extra melted chocolate on top before chilling. Remember, these clusters are highly customizable, so feel free to adjust the ingredients to suit your taste or dietary needs.
Lemon Raspberry Cheesecake Cups
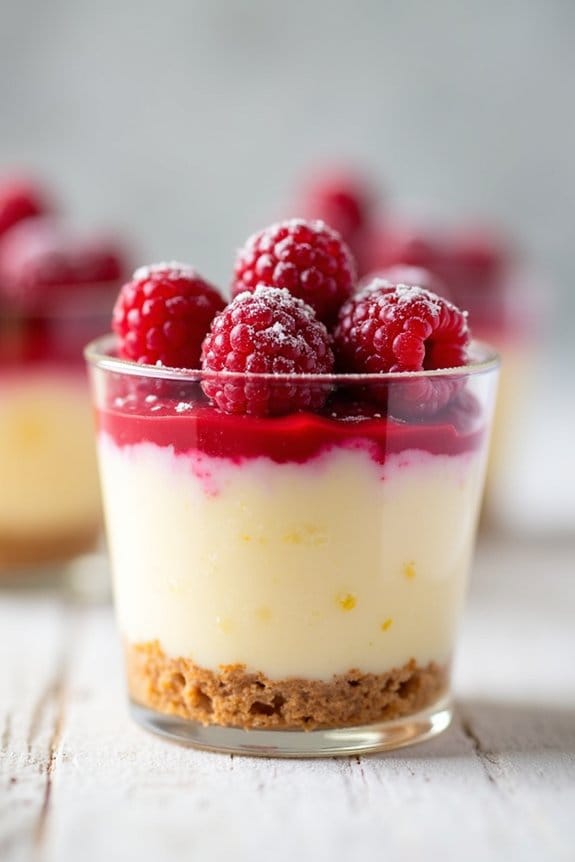
Lemon Raspberry Cheesecake Cups are a delightful and invigorating no-bake dessert option perfect for the holiday season. These individual cups combine the zesty flavor of lemon with the sweet, tart essence of raspberries to create a light yet indulgent treat.
Made with a creamy cheesecake filling, a crisp graham cracker crust, and a topping of fresh raspberries, these cups aren’t only delicious but also visually appealing, making them a wonderful addition to any Christmas dessert table.
The best part about these Lemon Raspberry Cheesecake Cups is that they require no baking, making them simple to prepare ahead of time. They’re ideal for serving 4-6 people, whether you’re hosting a small gathering or contributing to a festive potluck.
With just a few ingredients and minimal effort, you can create a dessert that’s sure to impress your family and friends.
Ingredients (serving size for 4-6 people):
- 1 cup graham cracker crumbs
- 1/4 cup unsalted butter, melted
- 8 oz cream cheese, softened
- 1/2 cup Greek yogurt
- 1/4 cup honey or maple syrup
- 1 teaspoon vanilla extract
- Zest and juice of 1 lemon
- 1 cup fresh raspberries
- 1 tablespoon powdered sugar (optional, for dusting)
Instructions:
- Prepare the Crust: In a medium bowl, combine the graham cracker crumbs and melted butter. Mix until well combined. Spoon about two tablespoons of the mixture into the bottom of each serving glass or cup, pressing down firmly to form a crust. Set aside in the refrigerator to chill while you prepare the filling.
- Make the Cheesecake Filling: In a large mixing bowl, combine the softened cream cheese, Greek yogurt, honey or maple syrup, vanilla extract, lemon zest, and lemon juice. Use an electric mixer to beat the ingredients until the mixture is smooth and creamy.
- Assemble the Cups: Remove the glasses with the crusts from the refrigerator. Evenly distribute the cheesecake filling among the glasses, gently smoothing the tops with a spatula. Top each cheesecake cup with fresh raspberries.
- Chill the Dessert: Place the assembled cups back into the refrigerator to chill for at least 2-3 hours, or until the cheesecake filling is set.
- Serve and Enjoy: Before serving, you may choose to dust the tops of the cups with a little powdered sugar for an extra touch of sweetness and decoration. Serve chilled and enjoy!
Extra Tips:
When preparing these Lemon Raspberry Cheesecake Cups, be sure to use room temperature cream cheese to guarantee a smooth and creamy filling.
If desired, you can substitute Greek yogurt with a dairy-free alternative to make this dessert suitable for those with dietary restrictions.
Additionally, feel free to experiment with other berry toppings or even add a layer of lemon curd between the crust and cheesecake filling for an extra burst of lemon flavor.
These cups can be made a day in advance, making them a perfect stress-free option for holiday gatherings.
Matcha Mint Truffles
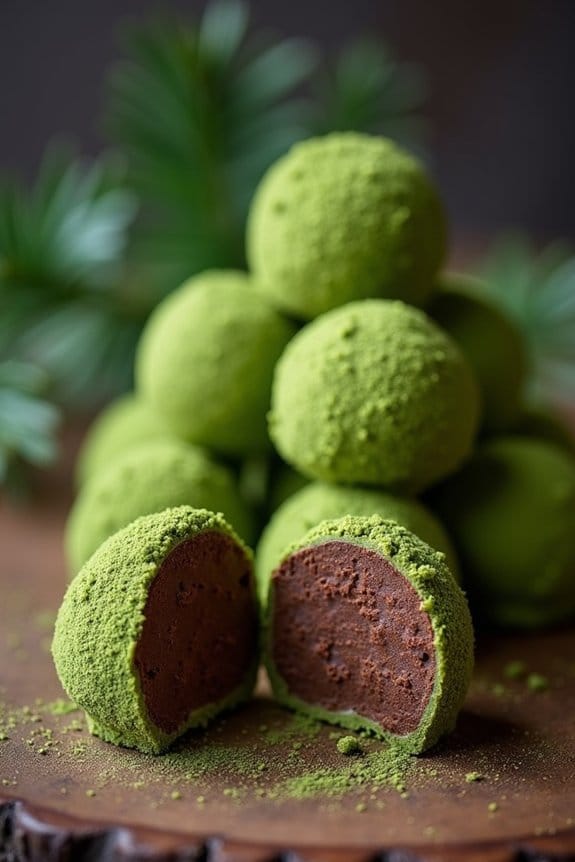
Indulge in the festive spirit this holiday season with a delightful treat that combines the unique flavors of earthy matcha and invigorating mint. These Matcha Mint Truffles are a perfect addition to your Christmas dessert spread, offering a healthier alternative that doesn’t compromise on taste. Made with nutrient-rich ingredients, these truffles aren’t only no-bake but also gluten-free, making them suitable for a variety of dietary preferences.
Prepare these luscious truffles in advance and wow your guests with a dessert that’s as beautiful as it’s delicious. The subtle bitterness of matcha pairs wonderfully with the coolness of mint, creating a harmonious balance that tantalizes the taste buds. The truffles are rolled in a dusting of matcha powder, giving them an elegant green hue that evokes the essence of Christmas.
Whether you’re planning a festive gathering or simply want to enjoy a guilt-free treat, these Matcha Mint Truffles are sure to become a holiday favorite. With a serving size of 4-6 people, this recipe is perfect for sharing with friends and family.
Ingredients (Serves 4-6):
- 1 cup almond flour
- 1/4 cup matcha powder (plus extra for dusting)
- 1/4 cup cocoa powder
- 1/4 cup maple syrup
- 2 tablespoons coconut oil, melted
- 1 teaspoon peppermint extract
- 1/4 teaspoon sea salt
- 1/2 cup dark chocolate chips (optional for coating)
Instructions:
- Mix Dry Ingredients: In a large mixing bowl, combine the almond flour, 1/4 cup matcha powder, cocoa powder, and sea salt. Whisk together until well blended, ensuring there are no lumps in the mixture.
- Add Wet Ingredients: Pour in the maple syrup, melted coconut oil, and peppermint extract into the dry mixture. Stir well until all the ingredients are fully incorporated and the mixture forms a thick dough.
- Shape the Truffles: Using your hands, scoop out about a tablespoon of dough and roll it into a ball. Repeat this process until all the dough is used up. You should end up with approximately 12-15 truffles.
- Optional Chocolate Coating: If you prefer a chocolate-coated truffle, melt the dark chocolate chips in a microwave or double boiler. Once melted, dip each truffle into the chocolate, ensuring it’s fully covered. Place on a baking sheet lined with parchment paper to set.
- Dust with Matcha: Once the chocolate has set (if using), roll the truffles in additional matcha powder for a festive finish. This step is optional if you want a stronger matcha flavor.
- Chill: Place the truffles in the refrigerator for at least 30 minutes to firm up before serving.
Extra Tips: For a more intense mint flavor, you can adjust the amount of peppermint extract to suit your taste, but be cautious as it can quickly become overpowering. If the dough is too sticky to handle, refrigerate it for about 10 minutes before rolling into balls.
Additionally, these truffles can be stored in an airtight container in the fridge for up to a week, making them a convenient make-ahead dessert. Enjoy the balance of flavors and the festive flair they bring to your holiday celebrations!
Raw Chocolate Hazelnut Tart

The Raw Chocolate Hazelnut Tart is a deliciously decadent dessert that’s perfect for the festive season, while still being a healthier option. Completely no-bake and raw, this tart combines the rich flavors of chocolate and hazelnuts, offering a creamy texture that’s certain to satisfy any sweet tooth.
What makes it ideal for Christmas isn’t just its taste, but also the simplicity of preparation, requiring no oven and minimal effort. This tart is naturally sweetened and gluten-free, making it suitable for a variety of dietary preferences.
The base is made from a mixture of nuts and dates, providing a chewy and flavorful foundation, while the filling is a smooth blend of chocolate and hazelnut butter. Topped with crushed hazelnuts or cacao nibs, this dessert is as much a treat for the eyes as it’s for the palate. Serving 4-6 people, it’s perfect for small gatherings or family dinners during the holiday season.
Ingredients:
- 1 cup raw hazelnuts
- 1 cup Medjool dates, pitted
- 1/4 cup raw cacao powder
- 1/4 teaspoon sea salt
- 1 cup hazelnut butter
- 1/2 cup coconut oil, melted
- 1/4 cup maple syrup
- 1 teaspoon vanilla extract
- 1/4 cup cacao nibs or additional hazelnuts for topping
Instructions:
- Prepare the Base: Start by placing the hazelnuts in a food processor. Pulse until they form a fine crumb. Add the Medjool dates, raw cacao powder, and sea salt. Process until the mixture is sticky and holds together when pressed between your fingers.
- Form the Crust: Press the base mixture evenly into the bottom of a tart pan with a removable base. Use the back of a spoon or your fingers to confirm it’s compact and level. Put the crust in the refrigerator to chill while you prepare the filling.
- Make the Filling: In a medium bowl, combine the hazelnut butter, melted coconut oil, maple syrup, and vanilla extract. Whisk together until smooth and well combined.
- Assemble the Tart: Pour the filling mixture over the chilled crust. Spread it evenly with a spatula, confirming it reaches all edges of the crust.
- Add the Toppings: Sprinkle cacao nibs or chopped hazelnuts over the top of the filling for added texture and flavor.
- Chill and Serve: Place the tart in the refrigerator for at least 2 hours, or until the filling is set. Once set, remove from the tart pan, slice, and serve.
Extra Tips:
To guarantee the best texture and flavor, use fresh Medjool dates as they provide the right amount of stickiness to bind the base. If your dates are dry, soak them in warm water for 10 minutes before using.
Make certain all ingredients are at room temperature before mixing, as this will help them combine more smoothly. Additionally, for a more intense chocolate flavor, consider adding a tablespoon of cacao powder into the filling mixture. Enjoy your festive, guilt-free dessert!
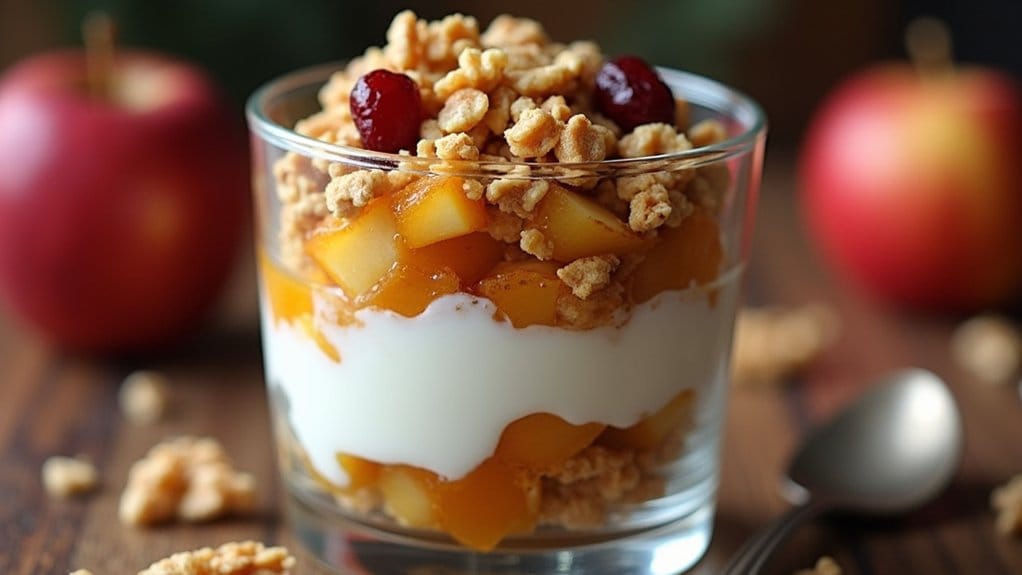
Spiced Apple Pie Parfaits
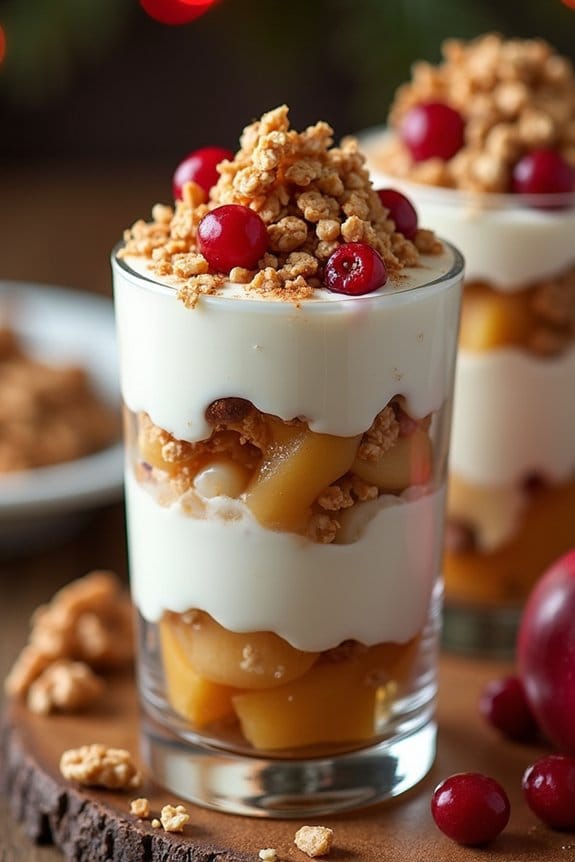
Spiced Apple Pie Parfaits are a delightful addition to your holiday dessert menu, offering a healthy yet indulgent treat without the need for baking. These parfaits combine the classic flavors of apple pie with the convenience of a no-bake dessert, making them perfect for holiday gatherings or a cozy night in.
Each layer is beautifully spiced with cinnamon and nutmeg, providing the warmth and comfort associated with traditional Christmas desserts, while remaining light and invigorating.
The base of this parfait consists of a simple mixture of spiced, diced apples that mimic the filling of an apple pie. These apples are then layered with a creamy yogurt mixture, offering a tangy contrast to the sweet and spicy apples. A crunchy granola topping adds the perfect textural finish to these parfaits, making them both satisfying and nutritious.
Whether served in individual glasses or a larger trifle dish, Spiced Apple Pie Parfaits are sure to impress your guests with their elegant appearance and delightful flavor.
Ingredients (Serves 4-6):
- 4 large apples, peeled, cored, and diced
- 2 teaspoons ground cinnamon
- 1/2 teaspoon ground nutmeg
- 3 tablespoons honey
- 2 cups plain Greek yogurt
- 1 teaspoon vanilla extract
- 1 cup granola
- 1/4 cup chopped walnuts (optional)
- 1/4 cup dried cranberries (optional)
Instructions:
- Prepare the Apples: In a medium-sized bowl, combine the diced apples, ground cinnamon, ground nutmeg, and honey. Stir until the apples are evenly coated with the spices and honey. Let the mixture sit for about 10 minutes to allow the flavors to meld.
- Mix the Yogurt: In another bowl, combine the Greek yogurt and vanilla extract. Stir well until the vanilla is fully incorporated into the yogurt, creating a smooth and creamy texture.
- Assemble the Parfaits: In individual serving glasses or a large trifle dish, begin layering the parfaits. Start with a layer of the spiced apple mixture at the bottom, followed by a layer of the vanilla yogurt. Continue layering until all the ingredients are used, ending with a layer of yogurt on the top.
- Add the Toppings: Sprinkle granola evenly over the top layer of yogurt. If desired, add chopped walnuts and dried cranberries for extra flavor and texture.
- Chill and Serve: Cover the parfaits with plastic wrap and refrigerate for at least 30 minutes to allow the flavors to develop. Serve chilled and enjoy the invigorating taste of these holiday parfaits.
Extra Tips:
Feel free to customize your Spiced Apple Pie Parfaits by using different types of apples according to your taste preference. Granny Smith apples add a tart flavor, while Honeycrisp apples provide a sweeter note.
You can also swap the Greek yogurt for coconut yogurt to make the parfaits dairy-free. Additionally, try experimenting with different granola flavors or nut combinations to find your favorite variation.
These parfaits are highly versatile, allowing you to adjust the ingredients to suit dietary preferences and seasonal availability.
