
Creating a memorable holiday experience starts with a beautifully curated Christmas party buffet. Think of a stunning charcuterie board with gourmet cheeses and cured meats. Add in the vibrant freshness of mini caprese skewers. Picture guests savoring elegant shrimp cocktails and indulging in savory puff pastry bites. These delicious treats set the stage for a festive feast that promises to delight everyone.
Stylish Charcuterie Board

A charcuterie board isn’t only a feast for the taste buds but also a visual delight, making it a perfect centerpiece for any Christmas party buffet. The art of creating a stylish charcuterie board lies in the careful selection and harmonious arrangement of a variety of meats, cheeses, and complementary accompaniments. This board will offer a delightful mix of flavors and textures, with something to please every palate.
To create an impressive charcuterie board for 4-6 people, choose a variety of cured meats and cheeses, along with a selection of fruits, nuts, and spreads to balance the savory elements.
Begin by selecting a large wooden or marble board as the base for your charcuterie array. Start with an assortment of cured meats such as prosciutto, salami, and chorizo, which provide a range of flavors from mild to spicy. Complement these with a variety of cheeses like a creamy brie, a sharp cheddar, or a tangy blue cheese. Add fresh and dried fruits for sweetness, crunchy nuts for texture, and a selection of condiments such as honey or fig jam to tie everything together.
With a bit of creativity and attention to detail, your charcuterie board won’t only be delicious but also visually stunning.
Ingredients (serving size: 4-6 people):
- 100g prosciutto
- 100g salami
- 100g chorizo
- 150g brie cheese
- 150g sharp cheddar cheese
- 150g blue cheese
- 1 cup grapes
- 1 cup dried apricots
- 1/2 cup almonds
- 1/2 cup walnuts
- 1 small jar of honey
- 1 small jar of fig jam
- 1 baguette or a selection of crackers
Instructions:
- Prepare the Board: Choose a large wooden or marble board. Confirm it’s clean and dry before starting the arrangement.
- Arrange the Meats: Roll or fold the prosciutto, salami, and chorizo into attractive shapes and place them in different sections of the board, making sure they’re spread evenly around the board for easy access.
- Add the Cheeses: Cut the brie, cheddar, and blue cheese into slices or wedges and place them adjacent to the meats. Consider leaving some cheeses whole for guests to cut themselves.
- Incorporate Fruits: Distribute the grapes and dried apricots around the board, filling in gaps and adding pops of color.
- Include Nuts: Scatter the almonds and walnuts in small clusters, providing a crunchy texture that complements the softness of the meats and cheeses.
- Add Condiments: Place small bowls of honey and fig jam on the board, using small spoons or spreaders for easy serving.
- Finish with Bread: Slice the baguette or arrange crackers around the edges of the board, allowing guests to create their own combinations.
Extra Tips:
To elevate your charcuterie board, consider adding fresh garnishes like rosemary sprigs or edible flowers for an extra touch of elegance. Use a variety of cracker types for added texture, such as seeded or whole-grain options. Verify all items are bite-sized for easy snacking, and replenish the board throughout the event to keep it looking fresh and inviting.
Finally, allow the cheeses to come to room temperature before serving to enhance their flavors.
Mini Caprese Skewers
- 24 cherry tomatoes
- 24 bocconcini (small mozzarella balls)
- 24 fresh basil leaves
- Balsamic glaze
- Salt and freshly ground black pepper
- 24 wooden skewers or toothpicks
Cooking Instructions:
- Prepare the Ingredients: Start by washing the cherry tomatoes and basil leaves under cool running water. Pat them dry with a clean kitchen towel to remove any excess moisture.
- Assemble the Skewers: Take a wooden skewer or toothpick and begin by threading a cherry tomato onto it. Follow up with a bocconcini, then a basil leaf. Repeat the sequence until each skewer holds one of each ingredient, finishing with a tomato on top. Make sure the ingredients are tightly packed but not squished.
- Season the Skewers: Once all the skewers are assembled, lay them out on a serving platter. Lightly sprinkle them with salt and freshly ground black pepper to enhance the flavors of the tomatoes and mozzarella.
- Add the Finishing Touch: Drizzle a generous amount of balsamic glaze over the skewers. This will add a sweet-tangy element that complements the fresh ingredients beautifully.
- Chill Before Serving: If preparing in advance, cover the platter with plastic wrap and refrigerate for up to 2 hours. This will allow the flavors to meld together. Serve cold or at room temperature.
Extra Tips:
For the best flavor, use high-quality balsamic glaze or make your own by reducing balsamic vinegar with a bit of sugar until thick and syrupy.
If bocconcini aren’t available, fresh mozzarella can be cut into small cubes as a substitute.
Additionally, if you’re serving a large crowd, consider doubling or tripling the ingredients to make certain everyone gets a taste of these delightful skewers.
Elegant Shrimp Cocktail

The key to a successful shrimp cocktail is using high-quality, fresh shrimp and a well-balanced cocktail sauce. The shrimp should be perfectly cooked, tender, and flavorful, while the sauce should have the right balance of tanginess and spice.
Preparing this dish in advance allows you to focus on other party preparations, ensuring a stress-free hosting experience. Let’s explore the recipe for this elegant shrimp cocktail, serving 4-6 people.
Ingredients:
- 2 pounds of large shrimp, peeled and deveined
- 1 lemon, halved
- 1 tablespoon of Old Bay seasoning
- 1 cup of ketchup
- 2 tablespoons of prepared horseradish
- 1 tablespoon of lemon juice
- 1 teaspoon of Worcestershire sauce
- 1/2 teaspoon of hot sauce (optional)
- Salt to taste
- Fresh parsley for garnish
- Ice for chilling
Cooking Instructions:
- Prepare the Shrimp:
- Fill a large pot with water and bring it to a boil. Add the halved lemon and Old Bay seasoning to the water.
- Once the water is boiling, add the shrimp and cook for 2-3 minutes, or until the shrimp are pink and opaque. Be careful not to overcook them as they’ll become rubbery.
- Chill the Shrimp:
- Remove the shrimp from the boiling water and immediately transfer them to an ice bath to stop the cooking process. This will also help chill the shrimp quickly. Let them sit in the ice bath for about 5 minutes.
- Prepare the Cocktail Sauce:
- In a medium bowl, combine the ketchup, horseradish, lemon juice, Worcestershire sauce, and hot sauce. Mix well until all ingredients are fully incorporated. Taste and add salt if necessary.
- Serve:
- Arrange the chilled shrimp on a platter with a small bowl of cocktail sauce in the center. Garnish with fresh parsley and lemon wedges for a festive touch.
Extra Tips:
For the best flavor, select shrimp with the shell on, as they tend to be fresher. If you’re in a hurry, pre-cooked shrimp can be used, but the flavor won’t be as rich.
When making the cocktail sauce, adjust the amount of horseradish and hot sauce based on your preference for spiciness. Preparing the sauce a day in advance allows the flavors to meld, enhancing the overall taste.
Festive Cheese Ball
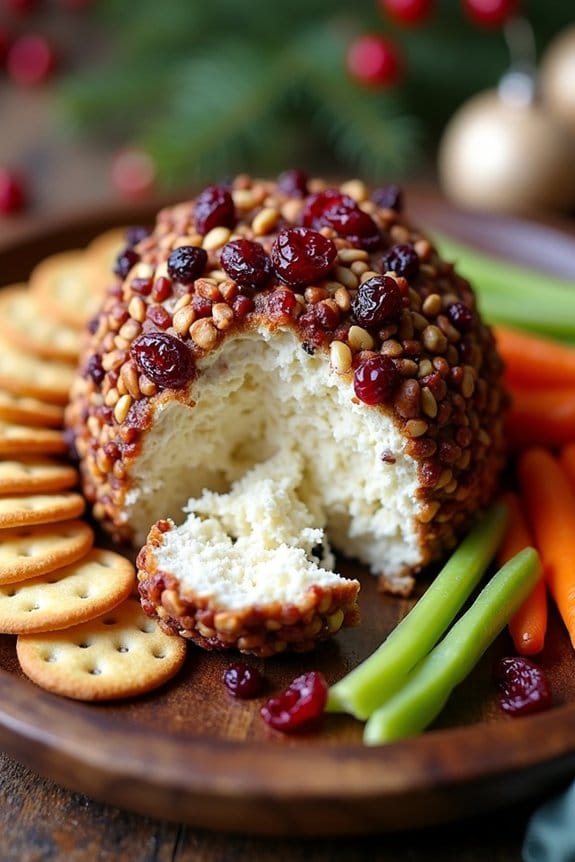
The Festive Cheese Ball is a delightful and versatile addition to any Christmas party buffet. This dish not only looks impressive but is also bursting with flavor, making it a guaranteed crowd-pleaser. With a blend of cheeses, herbs, and nuts, this cheese ball is both savory and creamy, offering a perfect accompaniment to crackers, breadsticks, or vegetable sticks. The best part is that it can be prepared ahead of time, allowing you to focus on other party preparations.
Creating a Festive Cheese Ball is straightforward, yet it allows for creativity in presentation and flavor. The cheese ball can be rolled in a variety of coatings to add texture and interest, such as chopped nuts, fresh herbs, or even dried cranberries for a hint of sweetness. This recipe is designed to serve 4-6 people, making it ideal for smaller gatherings or as part of a larger spread.
Ingredients (serving size: 4-6 people):
- 8 oz cream cheese, softened
- 1 cup sharp cheddar cheese, shredded
- 1/4 cup blue cheese, crumbled
- 1/4 cup green onions, finely chopped
- 1 teaspoon Worcestershire sauce
- 1 teaspoon garlic powder
- 1/2 teaspoon black pepper
- 1/2 cup chopped pecans
- 1/4 cup dried cranberries
- Crackers or breadsticks, for serving
Cooking Instructions:
- Prepare the Cheese Mixture: In a large mixing bowl, combine the softened cream cheese, shredded sharp cheddar cheese, and crumbled blue cheese. Mix thoroughly until the ingredients are well integrated and smooth.
- Add Flavorings: Stir in the finely chopped green onions, Worcestershire sauce, garlic powder, and black pepper. Mix until all the ingredients are evenly distributed throughout the cheese mixture.
- Shape the Cheese Ball: Lay a large piece of plastic wrap on your work surface. Scoop the cheese mixture onto the center of the wrap. Use the wrap to help you form the cheese mixture into a ball shape, guaranteeing it’s compact and smooth.
- Coat the Cheese Ball: Spread the chopped pecans and dried cranberries on a flat plate. Unwrap the cheese ball and gently roll it over the pecans and cranberries, pressing slightly to confirm they adhere to the surface. Continue until the entire cheese ball is covered.
- Chill and Set: Wrap the coated cheese ball in a fresh piece of plastic wrap and refrigerate for at least 1-2 hours, or until firm. This will help the flavors meld together and make the cheese ball easier to handle when serving.
- Serve: Once chilled, unwrap the cheese ball and place it on a serving platter. Surround it with crackers or breadsticks for dipping and enjoy!
Extra Tips:
For a more personalized touch, consider experimenting with different types of cheese or herbs based on your preferences. If you prefer a spicier kick, try adding a pinch of cayenne pepper or a splash of hot sauce to the cheese mixture.
Additionally, if you’re preparing the cheese ball well in advance, it can be stored wrapped tightly in plastic wrap in the refrigerator for up to 3 days. Just make sure it’s brought to room temperature before serving to enhance its creamy texture.
Savory Puff Pastry Bites
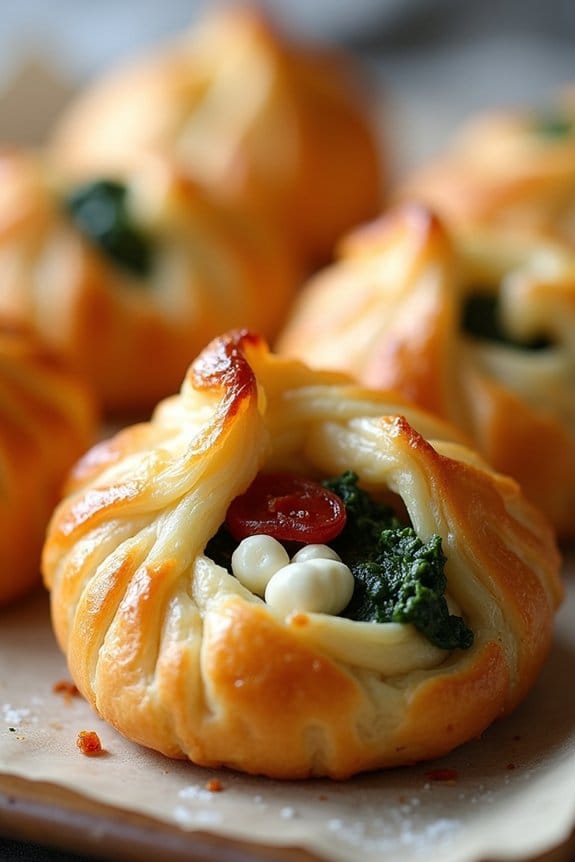
Savory Puff Pastry Bites are a delightful addition to any Christmas party buffet, offering both a flaky texture and a burst of flavors with every bite. These versatile appetizers can be filled with a variety of ingredients, making them a crowd-pleaser for guests with different tastes.
Whether you prefer a classic combination of spinach and cheese or a rich mix of mushrooms and herbs, these puff pastry bites are bound to impress. The best part? They’re simple to prepare and can be made ahead of time, allowing you to enjoy the festivities without being stuck in the kitchen.
The key to achieving the perfect puff pastry bite is using high-quality puff pastry sheets and guaranteeing the fillings are well-seasoned. Each bite should be a harmonious blend of crisp, golden pastry and a savory center. This recipe provides a filling made with spinach, feta cheese, and sun-dried tomatoes, creating a Mediterranean-inspired flavor profile.
Perfect for a serving size of 4-6 people, these bites are sure to be a hit at your holiday gathering.
Ingredients:
- 1 package (approximately 17.3 ounces) of frozen puff pastry sheets, thawed
- 1 cup fresh spinach, chopped
- 1/2 cup feta cheese, crumbled
- 1/4 cup sun-dried tomatoes, chopped
- 1 clove garlic, minced
- 1 tablespoon olive oil
- 1 egg, beaten (for egg wash)
- Salt and pepper to taste
Instructions:
1. Preheat the Oven: Begin by preheating your oven to 400°F (200°C). This guarantees that your puff pastry bites will bake evenly and achieve the desired golden brown color.
2. Prepare the Filling: In a skillet, heat the olive oil over medium heat. Add the minced garlic and sauté for about 1 minute until fragrant. Add the chopped spinach and cook until wilted, about 2-3 minutes. Remove from heat and let it cool slightly.
Once cooled, combine the spinach with the crumbled feta cheese and chopped sun-dried tomatoes. Season with salt and pepper to taste.
3. Prepare the Puff Pastry: Roll out the thawed puff pastry sheets on a lightly floured surface. Cut each sheet into squares, approximately 3×3 inches in size. You should have about 16 squares in total.
4. Assemble the Bites: Place a spoonful of the spinach mixture in the center of each puff pastry square. Fold the corners over the filling to form a small pouch. Guarantee the edges are sealed by pressing them together.
5. Apply the Egg Wash: Place the assembled puff pastry bites onto a baking sheet lined with parchment paper. Brush each bite with the beaten egg to give them a shiny, golden finish when baked.
6. Bake: Place the baking sheet in the preheated oven and bake for about 15-20 minutes, or until the puff pastry is puffed and golden brown. Remove from the oven and let them cool slightly before serving.
Extra Tips:
When working with puff pastry, always keep it cool; if it becomes too warm, it can become sticky and difficult to handle. If you find the pastry is warming up too much, place it in the refrigerator for a few minutes before continuing.
Feel free to experiment with different fillings, such as mushrooms and goat cheese or ham and cheddar, to suit your guests’ preferences. These bites can be prepared a day in advance and baked just before serving to guarantee they’re fresh and crisp for your party.
Glazed Ham Sliders

Glazed Ham Sliders are a delightful addition to any Christmas party buffet. These savory and sweet sandwiches combine the rich flavors of glazed ham with the soft, buttery texture of slider buns. Each bite-sized sandwich is packed with flavor, making them an irresistible treat for your guests. Perfect for serving at a festive gathering, these sliders are easy to prepare and are guaranteed to be a crowd-pleaser.
To create Glazed Ham Sliders, you’ll need to prepare a succulent glazed ham, slice it thinly, and assemble it into sliders using soft rolls. The glaze, typically made with a blend of sweet and tangy ingredients, adds an extra layer of flavor that complements the salty ham perfectly. This recipe serves 4-6 people, making it ideal for a small gathering or as part of a larger buffet spread.
Ingredients:
- 1 lb of sliced glazed ham
- 12 slider rolls
- 1/2 cup of Dijon mustard
- 1/4 cup of honey
- 1/4 cup of unsalted butter, melted
- 1 tablespoon of brown sugar
- 1 tablespoon of poppy seeds
- 1 teaspoon of Worcestershire sauce
- 1/2 teaspoon of garlic powder
- 1/4 teaspoon of salt
- 1/4 teaspoon of black pepper
Cooking Instructions:
- Preheat the Oven: Begin by preheating your oven to 350°F (175°C). This will guarantee that your sliders bake evenly.
- Prepare the Glaze: In a small bowl, combine the Dijon mustard, honey, melted butter, brown sugar, Worcestershire sauce, garlic powder, salt, and pepper. Mix well until all ingredients are thoroughly combined to form a smooth glaze.
- Prepare the Slider Rolls: Slice the slider rolls in half horizontally without separating them completely. This will create a top and bottom layer for your sliders.
- Assemble the Sliders: Place the bottom half of the slider rolls in a baking dish. Spread a generous layer of the prepared glaze over the bottom half, then layer the sliced glazed ham evenly on top. Cover with the top half of the slider rolls.
- Add Final Touches: Brush the remaining glaze on top of the slider rolls. Sprinkle the poppy seeds evenly over the top.
- Bake the Sliders: Cover the baking dish with aluminum foil and bake in the preheated oven for 15 minutes. After 15 minutes, remove the foil and bake for an additional 10 minutes, or until the tops are golden and the glaze is bubbly.
- Serve and Enjoy: Once baked, remove the sliders from the oven and let them cool slightly before serving. Cut along the roll lines to create individual sliders.
Extra Tips: When preparing Glazed Ham Sliders, you can customize the glaze to suit your taste by adding a bit of spice, such as cayenne pepper or hot sauce, for a kick. If you have leftover ham from another meal, this recipe is a great way to use it up.
Additionally, you can prepare the sliders a day in advance and store them in the refrigerator, then simply bake them before serving to save time on the day of your event.
Cranberry Brie Tarts
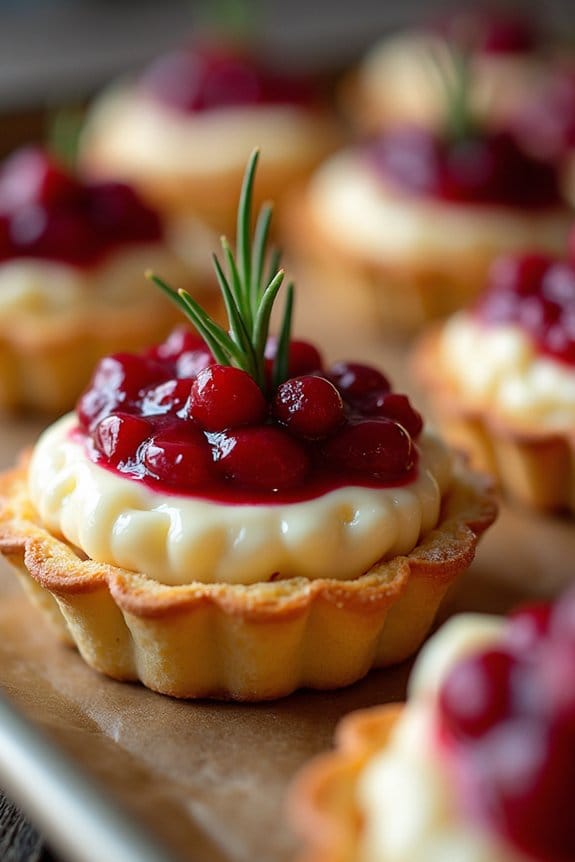
Cranberry Brie Tarts are a delightful addition to any Christmas party buffet, offering a perfect blend of creamy brie cheese, tangy cranberry sauce, and flaky puff pastry.
These bite-sized treats aren’t only visually appealing but also incredibly delicious, making them a hit with party guests. The combination of sweet and savory flavors makes these tarts a versatile option that can be enjoyed by both cheese lovers and those with a sweet tooth.
Preparing Cranberry Brie Tarts is relatively simple and requires only a few key ingredients. The luscious taste of melted brie paired with tart cranberries results in a flavor explosion.
These tarts can be prepared ahead of time, making them a convenient choice for holiday gatherings. Here’s a recipe to make Cranberry Brie Tarts that will serve approximately 4-6 people.
Ingredients:
- 1 sheet of puff pastry, thawed
- 8 oz brie cheese, cut into small pieces
- 1 cup cranberry sauce (homemade or store-bought)
- 1 egg, beaten (for egg wash)
- Fresh rosemary sprigs (optional, for garnish)
Instructions:
- Prepare the Puff Pastry: Preheat the oven to 375°F (190°C). Roll out the thawed puff pastry sheet on a lightly floured surface. Trim the edges and cut the pastry into 12 equal squares or rectangles, depending on your preference.
- Prepare the Baking Tray: Line a baking tray with parchment paper. Place the cut puff pastry squares on the prepared baking tray, ensuring they’re evenly spaced.
- Assemble the Tarts: Place a small piece of brie cheese in the center of each puff pastry square. Top the brie with a spoonful of cranberry sauce. Be careful not to overfill, as the sauce will spread as it bakes.
- Apply Egg Wash: Brush the edges of the puff pastry squares with the beaten egg. This will help give the tarts a golden-brown finish and help the edges puff up during baking.
- Bake: Place the tray in the preheated oven and bake for 15-20 minutes, or until the pastry is golden brown and puffed up. The cheese should be melted and bubbly by this point.
- Garnish and Serve: Remove the tarts from the oven and allow them to cool for a few minutes. Garnish each tart with a small sprig of fresh rosemary for an added touch of elegance and a hint of aromatic flavor.
Extra Tips: To save time, you can prepare the puff pastry squares and cut the brie ahead of time, storing them in the refrigerator until you’re ready to assemble and bake.
If using store-bought cranberry sauce, consider adding a dash of orange zest or a sprinkle of cinnamon to enhance the flavor. Additionally, try experimenting with different types of jams or jellies, such as fig or apricot, for variations on this recipe.
Smoked Salmon Canapés
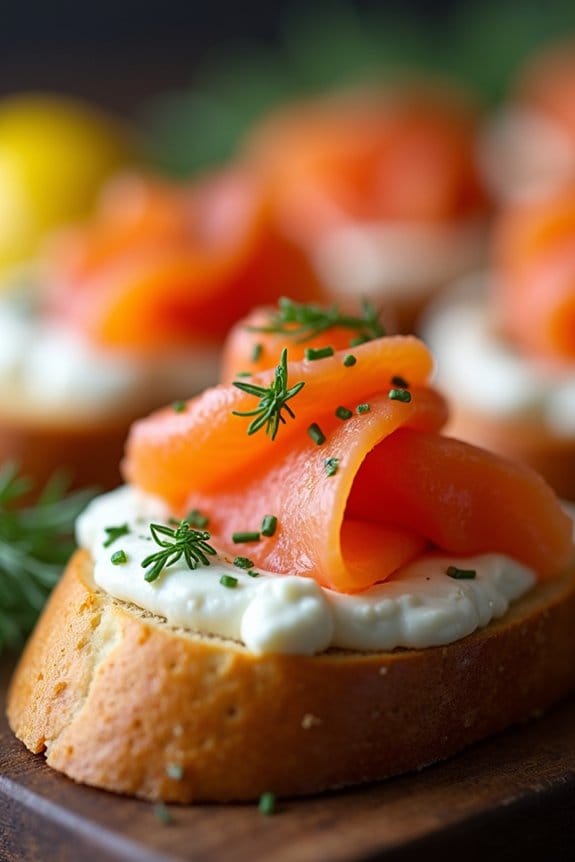
Smoked salmon canapés are a delightful addition to any Christmas party buffet. These elegant bite-sized treats aren’t only visually appealing but also pack a punch of flavor. With a creamy, tangy base topped with savory smoked salmon and a hint of fresh herbs, these canapés will undoubtedly impress your guests.
They’re also simple to prepare, allowing you to spend more time enjoying the festivities rather than being tied up in the kitchen.
The key to a successful canapé is in the balance of flavors and textures. The creaminess of the topping should complement the smoky richness of the salmon, while the crunchy base provides a satisfying contrast. These canapés can be made ahead of time, making them a convenient choice for a busy holiday party schedule.
Below, you’ll find a recipe to serve 4-6 people, perfect for a festive gathering.
Ingredients (Serves 4-6):
- 12 slices of smoked salmon
- 1 French baguette or 12 small rye bread slices
- 8 oz (225 g) cream cheese
- 2 tablespoons sour cream
- 1 tablespoon lemon juice
- 1 tablespoon capers, finely chopped
- 1 tablespoon fresh dill, chopped
- 1 tablespoon fresh chives, chopped
- Salt and pepper to taste
- Lemon wedges for garnish
Cooking Instructions:
- Prepare the Base: Slice the French baguette into 12 even slices, about 1/2 inch thick. Alternatively, you can use small rye bread slices. Toast them lightly in a preheated 350°F (175°C) oven for about 5 minutes until they’re crisp and golden. Remove and let cool.
- Make the Cream Cheese Mixture: In a medium bowl, combine the cream cheese, sour cream, lemon juice, chopped capers, and half of the fresh dill. Mix until smooth and well combined. Season with salt and pepper to taste.
- Assemble the Canapés: Spread a generous spoonful of the cream cheese mixture onto each toasted bread slice. Confirm the mixture is evenly distributed to cover the entire surface.
- Add the Smoked Salmon: Take a slice of smoked salmon and gently roll or fold it to create a decorative shape. Place it on top of the cream cheese layer on each canapé.
- Garnish: Sprinkle the remaining dill and the chopped chives over the top of the canapés. Add a small wedge of lemon on the side for an extra touch of elegance and a pop of color.
Extra Tips:
When preparing smoked salmon canapés, freshness is key—always use high-quality smoked salmon for the best flavor.
You can prepare the cream cheese mixture a day in advance and store it in the refrigerator, which will help save time on the day of your party. Just before serving, allow the canapés to sit at room temperature for a few minutes; this brings out the flavors more robustly.
If you like a bit of spice, consider adding a small pinch of cayenne pepper to the cream cheese mixture for a subtle kick. Enjoy the festive flavors these canapés bring to your holiday celebrations!
Roasted Vegetable Platter
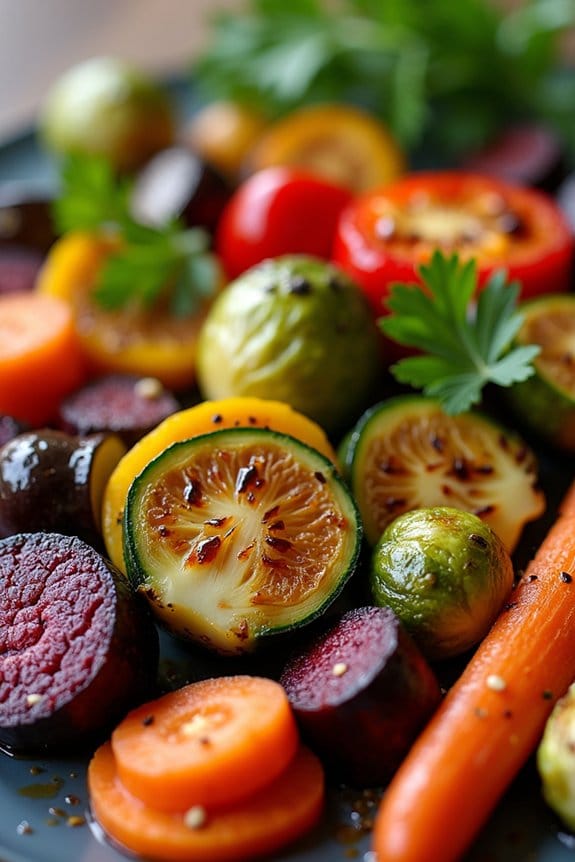
A roasted vegetable platter is a colorful and delicious addition to any Christmas party buffet. This dish not only adds a vibrant touch to your table but also caters to a variety of dietary preferences, making it a perfect choice for gatherings with diverse guests. The vegetables are roasted to perfection, enhancing their natural flavors and offering a delightful mix of textures. The combination of seasonal vegetables guarantees a rich array of tastes, from the sweetness of carrots to the earthiness of beets and the subtly savory notes of brussels sprouts.
Preparing a roasted vegetable platter is a straightforward process that allows for creativity and personalization. You can select a variety of vegetables based on availability, preference, or even color coordination to match your festive theme. With a simple seasoning of olive oil, herbs, and spices, the vegetables transform into a delectable dish that’s both healthy and satisfying. This platter serves as a beautiful centerpiece and is sure to be a crowd-pleaser at your Christmas celebration.
Ingredients for a serving size of 4-6 people:
- 2 large carrots
- 2 red bell peppers
- 1 large zucchini
- 1 medium eggplant
- 1 pound brussels sprouts
- 2 medium beets
- 1 red onion
- 1/4 cup olive oil
- 2 teaspoons salt
- 1 teaspoon black pepper
- 2 teaspoons dried thyme
- 2 teaspoons dried rosemary
- 1 tablespoon balsamic vinegar
- Fresh parsley for garnish
Cooking Instructions:
- Preheat the Oven: Set your oven to 400°F (200°C) to make sure it reaches the proper temperature while you prepare the vegetables. This temperature is ideal for roasting, allowing the vegetables to cook evenly and develop a slight caramelization.
- Prepare the Vegetables: Wash all the vegetables thoroughly. Peel the carrots and beets, then cut them into uniform pieces. Slice the bell peppers, zucchini, and eggplant into strips. Halve the brussels sprouts and slice the red onion into thick wedges. Uniform cutting guarantees even cooking.
- Season the Vegetables: In a large mixing bowl, combine the prepared vegetables. Drizzle them with olive oil, and sprinkle with salt, black pepper, dried thyme, and dried rosemary. Toss everything together until the vegetables are well coated with the oil and seasoning.
- Arrange on a Baking Sheet: Line a large baking sheet with parchment paper or a silicone baking mat. Spread the seasoned vegetables in a single layer on the sheet, making sure they aren’t overcrowded. This allows them to roast rather than steam.
- Roast the Vegetables: Place the baking sheet in the preheated oven and roast for 25-30 minutes, or until the vegetables are tender and slightly browned around the edges. Stir the vegetables halfway through the cooking time to make sure of even roasting.
- Finish with Balsamic Vinegar: Once roasted, remove the vegetables from the oven and drizzle with balsamic vinegar. Toss gently to coat the vegetables with the vinegar’s tangy flavor.
- Garnish and Serve: Transfer the roasted vegetables to a serving platter. Garnish with freshly chopped parsley for an added burst of color and freshness. Serve warm or at room temperature as part of your Christmas buffet.
Extra Tips:
For the best flavor, try to select vegetables that are in season, as they tend to be fresher and more flavorful. You can also experiment with different herbs and spices to suit your taste preferences—adding garlic powder, paprika, or cumin can introduce new dimensions to the dish.
If you prefer a bit of sweetness, consider adding a drizzle of honey or maple syrup before roasting. Finally, make sure the vegetables are spread out evenly on the baking sheet to prevent steaming, which can result in a less crispy texture.
Assorted Holiday Dips
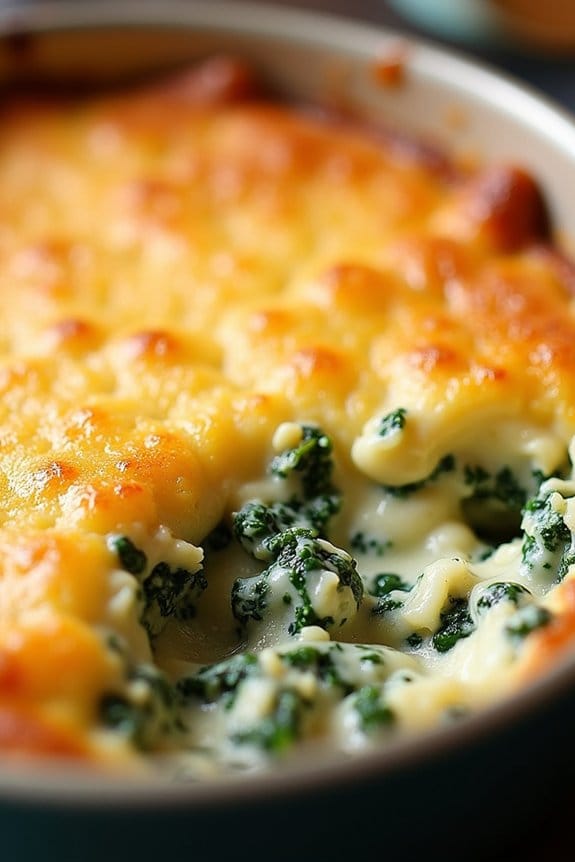
A Christmas party buffet isn’t complete without a selection of delightful dips that keep guests coming back for more. One classic favorite that never disappoints is the Festive Spinach Artichoke Dip. This creamy, cheesy dip combines the earthy flavors of spinach with the tangy taste of artichokes, creating a warm and comforting dish that pairs perfectly with crackers, bread, or fresh vegetables. Not only is it delicious, but this dip is also easy to prepare, making it an ideal choice for busy holiday hosts.
The Festive Spinach Artichoke Dip can be made in advance and simply reheated when your guests arrive, allowing you to spend more time enjoying the festivities. Its rich, velvety texture is achieved by blending cream cheese, sour cream, and a mix of cheeses, which are then combined with sautéed spinach and artichokes. Topped with a sprinkle of Parmesan cheese, the dip is baked until bubbly and golden brown, guaranteeing a dish that’s not only visually appealing but also irresistibly tasty.
Ingredients (serves 4-6 people):
- 1 tablespoon olive oil
- 1 cup frozen chopped spinach, thawed and drained
- 1 cup canned artichoke hearts, drained and chopped
- 1 cup cream cheese, softened
- 1/2 cup sour cream
- 1/2 cup mayonnaise
- 1 cup shredded mozzarella cheese
- 1/2 cup grated Parmesan cheese, divided
- 2 cloves garlic, minced
- 1/2 teaspoon salt
- 1/4 teaspoon black pepper
- 1/4 teaspoon red pepper flakes (optional)
Cooking Instructions:
- Preheat the Oven: Start by preheating your oven to 375°F (190°C). This will guarantee that your dip bakes evenly and achieves a golden-brown crust.
- Prepare the Spinach and Artichokes: Heat the olive oil in a skillet over medium heat. Add the minced garlic and sauté for about 1 minute, until fragrant. Stir in the drained spinach and artichokes, and cook for another 2-3 minutes. This step helps to infuse the vegetables with flavor and remove excess moisture.
- Mix the Creamy Base: In a large mixing bowl, combine the softened cream cheese, sour cream, and mayonnaise. Mix until smooth and well-blended. Add the sautéed spinach and artichokes, mozzarella cheese, half of the Parmesan cheese, salt, pepper, and red pepper flakes (if using). Stir until all ingredients are evenly distributed.
- Transfer to Baking Dish: Spoon the mixture into a baking dish, spreading it out evenly. Sprinkle the remaining Parmesan cheese over the top to create a delicious cheesy crust.
- Bake the Dip: Place the baking dish in the preheated oven and bake for 20-25 minutes, or until the top is bubbly and golden brown. Allow the dip to cool for a few minutes before serving.
Extra Tips:
To make your Festive Spinach Artichoke Dip even more special, consider adding a splash of lemon juice for a fresh zing or a dash of nutmeg for a hint of warmth. If you prefer a bit of heat, the optional red pepper flakes will add a subtle kick.
This dip can also be made a day in advance and stored in the refrigerator, allowing you to simply bake it just before serving. Remember, it pairs wonderfully with a variety of dippers like sliced baguette, pita chips, or an assortment of fresh veggies, so be creative with your presentation!
Chocolate Fondue Station
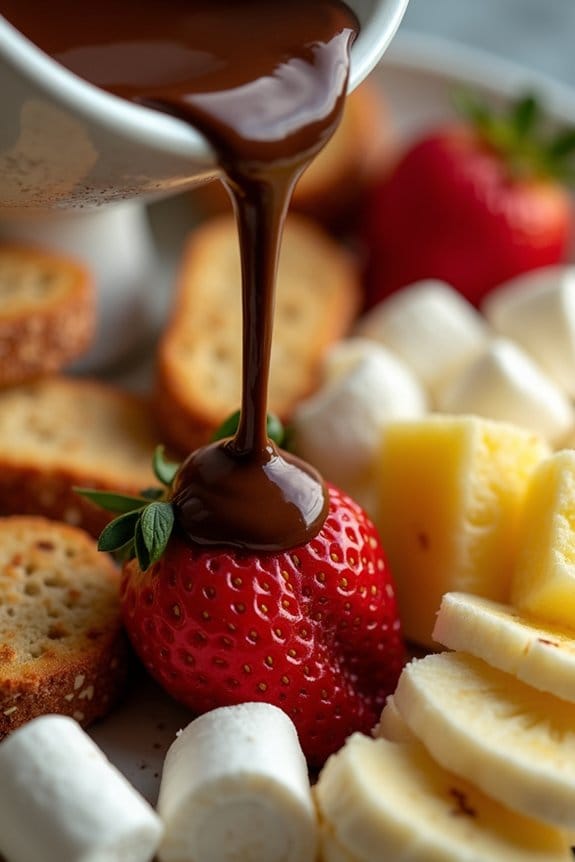
A Chocolate Fondue Station is a delightful addition to any Christmas party buffet, offering a fun and interactive dessert experience for guests. With its rich, velvety chocolate and an assortment of dippable treats, it becomes a festive centerpiece that encourages mingling and brings out the inner child in everyone.
This simple yet indulgent setup allows guests to customize their dessert experience, dipping fruits, marshmallows, or even pretzels into warm, melted chocolate.
The key to a successful Chocolate Fondue Station lies in the quality of the chocolate and the variety of items available for dipping. For a serving size of 4-6 people, you’ll want to guarantee that your chocolate fondue is smooth and creamy, while providing a balance of sweet, salty, and fruity options for your guests to enjoy.
This recipe will guide you through creating the perfect chocolate fondue and offer tips on setting up an inviting station that will be a hit at your holiday gathering.
Ingredients:
- 12 oz (340g) high-quality dark chocolate, chopped
- 1 cup (240ml) heavy cream
- 2 tablespoons unsalted butter
- 1 teaspoon vanilla extract
- A pinch of salt
For Dipping:
- Fresh strawberries, washed and hulled
- Banana slices
- Pineapple chunks
- Marshmallows
- Pretzel sticks
- Biscotti or shortbread cookies
Cooking Instructions:
- Prepare the Chocolate Mixture:
- In a medium saucepan over low heat, combine the chopped dark chocolate, heavy cream, and unsalted butter. Stir constantly with a rubber spatula until the chocolate is completely melted and the mixture is smooth and glossy.
- Enhance the Flavor:
- Once the chocolate mixture is smooth, remove it from the heat. Stir in the vanilla extract and a pinch of salt. The vanilla adds depth to the chocolate flavor, while the salt enhances its sweetness.
- Transfer to Fondue Pot:
- Pour the chocolate mixture into a fondue pot or a heat-proof bowl placed over a gentle heat source, such as a tealight or fondue burner, to keep the chocolate warm and melted. Stir occasionally to maintain a smooth consistency.
- Set Up the Dipping Station:
- Arrange the prepared fruits, marshmallows, pretzel sticks, and cookies around the fondue pot. Provide skewers or fondue forks for guests to use when dipping their chosen treats into the chocolate.
- Serve and Enjoy:
- Encourage guests to mix and match the dipping items, experimenting with different flavor combinations. Replenish the dipping items as needed to guarantee everyone gets to enjoy the fondue experience.
Extra Tips:
To make your Chocolate Fondue Station even more inviting, consider adding a few additional flavor options to your setup. You can offer a bowl of toasted coconut, crushed nuts, or mini chocolate chips for guests to sprinkle over their dipped items.
Additionally, if you’re expecting a larger crowd, consider preparing a variety of chocolate types—such as milk chocolate or white chocolate—in separate fondue pots to cater to different tastes.
Remember to keep the fondue warm throughout the party, as chocolate tends to thicken as it cools, which could make dipping more difficult.
Decadent Yule Log Cake
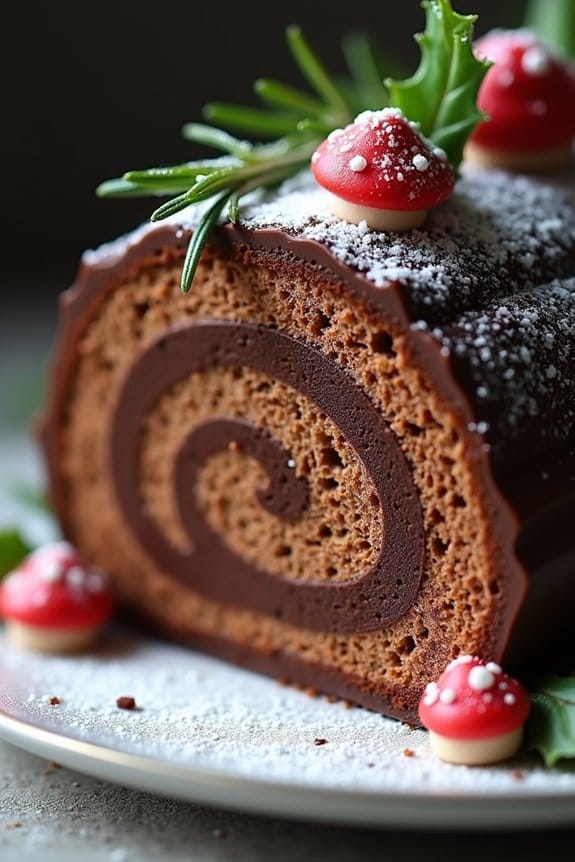
The Decadent Yule Log Cake, also known as Bûche de Noël, is a traditional Christmas dessert that brings a touch of elegance and festivity to any holiday buffet. This classic French dessert features a light and airy sponge cake rolled with a rich, creamy filling, and beautifully decorated to resemble a yule log. It’s perfect for delighting guests at your Christmas party with its combination of luscious flavors and stunning presentation.
A Yule Log Cake typically involves baking a genoise sponge cake, spreading it with a delicious filling like chocolate mousse or buttercream, and then rolling it up into a log shape. The exterior is traditionally coated with a chocolate ganache or buttercream, textured to mimic tree bark, and garnished with confectionery mushrooms, holly leaves, or a dusting of powdered sugar to resemble snow. Here’s how you can prepare this delightful dessert to serve 4-6 people.
Ingredients:
- For the Sponge Cake:
- 4 large eggs
- 1/2 cup granulated sugar
- 1 teaspoon vanilla extract
- 1/2 cup all-purpose flour
- 1/4 cup unsweetened cocoa powder
- 1/4 teaspoon salt
- For the Filling:
- 1 cup heavy cream
- 2 tablespoons powdered sugar
- 1 teaspoon vanilla extract
- For the Chocolate Ganache:
- 1 cup heavy cream
- 8 ounces semi-sweet chocolate, finely chopped
- Optional Decorations:
- Powdered sugar
- Confectionery mushrooms
- Fresh rosemary sprigs or edible holly leaves
Instructions:
- Preheat and Prepare: Preheat your oven to 350°F (175°C). Line a 10×15-inch jelly roll pan with parchment paper, making sure the paper extends slightly over the edges for easy lifting later.
- Make the Sponge Cake Batter: In a large bowl, beat the eggs and sugar together using an electric mixer on high speed until the mixture is thick and pale, about 5 minutes. Add the vanilla extract and mix briefly to combine. In a separate bowl, sift together the flour, cocoa powder, and salt. Gently fold the dry ingredients into the egg mixture in batches until just combined.
- Bake the Cake: Pour the batter into the prepared pan, spreading it evenly. Bake for 10-12 minutes, or until the cake springs back when lightly touched. While the cake is baking, prepare a clean kitchen towel by dusting it generously with powdered sugar.
- Roll the Cake: Once baked, immediately invert the cake onto the prepared towel. Carefully peel off the parchment paper. Starting from a short edge, roll the cake and towel together into a log shape. Let it cool completely on a wire rack.
- Prepare the Filling: In a chilled bowl, whip the heavy cream, powdered sugar, and vanilla extract together until stiff peaks form.
- Unroll and Fill the Cake: Gently unroll the cooled cake and spread the filling evenly over the surface. Re-roll the cake (without the towel) tightly and place it seam-side down on a serving platter.
- Make the Ganache: Heat the heavy cream in a saucepan over medium heat until it just begins to simmer. Remove from heat and pour over the chopped chocolate. Let it sit for a minute, then stir until smooth and glossy.
- Decorate the Cake: Spread the ganache over the rolled cake, using a spatula to create a bark-like texture. Decorate with confectionery mushrooms, fresh rosemary sprigs, or edible holly leaves. Dust with powdered sugar to simulate snow if desired.
Extra Tips:
To guarantee your Decadent Yule Log Cake turns out perfectly, make sure to roll the sponge cake while it’s still warm to prevent cracking. Additionally, allow the ganache to cool slightly before spreading it on the cake for better texture and easier manipulation.
To make the cake even more festive, consider adding a touch of brandy or rum to the filling for a subtle depth of flavor. Finally, refrigerate the cake for at least an hour before serving to allow the flavors to meld and the ganache to set.
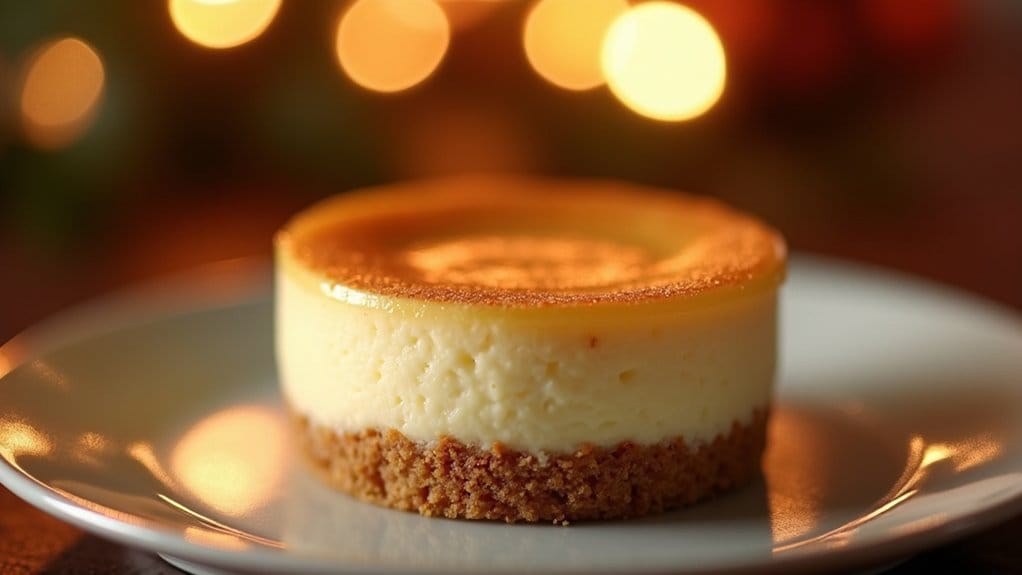
Miniature Dessert Assortment
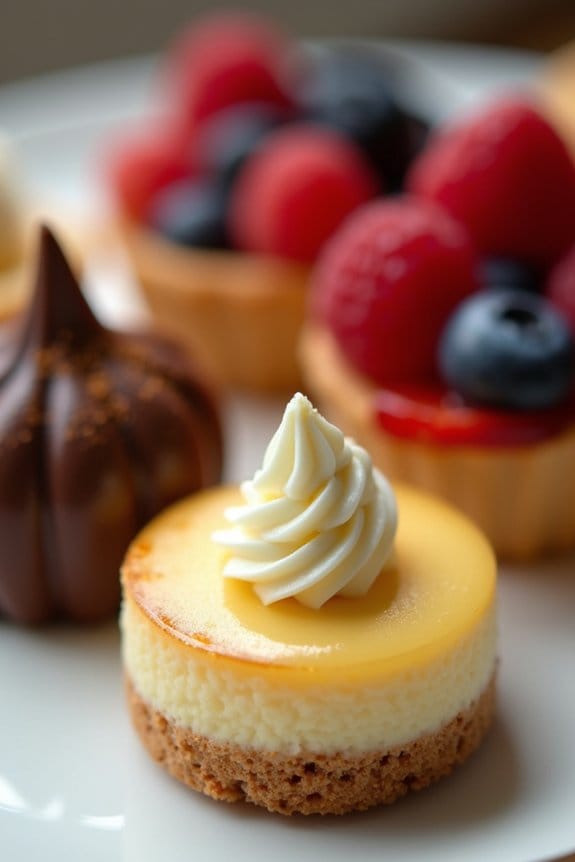
Creating a delightful Miniature Dessert Assortment is a perfect way to add a festive and elegant touch to your Christmas party buffet. These bite-sized treats offer a variety of flavors and textures, appealing to every guest’s palate. From creamy cheesecakes to rich chocolate truffles and fruity tartlets, this assortment is designed to satisfy all sweet cravings while providing a visually stunning display.
To create this assortment, we’ll prepare three different desserts: Mini Cheesecakes, Chocolate Truffles, and Fruit Tartlets. Each dessert will be crafted to be small enough for a couple of bites, allowing guests to indulge in multiple flavors without feeling overwhelmed. This recipe is designed to serve 4-6 people, guaranteeing everyone has a chance to try each dessert.
Ingredients for 4-6 People:
*Mini Cheesecakes:*
- 1 cup of graham cracker crumbs
- 3 tablespoons of unsalted butter, melted
- 8 oz cream cheese, softened
- 1/4 cup granulated sugar
- 1 teaspoon vanilla extract
- 1 large egg
Chocolate Truffles:
- 8 oz semi-sweet chocolate, chopped
- 1/2 cup heavy cream
- 1 teaspoon vanilla extract
- Cocoa powder or finely chopped nuts (for coating)
Fruit Tartlets:
- 1 package of mini phyllo pastry shells (15 shells)
- 1/2 cup mascarpone cheese
- 1 tablespoon honey
- 1 cup mixed berries (e.g., raspberries, blueberries, strawberries)
Cooking Instructions:
- Prepare Mini Cheesecakes:
- Preheat the oven to 325°F (163°C). Line a mini muffin tin with paper liners.
- In a bowl, mix graham cracker crumbs and melted butter. Press a spoonful of the mixture into the bottom of each liner to form a crust.
- Beat the cream cheese, sugar, and vanilla extract until smooth. Add the egg and mix until incorporated.
- Spoon the cream cheese mixture over the crusts, filling each liner about 3/4 full.
- Bake for 15-18 minutes, or until the center is set. Allow cooling at room temperature before refrigerating for at least an hour.
- Make Chocolate Truffles:
- Heat the heavy cream in a small saucepan over medium heat until it begins to simmer.
- Pour the hot cream over the chopped chocolate in a heatproof bowl. Let it sit for 5 minutes, then stir until smooth.
- Stir in the vanilla extract and refrigerate the mixture for about 1-2 hours, or until firm.
- Scoop small amounts of the chocolate mixture and roll them into balls. Roll the truffles in cocoa powder or nuts for coating.
- Assemble Fruit Tartlets:
- In a bowl, mix mascarpone cheese and honey until smooth.
- Spoon a small amount of the mascarpone mixture into each phyllo shell.
- Top with fresh mixed berries, arranging them attractively.
Extra Tips:
When preparing the miniature dessert assortment, feel free to customize the flavors to suit your preferences. For instance, you can add different extracts like almond or peppermint to the cheesecakes or truffles for a unique twist.
Confirm that the cream cheese for the mini cheesecakes is at room temperature to achieve a smooth and creamy mixture. Additionally, make the desserts a day in advance to save time on the day of your event, allowing you to focus on other preparations.
Finally, consider arranging the desserts on a tiered stand for an impressive presentation that will wow your guests.
