
Gathering around a festive buffet with loved ones is truly magical. I’ve put together a list of 10 Christmas lunch recipes that will make your celebration shine. From the irresistible Honey Glazed Ham to the refreshing Cranberry Walnut Salad, each dish is crafted to bring joy and warmth. Picture the smiles and memories these dishes will create. Ready to explore more?
Honey Glazed Ham With Cranberry-Orange Sauce
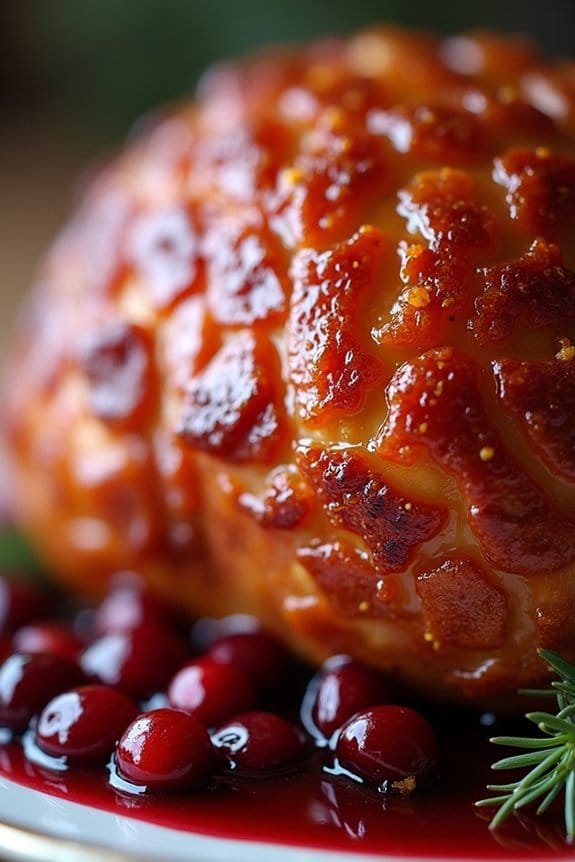
Honey Glazed Ham with Cranberry-Orange Sauce is a delightful centerpiece for your Christmas lunch, combining the sweet and savory flavors of honey-glazed ham with a tangy cranberry-orange sauce that perfectly complements it.
This dish isn’t only visually impressive but also a joy for the taste buds, making it a perfect choice for a festive gathering of family and friends. The combination of succulent ham with the sweet and slightly tart sauce is sure to be a hit at your holiday table.
This recipe serves 4-6 people, making it ideal for a small to medium Christmas lunch. The ham is first prepared with a honey glaze to give it a beautiful, caramelized finish, while the cranberry-orange sauce adds a vibrant and festive touch. The preparation is straightforward, allowing you to enjoy both the cooking and the eating experience.
Ingredients:
- 1 (3-4 pound) fully cooked bone-in ham
- 1 cup honey
- 1/2 cup brown sugar
- 1/4 cup Dijon mustard
- 1/4 cup apple cider vinegar
- 1/4 teaspoon ground cloves
- 2 cups fresh or frozen cranberries
- 1 cup orange juice
- 1/2 cup granulated sugar
- 1 tablespoon orange zest
- 1/2 teaspoon ground cinnamon
- 1/4 teaspoon ground nutmeg
Cooking Instructions:
- Prepare the Ham: Preheat your oven to 325°F (165°C). Place the ham on a rack in a shallow roasting pan.
- Make the Glaze: In a medium saucepan, combine honey, brown sugar, Dijon mustard, apple cider vinegar, and ground cloves. Cook over medium heat, stirring occasionally until the sugar is dissolved and the mixture is smooth.
- Glaze the Ham: Brush the prepared glaze over the ham, making certain that it’s evenly coated. Reserve some glaze for basting during cooking.
- Roast the Ham: Cover the ham loosely with aluminum foil and roast in the preheated oven for about 1.5 to 2 hours, basting with the reserved glaze every 30 minutes. Remove the foil during the last 30 minutes to allow the glaze to caramelize.
- Prepare the Cranberry-Orange Sauce: While the ham is roasting, combine cranberries, orange juice, granulated sugar, orange zest, ground cinnamon, and ground nutmeg in a saucepan. Cook over medium heat until the cranberries burst and the sauce thickens, about 10-15 minutes. Stir occasionally.
- Finish and Serve: Once the ham is roasted to a deep golden brown and reaches an internal temperature of 140°F (60°C), remove it from the oven and let it rest for 10 minutes. Slice and serve the ham with the cranberry-orange sauce on the side.
Extra Tips:
To guarantee the ham remains moist, avoid overcooking it. Using a meat thermometer is essential to check that the ham reaches the correct internal temperature without drying out.
If you prefer a slightly less sweet glaze, you can adjust the amount of honey and brown sugar to suit your taste. For a more intense orange flavor in the sauce, add extra orange zest.
The cranberry-orange sauce can be made a day in advance and stored in the refrigerator, which can be a time-saver on the busy day of your Christmas lunch.
Herb-Crusted Prime Rib Roast
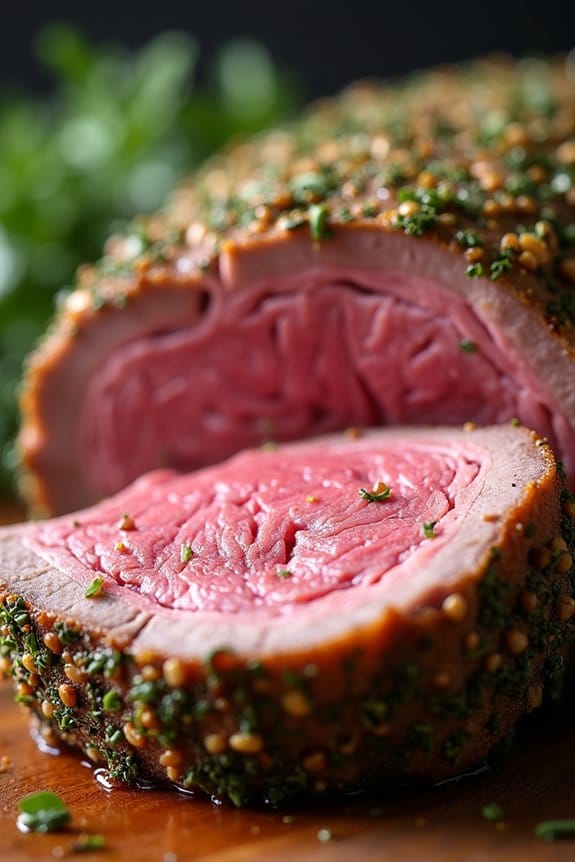
Herb-Crusted Prime Rib Roast is the perfect centerpiece for your Christmas lunch, offering a succulent, flavorful, and impressive dish that’s guaranteed to wow your guests. This prime rib roast is coated with a savory blend of fresh herbs, garlic, and spices, creating a crust that locks in the juices and enhances the natural flavors of the beef.
When cooked to perfection, the inside remains juicy and tender, while the exterior boasts a delightful crust that adds both texture and taste. This recipe is designed to serve 4-6 people, making it ideal for a festive gathering. The key to a successful roast lies in selecting a high-quality cut of meat and allowing it to rest after cooking, making certain every bite is tender and full of flavor.
Follow the steps below to create a memorable and delectable Herb-Crusted Prime Rib Roast for your Christmas celebration.
Ingredients:
- 1 (4-5 pound) prime rib roast
- 1 tablespoon olive oil
- 4 cloves garlic, minced
- 2 tablespoons fresh rosemary, chopped
- 2 tablespoons fresh thyme, chopped
- 1 tablespoon fresh parsley, chopped
- 1 tablespoon kosher salt
- 1 teaspoon black pepper
- 1 teaspoon Dijon mustard
Cooking Instructions:
1. Preheat the Oven: Begin by preheating your oven to 450°F (232°C). This high initial temperature will help create a crispy herb crust on the prime rib.
2. Prepare the Herb Mixture: In a small bowl, combine the minced garlic, chopped rosemary, thyme, parsley, kosher salt, black pepper, and olive oil. Mix them well to form a fragrant herb paste.
3. Season the Roast: Pat the prime rib roast dry with paper towels to remove any excess moisture. Rub the Dijon mustard evenly over the entire surface of the roast.
Then, apply the herb mixture generously, making sure it adheres well to the meat.
4. Roast the Meat: Place the seasoned prime rib on a rack in a roasting pan, bone side down. Insert a meat thermometer into the thickest part of the roast, avoiding any bones. Roast in the preheated oven at 450°F for 20 minutes to form the crust.
5. Adjust Oven Temperature: After the initial 20 minutes, reduce the oven temperature to 325°F (163°C). Continue roasting until the internal temperature of the meat reaches your desired level of doneness (e.g., 130°F for medium-rare), which should take about 1 1/2 to 2 hours.
6. Rest the Roast: Once the desired temperature is reached, remove the roast from the oven and cover it loosely with aluminum foil. Let it rest for 20-30 minutes before carving.
This resting period allows the juices to redistribute throughout the meat, making certain each slice is juicy and flavorful.
Extra Tips: For the best results, make sure that the prime rib roast is at room temperature before you begin cooking, as this helps it cook more evenly. Use a sharp carving knife to slice the roast against the grain for the most tender pieces.
If you prefer, you can add a splash of red wine or beef stock to the roasting pan during the final stages of cooking to create a simple, flavorful pan sauce to accompany your roast.
Maple Roasted Turkey Breast
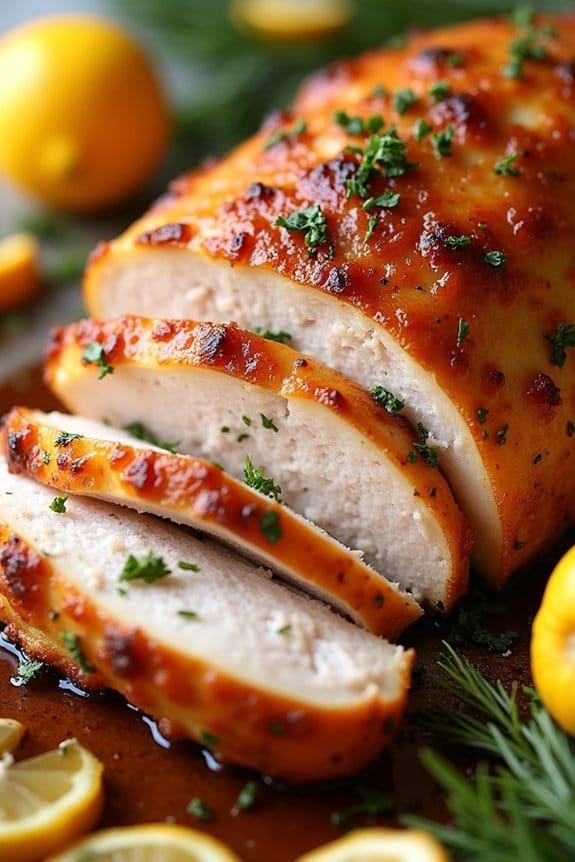
The Maple Roasted Turkey Breast is a delightful centerpiece for your Christmas lunch, offering a sweet and savory flavor that’s sure to impress your guests. This recipe combines the natural richness of turkey breast with the caramel-like sweetness of maple syrup, creating an irresistible glaze that will have everyone coming back for seconds.
Perfect for a smaller gathering, this dish is a great alternative to a whole turkey, saving time while still delivering holiday cheer on the table.
The turkey breast is first marinated in a mixture of maple syrup, mustard, and fresh herbs, allowing the flavors to penetrate the meat and keep it juicy during roasting. As it cooks, the marinade transforms into a sticky, golden glaze that enhances the natural taste of the turkey.
With minimal preparation and a straightforward cooking process, this dish is both stress-free and delectable, guaranteeing a memorable Christmas feast for all.
Ingredients (Serves 4-6 people):
- 1 (3-4 pounds) turkey breast, bone-in and skin-on
- 1/2 cup pure maple syrup
- 1/4 cup Dijon mustard
- 2 tablespoons olive oil
- 4 cloves garlic, minced
- 1 tablespoon fresh rosemary, chopped
- 1 tablespoon fresh thyme, chopped
- 1 teaspoon salt
- 1/2 teaspoon black pepper
- 1 lemon, sliced
- 1 cup chicken broth
Cooking Instructions:
- Prepare the Marinade: In a medium bowl, whisk together the maple syrup, Dijon mustard, olive oil, minced garlic, rosemary, thyme, salt, and black pepper until well combined.
- Marinate the Turkey: Place the turkey breast in a large resealable plastic bag or a shallow dish. Pour the marinade over the turkey, making sure it’s evenly coated. Seal the bag or cover the dish and refrigerate for at least 2 hours, or overnight for the best flavor.
- Preheat the Oven: Preheat your oven to 350°F (175°C).
- Prepare for Roasting: Remove the turkey from the marinade and place it in a roasting pan. Arrange the lemon slices around the turkey and pour the chicken broth into the bottom of the pan.
- Roast the Turkey: Roast the turkey in the preheated oven for about 1.5 to 2 hours, or until the internal temperature reaches 165°F (74°C). Baste the turkey every 30 minutes with the pan juices to keep it moist.
- Rest and Serve: Once cooked, remove the turkey from the oven and let it rest for 10-15 minutes before carving. Serve with the pan juices drizzled over the slices for added flavor.
Extra Tips:
To make sure your Maple Roasted Turkey Breast remains juicy and flavorful, don’t skip the marinating step, as it’s essential for infusing the meat with the rich flavors of the marinade.
If you prefer a deeper caramelized glaze, you can increase the oven temperature to 400°F (200°C) for the last 10 minutes of roasting, keeping a close eye to prevent burning.
Additionally, if you have leftover turkey, it makes for a delicious sandwich filling or can be added to salads for a post-holiday meal.
Baked Salmon With Dill and Lemon

Baked salmon with dill and lemon is a delectable and festive dish that brings a touch of elegance to your Christmas lunch. This dish isn’t only visually appealing with its vibrant colors but also packed with flavors that are both invigorating and savory. The combination of fresh dill and zesty lemon creates a perfect balance, enhancing the natural taste of the salmon.
It’s a healthy option that doesn’t sacrifice taste, making it a great choice for those looking to enjoy a lighter meal during the holiday season. This recipe is designed to serve 4-6 people, making it ideal for a family gathering or a small holiday party. The preparation is straightforward, allowing you to spend more time with your loved ones and less time in the kitchen.
The salmon is baked to perfection, guaranteeing it’s moist and tender, while the dill and lemon infuse the fish with their delightful aromas. It’s a dish that will impress your guests and leave them wanting more.
Ingredients:
- 2 pounds salmon fillet
- 2 tablespoons olive oil
- Salt and pepper to taste
- 1 lemon, thinly sliced
- 2 tablespoons fresh dill, chopped
- 2 cloves garlic, minced
- 1 teaspoon lemon zest
- 1 tablespoon butter
Cooking Instructions:
- Preheat the Oven: Start by preheating your oven to 375°F (190°C). This guarantees the salmon will cook evenly and develop a nice golden crust.
- Prepare the Baking Dish: Lightly grease a large baking dish with olive oil to prevent sticking. Place the salmon fillet in the dish, skin-side down.
- Season the Salmon: Rub the salmon with olive oil and season generously with salt and pepper. This enhances the salmon’s natural flavors.
- Add Aromatics: Sprinkle the minced garlic and lemon zest evenly over the salmon. Arrange the lemon slices on top of the fillet. These ingredients will infuse the salmon with an invigorating aroma as it bakes.
- Top with Dill and Butter: Scatter the chopped dill over the lemon slices. Dot the salmon with small pieces of butter to add richness and moisture to the dish.
- Bake the Salmon: Place the baking dish in the preheated oven and bake for 20-25 minutes. Check for doneness by inserting a fork into the thickest part of the salmon; it should flake easily and be opaque in color.
- Serve: Remove the salmon from the oven and let it rest for a few minutes before serving. This helps the juices redistribute, keeping the fish moist. Serve with additional lemon wedges if desired.
Extra Tips:
For the best results, choose a fresh, high-quality salmon fillet, ideally wild-caught if available. This will guarantee a superior taste and texture.
If you prefer a more intense lemon flavor, you can squeeze additional lemon juice over the salmon before serving. To prevent the salmon from overcooking, use a meat thermometer to check that the internal temperature reaches 145°F (63°C).
Pair this dish with a light salad or roasted vegetables for a complete holiday meal.
Cheesy Scalloped Potatoes

Cheesy Scalloped Potatoes are a classic comfort dish that makes an ideal addition to your Christmas lunch spread. This creamy, cheesy, and decadent side dish features layers of thinly sliced potatoes smothered in a rich cheese sauce, baked until golden and bubbly. The dish pairs perfectly with roasted meats or can stand alone as a satisfying vegetarian option.
Its crispy top layer and tender, flavorful interior make it a crowd-pleaser, adding warmth and heartiness to your festive meal.
This recipe for Cheesy Scalloped Potatoes serves 4-6 people, making it perfect for a family gathering or a small holiday party. Using simple ingredients readily available in your pantry or local supermarket, you’ll create a dish that’s both elegant and comforting. The preparation process is straightforward, allowing you to focus on spending time with loved ones while guaranteeing your holiday meal is a success.
Ingredients:
- 2 pounds of Yukon Gold potatoes
- 2 tablespoons unsalted butter
- 2 tablespoons all-purpose flour
- 2 cups milk
- 1 cup heavy cream
- 2 cups shredded cheddar cheese
- 1 teaspoon garlic powder
- 1 teaspoon onion powder
- Salt and pepper to taste
- 1/4 cup grated Parmesan cheese
- Fresh parsley for garnish (optional)
Instructions:
1. Preheat the Oven: Begin by preheating your oven to 375°F (190°C). Grease a 9×13-inch baking dish with butter or cooking spray to prevent sticking.
2. Prepare the Potatoes: Wash and peel the potatoes. Use a mandoline slicer or a sharp knife to slice them into 1/8-inch thick rounds. Set aside.
3. Make the Cheese Sauce: In a medium saucepan, melt the butter over medium heat. Whisk in the flour and cook for about 1 minute, until it forms a smooth paste. Gradually whisk in the milk and heavy cream, making sure no lumps form.
Continue to cook, stirring frequently, until the mixture thickens and begins to bubble.
4. Add Cheese and Seasoning: Remove the saucepan from heat and stir in the shredded cheddar cheese until it melts completely. Add the garlic powder, onion powder, salt, and pepper to taste.
5. Layer the Potatoes: Arrange half of the sliced potatoes in an even layer in the prepared baking dish. Pour half of the cheese sauce over the potatoes, spreading it evenly. Repeat with the remaining potatoes and cheese sauce.
6. Top with Parmesan: Sprinkle the grated Parmesan cheese evenly over the top layer of potatoes.
7. Bake: Cover the dish with aluminum foil and bake in the preheated oven for 45 minutes. Remove the foil and bake for an additional 20-25 minutes, or until the potatoes are tender and the top is golden and bubbly.
8. Garnish and Serve: Remove from the oven and let it cool slightly. Garnish with freshly chopped parsley if desired, and serve warm.
Extra Tips:
When cooking Cheesy Scalloped Potatoes, ascertain the potato slices are of uniform thickness to cook evenly. Yukon Gold potatoes are recommended for their creamy texture, but Russet potatoes can be used as a substitute.
For added flavor, consider mixing in some crispy bacon bits or sautéed onions between the layers. The dish can be made ahead of time and reheated for convenience, making it perfect for stress-free holiday planning.
Brussels Sprouts With Bacon and Balsamic Glaze
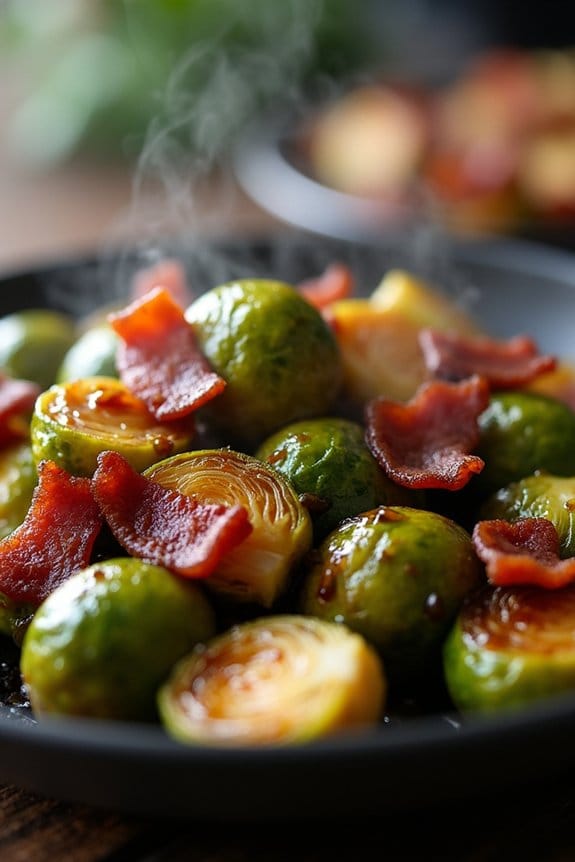
Brussels Sprouts With Bacon and Balsamic Glaze is a delicious and savory addition to any Christmas lunch. This dish combines the earthy flavor of Brussels sprouts with the salty, crispy goodness of bacon, all enhanced by the sweet and tangy notes of a balsamic glaze. It’s a perfect side dish that will complement your holiday meal and leave your guests coming back for more.
This recipe isn’t only scrumptious but also straightforward to prepare, making it an ideal choice for busy holiday chefs. The combination of textures and flavors makes it a crowd-pleaser. With a serving size meant for 4-6 people, this dish will fit seamlessly into your festive menu, adding a touch of gourmet flair without the stress.
Ingredients (Serves 4-6):
- 1 1/2 pounds Brussels sprouts
- 6 slices of bacon
- 2 tablespoons olive oil
- Salt and pepper to taste
- 1/2 cup balsamic vinegar
- 2 tablespoons honey
Cooking Instructions:
- Prepare the Brussels Sprouts: Start by preheating your oven to 400°F (200°C). Wash the Brussels sprouts and trim the ends. Remove any yellow or damaged outer leaves and slice them in half.
- Cook the Bacon: In a large skillet over medium heat, cook the bacon slices until they’re crispy. This should take about 5-7 minutes. Once done, remove them from the skillet and place them on a paper towel-lined plate to drain excess fat. Reserve a couple of tablespoons of bacon fat in the skillet.
- Roast the Brussels Sprouts: Place the halved Brussels sprouts in a large mixing bowl and drizzle with olive oil. Season with salt and pepper to taste, and toss them to coat evenly. Spread the Brussels sprouts onto a baking sheet in a single layer. Roast in the preheated oven for 20-25 minutes, or until they’re tender and have a nice golden-brown color.
- Prepare the Balsamic Glaze: While the Brussels sprouts are roasting, prepare the balsamic glaze. In a small saucepan, combine the balsamic vinegar and honey. Bring to a simmer over medium heat, then reduce the heat to low and let it simmer until it thickens slightly, about 5-7 minutes. Remove from heat.
- Combine and Serve: Chop the cooked bacon into small pieces. Once the Brussels sprouts are done roasting, transfer them to a serving dish. Sprinkle the chopped bacon over the top and drizzle with the balsamic glaze. Toss everything together gently to guarantee even distribution of flavors. Serve warm.
Extra Tips:
When selecting Brussels sprouts, look for ones that are firm and bright green, as these are fresher and will yield better results. If you have time, let the Brussels sprouts marinate in the olive oil, salt, and pepper mixture for about 10 minutes before roasting. This will enhance their flavor even more.
Additionally, you can prepare the balsamic glaze in advance and store it in the refrigerator, then gently reheat it before serving. This will save you time when you’re busy preparing other dishes for your Christmas lunch.
Garlic and Herb Stuffed Mushrooms
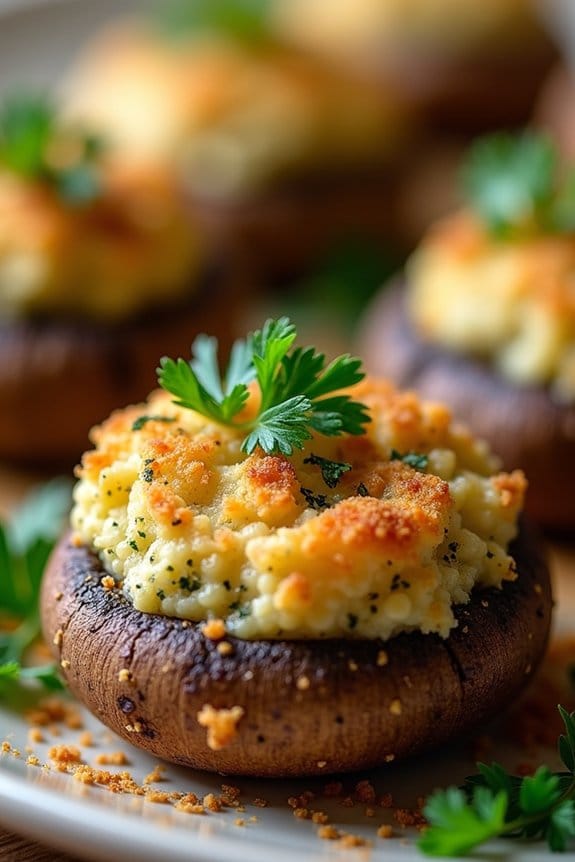
Garlic and Herb Stuffed Mushrooms are a delightful addition to any Christmas lunch spread. These bite-sized treats are bursting with flavor, thanks to a savory mixture of garlic, fresh herbs, and cheese, all nestled into tender mushroom caps. They’re perfect for serving as an appetizer or a side dish, providing a delicious contrast to traditional holiday fare.
Furthermore, they’re simple to prepare and can be made ahead of time, allowing you to spend more time with loved ones during the holiday festivities.
The mushrooms are stuffed with a mixture that combines cream cheese for a creamy texture, breadcrumbs for a bit of crunch, and a blend of herbs like parsley and thyme for a fragrant touch. The garlic infuses the stuffing with a rich, aromatic flavor that complements the earthiness of the mushrooms. This crowd-pleasing dish isn’t only delicious but also vegetarian-friendly, guaranteeing that everyone at your Christmas lunch table will find something to enjoy.
Ingredients (serves 4-6 people):
- 24 large white button mushrooms
- 2 tablespoons olive oil
- 1 small onion, finely chopped
- 3 cloves garlic, minced
- 1/4 cup fresh parsley, chopped
- 1 teaspoon fresh thyme leaves
- 1 cup cream cheese, softened
- 1/2 cup grated Parmesan cheese
- 1/4 cup breadcrumbs
- Salt and pepper to taste
- Optional: 2 tablespoons finely chopped walnuts
Cooking Instructions:
- Prepare the Mushrooms: Preheat your oven to 375°F (190°C). Gently clean the mushrooms with a damp paper towel and remove the stems. Set the mushroom caps aside on a baking sheet, and finely chop the stems for the stuffing.
- Cook the Aromatics: In a skillet, heat the olive oil over medium heat. Add the chopped onion and sauté for about 3-4 minutes until it becomes translucent. Stir in the minced garlic and chopped mushroom stems, cooking for an additional 2 minutes until fragrant.
- Mix the Stuffing: In a mixing bowl, combine the sautéed mixture with cream cheese, Parmesan cheese, breadcrumbs, parsley, and thyme. Season with salt and pepper to taste. If desired, add the chopped walnuts for an extra crunch.
- Stuff the Mushrooms: Using a small spoon, carefully fill each mushroom cap with the prepared stuffing. Pack the stuffing tightly to guarantee it stays in place during baking.
- Bake: Arrange the stuffed mushrooms on the baking sheet and bake in the preheated oven for 20-25 minutes, or until the tops are golden brown and the mushrooms are tender.
- Serve: Once baked, allow the mushrooms to cool slightly before serving. They can be enjoyed warm or at room temperature.
Extra Tips: When selecting mushrooms, choose ones that are similar in size to guarantee even cooking. If you want to prepare this dish ahead of time, stuff the mushrooms and store them in the refrigerator covered with plastic wrap for up to 24 hours before baking.
To add a touch of color, garnish the mushrooms with a sprinkle of extra chopped parsley before serving. If you prefer a spicier kick, consider adding a pinch of red pepper flakes to the stuffing mixture.
Classic Green Bean Casserole
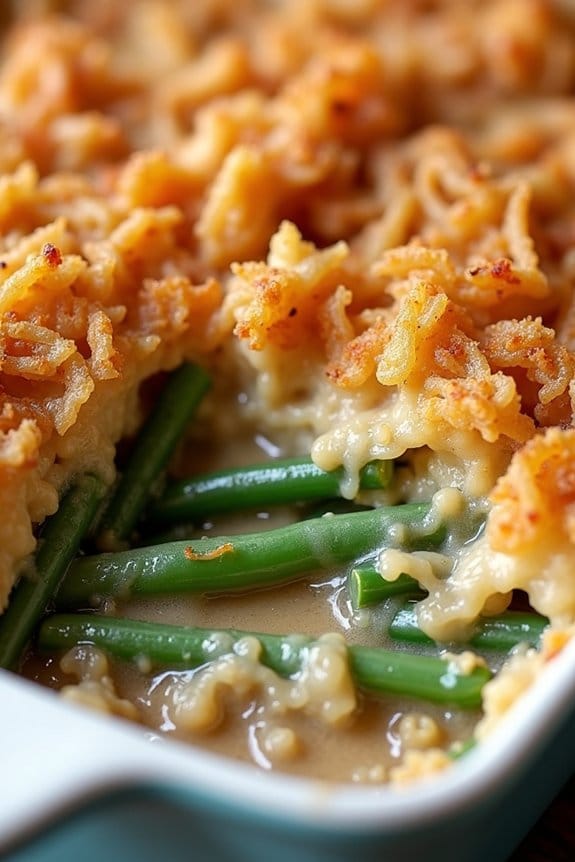
The Classic Green Bean Casserole is a beloved staple at many Christmas lunch tables, offering a creamy and flavorful side dish that complements a variety of main courses. This traditional dish combines crisp green beans with a rich mushroom sauce and is topped with crunchy fried onions, creating a delightful mix of textures and tastes.
It’s a comforting dish that not only tastes delicious but is also relatively simple to prepare, making it a perfect addition to your holiday feast. Originally popularized in the mid-20th century, this casserole has become a holiday favorite due to its ease of preparation and the comforting flavors it brings to the table.
The following recipe serves 4-6 people, guaranteeing there’s plenty to go around for your family and guests. Whether you’re a seasoned cook or a beginner, this step-by-step guide will help you create a green bean casserole that’s sure to impress.
Ingredients (serves 4-6):
- 1 pound fresh green beans, trimmed and cut into 1-inch pieces
- 2 tablespoons unsalted butter
- 1 small onion, finely chopped
- 2 cloves garlic, minced
- 8 ounces button mushrooms, sliced
- 1/4 cup all-purpose flour
- 1 cup chicken or vegetable broth
- 1 cup heavy cream
- Salt and pepper to taste
- 1 1/2 cups crispy fried onions
- 1/2 cup grated Parmesan cheese (optional)
Cooking Instructions:
1. Preheat Oven: Begin by preheating your oven to 350°F (175°C) to guarantee it’s ready for baking once your casserole is assembled.
2. Prepare Green Beans: Bring a large pot of salted water to a boil. Add the green beans and blanch them for 5 minutes until they’re bright green and slightly tender. Drain and set aside.
3. Sauté Aromatics: In a large skillet over medium heat, melt the butter. Add the finely chopped onion and minced garlic, sautéing until the onion becomes translucent and fragrant, about 2-3 minutes.
4. Cook Mushrooms: Add the sliced mushrooms to the skillet and cook until they release their moisture and become golden brown, around 5-7 minutes.
5. Make Sauce: Sprinkle the flour over the mushroom mixture, stirring constantly for about 1 minute to eliminate the raw flour taste. Gradually whisk in the chicken or vegetable broth, followed by the heavy cream.
Continue to stir until the sauce thickens, about 3-5 minutes. Season with salt and pepper to taste.
6. Assemble Casserole: In a large mixing bowl, combine the blanched green beans with the mushroom sauce. Transfer the mixture to a 9×13 inch baking dish. Top with crispy fried onions and, if desired, sprinkle with grated Parmesan cheese for added flavor.
7. Bake: Place the baking dish in the preheated oven and Bake for 25-30 minutes, or until the casserole is bubbly and the top is golden brown.
8. Serve: Allow the casserole to rest for a few minutes before serving. It pairs wonderfully with roasted meats or as part of a larger spread of holiday dishes.
Extra Tips:
For a twist on this classic dish, consider adding a pinch of nutmeg to the sauce for added depth of flavor. You can also experiment with different types of mushrooms, such as cremini or shiitake, for a more robust taste.
If you prefer a lighter version, substitute the heavy cream with half-and-half or milk. Be sure to taste your sauce before assembling the casserole to adjust seasoning as needed, guaranteeing a perfectly balanced dish.
Cranberry Walnut Salad With Honey Dressing
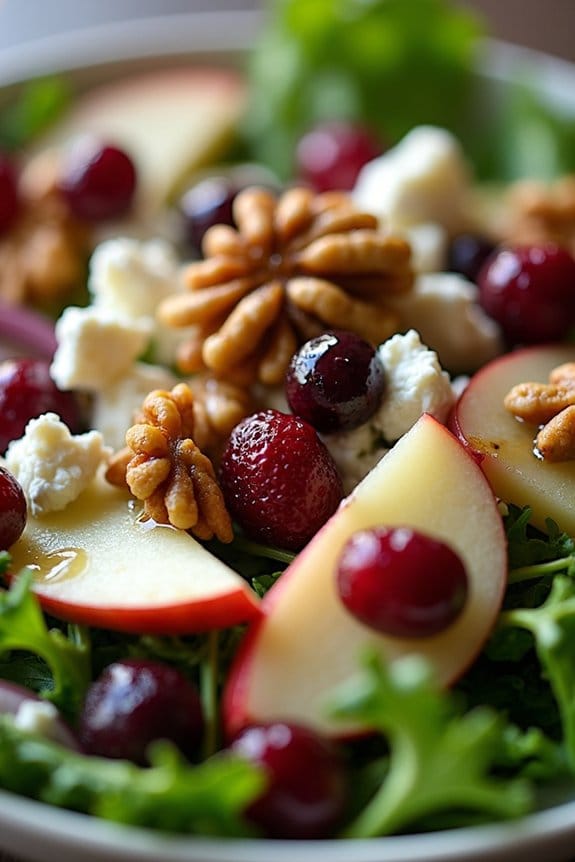
Cranberry Walnut Salad with Honey Dressing is a delightful and revitalizing addition to any Christmas lunch spread. This salad combines the tartness of cranberries with the earthy crunch of walnuts, all tied together with a sweet and tangy honey dressing. It’s a perfect balance of flavors and textures, making it a standout dish that complements a variety of holiday meals.
The vibrant colors of the salad also add a festive touch to your table, making it as visually appealing as it’s delicious. Perfect for serving 4-6 people, this salad isn’t only simple to prepare but also quick to assemble, allowing you more time to enjoy the festivities with your loved ones.
The fresh ingredients guarantee a burst of flavor with every bite, and the homemade honey dressing takes it to the next level. Whether you’re a seasoned chef or a beginner in the kitchen, this recipe is straightforward and rewarding, promising to delight your guests with its elegance and taste.
Ingredients:
- 6 cups of mixed salad greens (such as arugula, spinach, and romaine)
- 1 cup of dried cranberries
- 1 cup of walnut halves, toasted
- 1/2 cup of feta cheese, crumbled
- 2 small apples, thinly sliced
- 1/4 cup of red onion, thinly sliced
For the Honey Dressing:
- 1/4 cup of olive oil
- 3 tablespoons of apple cider vinegar
- 2 tablespoons of honey
- 1 teaspoon of Dijon mustard
- Salt and pepper to taste
Instructions:
- Prepare the Salad Base: In a large salad bowl, combine the mixed salad greens, dried cranberries, and toasted walnut halves. Toss gently to facilitate an even distribution of ingredients.
- Add the Extras: Incorporate the crumbled feta cheese into the salad, followed by the thinly sliced apples and red onion. This layering guarantees each bite has a mix of flavors and textures.
- Make the Honey Dressing: In a small bowl, whisk together the olive oil, apple cider vinegar, honey, and Dijon mustard. Season with salt and pepper to taste, adjusting the flavors as necessary. The dressing should be well-emulsified and smooth.
- Dress the Salad: Pour the honey dressing over the salad ingredients in the bowl. Use salad tongs or two large spoons to gently toss the salad, ensuring that the dressing coats all the components evenly.
- Serve: Transfer the salad to a serving dish or individual plates. Top with additional walnuts or cranberries for a decorative touch if desired.
Extra Tips:
For a more robust flavor, consider adding a sprinkle of fresh herbs like parsley or mint to the salad. If you prefer a creamier dressing, add a tablespoon of Greek yogurt to the honey dressing.
Toasting the walnuts enhances their flavor, but be sure to watch them closely to prevent burning. If you’re making this salad ahead of time, add the dressing just before serving to keep the greens crisp. Enjoy your beautifully festive Cranberry Walnut Salad with Honey Dressing as a part of your Christmas feast!
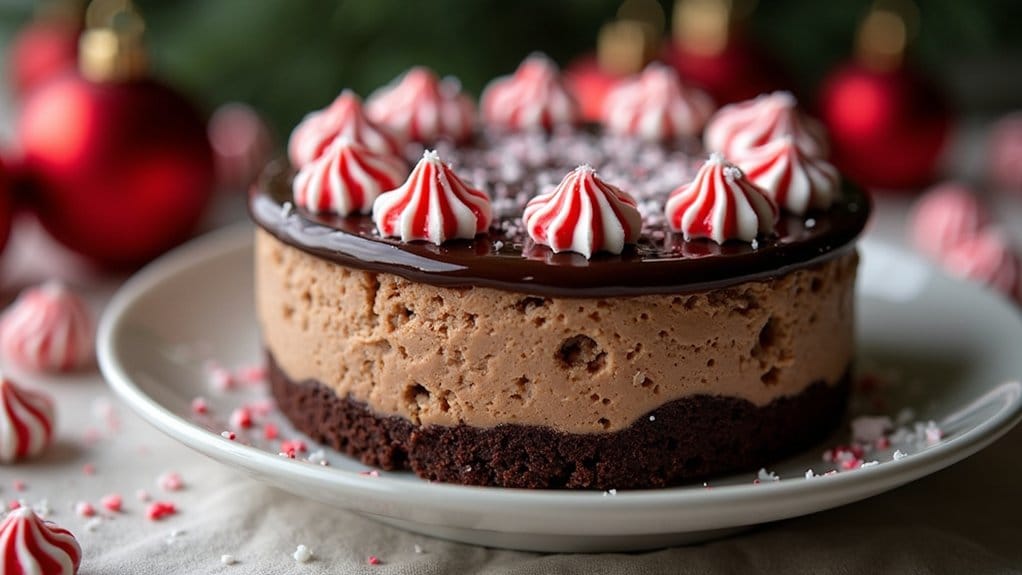
Chocolate Peppermint Cheesecake
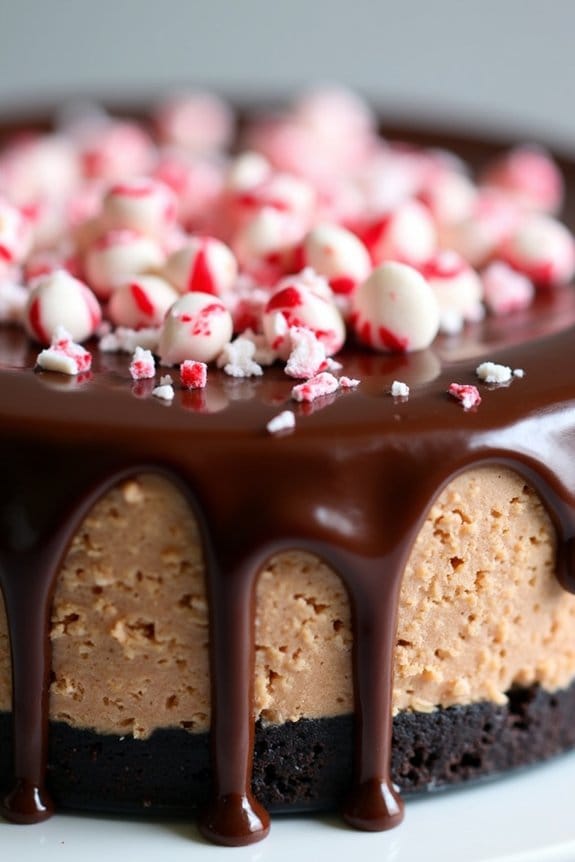
Indulge in the flavors of the season with a decadent Chocolate Peppermint Cheesecake that’s perfect for your Christmas lunch. This luscious dessert combines the rich and creamy texture of classic cheesecake with the invigorating zing of peppermint, all nestled on a delightful chocolate crust.
Topped with a glossy chocolate ganache and adorned with festive peppermint candies, this cheesecake not only tastes divine but also makes for an impressive centerpiece on your holiday table.
Whether you’re a seasoned baker or trying your hand at cheesecake for the first time, this recipe is designed to be approachable and rewarding. With a serving size of 4-6 people, it’s ideal for intimate gatherings or as part of a larger spread of Christmas treats. Gather your ingredients and follow along to create a beautiful dessert that’s sure to be a hit with family and friends.
Ingredients (serving size: 4-6 people):
- 1 1/2 cups chocolate cookie crumbs
- 1/4 cup unsalted butter, melted
- 3 (8-ounce) packages cream cheese, softened
- 1 cup granulated sugar
- 3 large eggs
- 1 teaspoon vanilla extract
- 1 teaspoon peppermint extract
- 1/4 cup all-purpose flour
- 1/4 cup cocoa powder
- 1/2 cup sour cream
- 1 cup heavy cream
- 8 ounces semi-sweet chocolate, chopped
- 1/4 cup crushed peppermint candies
Instructions:
1. Prepare the Crust: Preheat your oven to 325°F (160°C). In a medium bowl, combine the chocolate cookie crumbs and melted butter. Mix until the crumbs are evenly coated. Press the mixture into the bottom of a 9-inch springform pan to form an even crust. Bake for 10 minutes, then remove from the oven and let cool.
2. Make the Cheesecake Filling: In a large mixing bowl, beat the softened cream cheese and granulated sugar together until smooth and creamy. Add the eggs one at a time, beating well after each addition. Stir in the vanilla and peppermint extracts. Gradually add the flour and cocoa powder, mixing until just combined. Fold in the sour cream until the mixture is smooth.
3. Bake the Cheesecake: Pour the filling over the cooled crust in the springform pan, smoothing the top with a spatula. Place the pan on a baking sheet to catch any drips, and bake in the preheated oven for 50-60 minutes, or until the edges are set and the center is slightly jiggly.
Turn off the oven and leave the cheesecake inside with the door ajar for 1 hour to cool slowly and prevent cracking.
4. Prepare the Chocolate Ganache: In a small saucepan, heat the heavy cream over medium heat until it begins to simmer. Remove from the heat and add the chopped semi-sweet chocolate. Let it sit for a minute, then stir until the chocolate is completely melted and the mixture is smooth.
5. Assemble and Chill: Pour the ganache over the cooled cheesecake, spreading it evenly with a spatula. Sprinkle the crushed peppermint candies over the top. Refrigerate the cheesecake for at least 4 hours, or overnight, to set.
6. Serve: Once set, remove the cheesecake from the springform pan, slice, and serve chilled. Enjoy the blend of chocolate and peppermint flavors with each bite.
Extra Tips:
For the best results, verify all your ingredients are at room temperature before you start, especially the cream cheese, as this will help achieve a smooth and creamy filling.
When crushing peppermint candies, place them in a sealed plastic bag and gently tap with a rolling pin to avoid a mess. If you prefer a stronger peppermint flavor, you can adjust the peppermint extract to taste, but be cautious as it can be quite potent.
Finally, for a flawless presentation, use a hot knife to slice the cheesecake, wiping it clean between cuts.
