

Looking to impress your guests this Christmas with a buffet they’ll be talking about until next year?
Start with a show-stopping Herb-Crusted Prime Rib that’s as delicious as it is beautiful.
Pair it with a delightful Maple-Glazed Ham with Pineapple for a touch of holiday sweetness.
Don’t forget those sides—Creamy Garlic Mashed Potatoes are a must.
Ready to make your holiday spread unforgettable?
Herb-Crusted Prime Rib
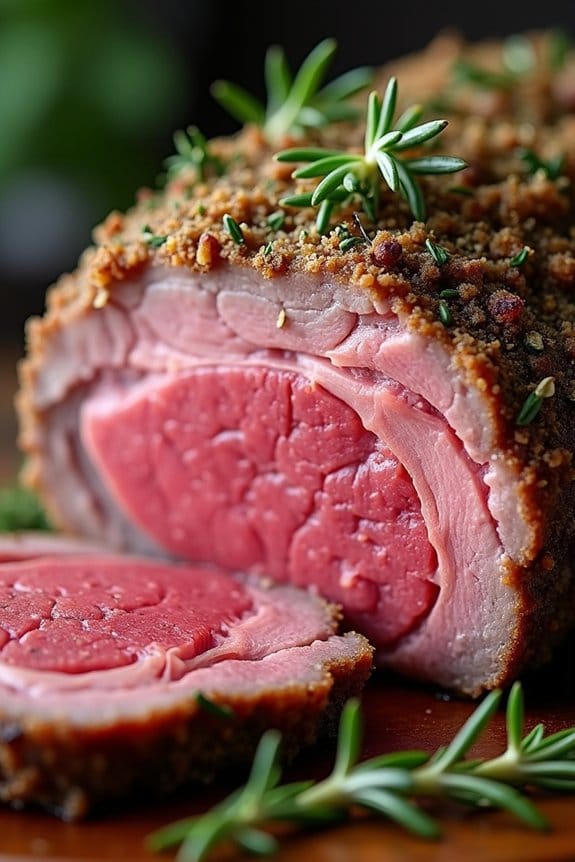
Herb-Crusted Prime Rib is a show-stopping centerpiece perfect for a Christmas lunch buffet. This dish combines the luxurious flavors of a succulent prime rib roast with a fragrant, crunchy herb crust that elevates its taste and presentation.
Whether you’re hosting a large gathering or an intimate family meal, this prime rib recipe will surely leave a lasting impression on your guests. The key to success lies in selecting a quality rib roast and preparing a well-balanced herb mixture that complements the meat’s natural richness.
The beauty of an herb-crusted prime rib is its simplicity and ability to cook evenly, guaranteeing every slice is juicy and tender. This recipe is designed for a serving size of 4-6 people, making it ideal for a moderate-sized holiday gathering.
The preparation involves a straightforward seasoning process, followed by a slow roast in the oven, allowing the flavors to meld while creating a savory crust that locks in the juices. With the right techniques and a little patience, you’ll be rewarded with a prime rib that’s perfectly cooked and full of flavor.
Ingredients (Serves 4-6):
- 1 (4-5 pound) prime rib roast, bone-in
- 3 tablespoons olive oil
- 1 tablespoon kosher salt
- 1 tablespoon freshly ground black pepper
- 2 tablespoons fresh rosemary, chopped
- 2 tablespoons fresh thyme, chopped
- 5 cloves garlic, minced
- 1 tablespoon Dijon mustard
- 1 teaspoon paprika
Cooking Instructions:
- Preparation: Start by removing the prime rib from the refrigerator and let it sit at room temperature for about 1 hour. This step guarantees even cooking throughout the roast.
- Preheat the Oven: Set your oven to 450°F (230°C). This initial high temperature will help sear the roast and develop a flavorful crust.
- Create the Herb Mixture: In a small bowl, combine the olive oil, kosher salt, black pepper, rosemary, thyme, garlic, Dijon mustard, and paprika. Mix thoroughly to form a paste-like consistency.
- Season the Roast: Pat the prime rib dry with paper towels. Rub the herb mixture evenly over the entire surface of the roast, guaranteeing that the meat is well-coated.
- Roast the Prime Rib: Place the seasoned prime rib on a rack in a roasting pan, bone side down. Insert an oven-safe meat thermometer into the thickest part of the meat, avoiding the bone. Roast in the preheated oven for 20 minutes.
- Adjust Temperature: After 20 minutes, reduce the oven temperature to 325°F (165°C). Continue roasting until the thermometer reads 130°F (54°C) for medium-rare, approximately 1.5 to 2 hours, depending on the size of the roast.
- Rest the Meat: Once the desired internal temperature is reached, remove the roast from the oven. Cover it loosely with aluminum foil and let it rest for at least 20 minutes. This resting period allows the juices to redistribute throughout the meat, resulting in a tender and flavorful roast.
- Carve and Serve: After resting, carve the prime rib into slices of your preferred thickness. Serve immediately, pairing it with your favorite sides and sauces.
Extra Tips:
For the best results, make sure that the prime rib is at room temperature before roasting, as this helps the meat cook more evenly.
A meat thermometer is essential for achieving the desired doneness, so be sure to check the temperature frequently as the roast nears completion. If you prefer a different level of doneness, adjust the final internal temperature accordingly: 125°F for rare, 135°F for medium, and 145°F for medium-well.
Finally, consider preparing a simple au jus or horseradish sauce to accompany the roast and enhance its flavors.
Maple-Glazed Ham With Pineapple
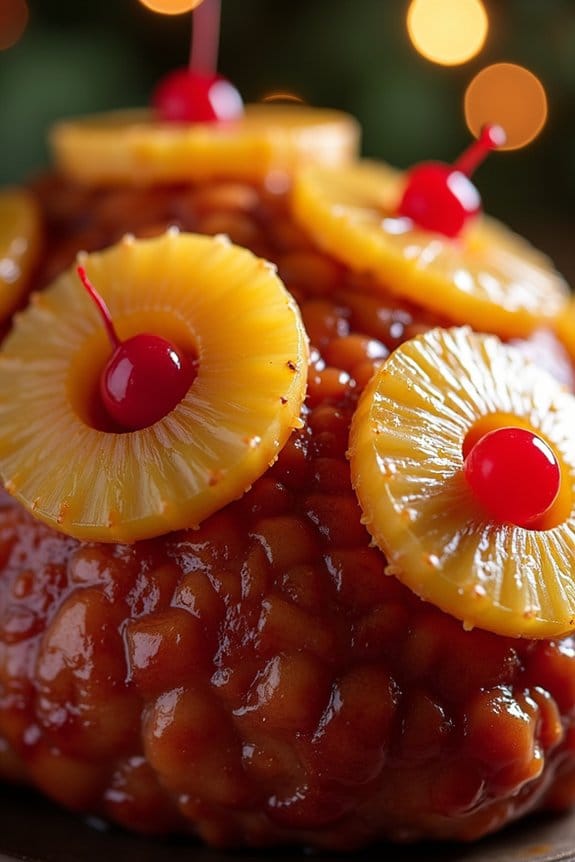
Maple-Glazed Ham With Pineapple is a classic centerpiece for any Christmas lunch buffet. Its sweet and savory flavor profile, coupled with a beautiful caramelized glaze, makes it an irresistible dish that’s bound to impress your guests. The ham is coated in a luscious maple syrup glaze and adorned with rings of fresh pineapple, creating a stunning presentation that tastes as good as it looks. This recipe is perfect for serving a crowd, as it not only satisfies the taste buds but is also easy to prepare.
The combination of the salty ham with the sweetness of maple syrup and the tanginess of pineapple creates a harmonious flavor balance that will appeal to both adults and children alike. The glaze caramelizes beautifully in the oven, giving the ham a rich, golden-brown color that’s visually appealing. By following this recipe, you’ll be able to create a mouthwatering Maple-Glazed Ham With Pineapple that will be the star of your Christmas lunch buffet.
Ingredients (Serves 4-6):
- 1 fully cooked bone-in ham (approximately 4-5 pounds)
- 1 cup pure maple syrup
- 1/2 cup brown sugar
- 1/3 cup Dijon mustard
- 1/4 cup apple cider vinegar
- 1/4 teaspoon ground cloves
- 1 teaspoon ground cinnamon
- 1 can (20 ounces) pineapple slices, drained
- Maraschino cherries (optional)
- Toothpicks
Cooking Instructions:
- Preheat the Oven: Preheat your oven to 325°F (163°C) to make sure it’s ready for cooking the ham.
- Prepare the Glaze: In a medium saucepan over medium heat, combine the maple syrup, brown sugar, Dijon mustard, apple cider vinegar, ground cloves, and ground cinnamon. Stir until the sugar is dissolved and the mixture is smooth. Allow the glaze to simmer for about 5 minutes, then remove from heat.
- Score the Ham: Place the ham on a roasting pan. With a sharp knife, score the surface of the ham in a diamond pattern, making sure not to cut too deep. This will allow the glaze to penetrate the meat.
- Apply the Glaze: Generously brush the prepared glaze over the scored ham, making sure that it covers the entire surface for even flavor distribution.
- Decorate with Pineapple and Cherries: Arrange the pineapple slices over the ham, securing each with a toothpick. If desired, place a maraschino cherry in the center of each pineapple ring and secure with another toothpick.
- Roast the Ham: Place the ham in the preheated oven and roast for approximately 1.5 to 2 hours or until the internal temperature reaches 140°F (60°C). Baste the ham with the remaining glaze every 30 minutes to enhance the flavor and caramelization.
- Rest and Serve: Once cooked, remove the ham from the oven and allow it to rest for about 10 minutes before slicing. This will help the juices redistribute, resulting in a juicier ham.
Extra Tips:
To guarantee your Maple-Glazed Ham With Pineapple is a hit, consider using a meat thermometer to accurately measure the internal temperature, preventing overcooking. If you find the glaze browning too quickly, tent the ham with aluminum foil to prevent burning.
For an extra touch of flavor, consider adding a splash of bourbon to the glaze mixture before simmering. Finally, use the pan drippings to create a delicious sauce by deglazing the roasting pan with a bit of water or stock, scraping up the flavorful bits. This sauce can be served alongside the ham for added richness.
Roasted Turkey With Cranberry Relish
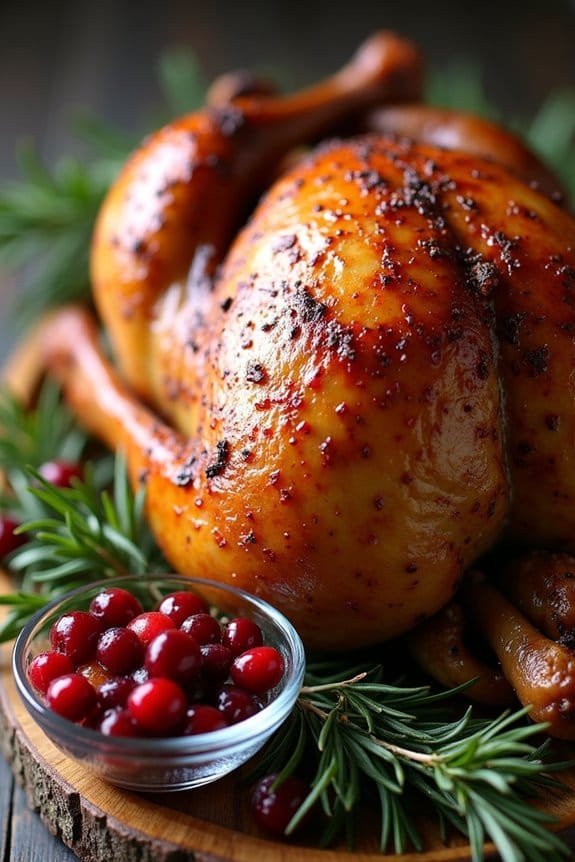
Roasted Turkey With Cranberry Relish is a classic dish that adds a festive touch to any Christmas lunch buffet. The succulent roasted turkey is a centerpiece that never fails to impress, while the tangy cranberry relish provides a revitalizing contrast that enhances the rich flavors of the turkey. This dish not only looks stunning on the table but also tantalizes the taste buds with its harmonious blend of savory and sweet flavors.
To achieve the perfect Roasted Turkey With Cranberry Relish, it’s crucial to focus on both the preparation of the turkey and the creation of a vibrant, homemade relish. The turkey should be seasoned well and cooked to golden perfection, guaranteeing it remains juicy and tender. Meanwhile, the cranberry relish should be made with fresh cranberries and a balance of sweet and tart ingredients to complement the turkey beautifully. This dish serves 4-6 people, making it ideal for a small festive gathering.
Ingredients for Roasted Turkey:
- 1 whole turkey (around 8-10 pounds)
- 1/4 cup unsalted butter, softened
- 1 tablespoon salt
- 1 teaspoon black pepper
- 1 tablespoon fresh thyme leaves
- 1 tablespoon fresh rosemary, chopped
- 1 lemon, halved
- 1 onion, quartered
- 3 garlic cloves, smashed
Ingredients for Cranberry Relish:
- 2 cups fresh cranberries
- 1/2 cup granulated sugar
- 1/4 cup orange juice
- 1 tablespoon grated orange zest
- 1/4 teaspoon ground cinnamon
Cooking Instructions:
- Preheat the Oven: Preheat your oven to 325°F (165°C) to make sure it’s ready for roasting the turkey.
- Prepare the Turkey: Remove the giblets and pat the turkey dry with paper towels. Gently loosen the skin over the breast meat and rub the softened butter under the skin and all over the turkey. Season the turkey generously with salt, pepper, thyme, and rosemary.
- Stuff the Turkey: Stuff the cavity of the turkey with the halved lemon, quartered onion, and smashed garlic cloves to infuse flavor during roasting.
- Roast the Turkey: Place the turkey on a rack in a roasting pan. Roast in the preheated oven for approximately 3 to 3.5 hours, or until the internal temperature reaches 165°F (74°C) when measured at the thickest part of the breast and thigh. Baste the turkey occasionally with its drippings.
- Prepare the Cranberry Relish: While the turkey is roasting, combine cranberries, sugar, orange juice, orange zest, and cinnamon in a medium saucepan over medium heat. Cook until the cranberries burst and the mixture thickens, stirring occasionally, about 10-15 minutes. Remove from heat and let cool.
- Rest the Turkey: Once the turkey is done, remove it from the oven and let it rest for at least 20 minutes before carving. This helps the juices redistribute, keeping the meat moist.
- Serve: Carve the turkey and serve it on a platter with the cranberry relish on the side. Garnish with additional rosemary or thyme if desired.
Extra Tips:
For the juiciest turkey, consider brining it the night before with a simple saltwater solution. This helps to enhance the flavor and moisture content of the meat.
When making the cranberry relish, you can adjust the sugar to your taste preference for a sweeter or more tart relish. If you prefer a smoother relish texture, you can pulse it in a food processor after cooking.
Finally, consider using the turkey drippings to make a delicious gravy to accompany the dish, adding another layer of flavor to your festive meal.
Festive Stuffed Pork Loin

A Festive Stuffed Pork Loin is a perfect centerpiece for your Christmas lunch buffet, offering a delightful blend of savory flavors and holiday flair. This dish combines tender, juicy pork loin with a savory stuffing made from a medley of herbs, breadcrumbs, and dried fruits, creating a harmonious balance of flavors and textures.
The stuffing not only adds flavor but also keeps the pork moist during roasting, guaranteeing a succulent result that will impress your guests. This recipe serves 4-6 people, making it ideal for an intimate gathering. The pork loin is seasoned and rolled around the stuffing, then roasted to perfection.
The aroma of the herbs and the sweet notes of dried fruits will fill your home, adding to the festive atmosphere. The final result is a beautifully sliced pork loin with a vibrant stuffing spiraled throughout, making each bite a festive treat.
Ingredients:
- 1 (2-3 pound) boneless pork loin
- Salt and pepper, to taste
- 2 tablespoons olive oil
- 1 cup fresh breadcrumbs
- 1/2 cup dried cranberries or apricots, chopped
- 1/4 cup walnuts or pecans, chopped
- 1 tablespoon fresh rosemary, chopped
- 1 tablespoon fresh thyme, chopped
- 1 clove garlic, minced
- Zest of 1 lemon
- 1/2 cup chicken broth
- 2 tablespoons Dijon mustard
Cooking Instructions:
- Prepare the Pork Loin: Preheat the oven to 375°F (190°C). Butterfly the pork loin by slicing it horizontally, being careful not to cut all the way through, and open it like a book. Cover with plastic wrap and gently pound with a meat mallet to even thickness.
- Season the Pork: Season both sides of the pork with salt and pepper. Set aside while preparing the stuffing.
- Make the Stuffing: In a medium bowl, combine the breadcrumbs, chopped dried cranberries or apricots, chopped walnuts or pecans, rosemary, thyme, minced garlic, and lemon zest. Mix well. Add the chicken broth and stir until the mixture is moistened but not soggy.
- Stuff and Roll: Spread the stuffing evenly over the cut side of the pork loin. Starting from one end, carefully roll the pork loin into a tight cylinder, enclosing the stuffing. Secure with kitchen twine at 1-2 inch intervals.
- Sear the Pork: In a large ovenproof skillet, heat the olive oil over medium-high heat. Add the stuffed pork loin and sear on all sides until browned, about 3-4 minutes per side.
- Roast the Pork: Brush the top of the seared pork loin with Dijon mustard. Transfer the skillet to the preheated oven and roast for 45-60 minutes, or until an internal temperature of 145°F (63°C) is reached.
- Rest and Serve: Remove the pork from the oven and let it rest for 10 minutes before slicing. This allows the juices to redistribute. Slice the pork and serve with your choice of sides.
Extra Tips:
To guarantee even cooking, make sure your pork loin is of uniform thickness after pounding. If you prefer a sweeter stuffing, you can increase the amount of dried fruit or add a tablespoon of honey to the mixture.
When searing the pork, take care not to burn the surface, as this could affect the flavor. Always let the pork rest before slicing to ensure it remains juicy. If you find the stuffing is escaping while rolling, you can use toothpicks to secure any loose edges in addition to the kitchen twine.
Creamy Garlic Mashed Potatoes
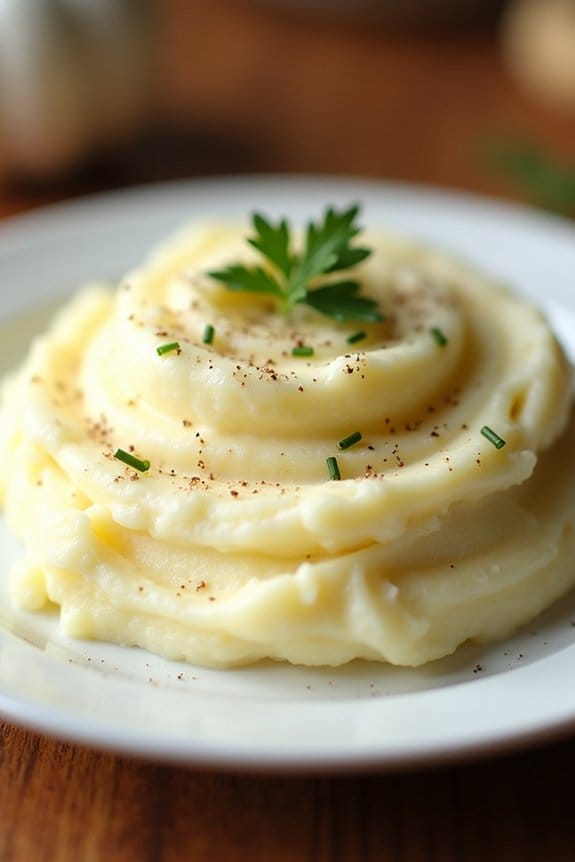
Creamy Garlic Mashed Potatoes are a classic and satisfying side dish that will perfectly complement your Christmas lunch buffet. This recipe combines the comforting flavors of rich cream, buttery potatoes, and aromatic garlic to create a smooth and flavorful mash. Ideal for serving alongside roasted meats, vegetables, or even as a standalone dish, these mashed potatoes are bound to be a hit with your guests.
With a few simple ingredients and easy-to-follow steps, you can whip up this delightful dish in no time. The key to achieving that perfect creamy texture lies in selecting the right type of potatoes and guaranteeing they’re cooked just right. Russet or Yukon Gold potatoes are ideal due to their starchy nature, which helps achieve a smooth consistency.
The addition of garlic, which is gently cooked until fragrant, adds a depth of flavor that elevates the entire dish. Prepare this recipe for 4-6 people and watch as they indulge in this comforting, luscious side dish.
Ingredients for 4-6 servings:
- 2 pounds of Russet or Yukon Gold potatoes
- 4 cloves of garlic, minced
- 1/2 cup of heavy cream
- 1/4 cup of unsalted butter
- Salt to taste
- Freshly ground black pepper to taste
- Fresh chives or parsley for garnish (optional)
Cooking Instructions:
- Prepare the Potatoes: Start by peeling the potatoes and cutting them into uniform chunks, about 1-2 inches in size. This guarantees even cooking.
- Boil the Potatoes: Place the potato chunks in a large pot and cover them with cold water. Add a generous pinch of salt. Bring the water to a boil over medium-high heat, then reduce to a simmer. Cook the potatoes for 15-20 minutes or until they’re fork-tender.
- Drain and Dry: Once the potatoes are cooked, drain them in a colander. Allow them to sit for a few minutes to let excess moisture evaporate, which helps in achieving a creamier texture.
- Prepare the Garlic and Cream Mixture: While the potatoes are draining, melt the butter in a small saucepan over medium heat. Add the minced garlic and sauté for about 1-2 minutes until the garlic is fragrant but not browned. Then, add the heavy cream and heat until everything is warmed through.
- Mash the Potatoes: Return the drained potatoes to the pot. Pour the warm garlic-cream mixture over the potatoes. Use a potato masher or a ricer to mash the potatoes until smooth.
- Season and Serve: Season the mashed potatoes with salt and freshly ground black pepper to taste. Mix well to guarantee even seasoning. If desired, garnish with freshly chopped chives or parsley before serving.
Extra Tips:
For the creamiest mashed potatoes, make sure to use warm butter and cream, as this helps to incorporate them more smoothly into the potatoes. Avoid over-mixing the potatoes, as this can lead to a gluey texture.
If you prefer a richer taste, you can substitute the heavy cream with half-and-half or whole milk. To save time during preparation, you can peel and cut the potatoes a few hours in advance and keep them submerged in cold water until you’re ready to cook.
Honey-Roasted Root Vegetables
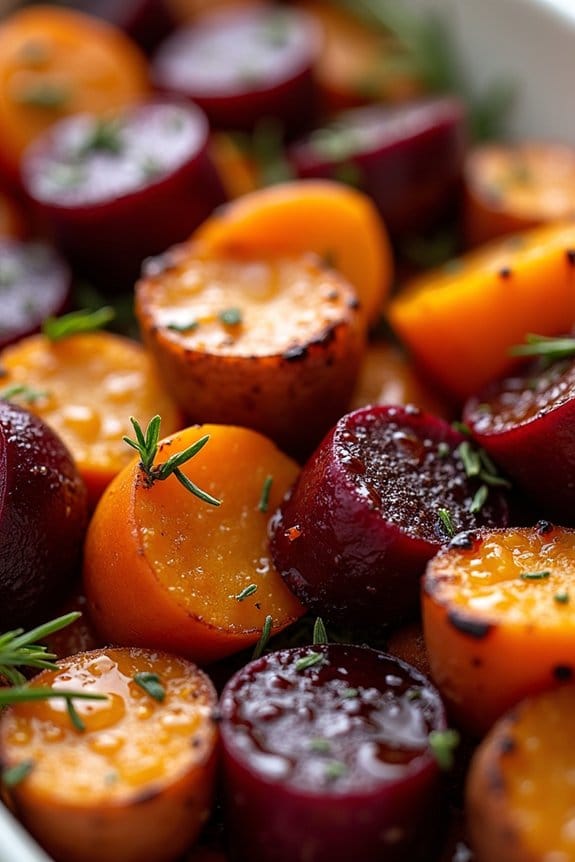
This Honey-Roasted Root Vegetables dish is a delightful addition to any Christmas lunch buffet, offering a perfect balance of sweet and savory flavors. The natural sweetness of carrots, parsnips, and beets is enhanced by a glaze of honey and herbs, creating a deliciously caramelized exterior with a tender and flavorful interior.
This colorful and nutritious side dish isn’t only easy to prepare but also adds a festive touch to your holiday table. Root vegetables are an excellent choice for a holiday meal as they’re in season during the winter months, making them both fresh and affordable.
The combination of different root vegetables not only provides a variety of flavors and textures but also offers a range of nutrients that are beneficial during the cold season. This recipe serves 4-6 people, making it perfect for a family gathering or as part of a larger buffet spread.
Ingredients:
- 3 large carrots
- 3 large parsnips
- 2 medium beets
- 1 large sweet potato
- 2 tablespoons olive oil
- 3 tablespoons honey
- 1 teaspoon salt
- 1/2 teaspoon black pepper
- 1 tablespoon fresh rosemary, chopped
- 1 tablespoon fresh thyme, chopped
Cooking Instructions:
- Preheat and Prepare: Preheat your oven to 400°F (200°C). Line a large baking sheet with parchment paper or lightly grease it with olive oil to prevent sticking.
- Prepare Vegetables: Peel the carrots, parsnips, and sweet potato. Scrub the beets thoroughly to remove any dirt. Cut all vegetables into uniform, bite-sized pieces to guarantee even cooking.
- Season the Vegetables: In a large mixing bowl, combine the chopped vegetables. Drizzle with olive oil and honey, making sure each piece is evenly coated. Sprinkle with salt, black pepper, rosemary, and thyme. Toss well to combine the flavors.
- Arrange and Roast: Spread the seasoned vegetables out in a single layer on the prepared baking sheet. Confirm there’s space between the pieces for even roasting. Place the baking sheet in the preheated oven.
- Roasting Time: Roast the vegetables for 35-40 minutes, stirring halfway through to confirm even caramelization. The vegetables are done when they’re tender and golden brown around the edges.
- Serve: Remove from the oven and transfer to a serving platter. Serve warm as part of your Christmas buffet.
Extra Tips:
For an extra depth of flavor, consider adding a splash of balsamic vinegar when tossing the vegetables with honey and olive oil. This will add a slight tang that complements the sweetness of the honey and vegetables.
If you prefer a spicier kick, a pinch of cayenne pepper can also be added to the seasoning mix. Make sure to keep an eye on the vegetables during the last 10 minutes of roasting to prevent them from burning, as honey can caramelize quickly.
Classic Green Bean Almondine
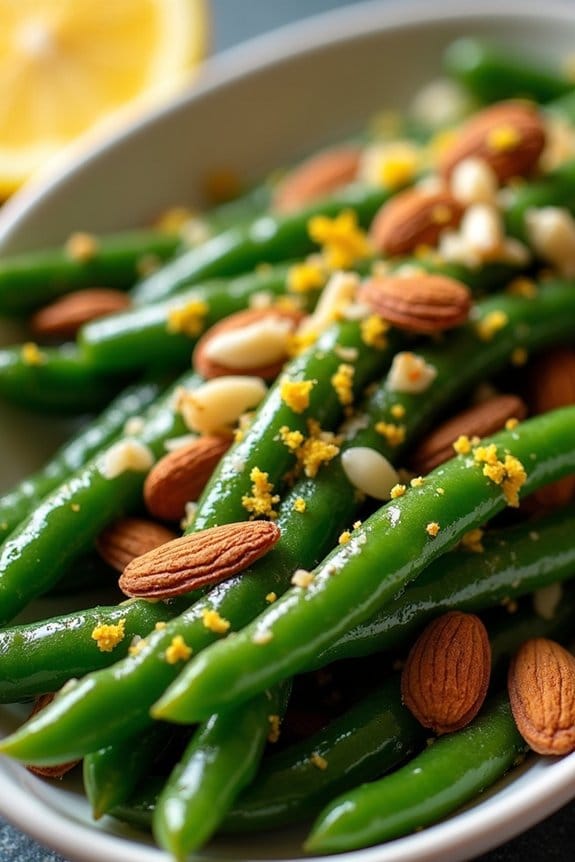
The Classic Green Bean Almondine is a timeless side dish that graces many holiday tables with its elegant simplicity and delicious flavors. This dish features tender green beans tossed with toasted almonds and a hint of lemon, creating a delightful balance of textures and tastes. It’s a perfect addition to a Christmas lunch buffet, complementing other traditional fare with its vibrant color and nutty undertones.
Preparing this dish for a serving size of 4-6 people guarantees that everyone gets a taste of this delectable treat. What makes Green Bean Almondine particularly appealing isn’t only its ease of preparation but also its ability to be made ahead of time and served at room temperature, making it a practical choice for busy holiday schedules. With just a few key ingredients, this dish can be brought together in no time, leaving you with more opportunity to enjoy the festivities.
Ingredients (for 4-6 servings):
- 1 pound fresh green beans, trimmed
- 3 tablespoons unsalted butter
- 1/3 cup sliced almonds
- 1 clove garlic, minced
- 1 tablespoon lemon juice
- Salt and pepper to taste
- Zest of 1 lemon
Cooking Instructions:
- Prepare the Green Beans: Start by bringing a large pot of salted water to a boil. Add the trimmed green beans and cook for about 3-5 minutes until they’re tender-crisp. Immediately drain and transfer them to a bowl of ice water to stop the cooking process and retain their vibrant green color. Once chilled, drain the beans and set them aside.
- Toast the Almonds: In a large skillet over medium heat, melt the butter. Add the sliced almonds to the skillet and toast them, stirring frequently, for about 3-4 minutes or until they’re golden brown and fragrant. Be careful not to burn them.
- Combine Ingredients: Add the minced garlic to the skillet with the toasted almonds. Cook for an additional 1 minute until the garlic is fragrant. Then, add the blanched green beans to the skillet.
- Season the Dish: Drizzle the lemon juice over the green beans and almonds, and season with salt and pepper to taste. Toss everything together until the green beans are well-coated with the buttery almond mixture.
- Finish with Lemon Zest: Just before serving, sprinkle the lemon zest over the top of the green beans for a fresh citrusy aroma and flavor boost.
Extra Tips:
When preparing Classic Green Bean Almondine, it’s important to avoid overcooking the green beans to maintain their crisp texture. Blanching them quickly and then shocking them in ice water helps preserve their color and crunch.
If you’re planning to make this dish ahead of time, you can prepare the components separately and combine them just before serving. Additionally, feel free to experiment with the amount of lemon juice and zest to suit your personal taste preferences, adding more for a tangier dish or less for subtle acidity.
Savory Sausage and Apple Stuffing
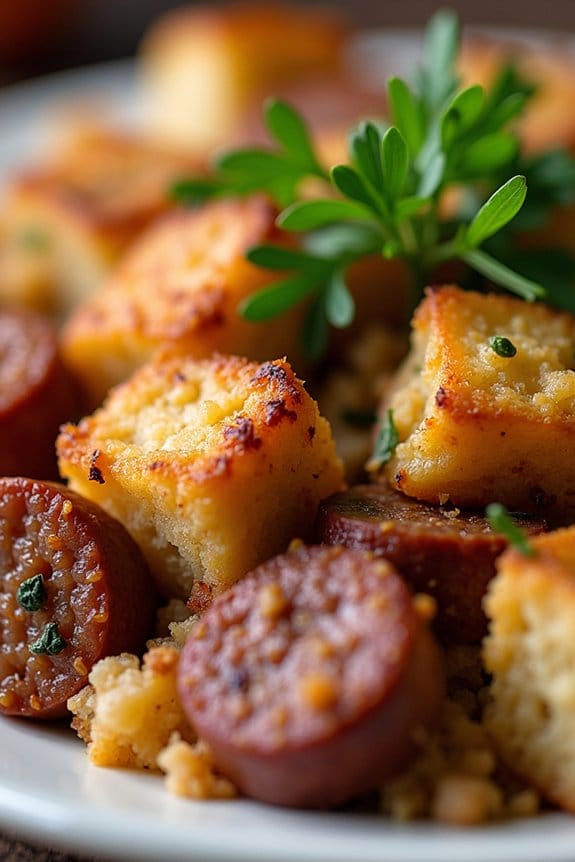
The holiday season is a time for indulgence, and there’s no better way to celebrate than with a festive Christmas lunch buffet. Among the many delectable dishes, Savory Sausage and Apple Stuffing stands out as a must-try recipe that’s both comforting and flavorful. This stuffing is a perfect balance of sweet and savory, with juicy apples providing a delightful contrast to the rich, seasoned sausage.
It’s an ideal accompaniment to any holiday spread, offering a twist on the traditional stuffing that your guests will love. The combination of fresh herbs, aromatic vegetables, and hearty bread cubes makes this dish a crowd-pleaser. The stuffing can be prepared in advance and baked just before serving, making it a convenient addition to your Christmas buffet.
Whether you’re serving it alongside a roast turkey or as a standalone dish, this Savory Sausage and Apple Stuffing is sure to become a holiday favorite. Below is a step-by-step guide to preparing this delicious stuffing for a serving size of 4-6 people.
Ingredients:
- 1 pound Italian sausage, casings removed
- 2 tablespoons unsalted butter
- 1 large onion, diced
- 2 stalks celery, diced
- 2 apples (such as Granny Smith), peeled, cored, and diced
- 2 cloves garlic, minced
- 1 teaspoon dried sage
- 1 teaspoon dried thyme
- 1/2 teaspoon salt
- 1/2 teaspoon black pepper
- 1/4 cup fresh parsley, chopped
- 8 cups bread cubes (preferably day-old, from a rustic loaf)
- 1 1/2 cups chicken broth
- 2 large eggs, beaten
Instructions:
- Preheat and Prepare: Preheat your oven to 350°F (175°C). Lightly grease a large baking dish and set it aside.
- Cook the Sausage: In a large skillet over medium heat, cook the Italian sausage until browned, breaking it into small pieces with a spoon. Once cooked through, remove the sausage from the skillet and set it aside.
- Cook the Vegetables and Apples: In the same skillet, add the unsalted butter. Once melted, add the diced onion and celery, cooking until softened and translucent, about 5 minutes. Stir in the diced apples and garlic, cooking for an additional 3 minutes until the apples start to soften.
- Season and Combine: Add the dried sage, thyme, salt, and black pepper to the skillet, stirring to combine. Mix in the cooked sausage and chopped fresh parsley, ensuring everything is well distributed.
- Prepare the Bread Mixture: In a large mixing bowl, combine the bread cubes with the sausage and apple mixture. Pour in the chicken broth and beaten eggs, gently stirring until the bread is evenly moistened.
- Transfer and Bake: Transfer the stuffing mixture to the prepared baking dish, spreading it out evenly. Cover the dish with foil and bake in the preheated oven for 30 minutes. Remove the foil and continue baking for an additional 15-20 minutes, or until the top is golden brown and crispy.
- Serve: Allow the stuffing to cool slightly before serving. Garnish with additional fresh parsley if desired.
Extra Tips:
For the best results, use slightly stale bread, as it will absorb the flavors better without becoming too mushy. If your bread is fresh, you can cube it and leave it out overnight to dry.
Feel free to experiment with different types of sausage, such as spicy or sweet varieties, to suit your personal taste. Also, consider adding a handful of toasted nuts like pecans or walnuts for added texture and flavor.
This stuffing can be made ahead of time and refrigerated overnight; simply reheat it before serving. Enjoy your delightful Christmas feast with this scrumptious Savory Sausage and Apple Stuffing!
Decadent Truffle Mac and Cheese
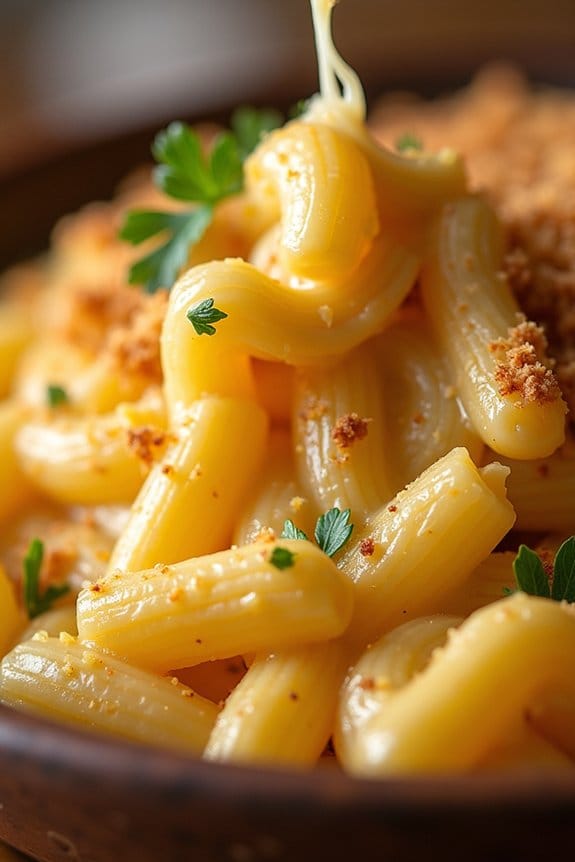
Indulge in the ultimate comfort food this holiday season with our Decadent Truffle Mac and Cheese. This elevated version of the classic dish combines creamy, gooey cheese with the luxurious flavor of truffle oil to create a rich and satisfying meal that will impress your guests at your Christmas lunch buffet.
The combination of sharp cheddar and Gruyère cheeses, along with the subtle earthiness of truffle oil, creates a symphony of flavors that’s both sophisticated and irresistibly delicious. Perfect for serving 4-6 people, this dish isn’t only a feast for the palate but also a visual delight, with its golden-brown crust and creamy interior.
Whether you’re looking to add a gourmet touch to your holiday spread or simply want to make a memorable meal for your loved ones, this recipe for Decadent Truffle Mac and Cheese is bound to become a festive favorite. Gather your ingredients and follow the simple steps below to create this culinary masterpiece.
Ingredients:
- 1 pound elbow macaroni
- 4 tablespoons unsalted butter
- 1/4 cup all-purpose flour
- 3 cups whole milk
- 1 cup heavy cream
- 2 cups sharp cheddar cheese, shredded
- 1 1/2 cups Gruyère cheese, shredded
- 1/4 cup grated Parmesan cheese
- 2 tablespoons truffle oil
- Salt and pepper to taste
- 1/2 cup panko breadcrumbs
- 2 tablespoons unsalted butter, melted
- 1 tablespoon chopped fresh parsley (optional, for garnish)
Instructions:
- Cook the Pasta: Begin by bringing a large pot of salted water to a boil. Add the elbow macaroni and cook according to package instructions until al dente. Drain the pasta and set it aside.
- Prepare the Cheese Sauce: In a large saucepan, melt 4 tablespoons of butter over medium heat. Once melted, whisk in the flour to create a roux. Cook, stirring constantly, for about 1-2 minutes until the mixture is golden and smooth.
- Add Milk and Cream: Gradually whisk in the milk and heavy cream, making certain there are no lumps. Continue to cook over medium heat until the mixture thickens and starts to bubble.
- Incorporate Cheeses: Reduce the heat to low and slowly stir in the cheddar, Gruyère, and Parmesan cheeses. Stir continuously until the cheeses are fully melted and the sauce is smooth.
- Season the Sauce: Add the truffle oil to the cheese sauce and season with salt and pepper to taste. Mix well to make sure the truffle flavor is evenly distributed.
- Combine Pasta and Sauce: Add the drained macaroni to the cheese sauce, stirring until the pasta is thoroughly coated with the sauce.
- Prepare the Topping: In a small bowl, combine the panko breadcrumbs with the melted butter. Stir until the breadcrumbs are evenly coated.
- Assemble and Bake: Preheat your oven to 375°F (190°C). Transfer the mac and cheese mixture to a greased baking dish. Sprinkle the prepared breadcrumb mixture evenly over the top.
- Bake to Perfection: Place the baking dish in the preheated oven and bake for 20-25 minutes, or until the top is golden brown and the cheese is bubbling.
- Garnish and Serve: Remove from the oven and let it cool slightly before serving. Garnish with chopped parsley, if desired, and enjoy your Decadent Truffle Mac and Cheese.
Extra Tips:
For the best results, use high-quality cheeses and fresh truffle oil, as these will greatly enhance the flavor of your dish. If you prefer a more pronounced truffle flavor, you can add an additional tablespoon of truffle oil.
Be careful not to overcook the pasta initially, as it will continue to cook in the oven. For a fun twist, consider adding cooked bacon or caramelized onions to the mac and cheese before baking to introduce additional layers of flavor.
Artisan Bread and Whipped Butter
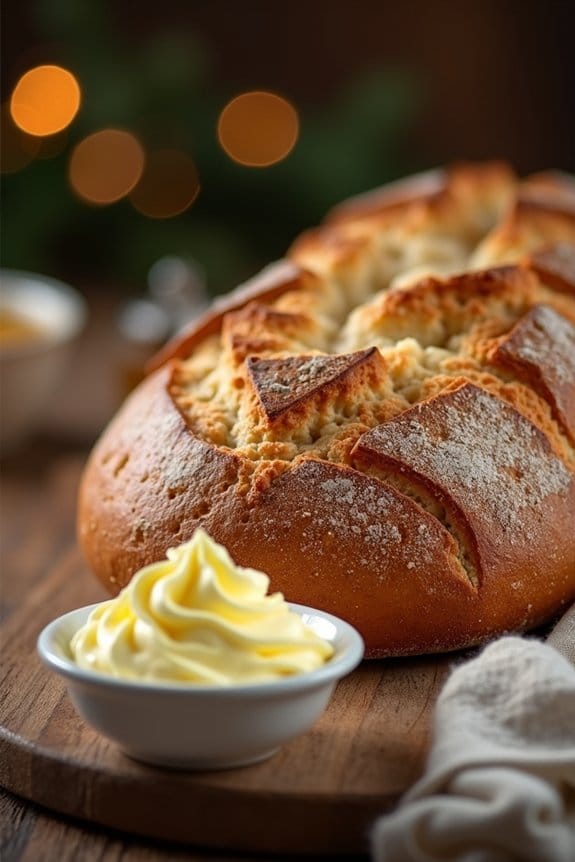
Artisan bread paired with whipped butter can elevate your Christmas lunch buffet to a new level of delight. The crusty exterior and soft, chewy interior of the bread, coupled with the light and fluffy texture of whipped butter, create a wonderful combination that’s both simple and sophisticated. This homemade bread will fill your kitchen with its warm, inviting aroma, while the whipped butter adds a luxurious touch that’s sure to impress your guests.
Creating your own artisan bread at home is easier than you might think, and it doesn’t require any special equipment. The key is giving the dough enough time to rise, which allows the flavors to develop and the texture to become perfect. Whipping up your own butter is equally simple and adds a personal touch to this classic pairing. Here’s how you can prepare artisan bread and whipped butter for a serving size of 4-6 people.
Ingredients:
*For the Artisan Bread:*
- 3 1/4 cups all-purpose flour
- 1 1/2 teaspoons salt
- 1/2 teaspoon active dry yeast
- 1 1/2 cups warm water
For the Whipped Butter:
- 1 cup unsalted butter, softened
- 1 tablespoon honey
- 1 teaspoon sea salt
Cooking Instructions:
- Prepare the Dough: In a large mixing bowl, combine the all-purpose flour, salt, and active dry yeast. Stir in the warm water until a shaggy dough forms. Cover the bowl with plastic wrap and let it sit at room temperature for 12-18 hours. This slow rise will enhance the bread’s flavor and texture.
- Shape the Dough: Once the dough has risen and become bubbly, turn it out onto a well-floured surface. Shape it into a ball by gently folding the edges towards the center. Place the dough on a piece of parchment paper and cover with a clean kitchen towel. Let it rise for another 1-2 hours.
- Preheat and Bake: Preheat your oven to 450°F (230°C) and place a Dutch oven inside to heat as well. Once preheated, carefully remove the Dutch oven and place the dough (with parchment paper) inside. Cover with the lid and bake for 30 minutes. Remove the lid and bake for an additional 15-20 minutes, or until the bread is golden brown and crusty. Let it cool on a wire rack.
- Make the Whipped Butter: While the bread is cooling, place the softened butter in a mixing bowl. Add honey and sea salt. Use an electric mixer to whip the butter on medium speed until it becomes light and fluffy, about 3-5 minutes. Transfer to a serving dish.
- Serve: Slice the artisan bread and serve with a generous dollop of whipped butter. Enjoy the combination of textures and flavors.
Extra Tips:
When making artisan bread, patience is key. Allowing the dough to rise slowly at room temperature helps develop the gluten structure and flavor, resulting in a superior texture. Don’t rush the process, and avoid over-handling the dough to preserve its airy structure.
For the whipped butter, make certain your butter is at room temperature before whipping for the best texture. You can also experiment by adding herbs or spices to the butter for additional flavor variations.
Assorted Holiday Desserts Display

Creating a festive and visually appealing Assorted Holiday Desserts Display can be the highlight of your Christmas lunch buffet. This delightful assortment won’t only satisfy the sweet tooth of your guests but also add a charming touch to your holiday spread. By offering a variety of flavors and textures, you can guarantee there’s something for everyone to enjoy.
From rich chocolate treats to fruity delights and creamy confections, this dessert display is sure to impress. The key to building an impressive dessert display is variety and presentation. Aim to include a range of desserts that differ in color, shape, and flavor to create a visually stunning arrangement.
Consider making mini versions of classic desserts to allow guests to sample several different types. Whether you choose to serve traditional holiday sweets or experiment with modern twists on classic recipes, the goal is to create a harmonious blend of tastes that evoke the warmth and joy of the holiday season.
Ingredients (Serving Size: 4-6 people)
- 12 mini chocolate brownies
- 12 mini fruit tarts
- 12 mini cheesecake bites
- 12 gingerbread cookies
- 1 cup whipped cream
- 1 cup fresh mixed berries (strawberries, blueberries, raspberries)
- 1/4 cup powdered sugar for dusting
- 1/2 cup chopped nuts (optional)
- 1/4 cup chocolate shavings
- Fresh mint leaves for garnish
Cooking Instructions
- Prepare the Mini Desserts: Begin by baking or purchasing mini chocolate brownies, fruit tarts, cheesecake bites, and gingerbread cookies. Confirm they’re cooled completely before arranging them on the display.
- Arrange the Desserts: On a large serving platter or dessert stand, start arranging the mini desserts. Place the chocolate brownies, fruit tarts, cheesecake bites, and gingerbread cookies in separate sections. You can create a circular or linear pattern, depending on the shape of your platter.
- Add Fresh Elements: Scatter fresh mixed berries around the desserts for a pop of color and freshness. Make sure the berries are washed and dried before adding them to the display.
- Decorate with Whipped Cream: Using a piping bag or spoon, add dollops of whipped cream on the cheesecake bites and fruit tarts. This adds a creamy element and enhances the visual appeal.
- Add Finishing Touches: Dust the entire platter lightly with powdered sugar for a snowy effect. Sprinkle chopped nuts over the brownies and chocolate shavings over the whipped cream for added texture and flavor. Finally, garnish the display with fresh mint leaves for a touch of green.
- Serve and Enjoy: Once the display is complete, place it at the center of your buffet table for all to admire. Encourage guests to sample a bit of everything to experience the full range of flavors.
Extra Tips
When preparing the Assorted Holiday Desserts Display, consider the dietary preferences and restrictions of your guests. Offering a few gluten-free or vegan options can guarantee that everyone can indulge in the holiday treats.
Additionally, make sure to have a balance of rich and light desserts to cater to different tastes. If you’re short on time, many local bakeries offer delicious mini desserts that can be incorporated into your display.
Finally, remember that presentation is key, so take the time to arrange the desserts in a way that’s both inviting and festive.
