
As the festive season approaches, there’s nothing quite like planning the perfect Christmas lunch that will have everyone gathered around the table in excitement. I love the idea of an herb-crusted prime rib roast as the star of the show, or perhaps a honey-glazed ham with spiced apples that keeps everyone coming back for seconds. These 15 flavorful recipes are sure to impress and make your holiday meal unforgettable. I’m thrilled to share the secrets to crafting a Christmas feast that truly stands out. Let’s get inspired and start planning a lunch that will be remembered for years to come.
Herb-Crusted Prime Rib Roast

Herb-Crusted Prime Rib Roast is a show-stopping centerpiece perfect for your Christmas lunch. This classic dish combines a tender, juicy prime rib roast with a flavorful herb crust that enhances the natural richness of the beef. The roast is slow-cooked to perfection, guaranteeing that every bite is succulent and full of flavor.
Whether you’re hosting a family gathering or an intimate holiday meal, this Herb-Crusted Prime Rib Roast is sure to impress your guests and create lasting holiday memories.
The beauty of this dish lies in its simplicity and the quality of ingredients used. A well-marbled prime rib roast is vital to achieve that melt-in-your-mouth texture, while a blend of fresh herbs, garlic, and seasonings creates a tantalizing crust that adds depth to the overall flavor profile.
When executed properly, this recipe will yield a roast that’s perfectly pink on the inside with a golden-brown crust on the outside, making it a feast for both the eyes and the palate.
Ingredients for 4-6 servings:
- 1 (5-pound) bone-in prime rib roast
- 2 tablespoons olive oil
- 4 cloves garlic, minced
- 2 tablespoons fresh rosemary, chopped
- 2 tablespoons fresh thyme, chopped
- 1 tablespoon fresh parsley, chopped
- 1 tablespoon coarse sea salt
- 1 teaspoon black pepper
- 1 teaspoon Dijon mustard
- 1 teaspoon lemon zest
Cooking Instructions:
- Prepare the Prime Rib: Remove the prime rib from the refrigerator and let it sit at room temperature for about 2 hours. This guarantees even cooking throughout the roast.
- Preheat the Oven: Set your oven to 450°F (232°C) and allow it to fully preheat. This initial high heat will help create a nice crust on the roast.
- Make the Herb Mixture: In a small bowl, combine the minced garlic, chopped rosemary, thyme, parsley, olive oil, Dijon mustard, lemon zest, sea salt, and black pepper. Mix well to create a paste.
- Season the Roast: Pat the prime rib dry with paper towels to remove any excess moisture. Rub the herb mixture evenly over the entire surface of the roast, pressing it gently to adhere.
- Roast the Prime Rib: Place the prime rib on a rack in a roasting pan, bone side down. Roast in the preheated oven for 20 minutes. This high heat will sear the outside, locking in the juices.
- Reduce the Heat: After 20 minutes, lower the oven temperature to 325°F (163°C). Continue roasting until a meat thermometer inserted into the thickest part of the roast reads 120°F (49°C) for medium-rare, about 1.5 to 2 hours.
- Rest the Roast: Once the desired temperature is reached, remove the roast from the oven and tent it loosely with foil. Let it rest for at least 20 minutes before carving. This allows the juices to redistribute, guaranteeing a juicy roast.
- Carve and Serve: Carefully slice the prime rib into desired portions and serve warm, accompanied by your favorite holiday sides.
Extra Tips:
For the best results, always use a meat thermometer to check the doneness of your roast, as ovens may vary. If you prefer your roast more well-done, adjust the internal temperature accordingly.
Additionally, allowing the roast to rest after cooking is vital for maintaining its juiciness and flavor. If desired, you can prepare a simple au jus by deglazing the roasting pan with beef broth and red wine, enhancing the flavor of the dish even further.
Honey-Glazed Ham With Spiced Apples

Honey-Glazed Ham With Spiced Apples is a delightful main course that brings warmth and cheer to your Christmas lunch. The sweet, sticky glaze on the ham perfectly complements the spiced apples, creating a harmonious balance of flavors that’s both comforting and festive. This dish isn’t only delicious but also visually appealing, making it a centerpiece worthy of your holiday table.
The preparation of Honey-Glazed Ham With Spiced Apples involves a few simple steps that result in a succulent and flavorful dish. The ham is coated with a honey glaze that caramelizes beautifully as it bakes, while the spiced apples provide a fragrant and juicy accompaniment. Ideal for serving 4-6 people, this recipe will surely leave your guests impressed and satisfied.
Ingredients for Honey-Glazed Ham With Spiced Apples (serving size: 4-6):
- 1 (4-5 pound) boneless ham
- 1 cup honey
- 1/2 cup brown sugar
- 2 tablespoons Dijon mustard
- 1 teaspoon ground cinnamon
- 1/2 teaspoon ground cloves
- 1/2 teaspoon ground allspice
- 4 large apples (such as Granny Smith or Honeycrisp), cored and sliced
- 1 tablespoon lemon juice
- 1/4 cup apple cider
- Salt and pepper to taste
Cooking Instructions:
- Preheat the Oven: Start by preheating your oven to 325°F (165°C). This will guarantee that your ham cooks evenly throughout.
- Prepare the Ham: Place the ham in a large roasting pan. In a small bowl, mix together the honey, brown sugar, Dijon mustard, cinnamon, cloves, and allspice. Stir until the mixture is smooth and well combined.
- Apply the Glaze: Generously brush the honey glaze over the entire surface of the ham, making sure it’s well coated. Reserve some of the glaze for basting during cooking.
- Prepare the Apples: In a medium bowl, toss the apple slices with lemon juice to prevent browning. Sprinkle lightly with salt, pepper, and a little cinnamon if desired.
- Bake the Ham: Place the roasting pan with the ham in the preheated oven. Bake for about 1.5 to 2 hours, or until the internal temperature reaches 140°F (60°C). Baste the ham with the reserved glaze every 30 minutes.
- Add the Apples: About 45 minutes before the ham is done, add the spiced apple slices around the base of the ham in the roasting pan. Pour apple cider over the apples to enhance their flavor as they cook.
- Finish and Serve: Once the ham reaches the desired temperature and is beautifully glazed, remove it from the oven. Let it rest for about 10 minutes before slicing. Serve the ham slices with the spiced apples on the side.
Extra Tips:
For an extra layer of flavor, consider inserting whole cloves into the surface of the ham before glazing. This won’t only enhance the aroma but also add a decorative touch.
Make sure to use a meat thermometer to avoid overcooking or undercooking the ham, as precise temperature is key to achieving a juicy and tender result. If you prefer a thicker glaze, you can simmer the leftover glaze on the stove until it thickens slightly and use it as a sauce when serving.
Enjoy this delightful dish with your favorite holiday sides and savor the festive flavors!
Stuffed Turkey Breast With Cranberry Sauce

If you’re looking to impress your family and friends this holiday season, a Stuffed Turkey Breast with Cranberry Sauce is a delectable main course that’s certain to please. This dish combines the savory flavors of turkey with a sweet and tangy cranberry sauce, offering a delightful twist on traditional Christmas fare. Stuffing the turkey breast not only adds incredible flavor but also keeps the meat moist and juicy. This recipe is perfect for a smaller gathering, serving 4-6 people, without the hassle of cooking a whole turkey.
The cranberry sauce, with its vibrant color and tart-sweet flavor, complements the savory stuffing and turkey perfectly. Whether you’re hosting a festive lunch or planning a cozy evening meal, this stuffed turkey breast pairs beautifully with classic sides like roasted vegetables or creamy mashed potatoes. Follow this simple yet elegant recipe to create a memorable holiday feast that will leave your guests keenly reaching for seconds.
Ingredients (Serves 4-6):
- 1 boneless turkey breast (about 2 to 2.5 lbs)
- 1 cup fresh cranberries
- 1/2 cup sugar
- 1/2 cup orange juice
- 1/4 cup water
- 2 cups cubed bread (preferably day-old)
- 1/2 cup chopped onion
- 1/2 cup chopped celery
- 1/2 cup chicken broth
- 1/4 cup chopped walnuts
- 1/4 cup dried cranberries
- 2 tablespoons olive oil
- 2 tablespoons butter
- 2 teaspoons dried sage
- 1 teaspoon dried thyme
- Salt and pepper to taste
Cooking Instructions:
- Prepare the Cranberry Sauce: In a medium saucepan, combine fresh cranberries, sugar, orange juice, and water. Bring the mixture to a boil over medium heat, stirring occasionally until the cranberries burst and the sauce thickens (about 10-15 minutes). Remove from heat and let it cool.
- Prepare the Stuffing: In a large skillet, heat olive oil over medium heat. Add chopped onion and celery, sautéing until they’re soft and translucent. Add cubed bread, chicken broth, walnuts, dried cranberries, sage, thyme, salt, and pepper. Stir well until the bread absorbs the broth and the mixture is well combined.
- Butterfly the Turkey Breast: Place the turkey breast on a cutting board. With a sharp knife, carefully slice horizontally through the thickest part of the breast, being careful not to cut all the way through, to create a flap. Open the turkey breast like a book, and flatten it gently with a meat mallet to even out the thickness.
- Stuff and Roll the Turkey Breast: Spread the stuffing mixture evenly over the turkey, leaving a small border around the edges. Starting from one side, carefully roll the turkey breast tightly into a log. Use kitchen twine to tie the roll at 1-2 inch intervals to secure it.
- Roast the Turkey: Preheat your oven to 350°F (175°C). In a roasting pan, melt butter over medium heat. Place the stuffed turkey roll seam-side down in the pan, browning on all sides for about 5 minutes. Transfer the pan to the oven and roast for 45-60 minutes, or until the internal temperature reaches 165°F (74°C).
- Serve: Once cooked, let the turkey rest for 10 minutes before slicing. Serve with the cranberry sauce on the side.
Extra Tips:
For extra flavor, consider marinating the turkey breast in a brine solution overnight before stuffing. This can enhance the taste and juiciness of the meat.
Also, when rolling the turkey, make certain it’s tight but not overly compressed to allow even cooking. If you’re short on time, you can prepare the cranberry sauce and stuffing a day ahead. Just make sure to store them separately in airtight containers in the refrigerator until ready to use.
Finally, always allow the turkey to rest after cooking; this helps the juices redistribute, making sure each slice is tender and moist.
Garlic and Rosemary Roasted Leg of Lamb
A Garlic and Rosemary Roasted Leg of Lamb is a classic, elegant centerpiece for a Christmas lunch, offering a burst of festive flavors that will delight your guests. The aromatic blend of garlic and rosemary infuses the lamb with a rich, savory taste, while roasting it to perfection guarantees a tender, juicy result.
This dish isn’t only a feast for the taste buds but also a visual delight, with its golden-brown exterior and succulent pink interior. Perfect for a Christmas celebration with family and friends, this recipe serves 4-6 people, making it ideal for a small to medium gathering.
With a few simple ingredients and some careful attention, you can create a memorable main course that embodies the warmth and joy of the holiday season. Pair it with your favorite sides, such as roasted potatoes and seasonal vegetables, for a complete meal that’s sure to impress.
Ingredients:
- 1 boneless leg of lamb, approximately 4-5 pounds
- 6 cloves of garlic, minced
- 2 tablespoons fresh rosemary, chopped
- 2 tablespoons olive oil
- Salt and pepper to taste
- Juice of 1 lemon
- 1 cup dry white wine or chicken broth
Cooking Instructions:
- Prepare the Marinade: In a small bowl, combine minced garlic, chopped rosemary, olive oil, lemon juice, salt, and pepper. Mix well to form a paste.
- Marinate the Lamb: Place the leg of lamb on a large roasting pan. Using a sharp knife, make small incisions all over the lamb. Rub the garlic and rosemary paste evenly over the entire surface, pressing it into the incisions to make certain the flavors penetrate deeply. Cover the lamb and refrigerate for at least 2 hours, or overnight for maximum flavor.
- Preheat the Oven: Preheat your oven to 375°F (190°C).
- Roast the Lamb: Remove the lamb from the refrigerator and let it come to room temperature. Pour the white wine or chicken broth into the roasting pan to keep the lamb moist during cooking. Roast the lamb in the preheated oven for approximately 1.5 to 2 hours, or until a meat thermometer inserted into the thickest part of the lamb reads 135°F (57°C) for medium-rare, or adjust according to your desired doneness.
- Rest the Lamb: Once cooked, remove the lamb from the oven and cover it loosely with aluminum foil. Allow it to rest for 15-20 minutes before carving. This resting period allows the juices to redistribute, assuring a succulent slice.
- Carve and Serve: Slice the lamb thinly against the grain and arrange it on a serving platter. Drizzle some of the pan juices over the slices for added flavor. Serve with your choice of sides and enjoy your delightful Christmas feast.
Extra Tips:
For best results, let the lamb marinate overnight to allow the flavors to fully develop. If you prefer your lamb well-done, extend the cooking time, but be cautious not to overcook, as lamb can become tough.
If you don’t have fresh rosemary, dried rosemary can be used, but use sparingly as it has a more concentrated flavor. Additionally, letting the lamb rest is vital, as cutting into it too soon can result in a loss of juices, leading to a drier texture.
Enjoy the process and the wonderful aroma that fills your kitchen as the lamb roasts to perfection.
Baked Salmon With Dill and Lemon
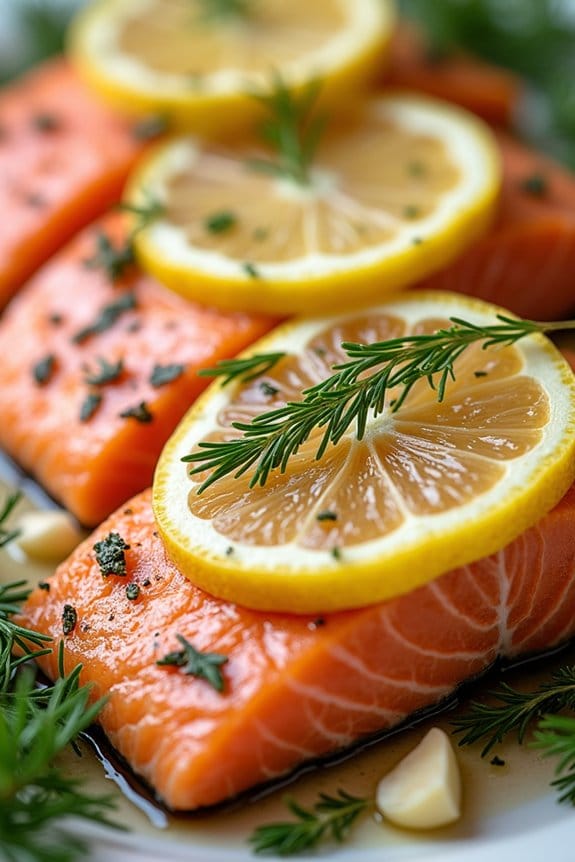
Baked Salmon With Dill and Lemon is a delightful and elegant main course perfect for a Christmas lunch. This dish combines the delicate flavor of salmon with the fresh, aromatic notes of dill and zesty lemon, providing a rejuvenating contrast that enhances the natural richness of the fish. Not only is it incredibly delicious, but it’s also simple to prepare, making it an excellent option for those who wish to spend more time with their family and friends rather than in the kitchen.
The presentation of the dish is as appealing as its taste, with the vibrant pink salmon adorned with sprigs of dill and slices of lemon, making it a visually stunning centerpiece for your holiday table.
Salmon is a fantastic choice for a Christmas lunch because it’s a rich source of omega-3 fatty acids, which are beneficial for heart health. Additionally, the combination of dill and lemon not only adds flavor but also complements the salmon without overpowering its natural taste. This recipe is designed to serve 4-6 people, guaranteeing that everyone at your gathering can enjoy a generous portion of this delightful dish. Pair it with some roasted vegetables or a light salad for a complete meal that’s both satisfying and healthy.
Ingredients:
- 2 pounds of salmon fillet
- 2 tablespoons of olive oil
- Salt, to taste
- Black pepper, to taste
- 1 lemon, thinly sliced
- 3 tablespoons of fresh dill, chopped
- 4 cloves of garlic, minced
- 1 tablespoon of lemon juice
Instructions:
- Preheat the Oven: Begin by preheating your oven to 375°F (190°C). This guarantees that the oven reaches the right temperature for even cooking, resulting in a perfectly baked salmon.
- Prepare the Baking Dish: Lightly grease a baking dish with olive oil to prevent the salmon from sticking. Choose a dish large enough to accommodate the salmon fillet without crowding, which allows for even heat distribution.
- Season the Salmon: Place the salmon fillet skin-side down in the prepared baking dish. Drizzle the olive oil evenly over the salmon, then season generously with salt and black pepper.
- Add Flavorful Ingredients: Sprinkle the minced garlic over the salmon, ensuring even distribution. Arrange the lemon slices on top of the salmon, followed by a generous sprinkling of fresh dill. Finally, drizzle the lemon juice over the entire fillet to enhance the citrusy flavor profile.
- Bake the Salmon: Place the dish in the preheated oven and bake for 20-25 minutes, depending on the thickness of the fillet. The salmon should be opaque and flake easily with a fork when done.
- Serve: Once baked, remove the salmon from the oven and let it rest for a few minutes before serving. This allows the juices to redistribute, keeping the fish moist and flavorful.
Extra Tips:
For best results, confirm that the salmon is at room temperature before baking, as this helps it cook more evenly. When selecting your salmon, look for fillets with vibrant color and a firm texture.
If you prefer a more intense lemon flavor, you can add zest from the lemon before slicing it. Additionally, when checking for doneness, an internal temperature of 145°F (63°C) is ideal for perfectly cooked salmon. Don’t forget to garnish with extra dill and lemon slices for a beautiful presentation that will impress your guests.
Mushroom and Chestnut Wellington

Mushroom and Chestnut Wellington is a festive and delicious vegetarian main course perfect for a Christmas lunch. This dish combines the earthy flavors of mushrooms with the sweet nuttiness of chestnuts, wrapped in a flaky puff pastry.
It’s not only a great centerpiece for vegetarians but also a delightful addition to any holiday table that everyone can enjoy. The rich filling is complemented by herbs and spices, making every bite a burst of flavor.
The preparation involves creating a savory mixture that’s encased in golden pastry, offering a satisfying texture contrast. The Wellington is baked until it’s beautifully browned and crisp on the outside, while the inside remains moist and flavorful.
This recipe caters to serving 4-6 people, making it ideal for a small family gathering or an intimate Christmas celebration.
Ingredients (serving size: 4-6 people):
- 2 tablespoons olive oil
- 1 large onion, finely chopped
- 2 garlic cloves, minced
- 500g mushrooms, finely chopped
- 200g cooked chestnuts, roughly chopped
- 1 tablespoon soy sauce
- 1 teaspoon fresh thyme leaves
- 1 teaspoon fresh rosemary, chopped
- 100g breadcrumbs
- 1 tablespoon Dijon mustard
- Salt and pepper to taste
- 500g puff pastry
- 1 egg, beaten (for egg wash)
Instructions:
- Prepare the Filling: Heat the olive oil in a large skillet over medium heat. Add the chopped onions and garlic, sautéing until the onions are translucent.
- Add the mushrooms and cook until they’ve released their moisture and become golden brown.
- Add Flavorings: Stir in the chopped chestnuts, soy sauce, thyme, rosemary, salt, and pepper. Cook for an additional 5 minutes, allowing the flavors to meld together.
- Bind the Mixture: Remove the mixture from heat and stir in the breadcrumbs and Dijon mustard. Allow it to cool slightly.
- Preheat the Oven: Preheat your oven to 200°C (392°F).
- Roll the Pastry: On a lightly floured surface, roll out the puff pastry into a rectangle large enough to encase the filling.
- Assemble the Wellington: Spoon the cooled mushroom and chestnut mixture onto the center of the pastry. Fold the pastry over the filling, sealing the edges by pressing them together. Trim any excess pastry if necessary.
- Apply Egg Wash: Place the Wellington seam-side down on a baking sheet lined with parchment paper. Brush the pastry with beaten egg to give it a golden finish.
- Bake: Bake in the preheated oven for 25-30 minutes or until the pastry is crisp and golden brown.
- Rest and Serve: Allow the Wellington to rest for about 10 minutes before slicing and serving.
Extra Tips:
For the best results, make sure that the mushroom mixture isn’t too wet, as excess moisture can make the pastry soggy.
You can prepare the filling a day ahead, refrigerating it until you’re ready to assemble the Wellington. If you’re looking to add a bit more flavor, consider a splash of balsamic vinegar or a sprinkle of nutmeg to the filling.
Make sure the puff pastry is well-chilled, as this helps it to puff up beautifully when baked.
Citrus and Herb Marinated Grilled Chicken
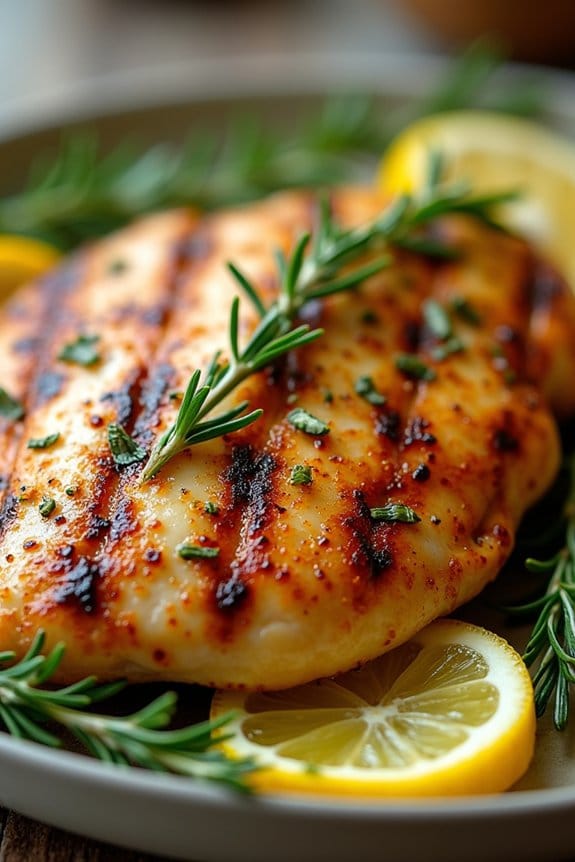
Citrus and Herb Marinated Grilled Chicken is a delightful main course that’s perfect for a festive Christmas lunch. The dish features juicy, tender chicken infused with the fresh flavors of citrus and aromatic herbs, offering a revitalizing twist to the traditional holiday meal.
The marinade, a blend of citrus juices, olive oil, garlic, and a variety of herbs, not only enhances the flavor of the chicken but also helps in keeping it moist and succulent when grilled. This dish pairs wonderfully with a variety of sides, making it a versatile addition to your holiday spread.
Preparing this Citrus and Herb Marinated Grilled Chicken is relatively simple, yet it delivers complex flavors that are sure to impress your family and friends. The key to this recipe is allowing the chicken to marinate for several hours, guaranteeing that it absorbs all the flavors of the marinade.
Grilling the chicken adds a subtle smokiness that complements the zesty citrus and earthy herbs. Whether you’re an experienced cook or a novice in the kitchen, this recipe is a fantastic choice for creating a memorable Christmas lunch.
Ingredients (Serves 4-6):
- 4-6 boneless, skinless chicken breasts
- 1/2 cup fresh orange juice
- 1/4 cup fresh lemon juice
- 1/4 cup fresh lime juice
- 1/4 cup olive oil
- 3 cloves garlic, minced
- 1 tablespoon honey
- 1 tablespoon Dijon mustard
- 1 tablespoon fresh thyme leaves
- 1 tablespoon fresh rosemary, chopped
- 1 tablespoon fresh parsley, chopped
- Salt and pepper to taste
- Lemon and lime slices for garnish (optional)
Cooking Instructions:
- Prepare the Marinade: In a large mixing bowl, combine the orange juice, lemon juice, lime juice, olive oil, minced garlic, honey, Dijon mustard, thyme, rosemary, and parsley. Whisk the ingredients together until well combined.
- Marinate the Chicken: Place the chicken breasts in a resealable plastic bag or shallow dish. Pour the marinade over the chicken, guaranteeing each piece is thoroughly coated. Seal the bag or cover the dish with plastic wrap and refrigerate for at least 2 hours, or up to 8 hours for maximum flavor infusion.
- Preheat the Grill: About 30 minutes before you’re ready to cook, preheat your grill to medium-high heat. This will guarantee the grill is hot enough to sear the chicken, locking in the juices.
- Grill the Chicken: Remove the chicken from the marinade and let any excess drip off. Place the chicken on the grill and cook for 6-7 minutes on each side, or until the internal temperature reaches 165°F (74°C). Avoid moving the chicken too much to achieve beautiful grill marks.
- Rest and Serve: Once cooked, remove the chicken from the grill and let it rest for 5 minutes before serving. This allows the juices to redistribute throughout the meat, guaranteeing each bite is juicy. Garnish with lemon and lime slices if desired.
Extra Tips:
When preparing this dish, consider doubling the marinade recipe to reserve some for basting while grilling or as a sauce to serve alongside the finished chicken.
If you don’t have access to a grill, you can also use a grill pan on the stove top or bake the chicken in the oven at 375°F (190°C) for about 25-30 minutes. Adjust the seasoning to your preference, and feel free to experiment with different herbs based on your taste or availability.
Always remember to discard any marinade that has come into contact with raw chicken to prevent contamination.
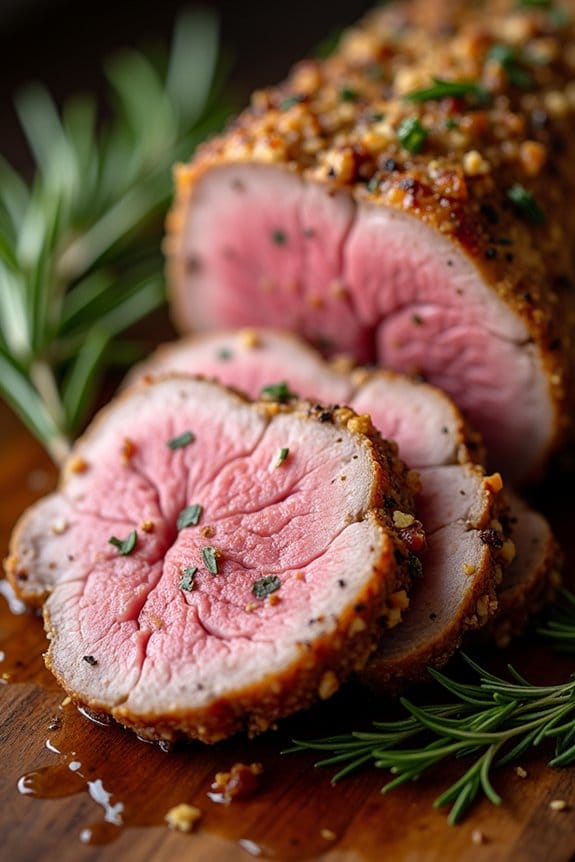
Pork Loin With Apple Cider Reduction

This Christmas, elevate your holiday meal with a beautifully cooked pork loin paired with a flavorful apple cider reduction. The combination of succulent pork and the sweet, tangy reduction creates an exquisite dish that will surely impress your family and guests. The pork loin is seasoned and roasted to perfection, while the apple cider reduction adds a burst of flavor that complements the meat wonderfully. It’s a delightful main course that strikes the perfect balance between savory and sweet.
Cooking a pork loin with an apple cider reduction not only provides a delicious meal but also fills your kitchen with the warm, inviting aromas of the festive season. This dish is perfect for a Christmas lunch, offering a unique twist on traditional holiday flavors. The use of apple cider in the reduction introduces a subtle sweetness that pairs beautifully with the savory, tender pork. With a serving size of 4-6 people, this recipe guarantees that everyone at your table will enjoy a hearty and memorable meal.
Ingredients (Serves 4-6):
- 3 to 4-pound pork loin
- Salt and freshly ground black pepper
- 2 tablespoons olive oil
- 1 cup apple cider
- 1/2 cup chicken broth
- 2 tablespoons Dijon mustard
- 2 tablespoons brown sugar
- 2 cloves garlic, minced
- 1 tablespoon fresh thyme leaves
- 1/4 cup heavy cream
- 2 tablespoons butter
Cooking Instructions:
- Preheat and Prepare: Preheat your oven to 375°F (190°C). Pat the pork loin dry with paper towels and season generously with salt and freshly ground black pepper.
- Sear the Pork: In a large oven-safe skillet, heat the olive oil over medium-high heat. Once hot, add the pork loin and sear on all sides until browned, about 3-4 minutes per side. This step locks in the juices and adds flavor.
- Roast the Pork: Transfer the skillet with the pork loin to the preheated oven. Roast for 25-30 minutes, or until the internal temperature reaches 145°F (63°C). Once cooked, remove the pork loin from the oven and let it rest on a cutting board covered with foil.
- Prepare the Reduction: While the pork is resting, place the skillet back on the stove over medium heat. Add the apple cider, chicken broth, Dijon mustard, brown sugar, garlic, and thyme. Stir well to combine, scraping up any browned bits from the bottom of the skillet.
- Simmer and Thicken: Allow the mixture to simmer until it has reduced by half, about 10-15 minutes. Stir occasionally to guarantee even cooking and prevent sticking.
- Finish the Sauce: Stir in the heavy cream and butter, and continue to cook for an additional 2-3 minutes until the sauce is smooth and slightly thickened. Taste and adjust seasoning with salt and pepper as needed.
- Serve: Slice the rested pork loin and arrange it on a serving platter. Drizzle the apple cider reduction over the top or serve it on the side. Garnish with additional thyme if desired.
Extra Tips:
When cooking pork loin, it’s important not to overcook it to prevent it from becoming dry. Use a meat thermometer to ascertain it reaches the correct internal temperature. Additionally, letting the pork rest after roasting allows the juices to redistribute, resulting in a more tender and flavorful meat.
If the reduction sauce becomes too thick, you can thin it out with a splash of apple cider or chicken broth. Enjoy this delicious dish with sides like roasted vegetables or mashed potatoes for a complete and satisfying Christmas lunch.
Vegetarian Lasagna With Spinach and Ricotta
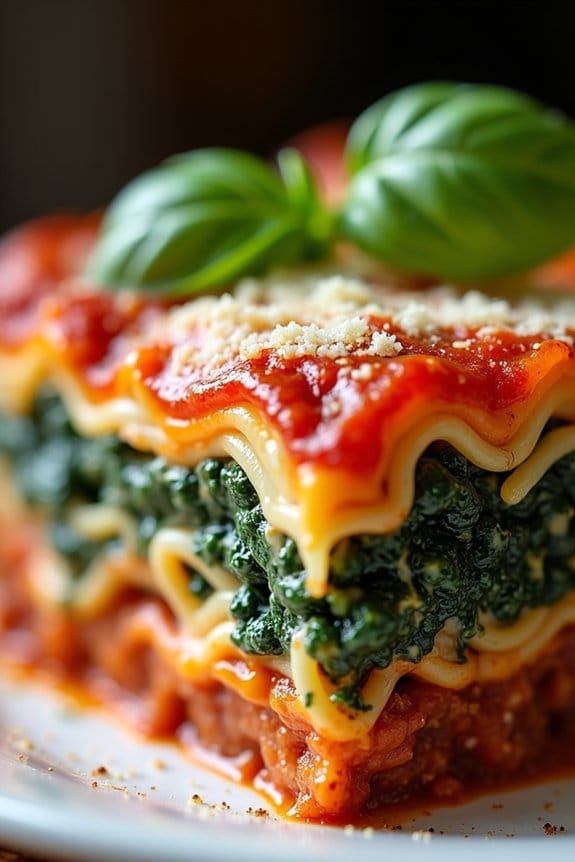
Vegetarian Lasagna with Spinach and Ricotta is a delightful and hearty dish perfect for a Christmas lunch. This dish combines layers of tender pasta, creamy ricotta cheese, and vibrant spinach, all smothered in a rich tomato sauce and topped with a generous sprinkling of melted cheese.
It’s a perfect centerpiece for a festive meal, offering a delicious and satisfying option for vegetarians and meat-eaters alike. The combination of flavors and textures makes it a crowd-pleaser, guaranteeing that everyone at the table will leave feeling nourished and satisfied.
The beauty of this lasagna lies in its rich flavors and wholesome ingredients. Spinach adds a nutritious element, while the ricotta cheese provides a creamy texture that complements the tanginess of the tomato sauce.
This recipe is designed to serve 4-6 people, making it an ideal choice for a family gathering or a small Christmas party. It’s also a versatile dish that can be prepared in advance, allowing you to enjoy the holiday festivities without spending too much time in the kitchen.
Ingredients (Serves 4-6):
- 12 lasagna noodles
- 2 tablespoons olive oil
- 2 cloves garlic, minced
- 1 onion, chopped
- 2 cups fresh spinach, chopped
- 1 container (15 ounces) ricotta cheese
- 1 egg
- 2 cups marinara sauce
- 2 cups shredded mozzarella cheese
- 1 cup grated Parmesan cheese
- Salt and pepper to taste
- Fresh basil leaves for garnish
Cooking Instructions:
1. Preheat the Oven: Preheat your oven to 375°F (190°C) to make sure it’s ready for baking the lasagna.
2. Cook the Noodles: In a large pot of boiling salted water, cook the lasagna noodles according to package instructions. Once cooked, drain and set aside.
3. Prepare the Spinach Mixture: In a large skillet, heat olive oil over medium heat. Add minced garlic and chopped onion, sautéing until the onion becomes translucent. Add the chopped spinach and cook until wilted.
Season with salt and pepper. Remove from heat and let it cool slightly.
4. Mix Ricotta and Egg: In a mixing bowl, combine the ricotta cheese, egg, and a pinch of salt and pepper. Stir until well blended and then add the cooled spinach mixture, mixing thoroughly.
5. Assemble the Lasagna: Spread a thin layer of marinara sauce on the bottom of a 9×13 inch baking dish. Place a layer of lasagna noodles over the sauce. Spread half of the ricotta-spinach mixture over the noodles, followed by a layer of marinara sauce and a sprinkle of mozzarella cheese.
Repeat the layers, finishing with a layer of noodles, marinara sauce, and the remaining mozzarella and Parmesan cheese.
6. Bake the Lasagna: Cover the dish with aluminum foil and bake in the preheated oven for 25 minutes. Remove the foil and bake for an additional 15 minutes, or until the cheese is golden and bubbly.
7. Garnish and Serve: Let the lasagna cool for about 10 minutes before slicing. Garnish with fresh basil leaves before serving.
Extra Tips:
To save time, you can assemble the lasagna a day in advance and keep it refrigerated until you’re ready to bake. If you’re using frozen spinach, make sure it’s thoroughly thawed and excess water is squeezed out before adding it to the ricotta mixture.
For a bit of extra flavor, consider adding a pinch of nutmeg to the ricotta mixture. Finally, if you want a crispier top, broil the lasagna for the last few minutes of baking.
Beef Tenderloin With Red Wine Sauce
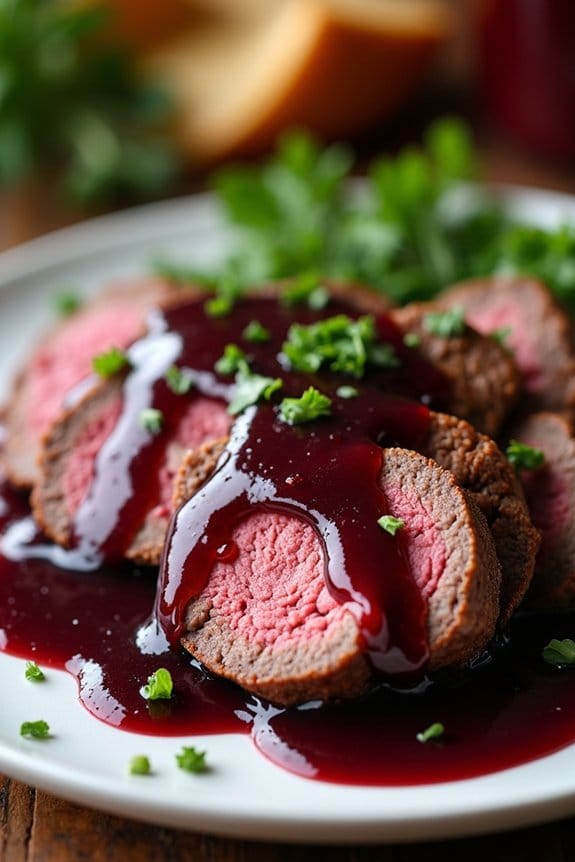
Beef Tenderloin with Red Wine Sauce is a luxurious and elegant dish that’s perfect for celebrating Christmas lunch with family and friends. The succulent beef tenderloin, cooked to perfection, is complemented by a rich and flavorful red wine sauce that adds depth and sophistication to the meal. This dish not only impresses with its taste but also with its presentation, making it a truly special centerpiece for your holiday table.
The tenderloin is a premium cut of beef known for its tenderness and mild flavor. When paired with the robust red wine sauce, it creates a harmonious balance that’s bound to delight your guests. The sauce is made by reducing red wine with shallots, garlic, and herbs, resulting in a bold and aromatic accompaniment that enhances the natural flavors of the beef. This recipe serves 4-6 people, making it ideal for a small family gathering or an intimate holiday celebration.
Ingredients (Serves 4-6):
- 2 to 3 pounds beef tenderloin, trimmed
- Salt and freshly ground black pepper
- 2 tablespoons olive oil
- 2 tablespoons unsalted butter
- 2 shallots, finely chopped
- 2 cloves garlic, minced
- 1 cup red wine (preferably a full-bodied variety)
- 1 cup beef stock
- 1 teaspoon fresh thyme leaves
- 1 tablespoon flour
- 1 tablespoon fresh parsley, chopped (for garnish)
Cooking Instructions:
- Prepare the Beef Tenderloin: Preheat your oven to 400°F (200°C). Season the beef tenderloin generously with salt and freshly ground black pepper on all sides.
- Sear the Beef: In a large ovenproof skillet, heat the olive oil over medium-high heat. Add the beef tenderloin and sear on all sides until browned, about 3-4 minutes per side. Transfer the skillet to the preheated oven.
- Roast the Beef: Roast the tenderloin in the oven for approximately 20-25 minutes for medium-rare, or until the internal temperature reaches 130°F (54°C). Adjust the cooking time if you prefer your meat more or less done. Remove the tenderloin from the oven, cover with foil, and let it rest for at least 10 minutes.
- Prepare the Red Wine Sauce: While the beef is resting, make the sauce. In the same skillet, melt the butter over medium heat. Add the shallots and garlic, sautéing until softened, about 2-3 minutes.
- Deglaze and Reduce: Pour in the red wine, scraping up any browned bits from the bottom of the skillet. Allow the wine to reduce by half, about 5 minutes. Stir in the beef stock and thyme, and let it simmer for another 5 minutes.
- Thicken the Sauce: In a small bowl, mix the flour with a tablespoon of water to create a slurry. Stir the slurry into the sauce and cook until the sauce is thickened, about 2-3 minutes. Season with salt and pepper to taste.
- Serve: Slice the rested beef tenderloin into 1-inch thick slices. Arrange on a serving platter and drizzle with the red wine sauce. Garnish with chopped parsley before serving.
Extra Tips: When selecting a red wine for the sauce, choose a full-bodied variety like Cabernet Sauvignon or Merlot for the best flavor. Confirm the beef tenderloin is at room temperature before searing to achieve an even cook. Additionally, resting the meat after roasting is essential for juiciness, as it allows the juices to redistribute throughout the meat. For the sauce, if you prefer a smoother texture, strain it through a fine-mesh sieve before serving.
Moroccan-Spiced Roasted Cauliflower Steaks
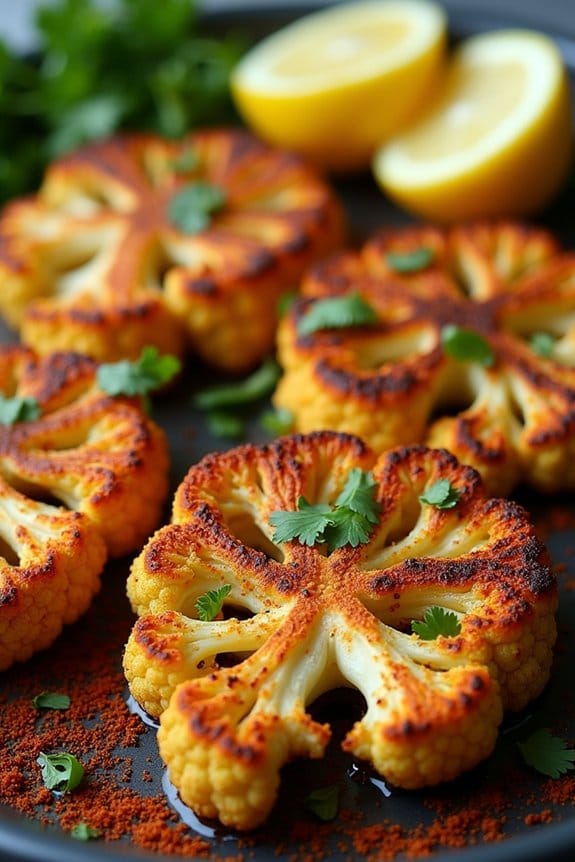
Bring the exotic flavors of Morocco to your Christmas lunch table with these delicious Moroccan-Spiced Roasted Cauliflower Steaks. Perfect as a main course for those seeking a vegetarian option, these hearty cauliflower steaks are infused with a blend of aromatic spices that will tantalize your taste buds. The combination of warm spices and the natural sweetness of the cauliflower creates a delightful dish that’s both flavorful and satisfying.
The dish isn’t only visually stunning but also easy to prepare, making it an ideal choice for a festive gathering. Whether you’re accommodating vegetarian guests or simply looking to add a unique twist to your holiday menu, these Moroccan-Spiced Roasted Cauliflower Steaks are guaranteed to impress. Serve them with a side of couscous or a fresh salad for a complete and wholesome meal.
Ingredients (serves 4-6):
- 2 large cauliflower heads
- 4 tablespoons olive oil
- 1 tablespoon ground cumin
- 1 tablespoon ground coriander
- 1 teaspoon ground turmeric
- 1 teaspoon ground cinnamon
- 1 teaspoon smoked paprika
- 1/2 teaspoon cayenne pepper
- Salt and black pepper to taste
- 2 tablespoons lemon juice
- 3 tablespoons chopped fresh cilantro (for garnish)
- Lemon wedges (for serving)
Instructions:
- Preheat the Oven: Set your oven to 425°F (220°C) to confirm it’s hot and ready for roasting, which will give the cauliflower a nice, caramelized surface.
- Prepare the Cauliflower: Remove the outer leaves from the cauliflower heads and trim the stems to create a flat base. Carefully cut each cauliflower into 1-inch thick slices (or “steaks”). You should be able to get about 3 to 4 steaks from each cauliflower head, depending on their size.
- Mix the Spice Rub: In a small bowl, combine the olive oil, ground cumin, ground coriander, ground turmeric, ground cinnamon, smoked paprika, cayenne pepper, salt, and black pepper. Stir well to form a uniform paste.
- Season the Cauliflower: Place the cauliflower steaks on a baking sheet lined with parchment paper. Brush both sides of each steak generously with the spice rub, making sure they’re evenly coated.
- Roast the Cauliflower: Place the baking sheet in the preheated oven and roast the cauliflower steaks for 25-30 minutes. Flip the steaks halfway through the cooking time to confirm both sides are golden brown and tender.
- Add Lemon Juice: Once the cauliflower steaks are cooked, remove them from the oven and drizzle with lemon juice to add a hint of acidity and brightness to the dish.
- Garnish and Serve: Transfer the roasted cauliflower steaks to a serving platter. Garnish with chopped fresh cilantro and serve with lemon wedges on the side for an extra citrusy kick.
Extra Tips:
For best results, choose cauliflowers that are large and firm with tightly packed florets. This will make it easier to cut them into steaks that hold together during roasting. If any smaller florets break off while slicing, you can roast them alongside the steaks for a tasty snack.
To enhance the Moroccan flavors, serve the cauliflower steaks with a side of harissa sauce or a dollop of yogurt mixed with a pinch of salt and a squeeze of lemon. Remember to keep an eye on the oven as cooking times may vary slightly depending on the thickness of the cauliflower steaks and your oven’s characteristics.
Duck Breast With Cherry Port Sauce
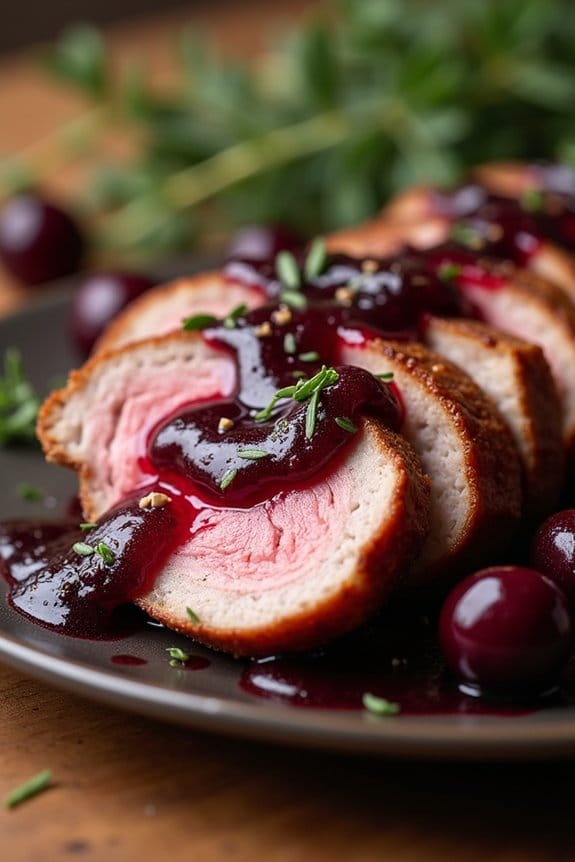
Duck Breast With Cherry Port Sauce is an elegant and festive main course, perfect for a Christmas lunch. This dish combines the rich, savory flavor of duck breast with a sweet and tangy cherry port sauce, creating a delightful harmony of flavors that’s sure to impress your guests.
The duck breast is seared to perfection, ensuring a crispy skin and juicy meat, while the cherry port sauce adds a luxurious and vibrant touch to the dish.
This recipe is designed to serve 4-6 people, making it an ideal choice for a small holiday gathering. The combination of high-quality ingredients and meticulous preparation results in a sophisticated meal that’s both satisfying and memorable. Paired with your favorite holiday sides, this dish is guaranteed to be the star of your Christmas lunch.
Ingredients:
- 4-6 duck breasts, skin-on
- Salt and pepper, to taste
- 2 tablespoons vegetable oil
- 1 cup fresh or frozen cherries, pitted
- 1/2 cup port wine
- 1/4 cup chicken stock
- 2 tablespoons balsamic vinegar
- 2 tablespoons honey
- 1 tablespoon unsalted butter
- 1 teaspoon fresh thyme leaves
Cooking Instructions:
- Prepare the Duck Breasts: Pat the duck breasts dry with paper towels. Score the skin in a crosshatch pattern, being careful not to cut into the meat. This will help render the fat and crisp the skin. Season both sides with salt and pepper.
- Sear the Duck: Heat the vegetable oil in a large skillet over medium-high heat. Place the duck breasts skin-side down and cook for about 6-8 minutes, or until the skin is golden brown and crispy. Turn the duck breasts over and cook for another 4-5 minutes, or until the internal temperature reaches 135°F for medium-rare. Remove the duck from the skillet and let it rest on a cutting board.
- Make the Cherry Port Sauce: In the same skillet, drain excess fat, leaving about 1 tablespoon. Add the cherries, port wine, chicken stock, balsamic vinegar, and honey. Stir to combine and bring to a simmer. Cook for about 10 minutes, or until the sauce has reduced by half and thickened slightly.
- Finish the Sauce: Remove the skillet from heat and stir in the butter and fresh thyme leaves until the butter is melted and the sauce is smooth. Taste and adjust seasoning if necessary.
- Serve the Dish: Slice the duck breasts thinly against the grain. Arrange the slices on a serving platter and drizzle with the cherry port sauce. Serve immediately.
Cooking Tips:
When scoring the duck skin, be gentle and precise to avoid cutting into the meat, which can cause the juices to escape during cooking.
It’s important to let the duck rest after cooking, as this allows the juices to redistribute throughout the meat, resulting in a more tender and juicy texture.
Additionally, if you prefer a thicker sauce, you can continue to reduce it further or add a cornstarch slurry (a mix of cornstarch and water) to achieve your desired consistency.
Butternut Squash and Sage Risotto

Butternut Squash and Sage Risotto is a delightful dish that combines the creamy texture of risotto with the sweet and nutty flavor of roasted butternut squash. The aromatic addition of fresh sage leaves elevates this dish, making it a perfect centerpiece for a Christmas lunch.
This risotto isn’t only visually appealing with its vibrant orange hue but also comforting and satisfying, embodying the essence of a festive meal. Whether you’re serving it as a vegetarian main course or pairing it with other holiday dishes, this risotto is sure to impress your guests.
The key to a perfect risotto lies in its creamy consistency and the balance of flavors. Roasting the butternut squash beforehand enhances its sweetness and adds depth to the overall taste. The sage provides an earthy note that complements the squash beautifully.
When preparing this dish, it’s important to use a high-quality Arborio rice, which absorbs the flavors well and creates a luscious, creamy texture. This recipe serves 4-6 people, making it ideal for a small family gathering or an intimate holiday celebration.
Ingredients:
- 1 medium butternut squash, peeled and cubed
- 2 tablespoons olive oil
- Salt and black pepper to taste
- 1 tablespoon unsalted butter
- 1 small onion, finely chopped
- 2 cloves garlic, minced
- 1 ½ cups Arborio rice
- ½ cup dry white wine
- 4 cups vegetable broth, kept warm
- 1/2 cup grated Parmesan cheese
- 1 tablespoon fresh sage leaves, finely chopped
- Additional sage leaves for garnish
- Optional: 1/4 cup pine nuts, toasted
Cooking Instructions:
- Roast the Butternut Squash: Preheat your oven to 400°F (200°C). Spread the cubed butternut squash on a baking tray, drizzle with olive oil, and season with salt and pepper. Roast in the oven for 25-30 minutes until tender and slightly caramelized. Remove from oven and set aside.
- Prepare the Risotto Base: In a large saucepan or deep skillet, melt the butter over medium heat. Add the chopped onion and sauté until translucent, about 5 minutes. Add the minced garlic and cook for another minute until fragrant.
- Cook the Rice: Stir in the Arborio rice, ensuring each grain is coated with the butter and oil. Toast the rice for 2-3 minutes, stirring frequently, until it becomes slightly translucent.
- Deglaze with Wine: Pour in the white wine and cook, stirring constantly, until the wine is absorbed by the rice.
- Add Broth Gradually: Begin adding the warm vegetable broth, one ladleful at a time, stirring constantly. Wait for each addition to be absorbed before adding the next. This process should take about 18-20 minutes, resulting in a creamy consistency.
- Incorporate Squash and Cheese: Once the rice is al dente, gently fold in the roasted butternut squash and grated Parmesan cheese. Stir in the chopped sage and season with additional salt and pepper to taste.
- Garnish and Serve: Serve the risotto hot, garnished with fresh sage leaves and toasted pine nuts, if using.
Extra Tips:
To achieve the best texture, continuously stir the risotto as it cooks; this encourages the rice to release its starch, resulting in a creamy finish.
Keep the broth warm to maintain the cooking temperature and avoid shocking the rice. If the risotto seems too thick, you can adjust the consistency by adding a bit more broth or water.
Finally, if you prefer a richer flavor, consider adding a small knob of butter right before serving for an extra creamy touch.
Roasted Vegetable Tart With Goat Cheese

Roasted Vegetable Tart With Goat Cheese is a delightful main course that combines the earthy flavors of roasted vegetables with the creamy tang of goat cheese, all nestled in a flaky tart crust. This dish is perfect for a Christmas lunch, offering a vibrant and flavorful centerpiece that can accommodate both vegetarians and meat-lovers alike.
The tart is visually appealing, with a symphony of colors from the roasted vegetables, making it as beautiful as it’s delicious. The preparation of this tart involves roasting a medley of seasonal vegetables until they’re caramelized and tender. The vegetables are then layered in a savory tart shell that has been pre-baked to guarantee a crisp base.
A generous sprinkle of goat cheese over the top adds a delightful creaminess and sharp flavor, perfectly complementing the sweet and savory vegetables. This dish isn’t only tasty but also quite simple to prepare, making it a stress-free addition to your holiday menu.
Ingredients (Serves 4-6):
- 1 sheet of puff pastry (thawed)
- 1 red bell pepper, sliced
- 1 zucchini, sliced
- 1 red onion, sliced
- 1 cup cherry tomatoes, halved
- 1 tablespoon olive oil
- 1 teaspoon dried thyme
- Salt and pepper, to taste
- 4 ounces goat cheese, crumbled
- 1 egg, beaten (for egg wash)
- Fresh basil leaves, for garnish
Cooking Instructions:
1. Preheat the Oven:
Preheat your oven to 400°F (200°C). This guarantees that it’s hot enough to properly roast the vegetables and bake the tart.
2. Prepare the Vegetables:
Toss the sliced bell pepper, zucchini, red onion, and halved cherry tomatoes in a bowl with olive oil, dried thyme, salt, and pepper. Confirm they’re evenly coated.
3. Roast the Vegetables:
Spread the vegetables on a baking sheet in a single layer. Roast in the preheated oven for 20-25 minutes, or until they’re tender and slightly caramelized.
4. Prepare the Puff Pastry:
While the vegetables are roasting, roll out the thawed puff pastry on a floured surface to fit your tart pan. Press the pastry into the pan, trimming any excess. Prick the base with a fork to prevent it from puffing up during baking.
5. Blind Bake the Pastry:
Line the pastry with parchment paper and fill with baking weights or dried beans. Blind bake in the oven for 10 minutes. Remove the weights and parchment, then brush with beaten egg and bake for another 5 minutes until golden.
6. Assemble the Tart:
Once the pastry is ready, arrange the roasted vegetables evenly over the base. Sprinkle the crumbled goat cheese on top.
7. Final Bake:
Return the assembled tart to the oven and bake for an additional 10-15 minutes, or until the cheese is melty and the edges of the pastry are golden brown.
8. Garnish and Serve:
Remove from the oven and let it cool slightly. Garnish with fresh basil leaves before serving.
Extra Tips:
When roasting the vegetables, confirm they’re cut evenly to promote uniform cooking. If you prefer a more intense flavor, add a drizzle of balsamic glaze over the tart before serving.
You can also customize the vegetables according to your preference or what’s in season. If you don’t have puff pastry, a shortcrust pastry can be a good substitute. This tart is best served warm, but it can also be enjoyed at room temperature, making it a versatile dish for any holiday gathering.
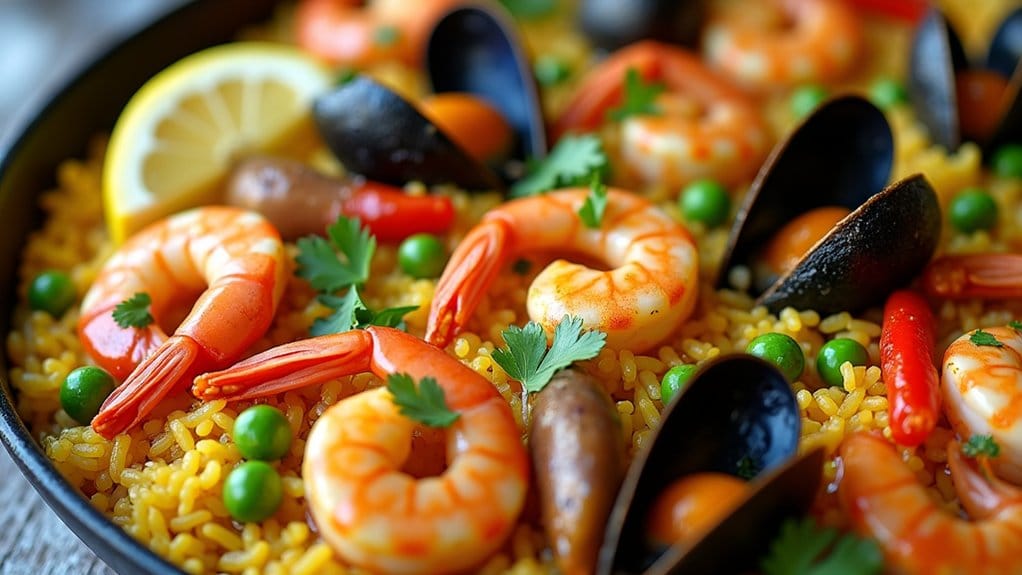
Seafood Paella With Saffron and Peppers
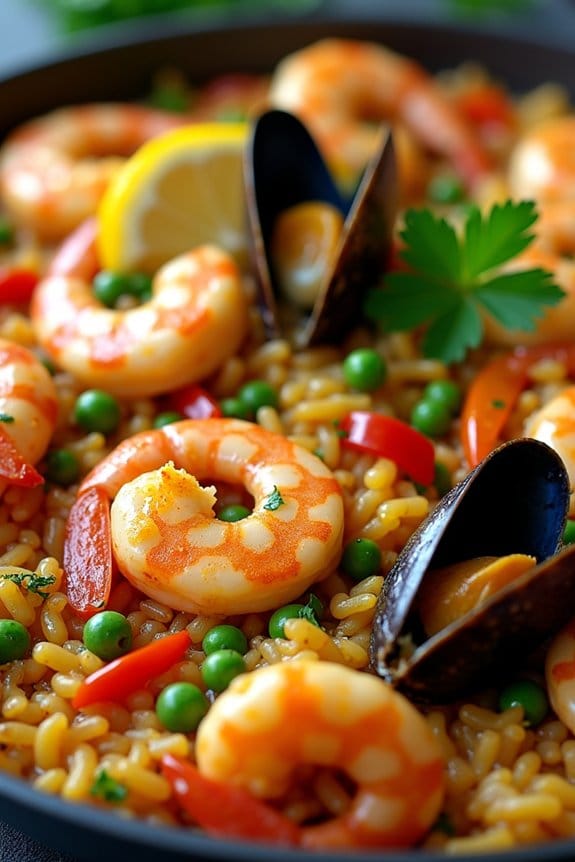
Seafood Paella with Saffron and Peppers is a vibrant and flavorful dish that brings the taste of the Spanish coast to your Christmas table. This dish is known for its rich combination of seafood, aromatic saffron, and colorful peppers, creating a festive and mouthwatering main course. With its roots in Spanish culinary tradition, this paella is a delightful medley of textures and flavors, perfect for a holiday gathering. The saffron adds a luxurious touch, enhancing the natural sweetness of the seafood and the smokiness of the bell peppers.
Cooking this dish requires attention to detail, particularly in balancing the flavors and guaranteeing the rice is perfectly cooked. The key is to allow the saffron to infuse the rice with its distinctive aroma and color, while the seafood should be tender and succulent. This recipe serves 4-6 people, making it ideal for a family celebration or an intimate Christmas lunch with friends.
Ingredients (Serves 4-6):
- 2 cups of short-grain rice (such as Bomba or Arborio)
- 1 pound of mixed seafood (shrimp, mussels, and squid)
- 4 cups of chicken or seafood stock
- 1 pinch of saffron threads
- 1 large onion, finely chopped
- 3 cloves of garlic, minced
- 1 red bell pepper, sliced into strips
- 1 green bell pepper, sliced into strips
- 1/2 cup of frozen peas
- 1/2 cup of diced tomatoes
- 1 teaspoon of smoked paprika
- 1/4 cup of olive oil
- Salt and pepper to taste
- Lemon wedges for serving
- Fresh parsley, chopped, for garnish
Instructions:
- Prepare the Saffron Stock: Begin by heating the chicken or seafood stock in a saucepan. Once hot, add the saffron threads and let them steep in the stock for about 10 minutes. This will allow the saffron to release its color and flavor into the stock.
- Cook the Aromatics: In a large paella pan or a wide, heavy-bottomed skillet, heat the olive oil over medium heat. Add the chopped onions and sauté until they’re soft and translucent. Add the minced garlic and cook for another minute until fragrant.
- Add the Peppers and Tomatoes: Stir in the sliced red and green bell peppers, and cook for about 5 minutes until they begin to soften. Add the diced tomatoes and smoked paprika, mixing well to combine all the ingredients.
- Toast the Rice: Add the rice to the pan and stir it into the vegetable mixture, making sure that each grain is coated with oil and spices. Cook for about 2 minutes to lightly toast the rice, enhancing its flavor.
- Incorporate the Saffron Stock: Slowly pour in the saffron-infused stock, and season with salt and pepper. Stir well to distribute the liquid evenly, then bring the mixture to a gentle simmer. Don’t stir the rice once it starts to simmer, as this helps achieve the desired texture.
- Cook the Seafood: Arrange the seafood on top of the rice, pressing them gently into the mixture. Cover the pan with a lid or aluminum foil and let it cook for about 15 minutes, or until the rice is tender and the seafood is cooked through.
- Add the Peas and Rest: In the last 5 minutes of cooking, sprinkle the frozen peas over the top. Once done, remove the pan from the heat and let the paella rest for about 5 minutes before serving.
- Serve the Paella: Garnish with fresh parsley and serve with lemon wedges on the side for a bright, citrusy contrast to the rich flavors of the dish.
Extra Tips:
When cooking Seafood Paella with Saffron and Peppers, it’s important to use a wide, shallow pan to allow the rice to cook evenly. If you don’t have a traditional paella pan, a large skillet will work as well.
Be patient with the cooking process, particularly when it comes to letting the rice absorb the saffron stock without stirring, as this helps develop the signature crusty bottom known as “socarrat.” Additionally, you can adjust the variety of seafood to your preference or what’s available, but confirm that the seafood is fresh for the best flavor.
