
As the holiday season draws near, I’ve found the perfect way to turn cooking into a joyful adventure for kids with 11 easy Christmas recipes. Picture the laughter and creativity as they decorate Reindeer Cupcakes or assemble Santa Hat Cheesecake Bites. These recipes are a wonderful opportunity to create cherished family memories while building baking skills. Ready to bring some warmth and excitement to your holiday celebrations? Let’s explore these festive treats together.
Reindeer Cupcakes

Reindeer Cupcakes are a festive and fun treat that’s perfect for getting the kids involved in holiday baking. These adorable cupcakes aren’t only delicious but also a creative way to bring some Christmas cheer into your kitchen. With their cute reindeer faces made from simple decorations, they’re sure to bring smiles and laughter to both adults and children alike.
Perfect for a holiday party or simply as a sweet seasonal snack, these cupcakes will quickly become a family favorite. Making Reindeer Cupcakes is a wonderful opportunity for kids to participate in holiday preparations. They can help with mixing the batter, decorating the cupcakes, and of course, taste-testing the final product!
The process is straightforward and enjoyable, making it a fantastic activity for a cozy afternoon at home. Plus, these cupcakes are easy to customize, allowing for creativity with different colors and toppings to create unique reindeer designs.
Ingredients for Reindeer Cupcakes (Serves 4-6):
- 1 ½ cups all-purpose flour
- 1 cup granulated sugar
- ½ cup unsweetened cocoa powder
- 1 teaspoon baking powder
- ½ teaspoon baking soda
- ¼ teaspoon salt
- 2 large eggs
- ½ cup milk
- ⅓ cup vegetable oil
- 1 teaspoon vanilla extract
- ½ cup boiling water
- 1 cup chocolate frosting
- 12 mini pretzels
- 12 candy eyes
- 12 red candy-coated chocolates (like M&Ms)
Instructions:
- Preheat and Prep: Begin by preheating your oven to 350°F (175°C). Line a 12-cup muffin tin with cupcake liners.
- Mix Dry Ingredients: In a large bowl, whisk together the flour, sugar, cocoa powder, baking powder, baking soda, and salt until well combined.
- Prepare Wet Ingredients: In a separate bowl, beat the eggs, then add the milk, vegetable oil, and vanilla extract. Mix until smooth.
- Combine Mixtures: Gradually add the wet ingredients to the dry ingredients, mixing until just combined. Carefully stir in the boiling water until the batter is smooth and thin.
- Fill and Bake: Pour the batter into the prepared cupcake liners, filling each about two-thirds full. Bake in the preheated oven for 18-22 minutes, or until a toothpick inserted into the center of a cupcake comes out clean.
- Cool and Frost: Allow the cupcakes to cool in the pan for a few minutes before transferring them to a wire rack to cool completely. Once cooled, spread a layer of chocolate frosting on each cupcake.
- Decorate: To create the reindeer faces, gently press two mini pretzels into the frosting at the top of each cupcake to form antlers. Place two candy eyes below the pretzels, and a red candy-coated chocolate as the nose in the center.
Extra Tips:
For a more personalized touch, consider using different colored candy-coated chocolates for the noses, or experiment with various types of candy eyes. If you want to make the cupcakes even more festive, try sprinkling a little edible glitter on top of the frosting before adding the decorations.
These cupcakes can be made a day ahead and stored in an airtight container, making them a convenient and delightful addition to any holiday gathering.
Snowman Pancakes
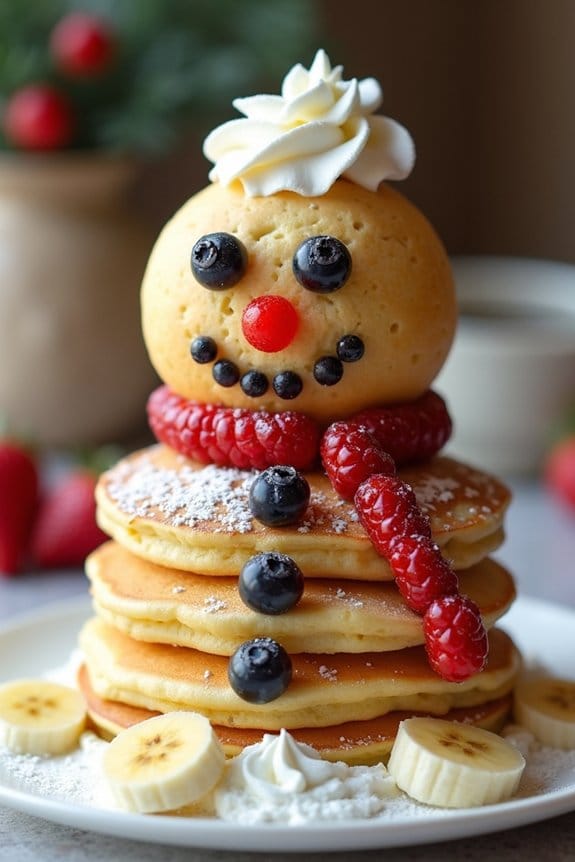
Creating Snowman Pancakes is a delightful and fun way to celebrate the holidays with little ones. This whimsical breakfast idea not only brings a smile to children‘s faces but also offers a chance to get them involved in the kitchen. The pancakes are designed to resemble a snowman, complete with a scarf, buttons, and a charming smile. This recipe is perfect for a festive morning or a cozy winter brunch, capturing the essence of a snowy day in a delicious and playful manner.
Snowman Pancakes aren’t just about taste but also about creativity. You can use a variety of toppings to decorate your snowman, allowing kids to express their artistic side. The process involves making fluffy pancakes and then assembling them to create the snowman shape. This recipe serves 4-6 people, making it ideal for a family breakfast or a small gathering with friends. Below is a list of ingredients and a detailed guide on how to make these adorable Snowman Pancakes.
Ingredients (serving size: 4-6 people):
- 2 cups all-purpose flour
- 2 tablespoons sugar
- 2 teaspoons baking powder
- 1/2 teaspoon baking soda
- 1/2 teaspoon salt
- 2 cups buttermilk
- 2 large eggs
- 1/4 cup unsalted butter, melted
- Cooking spray or additional butter for greasing the pan
- Chocolate chips, blueberries, or raisins for eyes and buttons
- Banana slices for scarf
- Strawberries or raspberries for nose
- Whipped cream for snow effect
Instructions:
- Prepare the Batter: In a large mixing bowl, combine the flour, sugar, baking powder, baking soda, and salt. In another bowl, whisk together the buttermilk, eggs, and melted butter. Gradually add the wet ingredients to the dry ingredients, stirring until just combined. Be careful not to overmix as this can make the pancakes tough.
- Cook the Pancakes: Heat a large non-stick skillet or griddle over medium heat and lightly coat it with cooking spray or butter. Pour 1/4 cup of batter for each pancake onto the skillet. Cook until bubbles form on the surface, then flip and cook until the other side is golden brown. For each snowman, you’ll need three pancakes of varying sizes (small, medium, and large).
- Assemble the Snowman: Place the largest pancake at the bottom of the plate, followed by the medium-sized pancake in the middle, and the smallest pancake at the top to form the head. Arrange them in a straight line to create the snowman shape.
- Decorate: Use chocolate chips, blueberries, or raisins as eyes and buttons. Slice bananas into thin strips and place them around the neck area as a scarf. Add a small piece of strawberry or raspberry for the nose and use whipped cream around the pancakes to create a snowy effect.
- Serve: Once assembled and decorated, serve the Snowman Pancakes warm. Encourage the kids to add their favorite toppings or additional decorations, like sprinkles or syrup.
Extra Tips:
When making Snowman Pancakes, verify your skillet is at the right temperature – not too hot, so the pancakes cook evenly and don’t burn. If you’re cooking with kids, let them be creative with the decoration process. You can also prepare the batter the night before and store it in the refrigerator, making the morning cooking process faster and more convenient.
Finally, have fun with different fruit combinations and toppings to create a unique snowman every time!
Christmas Tree Brownies

Christmas is a magical time of year, especially for kids who delight in the festive sights, sounds, and smells of the season. One way to make the holiday extra special is to get them involved in the kitchen with fun and easy recipes. What could be more delightful than transforming a classic treat into a whimsical holiday creation? Enter Christmas Tree Brownies—a delicious, creative, and kid-friendly dessert that combines the rich, chocolatey goodness of brownies with the festive cheer of Christmas.
Perfect for family gatherings or holiday parties, these treats aren’t only scrumptious but also a joy to decorate. Christmas Tree Brownies are a wonderful project for young chefs, allowing them to express their creativity while learning basic baking skills. Each brownie can be uniquely decorated, making the process as much fun as the final result.
The preparation is straightforward and doesn’t require any complex techniques or hard-to-find ingredients. With just a few simple steps, you’ll have a batch of charming, edible Christmas trees that are sure to impress both kids and adults alike. Ideal for serving 4-6 people, this recipe guarantees everyone gets to enjoy a sweet piece of holiday magic.
Ingredients for Christmas Tree Brownies (Serves 4-6)
- 1 box of brownie mix (or homemade brownie batter)
- 2 large eggs
- 1/2 cup vegetable oil
- 1/4 cup water
- Green frosting
- Mini candy canes
- Assorted Christmas sprinkles
- Star-shaped candies or edible stars
Cooking Instructions
- Preheat and Prepare: Preheat your oven to 350°F (175°C). Line a 9×13 inch baking dish with parchment paper or lightly grease it to prevent the brownies from sticking.
- Mix the Batter: In a large mixing bowl, combine the brownie mix with the eggs, vegetable oil, and water. Stir until the mixture is smooth and lump-free. Pour the batter into the prepared baking dish, spreading it evenly.
- Bake the Brownies: Place the baking dish in the preheated oven and bake for 20-25 minutes, or until a toothpick inserted into the center comes out with a few moist crumbs. Don’t overbake, as you want the brownies to be fudgy.
- Cool and Cut: Allow the brownies to cool completely in the pan. Once cooled, carefully lift them out using the parchment paper and place them on a cutting board. Cut the brownies into triangle shapes to resemble Christmas trees.
- Decorate: Insert a mini candy cane into the base of each brownie triangle to serve as the tree trunk. Using a piping bag or a ziplock bag with the corner snipped off, pipe green frosting in a zigzag pattern over each brownie. Add sprinkles and a star-shaped candy on top of each tree as ornaments.
- Serve and Enjoy: Arrange the decorated Christmas Tree Brownies on a festive platter and serve them to delighted guests.
Extra Tips
When cutting the brownies into triangle shapes, it can be helpful to measure and mark the sections beforehand to guarantee even pieces. If you’re using homemade frosting, make sure it’s thick enough to hold its shape when piped.
To make the decorating process easier for kids, prepare small bowls of sprinkles and candies ahead of time, letting them choose their decorations as they wish. For an added touch, consider dusting the trees with a light sprinkle of powdered sugar to resemble snow.
Most importantly, enjoy the process and let creativity shine—these brownies are meant to be as fun to make as they’re to eat!
Santa Hat Cheesecake Bites
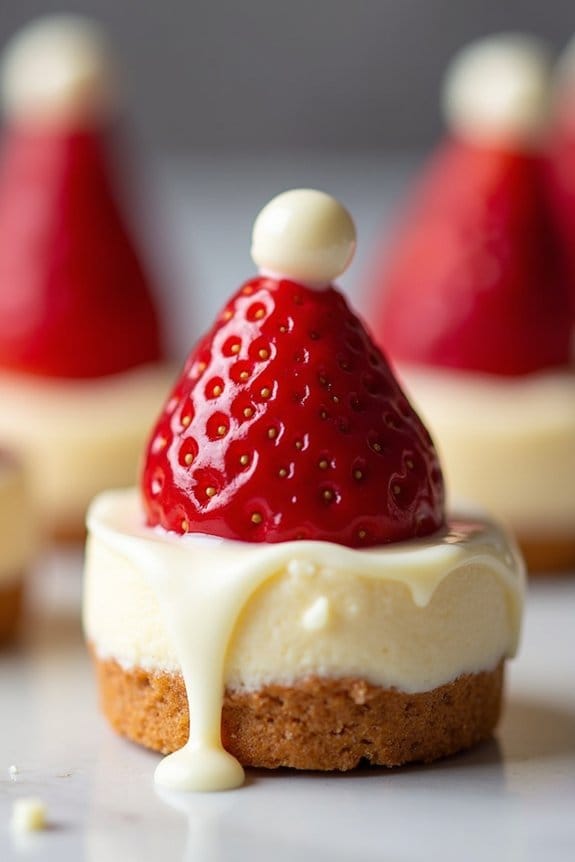
These adorable Santa Hat Cheesecake Bites are a festive and fun treat perfect for getting kids involved in holiday baking. With a creamy cheesecake filling, sweet strawberries, and a touch of chocolate, these bites are bound to be a hit at any Christmas gathering. Not only are they delicious, but they also require no baking, making them a stress-free option for busy holiday schedules.
Involving kids in the kitchen can be a fun and educational experience. These Santa Hat Cheesecake Bites are a great recipe for little hands, as they can help with assembling and decorating the bites to look just like Santa’s iconic hat. Plus, they make for a delightful and festive presentation on your holiday dessert table.
Ingredients (serves 4-6 people):
- 12 ginger snap cookies or vanilla wafers
- 8 oz cream cheese, softened
- 1/4 cup confectioners’ sugar
- 1/2 teaspoon vanilla extract
- 12 fresh strawberries, hulled
- 1/4 cup white chocolate chips
- 1 tablespoon heavy cream
Instructions:
- Prepare the Cheesecake Filling: In a medium-sized mixing bowl, combine the softened cream cheese, confectioners’ sugar, and vanilla extract. Use an electric mixer to blend the ingredients until smooth and creamy.
- Prep the Strawberries: Wash and hull the strawberries, making sure to cut them flat on the bottom so they sit upright without wobbling. Set them aside.
- Melt the White Chocolate: In a microwave-safe bowl, combine the white chocolate chips and heavy cream. Microwave in 15-second intervals, stirring in between, until the chocolate is fully melted and smooth.
- Assemble the Santa Hats: Lay out the ginger snap cookies or vanilla wafers on a flat surface. Pipe or spoon a dollop of cheesecake filling onto each cookie, then place a strawberry on top, flat side down, pressing gently so the filling oozes out slightly to look like the brim of Santa’s hat.
- Add the Pom-Pom: Using a small spoon or piping bag, add a tiny dot of melted white chocolate to the tip of each strawberry to create the pom-pom effect of Santa’s hat.
- Chill Before Serving: Place the assembled Santa Hat Cheesecake Bites in the refrigerator for at least 30 minutes to allow the filling to set before serving.
Extra Tips: When preparing the cheesecake filling, make sure the cream cheese is at room temperature to guarantee a smooth consistency without lumps. If you don’t have a piping bag, you can use a zip-top bag with the corner snipped off to pipe the filling onto the cookies.
For an added festive touch, consider sprinkling a little edible glitter over the top of the finished bites before serving. Remember to supervise children closely when using the microwave and handling sharp objects like knives for hulling strawberries.
Gingerbread Cookies

Gingerbread cookies are a quintessential holiday treat, perfect for getting kids involved in the festive spirit. These spiced cookies aren’t only delicious but also provide a fun activity for children as they can help with mixing the dough, cutting out shapes, and decorating the final product.
Whether you’re making these cookies for a family gathering or simply as a fun afternoon activity, gingerbread cookies are sure to bring smiles to everyone’s faces.
The recipe is simple enough to follow, and it yields cookies that are perfect for decorating with royal icing, sprinkles, or candies. This classic Christmas cookie can be enjoyed on its own or used to create edible decorations for your Christmas tree.
With the following recipe, you’ll be able to make a batch that serves 4-6 people, leaving plenty of room for creativity and fun in the kitchen.
Ingredients for Gingerbread Cookies (serving size: 4-6 people):
- 3 cups all-purpose flour
- 3/4 cup packed brown sugar
- 1 tablespoon ground ginger
- 1 tablespoon ground cinnamon
- 1/2 teaspoon ground cloves
- 1/2 teaspoon baking soda
- 1/2 teaspoon salt
- 3/4 cup unsalted butter, softened
- 3/4 cup molasses
- 1 egg
- 1 teaspoon vanilla extract
- Royal icing, sprinkles, and candies for decoration
Cooking Instructions:
- Prepare the Dough: In a large bowl, whisk together the flour, brown sugar, ginger, cinnamon, cloves, baking soda, and salt. In a separate bowl, beat the softened butter until creamy, then add the molasses, egg, and vanilla extract. Mix until well combined.
- Combine Ingredients: Gradually add the dry ingredients to the wet ingredients, mixing until a soft dough forms. Divide the dough into two equal portions, flatten each into a disk, wrap in plastic wrap, and refrigerate for at least 1 hour. This will make the dough easier to roll out and cut.
- Preheat Oven: Preheat your oven to 350°F (175°C) and line two baking sheets with parchment paper.
- Roll Out Dough: On a lightly floured surface, roll out one disk of dough to about 1/4 inch thick. Use cookie cutters to cut out shapes and place them on the prepared baking sheets, leaving space between each cookie.
- Bake the Cookies: Bake in the preheated oven for 8-10 minutes, or until the edges are firm and the cookies are lightly browned. Allow them to cool on the baking sheets for 5 minutes before transferring to wire racks to cool completely.
- Decorate: Once the cookies are completely cooled, use royal icing, sprinkles, and candies to decorate them as desired. Let the icing set before storing or serving.
Extra Tips:
To guarantee your gingerbread cookies hold their shape, make sure to chill the dough thoroughly before rolling it out. If you find the dough becomes too soft while cutting out shapes, simply return it to the refrigerator for a few minutes.
When decorating with kids, set up a decorating station with all the icing, sprinkles, and candies at arm’s reach to keep the process smooth and enjoyable. Store the decorated cookies in an airtight container at room temperature for up to one week to keep them fresh.
Festive Fruit Kabobs
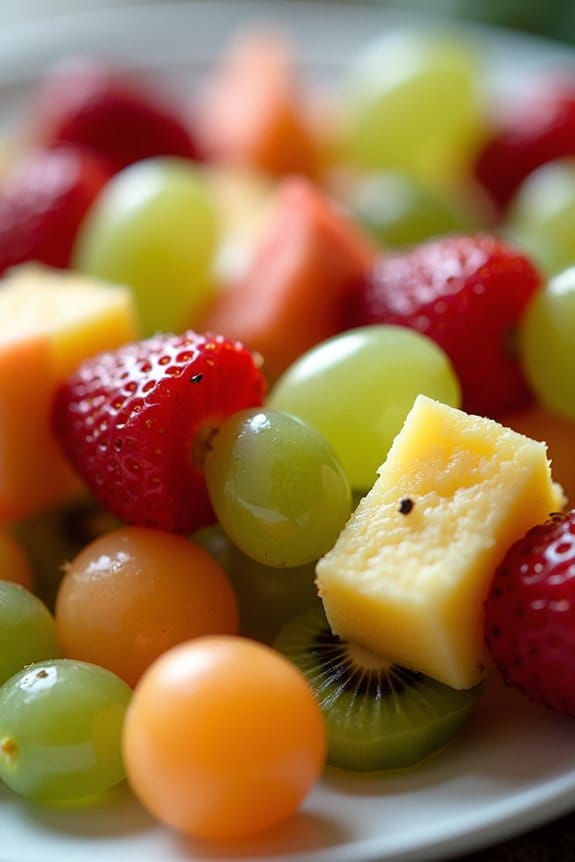
Festive Fruit Kabobs are the perfect way to bring a pop of color and healthy sweetness to your holiday gatherings. These easy-to-make treats are a fun activity for kids and a nutritious addition to your Christmas spread. The combination of vibrant fruits not only looks visually appealing but also offers a revitalizing taste that complements the rich flavors of traditional holiday fare.
Whether you’re hosting a party or just looking to entertain the little ones, assembling these kabobs can be a delightful family activity.
These kabobs are a great way to introduce kids to a variety of fruits while allowing them to get creative with their food. You can choose a mix of your favorite fruits or stick to a red and green theme for a more festive look. The recipe is simple and requires no cooking, making it an ideal choice for younger chefs. Plus, it’s easily customizable to cater to different tastes or dietary preferences.
Let’s plunge into the ingredients you’ll need to make Festive Fruit Kabobs for 4-6 people.
Ingredients:
- 1 cup strawberries, hulled and halved
- 1 cup green grapes
- 1 cup red grapes
- 1 cup pineapple chunks
- 1 cup kiwi slices
- 1 cup melon balls (cantaloupe or honeydew)
- Wooden skewers
Instructions:
- Prepare the Fruits: Begin by washing all the fruits thoroughly under cold running water. Pat them dry with a clean kitchen towel. Remove the stems from the strawberries and halve them. Peel and slice the kiwi into round discs. Cut the pineapple into bite-sized chunks if not pre-cut. Use a melon baller to scoop out melon balls from your cantaloupe or honeydew.
- Assemble the Kabobs: Take a wooden skewer and start threading the fruits onto it. Begin with a piece of strawberry, followed by a grape, a chunk of pineapple, a slice of kiwi, a melon ball, and another grape. Repeat the pattern until the skewer is filled, leaving about an inch empty at the bottom for easy handling.
- Repeat the Process: Continue assembling the remaining skewers in the same pattern or mix it up according to your preference until all the fruits are used up. This is a great opportunity for kids to get involved and make their own patterns.
- Arrange and Serve: Once all the kabobs are ready, arrange them neatly on a serving platter. You can serve them immediately or cover them with plastic wrap and refrigerate until it’s time to serve. The skewers can be enjoyed as a healthy snack or a fun dessert.
Extra Tips:
For best results, use fresh, ripe fruits to guarantee maximum flavor and sweetness. If serving at a party, consider placing the kabobs over a bed of ice to keep them cool and crisp.
If you want to add a little more sweetness, consider drizzling a bit of honey or a sprinkle of powdered sugar over the kabobs before serving. Additionally, if wooden skewers are too sharp for small children, you can opt for plastic ones or cut the sharp tips off after assembly.
Enjoy your vibrant and healthy Festive Fruit Kabobs!
Holiday Pretzel Treats

Looking for a festive and simple treat to make with your kids this holiday season? Holiday Pretzel Treats are the perfect combination of sweet and salty, with a delightful crunch. They’re incredibly easy to make, require no baking, and are a great way for kids to get involved in the kitchen.
These colorful snacks aren’t only tasty but also eye-catching, making them an excellent addition to any holiday party or family gathering. The beauty of Holiday Pretzel Treats lies in their versatility. You can customize them with different types of chocolate and toppings to suit your family’s tastes.
Whether you prefer milk chocolate, white chocolate, or even dark chocolate, these treats can be tailored to your liking. Plus, the addition of festive sprinkles or candies adds an extra touch of holiday cheer. Gather your little helpers and get ready for a fun and delicious activity that everyone will enjoy.
Ingredients (for 4-6 people):
- 48 mini pretzel twists
- 48 Hershey’s Kisses (milk chocolate or your choice)
- 48 M&M’s candies (holiday-colored)
- Festive sprinkles (optional)
Instructions:
- Preheat the oven: Start by preheating your oven to 200 degrees Fahrenheit (93 degrees Celsius). This low temperature will gently melt the chocolate without burning it.
- Arrange the pretzels: Line a baking sheet with parchment paper. Lay out the mini pretzel twists in a single layer on the parchment paper, spacing them slightly apart. This will prevent the chocolate from sticking to the baking sheet.
- Add the chocolate: Unwrap the Hershey’s Kisses and place one Kiss in the center of each pretzel. Encourage your kids to help with this step; they’ll enjoy unwrapping and placing the chocolates.
- Melt the chocolate: Place the baking sheet in the preheated oven for about 4-5 minutes. Keep a close eye on the chocolate to guarantee it softens but doesn’t melt completely. The Kisses should look shiny and slightly glossy.
- Add the toppings: Remove the baking sheet from the oven and immediately press one M&M candy into each softened Kiss. This will create a flat top and secure the candy in place. If desired, sprinkle festive sprinkles over the top for added decoration.
- Cool and set: Allow the treats to cool and the chocolate to set completely. You can speed up this process by placing the baking sheet in the refrigerator for about 15-20 minutes.
Extra Tips:
When making Holiday Pretzel Treats, it’s important to use parchment paper or a silicone baking mat to prevent sticking. If you’re making a large batch, work in batches to guarantee each treat has enough space on the baking sheet.
Feel free to get creative with toppings; you can use different types of candies, nuts, or even crushed peppermint for a minty twist. These treats store well in an airtight container at room temperature, making them perfect for gifting or enjoying over several days.
Candy Cane Marshmallow Pops

Candy Cane Marshmallow Pops are a delightful and festive treat that will bring joy to kids and adults alike during the Christmas season.
These pops aren’t only easy to make but also offer a fun activity for children who love to get creative in the kitchen. With a combination of sweet marshmallows, crunchy candy canes, and a touch of chocolate, these pops are sure to become a holiday favorite.
Perfect for a Christmas party or as a homemade gift, Candy Cane Marshmallow Pops can be custom-decorated with various toppings to suit personal preferences.
The process of making these pops is simple, requiring minimal ingredients and time, and the end result is a colorful and delicious snack that captures the spirit of the holidays.
Gather your little helpers and prepare to make these delightful treats!
Ingredients for 4-6 servings:
- 12 large marshmallows
- 6 candy canes
- 1 cup semisweet chocolate chips
- 1 tablespoon vegetable oil
- Assorted sprinkles or crushed peppermint candies (optional)
Instructions:
- Prepare the Candy Canes: Unwrap the candy canes and carefully break them in half. Each half will serve as a stick for the marshmallow pops.
- Insert Candy Cane Sticks: Push the straight end of a candy cane half into the center of each marshmallow, ensuring it’s secure but not poking through the other side.
- Melt the Chocolate: In a microwave-safe bowl, combine the chocolate chips and vegetable oil. Microwave in 30-second intervals, stirring in between, until the chocolate is smooth and fully melted.
- Dip the Marshmallows: Hold the marshmallow by the candy cane stick and dip it into the melted chocolate, turning to coat evenly. Allow any excess chocolate to drip off.
- Decorate the Pops: If desired, immediately sprinkle the chocolate-coated marshmallows with assorted sprinkles or crushed peppermint candies before the chocolate sets.
- Let Them Set: Place the chocolate-dipped marshmallows on a sheet of wax paper or a silicone baking mat. Allow the chocolate to cool and harden completely, which may take about 30 minutes.
- Serve and Enjoy: Once the chocolate has set, your Candy Cane Marshmallow Pops are ready to be enjoyed. Serve them at room temperature and watch them disappear!
Extra Tips:
For an added festive touch, consider using white chocolate or colored candy melts in addition to or instead of semisweet chocolate. This can add a vibrant look to your pops.
If you’re having trouble with the candy canes breaking while inserting them into the marshmallows, try gently twisting the candy cane as you push it in.
Additionally, store any leftover pops in an airtight container to maintain their freshness and prevent the marshmallows from drying out.
Christmas Wreath Rice Krispie Treats
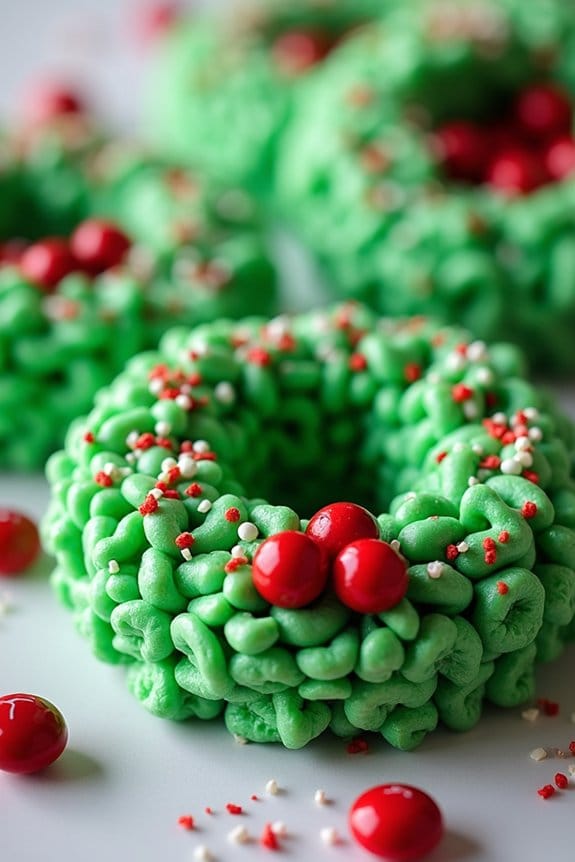
Christmas is the perfect time for festive and fun treats, and Christmas Wreath Rice Krispie Treats are a delightful addition to any holiday table. These bright and colorful treats aren’t only delicious but also easy to make, making them perfect for kids to help with in the kitchen. Shaped like mini holiday wreaths, these treats are sure to bring a smile to everyone’s face and add a touch of holiday cheer to your dessert spread.
These Rice Krispie treats are made using the classic recipe with an added twist of green food coloring and festive decorations. The marshmallow mixture is tinted green to mimic the look of wreaths, and they’re adorned with red candies to resemble holly berries. With simple ingredients and minimal cooking time, they’re an ideal project for young chefs enthusiastic to contribute to holiday preparations. This recipe serves 4-6 people, making it perfect for small gatherings or family enjoyment.
Ingredients:
- 4 cups mini marshmallows
- 6 cups Rice Krispies cereal
- 3 tablespoons butter
- 1 teaspoon vanilla extract
- Green food coloring
- Non-stick cooking spray
- Red cinnamon candies or red M&M’s
- Sprinkles (optional)
Cooking Instructions:
- Prepare the Work Area: Begin by gathering all your ingredients and verifying your workspace is clean. Spray a baking sheet or wax paper with non-stick cooking spray to prevent sticking.
- Melt the Butter and Marshmallows: In a large saucepan, melt 3 tablespoons of butter over low heat. Add 4 cups of mini marshmallows and stir until they’re completely melted and smooth. This usually takes about 5 minutes.
- Add Flavor and Color: Remove the saucepan from the heat and stir in 1 teaspoon of vanilla extract. Gradually add green food coloring to the melted marshmallow mixture, stirring until you achieve the desired shade of green for your wreaths.
- Mix in the Cereal: Pour 6 cups of Rice Krispies cereal into the saucepan. Stir until the cereal is completely coated with the marshmallow mixture. Be sure to mix thoroughly to guarantee an even distribution of color and flavor.
- Shape the Wreaths: Working quickly, use a spoon to scoop portions of the mixture onto the prepared baking sheet. Lightly spray your hands with non-stick cooking spray to prevent sticking, and shape each portion into a wreath form. You can create a hole in the center using your fingers or a small circular object.
- Decorate: While the wreaths are still warm, press a few red cinnamon candies or red M&M’s onto each one to resemble holly berries. If desired, sprinkle some festive sprinkles for added decoration.
- Cool: Allow the wreaths to cool completely at room temperature before serving. This will help them hold their shape.
Extra Tips:
When making Christmas Wreath Rice Krispie Treats, it’s important to work quickly once the cereal is added to the marshmallow mixture since it can harden as it cools. If the mixture becomes too difficult to shape, you can rewarm it slightly to make it more pliable.
Additionally, encourage kids to get creative with decorations, using a variety of candies and sprinkles to personalize their wreaths. These treats not only make a delightful snack but also a fun and interactive holiday activity.
Snowflake Sugar Cookies

Baking Snowflake Sugar Cookies is a fun and creative way to spend time with your children during the holidays. This recipe yields about 24 cookies, making it suitable for 4-6 people to enjoy. The cookies are buttery, sweet, and have a delightful crunch. With a few basic ingredients that you likely already have in your pantry, you can whip up a batch of these cookies and fill your home with the warm aroma of sugar and vanilla. Gather your little helpers, roll up your sleeves, and get ready to bake some memories.
Ingredients:
- 2 3/4 cups all-purpose flour
- 1 teaspoon baking soda
- 1/2 teaspoon baking powder
- 1 cup unsalted butter, softened
- 1 1/2 cups granulated sugar
- 1 egg
- 1 teaspoon vanilla extract
- 1/2 teaspoon almond extract
- Assorted colored icing and sprinkles for decoration
Instructions:
- Preheat and Prepare: Preheat your oven to 375°F (190°C). Line two baking sheets with parchment paper to prevent the cookies from sticking and guarantee an even bake.
- Mix Dry Ingredients: In a medium-sized bowl, whisk together the flour, baking soda, and baking powder. This guarantees that the baking soda and baking powder are evenly distributed throughout the flour.
- Cream Butter and Sugar: In a large bowl, beat the softened butter and sugar together with an electric mixer on medium speed until light and fluffy. This should take about 2-3 minutes.
- Add Wet Ingredients: Beat in the egg, vanilla extract, and almond extract until well combined. This adds flavor and binds the dough together.
- Combine Mixtures: Gradually add the dry ingredients to the wet ingredients, mixing on low speed until just combined. Be careful not to overmix, as this can make the cookies tough.
- Chill Dough: Divide the dough in half, wrap each half in plastic wrap, and refrigerate for at least 1 hour. Chilling the dough makes it easier to roll out and helps the cookies keep their shape during baking.
- Roll and Cut: On a lightly floured surface, roll out the dough to about 1/4-inch thickness. Use snowflake-shaped cookie cutters to cut out the cookies and place them on the prepared baking sheets.
- Bake: Bake the cookies in the preheated oven for 8-10 minutes, or until the edges are lightly golden. Allow them to cool on the baking sheet for a few minutes before transferring them to a wire rack to cool completely.
- Decorate: Once the cookies are completely cooled, use colored icing and sprinkles to decorate them as desired. Let the icing set before serving or storing.
Extra Tips:
When rolling out the dough, sprinkle a little flour on the rolling pin and work surface to prevent sticking. If the dough becomes too soft while cutting, pop it back in the fridge for a few minutes to firm up.
Also, be sure to let the cookies cool completely before decorating to prevent the icing from melting off. If you want a more vibrant design, consider using gel food coloring in your icing.
These cookies can be stored in an airtight container at room temperature for up to a week, making them perfect for holiday gift-giving or snacking throughout the festive season.
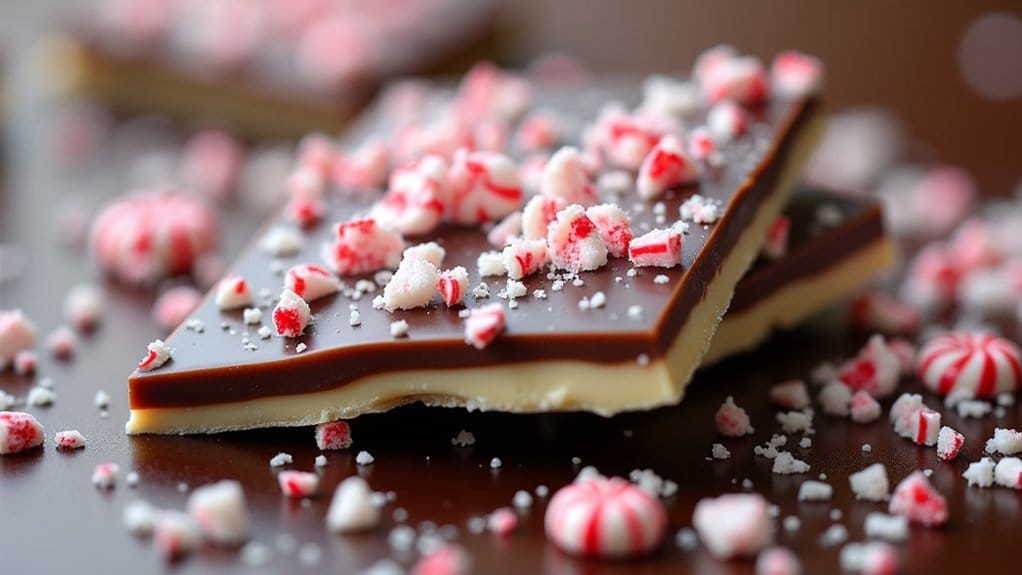
Peppermint Bark
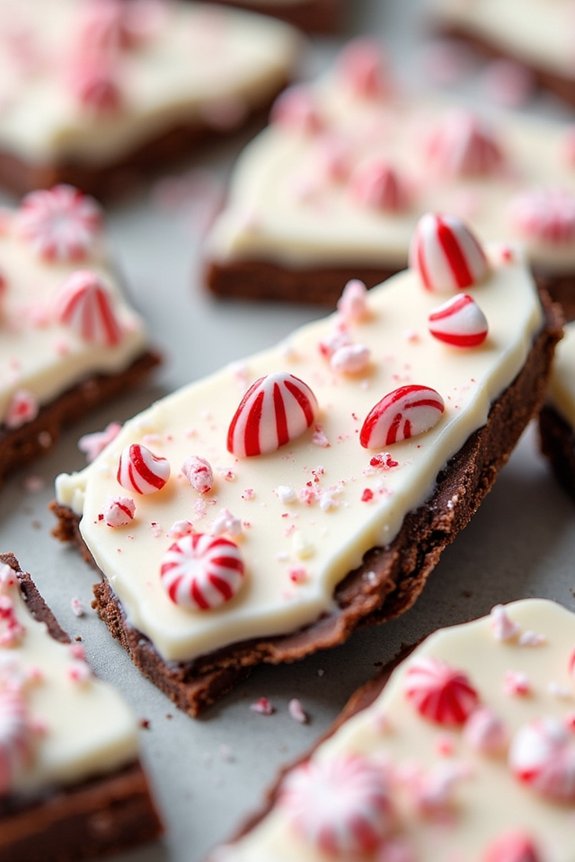
Peppermint Bark is a delightful and festive treat that perfectly captures the spirit of the holiday season. This no-bake dessert is a layered confection that combines rich, creamy chocolate with invigorating peppermint flavors, making it a favorite among both kids and adults.
Not only is it delicious, but it’s also incredibly easy to prepare, making it an ideal recipe for kids to get involved in the kitchen. With its simple ingredients and straightforward steps, Peppermint Bark can be made in advance and stored for holiday gatherings or gifted to friends and family.
This recipe yields a serving size suitable for 4-6 people, making it perfect for a small holiday gathering or a cozy family night in. The combination of white and dark chocolate with crushed peppermint candies not only creates a stunning visual contrast but also a delightful mix of flavors and textures.
Whether you’re planning a Christmas party or just looking for a fun cooking activity with your kids, this Peppermint Bark recipe is sure to be a hit.
Ingredients:
- 12 ounces of dark chocolate chips
- 12 ounces of white chocolate chips
- 1 teaspoon of peppermint extract
- 1 cup of crushed peppermint candies or candy canes
- Parchment paper
Instructions:
1. Prepare Your Workspace:
Begin by lining a baking sheet with parchment paper. This will prevent the chocolate from sticking to the pan and make it easier to remove once set.
2. Melt the Dark Chocolate:
In a microwave-safe bowl, melt the dark chocolate chips in 30-second intervals, stirring between each interval until smooth. Be careful not to overheat the chocolate to avoid burning.
3. Add Peppermint Extract:
Once the dark chocolate is melted and smooth, stir in 1/2 teaspoon of peppermint extract. This will infuse the chocolate with a zesty minty flavor.
4. Spread the Dark Chocolate:
Pour the melted dark chocolate onto the prepared baking sheet, spreading it evenly with a spatula to create a uniform layer. Place the baking sheet in the refrigerator for about 15-20 minutes to allow the chocolate to set.
5. Melt the White Chocolate:
In a separate microwave-safe bowl, melt the white chocolate chips using the same method as the dark chocolate. Stir until smooth and creamy.
6. Spread the White Chocolate:
Once the dark chocolate has set, pour the melted white chocolate over the top, spreading it evenly to cover the dark chocolate layer.
7. Add Crushed Peppermint:
Immediately sprinkle the crushed peppermint candies or candy canes over the white chocolate layer while it’s still soft. Gently press the candy pieces into the chocolate with your fingers or a spatula.
8. Set the Bark:
Place the baking sheet back in the refrigerator for about 30-40 minutes, or until the chocolate layers are completely set and firm.
9. Break and Serve:
Once set, remove the Peppermint Bark from the refrigerator and break it into pieces of your desired size. Serve immediately or store in an airtight container.
Extra Tips:
To make your Peppermint Bark even more special, consider using high-quality chocolate for a richer taste. If you’re helping kids with this recipe, make sure they’re careful when melting the chocolate, as it can get hot.
Also, you can get creative with shapes by using cookie cutters to cut out festive shapes before the bark fully sets. For storage, keep the Peppermint Bark in a cool, dry place, as moisture can cause the chocolate to lose its texture. Enjoy your holiday treat!
