
Halloween is such a magical time to let your creativity shine in the kitchen with spooky treats. There’s nothing better than seeing the excitement on everyone’s faces when you serve up witch’s brew punch with a creepy cauldron cake centerpiece. Mummy hot dogs and ghostly cheese balls are always a hit too! These 14 fun recipes promise a hauntingly good time. Ready to conjure up some kitchen magic? Let’s explore these ghoulish delights together!
Spooky Spider Cupcakes

With Halloween just around the corner, it’s the perfect time to whip up a batch of Spooky Spider Cupcakes. These delightful treats aren’t only delicious but also add a touch of frightful fun to any Halloween gathering. Made with rich chocolate cupcakes as the base and topped with creepy, crawly decorations, these cupcakes are certain to be a hit with both kids and adults alike.
Spooky Spider Cupcakes add frightful fun and delicious delight to Halloween gatherings, impressing both kids and adults.
Whether you’re hosting a Halloween party or just looking for a festive baking project, these Spooky Spider Cupcakes will undoubtedly spin a web of excitement.
The cupcakes are easy to prepare and require minimal ingredients, making them a fantastic choice for busy bakers. The chocolate cupcakes are moist and flavorful, serving as the perfect canvas for the spider web frosting and candy spider decorations. With a few simple steps, you can transform ordinary cupcakes into a spooky masterpiece that will impress your guests.
This recipe serves 4-6 people, providing just the right amount for a small gathering or family treat.
Ingredients:
- 1 cup all-purpose flour
- 1 cup granulated sugar
- 1/2 cup unsweetened cocoa powder
- 1 teaspoon baking powder
- 1/2 teaspoon baking soda
- 1/4 teaspoon salt
- 1/2 cup milk
- 1/4 cup vegetable oil
- 1 large egg
- 1 teaspoon vanilla extract
- 1/2 cup boiling water
- 1 cup chocolate frosting
- Black licorice strings
- Candy eyes
- Chocolate sprinkles
Instructions:
1. Preheat the Oven and Prepare the Pan:
Preheat your oven to 350°F (175°C). Line a cupcake pan with 12 cupcake liners to guarantee easy removal after baking.
2. Mix the Dry Ingredients:
In a large mixing bowl, combine the flour, sugar, cocoa powder, baking powder, baking soda, and salt. Whisk together until well blended.
3. Add Wet Ingredients:
Add the milk, vegetable oil, egg, and vanilla extract to the dry ingredients. Mix until smooth and well combined.
4. Incorporate the Boiling Water:
Gradually stir in the boiling water. The batter will be thin, which is normal. Continue to mix until the batter is smooth.
5. Fill the Cupcake Liners:
Divide the batter evenly among the 12 cupcake liners, filling each about two-thirds full.
6. Bake the Cupcakes:
Place the cupcake pan in the preheated oven and bake for 18-22 minutes or until a toothpick inserted into the center of a cupcake comes out clean. Let them cool in the pan for about 5 minutes, then transfer to a wire rack to cool completely.
7. Frost the Cupcakes:
Once the cupcakes are cool, spread a layer of chocolate frosting on each one.
8. Decorate with Spiders:
Cut the black licorice into small pieces to create spider legs. Place eight pieces around the edges of each cupcake to form the legs. Add candy eyes on top to create the spider’s face. Sprinkle some chocolate sprinkles over the frosting to give texture.
Extra Tips:
When making Spooky Spider Cupcakes, feel free to get creative with your decorations. You can use different colored candy eyes or add a sprinkle of edible glitter for an extra spooky touch.
If you have trouble finding black licorice, consider using pretzel sticks dipped in chocolate as an alternative for spider legs. For an added Halloween twist, consider adding a few drops of orange food coloring to the frosting to contrast with the chocolate.
These cupcakes can be stored in an airtight container for up to three days, making them a convenient make-ahead option for your Halloween festivities.
Witch’s Brew Punch
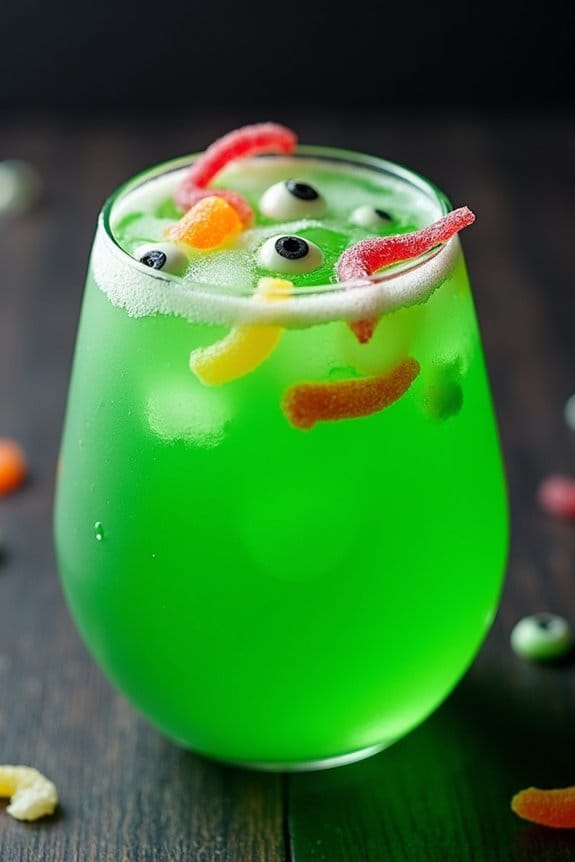
Witch’s Brew Punch is the perfect spooky beverage to complement your Halloween festivities. This magical concoction is both fun and delicious, making it an ideal party drink for both kids and adults. With its vibrant color and mysterious ingredients, Witch’s Brew Punch sets the mood for a night of eerie enchantment. Serve this potion in a cauldron or a large punch bowl to enhance the Halloween atmosphere.
The punch combines a mix of fruity flavors with a fizzy twist, creating a revitalizing and enjoyable drink. The deep green color of the punch, achieved with a few simple ingredients, captures the essence of a witch’s cauldron bubbling over with mysterious potions. Garnish with creepy eyeball ice cubes or gummy worms to add a touch of whimsy and fright. This recipe is designed to serve 4-6 people, making it perfect for small gatherings or family celebrations.
Ingredients (Serving size: 4-6 people):
- 4 cups of lemon-lime soda
- 2 cups of pineapple juice
- 1 cup of lime sherbet
- ½ cup of green apple syrup
- 1 cup of water
- Ice cubes
- Optional: gummy worms, eyeball candies for garnish
Instructions:
- Prepare the Punch Base: In a large punch bowl or cauldron, pour the lemon-lime soda and pineapple juice. Stir gently to combine the flavors without losing the carbonation.
- Add the Sherbet: Scoop the lime sherbet into the punch mixture. Allow it to melt slightly, which will create a frothy, bubbling effect resembling a witch’s cauldron.
- Incorporate the Green Apple Syrup: Pour the green apple syrup into the punch. Stir well to guarantee an even distribution of the syrup, which will give the punch its vibrant green color.
- Adjust the Consistency: Add one cup of water to the punch to adjust the sweetness and consistency. Stir gently to incorporate.
- Chill the Punch: Add ice cubes to the punch to keep it cold and revitalizing. Stir until the punch is well-chilled.
- Garnish and Serve: For a spooky effect, add gummy worms or eyeball candies on top of the punch. Serve immediately in individual cups or glasses.
Extra Tips:
For an extra special presentation, freeze gummy worms or eyeball candies inside the ice cubes before adding them to the punch. This not only chills the drink but also adds a fun surprise when the ice melts.
If you prefer a less sweet punch, adjust the amount of green apple syrup according to your taste. To make the punch more adult-friendly, consider adding a splash of vodka or rum for a spirited version. Always verify that the punch is well-stirred to maintain the right balance of flavors.
Mummy Hot Dogs
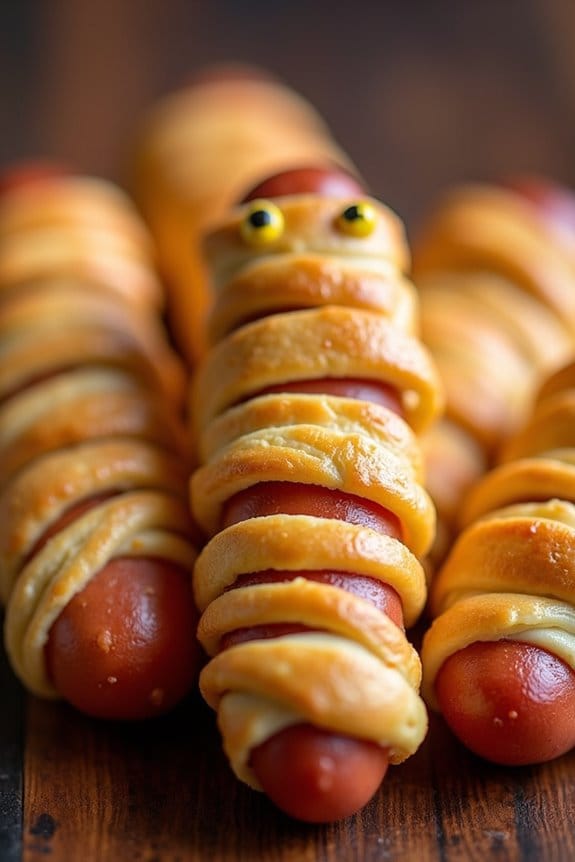
Mummy Hot Dogs are the perfect spooky treat to serve at your Halloween gathering. These delightful snacks aren’t only adorable but also incredibly easy to make, making them a hit with both kids and adults alike. Crafted to resemble mummies, these hot dogs are wrapped in strips of dough to create a fun and festive appearance.
Whether you’re hosting a party or simply want to add a bit of Halloween flair to your meal, Mummy Hot Dogs are a creative way to celebrate the holiday.
The beauty of this recipe lies in its simplicity. With just a few ingredients and minimal preparation time, you can have a festive dish ready to impress your guests. Mummy Hot Dogs are versatile enough to serve as a main dish or a fun appetizer, and they pair perfectly with a variety of dipping sauces.
As you prepare these little mummies, you’ll find that they not only look great but taste delicious too. They’re sure to be a memorable addition to your Halloween menu.
Ingredients for Mummy Hot Dogs (serving size: 4-6 people):
- 8 hot dogs
- 1 can (8 oz) refrigerated crescent roll dough or puff pastry
- Mustard or ketchup for eyes
- Cooking spray or parchment paper
Cooking Instructions:
- Preheat the Oven: Start by preheating your oven to 375°F (190°C). This guarantees that the dough will cook evenly and become golden brown.
- Prepare the Dough: Unroll the crescent roll dough or puff pastry on a clean surface. If using crescent rolls, pinch the perforations to seal them and create a single sheet of dough.
- Cut the Dough into Strips: Using a pizza cutter or sharp knife, cut the dough into thin strips, about 1/4 inch wide. These strips will serve as the mummy’s “bandages.”
- Wrap the Hot Dogs: Take each hot dog and wrap it with the dough strips, leaving a small space at one end for the face. You can wrap the strips in a crisscross pattern to create a mummy-like appearance. Be sure to leave some gaps for the “bandages” to look authentic.
- Arrange on Baking Sheet: Place the wrapped hot dogs on a baking sheet lined with parchment paper or lightly sprayed with cooking spray to prevent sticking.
- Bake the Mummies: Place the baking sheet in the preheated oven and bake for 12-15 minutes, or until the dough is golden brown and cooked through.
- Add the Eyes: Once the mummy hot dogs are baked, remove them from the oven and let them cool slightly. Use a small amount of mustard or ketchup to dot on eyes where you left the face space exposed.
Extra Tips:
For extra flavor, you can brush the dough strips with a bit of melted butter or garlic butter before baking. If you want to add a cheesy twist, consider placing a slice of cheese under the dough before wrapping the hot dog.
You can also experiment with different types of sausages, like chicken or turkey hot dogs, to suit your taste preferences. Remember to keep an eye on the mummies while they bake, as oven temperatures can vary and you don’t want them to overcook.
Enjoy your spooky creation, and have a hauntingly good time!
Ghostly Cheese Balls

Ghostly Cheese Balls are a fun and spooky addition to any Halloween gathering. These delightful treats aren’t only delicious but also add a whimsical touch to your festive table. Made with creamy cheese and a hint of herbs, these balls are shaped into cute little ghosts, making them a perfect appetizer or snack for both kids and adults alike.
The ghostly appearance is achieved with a simple combination of cheeses and a few edible decorations, making them both easy and enjoyable to create. Whether you’re hosting a Halloween party or simply want to surprise your family with a themed snack, Ghostly Cheese Balls offer a fantastic way to bring the spirit of Halloween into your kitchen.
The recipe is straightforward, and the results are sure to impress your guests. Perfectly portioned for 4-6 people, these cheese balls can be prepared in advance, allowing you to focus on other aspects of your celebration without stress.
Ingredients (serving size: 4-6 people):
- 8 oz (225 g) cream cheese, softened
- 1 cup shredded cheddar cheese
- 1/4 cup grated Parmesan cheese
- 1/4 cup chopped fresh chives
- 1/2 teaspoon garlic powder
- 1/4 teaspoon onion powder
- 1/4 teaspoon black pepper
- 1/4 teaspoon salt
- Black olives, sliced (for eyes)
- Pretzel sticks (for arms)
Cooking Instructions:
- Prepare the Cheese Mixture: In a large mixing bowl, combine the softened cream cheese, shredded cheddar cheese, grated Parmesan cheese, chopped chives, garlic powder, onion powder, black pepper, and salt. Mix well until all ingredients are thoroughly combined and smooth.
- Shape the Ghosts: Scoop out tablespoon-sized portions of the cheese mixture and roll them into balls. Flatten one side slightly to form the base of the ghost, ensuring it stands upright. Continue shaping until all the mixture is used.
- Add Edible Decorations: Cut small pieces from the black olives to form eyes and mouth for each ghost. Gently press the olive pieces onto the cheese balls to create the ghostly face. Insert two pretzel sticks into the sides of each cheese ball to represent ghost arms.
- Chill the Cheese Balls: Place the decorated cheese balls on a tray lined with parchment paper. Refrigerate them for at least 1 hour to allow the flavors to meld and the ghosts to firm up.
- Serve and Enjoy: Once chilled, arrange the Ghostly Cheese Balls on a serving platter. Serve with crackers or breadsticks for a delightful Halloween appetizer.
Extra Tips: When shaping the cheese balls, keep your hands slightly damp to prevent the mixture from sticking. If you find the cheese mixture too soft to handle, refrigerate it for about 15 minutes before shaping.
Feel free to experiment with different herbs or spices to customize the flavor to your liking. If you’re preparing the cheese balls in advance, store them in an airtight container in the refrigerator and decorate them with olives and pretzels just before serving to maintain freshness and crispness.
Vampire Bat Wings

Transform your Halloween party menu with this spooky yet scrumptious dish: Vampire Bat Wings. Perfect for a themed gathering, these wings aren’t only visually intriguing but also packed with bold flavors that will keep your guests coming back for more. The deep, dark hue of the wings is achieved by marinating them in a special blend of soy sauce and balsamic vinegar, giving them a sinister yet tantalizing appearance. Served with a side of eerie garlic dipping sauce, these wings embody the essence of Halloween while satisfying those savory cravings.
The key to this dish lies in the careful preparation and marination of the wings. Choosing fresh, high-quality chicken wings is essential for achieving the best results. The marinade, rich with garlic, ginger, and a touch of honey, penetrates the meat, guaranteeing every bite is juicy and flavorful. When cooked to perfection, these Vampire Bat Wings boast a crispy exterior with a tender, succulent interior.
Whether you’re hosting a Halloween bash or simply looking to add a little fright to your night, these wings are sure to be a hit.
Ingredients (Serves 4-6):
- 2 pounds of chicken wings
- 1/2 cup soy sauce
- 1/4 cup balsamic vinegar
- 2 tablespoons honey
- 3 cloves garlic, minced
- 1 tablespoon fresh ginger, grated
- 1 teaspoon black food coloring (optional for darker wings)
- 1 tablespoon olive oil
- Salt and pepper to taste
- 1 bunch of green onions, chopped (for garnish)
Cooking Instructions:
- Prepare the Marinade: In a large mixing bowl, combine the soy sauce, balsamic vinegar, honey, minced garlic, grated ginger, and black food coloring. Mix well until all the ingredients are fully incorporated.
- Marinate the Wings: Add the chicken wings to the marinade, ensuring they’re fully submerged. Cover the bowl with plastic wrap and refrigerate for at least 2 hours, or overnight for best results. This will allow the flavors to penetrate the meat thoroughly.
- Preheat the Oven: Preheat your oven to 400°F (200°C). Line a baking sheet with aluminum foil for easy cleanup and lightly grease it with olive oil.
- Bake the Wings: Arrange the marinated wings on the prepared baking sheet in a single layer. Sprinkle them with salt and pepper to taste. Bake in the preheated oven for 25-30 minutes, turning halfway through, until the wings are crispy and cooked through.
- Garnish and Serve: Once cooked, remove the wings from the oven and transfer them to a serving platter. Garnish with chopped green onions for a pop of color and an extra layer of flavor. Serve hot with your choice of dipping sauce.
Extra Tips:
For an even spookier presentation, consider adding a few drops of black food coloring to the marinade to intensify the dark, bat-like appearance of the wings. If you prefer a smokier flavor, you can also grill the wings instead of baking them. Just be sure to keep an eye on them to avoid burning.
To guarantee your chicken wings are cooked to perfection, use a meat thermometer to check that the internal temperature reaches 165°F (75°C). Enjoy these Vampire Bat Wings with a garlic dipping sauce or a spicy salsa for an extra kick.
Monster Eyeball Cookies

Monster Eyeball Cookies are a perfect treat for Halloween, combining spooky aesthetics with a delicious taste. These cookies not only look like creepy eyeballs but also deliver a delightful mix of flavors with every bite.
Whether you’re hosting a Halloween party or just want to surprise your family with a themed dessert, these cookies will surely stand out on the dessert table. The colorful icing and candy decorations make them visually appealing, while the soft cookie base guarantees everyone enjoys the taste just as much as the presentation.
To create these eerie delights, you’ll need some basic baking ingredients along with a few special items to achieve the monster eyeball effect. The cookies themselves are fairly simple to make, with a classic sugar cookie dough as the base. The fun comes in decorating them to resemble monstrous eyeballs using icing and candy.
The following recipe serves 4-6 people, making it ideal for a small gathering or family treat. Let’s plunge into the ingredients you’ll need to bring these Monster Eyeball Cookies to life.
Ingredients:
- 2 1/2 cups all-purpose flour
- 1/2 teaspoon baking powder
- 1/4 teaspoon salt
- 1 cup unsalted butter, softened
- 1 cup granulated sugar
- 1 large egg
- 1 teaspoon vanilla extract
- Red, blue, and green food coloring
- Candy eyeballs (available at baking supply stores)
- Black writing gel
- Red gel icing
Cooking Instructions:
1. Prepare the Dough: In a medium bowl, whisk together the flour, baking powder, and salt. In a separate large bowl, beat the softened butter and granulated sugar together with an electric mixer until the mixture is light and fluffy.
Add the egg and vanilla extract, and continue beating until well incorporated. Gradually add the dry ingredients to the wet ingredients, mixing until a soft dough forms.
2. Color the Dough: Divide the dough into three equal portions. Tint each portion with a different food coloring: red, blue, and green. Knead the dough gently until the color is evenly distributed.
Wrap each colored dough in plastic wrap and refrigerate for 30 minutes.
3. Shape the Cookies: Preheat your oven to 350°F (175°C). Line a baking sheet with parchment paper. Roll each colored dough into 1-inch balls and place them on the prepared baking sheet, leaving about 2 inches of space between each ball.
4. Bake the Cookies: Bake in the preheated oven for 10-12 minutes, or until the edges are just beginning to turn golden. Remove from the oven and immediately press a candy eyeball into the center of each cookie.
Allow the cookies to cool on the baking sheet for 5 minutes before transferring them to a wire rack to cool completely.
5. Decorate the Cookies: Once the cookies are completely cooled, use the black writing gel to draw wavy lines from the candy eyeball to the edge of each cookie, mimicking veins. Use the red gel icing to add additional creepy vein details around the eyeball for an extra spooky effect.
For the best results, make sure your butter is at room temperature before you start making the dough; this will help you achieve the right consistency.
If you’re short on time, you can prepare the dough a day in advance and store it in the refrigerator. When decorating, let your creativity flow with the icing and gel colors to make each eyeball unique.
Always confirm the cookies are fully cooled before decorating, as the heat can cause the icing to melt and run. Enjoy your deliciously creepy Monster Eyeball Cookies!
Frankenstein Rice Krispie Treats

Frankenstein Rice Krispie Treats are a fun and festive way to celebrate Halloween. These delicious treats are a spooky twist on the classic Rice Krispie Treats, featuring vibrant green marshmallow squares decorated with chocolate and candy to resemble everyone’s favorite monster, Frankenstein. Perfect for Halloween parties, these treats aren’t only a hit with kids but also a nostalgic delight for adults who remember the joy of Rice Krispie Treats from their own childhoods.
Creating these treats is simple and requires just a few basic ingredients you likely already have in your pantry. The addition of green food coloring gives these treats their characteristic Frankenstein hue, while melted chocolate and candy create the iconic face. Whether you’re hosting a Halloween party or just looking to add some seasonal fun to your dessert table, Frankenstein Rice Krispie Treats are sure to be a crowd-pleaser.
Ingredients (serves 4-6 people):
- 6 cups Rice Krispies cereal
- 3 tablespoons unsalted butter
- 1 package (10 oz) mini marshmallows
- Green food coloring
- 1/2 cup chocolate chips
- 12 candy eyes
- 12 pretzel sticks
- Black icing or decorating gel
Cooking Instructions:
- Prepare the Pan: Line a 9×13 inch baking dish with parchment paper or lightly grease it with butter to prevent sticking.
- Melt the Butter and Marshmallows: In a large saucepan over low heat, melt the butter. Once melted, add the mini marshmallows and stir continuously until they’re completely melted and smooth.
- Color the Mixture: Remove the saucepan from heat. Add a few drops of green food coloring to the melted marshmallow mixture and stir until the color is even. Adjust the amount of food coloring until you reach the desired shade of green.
- Combine with Cereal: Pour the Rice Krispies cereal into the saucepan and gently fold them into the marshmallow mixture until they’re fully coated.
- Transfer and Flatten: Quickly transfer the mixture to the prepared baking dish. Use a buttered spatula or wax paper to evenly press and flatten the mixture into the dish. Allow it to cool and set for about 10-15 minutes.
- Cut and Decorate: Once set, cut the mixture into 12 even rectangles. Melt the chocolate chips in the microwave or over a double boiler. Using a spoon or piping bag, add a tuft of hair to the top of each rectangle with the melted chocolate. Stick two candy eyes onto each piece and use black icing or decorating gel to draw a mouth and stitches. Insert a pretzel stick into each side of the rectangle to resemble bolts.
- Set and Serve: Allow the decorations to set for a few minutes, then serve and enjoy your spooky treats!
Extra Tips: To make the process easier, have all your decorating supplies ready before you start making the treats. You can cover your workspace with wax paper to minimize cleanup. If you want to experiment, try using different candy decorations or even adding a touch of vanilla extract to the marshmallow mixture for extra flavor. For a more vivid green color, use gel food coloring instead of liquid drops. Enjoy getting creative with your Frankenstein Rice Krispie Treats!
Jack-o’-Lantern Stuffed Peppers

Jack-o’-Lantern Stuffed Peppers are a festive and delicious way to celebrate Halloween while serving a nutritious meal. This dish transforms ordinary bell peppers into charming jack-o’-lanterns by carving out spooky faces, making it a fun project for both kids and adults. Not only does this recipe bring a festive spirit to your dining table, but it also provides a healthy and hearty meal with its combination of seasoned ground meat, rice, and vegetables.
These stuffed peppers are versatile and can be customized to suit various dietary preferences. Whether you’re using beef, turkey, or a vegetarian alternative, the dish remains flavorful and satisfying. The carved peppers not only look great but also add a sweet, slightly smoky flavor as they roast, complementing the savory filling inside. This recipe is perfect for a family dinner or a Halloween party, offering both visual appeal and delightful taste.
Ingredients (Serves 4-6):
- 6 large orange bell peppers
- 1 pound ground beef or turkey
- 1 cup cooked rice
- 1 small onion, diced
- 2 cloves garlic, minced
- 1 can (14.5 oz) diced tomatoes, drained
- 1 cup shredded mozzarella cheese
- 1 teaspoon salt
- 1/2 teaspoon black pepper
- 1 teaspoon Italian seasoning
- 1 tablespoon olive oil
Cooking Instructions:
- Prepare the Peppers: Preheat your oven to 375°F (190°C). Carefully slice the tops off the bell peppers and remove the seeds and membranes. Using a small knife, carve jack-o’-lantern faces into one side of each pepper.
- Cook the Filling: In a large skillet, heat the olive oil over medium heat. Add the diced onion and cook for about 3 minutes until translucent. Add the minced garlic and cook for another minute. Then, add the ground beef or turkey, breaking it up with a spoon, and cook until browned. Drain any excess fat.
- Mix the Filling: Stir in the cooked rice, drained diced tomatoes, salt, black pepper, and Italian seasoning. Let the mixture cook for another 5 minutes, allowing the flavors to meld together. Remove the skillet from heat and stir in half of the shredded mozzarella cheese until melted and combined.
- Stuff the Peppers: Place the carved bell peppers upright in a baking dish. Carefully spoon the meat and rice mixture into each pepper, packing it tightly. Sprinkle the remaining mozzarella cheese on top of each stuffed pepper.
- Bake the Peppers: Cover the baking dish with aluminum foil and bake in the preheated oven for 30 minutes. Remove the foil and bake for an additional 10 minutes, or until the peppers are tender and the cheese is bubbly and golden brown.
- Serve: Allow the peppers to cool slightly before serving. Serve the jack-o’-lantern peppers with a side salad or bread for a complete meal.
Extra Tips:
When carving the jack-o’-lantern faces, be gentle to avoid tearing the peppers. If you prefer a vegetarian version, substitute the meat with cooked lentils or a plant-based ground meat alternative. For added flavor, consider mixing in chopped herbs like parsley or basil into the filling.
If you’re short on time, use pre-cooked rice or a microwaveable rice pouch. Finally, these peppers can be prepared in advance and stored in the refrigerator for up to two days before baking, making them a convenient dish for busy schedules.
Candy Corn Popcorn Mix
Candy Corn Popcorn Mix is a delightful and festive treat perfect for Halloween celebrations. This recipe combines the classic flavors of buttery popcorn with the sweetness of candy corn, creating a fun and colorful snack that’s certain to be a hit with both kids and adults.
Whether you’re hosting a Halloween party or just looking for a fun treat to enjoy with family and friends, this mix is easy to make and incredibly satisfying.
The combination of textures and flavors in this Candy Corn Popcorn Mix makes it an irresistible snack. The popcorn provides a light and crispy base, while the candy corn adds a chewy and sweet contrast.
Additionally, the mix is customizable, allowing you to add your favorite nuts or chocolates for an extra layer of flavor. Best of all, this recipe is simple to prepare, making it an ideal choice for busy Halloween festivities.
Ingredients (Serving Size: 4-6 people)
- 8 cups of popped popcorn
- 2 cups of candy corn
- 1 cup of pretzels
- 1 cup of salted peanuts
- 1/2 cup of melted white chocolate
- 1/2 cup of mini chocolate candies (e.g., M&M’s)
Cooking Instructions
- Prepare the Popcorn: Begin by popping your popcorn. You can use microwave popcorn or pop kernels on the stove. Once popped, transfer the popcorn into a large mixing bowl, making certain that you remove any unpopped kernels.
- Combine Dry Ingredients: Add the candy corn, pretzels, salted peanuts, and mini chocolate candies to the bowl with the popcorn. Gently toss the ingredients together until they’re evenly mixed.
- Melt the White Chocolate: In a microwave-safe bowl, melt the white chocolate in 30-second intervals, stirring in between, until smooth and fully melted.
- Coat the Mix: Drizzle the melted white chocolate over the popcorn mixture. Use a spatula or your hands to gently fold the mix, making sure the white chocolate coats all ingredients.
- Let It Set: Spread the popcorn mix onto a large baking sheet lined with parchment paper. Allow it to set at room temperature for about 20-30 minutes, or until the white chocolate has hardened.
- Serve and Enjoy: Once the mix is set, break it into pieces and serve in a large bowl or individual treat bags for guests to enjoy.
Extra Tips
For an even more festive touch, consider adding a few drops of orange or black food coloring to the melted white chocolate before drizzling it over the popcorn mix. This will give your snack a more Halloween-themed appearance.
It’s also important to make sure that the popcorn is completely cool before adding the white chocolate, as any residual heat might cause the chocolate to set unevenly.
Feel free to experiment by adding other ingredients like dried cranberries or different types of nuts to suit your taste preferences.
Bloody Finger Breadsticks

Halloween is the perfect time to get creative in the kitchen and what better way to spook your guests than with some Bloody Finger Breadsticks? These creepy yet delicious treats are sure to be a hit at your Halloween party. Shaped like fingers and complete with almond “nails” and a gruesome marinara “blood” dipping sauce, these breadsticks are both fun to make and tasty to eat. They’re a fantastic way to add a touch of horror to your festive spread.
Bloody Finger Breadsticks are a spooky and delicious hit for Halloween festivities.
Whether you’re hosting a party or just looking for a fun family activity, Bloody Finger Breadsticks are easy to make and require only a few simple ingredients. The dough is shaped into finger-like forms, while the almonds are placed to mimic fingernails. Once baked to golden perfection, the breadsticks are served with a side of marinara sauce for dipping, giving them the appearance of bloody fingers. This recipe serves 4-6 people, making it ideal for small gatherings or family dinners.
Ingredients:
- 1 package of refrigerated breadstick dough
- 24 whole blanched almonds
- 1 egg, beaten
- 1 teaspoon water
- 1/2 teaspoon garlic powder
- 1/2 teaspoon dried oregano
- Salt to taste
- 1 cup marinara sauce
Cooking Instructions:
- Preheat and Prepare the Oven: Preheat your oven to 375°F (190°C). Line a baking sheet with parchment paper to prevent the breadsticks from sticking.
- Prepare the Dough: Open the package of refrigerated breadstick dough and separate the dough pieces. Roll each piece into a long, thin shape, resembling a finger. Slightly taper one end to create the fingertip.
- Add the “Nails”: Press a whole blanched almond into the tapered end of each dough piece to form a fingernail. Confirm it’s secure but not too deep to prevent it from falling off during baking.
- Create Knuckle Details: Use a small knife to make shallow cuts in the dough to imitate knuckle lines. This will add a realistic touch to your breadsticks.
- Egg Wash and Season: In a small bowl, mix the beaten egg with water to create an egg wash. Lightly brush this mixture over each breadstick to give them a golden finish. Sprinkle garlic powder, dried oregano, and a little salt over the breadsticks for flavor.
- Bake the Breadsticks: Place the prepared breadsticks on the lined baking sheet and bake in the preheated oven for 12-15 minutes or until they turn golden brown.
- Prepare the Dipping Sauce: While the breadsticks bake, heat the marinara sauce in a small saucepan over low heat until warm. Transfer to a serving bowl.
- Serve: Once baked, arrange the breadsticks on a serving platter around the bowl of warm marinara sauce. Encourage guests to dip the “fingers” into the “blood” for a spooky snack.
Extra Tips:
For an even more realistic look, consider adding a few drops of red food coloring to the almond nails before baking. Also, if you want to enhance the flavor, you can add some grated Parmesan cheese to the egg wash mixture. When shaping the breadsticks, confirm they’re not too thin, as they might bake too quickly and become too hard. Enjoy your spooky creation and have fun scaring your guests with these terrifyingly tasty treats!
Creepy Cauldron Cake

Creepy Cauldron Cake is the perfect centerpiece for your Halloween party, offering a spine-chilling effect while delighting guests with its rich flavors. This cake is designed to resemble a bubbling witch’s cauldron, complete with eerie smoke and a deliciously moist chocolate interior.
It’s both a visual and culinary treat that will add a touch of spooky sophistication to your festive spread. This recipe yields a cake that serves 4-6 people, making it ideal for a small gathering or as part of a larger dessert table. The combination of chocolate cake, rich ganache, and creative decoration will leave your guests both impressed and enchanted.
With a little patience and creativity, you can craft a Creepy Cauldron Cake that’s sure to be the talk of the party.
Ingredients:
- 1 ¾ cups all-purpose flour
- ¾ cup unsweetened cocoa powder
- 1 ½ teaspoons baking powder
- 1 ½ teaspoons baking soda
- 1 teaspoon salt
- 2 cups granulated sugar
- 2 large eggs
- 1 cup whole milk
- ½ cup vegetable oil
- 2 teaspoons vanilla extract
- 1 cup boiling water
- 1 cup heavy cream
- 8 ounces semisweet chocolate, chopped
- Black food coloring
- Green food coloring
- 1 package of dry ice (optional, for effect)
- Assorted Halloween-themed candies for decoration
Instructions:
- Preheat and Prepare Pans: Preheat your oven to 350°F (175°C). Grease and flour two 8-inch round cake pans. Line the bottom with parchment paper for easy removal.
- Mix Dry Ingredients: In a large mixing bowl, sift together the flour, cocoa powder, baking powder, baking soda, and salt.
- Combine Wet Ingredients: In another bowl, beat the sugar, eggs, milk, oil, and vanilla extract until well combined. Gradually add the dry ingredients to the wet mixture, mixing until just incorporated.
- Add Boiling Water: Carefully stir in the boiling water. The batter will be thin, which is normal for this recipe.
- Bake the Cake: Divide the batter between the prepared pans. Bake for 30-35 minutes, or until a toothpick inserted into the center comes out clean.
Pumpkin Patch Brownies
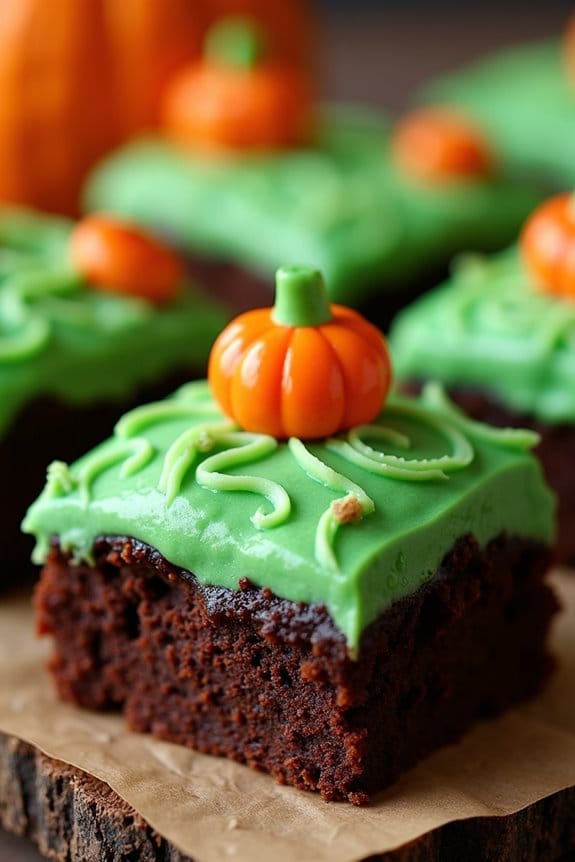
Pumpkin Patch Brownies are the perfect Halloween treat, combining the rich, chocolatey goodness of classic brownies with a festive pumpkin theme. These brownies aren’t only delicious but also visually appealing, making them an ideal choice for Halloween parties or family gatherings. The addition of pumpkin-flavored frosting and decorative candy pumpkins brings a seasonal twist to this beloved dessert, creating a delightful treat that’s sure to impress both kids and adults alike.
Creating these Pumpkin Patch Brownies is a fun and easy process that involves baking a batch of moist, fudgy brownies as the base and then adorning them with vibrant frosting and candy decorations. The result is a scrumptious dessert that captures the essence of fall with every bite. Whether you’re a seasoned baker or a novice in the kitchen, this recipe offers a straightforward approach to creating a memorable Halloween treat.
Ingredients (serving size: 4-6 people):
- 1 cup unsalted butter
- 2 cups granulated sugar
- 4 large eggs
- 1 teaspoon vanilla extract
- 1 cup all-purpose flour
- 1/2 cup cocoa powder
- 1/4 teaspoon salt
- 1/2 teaspoon baking powder
- 1 cup pumpkin puree
- 1 teaspoon pumpkin pie spice
- 1 cup powdered sugar
- 2-3 tablespoons milk
- Green food coloring
- Candy pumpkins for decoration
Cooking Instructions:
- Preheat and Prepare: Preheat your oven to 350°F (175°C). Grease a 9×13 inch baking pan or line it with parchment paper for easy removal of the brownies.
- Make the Brownie Batter: In a medium saucepan, melt the butter over low heat. Once melted, remove from heat and stir in the granulated sugar, mixing until well combined. Add the eggs one at a time, beating well after each addition. Stir in the vanilla extract.
- Combine Dry Ingredients: In a separate bowl, whisk together the flour, cocoa powder, salt, and baking powder until evenly mixed. Gradually add the dry ingredients to the butter mixture, stirring until just combined.
- Bake the Brownies: Pour the batter into the prepared baking pan, spreading it evenly. Bake in the preheated oven for 25-30 minutes, or until a toothpick inserted into the center comes out with a few moist crumbs. Allow the brownies to cool completely in the pan.
- Prepare the Pumpkin Frosting: In a mixing bowl, combine the pumpkin puree and pumpkin pie spice. Gradually add the powdered sugar, mixing until smooth. Add milk as needed to achieve a spreadable consistency. Stir in a few drops of green food coloring to create a vibrant green frosting.
- Decorate the Brownies: Once the brownies are cooled, spread the green pumpkin frosting evenly over the surface. Arrange candy pumpkins on top to resemble a pumpkin patch. Let the frosting set for a few minutes before slicing into squares.
Extra Tips:
For an added touch of fun, you can use a toothpick or a small knife to create vine-like patterns in the frosting, enhancing the pumpkin patch theme. If you prefer a creamier frosting, consider adding a tablespoon of softened cream cheese to the frosting mixture.
Additionally, feel free to adjust the amount of pumpkin pie spice to suit your taste preference, adding more for a stronger pumpkin flavor or less for subtlety. These Pumpkin Patch Brownies can be made a day ahead, allowing the flavors to meld together beautifully.
Skeleton Veggie Platter

The Skeleton Veggie Platter is a fun and festive way to serve healthy snacks at your Halloween party. This creative dish transforms an assortment of fresh vegetables into a spooky skeleton shape, making it both a delightful centerpiece and a nutritious treat. Perfect for gatherings of 4-6 people, this platter will add a ghoulish touch to your table while ensuring your guests have a colorful and crunchy option amidst the usual Halloween sweets.
To create this eerie masterpiece, you’ll need a variety of vegetables that offer different colors and textures. The idea is to arrange the veggies in a way that resembles a skeleton, with each type of vegetable representing a different part of the skeleton’s anatomy. Not only is this dish eye-catching, but it also encourages everyone to enjoy their greens in a playful manner. Gather your ingredients and get ready to assemble a platter that will be the talk of your Halloween celebration.
Ingredients (serving size: 4-6 people):
- 1 head of cauliflower
- 1 large cucumber
- 2 large carrots
- 1 red bell pepper
- 1 yellow bell pepper
- 1 bunch of celery
- 1 cup cherry tomatoes
- ½ cup black olives
- 1 cup ranch dressing (for dipping)
- 4-6 small pretzel rods (for bones)
Instructions:
1. Prepare the Vegetables:
Wash all the vegetables thoroughly. Cut the cauliflower into bite-sized florets. Slice the cucumber into thin rounds. Peel and cut the carrots into sticks. Slice the bell peppers into strips. Cut the celery into manageable sticks. Halve the cherry tomatoes.
2. Assemble the Skeleton:
On a large platter, start by placing the cauliflower florets at the top to form the skeleton’s head. Use two black olives for eyes and a piece of red bell pepper for the mouth.
3. Create the Ribcage and Limbs:
Position the cucumber slices vertically below the cauliflower to represent the neck. Arrange the celery sticks horizontally beneath the cucumber to form ribs. Use the carrots and bell pepper strips to create arms and legs, positioning them in a bone-like fashion.
4. Add Finishing Touches:
Place the cherry tomatoes and remaining olives around the platter as decoration or to fill in gaps. Use pretzel rods to mimic bones scattered around the skeleton.
5. Serve with Dip:
Place the ranch dressing in a small bowl and set it near the skeleton platter for dipping.
Extra Tips:
Feel free to get creative with the vegetables you use; any colorful, firm vegetable can be substituted or added to enhance the look. You can add a spooky twist by using a small pumpkin or gourd as part of the display or by carving a small jack-o’-lantern face into the cauliflower head.
If you want to give the skeleton a more realistic touch, consider using edible markers to draw additional features on the vegetables. This platter can be prepared a few hours in advance and stored in the refrigerator until guests arrive, making it a convenient and stress-free party appetizer.
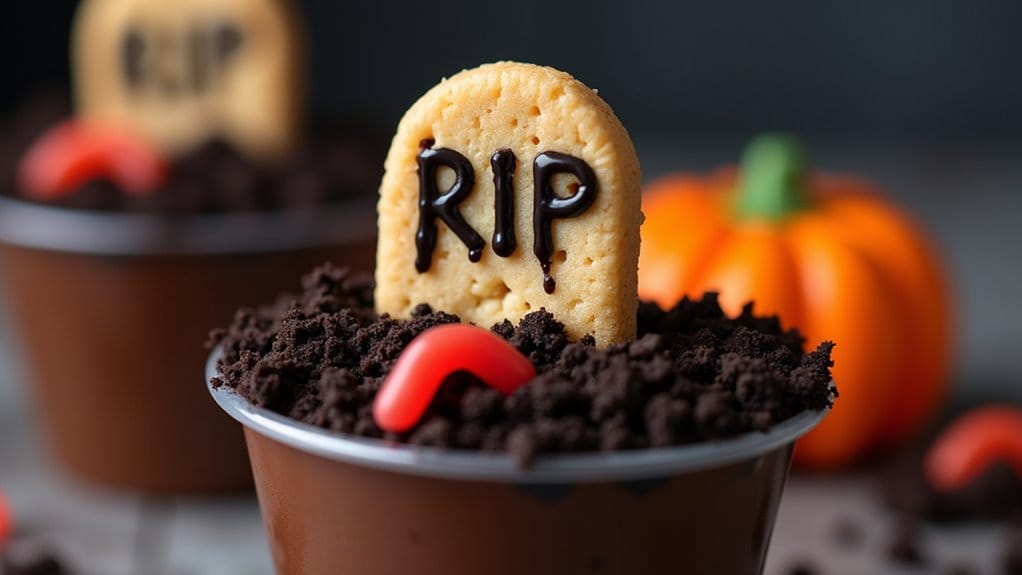
Haunted Graveyard Pudding Cups

Haunted Graveyard Pudding Cups are a spooky and fun dessert perfect for Halloween gatherings. These delightful treats are a creative way to engage your guests with a deliciously eerie sweet that combines rich, chocolatey flavors with playful decorations.
The concept is simple: transform ordinary pudding cups into miniature graveyards with cookie tombstones, candy pumpkins, and a sprinkling of crushed cookies to resemble dirt. Not only do they taste fantastic, but they also add a festive touch to your Halloween table.
This recipe is perfect for a serving size of 4-6 people, making it an ideal dessert for small parties or family gatherings. The preparation is straightforward, allowing even novice cooks to whip up these hauntingly good treats with ease. All you need is a handful of ingredients and a pinch of creativity to make these pudding cups the highlight of your Halloween festivities.
Ingredients:
- 2 cups of chocolate pudding (store-bought or homemade)
- 12 chocolate sandwich cookies
- 4-6 rectangular-shaped cookies (e.g., Milano or Biscoff)
- 4-6 candy pumpkins
- 1 tube of black decorating gel or icing
- Optional: gummy worms, candy bones, or other Halloween-themed candies
Instructions:
- Prepare the Pudding Cups: Start by dividing the chocolate pudding evenly among 4-6 small cups or bowls. These will serve as the base of your graveyard.
- Create the Dirt: In a food processor, pulse the chocolate sandwich cookies until they’re finely crushed. If you don’t have a food processor, place the cookies in a sealed plastic bag and crush them with a rolling pin. Sprinkle a generous layer of these cookie crumbs over the pudding in each cup to simulate dirt.
- Make the Tombstones: Take the rectangular-shaped cookies and use the black decorating gel to write spooky messages or simple “RIP” on each one. Allow the gel to set for a few minutes before proceeding.
- Assemble the Graveyard: Insert one decorated cookie tombstone into the pudding in each cup, standing it upright. Add a candy pumpkin next to the tombstone for a festive touch.
- Add Extra Decorations: If desired, place gummy worms, candy bones, or other themed candies around the “graveyard” to enhance the spooky effect.
- Chill and Serve: Refrigerate the pudding cups for at least 30 minutes to allow the flavors to meld and the decorations to set. Serve chilled to your guests and enjoy the delightful spookiness.
Extra Tips:
For a more personalized touch, you can customize the tombstone messages to include names or funny epitaphs for your guests.
If you’re making your chocolate pudding from scratch, consider adding a dash of vanilla or a pinch of salt to enhance the flavor.
These pudding cups can be prepared a day in advance and stored in the refrigerator, making them a convenient option for busy hosts.
Finally, get creative with your decorations by incorporating different Halloween candies or using colored icing to add a pop of color to your graveyard scene.
