
With the holiday season right around the corner, it’s the perfect time to start thinking about how to make family time in the kitchen both enjoyable and health-conscious. I’ve been searching for ways to turn cooking into a fun activity that entertains the kids while adding a touch of nutrition. Crafting adorable reindeer veggie platters and building snowman fruit skewers are just some of the creative recipes I’ve found. These ideas promise to make our festive kitchen adventures both merry and memorable. Are you ready to explore these cheerful culinary creations?
Reindeer Veggie Platters
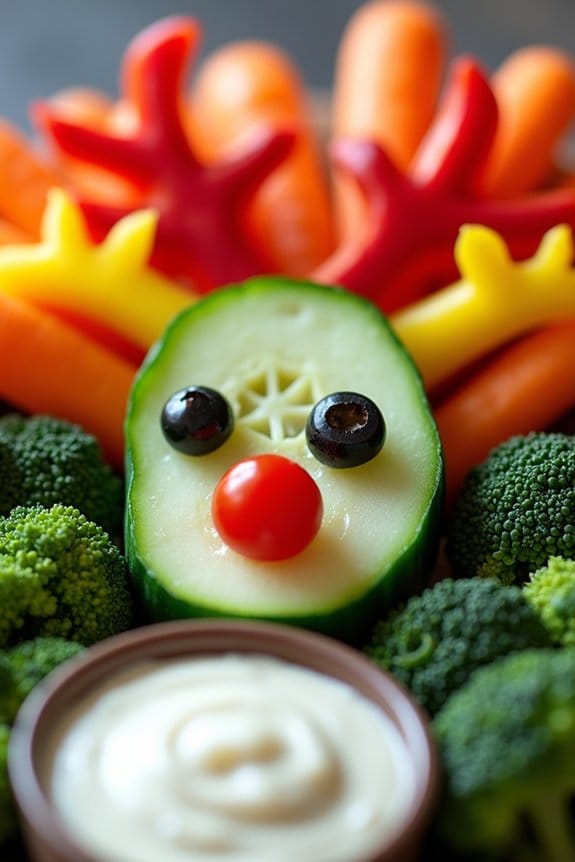
This festive season, delight your kids with a healthy and fun snack option – the Reindeer Veggie Platter. It’s a creative way to get children excited about eating their vegetables while celebrating the holiday spirit. The platter is designed to resemble a reindeer’s face using fresh, vibrant vegetables like carrots, cucumbers, and cherry tomatoes. Not only is it visually appealing, but it’s also packed with nutrients, making it a great appetizer or snack for your family gatherings.
Creating a Reindeer Veggie Platter is an enjoyable activity that can involve the whole family. Let your kids help in arranging the veggies, turning it into a fun bonding experience. The platter isn’t only perfect for Christmas parties but can also be adapted for other festive occasions by simply changing the shape. The combination of crunchy vegetables and a creamy dip guarantees that this dish will be a hit with kids and adults alike.
Ingredients (serving size: 4-6 people):
- 2 large cucumbers
- 1 red bell pepper
- 1 yellow bell pepper
- 1 cup cherry tomatoes
- 1 cup baby carrots
- 1 cup broccoli florets
- 1/2 cup black olives
- 1/2 cup hummus or ranch dip
Cooking Instructions:
- Prepare the Vegetables:
- Wash all the vegetables thoroughly.
- Slice the cucumbers into thin rounds for the reindeer’s face.
- Cut the red bell pepper into strips to create the antlers.
- Slice the yellow bell pepper into small pieces to form the reindeer’s nose.
- Halve the cherry tomatoes for added color and garnish.
- Assemble the Reindeer Face:
- On a large serving platter, arrange the cucumber slices in an oval shape to form the base of the reindeer’s face.
- Use the red bell pepper strips to create antler shapes extending from the top of the cucumber face.
- Place two cherry tomato halves at the top of the cucumber face to serve as eyes.
- Use the yellow bell pepper pieces to form a nose just below the eyes.
- Add Decorative Elements:
- Scatter the baby carrots around the platter to create a mane and add more color.
- Place broccoli florets around the edges of the platter for an added green touch.
- Use black olives to add details, like pupils in the eyes or decorative touches on the antlers.
- Serve with Dip:
- Place a small bowl of hummus or ranch dip at the bottom of the platter, allowing the veggies to be dipped and enjoyed.
Extra Tips:
To make the Reindeer Veggie Platter more appealing, consider using different vegetable varieties based on your child’s preferences. For added fun, involve kids in the assembly process by assigning them tasks like placing vegetables or creating the antlers.
If you want to add some protein, include sliced turkey or cheese sticks alongside the veggies. Remember to keep the vegetables fresh and crisp by preparing and assembling the platter just before serving.
Snowman Fruit Skewers
Creating festive snacks for kids during the holiday season can be both fun and healthy. One delightful treat you can prepare is Snowman Fruit Skewers. This recipe is a perfect blend of creativity and nutrition, making it an ideal activity for children and a great addition to any Christmas gathering.
These skewers are colorful, easy to assemble, and provide a fun way for kids to enjoy fruit, all while adding a touch of holiday spirit to your table. Snowman Fruit Skewers aren’t only visually appealing but also packed with vitamins and minerals from the fresh fruits used.
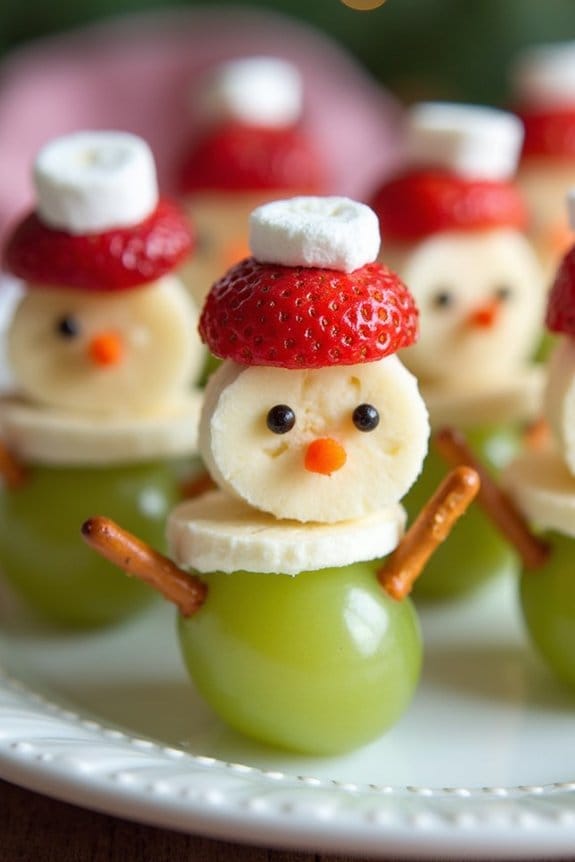
The skewers are designed to resemble adorable snowmen, using a combination of bananas, strawberries, grapes, and other fruits. These skewers aren’t just a treat for the eyes but a healthy snack option that guarantees kids get their daily dose of fruits in a fun and engaging way.
Get ready to create a winter wonderland with these charming snowman skewers that are sure to be a hit with kids and adults alike.
Ingredients (serves 4-6 people):
- 3 bananas
- 12 large strawberries
- 12 green grapes
- 12 mini marshmallows
- 12 pretzel sticks
- 12 wooden skewers
- 1 edible black marker or melted chocolate
- 1 small carrot
Instructions:
- Prepare the Fruits: Start by peeling the bananas and cutting them into thick slices. Each banana should yield around four slices, giving you a total of about 12 slices. Rinse the strawberries and grapes thoroughly under cold water and pat them dry with a paper towel. Cut the tops off the strawberries.
- Assemble the Snowmen: Take a wooden skewer and begin by placing a grape at the bottom, followed by a banana slice, and then a strawberry with the pointed end facing upwards. Top it off with another banana slice. The grape acts as the snowman’s base, while the banana slices and strawberry form the body and head.
- Create Snowman Faces: Use an edible black marker to draw eyes and a mouth on the top banana slice of each skewer. Alternatively, you can melt a small amount of chocolate, place it in a piping bag, and carefully dot on the eyes and mouth.
- Add Accessories: Cut thin strips of the carrot to form small noses and gently press them into the banana slice to give each snowman a nose. Break the pretzel sticks in half and stick them into the sides of the banana slice to form arms.
- Finish with Marshmallow Hats: Top the strawberry with a mini marshmallow to create the illusion of a hat. Repeat these steps for all the skewers.
Extra Tips:
To prevent the bananas from browning, you can brush them lightly with a bit of lemon juice after slicing. If the edible marker isn’t available, using melted chocolate or even small chocolate chips for the eyes and mouths can work just as well.
Be sure to assemble the skewers just before serving to make certain the fruits remain fresh and vibrant. Keep the skewers refrigerated if not serving immediately, but try to serve them within a few hours of preparation for the best taste and appearance.
Christmas Tree Pita Pizzas
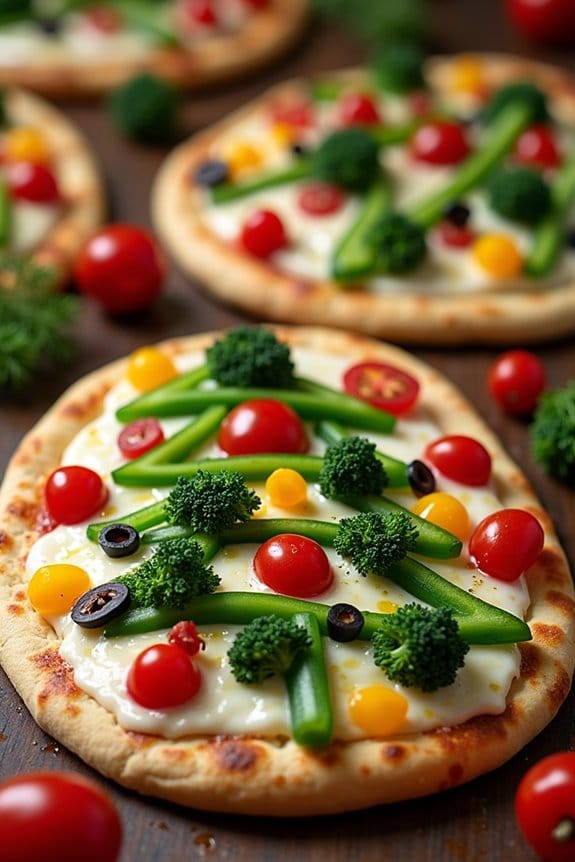
Transform your holiday meal into a delightful and festive experience with these Christmas Tree Pita Pizzas. These delicious and healthy mini pizzas are perfect for kids and a fun way to engage them in cooking. The vibrant colors of the fresh vegetables mirror the festive holiday charm, while the wholesome ingredients guarantee that your kids get the nutrition they need.
Creative and tasteful, these pita pizzas will surely be the star of any holiday gathering, making lunchtime both fun and festive. Perfect for a serving size of 4-6 people, these Christmas Tree Pita Pizzas are easy to prepare and can be customized with a variety of toppings according to your child’s preferences.
The pita bread serves as the canvas for your little ones’ culinary creativity, and the traditional flavors of cheese and tomato sauce make this meal both healthy and kid-friendly. Whether served as a main dish or a holiday-themed appetizer, these pizzas can be enjoyed by children and adults alike.
Ingredients (for 4-6 servings):
- 6 whole wheat pita breads
- 1 cup pizza sauce
- 2 cups shredded mozzarella cheese
- 1 green bell pepper
- 1 red bell pepper
- 1 yellow bell pepper
- 12 cherry tomatoes
- 1 small broccoli head
- 1/4 cup sliced black olives
- 2 tablespoons olive oil
- Salt and pepper to taste
Instructions:
- Prepare the ingredients: Wash all the vegetables thoroughly. Cut the green, red, and yellow bell peppers into small, thin strips. Halve the cherry tomatoes. Cut the broccoli head into small florets.
- Preheat the oven: Set your oven to 375°F (190°C) and allow it to preheat while you assemble the pizzas.
- Assemble the pizzas: Place the pita breads on a baking sheet lined with parchment paper. Spread a generous amount of pizza sauce over each pita, leaving a small border around the edges for the crust.
- Add the cheese: Sprinkle shredded mozzarella cheese evenly over the sauce on each pita, ensuring good coverage. This will serve as the base for your toppings.
- Create the Christmas tree design: Use the green bell pepper strips to form a tree shape on each pita. Decorate the “trees” with cherry tomatoes, broccoli florets, and slices of red and yellow bell peppers to mimic ornaments. Add black olive slices for extra decoration.
- Drizzle with olive oil: Lightly drizzle olive oil over the assembled pizzas. Season with a pinch of salt and pepper to taste.
- Bake the pizzas: Place the baking sheet in the preheated oven and bake for about 10-12 minutes, or until the cheese is melted and bubbly, and the edges of the pita are lightly crispy.
- Serve warm: Remove the pizzas from the oven and let them cool slightly before serving. Enjoy the festive meal!
Extra Tips: To make the Christmas Tree Pita Pizzas even more festive, consider using cookie cutters to shape your vegetables into stars or other holiday-themed shapes. You can also add a sprinkle of Italian seasoning or fresh basil for an extra burst of flavor.
If you want to involve your kids in the process, allow them to decorate their own pizzas with the toppings of their choice, encouraging creativity and making the meal even more enjoyable.
Santa Hat Strawberry Bites
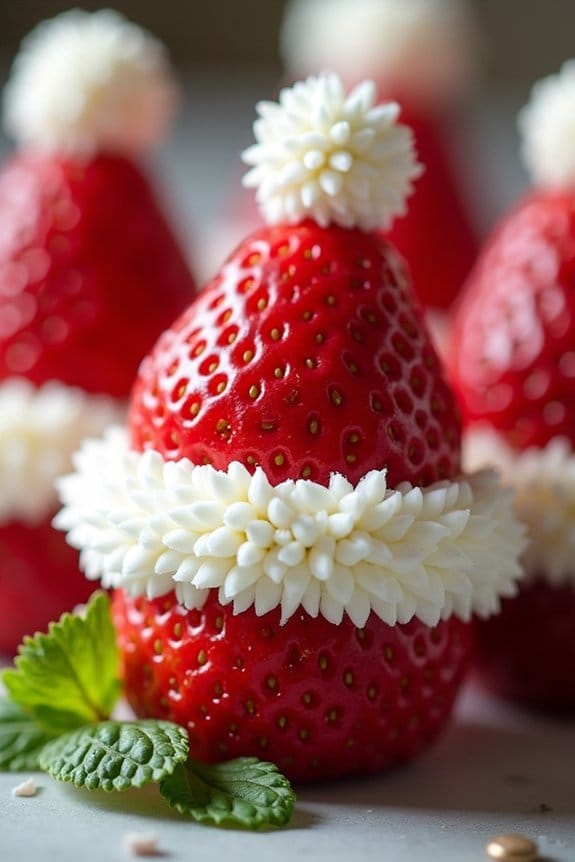
Santa Hat Strawberry Bites are a delightful and healthy treat perfect for the festive season. These adorable little bites aren’t only fun for kids to make but also make a vibrant addition to any holiday spread. Made with fresh strawberries, whipped cream, and a hint of sweetness, they’re a guilt-free indulgence that both children and adults will love.
They’re a clever way to incorporate fruit into festive treats while keeping sugar to a minimum. This recipe is ideal for involving kids in the kitchen, as it requires minimal preparation and is simple enough for young hands to help with. The strawberries provide a juicy base, while the whipped cream creates the perfect fluffy texture to mimic Santa’s hat.
With just a few ingredients and easy assembly, Santa Hat Strawberry Bites can be enjoyed as a snack, dessert, or even a fun activity during a holiday gathering.
Ingredients for 4-6 servings:
- 1 pound fresh strawberries
- 1 cup heavy whipping cream
- 2 tablespoons powdered sugar
- 1 teaspoon vanilla extract
- Fresh mint leaves (optional, for garnish)
Cooking Instructions:
- Prepare the Strawberries: Begin by thoroughly washing the strawberries under cold water. Pat them dry with a paper towel. Slice off the green tops of the strawberries to create a flat surface so they can stand upright.
- Whip the Cream: In a mixing bowl, combine the heavy whipping cream, powdered sugar, and vanilla extract. Using an electric mixer, whip the cream until it forms stiff peaks. This will take about 3-5 minutes. Confirm the cream is thick enough to hold its shape when piped.
- Assemble the Bites: Transfer the whipped cream into a piping bag fitted with a round tip or simply use a spoon. Pipe a small dollop of whipped cream onto the flat surface of each strawberry, creating the base of the Santa hat.
- Top with Strawberry Caps: Place the cut-off tops of the strawberries back onto the whipped cream to form the pointed part of the hat. Add a small dot of whipped cream on the tip of each strawberry to resemble a pom-pom.
- Garnish and Serve: If desired, place a few fresh mint leaves around the base of each strawberry for a festive touch. Arrange the Santa Hat Strawberry Bites on a serving platter and serve immediately.
Extra Tips:
To confirm the strawberries stand upright, try to select strawberries that are similar in size and have a broad base. If the strawberries are too wobbly, you can cut a thin slice from the bottom to create a more stable base.
For an extra touch of holiday cheer, you can sprinkle a little edible glitter over the whipped cream. Since whipped cream can melt if left out too long, it’s best to assemble these bites just before serving. Enjoy these delightful Santa Hat Strawberry Bites as a merry and healthy holiday treat!
Grinch Fruit Kabobs
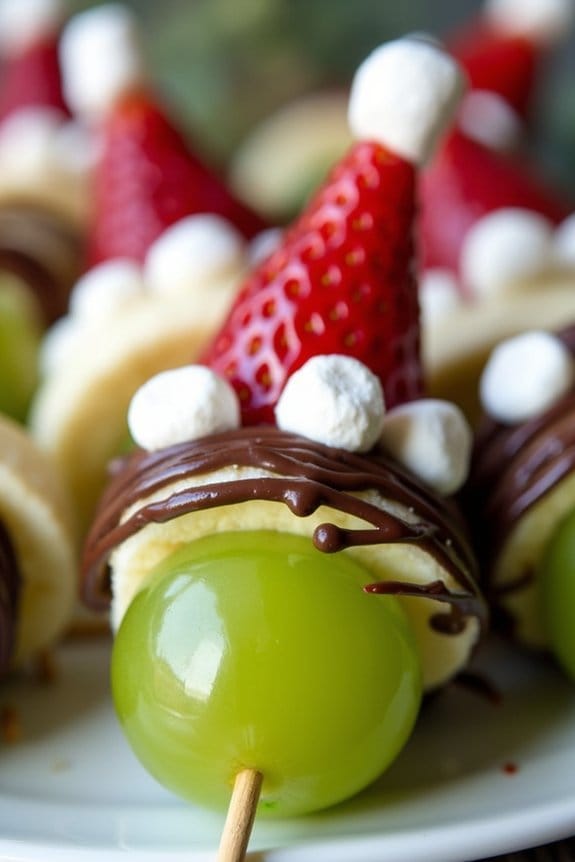
Grinch Fruit Kabobs are a delightful and healthy treat that kids will adore during the Christmas season. Inspired by the classic holiday character, these kabobs aren’t only fun to make but also packed with vitamins and nutrients. They’re perfect for holiday parties, school events, or as a festive snack at home. The vibrant colors and whimsical design will surely make them the star of any festive spread.
These kabobs are easy to assemble and don’t require any cooking, making them an excellent choice for involving kids in the kitchen. The combination of sweet fruits and a hint of chocolate adds a delicious twist, while maintaining the health factor. Plus, they can be prepared ahead of time, allowing for stress-free entertaining. Below is a recipe designed to serve 4-6 people, making it perfect for small gatherings or family treats.
Ingredients for 4-6 servings:
- 12 large green grapes
- 12 large strawberries
- 12 banana slices (about 1/2 inch thick)
- 12 mini marshmallows
- 12 small wooden skewers or toothpicks
- Optional: melted dark chocolate for drizzling
Cooking Instructions:
- Prepare the Fruits: Wash the green grapes and strawberries thoroughly. Pat them dry with a clean towel. Hull the strawberries by removing the leafy tops. Peel the banana and cut it into slices approximately 1/2 inch thick.
- Assemble the Kabobs: Take a skewer or toothpick and start by threading a grape onto it, followed by a banana slice. Next, add a strawberry with the pointed end facing upwards, and finish with a mini marshmallow on top to create the Grinch’s “hat.”
- Repeat the Process: Continue assembling the remaining kabobs using the same sequence: grape, banana slice, strawberry, and mini marshmallow until all ingredients are used up.
- Optional Chocolate Drizzle: If desired, melt some dark chocolate in a microwave-safe bowl or using a double boiler. Drizzle the melted chocolate over the assembled kabobs for an extra touch of sweetness.
- Serve: Arrange the Grinch Fruit Kabobs on a festive platter and serve immediately or refrigerate until ready to eat.
Extra Tips:
When preparing the banana slices, use bananas that are firm to the touch, as they’ll hold better on the skewers without becoming mushy. To prevent bananas from browning, you can lightly coat the slices with lemon juice.
If you’re making the kabobs in advance, store them in an airtight container in the refrigerator to keep them fresh. For an allergen-free option, consider using a dairy-free mini marshmallow or omit the marshmallow altogether.
Enjoy this fun and nutritious snack that brings the Christmas spirit to the table!
Nutty Elf Energy Balls

Nutty Elf Energy Balls are a delightful and nutritious treat that’s perfect for the holiday season, especially for kids. They’re packed with natural ingredients that provide a healthy boost of energy, making them an ideal snack for active little ones. The combination of nuts, dates, and a hint of festive spices creates a sweet yet wholesome flavor that children will love.
Plus, these no-bake energy balls are simple to make, allowing you to involve your little elves in the kitchen for a fun and interactive cooking experience.
With a serving size of 4-6 people, this recipe is perfect for a small family gathering or as a snack to have on hand throughout the festive season. The ingredients are carefully selected to provide a balanced mix of protein, healthy fats, and natural sugars, guaranteeing that these energy balls are both delicious and nutritious.
Best of all, they can be made in advance and stored, making them a convenient option for holiday preparations.
Ingredients:
- 1 cup raw almonds
- 1 cup pitted dates
- 1/2 cup rolled oats
- 1/4 cup unsweetened shredded coconut
- 2 tablespoons cocoa powder
- 1 tablespoon almond butter
- 1 teaspoon vanilla extract
- 1/2 teaspoon ground cinnamon
- 1/4 teaspoon ground nutmeg
- A pinch of salt
- Optional: 2 tablespoons mini chocolate chips or dried cranberries
Instructions:
- Prepare the Ingredients: Begin by gathering all the ingredients. It’s important to verify the pitted dates are soft; if not, soak them in warm water for about 10 minutes and then drain.
- Blend the Nuts and Dates: In a food processor, combine the raw almonds and pitted dates. Pulse until the mixture is finely chopped and starts to come together as a sticky dough.
- Add Remaining Ingredients: Add the rolled oats, shredded coconut, cocoa powder, almond butter, vanilla extract, cinnamon, nutmeg, and salt to the food processor. Pulse again until all ingredients are well combined and the mixture resembles a coarse, sticky dough.
- Incorporate Optional Add-ins: If using mini chocolate chips or dried cranberries, gently fold them into the mixture using a spatula or your hands.
- Form the Energy Balls: Scoop out about a tablespoon of the mixture and roll it between your palms to form a smooth ball. Repeat this process until all the mixture is used up.
- Chill the Balls: Place the energy balls on a tray lined with parchment paper and refrigerate for at least 30 minutes. This helps them firm up and hold their shape better.
- Serve and Store: Once chilled, the Nutty Elf Energy Balls are ready to be enjoyed. Keep any leftovers in an airtight container in the refrigerator for up to one week.
Extra Tips:
When making Nutty Elf Energy Balls, feel free to get creative with your choice of nuts or add-ins. For instance, walnuts or cashews can be substituted for almonds, and you can experiment with different spices such as ginger or cloves for a unique twist.
If you don’t have a food processor, a high-powered blender can also do the job, though you might need to blend in smaller batches. Finally, if your mixture feels too dry and crumbly, adding a teaspoon of water or an extra scoop of almond butter can help achieve the right consistency.
Festive Fruit Wreath
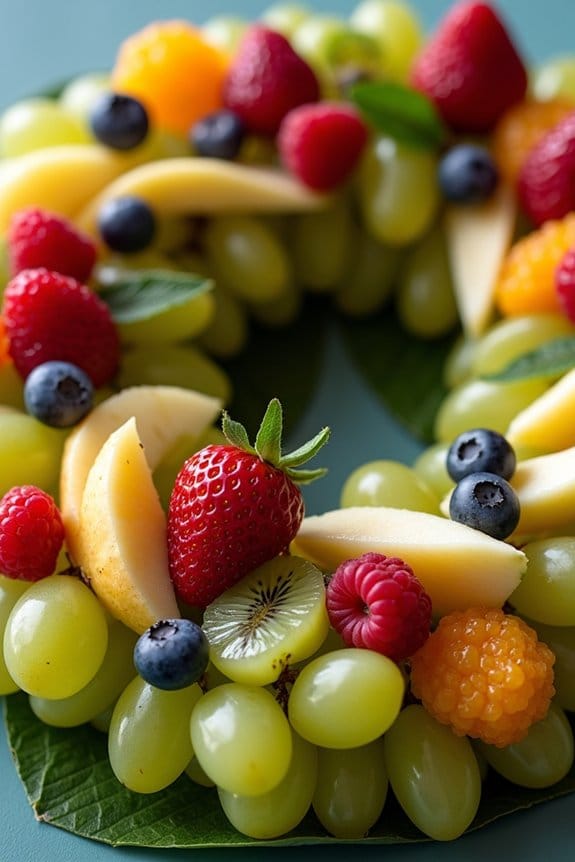
The Festive Fruit Wreath is a delightful and healthy Christmas recipe that’s perfect for kids. This vibrant and colorful creation not only appeals to the eyes but also provides a nutritious treat that children will love. Made from an assortment of fresh fruits, this wreath is a great way to incorporate a variety of vitamins and antioxidants into your holiday celebrations.
It can serve as a fun centerpiece for your Christmas table, encouraging kids to enjoy healthy snacking in a playful and engaging way. Creating the Festive Fruit Wreath is an enjoyable activity that the whole family can partake in, making it a perfect bonding experience.
Assembling the wreath is as simple as arranging different fruits in a circular pattern, resembling a traditional Christmas wreath. The key is to use a mix of fruits that provide a balance of flavors and colors, guaranteeing that the final presentation is both attractive and appetizing. This recipe is ideal for serving 4-6 people, making it a great addition to any festive gathering.
Ingredients:
- 1 bunch of green grapes
- 1 bunch of red grapes
- 1 small pineapple
- 2 kiwis
- 1 pint of strawberries
- 1 apple
- 1 pear
- 1 orange
- 1 cup of blueberries
- 1 cup of raspberries
- Fresh mint leaves for garnish
Instructions:
- Prepare the fruits: Wash all the fruits thoroughly. Peel and slice the pineapple and kiwis into round slices. Core and slice the apple and pear into thin wedges. Peel the orange and separate it into segments.
- Arrange the base: On a large round platter, start by arranging the green and red grapes in a circular pattern to form the base of the wreath. Guarantee the fruits are evenly distributed around the platter.
- Add the sliced fruits: Layer the pineapple slices on top of the grapes, followed by the kiwi slices. Distribute the apple and pear wedges evenly around the wreath.
- Incorporate the berries: Scatter the strawberries, blueberries, and raspberries over the arranged fruits, filling in any gaps and adding vibrant color to the wreath.
- Garnish and serve: Tuck fresh mint leaves between the fruits for a pop of green and a rejuvenating aroma. Your Festive Fruit Wreath is now ready to serve!
Extra Tips:
When creating your Festive Fruit Wreath, feel free to add or substitute fruits based on availability and preference. For an added touch, you can drizzle a bit of honey or a light yogurt dressing over the fruit before serving.
To keep the apple and pear slices from browning, you can lightly coat them in lemon juice. This not only preserves their color but also adds a zesty flavor that complements the sweetness of the fruits. Encourage kids to help with the arrangement process, making it a fun and educational activity about healthy eating.
Rudolph’s Red-Nosed Smoothie

Rudolph’s Red-Nosed Smoothie is a festive and healthy treat that will delight kids during the Christmas season. This vibrant smoothie not only looks enticing with its bright red color, reminiscent of Rudolph’s famous nose, but it also packs a nutritious punch. Made with a blend of fresh fruits and a hint of holiday spice, this smoothie is perfect for breakfast, a snack, or even as a nutritious dessert option.
It’s a great way to get kids excited about eating fruits while keeping the holiday spirit alive. This smoothie is also an excellent way to involve children in the kitchen. They can help with washing the fruits, measuring ingredients, and even pressing the blender button under supervision. It’s a fun, interactive, and educational activity that can also help them appreciate the importance of healthy eating.
The recipe is simple enough for young chefs to follow, making it a perfect holiday project. Plus, it’s naturally sweetened, which makes it a guilt-free indulgence for the whole family.
Ingredients (Serves 4-6):
- 2 cups fresh strawberries, hulled
- 1 cup fresh raspberries
- 1 ripe banana
- 1 cup unsweetened almond milk
- 1/2 cup plain Greek yogurt
- 2 tablespoons honey or maple syrup
- 1 teaspoon vanilla extract
- 1/2 teaspoon ground cinnamon
- Ice cubes (optional)
Instructions:
- Prepare the Fruits: Wash the strawberries and raspberries thoroughly under cold running water. Hull the strawberries and peel the banana. This guarantees all your fruits are clean and ready for blending.
- Blend the Ingredients: In a blender, combine the strawberries, raspberries, banana, almond milk, Greek yogurt, honey (or maple syrup), vanilla extract, and cinnamon. Blend on high speed until the mixture is smooth and creamy. If you prefer a colder smoothie, add a handful of ice cubes and blend again until smooth.
- Taste and Adjust: Taste your smoothie and adjust the sweetness to your preference. If it’s not sweet enough, you can add a little more honey or maple syrup and blend again for a few seconds.
- Serve: Pour the smoothie into glasses. For an extra festive touch, you can garnish with a few whole raspberries or a sprinkle of cinnamon on top. Serve immediately to enjoy the fresh flavors.
- Clean Up: Make sure to clean the blender immediately after serving to prevent the fruit residues from sticking and hardening, which makes cleaning difficult.
Extra Tips:
For an even more festive presentation, you can serve the smoothie in clear glasses with a peppermint stick or candy cane as a stirrer. If your kids are sensitive to dairy, substitute the Greek yogurt with a dairy-free alternative like coconut yogurt.
You can also freeze the fruits ahead of time to guarantee a naturally cold and thick smoothie without needing ice cubes. This smoothie can be stored in the refrigerator for up to 24 hours, though it’s best consumed fresh to enjoy the fullest flavors.
Snowflake Cheese and Crackers
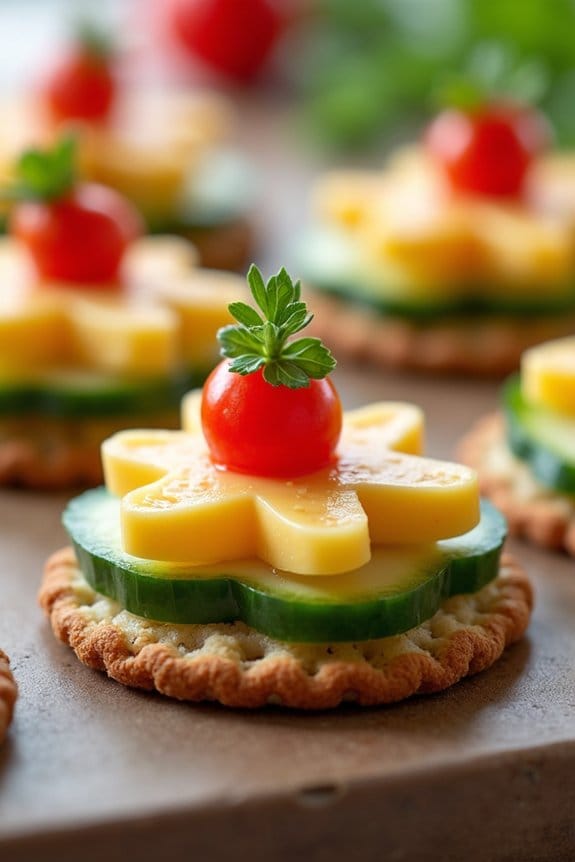
Creating festive and healthy snacks for the Christmas season can be a fun and engaging activity for both kids and adults. Snowflake Cheese and Crackers is a simple yet delightful recipe that combines wholesome ingredients with a touch of creativity, perfect for holiday gatherings or a cheerful snack time with the family. This recipe isn’t only visually appealing but also nutritious, making it an ideal choice for parents who want to offer their children a healthy treat without compromising on the festive spirit.
The Snowflake Cheese and Crackers recipe focuses on using fresh ingredients and fun shapes to make snack time exciting. By using whole-grain crackers and a variety of cheeses, this dish offers a good balance of carbohydrates and proteins, essential for growing kids. The snowflake shapes are cut out from cheese slices, adding an artistic touch that’s sure to captivate and engage children. This recipe serves 4-6 people and can be easily adjusted to cater to larger groups or tailored to individual preferences by experimenting with different cheese types and toppings.
Ingredients:
- 20-24 whole-grain crackers
- 8 slices of cheese (cheddar, mozzarella, or Swiss)
- 1/2 cup cherry tomatoes, halved
- 1/4 cup cucumber slices
- 1/4 cup bell pepper strips
- Snowflake-shaped cookie cutter
- Fresh herbs (like parsley or basil) for garnish
Instructions:
- Prepare the Cheese: Lay the cheese slices on a clean cutting board. Using the snowflake-shaped cookie cutter, carefully cut out snowflake shapes from each slice of cheese. Set the cheese snowflakes aside for assembly.
- Prepare the Vegetables: Wash and dry all vegetables thoroughly. Slice the cherry tomatoes in half, cut the cucumber into thin slices, and the bell peppers into strips. Arrange these in separate bowls for easy access during assembly.
- Assemble the Crackers: Place the whole-grain crackers on a large serving platter or individual plates. Top each cracker with a snowflake-shaped cheese cut-out.
- Add Vegetables: Add a cherry tomato half, a slice of cucumber, and a strip of bell pepper on top of the cheese. You can arrange them to mimic the intricate patterns of a snowflake or simply place them artistically.
- Garnish and Serve: Finish by adding a small sprig of fresh herb on each cracker for a pop of color and extra flavor. Serve immediately or refrigerate until ready to enjoy.
Extra Tips:
When making Snowflake Cheese and Crackers, it’s important to keep the cheese slices chilled until you’re ready to use them. This helps in maintaining their shape when cutting with the cookie cutter.
For variety, consider using different types of cheese for a mix of flavors or offer a selection of crackers, including gluten-free options, to accommodate dietary preferences. Additionally, involving kids in the preparation process can enhance their enjoyment and encourage them to try new vegetables and flavors.
North Pole Banana Pops
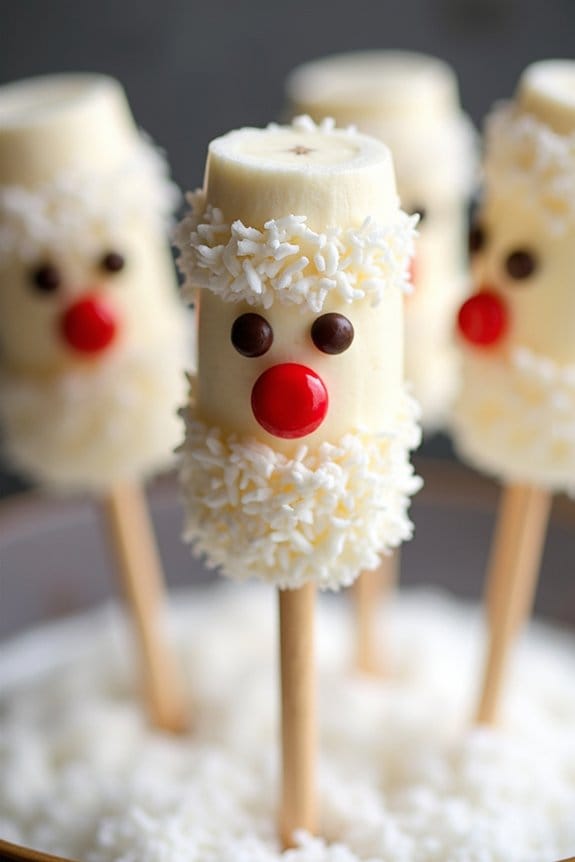
Make your holiday festivities even more fun and healthy with these delightful North Pole Banana Pops! These festive treats aren’t only delicious but also packed with nutritional goodness, making them perfect for kids. As a playful twist on traditional holiday snacks, North Pole Banana Pops combine the invigorating taste of bananas with a touch of yogurt and creative decorations to bring smiles to little faces.
Whether you’re hosting a Christmas party or spending a cozy afternoon at home, these pops are sure to be a hit with children and adults alike. The great part about this recipe is its simplicity and the fact that it can be customized to fit your family’s dietary needs or preferences. With just a few ingredients, you can whip up a batch of these sweet and healthy treats in no time.
Plus, the kids can join in the fun of decorating their own banana pops, making it a perfect holiday activity. Let’s plunge into how you can create these adorable North Pole Banana Pops for a serving size of 4-6 people.
Ingredients:
- 3 bananas
- 1 cup vanilla Greek yogurt
- 1/2 cup shredded coconut
- 12 mini marshmallows
- 6 wooden popsicle sticks
- Red food coloring or edible glitter (optional)
- 1/4 cup mini chocolate chips (for eyes and buttons)
- 1/4 cup red candy-coated chocolates (for noses)
Instructions:
- Prepare the Bananas: Peel the bananas and cut each one in half. Insert a popsicle stick into the flat end of each banana half to create a ‘pop’.
- Coat with Yogurt: Pour the vanilla Greek yogurt into a shallow bowl. Roll each banana half in the yogurt, making sure it’s evenly coated. This will serve as the ‘snow’ on your North Pole Banana Pops.
- Add Coconut: Sprinkle shredded coconut over the yogurt-coated bananas. The coconut will stick to the yogurt, adding texture and enhancing the snowy effect.
- Decorate: Use mini chocolate chips to create eyes and buttons on the banana pops. Place a red candy-coated chocolate at the top of each banana for a nose.
- Top with Marshmallows: Place a mini marshmallow on the tip of each banana, giving the appearance of a snow-covered North Pole.
- Optional Decorations: If desired, sprinkle a little red food coloring or edible glitter over the pops for an extra festive touch.
- Chill: Place the decorated banana pops on a tray lined with parchment paper and chill them in the freezer for about 30 minutes or until the yogurt is set.
- Serve: Remove the pops from the freezer and let them sit for a few minutes at room temperature before serving to make sure they aren’t too hard to bite.
Extra Tips:
When creating these North Pole Banana Pops, feel free to experiment with different toppings like crushed nuts or granola for added crunch. If you want to make the pops more festive, you can use colored yogurt or incorporate other edible decorations that fit the holiday theme.
Additionally, if the pops are too cold for little ones, let them thaw slightly before serving to make them easier to eat. Enjoy the process of making these delightful treats with your kids, and cherish the memories of this fun holiday activity!
Holiday Veggie Roll-Ups
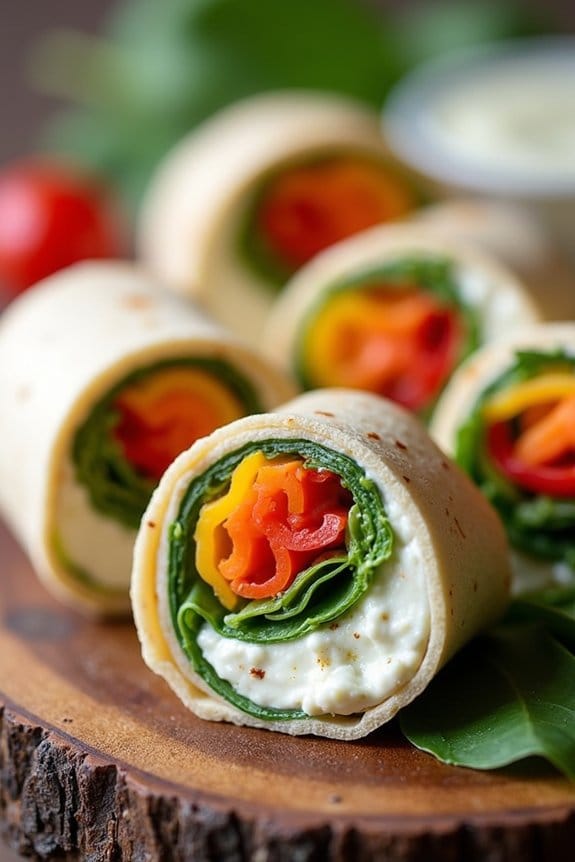
When it comes to festive meals that cater to younger palates, Holiday Veggie Roll-Ups are a fun and healthy option that will brighten up any Christmas table. These colorful roll-ups not only look appealing but are also packed with nutrients, making them a great way to sneak some extra vegetables into your child’s diet during the holiday season. They’re simple to make and can be customized with your child’s favorite veggies, guaranteeing that even the pickiest eaters will enjoy them.
The beauty of Holiday Veggie Roll-Ups lies in their versatility and ease of preparation. They can be served as an appetizer, a snack, or even a light main course. Using whole wheat tortillas, a variety of fresh vegetables, and a creamy yogurt-based spread, these roll-ups are both satisfying and nutritious. Whether you’re hosting a holiday party or simply looking for a festive recipe to make with your kids, these roll-ups are sure to be a hit.
Ingredients (Serving Size: 4-6 people):
- 4 whole wheat tortillas
- 1 cup of plain Greek yogurt
- 1 tablespoon of lemon juice
- 1 teaspoon of garlic powder
- 1 teaspoon of dried Italian herbs
- 1 red bell pepper, julienned
- 1 yellow bell pepper, julienned
- 1 cucumber, julienned
- 1 carrot, julienned
- 1/2 cup of baby spinach leaves
- Salt and pepper to taste
Cooking Instructions:
- Prepare the Yogurt Spread: In a small bowl, combine the Greek yogurt, lemon juice, garlic powder, and dried Italian herbs. Mix well until all ingredients are fully incorporated. Season with a pinch of salt and pepper to taste.
- Prep the Vegetables: Wash and dry all the vegetables. Then, julienne the red and yellow bell peppers, cucumber, and carrot. Make sure they’re cut into thin strips for easy rolling. Wash and pat dry the baby spinach leaves.
- Assemble the Roll-Ups: Lay a whole wheat tortilla flat on a clean surface. Spread a generous layer of the yogurt mixture over the entire surface of the tortilla.
- Add the Vegetables: Arrange a small handful of each of the prepared vegetables in a line across the center of the tortilla. Place a few spinach leaves on top.
- Roll the Tortilla: Carefully roll the tortilla tightly around the vegetables, starting from one edge. Guarantee the roll is tight enough to hold together, but not so tight that the tortilla tears.
- Slice and Serve: Using a sharp knife, slice the rolled tortilla into 1-inch sections. Arrange the roll-ups on a serving platter, cut side up, for a festive presentation.
Extra Tips:
For an extra festive touch, you can use cookie cutters to shape the veggies into stars or Christmas trees before adding them to the roll-ups.
If you have time, let the roll-ups chill in the refrigerator for about 30 minutes before slicing; this will help them hold together better.
Feel free to experiment with different spreads, such as hummus or avocado, and add other toppings like shredded cheese or olives to suit your family’s taste preferences.
Jingle Bell Pepper Nachos
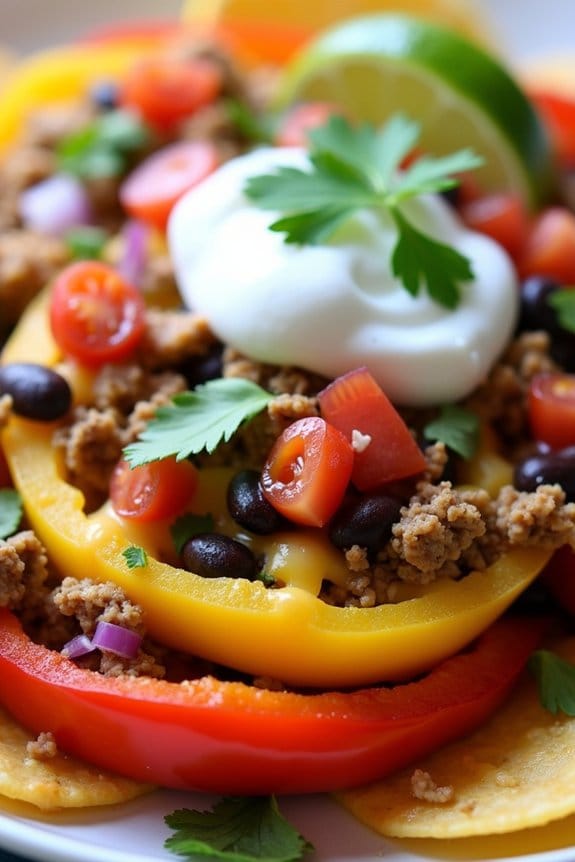
Jingle Bell Pepper Nachos are a festive twist on a classic favorite, perfect for adding a splash of color and fun to your holiday celebrations. This healthy version of nachos swaps out traditional tortilla chips for vibrant slices of fresh bell peppers, making it a kid-friendly snack that packs in flavor without sacrificing nutrition. The bright colors of the bell peppers not only make this dish visually appealing but also offer a range of vitamins and minerals, guaranteeing your little ones get a nutritious boost while enjoying this tasty treat.
These nachos are topped with a hearty mix of seasoned ground turkey, black beans, and melted cheese, making them both satisfying and delicious. The dish is garnished with fresh veggies and a dollop of Greek yogurt, providing a creamy contrast to the crunchy peppers. Quick and easy to prepare, Jingle Bell Pepper Nachos are an ideal dish to get your kids involved in the kitchen, allowing them to help assemble and personalize their own nacho bites. This recipe serves 4-6 people, making it perfect for a family gathering or holiday party.
Ingredients:
- 4 large bell peppers (red, green, yellow, or orange)
- 1 pound ground turkey
- 1 tablespoon olive oil
- 1 teaspoon garlic powder
- 1 teaspoon onion powder
- 1 teaspoon smoked paprika
- 1 teaspoon cumin
- Salt and pepper to taste
- 1 can (15 oz) black beans, drained and rinsed
- 1 cup shredded cheddar cheese
- 1/2 cup cherry tomatoes, diced
- 1/4 cup red onion, finely chopped
- 1/4 cup fresh cilantro, chopped
- 1/2 cup Greek yogurt
- 1 lime, cut into wedges
Instructions:
- Prepare the Bell Peppers: Preheat your oven to 375°F (190°C). Wash the bell peppers, then slice them into 1/2-inch thick rings. Arrange the rings on a large baking sheet lined with parchment paper.
- Cook the Turkey: Heat the olive oil in a large skillet over medium heat. Add the ground turkey and cook, breaking it apart with a spoon, until browned and cooked through, about 5-7 minutes.
- Season the Meat: Add the garlic powder, onion powder, smoked paprika, cumin, salt, and pepper to the skillet with the turkey. Stir well to combine, cooking for an additional 2 minutes to allow the flavors to meld.
- Add the Beans: Stir in the drained black beans and mix until well combined. Cook for another 2-3 minutes until everything is heated through.
- Assemble the Nachos: Spoon the turkey and bean mixture evenly onto each bell pepper ring on the baking sheet. Sprinkle the shredded cheddar cheese over the top.
- Bake the Nachos: Place the baking sheet in the preheated oven and bake for 8-10 minutes, or until the cheese is melted and bubbly.
- Garnish and Serve: Remove the nachos from the oven and let them cool slightly. Top each bell pepper nacho with diced cherry tomatoes, red onion, fresh cilantro, and a dollop of Greek yogurt. Serve with lime wedges on the side for an extra burst of flavor.
Extra Tips: When slicing the bell peppers, try to make the rings uniform in thickness to guarantee even cooking. If you prefer spicier nachos, consider adding some jalapeño slices to the topping.
For a vegetarian version, simply omit the turkey and increase the amount of black beans or add some cooked quinoa for extra protein. You can also prepare all the toppings in advance and have your kids help with the assembly, making this a fun and interactive family cooking activity.
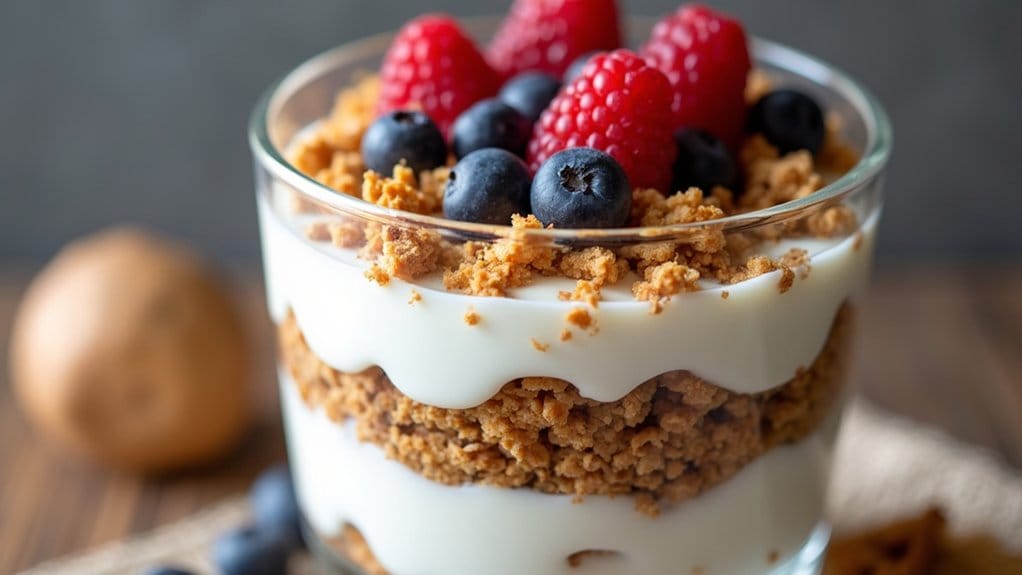
Gingerbread Yogurt Parfaits
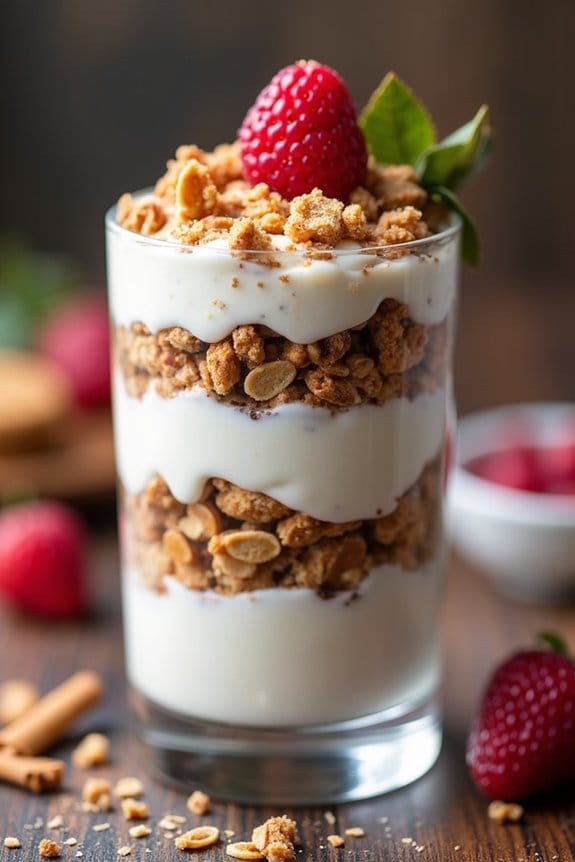
Gingerbread Yogurt Parfaits are a delightful and healthy treat that adds a festive touch to your Christmas celebrations. These parfaits are perfect for kids, offering a nutritious blend of flavors while allowing them to indulge in the holiday spirit. The combination of creamy yogurt, crunchy gingerbread granola, and warm spices creates a dessert that’s both satisfying and wholesome. Not only do these parfaits taste delicious, but they also provide a fun opportunity for children to get involved in the kitchen, making it a perfect family activity during the holiday season.
This recipe is designed to serve 4-6 people, making it ideal for a small gathering or a special family dessert. The layers of yogurt and gingerbread granola are accented with a hint of sweetness from honey or maple syrup, while the spices provide that classic holiday aroma. By using Greek yogurt, you guarantee that the parfaits are packed with protein and probiotics, giving your kids a healthy boost. It’s a versatile recipe that can be easily adapted to suit dietary preferences, such as using dairy-free yogurt or gluten-free granola.
Ingredients:
- 3 cups Greek yogurt
- 1 cup gingerbread granola
- 2 tablespoons honey or maple syrup
- 1 teaspoon ground cinnamon
- 1/2 teaspoon ground ginger
- 1/4 teaspoon ground nutmeg
- 1/4 teaspoon ground cloves
- 1/2 teaspoon vanilla extract
- 1/4 cup crushed gingerbread cookies (optional for garnish)
- Fresh berries (optional for garnish)
Instructions:
- Prepare the Yogurt Mixture: In a large mixing bowl, combine the Greek yogurt, honey or maple syrup, vanilla extract, ground cinnamon, ground ginger, ground nutmeg, and ground cloves. Stir well until all the spices are evenly distributed and the mixture is smooth and creamy.
- Layer the Parfaits: In serving glasses or jars, begin by spooning a layer of the spiced yogurt at the bottom. Add a layer of gingerbread granola on top of the yogurt. Repeat the layers until the glasses are filled, ending with a final layer of yogurt on top.
- Add Garnishes: For a decorative touch, sprinkle some crushed gingerbread cookies over the top layer of yogurt. You can also add a few fresh berries for an extra pop of color and flavor.
- Chill the Parfaits: Place the parfaits in the refrigerator for at least 30 minutes to allow the flavors to meld together and the granola to soften slightly.
- Serve and Enjoy: Once chilled, serve the Gingerbread Yogurt Parfaits as a healthy dessert or snack. They can be enjoyed immediately or stored in the refrigerator for up to 2 days.
Extra Tips:
When making Gingerbread Yogurt Parfaits, feel free to customize the recipe to fit your family’s preferences. For a dairy-free option, substitute the Greek yogurt with a plant-based alternative like coconut or almond yogurt.
You can also use homemade gingerbread granola for a personal touch, assuring it’s gluten-free if needed. If you prefer a sweeter parfait, adjust the amount of honey or maple syrup to taste.
Finally, consider involving the kids in the layering process to make it a fun and interactive holiday activity for everyone.
