
When it comes to Halloween, there’s nothing quite like the joy of making delightful messes in the kitchen with our little ones. Picture the laughter and sticky fingers as we create gooey monster eye cookies or put together haunted gingerbread houses. These fun and messy baking ideas turn our kitchen into a hub of spooky creativity. Curious how to transform ordinary ingredients into magical treats? Let’s embark on this enchanting culinary journey together!
Gooey Monster Eye Cookies
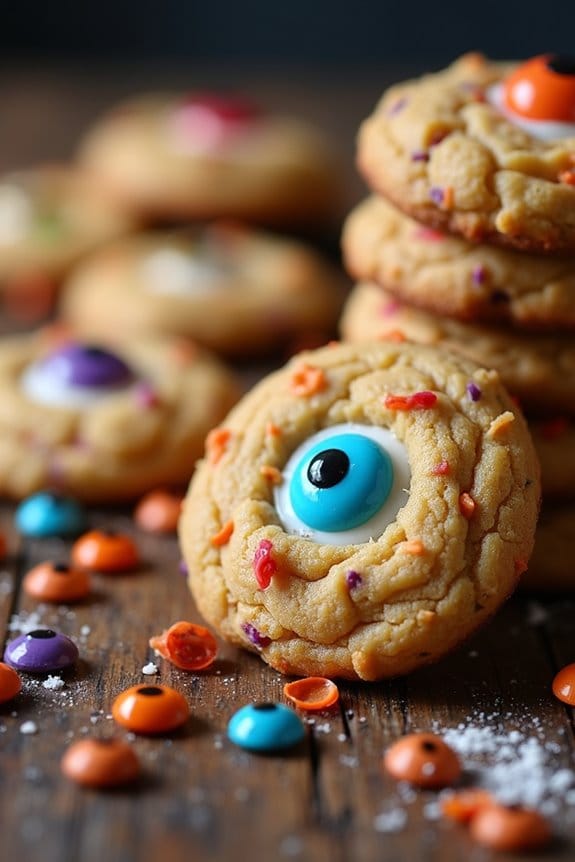
Gooey Monster Eye Cookies are the perfect treat to bring some spooky fun to your Halloween festivities. These cookies aren’t only delicious but also delightfully creepy, making them an exciting project for kids to both create and enjoy. With gooey centers and candy eyes peering out from the delicious chaos, these cookies are guaranteed to be a hit at any Halloween party.
A spooky, delicious, and kid-friendly treat for your Halloween festivities.
This recipe is designed to be simple enough for young bakers to follow, with adult supervision, and yields a batch perfect for a group of 4-6 people to enjoy. The key to these cookies is their monster-like appearance, which is achieved by using colorful candy melts and candy eyes to give each cookie its own quirky personality.
The soft and gooey texture of the cookies contrasts beautifully with the crunchy candy pieces, making each bite a delightful surprise. Whether you’re planning a Halloween party or just looking to have some festive fun in the kitchen, these Gooey Monster Eye Cookies are sure to be a crowd-pleaser.
Ingredients (for 4-6 servings):
- 1 cup unsalted butter, softened
- 1 cup granulated sugar
- 1 cup brown sugar, packed
- 2 large eggs
- 1 teaspoon vanilla extract
- 3 cups all-purpose flour
- 1 teaspoon baking soda
- 1/2 teaspoon baking powder
- 1/2 teaspoon salt
- 1 cup candy melts (various colors)
- 1 cup chocolate chips
- Candy eyes (1 package)
Cooking Instructions:
- Preheat the Oven: Begin by preheating your oven to 350°F (175°C). This guarantees that the cookies bake evenly and develop a nice, gooey center.
- Mix the Wet Ingredients: In a large mixing bowl, cream together the softened butter, granulated sugar, and brown sugar until the mixture is light and fluffy. Then, add the eggs one at a time, mixing well after each addition. Stir in the vanilla extract.
- Combine the Dry Ingredients: In a separate bowl, whisk together the flour, baking soda, baking powder, and salt. Gradually add this dry mixture to the wet ingredients, mixing until just combined.
- Add the Fun Ingredients: Fold in the candy melts and chocolate chips with a spatula, making sure they’re evenly distributed throughout the cookie dough. This will give the cookies their colorful, monster-like appearance.
- Shape the Cookies: Line a baking sheet with parchment paper. Using a tablespoon, scoop out dough and roll it into balls, placing them about 2 inches apart on the baking sheet.
- Add the Eyes: Gently press candy eyes into each dough ball, using as many as desired to achieve that perfect monster look.
- Bake: Place the baking sheet in the preheated oven and bake for 10-12 minutes, or until the edges are lightly golden but the centers remain soft and gooey.
- Cool and Serve: Allow the cookies to cool on the baking sheet for about 5 minutes before transferring them to a wire rack to cool completely. Serve once cooled, and watch as your guests delight in their monstrous appearance!
Extra Tips: For an extra spooky twist, consider using different shapes and sizes of candy eyes to make your monsters truly unique. You can also experiment with adding a few drops of food coloring to the dough for a more vibrant appearance.
Be sure to keep an eye on the cookies as they bake; you want them to remain soft and gooey, so avoid overbaking. Finally, these cookies are best enjoyed fresh, but they can be stored in an airtight container for up to a week.
Spooky Spiderweb Cupcakes

Halloween is the perfect time to get creative in the kitchen, especially when it comes to baking with kids. One of the most delightful treats you can make are Spooky Spiderweb Cupcakes. These charming cupcakes not only taste delicious but also add a fun, eerie element to your Halloween festivities.
The design of a spiderweb on top of the cupcakes is simple enough for kids to participate in, making it an ideal family baking activity. As you gather around the kitchen, you can enjoy the process of creating these intricate designs together, and the end result is sure to be a hit at any Halloween party.
These cupcakes are versatile and can be made using any flavor base you prefer, such as chocolate, vanilla, or red velvet. The real magic happens with the frosting and decorating. The spiderweb design is created using a contrasting color of icing, which is piped in a spiral and then artfully dragged into a web pattern.
The final touch involves adding a small candy spider on top, which can be made from edible materials or purchased from a baking supply store. With a serving size of 4-6 people, this recipe provides enough cupcakes for everyone to enjoy while still being manageable regarding preparation and decoration.
Ingredients (Serves 4-6 people):
- 1 box of chocolate cupcake mix (or homemade batter for 12 cupcakes)
- 3 large eggs
- 1/2 cup vegetable oil
- 1 cup water
- 1 tub of white frosting
- Black food coloring
- 1 piping bag with a small round tip
- Small edible candy spiders or chocolate chips
Instructions:
- Prepare the Cupcake Batter: Preheat your oven to 350°F (175°C). In a large mixing bowl, combine the cupcake mix, eggs, vegetable oil, and water. Mix until well blended and smooth. Line a muffin tin with paper cupcake liners.
- Bake the Cupcakes: Pour the batter evenly into the cupcake liners, filling each about two-thirds full. Place the muffin tin in the preheated oven and bake for 18-22 minutes, or until a toothpick inserted into the center of a cupcake comes out clean. Remove from the oven and allow the cupcakes to cool completely on a wire rack.
- Color the Frosting: While the cupcakes cool, divide the white frosting into two bowls. Add a few drops of black food coloring to one bowl and mix until you achieve a rich black color. Leave the other bowl white.
- Frost the Cupcakes: Once the cupcakes are completely cooled, spread a layer of white frosting on each cupcake using a spatula.
- Create the Spiderweb Design: Fill the piping bag with the black frosting. Starting from the center of the cupcake, pipe a spiral pattern outward. Using a toothpick, gently drag lines from the center to the edges of the cupcake, creating a web-like effect.
- Add the Finishing Touches: Place a small edible candy spider or a chocolate chip in the center of the spiderweb on each cupcake to complete the spooky design.
Extra Tips:
For an extra spooky effect, consider adding a drop of red food coloring to the spiderweb pattern to mimic blood droplets. Additionally, if you’re making the cupcakes from scratch, try incorporating flavors like pumpkin or cinnamon for a seasonal twist.
When working with food coloring, start with a small amount and gradually add more to achieve the desired shade. Finally, encourage kids to get creative with their designs and explore different spiderweb patterns for a unique set of cupcakes.
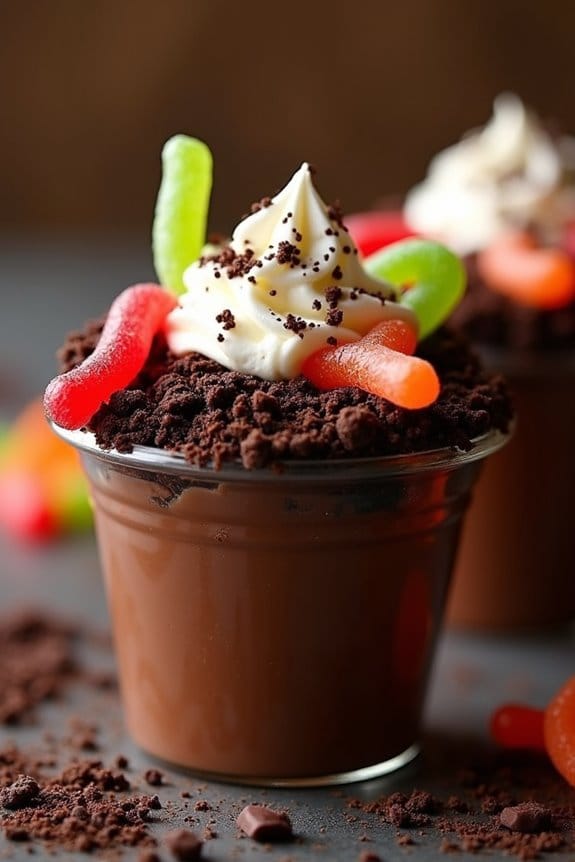
Wiggly Worm Dirt Cups
Wiggly Worm Dirt Cups are a delightful and spooky treat perfect for Halloween festivities, especially when you have kids enthusiastic to enjoy some fun in the kitchen. These no-bake desserts aren’t only easy to make but also allow for creative expression with their playful presentation.
Layers of chocolate pudding, crushed cookies, and gummy worms come together to mimic a miniature garden of deliciously eerie dirt and worms. It’s an engaging activity that can be enjoyed by kids and adults alike, making it a great choice for Halloween parties or a themed dessert night.
Creating Wiggly Worm Dirt Cups is a fun and interactive experience. The recipe involves simple steps that even young children can participate in, under adult supervision. Assembling the cups can be a great way to introduce kids to the joy of cooking, as they get to see their creations come to life.
The combination of textures and flavors guarantees a delightful treat that isn’t only visually appealing but also scrumptious. With a few basic ingredients, you can whip up these creepy-crawly desserts in no time, making them an excellent last-minute addition to your Halloween menu.
Ingredients (Serving Size: 4-6 people):
- 2 cups of cold milk
- 1 package (3.9 ounces) of instant chocolate pudding mix
- 1 package (14.3 ounces) of chocolate sandwich cookies
- 1 package of gummy worms
- 1 cup of whipped topping
- Small clear cups or glasses for serving
Cooking Instructions:
- Prepare the Pudding: In a large mixing bowl, pour 2 cups of cold milk. Add the instant chocolate pudding mix to the bowl and whisk together for about 2 minutes until the mixture starts to thicken. Once thickened, set the pudding aside to further set.
- Crush the Cookies: Place the chocolate sandwich cookies in a resealable plastic bag. Using a rolling pin or a similar object, crush the cookies until they resemble coarse crumbs. These will serve as the “dirt” in the cups.
- Layer the Cups: Begin by adding a layer of crushed cookies at the bottom of each cup. Next, spoon a layer of chocolate pudding over the cookie crumbs. Repeat the layering process, ending with a final layer of cookie crumbs on top.
- Add the Gummy Worms: Push a few gummy worms into the top layer of cookie crumbs, allowing them to hang over the edge of the cup, creating the appearance of worms emerging from the dirt.
- Top with Whipped Topping: Add a dollop of whipped topping to each cup. For an extra festive touch, you can sprinkle some additional cookie crumbs over the whipped topping.
- Chill and Serve: Place the cups in the refrigerator for at least 30 minutes to allow the pudding to set fully. Serve chilled and enjoy your spooky, edible creations!
Extra Tips:
For added flavor variety, consider mixing in some chocolate chips or mini marshmallows with the pudding layers. If you want to make the dessert more colorful, you can use different colored gummy worms.
To make the activity more educational, involve children by having them count the layers or worms as they assemble the cups. Remember, the presentation is key, so feel free to get creative with how the worms are placed to make them look as realistic as possible.
Haunted Gingerbread Houses
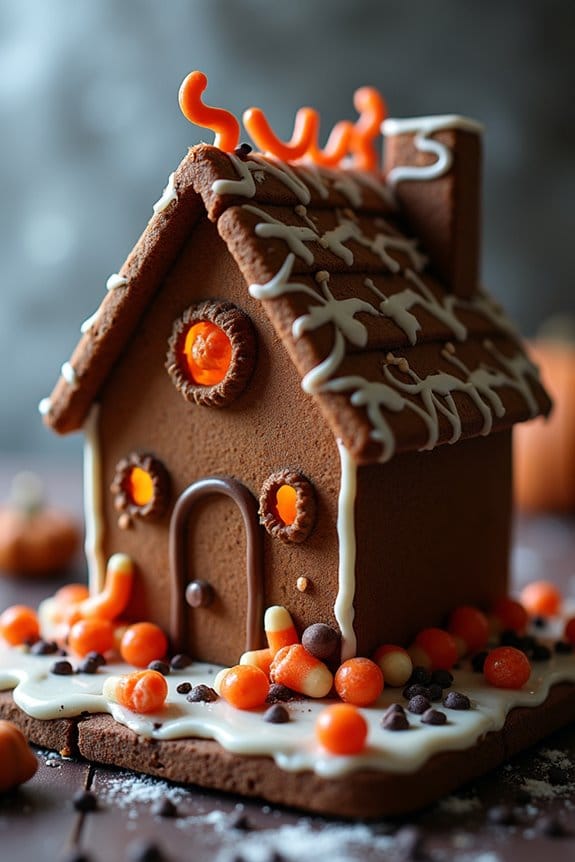
Halloween is the perfect time for kids to let their imaginations run wild and what better way to do that than by building and decorating their own Haunted Gingerbread Houses? These spooky creations not only provide a fun and engaging activity for the whole family but also result in a delicious treat that everyone will enjoy. With a bit of creativity and some spooky decorations, your gingerbread houses will be the talk of the Halloween party.
Creating Haunted Gingerbread Houses requires a bit of planning and preparation, but the end result is well worth the effort. The process involves baking gingerbread panels, constructing the house, and then decorating it with an array of eerie decorations. This recipe is designed to serve 4-6 people, making it perfect for a small Halloween gathering. Whether you’re a seasoned baker or a novice, this recipe will guide you through each step to guarantee your haunted house is both terrifyingly fun and delicious.
Ingredients (Serves 4-6):
- 3 cups all-purpose flour
- 1 teaspoon baking soda
- 1/2 teaspoon salt
- 2 teaspoons ground ginger
- 1 teaspoon ground cinnamon
- 1/2 teaspoon ground cloves
- 1/2 teaspoon ground nutmeg
- 6 tablespoons unsalted butter, softened
- 3/4 cup packed brown sugar
- 1 large egg
- 2/3 cup molasses
- 1 teaspoon vanilla extract
- Assorted candies for decoration (e.g., candy corn, gummy worms, chocolate chips)
- Edible glitter and food coloring (optional)
- Royal icing (store-bought or homemade) for assembly and decoration
Instructions:
1. Prepare the Dough: In a large bowl, sift together the flour, baking soda, salt, ginger, cinnamon, cloves, and nutmeg. In a separate bowl, beat the softened butter and brown sugar until the mixture is light and fluffy.
Add the egg, molasses, and vanilla extract, and continue beating until well combined. Gradually add the dry ingredients to the wet ingredients, mixing until a dough forms.
Divide the dough in half, wrap each portion in plastic wrap, and refrigerate for at least 2 hours.
2. Roll and Cut the Dough: Preheat the oven to 350°F (175°C). On a floured surface, roll out the dough to about 1/4-inch thickness. Use cardboard templates or cookie cutters to cut out the shapes needed for the house, such as walls, roof, and door.
Place the cutouts on a baking sheet lined with parchment paper.
3. Bake the Gingerbread: Bake the gingerbread pieces in the preheated oven for 10-12 minutes or until they’re firm to the touch. Allow them to cool completely on a wire rack before assembly.
4. Assemble the House: Once the gingerbread pieces are cool, use royal icing as the glue to assemble the house. Start with the walls, holding them together until the icing sets.
Attach the roof pieces and allow the house to dry completely, which may take a few hours.
5. Decorate the House: Use the royal icing to attach candies and decorations to the house. Let your creativity shine by adding spooky elements like candy corn windows, gummy worm pathways, and chocolate chip cobblestones.
You can also use edible glitter and food coloring to add extra flair.
Extra Tips:
For the best results, make certain that your gingerbread pieces are entirely cooled before attempting to assemble the house. This will prevent them from bending or breaking.
If you’re short on time, you can make the gingerbread pieces a day in advance and store them in an airtight container. For added stability, consider using a thicker royal icing for the initial construction and a thinner icing for decorative details.
Encourage kids to experiment with their designs, and don’t worry about perfection—imperfections can add to the haunted look!
Mummy Hot Dog Wraps

Creating Mummy Hot Dog Wraps is a straightforward process that requires minimal ingredients and effort. With a serving size of 4-6 people, these mummy wraps can be prepared quickly, making them an ideal last-minute addition to your Halloween menu.
Not only do they taste great, but they also add a spooky touch to your table setting with their cleverly wrapped appearance. It’s a creative way to serve a timeless favorite and is guaranteed to bring smiles to your little goblins and ghouls.
Ingredients (serving size: 4-6 people):
- 1 can of crescent roll dough (8 oz)
- 8 hot dogs
- 1 egg (optional, for egg wash)
- Mustard or ketchup for decoration
Cooking Instructions:
1. Preheat the Oven: Begin by preheating your oven to 375°F (190°C). This guarantees that the oven is at the right temperature when you’re ready to bake the mummies.
2. Prepare the Dough: Unroll the crescent roll dough and separate it into 8 triangles. Use a pizza cutter or a sharp knife to cut each triangle into thin strips, approximately 1/4 inch wide.
3. Wrap the Hot Dogs: Take one hot dog and start wrapping the dough strips around it, leaving a small gap near one end to create a ‘face’ for the mummy. Wrap the strips in a random and overlapping manner to give the appearance of mummy bandages.
Repeat this step for all hot dogs.
4. Optional Egg Wash: If desired, beat one egg and brush a light layer over the wrapped hot dogs. This will give the mummies a golden-brown finish when baked.
5. Bake the Mummies: Place the wrapped hot dogs on a baking sheet lined with parchment paper. Bake in the preheated oven for about 12-15 minutes, or until the dough is golden brown and cooked through.
6. Decorate the Faces: Once the mummies are out of the oven and slightly cooled, use a small amount of mustard or ketchup to dot eyes on the exposed part of the hot dogs, giving them a spooky face.
Extra Tips:
To guarantee the crescent dough doesn’t become too sticky when wrapping, you can lightly flour your cutting surface.
If you want to add a bit of cheese, consider laying a slice of cheese on the hot dog before wrapping it in dough. For an extra fun touch, you can also use edible candy eyes instead of mustard or ketchup.
Remember to keep an eye on the baking mummies to prevent overbrowning, as ovens can vary in temperature. Enjoy your mummified creations!
Ghostly Marshmallow Pops
Ghostly Marshmallow Pops are a delightful and spooky treat perfect for kids to make and enjoy during the Halloween season. These cute and easy-to-make pops are great for parties, trick-or-treat events, or simply as a fun activity to engage little ones in the kitchen. With just a few ingredients and minimal preparation, you can transform regular marshmallows into eerie, ghostly figures that will excite children and adults alike.
Perfect for a serving size of 4-6 people, these Ghostly Marshmallow Pops aren’t only fun to make but also delicious to eat. The marshmallows are coated in white chocolate to create a ghostly appearance, and with the addition of cute little eyes, they come to life as charming Halloween characters. This recipe is simple enough for kids to help with, making it a great opportunity for family bonding while preparing for the spooky season.
Ingredients:
- 12 large marshmallows
- 12 lollipop sticks
- 1 cup white chocolate chips
- 1 teaspoon coconut oil or vegetable shortening
- Black decorating gel or edible marker
- Wax or parchment paper
Instructions:
- Prepare Your Workspace: Line a baking sheet with wax or parchment paper to place the marshmallow pops once they’re dipped and decorated.
- Insert Lollipop Sticks: Gently insert a lollipop stick into each marshmallow, making sure it’s secure but not poking through the other side.
- Melt the White Chocolate: In a microwave-safe bowl, combine the white chocolate chips and coconut oil. Microwave in 30-second intervals, stirring well between each, until the chocolate is fully melted and smooth.
- Coat the Marshmallows: Dip each marshmallow into the melted white chocolate, using a spoon to help coat it evenly if needed. Allow the excess chocolate to drip off before placing it on the prepared baking sheet.
- Create Ghostly Eyes: Once the chocolate coating is set but still slightly sticky, use black decorating gel or an edible marker to draw two eyes on each marshmallow to make them look like ghosts.
- Let Them Set: Allow the marshmallow pops to sit at room temperature until the chocolate has completely hardened. You can also speed up the process by placing them in the refrigerator for about 10 minutes.
- Serve and Enjoy: Once set, your Ghostly Marshmallow Pops are ready to be devoured or displayed as part of your Halloween festivities.
Extra Tips: For an extra touch of creativity, you can use colored chocolate melts to give your ghost pops different hues or add sprinkles before the chocolate hardens for a more festive look. If you don’t have lollipop sticks, you can use pretzel sticks for a salty twist.
Be sure to supervise children during the melting process and while using decorating gels or markers to guarantee safety while creating these spooky treats.
Creepy Crawly Brownies
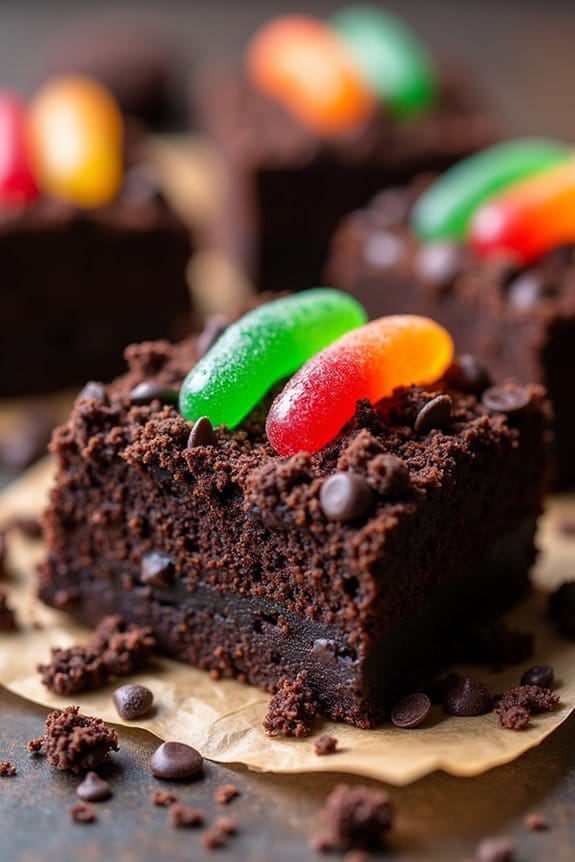
Halloween is the perfect time to get creative in the kitchen, especially when baking with kids. Creepy Crawly Brownies are a fun and delicious way to embrace the spooky season. These brownies are rich, chocolaty, and topped with gummy worms and other edible creepy crawlies that are sure to delight and perhaps even give a little fright. They make an excellent treat for a Halloween party or a fun family baking session, providing a mix of textures and flavors that appeal to both kids and adults.
These brownies aren’t only enjoyable to eat but also to make, as they offer plenty of opportunities for kids to participate in the kitchen. From mixing the batter to decorating with gummy creatures, every step is an adventure. The recipe is designed to serve 4-6 people, making it a great choice for a family gathering or a small Halloween celebration. Let’s get started on this spooky baking journey!
Ingredients:
- 1 cup unsalted butter
- 2 cups granulated sugar
- 4 large eggs
- 1 teaspoon vanilla extract
- 1 cup all-purpose flour
- 1 cup unsweetened cocoa powder
- 1/2 teaspoon salt
- 1/2 teaspoon baking powder
- 1 cup chocolate chips
- 1 cup gummy worms
- 1/2 cup chocolate cookie crumbs
- Edible eyes or other edible creepy crawlies for decoration
Instructions:
- Preheat and Prep: Preheat your oven to 350°F (175°C). Grease a 9×13-inch baking pan with butter or non-stick spray, and line it with parchment paper, letting the edges overhang for easy removal.
- Melt Butter and Mix: In a large microwave-safe bowl, melt the butter. Once melted, stir in the granulated sugar until well combined. Let the mixture cool slightly.
- Add Eggs and Vanilla: Beat in the eggs one at a time, mixing well after each addition. Stir in the vanilla extract until the mixture is smooth.
- Combine Dry Ingredients: In a separate bowl, sift together the all-purpose flour, cocoa powder, salt, and baking powder. Gradually add the dry ingredients to the wet ingredients, stirring until just combined. Avoid over-mixing to guarantee the brownies remain tender.
- Add Chocolate Chips: Fold in the chocolate chips gently so they’re evenly distributed throughout the batter.
- Pour and Bake: Pour the brownie batter into the prepared baking pan, spreading it evenly. Bake in the preheated oven for 25-30 minutes, or until a toothpick inserted into the center comes out with a few moist crumbs (not wet batter).
- Cool and Decorate: Allow the brownies to cool completely in the pan on a wire rack. Once cool, sprinkle the top with chocolate cookie crumbs to resemble dirt. Press gummy worms and other edible creepy crawlies into the top of the brownies, arranging them in a fun, spooky pattern.
- Serve: Cut into squares and serve these delightfully spooky treats to your family and friends.
Extra Tips:
For an extra spooky touch, consider adding a few drops of green or red food coloring to the brownie batter before baking. This will create a subtle, eerie hue when the brownies are cut.
Additionally, you can experiment with different types of edible decorations such as candy spiders or sugar skulls to make the brownies even more festive.
If you want to make the brownies ahead of time, you can bake and freeze them without the decorations, then thaw and add the creepy toppings just before serving. Enjoy your Halloween baking adventure!
Eerie Eyeball Cake Pops

Eerie Eyeball Cake Pops are a spine-chilling yet delightful treat perfect for any Halloween gathering. These delicious little bites aren’t only fun to make but also a fantastic way to get kids involved in the kitchen. With their creepy appearance and sweet taste, they’re sure to be a hit with kids and adults alike.
Whether you’re planning a Halloween party or simply want to enjoy some festive fun at home, these cake pops will add a spooky flair to your celebration.
Making Eerie Eyeball Cake Pops involves creating a moist cake base, forming it into balls, and then decorating them to resemble eyeballs. The process is simple enough for little hands to help with, making it a perfect family activity.
With a few basic ingredients and supplies, you can transform an ordinary cake into a Halloween masterpiece that’s as fun to look at as it’s to eat. Follow this recipe to make 12-15 eerie eyeball cake pops, enough to serve 4-6 people.
Ingredients:
- 1 box cake mix (any flavor)
- Ingredients as per cake mix (usually eggs, oil, and water)
- 1 cup frosting (vanilla or cream cheese)
- 12-15 cake pop sticks
- 2 cups white candy melts
- 1/2 cup red candy melts
- 1/4 cup mini chocolate chips
- Edible gel pens (black and red)
- 1/4 cup candy eyeballs
Instructions:
- Bake the Cake: Prepare the cake mix according to the box instructions. Once baked, allow the cake to cool completely. Crumble the cooled cake into a large mixing bowl, breaking it down into fine crumbs.
- Mix with Frosting: Add the frosting to the crumbled cake. Mix thoroughly until the mixture has a moldable consistency similar to cookie dough.
- Form Cake Balls: Roll the cake mixture into small balls, about 1 inch in diameter, and place them on a baking sheet lined with parchment paper.
- Chill Cake Balls: Insert a cake pop stick halfway into each ball. Place the cake balls in the refrigerator for about 30 minutes to firm up.
- Melt Candy Melts: In a microwave-safe bowl, melt the white candy melts according to package instructions. Dip the end of each cake pop stick into the melted candy before inserting it back into the cake balls to secure them.
- Coat and Decorate: Dip each cake pop into the melted white candy to fully coat. Allow excess to drip off before placing them back onto the parchment paper. Before the coating hardens, attach a candy eyeball to each pop.
- Add Details: Melt the red candy melts and drizzle over the cake pops to create bloodshot lines. Use edible gel pens to add pupils and additional details for an extra eerie effect.
- Set and Serve: Allow the cake pops to set completely. Once the candy coating is firm, they’re ready to serve.
Extra Tips:
To guarantee your Eerie Eyeball Cake Pops hold together well, make sure the cake balls are firm before dipping them into the candy melts. If you find the mixture too crumbly, adding a little more frosting can help achieve the right consistency.
When decorating, have fun experimenting with different colors and designs to make each eyeball unique. If you don’t have candy melts, white chocolate chips can be substituted, but be cautious of overheating which can cause clumping. Enjoy your spooky creations!
Witch Hat Cookies

Witch Hat Cookies are a delightful and whimsical treat perfect for celebrating Halloween with children. These fun and easy-to-make cookies resemble the classic pointed hats worn by witches and are sure to add a touch of magic to your holiday festivities. Not only are these cookies visually appealing, but they’re also a delicious combination of chocolate and sugar, making them a hit with kids of all ages.
Whimsical Witch Hat Cookies: magical, kid-friendly, and delightfully delicious for Halloween festivities.
Whether you’re hosting a Halloween party or simply looking for a fun baking activity to do with your children, these Witch Hat Cookies are guaranteed to be a crowd-pleaser. The beauty of this recipe lies in its simplicity, which makes it ideal for involving kids in the kitchen. The cookies are made using a combination of pre-made ingredients and homemade touches, allowing for a quick and enjoyable baking experience.
By using sugar cones for the hat’s shape and customizing the decoration with colorful icing and sprinkles, you can personalize each cookie to create a unique witch hat. This recipe yields about 12 to 18 Witch Hat Cookies, making it perfect for a serving size of 4-6 people, and can easily be doubled for larger gatherings.
Ingredients:
- 12 to 18 sugar cones
- 1 batch of sugar cookie dough (store-bought or homemade)
- 1 cup of semi-sweet chocolate chips
- 1 tablespoon of vegetable oil
- Assorted colored icing (in tubes for easy application)
- Assorted sprinkles and edible decorations (e.g., stars, bats)
- 12 to 18 round chocolate cookies (e.g., Oreos) for the base
Instructions:
- Preheat the Oven: Begin by preheating your oven to 350°F (175°C) if baking the sugar cookie dough from scratch. Prepare a baking sheet with parchment paper for easy cleanup.
- Prepare the Sugar Cookie Dough: If using homemade dough, roll it out to about 1/4 inch thick. Use a round cookie cutter to cut out circles that match the diameter of your sugar cones’ opening. This will serve as the base for the witch hats. If using pre-made dough, verify you have enough to make 12 to 18 cookies.
- Bake the Cookies: Place the cut-out sugar cookie rounds on the prepared baking sheet. Bake according to the recipe or package instructions, typically around 8-10 minutes, until they’re golden brown. Let them cool completely.
- Melt the Chocolate: While the cookies are cooling, melt the chocolate chips in a microwave-safe bowl. Heat in 30-second intervals, stirring in between, until smooth. Add the vegetable oil to the melted chocolate to give it a glossy finish.
- Assemble the Witch Hats: Once the cookies and chocolate are ready, dip the wide end of each sugar cone into the melted chocolate, ensuring it’s fully coated. Attach it to a baked cookie round, centering it to form the hat shape. Hold it in place for a few seconds to allow the chocolate to set slightly.
- Decorate: Use the colored icing to pipe decorative patterns around the base of the hat or to create a band. Add sprinkles and edible decorations while the chocolate is still slightly wet to ensure they stick.
- Cool and Set: Allow the witch hat cookies to cool and the chocolate to harden completely before serving. You can speed up this process by placing them in the refrigerator for a few minutes.
Extra Tips:
To prevent the sugar cones from cracking, handle them gently when dipping in chocolate. If you prefer, you can use pre-colored candy melts instead of chocolate chips for a variety of vibrant colors.
When baking with kids, be sure to let them get creative with the decorations. Using icing tubes makes it easier for little hands to create detailed designs on the hats. For a spooky twist, consider using black or purple icing for added Halloween flair.
Batty Chocolate Pretzels
Halloween is the perfect time to get creative in the kitchen, especially with recipes that are both fun and simple enough for kids to help with. One delightful treat that combines a spooky theme with delicious flavors is Batty Chocolate Pretzels. These charming snacks are shaped like little bats, making them a hit with children and adults alike. Not only do they taste amazing, but they also add a festive touch to your Halloween celebrations.
Whether you’re hosting a party or just looking for a fun activity to do with the kids, these Batty Chocolate Pretzels are bound to be a crowd-pleaser. The process of making Batty Chocolate Pretzels is as enjoyable as the finished product. It involves just a few simple steps and ingredients, making it an ideal recipe for little hands to get involved with.
The combination of sweet chocolate and salty pretzels creates a perfect balance of flavors. Plus, decorating these treats with candy eyes and wings made from chocolate-covered pretzels gives them a whimsical and spooky appearance. This recipe serves 4-6 people, providing enough for a small gathering or a fun family snack time.
Ingredients (Serves 4-6 people):
- 24 large pretzel twists
- 1 cup semi-sweet chocolate chips
- 1 tablespoon shortening
- 24 candy eyes
- 24 mini chocolate chips
- 1/4 cup white chocolate chips (optional, for decoration)
Instructions:
- Prepare the Chocolate Coating: In a microwave-safe bowl, combine the semi-sweet chocolate chips and shortening. Microwave on medium heat in 30-second intervals, stirring in between, until the chocolate is completely melted and smooth.
- Dip the Pretzels: Line a baking sheet with parchment paper. Dip each pretzel twist into the melted chocolate, making certain it’s evenly coated. Use a fork to lift the pretzel out, letting any excess chocolate drip back into the bowl, and place it on the prepared baking sheet.
- Add Candy Eyes: While the chocolate is still wet, place two candy eyes near the top of each pretzel. These will serve as the bat’s eyes.
- Create Bat Wings: Break some of the pretzel twists in half and attach them to the sides of the whole pretzels to resemble bat wings. Use a little melted chocolate as glue to guarantee they stick.
- Add Mini Chocolate Chips: Position a mini chocolate chip below the eyes, pointy side down, to form the bat’s nose.
- Decorate (Optional): If desired, melt the white chocolate chips and drizzle over the pretzels to add additional decoration.
- Set the Pretzels: Allow the chocolate to set completely. You can speed up this process by placing the baking sheet in the refrigerator for about 15-20 minutes.
Extra Tips:
When making Batty Chocolate Pretzels, precision isn’t essential, so don’t worry about making each one look identical. The quirky and uneven features add to their charm. If you don’t have candy eyes, you can use small marshmallows with a dot of chocolate for the eyes.
Be sure to melt the chocolate slowly to prevent burning, which can cause it to seize up and become unusable. Finally, these treats can be stored in an airtight container at room temperature for up to a week, making them a great make-ahead option for your Halloween festivities.
Zombie Hand Pies

Zombie Hand Pies are a spooky and delicious treat that will thrill kids and adults alike during the Halloween season. These ghoulishly fun pastries are shaped like creepy hands, filled with a sweet or savory filling of your choice, and baked to golden perfection. They make the perfect addition to any Halloween party or family gathering, providing a unique and entertaining twist on traditional hand pies.
Kids will love helping to create these eerie treats, from cutting out the hand shapes to adding the “bloody” fillings. This recipe is versatile, allowing you to choose from various fillings such as apple pie, cherry, or even a savory meat and cheese option. Whether you’re looking to delight little ones or impress your Halloween party guests, Zombie Hand Pies are an easy-to-make, crowd-pleasing choice.
Ingredients for 4-6 servings:
- 2 sheets of ready-to-use pie crust
- 1 cup pie filling of choice (apple, cherry, meat and cheese, etc.)
- 1 egg, beaten
- Red food coloring (optional)
- Flour for dusting
- Parchment paper
Cooking Instructions:
- Prepare the Dough:
- Preheat your oven to 375°F (190°C).
- Lightly flour your work surface and roll out the pie crusts to about 1/8-inch thick. Using a hand template or freehand, cut out hand shapes from the dough. You should aim for about 8 hands (4 pairs).
- Fill the Pies:
- Place a tablespoon of your chosen filling onto one hand shape, spreading it evenly but leaving a border around the edges. Be careful not to overfill.
- Assemble the Pies:
- Lay a second hand-shaped dough piece over the filled piece. Use a fork to press and seal the edges, creating a firm bond so the filling doesn’t leak out during baking. If desired, dip a toothpick into red food coloring and draw “veins” on the top of the hand for a bloody effect.
- Egg Wash:
- Brush the top of each hand pie with the beaten egg. This will give your pies a golden, shiny finish.
- Bake the Pies:
- Line a baking sheet with parchment paper and carefully place the hand pies on it. Bake in the preheated oven for 15-20 minutes or until the pies are golden brown and the filling is bubbling.
- Cool and Serve:
- Remove the hand pies from the oven and allow them to cool on a wire rack for a few minutes before serving.
Extra Tips:
For a more realistic zombie effect, consider using a knife to make small slits on the fingers before baking, giving the appearance of knuckles or cuts.
If you’re using a sweet filling, a sprinkle of cinnamon sugar on top before baking can add extra flavor and crunch. For savory pies, consider adding spices or herbs to enhance the taste.
Finally, always verify the edges are sealed properly to avoid any filling leaks during baking.
Pumpkin Patch Rice Krispie Treats

Pumpkin Patch Rice Krispie Treats are an adorable and fun way to celebrate Halloween with kids. These treats combine the classic, gooey goodness of Rice Krispies with a festive pumpkin twist. Shaped like tiny pumpkins and decorated with green icing vines, these treats are easy to make and perfect for a Halloween party or a fun family activity. Not only are they delicious, but they also add a touch of seasonal flair to your Halloween dessert table.
These treats are a great way to involve kids in the kitchen. They can help with shaping the pumpkins and decorating them, fostering their creativity and honing their culinary skills. Plus, the process of making these Pumpkin Patch Rice Krispie Treats is as enjoyable as eating them. With a bit of imagination, these treats can be transformed into a delightful pumpkin patch scene, complete with candy corn, chocolate chips, or any other fun embellishments your little ones can think of.
Ingredients (Serving size: 4-6 people):
- 6 cups Rice Krispies cereal
- 4 cups miniature marshmallows
- 3 tablespoons unsalted butter
- 1 teaspoon vanilla extract
- Orange food coloring
- Green icing or frosting
- Pretzel sticks, broken into small pieces (for stems)
- Optional: Candy corn or mini chocolate chips for decoration
Cooking Instructions:
- Prepare the Mixture: Begin by melting the unsalted butter in a large saucepan over low heat. Once melted, add the miniature marshmallows and stir until they’re completely melted and smooth. Remove the saucepan from the heat and stir in the vanilla extract.
- Color the Mixture: Add a few drops of orange food coloring to the melted marshmallow mixture. Stir until the color is well blended and you reach the desired shade of orange.
- Combine with Cereal: Gradually add the Rice Krispies cereal to the marshmallow mixture, stirring until all the cereal is evenly coated with the orange marshmallow mixture.
- Shape the Pumpkins: Let the mixture cool slightly to the touch, but be careful not to let it harden. Grease your hands with a bit of butter or cooking spray, and take small handfuls of the mixture to form into pumpkin shapes. Place them on a wax paper-lined baking sheet.
- Add Stems and Vines: While the pumpkins are still a bit warm and sticky, insert a piece of pretzel stick into the top of each pumpkin to serve as a stem. Use the green icing or frosting to pipe leaves and vines around each stem.
- Decorate: If desired, add candy corn or mini chocolate chips as additional decorations on your pumpkins.
- Set and Serve: Allow the Pumpkin Patch Rice Krispie Treats to set completely at room temperature before serving.
Extra Tips: To make shaping the pumpkins more manageable, be sure to keep your hands well-greased to prevent the mixture from sticking. If you find that the marshmallow mixture hardens too quickly, you can gently reheat it to soften again.
To add extra flair, consider using different shades of green icing for a more vibrant pumpkin patch. If you want to store these treats, place them in an airtight container to keep them fresh for a few days. Encourage kids to have fun with decorating, as the creativity in this step makes the treats even more special.
Frankenstein Marshmallow Pops

Halloween is a time for spooky fun and creative treats, and what better way to embrace the festive spirit than with Frankenstein Marshmallow Pops! These delightful snacks aren’t only a feast for the eyes but also a delicious treat for the taste buds. Perfect for kids and adults alike, these marshmallow pops are easy to make and require minimal ingredients.
With their charmingly monstrous appearance, they’re sure to be a hit at any Halloween gathering. Plus, they provide a wonderful opportunity for kids to get involved in the kitchen, making them an ideal family activity.
The concept is simple: fluffy marshmallows are transformed into mini Frankensteins using green candy melts, pretzel sticks, and a few decorative touches. The result is a spooky yet adorable treat that will have little goblins and ghouls coming back for more. This recipe yields enough for 4-6 people, making it a perfect addition to your Halloween party spread. Gather your ingredients, roll up your sleeves, and let the culinary magic begin!
Ingredients for 4-6 servings:
- 12 large marshmallows
- 1 cup green candy melts
- 12 lollipop sticks
- 24 mini chocolate chips
- 1/4 cup mini pretzel sticks
- 1 tube black gel icing
- 1 tube white gel icing
- 1/4 cup mini candy eyeballs
Cooking Instructions:
- Prepare the Workstation: Start by setting up your workstation. Insert a lollipop stick into each marshmallow, ensuring it’s secure but not piercing through the top.
- Melt the Candy: Place the green candy melts in a microwave-safe bowl. Heat in the microwave in 30-second intervals, stirring between each, until the candy is fully melted and smooth.
- Coat the Marshmallows: Dip each marshmallow into the melted candy, ensuring it’s fully covered. Gently tap the stick against the edge of the bowl to remove any excess candy.
- Add the Hair: Before the candy coating sets, stick a few mini chocolate chips on top of the marshmallow to create Frankenstein’s hair. Allow the candy coating to set completely, which takes about 10 minutes.
- Create the Face: Use the black gel icing to draw a mouth and stitches on the marshmallow. Attach two mini candy eyeballs with a dot of black gel icing.
- Attach the Bolts: Break mini pretzel sticks in half and insert one into each side of the marshmallow to create Frankenstein’s bolts.
- Finalize the Details: Use white gel icing to add any additional details you desire, such as highlights on the eyes or additional stitches.
- Let Them Set: Allow the marshmallow pops to set completely on a parchment-lined tray, ensuring the decorations are firm.
Extra Tips:
For an extra touch of creativity, consider using different colored candy melts to create a variety of Frankensteins. You can also add additional embellishments like sprinkles or edible glitter for an extra spooky effect.
If you’re working with younger children, consider pre-melting the candy and setting up a decorating station to make the process easier and more fun. Remember, these treats are meant to be fun and whimsical, so don’t worry if your Frankensteins turn out a little lopsided or unique; it only adds to their charm!
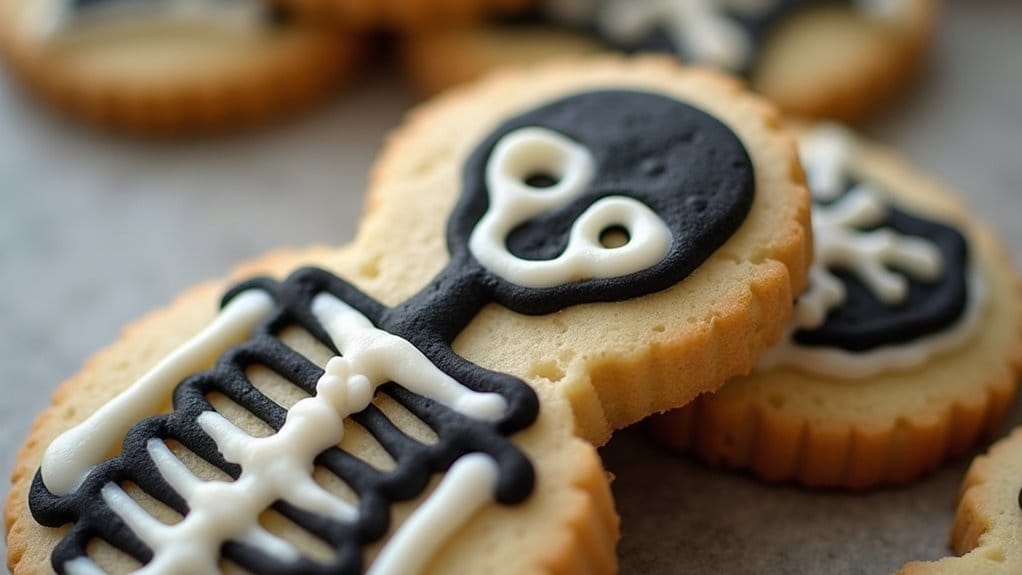
Skeleton Sugar Cookies
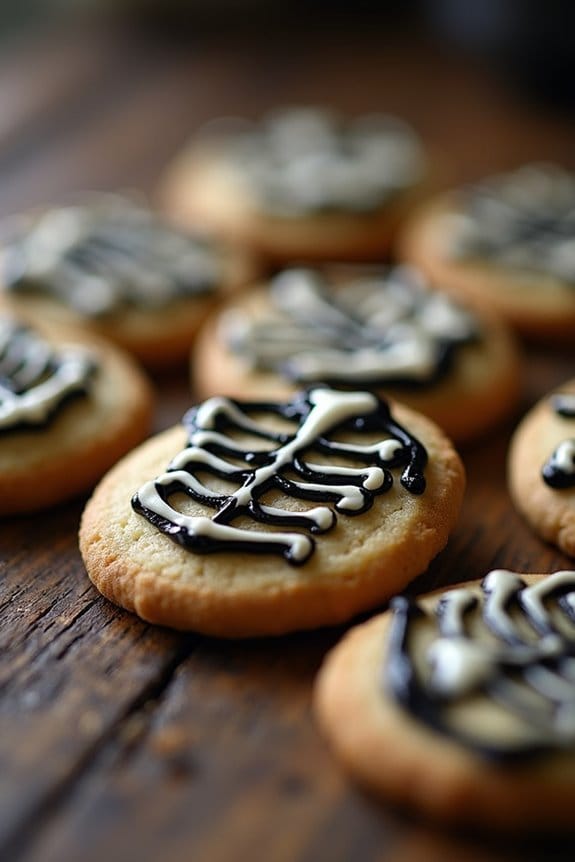
Skeleton Sugar Cookies are a fun and spooky treat perfect for Halloween celebrations. These cookies aren’t only delicious but also a creative activity for kids, making them an ideal choice for a festive family baking day. The cookies are shaped like skeletons and decorated with royal icing to create a creepy yet cute appearance. With a crisp texture and a hint of vanilla, these cookies will surely be a hit at any Halloween party.
To make Skeleton Sugar Cookies, you’ll start with a basic sugar cookie dough, then cut out skeleton shapes using cookie cutters. After baking, the fun begins as you and your kids can decorate each cookie with dark icing to create bones and facial features. Not only will this activity engage your children’s creativity, but it will also give them a sense of accomplishment as they see their spooky creations come to life.
Ingredients for 4-6 servings:
- 2 3/4 cups all-purpose flour
- 1 teaspoon baking soda
- 1/2 teaspoon baking powder
- 1 cup unsalted butter, softened
- 1 1/2 cups white sugar
- 1 egg
- 1 teaspoon vanilla extract
- 1/2 teaspoon almond extract
- Black food coloring
- 2 cups powdered sugar
- 2 tablespoons meringue powder
- 5 tablespoons water
Cooking Instructions:
- Prepare the Dough: In a large bowl, whisk together the flour, baking soda, and baking powder. In another bowl, cream the butter and sugar until smooth. Beat in the egg, vanilla extract, and almond extract. Gradually blend in the dry ingredients until a dough forms.
- Chill the Dough: Cover the dough with plastic wrap and refrigerate for at least one hour. This will make it easier to roll out and cut.
- Preheat the Oven: Preheat your oven to 375°F (190°C) and line a baking sheet with parchment paper.
- Roll and Cut the Dough: Once chilled, roll out the dough on a lightly floured surface to about 1/4-inch thick. Use skeleton-shaped cookie cutters to cut out cookies and place them on the prepared baking sheet.
- Bake the Cookies: Bake for 8 to 10 minutes in the preheated oven, or until the edges are lightly golden. Allow the cookies to cool on the baking sheet for 5 minutes before transferring to a wire rack to cool completely.
- Prepare the Icing: In a bowl, mix the powdered sugar, meringue powder, and water until smooth. Add black food coloring a few drops at a time until you achieve the desired shade for decorating.
- Decorate the Cookies: Once the cookies have cooled, use a piping bag or a squeeze bottle to decorate the cookies with the black icing, drawing skeleton bones and facial features.
Extra Tips:
When decorating your Skeleton Sugar Cookies, be patient and allow the icing to set completely before handling the cookies. You can use a toothpick to help with fine details if you don’t have a fine-tipped piping bag.
If you want to add more color, use different food colorings for the icing to create multicolored skeletons. Additionally, storing the cookies in an airtight container will keep them fresh and crispy for several days, perfect for making ahead of time for your Halloween festivities.
