

When it comes to Halloween, the excitement of whipping up spooky sweets for the kiddos is unmatched. I’ve gathered some enchanting cake ideas that will make this Halloween a memorable one. Picture yourself making a Monster Mash Cupcake with candy eyes peeking up at you or crafting a Ghoulish Ghost Cake wrapped in marshmallow fondant. These treats are not just delicious, but delightfully eerie too. Get ready for a fun-filled baking adventure.
Spooky Spiderweb Cake

Celebrate Halloween with a cake that’s as delicious as it’s eerie! The Spooky Spiderweb Cake is a perfect centerpiece for any Halloween party, delighting both kids and adults with its clever design and rich flavors. This cake features a moist chocolate base, topped with a silky smooth frosting, and adorned with a striking spiderweb design made of melted white chocolate.
Whether you’re hosting a party or simply want to surprise your family, this cake is bound to be a hit! The Spooky Spiderweb Cake isn’t only fun to make but also incredibly easy. The trick to achieving the perfect spiderweb design is to work with a steady hand and a little bit of patience. Before you know it, you’ll have a cake that looks like it came straight out of a Halloween bakery.
This recipe serves 4-6 people, making it an ideal choice for a small gathering or family dinner.
Ingredients:
- 1 ½ cups all-purpose flour
- 1 cup granulated sugar
- ½ cup unsweetened cocoa powder
- 1 teaspoon baking powder
- ½ teaspoon baking soda
- ½ teaspoon salt
- 2 large eggs
- ½ cup vegetable oil
- 1 teaspoon vanilla extract
- ¾ cup buttermilk
- ½ cup boiling water
- 1 cup heavy cream
- 1 cup dark chocolate chips
- ½ cup white chocolate chips
- Black food coloring gel (optional)
- Plastic spider decorations (optional)
Instructions:
1. Prepare the Cake Batter: Preheat your oven to 350°F (175°C). Grease and flour a 9-inch round cake pan. In a large bowl, whisk together the flour, sugar, cocoa powder, baking powder, baking soda, and salt.
In another bowl, beat the eggs, vegetable oil, and vanilla extract until well combined. Gradually add the wet ingredients to the dry ingredients, alternating with the buttermilk, and mix until smooth. Stir in the boiling water until the batter is well combined and smooth.
2. Bake the Cake: Pour the batter into the prepared cake pan. Bake in the preheated oven for 30-35 minutes or until a toothpick inserted into the center comes out clean. Let the cake cool in the pan for 10 minutes, then transfer it to a wire rack to cool completely.
3. Make the Frosting: In a saucepan over medium heat, bring the heavy cream to a simmer. Remove from heat and add the dark chocolate chips. Let it sit for a minute, then stir until smooth and glossy. Allow the mixture to cool slightly until it thickens to a spreadable consistency.
4. Frost the Cake: Once the cake has cooled, spread the chocolate frosting evenly over the top and sides of the cake.
5. Create the Spiderweb Design: Melt the white chocolate chips in a microwave-safe bowl in 30-second intervals, stirring in between, until completely melted. If desired, add a few drops of black food coloring gel to the melted white chocolate to create a spooky effect.
Transfer the melted chocolate to a piping bag or a small zip-top bag with a small corner snipped off. Starting from the center of the cake, pipe concentric circles, then use a toothpick to drag lines from the center outward to create a spiderweb pattern.
6. Decorate: Optional – add plastic spider decorations to the cake for an extra spooky touch.
Extra Tips:
To guarantee your cake has a soft and tender crumb, make sure all your ingredients, especially the eggs and buttermilk, are at room temperature before mixing. If you don’t have buttermilk, you can make a substitute by adding a tablespoon of lemon juice or vinegar to regular milk and letting it sit for 5 minutes.
When creating the spiderweb design, work quickly before the chocolate sets, and use a light hand to avoid breaking the lines. If you’re not confident in your piping skills, practice on a piece of parchment paper first to get a feel for the flow of the chocolate.
Monster Mash Cupcakes
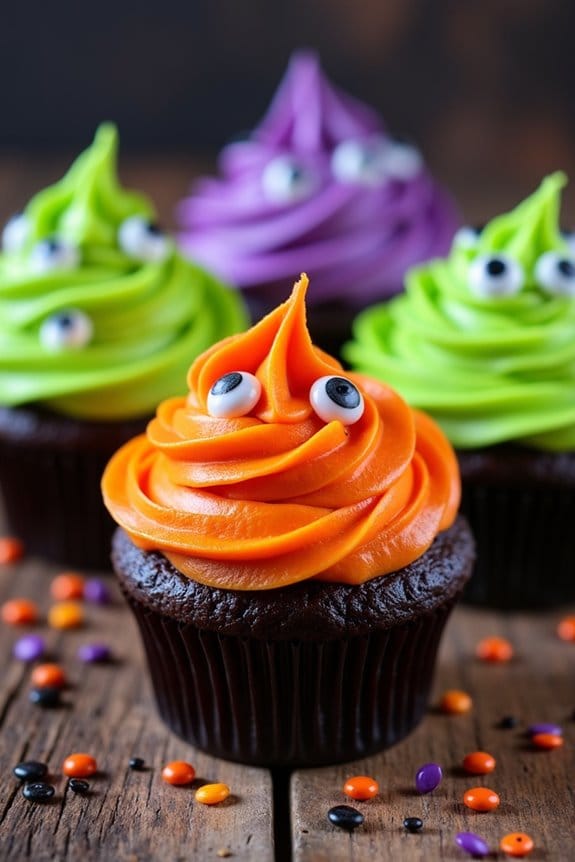
Get ready to delight your little ghouls and goblins with these whimsical Monster Mash Cupcakes. Perfect for a Halloween party or a fun baking session with kids, these cupcakes are as playful as they’re delicious. With vibrant colors and silly, spooky decorations, they promise to be the highlight of your Halloween treats. Not only do they look monstrous, but they also taste monstrously good!
Whimsical Monster Mash Cupcakes: Vibrant, spooky, and monstrously delicious Halloween treats!
These cupcakes are designed for 4-6 people, making them ideal for a small gathering or party. The recipe combines a moist and fluffy cupcake base with a rich, creamy frosting that can be tinted in any monstrous hue you desire. By adding some candy eyes and creative flair, kids will love decorating their own edible monsters.
Ingredients:
- 1 cup all-purpose flour
- 1/2 cup unsweetened cocoa powder
- 1 teaspoon baking powder
- 1/2 teaspoon baking soda
- 1/4 teaspoon salt
- 1/2 cup unsalted butter, softened
- 1 cup granulated sugar
- 2 large eggs
- 1 teaspoon vanilla extract
- 1/2 cup buttermilk
- 2 cups powdered sugar
- 1/2 cup unsalted butter, softened
- 1 teaspoon vanilla extract
- 2-3 tablespoons milk
- Food coloring (assorted colors)
- Candy eyes
- Assorted Halloween sprinkles
Cooking Instructions:
- Preheat and Prepare: Preheat your oven to 350°F (175°C) and line a muffin tin with cupcake liners to make about 12 cupcakes.
- Mix Dry Ingredients: In a medium bowl, whisk together the flour, cocoa powder, baking powder, baking soda, and salt. Set aside.
- Cream Butter and Sugar: In a large bowl, cream together the butter and granulated sugar until light and fluffy using an electric mixer. Add the eggs one at a time, beating well after each addition. Stir in the vanilla extract.
- Combine Ingredients: Gradually add the dry ingredients to the butter mixture, alternating with the buttermilk, beginning and ending with the dry ingredients. Mix until just combined.
- Fill and Bake: Divide the batter evenly among the prepared cupcake liners, filling each about 2/3 full. Bake for 18-20 minutes or until a toothpick inserted into the center comes out clean. Allow cupcakes to cool completely on a wire rack.
- Prepare Frosting: To make the frosting, beat together the powdered sugar and softened butter until smooth. Add vanilla extract and enough milk to achieve a spreadable consistency. Divide frosting into separate bowls and add desired food colors to each.
- Decorate: Once the cupcakes are cool, frost them with your colored frosting. Let the kids use candy eyes and sprinkles to create their own monster faces.
Extra Tips:
For the best results, make sure your butter is at room temperature before starting the recipe. This helps in achieving a creamy texture for both the cupcake batter and frosting.
Feel free to experiment with colors—neon green, purple, and orange work especially well for a Halloween theme. Keep some extra candy decorations on hand for last-minute creative inspirations.
Finally, encourage the kids to get creative and enjoy the process of designing their own unique monster cupcakes!
Ghoulish Ghost Cake

Halloween is the perfect time to get creative in the kitchen, and what better way to celebrate than with a Ghoulish Ghost Cake? This spooky dessert isn’t only a fun centerpiece for your Halloween party, but it’s also deliciously moist and filled with flavors that will delight kids and adults alike.
With a few simple ingredients and some creative decorating, you can whip up this eerie cake in no time. It’s an excellent way to get the kids involved in the kitchen, letting them decorate and add their own spooky touches to the final product.
Creating a Ghoulish Ghost Cake involves crafting a simple white cake base and topping it with a ghostly marshmallow fondant. The cake can be made with a classic vanilla flavor to please the crowd, while the marshmallow fondant gives it that smooth, ghostly appearance. The best part is that this cake serves 4-6 people, making it perfect for a small gathering or family event.
Here’s everything you need to make your Halloween cake come to life (or un-life!).
Ingredients (Serves 4-6):
- 1 ½ cups all-purpose flour
- 1 cup granulated sugar
- 1 ½ teaspoons baking powder
- ½ teaspoon salt
- ½ cup unsalted butter, softened
- ½ cup whole milk
- 2 large eggs
- 1 teaspoon vanilla extract
- 1 cup marshmallow fondant
- Black food coloring gel
- ½ cup powdered sugar (for dusting)
Instructions:
- Preheat and Prepare: Start by preheating your oven to 350°F (175°C). Grease and flour an 8-inch round cake pan to prevent sticking. This will guarantee your cake releases easily from the pan once baked.
- Mix Dry Ingredients: In a medium-sized bowl, combine the flour, baking powder, and salt. Whisk these dry ingredients together to guarantee even distribution of the baking powder, which will help your cake rise evenly.
- Cream Butter and Sugar: In a large mixing bowl, cream the softened butter and sugar together until light and fluffy. This should take about 2-3 minutes using an electric mixer. The creamed mixture should be pale and airy.
- Add Wet Ingredients: To the creamed butter and sugar, add the eggs one at a time, beating well after each addition. Mix in the vanilla extract. Gradually add the flour mixture, alternating with the milk, beginning and ending with the flour mixture. Mix until just combined; be careful not to overmix.
- Bake the Cake: Pour the batter into the prepared cake pan and smooth the top with a spatula. Bake in the preheated oven for 25-30 minutes or until a toothpick inserted into the center comes out clean. Let the cake cool in the pan for 10 minutes, then transfer it to a wire rack to cool completely.
- Prepare Fondant Ghosts: While the cake cools, roll out the marshmallow fondant on a surface dusted with powdered sugar to prevent sticking. Cut out ghost shapes using a ghost cookie cutter. Use the black food coloring gel to create eyes and spooky mouths on the fondant ghosts.
- Decorate the Cake: Once the cake is completely cooled, place the fondant ghosts on top and around the sides of the cake. Arrange them to look as if they’re floating or peeking over the edges.
Extra Tips:
For an added spooky effect, consider using a little cocoa powder or dark chocolate shavings to create shadows around the ghosts on the cake. This will enhance the overall ghostly appearance.
If you want to add a little extra flavor, consider incorporating a layer of raspberry or strawberry jam between the cake layers for a “bloody” surprise when the cake is cut. Remember to keep your fondant covered with plastic wrap when not in use to prevent it from drying out.
Enjoy your hauntingly delicious creation!
Witch’s Hat Cake Pops

Halloween is a time for spooky fun and sweet treats, and what better way to celebrate than with Witch’s Hat Cake Pops? These delightful confections are perfect for kids’ parties and will surely put a spell on your little ones.
With a rich cake interior coated in chocolate and topped with a whimsical hat, these cake pops are as enchanting to look at as they’re delicious to eat. Whether you’re hosting a Halloween bash or simply want to add a festive touch to your dessert table, Witch’s Hat Cake Pops are sure to be a hit.
Creating these magical treats is a fun and engaging activity that you can enjoy with your kids. The process involves shaping cake into balls, dipping them in chocolate, and adorning them with colorful candies to resemble a witch’s hat.
With a serving size of 4-6 people, this recipe is perfect for a small gathering or a family dessert. Get ready to cast a sweet spell in your kitchen with these bewitching cake pops!
Ingredients (Serves 4-6):
- 1 box of chocolate cake mix (plus ingredients needed to prepare it)
- 1 can of chocolate frosting
- 1 bag of dark chocolate melting wafers
- 1 bag of mini ice cream cones
- 1 tube of orange icing
- Candy sprinkles
- Green, purple, and orange candy melts
- Lollipop sticks
Cooking Instructions:
- Bake the Cake: Prepare the chocolate cake according to the package instructions. Allow it to cool completely before moving on to the next step.
- Crumble the Cake: Once cooled, crumble the cake into fine crumbs in a large bowl. The finer the crumbs, the smoother the cake pops will be.
- Mix with Frosting: Add about half a can of chocolate frosting to the cake crumbs. Mix thoroughly until the mixture is sticky enough to hold its shape when pressed together.
- Form the Cake Balls: Roll the mixture into small balls, approximately the size of a golf ball. Place them on a baking sheet lined with parchment paper and chill in the refrigerator for about 30 minutes.
- Prepare the Hat Cones: Melt some of the dark chocolate melting wafers in a microwave-safe bowl. Dip the rim of each mini ice cream cone into the melted chocolate and then into candy sprinkles. Set aside to harden.
- Attach the Lollipop Sticks: Melt a small amount of dark chocolate and dip the end of each lollipop stick into it. Insert the chocolate-coated end into each cake ball, then place them back on the baking sheet. Chill for another 10 minutes to secure the sticks.
- Coat the Cake Pops: Melt the remaining dark chocolate wafers in a deep bowl. Dip each cake pop into the chocolate, ensuring it’s completely covered. Allow any excess chocolate to drip off before placing it back on the parchment paper.
- Decorate with Candy Melts: Melt the green, purple, and orange candy melts in separate bowls. Use a spoon or piping bag to drizzle each color over the cake pops in a crisscross pattern, mimicking a witch’s hat.
- Add the Hat: Once the cake pops are set, place a decorated mini ice cream cone on top of each pop, securing it with a dab of melted chocolate if necessary.
- Finishing Touches: Use the orange icing to draw a band around the base of each cone to complete the witch’s hat look.
Extra Tips:
For a neater finish, make sure to chill the cake balls thoroughly before dipping them in chocolate to prevent them from falling apart.
If the chocolate coating begins to harden while you’re working, reheat it briefly in the microwave to maintain a smooth consistency.
To add a personal touch, experiment with different colors of candy melts and sprinkles to match your Halloween theme.
These Witch’s Hat Cake Pops can be stored in an airtight container in the refrigerator for up to a week, making them an ideal make-ahead treat for your Halloween festivities.
Pumpkin Patch Cake

Pumpkin Patch Cake is a delightful Halloween-themed dessert that brings the festive spirit to your table, especially for kids. This charming cake isn’t only visually appealing but also deliciously moist and rich. Designed to resemble a pumpkin patch, it’s adorned with miniature pumpkins made of fondant or marzipan, and the cake itself can be flavored with pumpkin spice, bringing a warm autumnal flavor to every bite.
Perfect for Halloween parties or a family treat, this cake is sure to be a hit with children and adults alike. The Pumpkin Patch Cake combines the comforting flavors of autumn with a fun and creative design. It’s an excellent way to get kids involved in the kitchen, as they can help with decorating the cake.
This recipe serves 4-6 people, making it ideal for small gatherings. Whether you’re an experienced baker or trying your hand at cake decorating for the first time, this cake offers a rewarding experience with its charming result.
Ingredients:
- 1 ½ cups all-purpose flour
- 1 teaspoon baking powder
- ½ teaspoon baking soda
- ¼ teaspoon salt
- 1 teaspoon ground cinnamon
- ½ teaspoon ground nutmeg
- ½ cup unsalted butter, softened
- 1 cup granulated sugar
- 2 large eggs
- 1 teaspoon vanilla extract
- ½ cup pumpkin puree
- ½ cup buttermilk
- Green food coloring
- 1 cup cream cheese frosting
- Fondant or marzipan for pumpkins
Cooking Instructions:
- Preheat and Prepare: Preheat your oven to 350°F (175°C). Grease and flour an 8-inch round cake pan to guarantee the cake doesn’t stick and is easy to remove once baked.
- Mix Dry Ingredients: In a medium bowl, whisk together the flour, baking powder, baking soda, salt, cinnamon, and nutmeg. This guarantees that all the dry ingredients are evenly distributed throughout the cake batter.
- Cream Butter and Sugar: In a large bowl, using an electric mixer, cream the softened butter and sugar until light and fluffy. This process usually takes about 3-4 minutes and helps to incorporate air into the batter, resulting in a lighter cake.
- Add Eggs and Vanilla: Beat in the eggs one at a time, making sure each egg is fully incorporated before adding the next. Stir in the vanilla extract for added flavor.
- Combine Pumpkin and Buttermilk: Mix in the pumpkin puree until well combined, followed by the buttermilk. This adds moisture and flavor, guaranteeing the cake stays tender.
- Incorporate Dry Ingredients: Gradually add the dry ingredients to the wet mixture, mixing until just combined. Be careful not to overmix, as this can make the cake dense.
- Bake the Cake: Pour the batter into the prepared cake pan. Smooth the top with a spatula and bake for 30-35 minutes, or until a toothpick inserted into the center comes out clean.
- Cool and Frost: Allow the cake to cool in the pan for about 10 minutes, then transfer it to a wire rack to cool completely. Once cooled, spread the cream cheese frosting over the top and sides of the cake.
- Decorate with Pumpkins: Tint a small amount of frosting with green food coloring to resemble grass and pipe it onto the top of the cake. Use fondant or marzipan to shape small pumpkins and place them decoratively on the cake to create a pumpkin patch effect.
Extra Tips:
When shaping the pumpkins from fondant or marzipan, use orange coloring for authenticity, and create tiny green stems for a realistic look. If you don’t have buttermilk, you can easily make a substitute by mixing ½ cup of milk with 1 tablespoon of lemon juice or vinegar and letting it sit for 5 minutes.
This cake can be made a day in advance; just be sure to store it in an airtight container to keep it fresh. Enjoy the delightful creation with your family and friends!
Eyeball Cake Surprise

If you’re looking to add a spooky yet delicious treat to your Halloween party menu, the Eyeball Cake Surprise will certainly leave kids both amazed and delighted. This cake isn’t just about the eerie look of bloodshot eyeballs staring back at the little ones; it also packs a sweet surprise with every bite! The combination of a moist, fluffy cake and creamy, gooey fillings guarantees that this dessert will be the highlight of your Halloween festivities.
Perfect for a serving size of 4-6 people, this cake is both easy to make and a real showstopper. The Eyeball Cake Surprise is designed to capture the imagination of children and make your party one they’ll remember. By incorporating various vibrant colors and textures, you can create an engaging dessert experience that matches the Halloween theme.
A spooky, vibrant treat that captivates kids and makes Halloween unforgettable.
This cake not only looks the part but also guarantees that every slice has a hidden surprise inside, making it a great interactive dessert. Let’s plunge into how you can bring this spooky treat to life!
Ingredients for 4-6 People:
- 2 cups all-purpose flour
- 1 ½ cups granulated sugar
- 1 cup unsalted butter, softened
- 4 large eggs
- 2 teaspoons vanilla extract
- 1 tablespoon baking powder
- ½ cup milk
- Red food coloring gel
- Black food coloring gel
- Green food coloring gel
- 1 cup white chocolate chips
- 1 cup cream cheese, softened
- ½ cup powdered sugar
- 12 gummy eyeballs (store-bought or homemade)
Cooking Instructions:
- Prepare the Cake Batter:
- Preheat your oven to 350°F (175°C) and grease a round cake pan.
- In a large mixing bowl, cream together the butter and granulated sugar until light and fluffy.
- Add the eggs one at a time, beating well after each addition, followed by the vanilla extract.
- In another bowl, mix the flour and baking powder. Gradually add this to the wet mixture, alternating with milk until the batter is smooth.
- Color the Batter:
- Divide the batter into three separate bowls. Add red food coloring to one, black to another, and leave the third bowl plain. Adjust the amount of food coloring until you achieve the desired shades.
- Bake the Cake:
- Pour the red batter into the prepared cake pan, followed by spoonfuls of the black batter for a marbled effect.
- Bake in the preheated oven for 25-30 minutes or until a toothpick inserted into the center comes out clean. Let it cool completely before decorating.
- Prepare the Cream Cheese Filling:
- In a medium bowl, beat together the cream cheese and powdered sugar until smooth. Fold in the white chocolate chips.
- Assemble the Eyeball Cake:
- Once the cake is cool, carefully cut out small holes on the top of the cake using a melon baller or small spoon. Fill these holes with the cream cheese mixture and gently place a gummy eyeball on top of each filled hole.
- Final Touches:
- Use green food coloring to tint any remaining cream cheese mixture, then pipe it around the edges of the cake for a ghastly effect.
Extra Tips:
For best results, make sure that the cake is completely cool before adding the filling and gummy eyeballs to prevent the cream cheese from melting. If you prefer, you can use a bundt pan to create a ring-shaped cake, which also allows for a fun presentation.
For an extra spooky twist, consider adding a few drops of red food coloring to the cream cheese filling to give it a bloodshot appearance. Remember, this cake is all about creativity, so feel free to experiment with different colors and decorations to make it your own!
Batty Brownie Cake

Get ready to spook and delight your kids this Halloween with a delicious Batty Brownie Cake! This whimsical treat combines rich, fudgy brownies with spooky bat decorations, perfect for a Halloween party or an afternoon of fun baking with the family. Not only is it delicious, but it’s also simple to create, making it an ideal project for kids to help with.
With its chocolaty goodness and playful presentation, this Batty Brownie Cake is sure to be a hit with children and adults alike.
The Batty Brownie Cake starts with a classic brownie base, ensuring a dense and moist texture that everyone will love. Once the brownies are baked and cooled, the fun begins with decorating! Let your creativity soar as you transform the brownie into a spooky bat-themed masterpiece.
Using simple ingredients like chocolate frosting and candy eyes, you can easily create bat shapes that will make your Halloween gathering extra special. This recipe serves 4-6 people, providing plenty of scrumptious portions for everyone to enjoy.
Ingredients:
- 1 cup unsalted butter, melted
- 2 cups granulated sugar
- 1 cup all-purpose flour
- 1 cup unsweetened cocoa powder
- 4 large eggs
- 1 teaspoon vanilla extract
- 1/2 teaspoon salt
- 1 cup chocolate chips (optional)
- 1 cup chocolate frosting
- Candy eyes
- Black licorice strings or pretzel sticks for bat wings
Cooking Instructions:
- Preheat the Oven: Begin by preheating your oven to 350°F (175°C). Grease a 9×13 inch baking pan or line it with parchment paper for easy removal.
- Prepare the Brownie Batter: In a large mixing bowl, combine the melted butter and granulated sugar. Stir in the eggs one at a time, mixing well after each addition. Add the vanilla extract and mix until well incorporated.
- Combine Dry Ingredients: In a separate bowl, whisk together the flour, cocoa powder, and salt. Gradually add the dry mixture into the wet ingredients, stirring until just combined. If desired, fold in chocolate chips for extra chocolaty goodness.
- Bake the Brownies: Pour the batter into the prepared baking pan, spreading it evenly with a spatula. Bake in the preheated oven for 25-30 minutes or until a toothpick inserted into the center comes out with a few moist crumbs. Allow the brownies to cool completely in the pan on a wire rack.
- Decorate the Brownie Cake: Once the brownies are cool, spread an even layer of chocolate frosting over the top. Use a knife or cookie cutter to cut the brownies into bat shapes, or simply cut into squares and decorate each piece as a bat.
- Add the Bat Features: Place candy eyes on each bat piece to bring them to life. Use black licorice strings or pretzel sticks to form bat wings, pressing them gently into the frosting to secure.
- Serve and Enjoy: Arrange the Batty Brownie Cake on a serving platter and watch as your kids’ eyes light up with delight. Serve and enjoy the spooky and delicious treat!
Extra Tips:
To make the Batty Brownie Cake even more fun, consider using edible glitter or colored sugar to create a sparkling effect on the bats. If you’re short on time, you can also use a store-bought brownie mix and frosting to speed up the process.
For a nutty twist, add some chopped nuts to the brownie batter or sprinkle them on top of the frosting. Remember to let the kids get creative with the decorations—there’s no wrong way to make a batty brownie!
Creepy Crawly Chocolate Cake

Creepy Crawly Chocolate Cake is the perfect treat to delight and spook your little ones this Halloween. This rich and decadent chocolate cake is adorned with gummy worms and chocolate cookie crumbs to mimic a spooky, earthy graveyard. The cake isn’t only a feast for the eyes but also a deliciously chocolatey indulgence that will have kids and adults alike coming back for more.
Its moist, chocolate layers are complemented by a creamy chocolate frosting, creating a scrumptious dessert that fits perfectly into the Halloween theme. This cake is easy to make and can be enjoyed by a group of 4-6 people, making it ideal for a small Halloween gathering or family dessert.
By using simple ingredients and a bit of creativity, you can create a cake that’s both fun and delicious. The Creepy Crawly Chocolate Cake is sure to be a hit at any Halloween party, bringing a touch of spooky fun to your celebrations. Now, let’s explore the ingredients and steps you’ll need to bring this creepy creation to life.
Create a spooky, fun, and delicious cake perfect for any Halloween celebration.
Ingredients (Serves 4-6)
- 1 3/4 cups all-purpose flour
- 1 1/2 cups granulated sugar
- 3/4 cup unsweetened cocoa powder
- 1 1/2 teaspoons baking powder
- 1 1/2 teaspoons baking soda
- 1 teaspoon salt
- 2 large eggs
- 1 cup whole milk
- 1/2 cup vegetable oil
- 2 teaspoons vanilla extract
- 1 cup boiling water
- 1 cup chocolate frosting
- 1 cup chocolate cookie crumbs
- 1 package gummy worms
Cooking Instructions
- Preheat the Oven: Preheat your oven to 350°F (175°C). Grease and flour two 9-inch round cake pans to prevent the cake from sticking.
- Mix Dry Ingredients: In a large mixing bowl, combine the flour, sugar, cocoa powder, baking powder, baking soda, and salt. Stir until well-mixed.
- Add Wet Ingredients: Add the eggs, milk, vegetable oil, and vanilla extract to the dry ingredients. Mix on medium speed until the batter is smooth and well-combined.
- Incorporate Boiling Water: Carefully stir in the boiling water. The batter will be thin, but this is normal. Confirm the water is fully incorporated.
- Bake the Cake: Divide the batter evenly between the prepared cake pans. Bake in the preheated oven for 30-35 minutes, or until a toothpick inserted into the center of the cakes comes out clean.
- Cool the Cakes: Allow the cakes to cool in the pans for 10 minutes, then transfer them to a wire rack to cool completely.
- Frost the Cake: Once the cakes are cool, spread a layer of chocolate frosting on top of one cake layer. Place the second layer on top and cover the entire cake with more frosting.
- Decorate with Cookie Crumbs and Gummy Worms: Sprinkle the chocolate cookie crumbs over the top of the cake to resemble dirt. Arrange gummy worms on top and around the cake to complete the creepy crawly effect.
Extra Tips
For an added spooky touch, consider using edible gel to write eerie messages on the cake, such as “RIP” or little ghostly doodles.
If you want a richer chocolate flavor, you can substitute the boiling water with freshly brewed coffee. This will enhance the chocolate taste without making the cake taste like coffee.
Remember to let the cake cool completely before frosting to avoid melting the frosting and creating a messy cake. Enjoy your Creepy Crawly Chocolate Cake with a tall glass of milk for the ultimate Halloween treat!
Black Cat Cake
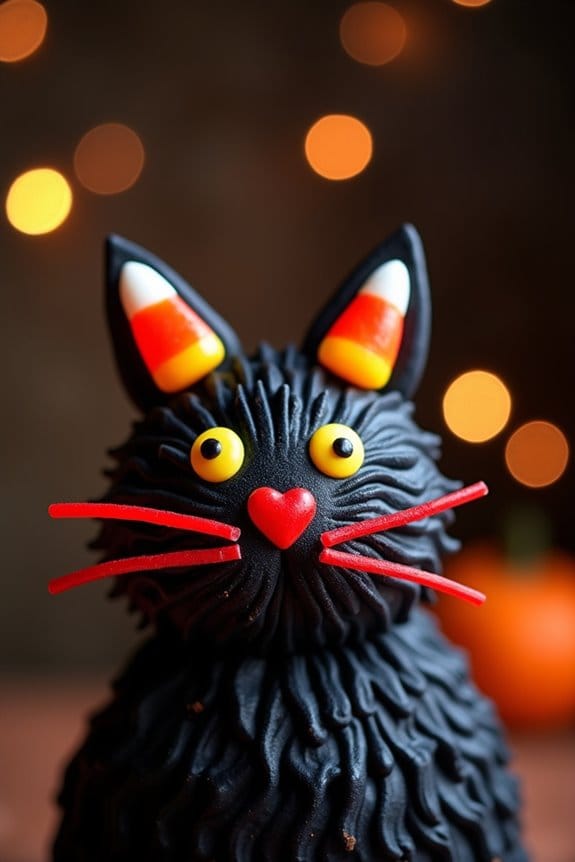
Celebrate Halloween with a delightful and spooky Black Cat Cake that will enchant kids and adults alike. This charming cake not only captivates with its whimsical appearance but also delights with its delicious taste. Perfect for Halloween parties or a fun baking activity with kids, this cake is designed to bring smiles and a touch of magic to your festive celebrations.
Its rich, chocolatey flavor combined with fun decorations makes it an ideal centerpiece for your Halloween dessert table. Creating a Black Cat Cake involves a combination of baking a moist chocolate cake and decorating it with creative elements to resemble a cute black cat. The process is simple enough to involve kids, making it an enjoyable family activity.
Prepare to indulge in a dessert that’s both visually appealing and irresistibly tasty, leaving everyone purring for more.
Ingredients (Serves 4-6 people)
- 1 ¾ cups all-purpose flour
- ¾ cup unsweetened cocoa powder
- 1 ½ teaspoons baking powder
- 1 ½ teaspoons baking soda
- 1 teaspoon salt
- 2 cups granulated sugar
- 2 large eggs
- 1 cup whole milk
- ½ cup vegetable oil
- 2 teaspoons vanilla extract
- 1 cup boiling water
- Black food coloring
- 1 ½ cups chocolate frosting
- 1 cup black fondant
- Jelly beans or candy for eyes
- Red licorice for whiskers
- Candy corn or a similar candy for ears
Instructions
- Preheat and Prepare: Preheat your oven to 350°F (175°C). Grease and flour two 9-inch round cake pans to prevent sticking and guarantee easy removal.
- Mix Dry Ingredients: In a large mixing bowl, combine the flour, cocoa powder, baking powder, baking soda, and salt. Whisk these dry ingredients together until thoroughly mixed.
- Combine Wet Ingredients: In another bowl, mix the sugar, eggs, milk, oil, and vanilla extract. Beat on medium speed until the mixture is smooth and creamy.
- Blend Together: Gradually add the wet mixture to the dry ingredients, stirring until just combined. Carefully stir in the boiling water until the batter is smooth. The batter will be thin.
- Add Color: Add black food coloring to achieve the desired shade, stirring well to guarantee even color distribution.
- Bake the Cake: Divide the batter evenly between the prepared cake pans. Bake in the preheated oven for 30-35 minutes or until a toothpick inserted into the center comes out clean. Let the cakes cool in the pans for 10 minutes, then transfer them to wire racks to cool completely.
- Frost the Cake: Once the cakes are cooled, spread a layer of chocolate frosting on top of one cake layer. Place the second layer on top. Frost the top and sides of the entire cake with the remaining chocolate frosting.
- Decorate the Cat Face: Roll out the black fondant and cut out two triangles for ears. Position the candy corn at the top for ears, jelly beans or candies for eyes, and licorice for whiskers. Use additional fondant or candy to create any additional facial features as desired.
- Final Touches: Confirm all decorations are securely placed. Refrigerate the cake for at least an hour to set the decorations before serving.
Extra Tips
To guarantee a smooth cake surface for decorating, use a crumb coat—a thin layer of frosting that seals in crumbs—before applying the final layer. If you’re working with kids, let them be creative with the decorations, using candies and edible markers.
For a deeper black color, allow the food coloring to develop in the batter for a few minutes before baking. Make sure the cakes are completely cool before frosting to avoid melting the frosting. Enjoy crafting this spooktacular treat, and have a howling good Halloween!
Haunted House Cake

Get ready to spook and delight your little goblins with a Haunted House Cake that’s not only a treat for the taste buds but also a feast for the eyes. Perfect for Halloween parties, this cake combines rich chocolatey goodness with a touch of creative flair to create an edible haunted mansion.
With layers of moist chocolate cake, creamy frosting, and eerie decorations, this cake will be the centerpiece of your Halloween festivities. The Haunted House Cake is designed to serve 4-6 people, making it an ideal size for a small gathering or a family celebration.
The key to this cake is its visual appeal, so be prepared to get creative with your spooky decorations. With a little bit of patience and imagination, you can craft a cake that’s ghostly, ghoulish, and utterly delicious!
Ingredients:
- 2 cups all-purpose flour
- 1 ¾ cups granulated sugar
- ¾ cup unsweetened cocoa powder
- 1 ½ teaspoons baking powder
- 1 ½ teaspoons baking soda
- 1 teaspoon salt
- 2 large eggs
- 1 cup whole milk
- ½ cup vegetable oil
- 2 teaspoons vanilla extract
- 1 cup boiling water
- 1 cup unsalted butter, softened
- 4 cups powdered sugar
- 1/3 cup heavy cream
- Black food coloring
- Halloween-themed candies (e.g., gummy worms, candy corn, mini marshmallows)
- Chocolate wafer cookies
- Mini chocolate chips
Cooking Instructions:
- Preheat and Prepare: Preheat your oven to 350°F (175°C). Grease and flour two 9-inch round cake pans, or line them with parchment paper to prevent sticking.
- Mix Dry Ingredients: In a large bowl, whisk together the flour, granulated sugar, cocoa powder, baking powder, baking soda, and salt until well combined. Set aside.
- Combine Wet Ingredients: In another bowl, beat the eggs, milk, vegetable oil, and vanilla extract until smooth. Gradually add the wet mixture to the dry ingredients, mixing until just combined.
- Add Boiling Water: Carefully stir in the boiling water until the batter is smooth and thin. Pour the batter into the prepared cake pans, dividing it evenly.
- Bake the Cake: Bake in the preheated oven for 30-35 minutes, or until a toothpick inserted into the center of the cakes comes out clean. Allow the cakes to cool in the pans for 10 minutes before transferring them to wire racks to cool completely.
- Prepare the Frosting: In a large bowl, beat the softened butter until creamy. Gradually add the powdered sugar, alternating with the heavy cream, until the frosting is smooth and spreadable. Add a few drops of black food coloring and mix until you achieve the desired shade.
- Assemble the Cake: Once the cakes have cooled, place one layer on a serving plate. Spread a generous amount of black frosting on top, then place the second cake layer over it. Cover the entire cake with the remaining frosting.
- Decorate Your Haunted House: Use the chocolate wafer cookies to create a roof and chimney, and mini chocolate chips as windows. Arrange Halloween-themed candies around the cake to give it a spooky atmosphere.
Gummy worms can crawl over the roof, while candy corn can line the base.
Extra Tips:
When crafting your Haunted House Cake, don’t be afraid to let your creativity shine. Consider adding a few drops of red food coloring to the frosting to create a “bloody” effect, or use shredded coconut dyed green for a grassy yard.
If you’re short on time, pre-made cake mix and frosting can be used as shortcuts. Remember, the goal is to have fun and create a cake that’s as much a visual masterpiece as it’s a tasty treat!
Frankenstein’s Monster Cake
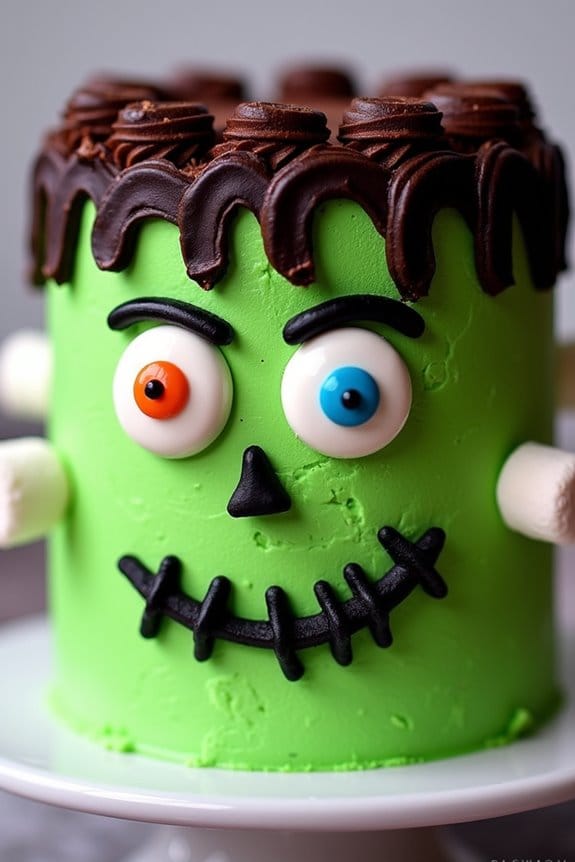
Frankenstein’s Monster Cake is a fun and spooky treat perfect for Halloween celebrations with kids. This cake is designed to look like the classic monster from Mary Shelley’s novel, complete with a green face, menacing stitches, and wild hair. It’s not only delicious but also a creative project that can involve the whole family.
With its vibrant colors and playful decorations, this cake is sure to be a hit at any Halloween party or gathering. This recipe combines simple cake-making techniques with a bit of artistry to create a memorable centerpiece for your Halloween dessert table. The cake itself is a moist and fluffy vanilla or chocolate sponge, while the decoration involves colorful frosting and a few candy accents to bring Frankenstein’s Monster to life.
This recipe serves 4-6 people, making it an ideal choice for a small party or family event.
Ingredients:
- 1 box of vanilla or chocolate cake mix
- 3 large eggs
- 1 cup of water
- 1/3 cup of vegetable oil
- 2 cups of green frosting
- Black gel food coloring
- 1 cup of chocolate frosting
- 1/2 cup of black licorice strings
- 2 large marshmallows
- 4 candy eyeballs
- Purple or black fondant for bolts
- Piping bags and tips
Cooking Instructions:
- Prepare the Cake Batter: Preheat your oven to 350°F (175°C). In a large mixing bowl, combine the cake mix, eggs, water, and vegetable oil. Mix thoroughly until you achieve a smooth batter.
- Bake the Cake: Pour the batter into a greased rectangular cake pan (9×13 inches is ideal) and smooth the top with a spatula. Bake for 25-30 minutes or until a toothpick inserted into the center comes out clean. Allow the cake to cool completely on a wire rack.
- Prepare the Frosting: While the cake is cooling, tint 2 cups of frosting with green food coloring to the desired shade of Frankenstein’s skin. Prepare a piping bag with a round tip filled with the green frosting.
- Frost the Cake: Once the cake is completely cool, remove it from the pan and place it on a serving platter. Spread a generous layer of green frosting over the entire surface of the cake.
- Decorate the Face: Use black gel food coloring or black frosting to draw Frankenstein’s stitches across the cake. Place candy eyeballs onto the cake for eyes, and use black licorice strings to create a mouth and eyebrows.
- Add Hair and Bolts: Pipe chocolate frosting along the top edge of the cake to form Frankenstein’s wild hair. Cut two pieces of fondant to resemble bolts and attach them to the sides of the cake. Stick the marshmallows onto the sides to act as part of the bolts.
- Final Touches: Add any additional decorations as desired, such as more stitches or scars, using black gel food coloring or frosting.
Extra Tips:
When decorating the Frankenstein’s Monster Cake, you can get as creative as you like. If fondant is unavailable, you can substitute the bolts with halved chocolate cookies or candy bars.
For an even more animated look, use various candy types to give Frankenstein a unique personality. Be sure to let kids assist with the decorating, as it’s a fun way to involve them in the kitchen and spark their creativity. Remember, the key to this cake isn’t perfection but having fun with the process.
Candy Corn Layer Cake
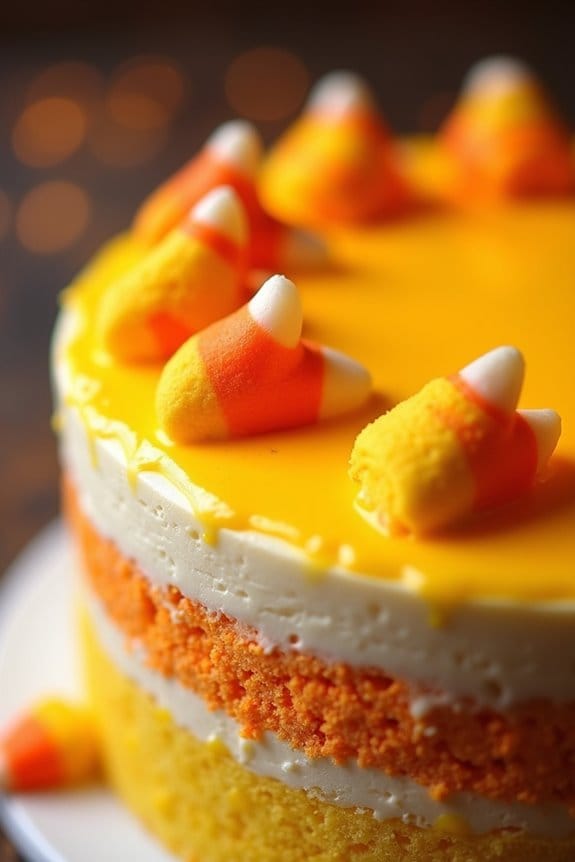
Halloween is the perfect time to let your creativity run wild in the kitchen, especially when baking treats for kids. One such delightful creation is the Candy Corn Layer Cake, inspired by the iconic Halloween candy. This cake not only tastes delicious but also visually mimics the layered colors of candy corn, making it a festive centerpiece at any Halloween celebration.
The cake consists of three layers, each dyed to match the yellow, orange, and white stripes of candy corn. Topped with a smooth, creamy frosting and garnished with actual candy corn, this cake is sure to delight kids and adults alike.
Three vibrant layers emulate candy corn’s classic hues, crowned with creamy frosting and candy corn garnishes for a festive treat.
This Candy Corn Layer Cake is designed to serve 4-6 people, making it ideal for a small Halloween gathering or family dessert. The cake layers are tender and moist, offering a subtle vanilla flavor that pairs perfectly with the sweet, buttery frosting. While it may look impressive, creating this cake is straightforward and involves basic baking techniques that even novice bakers can master with ease.
Ingredients (Serves 4-6):
- 2 1/2 cups all-purpose flour
- 2 1/2 teaspoons baking powder
- 1/2 teaspoon salt
- 1 cup unsalted butter, softened
- 2 cups granulated sugar
- 4 large eggs
- 2 teaspoons vanilla extract
- 1 cup whole milk
- Orange and yellow food coloring
- 2 1/2 cups confectioners’ sugar
- 3-4 tablespoons heavy cream
- 1 teaspoon vanilla extract (for frosting)
- Candy corn for decoration
Instructions:
- Preheat and Prepare Pans: Preheat your oven to 350°F (175°C). Grease and flour three 8-inch round cake pans to prevent sticking.
- Mix Dry Ingredients: In a medium bowl, whisk together the flour, baking powder, and salt. Set aside.
- Cream Butter and Sugar: In a large mixing bowl, beat the softened butter and granulated sugar together on medium-high speed until light and fluffy, about 3-4 minutes.
- Add Eggs and Vanilla: Beat in the eggs, one at a time, making sure each egg is fully incorporated before adding the next. Then add the vanilla extract and mix well.
- Combine Dry Ingredients and Milk: Gradually add the flour mixture to the butter mixture, alternating with the milk. Begin and end with the flour mixture, mixing just until combined.
- Divide and Color Batter: Divide the batter evenly into three separate bowls. Add a few drops of yellow food coloring to one bowl and orange food coloring to another, leaving the third bowl plain. Mix each until the color is evenly distributed.
- Bake the Layers: Pour each colored batter into the prepared cake pans, smoothing the tops. Bake for 20-25 minutes, or until a toothpick inserted in the center comes out clean. Allow the cakes to cool in the pans for 10 minutes, then transfer to a wire rack to cool completely.
- Make the Frosting: Beat the softened butter until creamy. Gradually add the confectioners’ sugar, alternating with the heavy cream. Add the vanilla extract and beat until light and fluffy. Adjust the consistency with more cream if needed.
- Assemble the Cake: Place the yellow layer on a serving plate, spread a layer of frosting on top, then place the orange layer. Repeat with frosting and finish with the white layer. Frost the top and sides of the cake with the remaining frosting.
- Decorate: Garnish the cake with candy corn around the edges or arranged in a creative pattern on top.
Extra Tips****:
When adding food coloring to the cake batter, start with a small amount and gradually increase until you achieve the desired shade. This prevents the colors from becoming too intense.
For even baking, make sure your cake layers are approximately the same thickness by using a kitchen scale to divide the batter evenly. If you’re short on time or want to simplify the process, you can use a boxed cake mix, adjusting the colors as necessary.
Finally, if you’re not serving the cake immediately, store it in the refrigerator; bring it to room temperature before serving for the best flavor and texture.
