
Halloween is just around the corner, and it’s time to get creative in the kitchen with some spooktacular charcuterie board ideas for your little monsters! Picture their faces lighting up at a spooky spider snack board or a ghostly fruit and cheese platter. These boards are not only fun but also a sneaky way to get some nutrition in. Ready to transform your kitchen into a Halloween haven with these enchanting treats? Let’s embrace the magic of the season!
Spooky Spider Snack Board
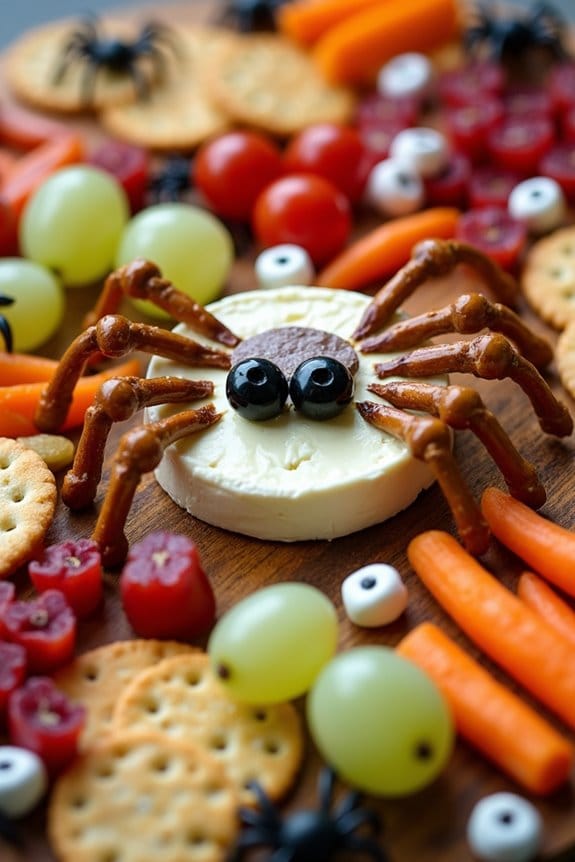
This Halloween, delight your kids with a Spooky Spider Snack Board that’s as fun to make as it’s to eat. This themed charcuterie board is packed with a variety of snacks, both sweet and savory, to satisfy every little ghoul’s taste buds. The main attraction, the spooky spider, is created using a clever combination of simple ingredients, making it a delightful centerpiece that ties the whole board together.
This board is designed to inspire creativity in both preparation and presentation, guaranteeing your Halloween gathering is a hit. Creating a Spooky Spider Snack Board for 4-6 people isn’t only a fun activity but also a great way to encourage kids to try new foods.
Whether you’re planning a Halloween party or just a festive family night in, this snack board offers a variety of flavors and textures. It’s an opportunity to mix traditional charcuterie items with Halloween-themed goodies, making it perfect for kids who might be hesitant to try new things. The balance of fruits, veggies, crackers, and sweets caters to different preferences, ensuring every child will find something they love.
Ingredients (Serves 4-6):
- 1 round wheel of Brie cheese (about 8 ounces)
- Black olives (whole and sliced)
- Pretzel sticks
- Assorted crackers
- Baby carrots
- Cherry tomatoes
- Green grapes
- Assorted gummy candies (worms, spiders)
- Chocolate chips
- Mini marshmallows
- Assorted candy eyes
- Honey or fruit spread
Instructions:
- Prepare the Spider Centerpiece: Begin by placing the Brie cheese wheel in the center of a large serving board. Create the spider’s body by using black olives to form the head on top of the Brie. Insert pretzel sticks around the Brie to mimic spider legs. Use whole black olives at the ends of the pretzel sticks to form the joints.
- Assemble the Savory Snacks: Arrange an assortment of crackers around the spider, creating a base layer on the board. Place baby carrots and cherry tomatoes in clusters around the edges to add color and texture. Use additional black olive slices to create patterns or borders around these items.
- Add the Sweet Elements: Fill in any gaps with green grapes, ensuring a balanced distribution of color across the board. Add gummy candies strategically around the board, ensuring they’re not too close to the savory items to avoid cross-flavoring.
- Create Spider Webs: Use thin lines of honey or fruit spread to draw spider webs across the board, weaving them through the different sections. This not only adds to the spooky theme but also provides a sweet dipping option for the crackers.
- Decorate with Candy Eyes and Chocolate Chips: Place candy eyes on the olives or other items to give them a spooky face. Sprinkle mini marshmallows and chocolate chips around the board for added sweetness and to fill any remaining gaps.
Extra Tips:
When creating your Spooky Spider Snack Board, consider the layout and balance of the ingredients to guarantee a visually appealing presentation. Be mindful of any dietary restrictions or allergies among your guests, and feel free to substitute ingredients to suit their needs.
Adding small bowls of dips, like hummus or yogurt, can enhance the flavor experience and provide additional options for your snackers. Remember, the key is to have fun and let your creativity shine through in the arrangement and decoration of your board.
Ghostly Fruit and Cheese Platter

Looking to create a fun and spooky treat for your kids this Halloween? A Ghostly Fruit and Cheese Platter is the perfect way to combine the festive spirit with nutritious snacks. This platter features a delightful mix of cheese, fruits, and other themed treats that not only appeal to the eyes but also to the taste buds.
Whether you’re hosting a Halloween party or just want to surprise your little ones with a themed snack, this platter is sure to be a hit.
The Ghostly Fruit and Cheese Platter is all about creativity and presentation. By using cookie cutters in ghostly shapes and incorporating a variety of vibrant fruits and cheeses, you can craft a platter that’s both visually appealing and delicious. You can even get the kids involved in the preparation process, making it an enjoyable activity for the whole family.
With just a bit of creativity, you can transform ordinary fruits and cheeses into a spooky yet healthy Halloween treat.
Ingredients (serves 4-6 people):
- 1 block of cheddar cheese
- 1 block of mozzarella cheese
- 1 small bunch of green grapes
- 1 small bunch of purple grapes
- 1 cup of strawberries
- 1 apple
- 1 pear
- 1/2 cup dried apricots
- 1/2 cup mixed nuts
- Halloween-themed cookie cutters (ghosts, bats, pumpkins)
Instructions:
- Prepare the Cheese: Start by slicing the cheddar and mozzarella cheese blocks into 1/4-inch thick pieces. Use the Halloween-themed cookie cutters to cut out ghostly shapes from the slices. Arrange these shaped cheeses on the platter.
- Prepare the Fruits: Wash the grapes, strawberries, apple, and pear thoroughly. Cut the apple and pear into thin slices. If desired, use the remaining cookie cutters to cut the fruit slices into Halloween shapes.
- Assemble the Platter: On a large serving platter, begin by placing the cheese shapes in the center. Surround them with clusters of green and purple grapes, and fan out the apple and pear slices around them. Add the strawberries in between for a pop of color.
- Add the Extras: Fill in any gaps on the platter with dried apricots and mixed nuts, scattering them evenly around the fruit and cheese. This not only adds variety but also enhances the visual appeal of the platter.
- Final Touches: For an extra spooky touch, consider adding small toy spiders or plastic eyeballs (ensure they’re clean and not meant for consumption) around the platter. This will enhance the Halloween theme and delight the kids.
Extra Tips:
To keep the apple and pear slices from browning, you can soak them in a mixture of water and lemon juice for a few minutes before arranging them on the platter. This will help maintain their fresh appearance.
Additionally, feel free to experiment with different types of cheeses and fruits based on your kids’ preferences. The key is to maintain a balance of colors and shapes to make the platter visually engaging and appealing.
Monster Mash-Up Veggie Tray
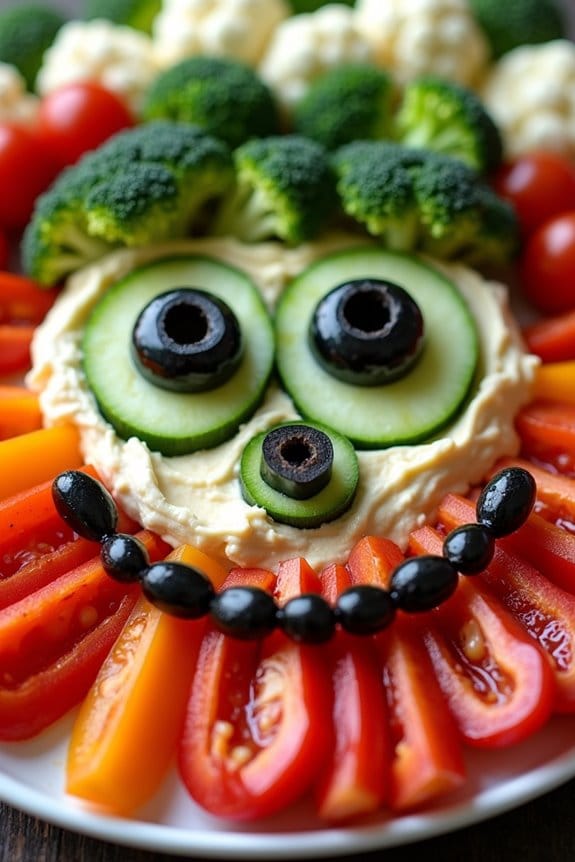
The Monster Mash-Up Veggie Tray is a fun and healthy addition to any Halloween-themed charcuterie board, perfect for kids. This colorful and creative dish features a variety of fresh vegetables arranged in a way that resembles a spooky monster face. Not only does it look exciting, but it also encourages kids to enjoy their veggies in a playful setting.
The Monster Mash-Up Veggie Tray is both easy to assemble and versatile, allowing for substitutions based on personal preference or dietary restrictions. Kids will have a blast helping to create this veggie tray masterpiece. They can contribute by arranging the vegetables into creative shapes and patterns, bringing their monster to life.
It’s a great opportunity to involve them in the kitchen, making healthy eating an interactive and enjoyable experience. This recipe is designed to cater to 4-6 people, making it an ideal choice for small gatherings or family dinners.
Ingredients for Monster Mash-Up Veggie Tray (serving size: 4-6 people):
- 1 large cucumber
- 1 red bell pepper
- 1 yellow bell pepper
- 1 cup cherry tomatoes
- 2 carrots
- 1 cup broccoli florets
- 1 cup cauliflower florets
- 4 black olives
- 1 cup hummus or ranch dressing
Cooking Instructions:
- Prepare the Vegetables: Wash all the vegetables thoroughly under cold water. Peel the carrots and slice them into thin strips. Slice the cucumber into rounds and cut the bell peppers into strips, removing the seeds and stem.
- Create the Monster Face Base: On a large platter or serving tray, spread a generous layer of hummus or ranch dressing. This will serve as the base and “glue” for your veggie monster face.
- Assemble the Face: Begin by placing the cucumber rounds in the center of the tray to form the eyes. Use two black olives as the pupils by placing them on top of the cucumber slices.
- Form the Monster’s Mouth: Use the red bell pepper strips to form a mouth shape below the eyes. Arrange them in a smile, frown, or scary expression depending on the desired look.
- Add the Hair and Features: Use the broccoli and cauliflower florets to create the monster’s hair above the eyes. Arrange the cherry tomatoes around the face to add extra details and color.
- Finish the Details: Use the carrot strips to add eyebrows, fangs, or other facial features to complete your monster’s look.
- Serve and Enjoy: Once your monster face is complete, place the tray in the center of your charcuterie board and serve with extra hummus or ranch dressing on the side for dipping.
Extra Tips:
To make the Monster Mash-Up Veggie Tray even more engaging, consider using small cookie cutters to shape the vegetables into fun and spooky forms like stars or bats. You can also add edible googly eyes to enhance the monster theme.
If you have picky eaters, allow them to choose their favorite veggies to incorporate into the design. Remember, the key is to have fun and let creativity flow as you assemble your Halloween-themed veggie tray!
Wicked Witch’s Candy Cauldron

The Wicked Witch’s Candy Cauldron is a fun and spooky treat that adds a magical touch to any Halloween-themed charcuterie board. This delightful recipe is perfect for kids and can be customized to include their favorite candies and snacks. The centerpiece of this treat is a cauldron made from chocolate, filled with a colorful variety of candies that resemble a bubbling witch’s brew.
It’s not only a feast for the taste buds but also a visual delight that will captivate young trick-or-treaters. Creating the Wicked Witch’s Candy Cauldron is simple and enjoyable, making it a fantastic activity to include the little ones in. The recipe is designed to serve 4-6 people, guaranteeing there’s plenty to go around.
By using a combination of sweet and slightly salty treats, this candy cauldron strikes a balance that keeps everyone coming back for more. Perfect for a Halloween party or a cozy family night, this dish is sure to be a hit with kids and adults alike.
Ingredients for Serving Size of 4-6 People:
- 1 large chocolate cauldron (or a small bowl if unavailable)
- 1 cup mini marshmallows
- 1 cup gummy worms
- 1 cup candy corn
- 1 cup popcorn
- 1/2 cup chocolate-covered pretzels
- 1/2 cup jelly beans
- 1/4 cup edible glitter or candy sprinkles
- Optional: small plastic spiders or Halloween-themed picks for decoration
Cooking Instructions:
- Prepare the Cauldron: If using a chocolate cauldron, verify it’s sturdy enough to hold the candies. If a chocolate cauldron isn’t available, a small bowl can be used as an alternative. Place the cauldron or bowl in the center of your serving platter or charcuterie board.
- Layering the Base: Start by adding a layer of mini marshmallows at the bottom of the cauldron. This will act as the base, giving the cauldron a fuller look and providing a soft texture contrast to the other candies.
- Add the Gummy Worms and Candy Corn: Arrange gummy worms so they drape over the sides of the cauldron, creating the appearance of them crawling out. Scatter candy corn over the marshmallows to add a pop of color.
- Fill with Popcorn and Pretzels: Add a layer of popcorn, filling the cauldron to halfway. This adds volume and a savory touch. Follow with chocolate-covered pretzels for a crunchy texture.
- Top with Jelly Beans and Glitter: Sprinkle jelly beans on top for variety and color. Finish by adding edible glitter or candy sprinkles to mimic a magical, sparkling brew.
- Decorate: Optional step – Add small plastic spiders or Halloween-themed picks to enhance the spooky theme. Guarantee these decorations are removed before eating.
Extra Tips:
When preparing the Wicked Witch’s Candy Cauldron, make sure to check for any potential allergies among the kids and opt for alternatives when necessary. Use a variety of candies to cater to different preferences, and consider incorporating some healthier snacks like dried fruits if desired.
If you can’t find a chocolate cauldron, remember that a simple bowl can work just as well with a bit of creativity. Most importantly, involve the kids in the preparation to make it an interactive and fun experience.
Vampire Bat Meat and Cheese Delights
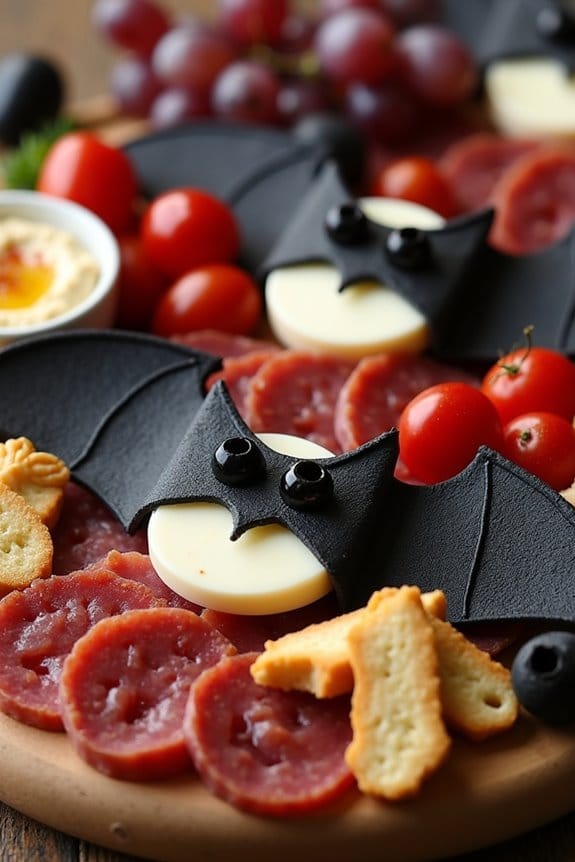
Creating a spooky yet delightful charcuterie board for Halloween can be both fun and delicious, especially for kids! The Vampire Bat Meat and Cheese Delights is a creative twist on the traditional charcuterie board. This dish combines a variety of meats, cheeses, and fruits, all arranged to resemble a gathering of vampire bats. It’s a perfect way to engage the little ones in a Halloween-themed activity while providing them with a tasty snack.
This dish is designed to serve 4-6 people, making it ideal for small gatherings or family celebrations. The key to this charcuterie board is the selection of ingredients that can be easily manipulated into shapes and forms that resemble bats and other spooky creatures. From arranging dark-colored salami to resemble bat wings to strategically placing cheese and fruits for the eyes and fangs, this dish is sure to be a hit at your Halloween event.
Ingredients for 4-6 people:
- 12 slices of dark-colored salami (e.g., soppressata or pepper salami)
- 8 ounces of cheddar cheese, cut into triangles
- 8 ounces of provolone cheese, cut into circles
- 1 cup of black olives, halved
- 1 cup of cherry tomatoes
- 1 cup of grapes (preferably red or dark-colored)
- 1 cup of mixed nuts (e.g., almonds, walnuts)
- 8-10 crackers (any choice)
- 1 cup of hummus or any dip of choice
Cooking Instructions:
- Prepare the Cheese Shapes: Start by cutting the cheddar cheese into small triangles, which will be used as the bat’s ears and wings. Cut the provolone cheese into circular shapes to create the bat’s body.
- Arrange the Meats: Lay out the slices of salami onto a large platter or wooden board. Shape them into bat wings by folding them slightly over the provolone cheese circles.
- Add the Facial Features: Use halved black olives to create the bat’s eyes on the provolone cheese circles. Place small triangles of cheddar cheese as the fangs, just below the olive eyes.
- Incorporate Fruits and Nuts: Scatter the cherry tomatoes and grapes around the platter. These will represent the vampire’s blood and add a pop of color. Add mixed nuts around the edges of the board for added texture and taste.
- Add Crackers and Dip: Place the crackers strategically around the board, and serve with a small bowl of hummus or the dip of your choice. This adds variety and makes the board more filling.
Extra Tips:
For an added Halloween effect, you can use small cookie cutters to shape the cheese into bats or other spooky shapes. If you want to add more color, consider using peppers or carrots cut into thin strips as garnish.
Additionally, you can make the platter more interactive by including small toothpicks so kids can easily pick up their desired pieces. Remember, the key to a successful charcuterie board is the balance of flavors, colors, and textures, so feel free to experiment with different ingredients that fit the Halloween theme.
Creepy Crawly Cracker Assortment

Transform your Halloween festivities with a playful and spooky Creepy Crawly Cracker Assortment. This fun and engaging recipe is perfect for kids and will certainly add a touch of whimsy to your Halloween charcuterie board. The idea is to create a delightful array of crackers topped with a variety of creepy-crawly-inspired toppings, sure to capture the imagination of your little ones.
Add a whimsical touch to Halloween with a Creepy Crawly Cracker Assortment, perfect for kids and fun festivities.
By using simple ingredients like cheese, olives, and pretzel sticks, you can design edible spiders, bugs, and other creepy critters that will have everyone smiling and snacking. This dish isn’t only appealing to the eyes but also a delicious way to introduce kids to new flavors and textures.
With a balanced mix of savory and crunchy elements, your Creepy Crawly Cracker Assortment will be a hit at your Halloween gathering. It’s easy to assemble and allows for creativity, making it an excellent activity for kids to help with. Gather your ingredients, roll up your sleeves, and get ready to craft these spooky snacks that are as fun to make as they’re to eat!
Ingredients for 4-6 servings:
- 24 assorted crackers (round and square)
- 1 cup cream cheese
- 1 cup mozzarella cheese, shredded
- 1/2 cup black olives, sliced
- 1/2 cup cherry tomatoes, halved
- 1/2 cup cucumber slices
- 24 pretzel sticks
- 1/4 cup raisins
- 1/4 cup mini pepperoni slices
- 1/4 cup fresh basil leaves
- 1/4 cup sliced almonds
Cooking Instructions:
- Prepare the Cheese Base: Spread a thin layer of cream cheese over each cracker using a butter knife. This will act as the adhesive layer for your creepy crawly toppings.
- Create Spider Bodies: Place a halved cherry tomato or a slice of black olive in the center of each cracker to form the body of the spider.
- Add Legs: Break pretzel sticks into smaller pieces and arrange them around the body to mimic spider legs. Aim for 4 pretzel pieces on each side of the body to give the appearance of eight legs.
- Assemble Caterpillars: Line up cucumber slices on a cracker to form the body of a caterpillar. Use a slice of olive or a raisin for the head. Place mini pepperoni slices along the sides for additional decoration.
- Decorate with Extras: Use raisins or sliced almonds to create eyes on your critters. For added flair, place a basil leaf under the head of the caterpillar or spider to resemble a spooky shadow or a patch of grass.
- Final Touches: Sprinkle mozzarella cheese over the entire board for a cobweb effect, enhancing the Halloween theme.
Extra Tips:
When assembling the Creepy Crawly Cracker Assortment, encourage kids to get involved by letting them design their own creatures. This activity can be both a creative outlet and a way to engage them with food preparation.
Be mindful of using small toppings like pretzel sticks and raisins, as these can pose a choking hazard for very young children. Make sure you serve the crackers soon after preparation to keep them crunchy and fresh. If you wish to prepare ahead of time, store the components separately and assemble just before serving. Enjoy your spooky creation!
Jack-o’-Lantern Pumpkin Patch Board
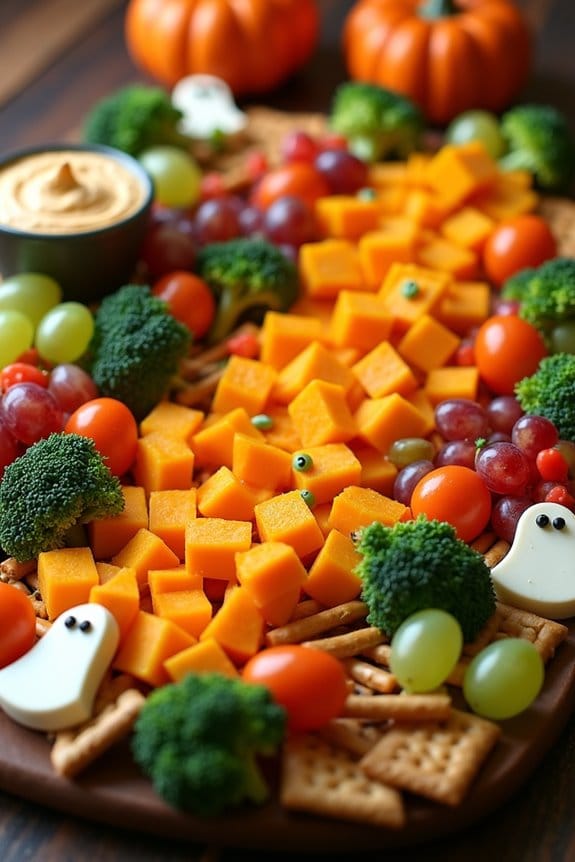
Creating a fun and festive charcuterie board for Halloween can be a delightful experience for both children and adults. The Jack-o’-Lantern Pumpkin Patch Board is an imaginative way to present a variety of snacks that resemble a pumpkin patch, complete with colorful, edible treats that mimic the fall harvest. This board is designed to capture the essence of Halloween with a balance of sweet and savory items that are guaranteed to please a crowd of 4-6 people.
Start by envisioning your pumpkin patch design and select a large, flat platter or cutting board to serve as your canvas. Gather an assortment of orange-colored foods to represent the pumpkins, such as cheese cubes, orange bell pepper slices, and mini carrots. Complement these with green items like broccoli florets and green grapes to simulate vines and leaves. Additionally, consider adding some spooky elements such as ghost-shaped crackers or edible candy eyes to enhance the Halloween theme.
Ingredients (Serves 4-6 people):
- 1 cup of cheddar cheese cubes
- 1 cup of orange bell pepper slices
- 1 cup of mini carrots
- 1 cup of broccoli florets
- 1 cup of green grapes
- 1/2 cup of ghost-shaped crackers
- 1/4 cup of edible candy eyes
- 1 cup of pretzel sticks
- 1/2 cup of hummus or ranch dip
- 1 small pumpkin for decoration
Instructions:
- Prepare the Board: Start by placing your large platter or cutting board on a flat surface. Arrange the small pumpkin in the center as a focal point to set the theme of the pumpkin patch.
- Arrange the Pumpkins: Scatter the cheddar cheese cubes, orange bell pepper slices, and mini carrots around the board to represent pumpkins. Try to distribute them evenly to create a balanced look.
- Create the Vines and Leaves: Place broccoli florets and green grapes around the ‘pumpkins’ to mimic vines and leaves. Aim for a natural, scattered look to enhance the pumpkin patch feel.
- Add Spooky Elements: Position the ghost-shaped crackers and edible candy eyes strategically around the board. This will add a playful Halloween element that kids will love.
- Include Snacks and Dips: Add pretzel sticks throughout the board for a crunchy texture. Place a small bowl of hummus or ranch dip near the edge for easy access.
- Finalize the Presentation: Step back and adjust any elements that may need repositioning. Confirm there’s a variety of colors and textures visible from all angles of the board.
Extra Tips:
When arranging your Jack-o’-Lantern Pumpkin Patch Board, consider using small bowls or ramekins for dips to keep them contained and tidy. Feel free to get creative with the spooky elements; for example, you can use cookie cutters to shape cheese slices into bats or ghosts.
If you’re serving this to younger children, be mindful of potential choking hazards with certain foods like grapes, and consider cutting them into smaller pieces. This board is highly customizable, so don’t hesitate to swap out ingredients based on dietary preferences or allergies.
Ghoulishly Good Chocolate Fondue

Ghoulishly Good Chocolate Fondue is the perfect indulgent treat to add to your Halloween charcuterie board for kids. This delightful dish combines the spooky charm of Halloween with the decadent allure of chocolate, making it an irresistible centerpiece for your festive gathering.
Whether you’re hosting a party or simply enjoying a fun family night, this fondue is sure to be a hit with both little ghouls and grown-ups alike.
To make this ghoulishly good fondue, you’ll be using a mixture of rich chocolate and heavy cream to create a smooth, luscious dip. The fondue can be paired with an assortment of dippable treats, such as marshmallows, pretzel sticks, fresh fruits, and even Halloween-themed cookies.
The combination of textures and flavors will delight the kids, while the spooky presentation adds an exciting touch to your Halloween spread.
Ingredients (Serves 4-6):
- 12 oz semisweet chocolate chips
- 1 cup heavy cream
- 1 tablespoon unsalted butter
- 1 teaspoon vanilla extract
- A pinch of salt
- Assorted dippables (marshmallows, strawberries, apple slices, pretzels, cookies)
Instructions:
- Prepare the Chocolate: Start by placing the semisweet chocolate chips in a heatproof bowl. Set aside while you prepare the cream mixture.
- Heat the Cream: In a small saucepan, combine the heavy cream and unsalted butter. Heat over medium heat until the mixture is hot but not boiling. Stir occasionally to prevent the cream from scorching.
- Combine Ingredients: Once the cream is hot, pour it over the chocolate chips. Let it sit for a minute or two to allow the chocolate to begin melting.
- Mix Until Smooth: Gently stir the mixture with a spatula or whisk until the chocolate is completely melted and the mixture is smooth and glossy. Add the vanilla extract and a pinch of salt, stirring to combine.
- Transfer to Fondue Pot: Pour the chocolate fondue into a fondue pot or a heatproof serving bowl. If using a fondue pot, keep the flame low to maintain the temperature without scorching the chocolate.
- Prepare Dippables: Arrange your chosen dippables on a platter around the fondue pot. You can use marshmallows, strawberries, apple slices, pretzels, and Halloween-themed cookies.
- Serve and Enjoy: Set out skewers or fondue forks for dipping, and let the kids (and adults) enjoy the fun of dipping their favorite treats into the chocolate fondue.
Extra Tips:
To keep your Ghoulishly Good Chocolate Fondue at the perfect consistency, make sure to keep the heat on low if using a fondue pot, or serve immediately if using a regular bowl.
If the chocolate begins to thicken, add a splash of warm cream and stir to loosen it up. For an extra spooky touch, consider using Halloween-themed skewers or fondue forks, and don’t forget to set the mood with some Halloween music or decorations around the table.
Haunted House Cookie and Dip Selection
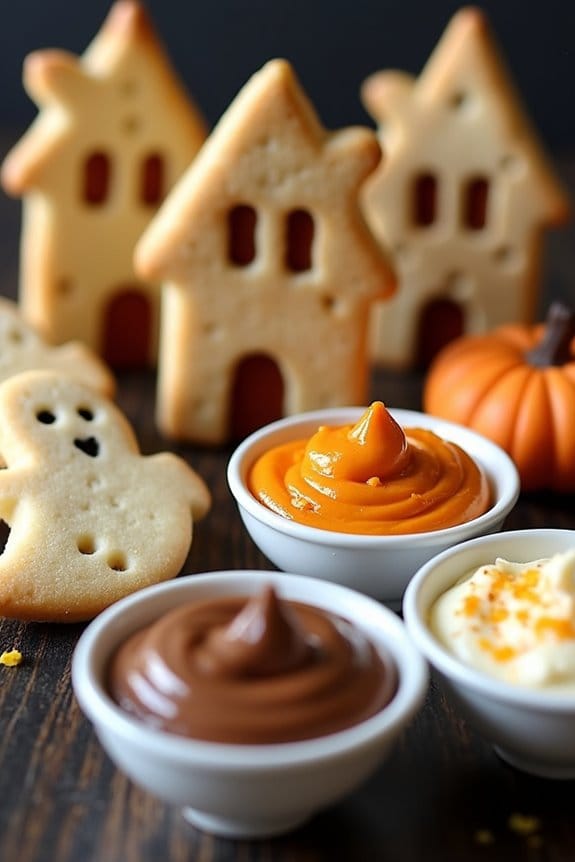
Create a spooky yet delightful treat for your Halloween charcuterie board with this Haunted House Cookie and Dip Selection. Perfect for a gathering with kids, this combination of ghostly cookies and creepy dips will definitely make your Halloween party a memorable one.
The cookies, shaped like haunted houses, ghosts, and pumpkins, are paired with a selection of sweet and savory dips that will tantalize the taste buds of everyone at the party. The dish not only looks fantastic on your Halloween spread but also offers a range of flavors that appeal to young palates.
For a serving size of 4-6 people, this recipe combines creativity with taste. The cookies are made using a classic sugar cookie recipe, allowing for easy shaping and decorating. The dips include a sweet chocolate hazelnut spread, a vibrant pumpkin spice dip, and a tangy cream cheese dip with a touch of orange zest. These dips complement the cookies perfectly, adding both visual appeal and flavor variety.
Get ready to impress your little ghosts and goblins with this fun and festive Halloween treat!
Ingredients for Haunted House Cookie and Dip Selection (Serves 4-6):
For the Cookies:
- 2 ½ cups all-purpose flour
- 1 cup unsalted butter, softened
- 1 cup granulated sugar
- 1 large egg
- 1 teaspoon vanilla extract
- ½ teaspoon baking powder
- ¼ teaspoon salt
For the Sweet Chocolate Hazelnut Dip:
– 1 cup chocolate hazelnut spread
For the Pumpkin Spice Dip:
- 1 cup pumpkin puree
- ½ cup cream cheese, softened
- ¼ cup brown sugar
- 1 teaspoon pumpkin pie spice
For the Cream Cheese Orange Zest Dip:
- 1 cup cream cheese, softened
- ¼ cup powdered sugar
- 1 tablespoon orange zest
Cooking Instructions:
1. Prepare the Cookie Dough: In a large bowl, cream together the softened butter and granulated sugar until light and fluffy. Beat in the egg and vanilla extract.
In a separate bowl, whisk together the flour, baking powder, and salt. Gradually add the dry ingredients to the wet ingredients, mixing until a dough forms. Divide the dough into two disks, wrap in plastic wrap, and chill for at least 1 hour.
2. Shape and Bake Cookies: Preheat your oven to 350°F (175°C). Roll out the chilled dough on a floured surface to about ¼ inch thickness. Use cookie cutters to cut out haunted house, ghost, and pumpkin shapes.
Place the shapes on a baking sheet lined with parchment paper. Bake for 8-10 minutes or until the edges are lightly golden. Allow them to cool completely on a wire rack.
3. Prepare the Dips:
- For the sweet chocolate hazelnut dip, simply spoon the chocolate hazelnut spread into a small serving bowl.
- For the pumpkin spice dip, beat together the pumpkin puree, softened cream cheese, brown sugar, and pumpkin pie spice until smooth and creamy. Transfer to a serving bowl.
- For the cream cheese orange zest dip, mix together the softened cream cheese, powdered sugar, and orange zest until well combined. Place in a small bowl for serving.
4. Assemble and Serve: Arrange the cooled cookies on a large platter or charcuterie board. Place the dips in separate bowls around the cookies.
Optionally, decorate the board with small Halloween-themed candies or decorative items to enhance the spooky theme.
Extra Tips:
When rolling out the cookie dough, if it becomes too sticky, dust it lightly with flour to prevent sticking to the surface or rolling pin.
For a more vibrant presentation, consider adding a few drops of food coloring to the cookie icing if you choose to decorate the cookies further. Additionally, the dips can be prepared a day in advance and stored in the refrigerator to allow the flavors to meld, making party day preparation even easier.
Remember to bring the dips to room temperature before serving to ascertain they’re easy to spread or dip into.
Mummy-Wrapped Mini Sandwiches
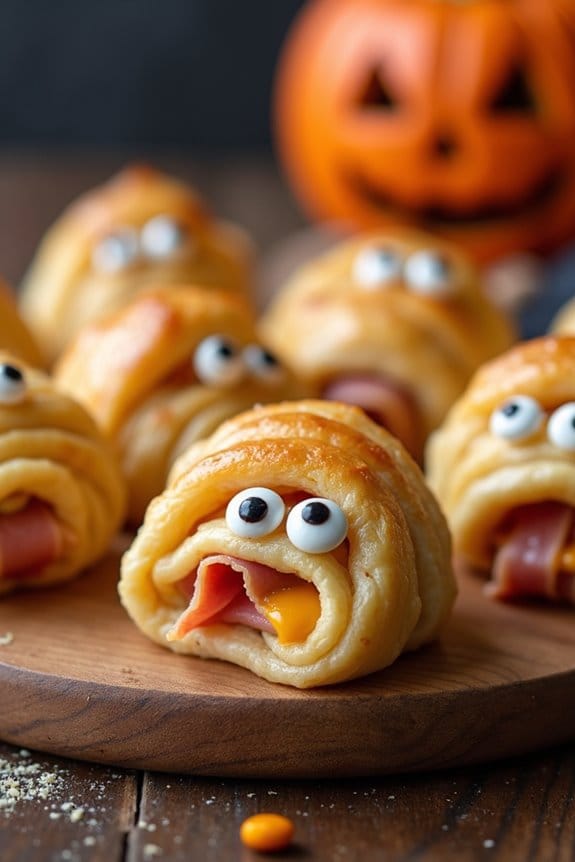
Mummy-Wrapped Mini Sandwiches are a fun and spooky addition to any Halloween charcuterie board, especially for kids. These adorable sandwiches aren’t only easy to make but also delightfully delicious. The concept is simple: mini sandwiches wrapped with strips of dough to resemble mummies, complete with little edible eyes. They make for a creative and interactive dish that kids will love to both make and eat.
The perfect spooky treat, mini sandwiches wrapped in dough look like mummies and are deliciously fun for kids!
Perfect for a serving size of 4-6 people, these mummy sandwiches can be customized with your choice of fillings, such as ham and cheese or turkey and mustard. The dough wrapping provides a nice, flaky texture that complements the savory fillings. The following recipe will guide you through creating these festive snacks, guaranteeing your Halloween spread is both fun and flavorful.
Ingredients:
- 1 can (8 oz.) refrigerated crescent roll dough
- 6 slices of ham
- 6 slices of cheese (cheddar or American)
- 2 tablespoons mustard (optional)
- 12 small edible candy eyes
- 1 egg, beaten (for egg wash)
Instructions:
- Preheat Oven: Preheat your oven to 375°F (190°C) to guarantee it’s ready for baking the mummy-wrapped sandwiches.
- Prepare Dough: Unroll the crescent roll dough on a flat surface and separate it into triangles. Use a pizza cutter or knife to cut each triangle into thin strips, approximately 1/2 inch wide.
- Assemble Sandwiches: Take a slice of ham and a slice of cheese, fold them in half, and place them together. Repeat this for each sandwich. If desired, spread a thin layer of mustard on the cheese before folding.
- Wrap Sandwiches: Wrap the ham and cheese slices with the dough strips, leaving small gaps to create a mummy effect. Leave a small opening near the top of each sandwich for the eyes.
- Add Eyes: Place two candy eyes on each sandwich, securing them in the dough’s open spaces near the top.
- Egg Wash: Brush each wrapped sandwich with beaten egg to give the dough a golden finish when baked.
- Bake: Place the mummy-wrapped sandwiches on a baking sheet lined with parchment paper. Bake for 10-12 minutes, or until the dough is golden brown and cooked through.
- Cool and Serve: Allow the sandwiches to cool slightly before serving, making them easier for little hands to handle.
Extra Tips:
To make the mummy-wrapped mini sandwiches even more appealing, consider using different colored doughs or adding a sprinkle of sesame seeds for texture.
If you want to prepare these in advance, assemble the sandwiches and refrigerate them until you’re ready to bake. Just be sure to apply the egg wash right before baking for best results.
Additionally, if you find it challenging to secure the candy eyes, a small dab of mustard or cream cheese can act as a glue to keep them in place.
These mummy sandwiches are sure to be a hit at your Halloween gathering!
Boo-tiful Breakfast Spread
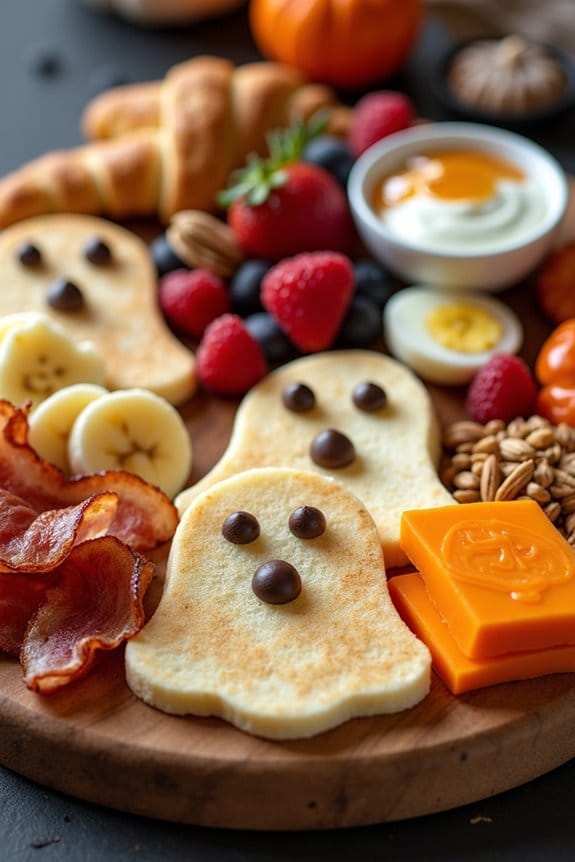
Creating a festive and fun Halloween breakfast spread is a great way to start the spooky day with excitement and creativity. A Boo-tiful Breakfast Spread features a charcuterie board filled with an assortment of kid-friendly breakfast items, cleverly arranged and decorated to capture the spirit of Halloween. This spread isn’t only delicious but also visually appealing, making it a perfect centerpiece for a Halloween morning gathering or a delightful surprise for the little ones before they head out for trick-or-treating.
This Boo-tiful Breakfast Spread blends traditional breakfast favorites with a Halloween twist. From ghost-shaped pancakes to “monster” fruit cups, each element of the charcuterie board is designed to delight and surprise. The spread offers a balanced mix of sweet and savory options, ensuring there’s something for everyone to enjoy. The recipe below is crafted for a serving size of 4-6 people and can be easily adjusted to suit larger gatherings.
Ingredients for 4-6 people:
- 12 mini pancakes (store-bought or homemade)
- 6 ghost-shaped cookie cutters
- 1 cup of mixed berries (strawberries, blueberries, raspberries)
- 2 bananas
- 1/2 cup of chocolate chips
- 6 hard-boiled eggs
- 4 strips of cooked bacon
- 1/2 cup of assorted nuts (almonds, walnuts)
- 4 mini croissants
- 4 slices of cheese (cut into Halloween shapes)
- 1/2 cup of yogurt (flavored or plain)
- 1/4 cup of honey
- 1/2 cup of granola
- Decorative Halloween candies and props (optional)
Cooking Instructions:
- Prepare the Pancakes: If you’re making homemade pancakes, prepare your pancake batter and pour small circles onto a hot griddle. Cook until bubbles form on top, then flip and cook the other side. Once cooled, use ghost-shaped cookie cutters to make ghost pancakes. Arrange them on the board.
- Assemble the Fruit Cups: Slice bananas and mix them with the berries. Place the fruit mixture into small cups or bowls. Add chocolate chips to create “monster eyes” and give them a spooky touch.
- Decorate the Eggs: Peel the hard-boiled eggs and use food coloring or edible markers to draw spooky faces on them. Place them strategically around the board.
- Arrange the Bacon and Nuts: Lay the cooked bacon strips on one section of the board, and scatter the assorted nuts for a crunchy texture variety.
- Prepare the Croissants and Cheese: Slice the mini croissants in half and arrange them on the board. Use Halloween-themed cookie cutters to cut the cheese slices into fun shapes, like pumpkins or bats, and place them alongside the croissants.
- Add the Yogurt and Granola: Place a small bowl of yogurt on the board, drizzle with honey, and sprinkle granola on top. This makes a healthy and sweet option for dipping or topping the fruit cups.
- Final Touches: Add decorative Halloween candies or props around the board for extra fun and visual appeal, and serve immediately.
Extra Tips:
Make sure to prepare as much as you can the night before, such as boiling the eggs and slicing the fruits, to save time on the morning of your event.
Use the Halloween theme to your advantage by incorporating colors like orange and black, which can be achieved with certain fruits and candies.
When arranging the board, consider placing items with different textures and colors next to each other to make the spread more visually interesting.
Finally, don’t be afraid to get creative and add your own spooky ideas to make the breakfast spread uniquely yours!
Fright Night Popcorn and Pretzel Mix
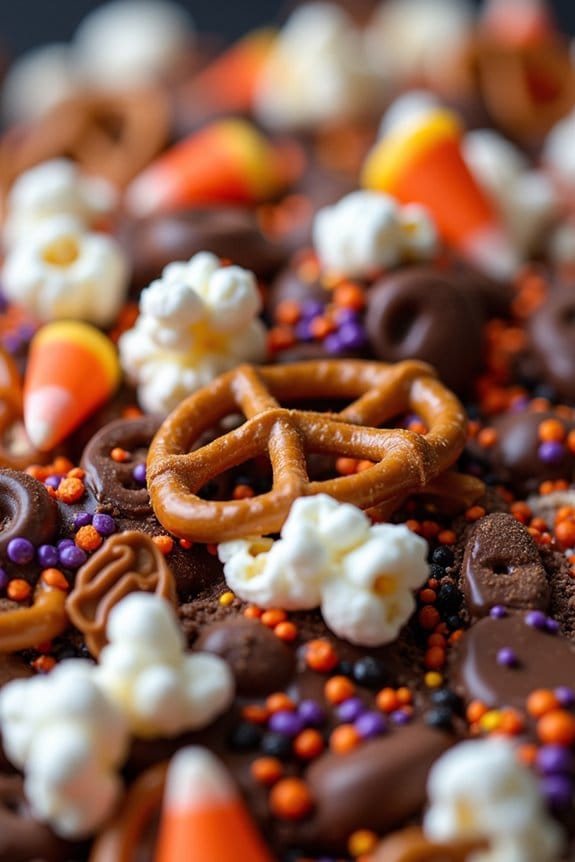
Fright Night Popcorn and Pretzel Mix is the perfect spooky snack to add to your Halloween charcuterie board for kids. This fun and festive treat combines the crunch of popcorn and pretzels with the sweetness of candy corn and chocolate, creating a delightful medley of flavors that will enchant little ghosts and goblins.
An enchanting mix of crunchy popcorn, sweet candy corn, and chocolate for little goblins.
With just a few simple ingredients and a dash of creativity, you can whip up a batch of this ghoulishly good mix that will keep the Halloween spirit thriving. Designed to serve 4-6 people, this mix is both easy to make and a hit among kids of all ages.
It provides a great balance of salty and sweet, making it an irresistible addition to any Halloween gathering. Not only is it delicious, but it’s also a breeze to put together, allowing you to spend more time enjoying the festivities and less time in the kitchen.
Whether you’re hosting a Halloween party or just looking to surprise the little ones with a special treat, this Fright Night Popcorn and Pretzel Mix is sure to become a seasonal favorite.
Ingredients (serving size: 4-6 people):
- 4 cups popped popcorn
- 2 cups mini pretzels
- 1 cup candy corn
- 1 cup chocolate candies (like M&M’s)
- 1/2 cup white chocolate chips
- 1/2 cup dark chocolate chips
- 1/4 cup Halloween-themed sprinkles
Instructions:
- Prepare the Popcorn: Begin by popping 4 cups of popcorn using your preferred method. You can use store-bought popcorn or pop your own kernels on the stovetop or in a popcorn machine. Verify there are no unpopped kernels in the mix.
- Melt the Chocolate: In a microwave-safe bowl, combine the white and dark chocolate chips. Microwave in 30-second intervals, stirring in between, until the chocolate is completely melted and smooth. Be careful not to overheat the chocolate.
- Mix the Ingredients: In a large mixing bowl, combine the popped popcorn, mini pretzels, candy corn, and chocolate candies. Gently toss them together to distribute the ingredients evenly.
- Add the Chocolate: Drizzle the melted chocolate over the popcorn and pretzel mixture. Use a spatula or spoon to gently mix until all the ingredients are lightly coated in chocolate.
- Finish with Sprinkles: Immediately after mixing in the chocolate, sprinkle the Halloween-themed sprinkles over the mix. This will add a festive touch and some extra sweetness.
- Let it Set: Spread the mixture onto a parchment-lined baking sheet in a single layer. Allow the chocolate to set at room temperature for about 30 minutes, or place in the refrigerator for a quicker set time.
- Serve: Once the chocolate is set, break the mix into clusters and serve in a large bowl or as part of your Halloween charcuterie board.
Extra Tips:
Feel free to customize this mix by adding other Halloween-themed candies or using different types of pretzels. If you’re making this mix ahead of time, store it in an airtight container to keep it fresh and crunchy.
For an added layer of flavor, consider adding a pinch of sea salt over the chocolate before it sets. This treat isn’t only visually appealing but also offers a deliciously addictive combination of flavors and textures that will have everyone reaching for more.
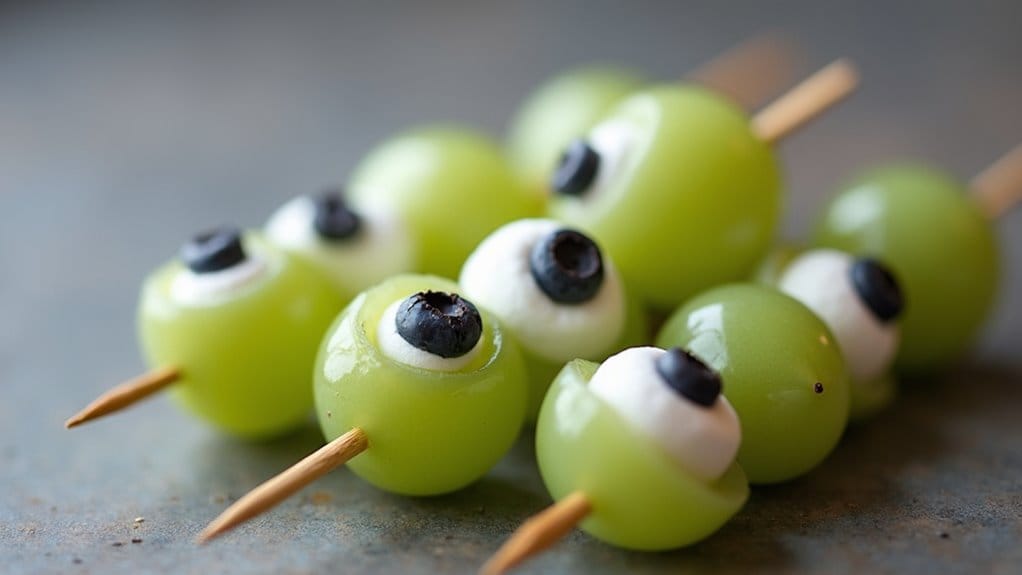
Eerie Eyeball Fruit Skewers

Get ready to spook your little ones with these fun and nutritious Eerie Eyeball Fruit Skewers, perfect for Halloween! This simple recipe won’t only delight your kids but also provide a healthy alternative to the sugar-laden treats often associated with this holiday.
You’ll only need a few ingredients and a bit of creativity to transform ordinary fruits into a creepy-crawly sensation that will look amazing on your Halloween charcuterie board.
These Eerie Eyeball Fruit Skewers are an excellent way to incorporate fresh fruit into your Halloween festivities. They’re made with juicy grapes, sweet blueberries, and revitalizing honeydew melon, all brought together with a touch of edible creativity to create the illusion of eyeballs.
The combination of flavors and textures is sure to please even the pickiest of eaters, and the fun presentation will make them a hit at any Halloween gathering.
Ingredients (serves 4-6 people):
- 24 green grapes
- 24 blueberries
- 1 small honeydew melon
- 12 wooden skewers
- 1 small lemon (for juice)
- 24 mini marshmallows
- 24 mini chocolate chips
Instructions:
- Prepare the Honeydew Melon: Begin by cutting the honeydew melon in half and removing the seeds. Use a melon baller to scoop out 24 small balls of honeydew. Set them aside in a bowl and drizzle with a bit of lemon juice to prevent browning.
- Assemble the Eyeballs: Take each honeydew ball and use a small knife to make a tiny incision. Insert a mini chocolate chip, pointed side down, into each melon ball to create the pupils of the eyeballs.
- Prepare the Grapes: Wash the grapes thoroughly and pat them dry with a paper towel. For each grape, use a knife to make a shallow cut, then gently insert a blueberry into the cut side to create an eyeball effect.
- Thread the Skewers: Start with a grape eyeball, followed by a honeydew eyeball, and then a mini marshmallow. Repeat this pattern until each skewer has 4 eyeball creations.
- Finishing Touches: Once all your skewers are assembled, arrange them creatively on your charcuterie board or a spooky serving platter.
Extra Tips:
When selecting fruits, opt for firm grapes and melon to guarantee they hold their shape on the skewers. If you find it challenging to insert the mini chocolate chips into the honeydew, you can slightly melt the base of each chip to make them stick better.
Additionally, consider using colored toothpicks or skewers to add an extra festive touch to your presentation. Keep the skewers refrigerated until serving to guarantee the fruits remain fresh and visually appealing.
Enjoy crafting this fun and ghoulish treat with your kids, making Halloween both healthy and fun!
