
Hi there, lovely readers! 🎃 As Halloween tiptoes closer, I’m thrilled to share a list of 15 indulgent desserts that promise to enchant your taste buds. Each treat, from the tantalizing dark chocolate chili tart to the luscious spiced pumpkin crème brûlée, brings a touch of elegance to the spooky season. With rich flavors and unique ingredients, these gourmet goodies are sure to make your Halloween celebration unforgettable. Ready to add a gourmet twist to your festive spread?
Dark Chocolate Chili Tarts

Dark Chocolate Chili Tarts are a sophisticated and spicy twist on the traditional tart, making them an ideal Halloween dessert for adults. These delectable desserts marry the rich, intense flavors of dark chocolate with a hint of fiery chili, creating an unexpected yet delightful taste sensation.
A sophisticated Halloween treat combining rich dark chocolate with a spicy chili kick for an unexpected taste sensation.
Perfect for a more mature Halloween gathering, these tarts offer a unique blend of flavors that will intrigue and satisfy even the most discerning palate.
These tarts aren’t only visually striking but also relatively simple to prepare. The velvety dark chocolate filling is balanced by a crisp, buttery crust, while the chili adds a warm, lingering heat that complements the sweetness perfectly. This recipe yields 4-6 tarts, making it just right for a small gathering or a special treat for yourself and loved ones.
Ingredients (serves 4-6):
- 1 1/4 cups all-purpose flour
- 1/2 cup unsalted butter, chilled and diced
- 1/4 cup granulated sugar
- 1 egg yolk
- 2 tablespoons cold water
- 1 cup heavy cream
- 8 ounces dark chocolate (70% cocoa or higher), chopped
- 1 teaspoon vanilla extract
- 1/2 teaspoon chili powder
- 1/4 teaspoon cayenne pepper
- A pinch of salt
Instructions:
1. Prepare the Tart Crust: In a bowl, mix the flour and sugar together. Add the diced butter and use a pastry cutter or your fingers to blend until the mixture resembles coarse crumbs.
Mix in the egg yolk and cold water until the dough just comes together. Form the dough into a disk, wrap in plastic wrap, and chill for at least 30 minutes.
2. Preheat and Prepare: Preheat your oven to 350°F (175°C). Roll out the chilled dough on a lightly floured surface and fit it into individual tart pans. Trim any excess dough and prick the base of the crusts with a fork to prevent puffing.
3. Bake the Crusts: Place the tart pans on a baking sheet and bake for 15-20 minutes or until golden brown. Remove from the oven and allow to cool completely.
4. Make the Chocolate Filling****: In a saucepan, heat the heavy cream over medium heat until it just begins to simmer. Remove from heat and add the chopped dark chocolate, stirring until completely melted and smooth.
Stir in the vanilla extract, chili powder, cayenne pepper, and a pinch of salt.
5. Assemble the Tarts: Pour the chocolate filling into the cooled tart shells, smoothing the tops with a spatula. Allow the tarts to set at room temperature for about 1 hour or refrigerate for 30 minutes until the filling is firm.
6. Serve: Once set, remove the tarts from the pans, slice, and serve. Optionally, garnish with a sprinkle of chili powder or a small piece of chili for decoration.
Extra Tips:
To guarantee the perfect tart crust, be sure not to overwork the dough as this can make it tough. The chocolate filling can be adjusted to taste; if you prefer a milder heat, reduce the amount of chili powder and cayenne pepper.
These tarts can be made a day in advance and stored in the refrigerator – perfect for serving at your Halloween party with minimal fuss.
Spiced Pumpkin Crème Brûlée
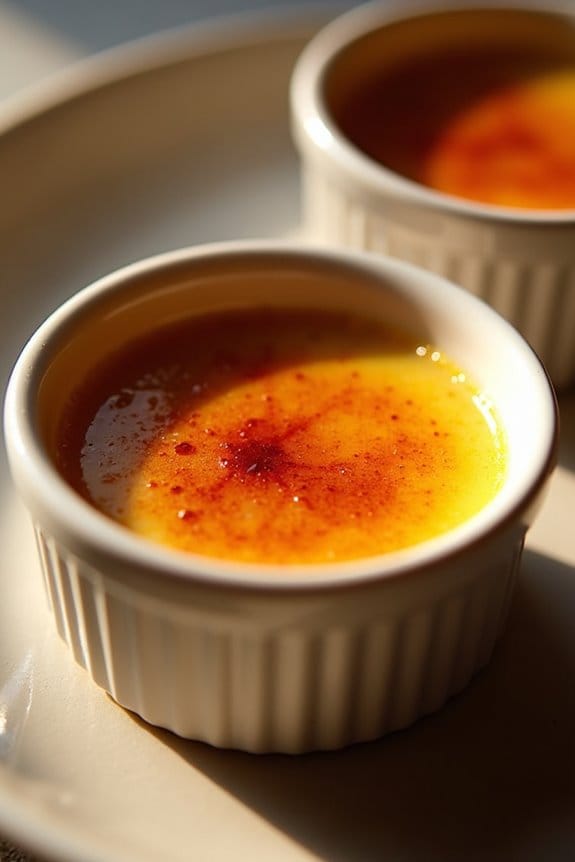
Indulge in a sophisticated Halloween treat with Spiced Pumpkin Crème Brûlée, a dessert that combines the rich, creamy texture of traditional crème brûlée with the warm, autumnal flavors of spiced pumpkin. This elegant dessert is perfect for adult gatherings, offering a refined twist on the classic pumpkin spice trend.
The luscious custard is infused with pumpkin purée and a blend of spices, while a delicate caramelized sugar topping adds a satisfying crunch. This recipe serves 4-6 people and is ideal for a cozy Halloween dinner party.
The preparation involves creating a smooth custard base, followed by a gentle baking process to achieve the perfect set without curdling. The final touch of torching the sugar topping transforms the dish into a show-stopping dessert. Whether you’re hosting or attending a gathering, this Spiced Pumpkin Crème Brûlée will impress with its balance of flavors and textures.
Ingredients for 4-6 Servings:
- 2 cups heavy cream
- 1/2 cup pumpkin purée
- 1/2 teaspoon ground cinnamon
- 1/4 teaspoon ground nutmeg
- 1/4 teaspoon ground ginger
- 1/4 teaspoon ground cloves
- 5 large egg yolks
- 1/2 cup granulated sugar, plus extra for caramelizing
- 1 teaspoon vanilla extract
- A pinch of salt
Cooking Instructions:
- Preheat the Oven: Begin by preheating your oven to 325°F (163°C). Prepare a baking dish by placing a kitchen towel at the bottom to prevent the ramekins from sliding.
- Prepare the Custard Base: In a medium saucepan, combine the heavy cream, pumpkin purée, cinnamon, nutmeg, ginger, and cloves. Heat the mixture over medium heat until it’s hot but not boiling, stirring occasionally. Remove from heat and set aside to allow the flavors to meld.
- Whisk the Egg Mixture: In a large mixing bowl, whisk together the egg yolks, 1/2 cup granulated sugar, vanilla extract, and a pinch of salt until the mixture is pale and slightly thickened.
- Combine and Temper: Slowly whisk the warm cream mixture into the egg yolk mixture, a little at a time, to temper the eggs and prevent curdling. Once combined, strain the custard through a fine-mesh sieve into a pitcher to remove any solids and guarantee a silky texture.
- Fill the Ramekins: Divide the custard evenly among 4-6 ramekins or small oven-proof dishes. Place the ramekins in the prepared baking dish.
- Create a Water Bath: Carefully pour hot water into the baking dish until it reaches halfway up the sides of the ramekins. This water bath will help cook the custards evenly and prevent cracking.
- Bake the Custard: Transfer the baking dish to the preheated oven and bake for 35-45 minutes, or until the custards are set around the edges but still slightly jiggly in the center.
- Cool and Chill: Remove the ramekins from the water bath and allow them to cool to room temperature. Cover with plastic wrap and refrigerate for at least 2 hours, or until completely chilled.
- Caramelize the Sugar: Just before serving, sprinkle a thin, even layer of granulated sugar over each custard. Use a kitchen torch to melt and caramelize the sugar until it forms a crisp, golden-brown crust.
Extra Tips:
For best results, make sure to use fresh, high-quality pumpkin purée, as it will greatly impact the flavor of the dessert. If you don’t have a kitchen torch, you can caramelize the sugar under a broiler, but be sure to watch closely to prevent burning.
When making the custard, be patient and heat the cream mixture slowly to avoid scorching. Finally, allow the caramelized sugar to cool for a minute or two before serving to guarantee it hardens properly, providing the perfect crunchy contrast to the creamy custard beneath.
Blood Orange Panna Cotta
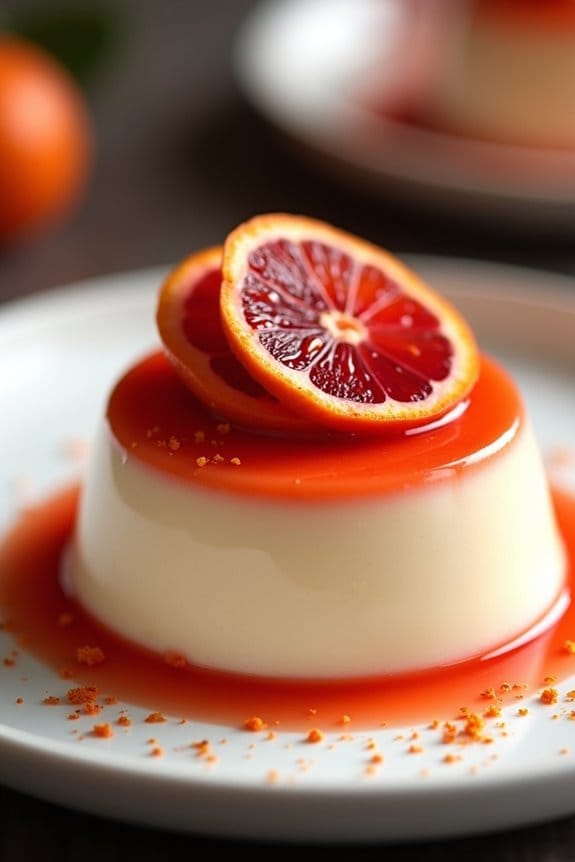
Blood Orange Panna Cotta is a sophisticated Halloween dessert that perfectly combines the spooky allure of the holiday with a touch of elegance. The vibrant, blood-orange hue is stunningly eerie, yet the dessert itself is smooth, creamy, and delightful to the palate. This dessert is ideal for adults looking to add a little sophistication to their Halloween festivities, as it balances sweetness with a subtle tartness from the blood oranges, making it a perfect end to a festive meal.
Panna cotta, which means “cooked cream” in Italian, is a traditionally simple dessert to make, requiring minimal ingredients. The addition of blood orange not only enhances the flavor but also gives the dessert a unique and festive color. This recipe serves 4-6 people, making it perfect for a small gathering or dinner party. With a few hours of chilling time, the panna cotta will be the perfect consistency to impress your guests.
Ingredients:
- 2 cups heavy cream
- 1 cup whole milk
- 1/2 cup granulated sugar
- 1 teaspoon vanilla extract
- 1 tablespoon unflavored gelatin
- 1/4 cup water
- 3/4 cup blood orange juice
- Zest of 1 blood orange
- Blood orange slices for garnish (optional)
Instructions:
- Prepare the Gelatin: In a small bowl, sprinkle the gelatin over 1/4 cup of water. Let it sit for about 5 minutes, allowing it to soften and bloom.
- Heat the Cream Mixture: In a medium saucepan, combine the heavy cream, whole milk, and sugar. Place over medium heat and stir occasionally until the sugar is fully dissolved and the mixture is heated through, but not boiling.
- Add Gelatin: Remove the saucepan from the heat and stir in the bloomed gelatin until it’s completely dissolved. This step guarantees that your panna cotta will set properly.
- Incorporate Flavors: Stir in the vanilla extract, blood orange juice, and blood orange zest into the cream mixture. Mix well until all the ingredients are fully combined.
- Strain the Mixture: To guarantee a smooth panna cotta, strain the mixture through a fine mesh sieve into a large measuring cup or a bowl with a pouring spout.
- Pour into Molds: Carefully pour the mixture into 4-6 small ramekins or molds. Allow them to cool slightly before covering with plastic wrap.
- Chill: Place the ramekins in the refrigerator for at least 4 hours, or until the panna cotta is fully set. Overnight chilling is ideal for the best texture.
- Serve: To unmold, dip the bottom of each ramekin into hot water for a few seconds, then invert onto serving plates. Garnish with blood orange slices if desired, and serve immediately.
Extra Tips:
For best results, use fresh blood orange juice as it will give the panna cotta a brighter and more authentic flavor. If you can’t find blood oranges, regular orange juice can be used, but the color and flavor will be slightly different.
Confirm that the gelatin is fully dissolved in the cream mixture to avoid any lumps. If you prefer a slightly firmer panna cotta, you can increase the gelatin by half a tablespoon.
Finally, patience is key—give the dessert plenty of time to set properly in the fridge for the creamiest texture.
Black Velvet Cupcakes

Indulge in the mysterious allure of Black Velvet Cupcakes this Halloween. These aren’t your ordinary cupcakes; they feature a rich, velvety texture and a dramatic dark hue that fits perfectly with any sophisticated adult Halloween gathering. The combination of decadent chocolate, intense black cocoa, and a hint of espresso promises a burst of flavors that will captivate your taste buds. Topped with a smooth cream cheese frosting, these cupcakes are both hauntingly beautiful and deliciously irresistible.
Perfect for a party or an intimate gathering, this recipe for Black Velvet Cupcakes yields 12 servings, allowing each guest to savor the delightful blend of flavors and textures. Whether you’re serving them as a standalone treat or as part of a dessert buffet, these cupcakes are sure to stand out. With their striking appearance and rich flavor profile, they provide an ideal balance of elegance and whimsy for an adult Halloween celebration.
Ingredients (Serves 4-6 people, yielding 12 cupcakes):
- 1 cup all-purpose flour
- 1/2 cup black cocoa powder
- 1 teaspoon baking powder
- 1/2 teaspoon baking soda
- 1/4 teaspoon salt
- 1/2 cup unsalted butter, softened
- 1 cup granulated sugar
- 2 large eggs
- 1 teaspoon vanilla extract
- 1/2 cup buttermilk
- 1 tablespoon instant espresso powder
- 1 tablespoon apple cider vinegar
- Black gel food coloring (optional)
- 1 package (8 oz) cream cheese, softened
- 1/4 cup unsalted butter, softened
- 2 cups powdered sugar
- 1 teaspoon vanilla extract
Instructions:
- Preheat and Prep: Begin by preheating your oven to 350°F (175°C). Line a 12-cup muffin tin with cupcake liners to guarantee easy removal and minimal cleanup.
- Mix Dry Ingredients: In a medium-sized bowl, sift together the all-purpose flour, black cocoa powder, baking powder, baking soda, and salt. This helps to evenly distribute the leavening agents and removes any lumps.
- Prepare Wet Ingredients: In a separate large bowl, beat together the softened butter and granulated sugar using an electric mixer on medium speed until the mixture is light and fluffy, about 3 minutes.
- Add Eggs and Flavoring: Add the eggs one at a time to the butter-sugar mixture, beating well after each addition. Stir in the vanilla extract until fully incorporated.
- Combine Ingredients: Gradually add the dry ingredients to the wet mixture in three parts, alternating with the buttermilk. Begin and end with the dry ingredients. Mix until just combined.
- Add Espresso and Vinegar: Dissolve the instant espresso powder in the apple cider vinegar, then add it to the batter. This will enhance the chocolate flavor and create a subtle complexity.
- Color the Batter: If using, add the black gel food coloring to achieve your desired shade of darkness. Fold it in gently with a spatula.
- Bake: Divide the batter evenly among the cupcake liners, filling each about two-thirds full. Bake in the preheated oven for 18-20 minutes, or until a toothpick inserted into the center comes out clean.
- Cool: Allow the cupcakes to cool in the pan for 5 minutes, then transfer them to a wire rack to cool completely.
- Make the Frosting: In a medium bowl, beat together the softened cream cheese and butter until smooth. Add the powdered sugar gradually, then mix in the vanilla extract. Beat until fluffy and well combined.
- Frost and Serve: Once the cupcakes are completely cool, use a piping bag or a knife to frost each cupcake with the cream cheese frosting. Serve and enjoy the spooky delight!
Extra Tips:
For the deepest, most intense black coloration, use a high-quality black cocoa powder and consider adding a few drops of black gel food coloring.
Be careful not to overmix the batter after adding the dry ingredients to maintain a tender crumb.
If you prefer a less sweet frosting, you can reduce the quantity of powdered sugar slightly, adjusting to taste.
Store any leftover cupcakes in an airtight container in the refrigerator for up to three days, bringing them to room temperature before serving for the best flavor and texture.
Salted Caramel Ghost Mousse

Salted Caramel Ghost Mousse is a sophisticated Halloween dessert that caters to adult palates seeking a balance of sweet and salty flavors. This dessert combines the creamy texture of mousse with the rich taste of salted caramel, creating a decadent treat that’s both elegant and playful. The ghostly appearance adds a festive touch, making it perfect for Halloween gatherings or a cozy night in with friends.
The mousse itself is light and airy, with a hint of vanilla that complements the caramel perfectly. The salted caramel sauce, drizzled over the top, adds a luscious, gooey layer that enhances the overall flavor profile. The ghostly appearance is achieved by using whipped cream to create ghost shapes on top of the mousse, adding a whimsical element to the presentation. This recipe serves 4-6 people, making it an ideal choice for a small gathering.
Ingredients:
- 1 cup granulated sugar
- 6 tablespoons unsalted butter, room temperature
- 1/2 cup heavy cream
- 1 teaspoon sea salt
- 1 cup heavy cream (for mousse)
- 1/2 teaspoon vanilla extract
- 4 ounces cream cheese, softened
- 1/4 cup powdered sugar
- 1 cup whipped cream (for ghosts)
- 1/4 cup mini chocolate chips (for eyes)
Instructions:
- Make the Salted Caramel Sauce: In a medium saucepan over medium heat, melt the granulated sugar, stirring constantly until it turns a deep amber color. Carefully add the butter, stirring until melted, then slowly pour in the 1/2 cup of heavy cream, continuing to stir. Allow the mixture to boil for about 1 minute, then remove from heat and stir in the sea salt. Set aside to cool to room temperature.
- Prepare the Mousse Base: In a large mixing bowl, beat the softened cream cheese with powdered sugar until smooth. Add the 1 cup of heavy cream and vanilla extract, then beat on medium-high speed until soft peaks form, creating a light mousse texture.
- Incorporate the Caramel: Gently fold half of the cooled salted caramel sauce into the mousse mixture, being careful not to deflate the mousse. Reserve the remaining caramel for drizzling.
- Chill and Assemble: Divide the mousse evenly into 4-6 serving glasses or bowls. Refrigerate for at least 2 hours, allowing the mousse to set.
- Create Ghost Toppings: Just before serving, use the 1 cup of whipped cream to create ghost shapes on top of each mousse serving. Use mini chocolate chips to add eyes to each ghost.
- Finish with Caramel: Drizzle the reserved salted caramel sauce over the ghost-topped mousse for an extra layer of flavor.
Extra Tips:
When making the caramel, keep a close eye on the sugar as it can burn quickly; a deep amber color is what you’re looking for. If the caramel hardens too much while cooling, gently reheat it to regain the right consistency for drizzling.
For the best presentation, serve the mousse in clear glasses to show off the layers. If you’re short on time, the mousse can be prepared a day in advance and topped with ghosts just before serving.
Espresso Martini Tiramisu
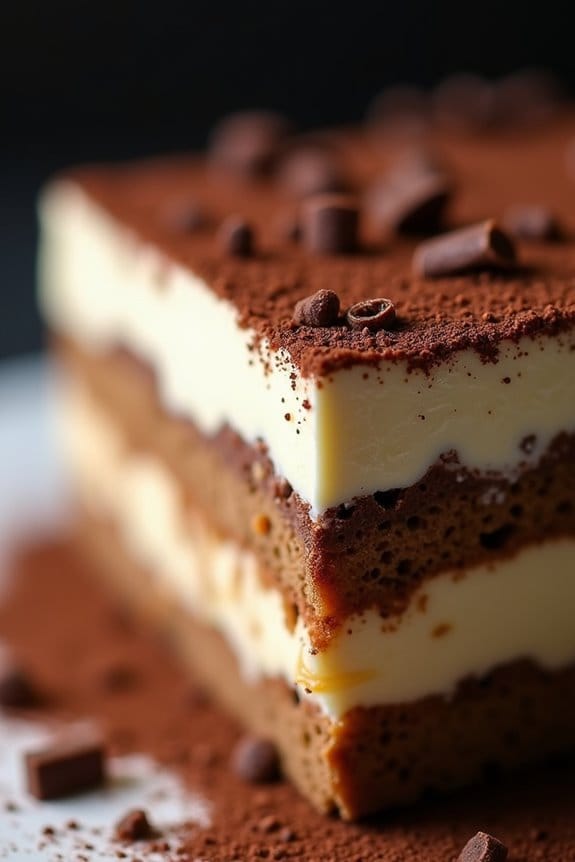
Indulge your senses this Halloween with a sophisticated twist on a classic dessert: Espresso Martini Tiramisu. This adult-oriented treat combines the beloved flavors of tiramisu with the bold, rich taste of an espresso martini, making it the perfect dessert for a spooky soirée.
Layers of coffee-soaked ladyfingers, velvety mascarpone cream, and a touch of espresso-infused liqueur come together to create an indulgent dessert that will satisfy your sweet tooth and provide a slightly boozy kick.
Perfect for a gathering of 4-6 people, this Espresso Martini Tiramisu can be served in individual cups or as one large dish for a more dramatic presentation. The combination of coffee and spirits creates a delightful balance of flavors, while the creamy texture of the mascarpone filling adds a luscious contrast to the slightly firm ladyfingers.
Whether you’re hosting a Halloween party or simply want to enjoy a grown-up dessert, this recipe is sure to impress your guests and add a touch of elegance to your celebration.
Ingredients (Serves 4-6):
- 1 cup strong brewed espresso, cooled
- 1/4 cup coffee liqueur (e.g., Kahlúa)
- 1/4 cup vodka
- 3 tablespoons granulated sugar
- 1 teaspoon vanilla extract
- 16-20 ladyfingers
- 1 cup mascarpone cheese
- 1 cup heavy cream
- 1/4 cup powdered sugar
- Cocoa powder, for dusting
- Dark chocolate shavings, for garnish
Instructions:
- Prepare the Espresso Mixture: In a shallow bowl, combine the brewed espresso, coffee liqueur, and vodka. Stir in the granulated sugar until fully dissolved, then add the vanilla extract. This mixture will be used to soak the ladyfingers.
- Whip the Cream: In a large mixing bowl, whip the heavy cream and powdered sugar together until soft peaks form. This will guarantee the cream is light and airy, providing a perfect texture for the mascarpone filling.
- Make the Mascarpone Filling: Gently fold the mascarpone cheese into the whipped cream mixture. Be careful not to overmix, as you want to maintain the lightness of the whipped cream.
- Soak the Ladyfingers: Quickly dip each ladyfinger into the espresso mixture, confirming they’re evenly soaked but not too soggy. Arrange half of them in a single layer in a serving dish or individual cups.
- Layer the Dessert: Spread half of the mascarpone mixture over the layer of soaked ladyfingers. Repeat the process with the remaining ladyfingers and mascarpone mixture to create two layers.
- Chill: Cover the dish with plastic wrap and refrigerate for at least 4 hours, or overnight if possible. This allows the flavors to meld and the dessert to set properly.
- Serve and Garnish: Before serving, dust the top with cocoa powder and sprinkle with dark chocolate shavings for an added touch of decadence.
Extra Tips: For the best results, confirm your espresso is freshly brewed and cooled before starting the recipe. This will enhance the flavor profile and confirm your ladyfingers absorb the liquid adequately.
You can also experiment with different coffee liqueurs to find the one that best suits your taste. If you’d like a stronger coffee flavor, feel free to adjust the amount of espresso or liqueur in the soaking mixture.
Finally, to achieve clean layers, be sure to level the mascarpone mixture before adding the next layer of ladyfingers. Enjoy this elegant dessert as a perfect ending to your Halloween festivities.
Boozy Bourbon Caramel Apples
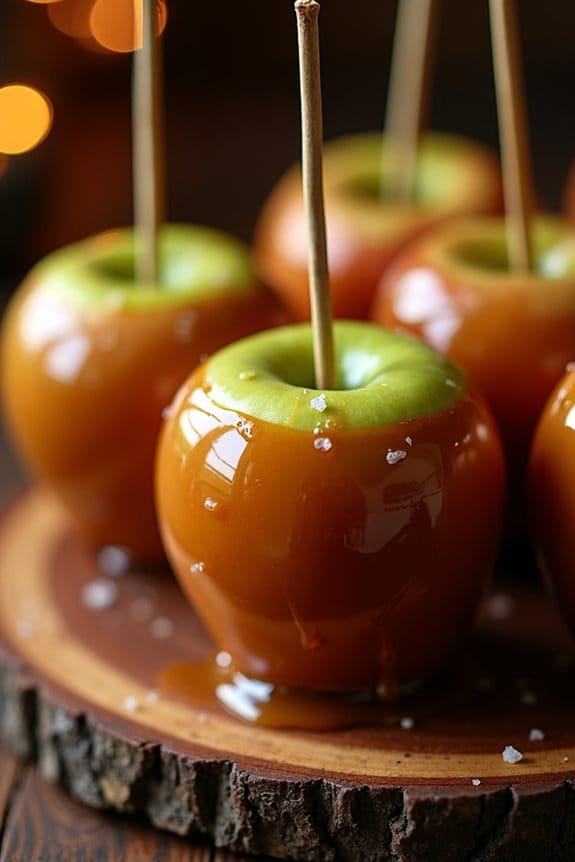
Celebrate Halloween with a grown-up twist on a classic treat by crafting Boozy Bourbon Caramel Apples. This dessert combines the nostalgic charm of caramel apples with the sophisticated flavor of bourbon, making it perfect for an adult Halloween gathering. The sweet and sticky caramel coats crisp apples, while the hint of bourbon elevates the flavor to create a decadent treat that’s bound to impress your guests.
These Boozy Bourbon Caramel Apples aren’t only delicious but also visually stunning, making them a centerpiece-worthy addition to your Halloween dessert table. The deep golden caramel, speckled with sea salt and infused with bourbon, pairs perfectly with the tartness of the apples. Serve them on a platter, and watch your friends and family savor each bite. This recipe makes enough for 4-6 people, guaranteeing everyone gets to enjoy this spooktacular delight.
Ingredients for 4-6 Servings:
- 6 medium-sized Granny Smith apples
- 1 cup brown sugar
- 1/2 cup unsalted butter
- 1/4 cup heavy cream
- 1/4 cup bourbon
- 1 teaspoon vanilla extract
- 1/4 teaspoon sea salt
- Wooden sticks or skewers
Cooking Instructions:
- Prepare the Apples: Start by washing the apples thoroughly to remove any wax coating. Dry them completely with a towel. Insert a wooden stick or skewer into the top of each apple and set them aside on a parchment-lined baking sheet.
- Make the Caramel: In a medium saucepan over medium heat, combine the brown sugar, butter, and heavy cream. Stir continuously until the mixture comes to a boil. Let it boil for 4-5 minutes, stirring occasionally to prevent burning.
- Add the Bourbon: Remove the saucepan from the heat and carefully stir in the bourbon, vanilla extract, and sea salt. Be cautious, as the mixture might bubble up when the bourbon is added. Stir until everything is well combined and smooth.
- Coat the Apples: Working quickly, dip each apple into the caramel, turning it to confirm it’s evenly coated. Allow any excess caramel to drip back into the saucepan. Place the coated apples back on the parchment-lined baking sheet. If desired, drizzle extra caramel over the top for an added touch.
- Let Them Set: Allow the caramel apples to cool and set at room temperature for about 30 minutes to an hour, or until the caramel is firm to the touch.
Extra Tips:
For best results, choose firm, tart apples like Granny Smith, as they balance the sweetness of the caramel beautifully. Confirm your apples are completely dry before coating them, as any moisture can prevent the caramel from sticking properly.
If you find the caramel hardening before you’ve coated all the apples, gently reheat it over low heat while stirring. Finally, consider rolling the freshly coated apples in chopped nuts, crushed cookies, or sprinkles for additional texture and flavor. Enjoy your Boozy Bourbon Caramel Apples responsibly!
Maple Pecan Macarons

Maple Pecan Macarons are a sophisticated treat perfect for adult Halloween gatherings. These delicate French cookies combine the rich, nutty flavor of pecans with the warm sweetness of maple syrup, creating a harmonious balance that’s both elegant and indulgent. Their crispy outer shell gives way to a chewy interior, filled with a luscious maple pecan buttercream that elevates any festive occasion.
Ideal for those who appreciate a refined dessert, these macarons are sure to impress your guests with their exquisite taste and presentation.
Crafting macarons requires precision and patience, but the effort is well worth it. Achieving the perfect macaron shell takes practice; however, with careful attention to detail, you’ll be rewarded with cookies that are both beautiful and delicious.
This recipe provides enough to serve 4-6 people, making them a perfect choice for a small gathering or as a special treat for yourself and a few friends. Whether you’re a seasoned baker or trying your hand at macarons for the first time, this recipe will guide you through each step to achieve delightful results.
Ingredients
- 200g powdered sugar
- 100g almond flour
- 50g pecan nuts, finely ground
- 120g egg whites, room temperature (about 3 large eggs)
- 30g granulated sugar
- 1/2 teaspoon cream of tartar
- 1 teaspoon maple extract
- Food coloring (optional, autumn shades like orange or brown)
- 150g unsalted butter, softened
- 100g confectioners’ sugar
- 2 tablespoons pure maple syrup
Instructions
- Prepare the Dry Ingredients: In a large mixing bowl, sift together the powdered sugar, almond flour, and finely ground pecans. This guarantees a smooth macaron shell by removing any lumps or larger pieces.
- Beat the Egg Whites: In a separate bowl, beat the egg whites with an electric mixer on medium speed until foamy. Add the cream of tartar and continue beating until soft peaks form. Gradually add the granulated sugar, one tablespoon at a time, and beat until stiff peaks form and the mixture is glossy. Add the maple extract and food coloring, if using, and mix until just combined.
- Combine Wet and Dry Ingredients: Gently fold the dry ingredients into the beaten egg whites using a spatula. Mix until the batter flows like lava, forming a thick ribbon when lifted; this is vital for the right consistency.
- Pipe the Macarons: Transfer the batter to a piping bag fitted with a round tip. Pipe small rounds (about 1 inch in diameter) onto a baking sheet lined with parchment paper. Tap the baking sheet firmly against the counter to release any air bubbles. Let the macarons sit at room temperature for 30-60 minutes to form a skin; they shouldn’t be sticky to the touch.
- Bake the Macarons: Preheat your oven to 300°F (150°C). Bake the macarons for 15-18 minutes, until they’ve risen and developed their characteristic “feet.” Remove from the oven and let cool completely on the baking sheet.
- Make the Buttercream Filling: In a medium bowl, beat the softened butter until creamy. Gradually add the confectioners’ sugar and beat until smooth. Mix in the maple syrup until fully incorporated and the buttercream is light and fluffy.
- Assemble the Macarons: Pair macaron shells of similar size. Pipe or spoon the maple pecan buttercream onto the flat side of one shell and gently sandwich with another. Repeat with the remaining macarons.
Extra Tips
When making macarons, precision is vital, so weigh your ingredients carefully. The resting time before baking is essential for forming the shell, so don’t skip this step.
If your macaron shells crack or don’t form properly, check your oven temperature and confirm your batter is the right consistency. Macarons are best eaten 24 hours after assembling, as this allows them to soften slightly and the flavors to meld.
Store them in an airtight container in the refrigerator and bring to room temperature before serving for the best taste and texture.
Red Wine Poached Pears

Halloween isn’t just for kids, and adults can indulge in the festive spirit with sophisticated desserts like Red Wine Poached Pears. This elegant dish perfectly balances the rich, deep flavors of red wine with the natural sweetness of ripe pears.
Ideal for a Halloween gathering or an intimate dinner party, these poached pears are certain to impress your guests with their vibrant color and delectable taste. The preparation involves gently simmering pears in a spiced red wine mixture until they absorb the aromatic flavors, resulting in a truly delightful treat.
Not only are Red Wine Poached Pears a visual feast, but they also offer a unique taste experience. The wine’s tannins enhance the sweetness of the fruit, while spices like cinnamon and cloves add warmth and depth, making it a fitting choice for an adult Halloween celebration.
Whether you serve them on their own, with a scoop of vanilla ice cream, or drizzled with a luscious reduction of the poaching liquid, these pears are bound to become a favorite at your autumn gatherings.
Ingredients for 4-6 servings:
- 4-6 ripe but firm pears, peeled with stems intact
- 1 bottle (750 ml) dry red wine
- 1 cup granulated sugar
- 1 cinnamon stick
- 4 whole cloves
- 1 vanilla bean, split lengthwise
- Zest of 1 orange
- 1 tablespoon lemon juice
- Optional: Vanilla ice cream or whipped cream for serving
Cooking Instructions:
- Prepare the Pears: Begin by peeling the pears, making sure to keep the stems intact for an elegant presentation. Use a melon baller or small spoon to remove the core from the bottom of the pears.
- Create the Wine Mixture: In a large saucepan, combine the red wine, sugar, cinnamon stick, cloves, vanilla bean, orange zest, and lemon juice. Stir the mixture over medium heat until the sugar is fully dissolved.
- Poach the Pears: Gently place the pears into the wine mixture, making certain they’re fully submerged. If necessary, add a little water to cover the pears. Bring the mixture to a simmer over medium heat.
- Simmer the Pears: Reduce the heat to low and let the pears simmer gently for 20-30 minutes, or until they’re tender when pierced with a fork. Rotate the pears occasionally to guarantee even coloring and flavor absorption.
- Reduce the Poaching Liquid: Once the pears are cooked, carefully remove them from the liquid and set aside. Increase the heat to medium-high and let the poaching liquid boil until it reduces to a syrupy consistency, about 10-15 minutes.
- Serve the Pears: Place each pear on a serving plate, drizzle with the reduced poaching syrup, and serve warm or at room temperature. Optionally, accompany with a scoop of vanilla ice cream or a dollop of whipped cream for added indulgence.
Extra Tips:
To elevate the flavor, consider experimenting with different wine varieties like Merlot or Pinot Noir for a nuanced taste. If your pears are particularly ripe, reduce the poaching time to prevent them from becoming too soft.
For a touch of festive flair, garnish with a sprinkle of chopped nuts or a cinnamon stick on the side. Remember, the longer the pears sit in the poaching liquid, the more vibrant their color will become, so feel free to make this dish a day ahead for an even more stunning presentation.
Licorice and Lavender Truffles

Halloween isn’t just for kids, and neither are these sophisticated Licorice and Lavender Truffles. A perfect treat for an adult Halloween party, these truffles are a delightful fusion of flavors that dance between the sweet, floral notes of lavender and the bold, anise-like taste of licorice. The result is a decadent dessert that’s both mysterious and enchanting, much like Halloween itself.
These truffles are bound to be a hit with your guests, providing a unique twist on traditional chocolate truffles. Making these truffles is a rewarding process, allowing you to craft something truly special with your own hands. The licorice flavor is introduced through anise extract, and the lavender provides an aromatic touch that balances the richness of the chocolate.
Rolled in cocoa powder, these truffles have a smooth, melt-in-your-mouth quality that makes them irresistible. This recipe serves 4-6 people, making it an ideal choice for an intimate gathering or a cozy night in with friends.
Ingredients:
- 1 cup heavy cream
- 1 tablespoon dried culinary lavender
- 8 ounces dark chocolate, finely chopped
- 2 tablespoons unsalted butter, softened
- 1/2 teaspoon anise extract
- 1/4 cup cocoa powder, for rolling
Instructions:
- Infuse the Cream: In a small saucepan, heat the heavy cream over medium heat until it just begins to simmer. Remove from heat and stir in the dried lavender. Cover and let it steep for about 15 minutes to extract the lavender flavor.
- Strain the Cream: After steeping, strain the cream through a fine-mesh sieve into a bowl to remove the lavender pieces. Return the strained cream to the saucepan and reheat gently until it simmers.
- Melt the Chocolate: Place the finely chopped dark chocolate in a heatproof bowl. Pour the hot cream over the chocolate and let it sit for a minute to soften the chocolate.
- Combine Ingredients: Stir the chocolate and cream mixture until smooth and fully combined. Add the softened butter and anise extract, stirring until the butter is melted and the mixture is smooth.
- Chill the Mixture: Cover the bowl with plastic wrap and refrigerate for about 2 hours, or until the mixture is firm enough to shape.
- Shape the Truffles: Using a melon baller or a teaspoon, scoop portions of the chocolate mixture and roll them into balls with your hands. Work quickly, as the chocolate can melt from the warmth of your hands.
- Coat the Truffles: Roll each truffle in cocoa powder to coat evenly. This gives them a classic truffle appearance and adds a hint of bitterness that complements the sweetness of the chocolate.
- Serve and Enjoy: Arrange the finished truffles on a serving platter and enjoy immediately or store them in an airtight container in the refrigerator until ready to serve.
Extra Tips:
For an even more intense licorice flavor, you can increase the amount of anise extract slightly, but be cautious as it can easily overpower the other flavors.
If you prefer a smoother texture, consider using a fine-mesh sieve to guarantee there are no small pieces of lavender left in the cream. Additionally, when shaping the truffles, having slightly damp hands can prevent the chocolate from sticking too much.
If you find the mixture becoming too soft to work with, return it to the refrigerator for a short time to firm up again. Enjoy these truffles with a glass of red wine or a dark stout for a perfect pairing.
Spooky Saffron Rice Pudding

Delight your Halloween guests with a sophisticated twist on a classic dessert by serving Spooky Saffron Rice Pudding. This enchanting dish combines the aromatic allure of saffron with the creamy texture of rice pudding, creating a hauntingly delicious treat that’s perfect for adult palates.
The addition of spooky garnishes transforms this beloved comfort food into a festive Halloween delight, ensuring it’s a hit at your autumnal gathering. The deep golden hue of saffron-infused rice pudding not only appeals to the eyes but also tantalizes the taste buds with its rich, floral flavor.
Combined with the creaminess of milk and a hint of sweetness, this dessert is both indulgent and unique. Whether you serve it warm or cold, Spooky Saffron Rice Pudding is an elegant finale to any Halloween celebration. With a few simple ingredients and a bit of culinary magic, you can create a dish that’s sure to impress.
Ingredients for 4-6 servings:
- 1 cup basmati rice
- 4 cups whole milk
- 1 cup sugar
- 1/2 teaspoon saffron threads
- 1/4 cup warm water
- 1 teaspoon vanilla extract
- 1/4 teaspoon ground cardamom
- 1/4 cup slivered almonds
- 1/4 cup raisins
- Black food coloring (optional)
- Edible glitter or spooky decorations (optional)
Cooking Instructions:
- Prepare the Saffron Mixture: Begin by soaking the saffron threads in 1/4 cup of warm water for about 10 minutes. This step allows the saffron to release its color and flavor, which will infuse the rice pudding with a rich, golden hue.
- Cook the Rice: In a large, heavy-bottomed saucepan, add the basmati rice and 4 cups of whole milk. Bring the mixture to a gentle boil over medium heat, stirring occasionally to prevent the rice from sticking to the bottom.
- Sweeten the Mixture: Once the rice is cooked and the mixture has thickened slightly, add the sugar, saffron mixture, vanilla extract, and ground cardamom. Stir well to combine all the ingredients, ensuring the sugar dissolves completely.
- Simmer the Pudding: Reduce the heat to low and let the pudding simmer for approximately 20-25 minutes, stirring frequently. This allows the flavors to meld together and the pudding to achieve a creamy consistency.
- Add Garnishes: Stir in the slivered almonds and raisins, saving a few for garnish. For a spooky touch, you can add a drop or two of black food coloring to create a ghostly effect. Stir until evenly distributed.
- Serve and Decorate: Spoon the Spooky Saffron Rice Pudding into serving dishes. Garnish with remaining almonds and raisins, and for an extra eerie touch, sprinkle with edible glitter or themed decorations. Serve warm or chill in the refrigerator for a couple of hours if you prefer it cold.
Extra Tips:
When cooking the rice pudding, be patient and stir frequently to prevent it from scorching at the bottom of the pan. If you prefer a thinner consistency, you can add a little more milk while cooking.
Adjust the sweetness to your taste by adding more or less sugar. If you choose to use food coloring, use it sparingly to maintain the saffron’s natural color and flavor.
And remember, garnishes can be as fun and creative as you like, so let your imagination run wild for a truly spooky presentation!
Hazelnut and Nutmeg Madeleines

Elevate your Halloween dessert table with these sophisticated Hazelnut and Nutmeg Madeleines. These delightful French pastries are given a seasonal twist with the warm, aromatic inclusion of nutmeg, perfectly complementing the nutty richness of hazelnut.
While traditionally a simple tea-time treat, these madeleines are dressed up for an adult Halloween gathering, offering a refined yet festive option that pairs beautifully with a glass of wine or a hot cup of spiced tea.
These madeleines aren’t only delicious but also visually appealing, with their signature shell-like shape. The batter is infused with finely ground hazelnuts and a hint of nutmeg, creating a delicate balance of flavors that’s both comforting and sophisticated.
Delight in the elegance of shell-shaped madeleines infused with rich hazelnuts and aromatic nutmeg.
Baked to a golden perfection, these treats are best enjoyed fresh from the oven when they’re still slightly warm and soft, with a gentle dusting of powdered sugar to add a touch of elegance.
Ingredients (Serves 4-6):
- 1/2 cup unsalted butter, melted and cooled
- 3/4 cup all-purpose flour
- 1/2 cup granulated sugar
- 1/2 cup finely ground hazelnuts
- 1 teaspoon baking powder
- 1/4 teaspoon salt
- 1/2 teaspoon ground nutmeg
- 3 large eggs
- 1 teaspoon vanilla extract
- Powdered sugar, for dusting
Instructions:
1. Preheat and Prepare:
Preheat your oven to 375°F (190°C). Generously butter and lightly flour a madeleine pan to prevent sticking.
2. Mix Dry Ingredients:
In a medium bowl, whisk together the all-purpose flour, finely ground hazelnuts, baking powder, salt, and ground nutmeg. Set aside.
3. Beat Eggs and Sugar:
In a large mixing bowl, beat the eggs and granulated sugar together using an electric mixer on high speed until the mixture is thick, pale, and has doubled in volume—this should take about 5 minutes.
4. Fold in Vanilla and Dry Ingredients:
Gently fold in the vanilla extract, followed by the flour mixture, using a spatula. Confirm that you fold carefully to maintain the airy texture of the batter.
5. Add Melted Butter:
Gradually pour the melted butter into the batter, folding it in until just combined. Be cautious not to overmix.
6. Chill the Batter:
Cover the bowl with plastic wrap and refrigerate the batter for at least 30 minutes or up to an hour. This step helps in achieving the classic hump of madeleines.
7. Fill the Molds:
Spoon the batter into the prepared madeleine molds, filling each shell about 3/4 full. This will allow room for the batter to rise without spilling over.
8. Bake:
Bake for 10-12 minutes, or until the edges are golden brown and the centers spring back when lightly touched.
9. Cool and Dust:
Remove from the oven and let the madeleines cool in the pan for a few minutes before transferring them to a wire rack. Dust with powdered sugar before serving.
Extra Tips:
To intensify the hazelnut flavor, consider toasting the hazelnuts before grinding them; this adds a deeper, roasted richness to the madeleines.
When serving, pair these madeleines with a complementary dip or sauce, such as a spiced chocolate ganache or a creamy hazelnut spread, for an extra layer of indulgence.
Gothic Black Forest Gateau
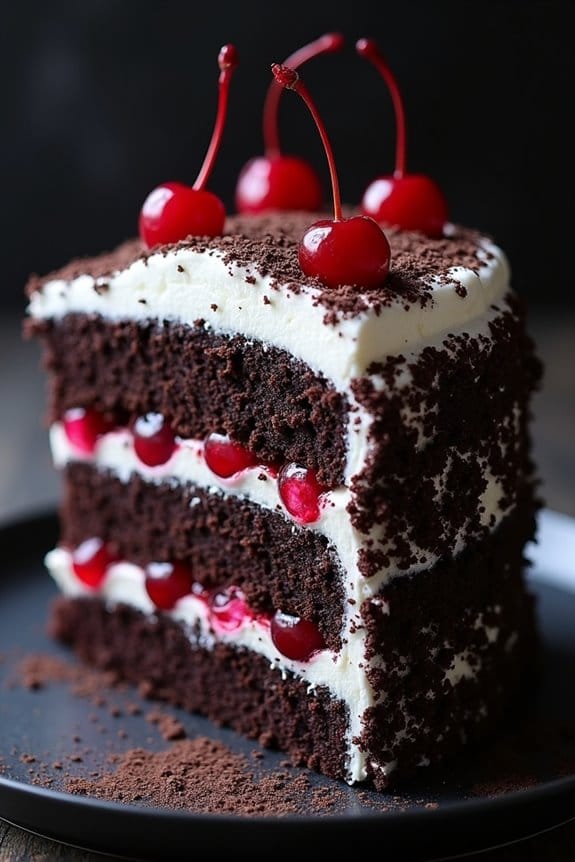
Indulge in the dark allure of a Gothic Black Forest Gateau, a refined twist on the classic dessert that’s perfect for an adult Halloween soirée. This decadent cake combines rich layers of chocolate sponge, luscious cherries, and a hint of Kirsch, all cloaked in an elegant black hue.
The intense flavors and dramatic presentation make it an irresistible treat that adds a touch of sophistication to your Halloween dessert table. With its intricate textures and flavors, this cake is sure to captivate your guests and become the highlight of your spooky celebration.
This recipe serves 4-6 people and requires attention to detail to achieve the perfect balance of flavors and aesthetics. The key is to use high-quality ingredients and take your time with each step, ensuring that every layer is moist and flavorful. By incorporating activated charcoal, you can achieve the striking gothic appearance without altering the taste of the traditional Black Forest Gateau.
Ingredients:
- 1 cup all-purpose flour
- 1/2 cup unsweetened cocoa powder
- 1 teaspoon baking powder
- 1/2 teaspoon baking soda
- 1/4 teaspoon salt
- 1/2 cup unsalted butter, softened
- 1 cup granulated sugar
- 2 large eggs
- 1 teaspoon vanilla extract
- 1/2 cup buttermilk
- 2 tablespoons activated charcoal (food grade)
- 1 cup pitted cherries, fresh or canned
- 2 tablespoons Kirsch (cherry brandy)
- 2 cups heavy cream
- 1/4 cup powdered sugar
- 1/2 cup dark chocolate shavings
Instructions:
- Prepare the Oven and Pans: Preheat your oven to 350°F (175°C). Grease and line two 8-inch round cake pans with parchment paper.
- Mix Dry Ingredients: In a medium bowl, whisk together the flour, cocoa powder, baking powder, baking soda, salt, and activated charcoal. Set aside.
- Cream Butter and Sugar: In a large bowl, use an electric mixer to cream the softened butter and granulated sugar until light and fluffy, about 3-4 minutes.
- Add Eggs and Vanilla: Beat in the eggs one at a time, ensuring each is fully incorporated before adding the next. Mix in the vanilla extract.
- Combine Wet and Dry Mixtures: Gradually add the dry ingredients to the wet mixture, alternating with buttermilk, beginning and ending with the dry ingredients. Mix until just combined, being careful not to overmix.
- Bake the Cakes: Divide the batter evenly between the prepared cake pans. Bake in the preheated oven for 25-30 minutes, or until a toothpick inserted into the center comes out clean. Allow the cakes to cool in the pans for 10 minutes, then transfer to a wire rack to cool completely.
- Prepare the Cherries: If using canned cherries, drain them and reserve the juice. If using fresh, pit them and toss with Kirsch. Allow them to soak for at least 30 minutes.
- Whip the Cream: In a chilled bowl, beat the heavy cream and powdered sugar until soft peaks form.
- Assemble the Cake: Place one cake layer on a serving plate. Spread a layer of whipped cream and top with half of the cherries. Place the second cake layer on top and cover the entire cake with whipped cream. Decorate with remaining cherries and dark chocolate shavings.
- Chill and Serve: Refrigerate the cake for at least 1 hour before serving to allow the flavors to meld together.
Extra Tips:
For the best flavor, prepare the cake a day in advance to allow the flavors to intensify. If you can’t find food-grade activated charcoal, you can substitute with a small amount of black food coloring to achieve the desired gothic appearance.
Always taste the cherries and adjust the amount of Kirsch according to your preference, as some cherries may be sweeter than others. When whipping the cream, make sure your bowl and beaters are cold to achieve the perfect consistency.
Chai-Spiced Apple Galette

Chai-Spiced Apple Galette is the perfect dessert for adults looking to indulge in a sophisticated Halloween treat. This rustic pastry combines the comforting flavors of chai spices with the natural sweetness of apples, creating a delightful harmony of taste and texture. The flaky, buttery crust envelops a spiced apple filling, making it a crowd-pleaser at any Halloween gathering.
With its beautiful presentation and complex flavors, this galette is certain to impress your guests. What sets this dessert apart is its balance of warm and aromatic spices such as cinnamon, cardamom, and ginger, which complement the tartness of the apples. The addition of chai spices elevates the traditional apple galette into an adult-friendly treat, perfect for serving at a sophisticated Halloween party.
This recipe serves 4-6 people, making it ideal for intimate gatherings or small dinner parties.
Ingredients:
- 1 1/4 cups all-purpose flour
- 1/2 teaspoon salt
- 1 tablespoon granulated sugar
- 1/2 cup unsalted butter, cold and cut into cubes
- 3 to 4 tablespoons ice water
- 4 medium apples, peeled, cored, and sliced
- 1/4 cup brown sugar
- 1 teaspoon ground cinnamon
- 1/2 teaspoon ground cardamom
- 1/2 teaspoon ground ginger
- 1/4 teaspoon ground cloves
- 1/4 teaspoon ground nutmeg
- 1 teaspoon vanilla extract
- 1 tablespoon lemon juice
- 1 tablespoon cornstarch
- 1 egg, beaten (for egg wash)
- Turbinado sugar (optional, for sprinkling)
Instructions:
1. Prepare the Dough: In a large bowl, combine the flour, salt, and granulated sugar. Add the cold, cubed butter and use a pastry cutter or your fingers to blend until the mixture resembles coarse crumbs.
Add the ice water, one tablespoon at a time, mixing just until the dough comes together. Form the dough into a disc, wrap it in plastic wrap, and refrigerate for at least 30 minutes.
2. Make the Filling: In a separate bowl, toss the sliced apples with brown sugar, cinnamon, cardamom, ginger, cloves, nutmeg, vanilla extract, lemon juice, and cornstarch. Confirm the apples are evenly coated with the spices.
3. Roll Out the Dough: Preheat the oven to 375°F (190°C). On a lightly floured surface, roll out the chilled dough into a 12-inch circle. Transfer the dough to a parchment-lined baking sheet.
4. Assemble the Galette: Arrange the spiced apple slices in the center of the dough, leaving a 2-inch border. Fold the edges of the dough over the apples, pleating as you go to create a rustic edge.
Brush the dough with the beaten egg and sprinkle with turbinado sugar if desired.
5. Bake the Galette: Place the galette in the preheated oven and bake for 35-40 minutes, or until the crust is golden brown and the apples are tender. Allow the galette to cool slightly before serving.
Extra Tips:
For the best results, use a mixture of apple varieties, such as Granny Smith and Honeycrisp, to achieve a balanced sweet-tart flavor. If you prefer a more robust chai flavor, you can adjust the spice quantities according to your taste.
Additionally, if the edges of the galette start to brown too quickly, cover them with aluminum foil to prevent over-browning. Serve the galette warm with a scoop of vanilla ice cream or a dollop of whipped cream for an extra indulgent treat.
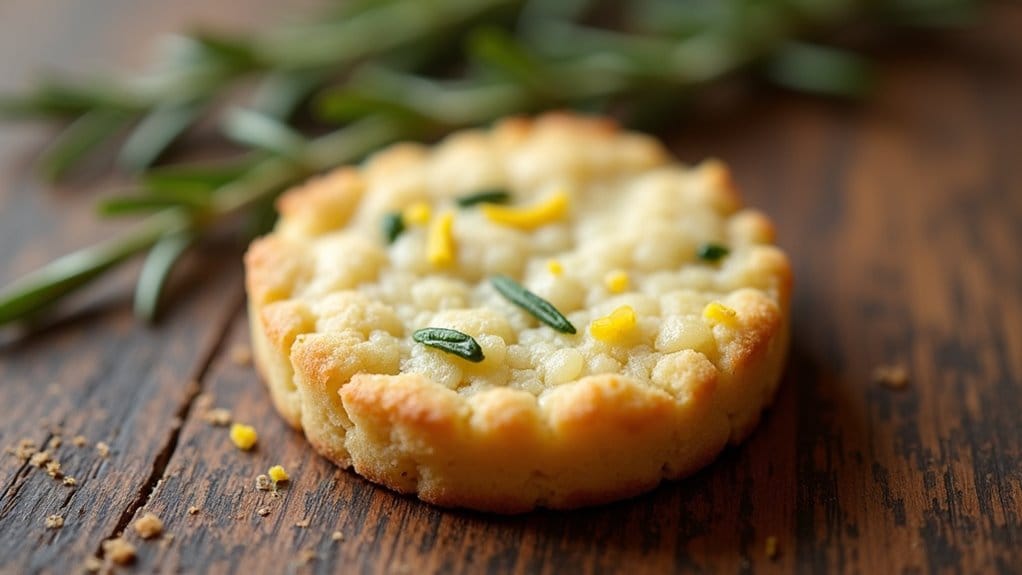
Rosemary Lemon Shortbread Cookies

Rosemary Lemon Shortbread Cookies are an elegant and sophisticated treat perfect for an adult Halloween gathering. These cookies combine the herbaceous notes of rosemary with the zesty brightness of lemon to create a delightful balance of flavors. The buttery, crumbly texture of the shortbread is enhanced by the aromatic rosemary, making these cookies a unique and memorable addition to your Halloween dessert table.
An elegant treat combining rosemary’s herbaceous notes with lemon’s zesty brightness for a sophisticated Halloween dessert.
Ideal for a serving size of 4-6 people, these cookies are easy to prepare ahead of time, allowing you to focus on other aspects of your gathering. The herb and citrus combination not only delivers a revitalizing taste but also offers a more grown-up twist to traditional Halloween sweets. Whether served with a cup of tea or a glass of your favorite wine, these Rosemary Lemon Shortbread Cookies are sure to impress your guests.
Ingredients:
- 1 cup unsalted butter, softened
- 1/2 cup granulated sugar
- Zest of 2 lemons
- 1 tablespoon fresh rosemary, finely chopped
- 2 cups all-purpose flour
- 1/4 teaspoon salt
- 1 teaspoon vanilla extract
Cooking Instructions:
- Preheat the Oven: Begin by preheating your oven to 325°F (163°C). This will guarantee the cookies bake evenly and achieve their signature crumbly texture.
- Prepare the Dough: In a large mixing bowl, cream together the softened butter and granulated sugar until the mixture is light and fluffy. This process should take about 3-5 minutes using an electric mixer.
- Add Flavorings: Incorporate the lemon zest, finely chopped rosemary, and vanilla extract into the creamed butter and sugar. Mix until all the ingredients are well combined and you can smell the aromatic blend of lemon and rosemary.
- Combine Dry Ingredients: In a separate bowl, sift together the all-purpose flour and salt. Gradually add this to the wet mixture, mixing until just combined. The dough should come together and be slightly crumbly but hold its shape when pressed together.
- Shape the Cookies: Turn the dough out onto a lightly floured surface. Roll it into a log about 2 inches in diameter. Wrap the log in plastic wrap and refrigerate for at least 1 hour or until firm. This step helps in slicing the cookies evenly.
- Slice and Bake: Once chilled, unwrap the dough and cut it into 1/4-inch thick slices. Place the slices on a parchment-lined baking sheet, spacing them about an inch apart to allow for spreading.
- Bake: Bake in the preheated oven for 15-18 minutes, or until the edges of the cookies just start to turn golden brown. Remove from the oven and let cool on the baking sheet for about 5 minutes before transferring to a wire rack to cool completely.
Extra Tips:
For an extra burst of flavor, consider dusting the finished cookies with a light sprinkle of powdered sugar mixed with a pinch of additional lemon zest.
Always make sure that the butter is softened to room temperature to achieve the perfect texture of the cookies. If you find the dough too sticky to roll, place it back in the refrigerator for a few more minutes.
These cookies store well in an airtight container for up to a week, allowing you to prepare them in advance for your Halloween festivities.
