

As Halloween approaches, it’s time to conjure up a feast that’s both delicious and delightfully spooky. Let’s start with Creepy Crawly Deviled Eggs, sure to give anyone a playful fright. Mummy Meatballs unravel layers of flavor that are simply irresistible. And don’t forget a bubbling pot of Witch’s Brew Soup to warm everyone’s spirits. With these enchanting dishes, your Halloween dinner will be an unforgettable treat for all.
Creepy Crawly Deviled Eggs

This Halloween, add a spooky twist to your party spread with Creepy Crawly Deviled Eggs. These delightful yet eerie treats are perfect for setting the tone at your haunted gathering. The classic deviled egg is transformed with a few strategic additions, making it a visual and tasty treat for both young goblins and seasoned witches alike.
Whether it’s the eerie spider-shaped olive garnishes or the slightly tangy filling, these deviled eggs are sure to be a hit at your Halloween dinner. The fun doesn’t stop at the appearance. These deviled eggs are loaded with flavor, thanks to the combination of creamy mayonnaise, tangy mustard, and a hint of paprika.
Eerie olive spiders and a tangy filling make these deviled eggs a Halloween favorite.
The addition of black olives not only adds a creepy element but also a savory depth. This recipe serves 4-6 people, making it an ideal appetizer for a small gathering or an addition to a larger Halloween feast. They’re simple to prepare, ensuring you spend more time enjoying the festivities and less time in the kitchen.
Ingredients for 4-6 Servings:
- 6 large eggs
- 3 tablespoons mayonnaise
- 1 teaspoon yellow mustard
- Salt and pepper to taste
- 1/4 teaspoon paprika
- 12 black olives (pitted)
Cooking Instructions:
- Boil the Eggs: Place the eggs in a single layer in a saucepan and cover them with water. Bring the water to a boil over medium-high heat. Once boiling, remove the saucepan from heat, cover, and let the eggs sit for 10-12 minutes.
- Cool and Peel: Drain the hot water and transfer the eggs to a bowl of ice water to cool for about 5 minutes. Once cooled, gently peel the eggs under running water to remove the shells without damaging the egg whites.
- Prepare the Filling: Slice each egg in half lengthwise and carefully remove the yolks, placing them in a medium-sized bowl. Set the egg whites aside on a serving platter.
- Make the Yolk Mixture: Mash the yolks with a fork, then add mayonnaise, mustard, salt, pepper, and paprika. Mix until smooth and creamy.
- Fill the Egg Whites: Spoon or pipe the yolk mixture back into the hollowed egg whites, mounding slightly.
- Create Spooky Spiders: Cut 6 olives in half lengthwise to form the spider bodies. Slice the remaining olives into thin strips to create the spider legs. Position one half olive on top of each filled egg half, then arrange 8 olive strips around each body to form the legs.
- Chill and Serve: Refrigerate the deviled eggs for at least 30 minutes before serving to allow the flavors to meld.
Extra Tips:
For a more dramatic presentation, consider dying the egg whites in a mixture of water, vinegar, and black food coloring before filling them. This will add an even spookier element to your Creepy Crawly Deviled Eggs.
If you want to add a little heat, consider mixing a dash of hot sauce into the yolk mixture. Remember, the key to perfectly peeled eggs is cooling them quickly after boiling, so don’t skip the ice bath!
Mummy Meatballs With Marinara
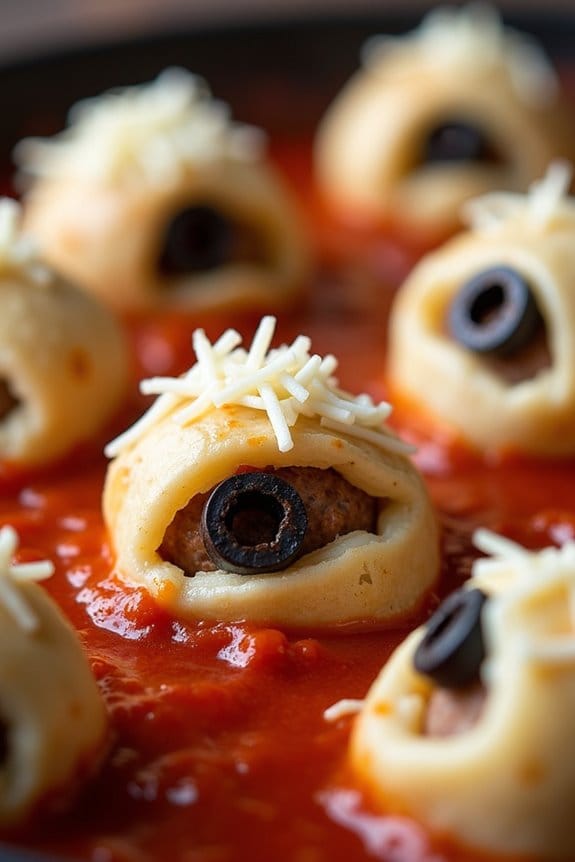
Mummy Meatballs With Marinara is a fun and spooky dish perfect for Halloween dinner. It’s a creative twist on the classic meatball dish, dressed up to resemble mummies. These meatballs are wrapped in a flaky crescent roll dough to mimic bandages, then baked until golden brown, and served over a rich marinara sauce. Not only is this dish delicious, but it’s also visually appealing, making it a hit for both kids and adults at your Halloween gathering.
The preparation is straightforward, and the ingredients are easy to find in most grocery stores. The savory meatballs combined with the slightly sweet crescent roll crust and the tangy marinara sauce create a delightful blend of flavors. This dish is perfect for serving a group of 4-6 people, providing a hearty meal that fits the spooky theme of the holiday.
Let’s explore the ingredients and steps to create your very own Mummy Meatballs With Marinara.
Ingredients (Serves 4-6):
- 1 pound ground beef
- 1/2 cup breadcrumbs
- 1/4 cup grated Parmesan cheese
- 1 egg
- 2 cloves garlic, minced
- 1 teaspoon Italian seasoning
- Salt and pepper to taste
- 1 can (8 oz) refrigerated crescent roll dough
- 1 jar (24 oz) marinara sauce
- 1 tablespoon olive oil
- 1/4 cup black olives, sliced (for eyes)
- 1/4 cup shredded mozzarella cheese (optional, for garnish)
Cooking Instructions:
- Preheat the Oven: Start by preheating your oven to 375°F (190°C).
- Prepare the Meatballs: In a large bowl, combine the ground beef, breadcrumbs, Parmesan cheese, egg, minced garlic, Italian seasoning, salt, and pepper. Mix well until all ingredients are thoroughly combined.
- Shape the Meatballs: Using your hands, form the mixture into meatballs, about 1.5 inches in diameter. You should get approximately 16-18 meatballs.
- Cook the Meatballs: In a large skillet, heat the olive oil over medium heat. Add the meatballs and cook for about 5-7 minutes, turning occasionally, until they’re browned on all sides. Remove from heat and set aside.
- Wrap the Meatballs: Unroll the crescent roll dough and cut it into thin strips. Wrap each meatball with a few strips to create a mummy effect, leaving small gaps for the “eyes.”
- Bake the Mummy Meatballs: Place the wrapped meatballs on a baking sheet lined with parchment paper. Bake in the preheated oven for 12-15 minutes or until the dough is golden brown.
- Prepare the Marinara Sauce: While the meatballs are baking, heat the marinara sauce in a separate saucepan over medium heat until warmed through.
- Assemble the Dish: Once the meatballs are done, place them on a serving platter over a bed of marinara sauce. Use sliced black olives to create “eyes” for the mummies.
- Add Optional Garnish: If desired, sprinkle some shredded mozzarella cheese over the top for extra flavor.
Extra Tips:
When wrapping the crescent roll dough around the meatballs, try to keep the strips thin and slightly uneven to achieve a more authentic mummy appearance. If the dough becomes too sticky, lightly flour your work surface and hands.
To save time, you can prepare the meatballs a day in advance and refrigerate them until ready to wrap and bake. Additionally, feel free to experiment with different seasonings or add a bit of spice for a kick.
This dish pairs well with a simple side salad or a serving of garlic bread to complete your Halloween feast.
Witch’s Brew Soup

Witch’s Brew Soup is a bewitching concoction perfect for a Halloween dinner that will enchant both adults and children. This mystical soup blends a medley of vibrant vegetables and aromatic herbs that simmer together, creating a cauldron of flavor that’s both hearty and comforting. Its deep green color, reminiscent of a bubbling witch’s potion, is sure to add a touch of magic to your evening festivities.
Ideal for a crowd, Witch’s Brew Soup serves 4-6 people and isn’t only delicious but also a healthy option for a Halloween feast. The soup is packed with nutrients from fresh ingredients like spinach, kale, and zucchini, and is seasoned with a sprinkle of magical herbs that elevate its taste. Whether you’re hosting a Halloween party or enjoying a cozy night in, this soup will cast a delicious spell on everyone who tastes it.
Ingredients:
- 2 tablespoons olive oil
- 1 large onion, chopped
- 3 cloves garlic, minced
- 2 zucchinis, chopped
- 2 cups fresh spinach leaves
- 2 cups kale, chopped
- 1 cup broccoli florets
- 4 cups vegetable broth
- 1 teaspoon dried thyme
- 1 teaspoon dried oregano
- 1 teaspoon salt
- 1 teaspoon black pepper
- 1/2 teaspoon paprika
- 1/4 teaspoon cayenne pepper (optional for a spicy kick)
- 1 cup coconut milk
- 2 tablespoons lemon juice
Cooking Instructions:
- Prepare the Vegetables: Begin by washing all the vegetables thoroughly. Chop the onion, mince the garlic, and cut the zucchini into small chunks. Chop the kale and separate the broccoli into small florets.
- Sauté the Aromatics: In a large pot, heat the olive oil over medium heat. Add the chopped onion and sauté until translucent, about 5 minutes. Stir in the minced garlic and continue to cook for another minute until fragrant.
- Cook the Vegetables: Add the chopped zucchini, kale, and broccoli to the pot. Stir well to combine with the onion and garlic. Cook for about 5 minutes until the vegetables begin to soften.
- Add the Broth and Seasonings: Pour in the vegetable broth and bring the mixture to a boil. Reduce the heat to a simmer and add the thyme, oregano, salt, black pepper, paprika, and cayenne pepper (if using). Cover and let it simmer for about 20 minutes, allowing the flavors to meld together.
- Blend the Soup: Remove the pot from heat. Using an immersion blender, blend the soup until smooth. Alternatively, transfer the soup in batches to a countertop blender and blend until smooth, then return it to the pot.
- Finish with Coconut Milk and Lemon: Stir in the coconut milk and lemon juice, and heat the soup gently over low heat until warmed through. Taste and adjust the seasoning as needed.
- Serve: Ladle the Witch’s Brew Soup into bowls and serve hot, garnished with additional lemon wedges or a sprinkle of fresh herbs, if desired.
Extra Tips:
For an extra spooky touch, consider serving the Witch’s Brew Soup in cauldron-shaped bowls or adding a swirl of sour cream or yogurt on top to create a ghostly design.
You can also experiment with the thickness of the soup by adjusting the quantity of vegetable broth according to your preference. If you have leftovers, this soup keeps well in the refrigerator for up to three days and can be reheated gently on the stove. Enjoy the enchanting flavors and have a hauntingly delicious Halloween!
Monster Mac and Cheese

This Halloween, transform a classic comfort food into a spooktacular delight with Monster Mac and Cheese. This dish isn’t only delicious but also visually enchanting, making it the perfect addition to any Halloween gathering. With its vibrant green hue and ghoulish garnishes, Monster Mac and Cheese will be a hit with both kids and adults alike. The creamy, cheesy goodness paired with a monstrous makeover will have your guests coming back for more, guaranteeing that your Halloween dinner is a memorable one.
Monster Mac and Cheese is the ultimate combination of fun and flavor, made with a blend of cheeses to create a rich and satisfying dish. By adding a splash of food coloring, you can bring this monster-inspired meal to life, while the addition of spooky decorations like olive eyes or crispy bacon mouths will give it a playful and eerie twist. This recipe is designed to serve 4-6 people, making it suitable for a small group of friends or family members. Follow the instructions below to create a hair-raising, mouthwatering masterpiece.
A monstrously fun and flavorful dish perfect for your Halloween festivities.
Ingredients (serves 4-6 people):
- 1 lb elbow macaroni
- 4 tablespoons unsalted butter
- 1/4 cup all-purpose flour
- 3 cups whole milk
- 2 cups shredded sharp cheddar cheese
- 1 cup shredded mozzarella cheese
- 1/2 cup grated Parmesan cheese
- 1 teaspoon salt
- 1/2 teaspoon black pepper
- 1/2 teaspoon garlic powder
- Green food coloring (gel or liquid)
- Black olives (for eyes)
- Cooked bacon strips (for mouths)
- Fresh parsley or chives (for garnish)
Cooking Instructions:
- Cook the Pasta: Begin by boiling a large pot of salted water. Add the elbow macaroni and cook according to package instructions until al dente. Drain the pasta and set aside.
- Make the Cheese Sauce: In a separate large saucepan, melt the butter over medium heat. Once melted, whisk in the flour and cook for about 1-2 minutes until the mixture is smooth and slightly golden.
- Add Milk: Gradually pour in the milk while continuously whisking to prevent lumps. Bring the mixture to a gentle simmer and allow it to thicken, which should take about 5-7 minutes.
- Incorporate Cheese: Once the sauce has thickened, reduce the heat to low and stir in the cheddar, mozzarella, and Parmesan cheeses. Continue stirring until the cheeses have melted and the sauce is smooth and creamy.
- Season and Color: Add salt, pepper, and garlic powder to the cheese sauce, stirring well. Add a few drops of green food coloring until the desired shade is achieved, mixing thoroughly to guarantee an even color.
- Combine Pasta and Sauce: Add the cooked pasta to the cheese sauce, stirring to coat the macaroni evenly in the vibrant, cheesy mixture.
- Decorate: Transfer the Monster Mac and Cheese to a serving dish. Arrange black olive slices on top to resemble eyes and place strips of cooked bacon to simulate ghoulish mouths. Sprinkle with freshly chopped parsley or chives for added color and flavor.
Extra Tips:
For an even more monstrous appearance, consider using different types of pasta shapes like shells or spirals, which can resemble spooky tentacles or monster limbs.
If you prefer a spicier version, add a pinch of cayenne pepper to the cheese sauce for a subtle kick.
When adding the food coloring, start with a few drops and gradually increase until reaching the desired intensity; gel coloring tends to provide a more vibrant color with less product.
Finally, feel free to get creative with other edible garnishes like sliced bell peppers or cherry tomatoes to enhance the monster theme.
Ghostly Grilled Cheese Sandwiches

Ghostly Grilled Cheese Sandwiches are a fun and spooky twist on the classic grilled cheese, perfect for a Halloween dinner or party. These sandwiches aren’t only delicious but also visually entertaining, as the cheese oozes out in ghostly shapes. They combine the comforting flavors of melted cheese and buttery toasted bread with a Halloween-themed presentation that will delight both kids and adults alike.
With a few simple ingredients and a little creativity, you can transform an ordinary meal into a haunted culinary experience. The secret to creating Ghostly Grilled Cheese Sandwiches lies in the use of cookie cutters to shape the bread and cheese into ghostly forms. By using a variety of cheese types, you can achieve different textures and flavors, while the butter guarantees a rich, golden crust.
These sandwiches are easy to prepare and can be customized with additional toppings or dips to cater to different taste preferences. Gather your ingredients and follow this recipe to serve a hauntingly good meal for 4-6 people.
Ingredients:
- 12 slices of bread (white or whole wheat)
- 12 slices of cheese (such as cheddar, mozzarella, or provolone)
- 6 tablespoons of unsalted butter, softened
- Optional: additional toppings such as sliced tomatoes, ham, or turkey
- Cookie cutters in ghost shapes (or a knife if you prefer freehand cutting)
Cooking Instructions:
- Prepare the Bread and Cheese: Begin by using ghost-shaped cookie cutters to cut ghost shapes out of each slice of bread and cheese. If you don’t have cookie cutters, carefully cut out ghost shapes using a knife. Make sure the cheese fits the bread shape, trimming as necessary.
- Assemble the Sandwiches: Lay out the ghost-shaped bread slices and place a slice of ghost-shaped cheese between two pieces of bread. If using additional toppings, add them between the cheese and bread at this stage.
- Butter the Bread: Spread a thin layer of softened butter on the outside of each assembled sandwich. This will help achieve a crispy, golden crust when grilled.
- Heat the Skillet: Preheat a large skillet or griddle over medium heat. Once heated, place the buttered sandwiches in the skillet, buttered side down.
- Grill the Sandwiches: Cook the sandwiches for about 3-4 minutes on each side, or until the bread is golden brown and the cheese is melted and gooey. If necessary, press down gently on the sandwiches with a spatula to guarantee even cooking.
- Serve: Remove the sandwiches from the skillet and let them cool slightly before serving. Arrange them on a platter, optionally with a spooky presentation using Halloween-themed decor.
Extra Tips: To make your Ghostly Grilled Cheese Sandwiches even more festive, consider using a variety of cheeses to create a colorful effect when they melt. If you find that the cheese isn’t melting as quickly as desired, cover the skillet with a lid to trap heat and help the cheese melt faster.
Additionally, for a healthier version, opt for whole wheat bread and reduced-fat cheese. Serve these sandwiches with a side of tomato soup or a spooky-themed dip for a complete Halloween meal.
Spooky Spider Pizza

Transform your Halloween dinner into a night of frightful fun with this Spooky Spider Pizza. A deliciously eerie twist on a classic favorite, this pizza is topped with creepy crawly olive spiders that are sure to give everyone a delightful scare. Perfect for a gathering of ghouls and goblins, this recipe combines the traditional flavors of pizza with a playful Halloween presentation.
Whether you’re hosting a party or simply enjoying a spooky-themed evening with family, this Spooky Spider Pizza will undoubtedly be a hit. This recipe is designed for a serving size of 4-6 people, making it ideal for a small crowd. The base is a classic pizza crust, layered with tangy tomato sauce, gooey mozzarella cheese, and an assortment of your favorite toppings.
The highlight of the dish, however, is the black olive spiders that add a fun and festive touch. Easy to assemble and even easier to devour, this pizza will be the star of your Halloween table.
Ingredients:
- 1 pre-made pizza dough or crust (enough for a 12-inch pizza)
- 1 cup tomato sauce
- 2 cups shredded mozzarella cheese
- 1/2 cup sliced pepperoni or your favorite pizza toppings
- 1 cup black olives
- 1 tablespoon olive oil
- 1 teaspoon dried oregano
- 1/2 teaspoon garlic powder
- 1/4 teaspoon crushed red pepper flakes (optional)
- Fresh basil leaves for garnish (optional)
Cooking Instructions:
- Preheat the Oven: Begin by preheating your oven to 450°F (230°C). If using a pizza stone, place it in the oven while preheating to guarantee a crispy crust.
- Prepare the Dough: Roll out the pizza dough on a lightly floured surface to your desired thickness. If using a pre-made crust, place it on a baking sheet or pizza peel lined with parchment paper.
- Add the Sauce: Spread the tomato sauce evenly over the pizza dough, leaving a small border around the edges for the crust.
- Sprinkle the Cheese: Generously sprinkle the shredded mozzarella cheese over the sauce, ensuring even coverage.
- Add Toppings: Arrange the pepperoni slices and any other desired toppings over the cheese.
- Create Olive Spiders: Slice the black olives in half for the spider bodies. For the legs, cut additional olives into thin strips. Arrange the halves and strips on the pizza to form spiders.
- Season the Pizza: Drizzle olive oil over the pizza and sprinkle with oregano, garlic powder, and red pepper flakes if using.
- Bake the Pizza: Transfer the pizza to the preheated oven and bake for 12-15 minutes or until the crust is golden brown and the cheese is bubbly and melted.
- Garnish and Serve: Once baked, remove the pizza from the oven and allow it to cool slightly. Garnish with fresh basil leaves if desired before slicing and serving.
Extra Tips:
For a more intense flavor, consider using a garlic-infused olive oil to drizzle over the pizza before baking. If you’re making your own pizza dough, allowing it to rest for an hour before rolling it out will result in a more pliable and stretchy crust.
To make the olive spiders more effective, use different sizes of olives to create varied sizes of spiders, adding to the spooky effect. Finally, while pre-made dough is convenient, don’t hesitate to try your hand at homemade dough for an extra touch of authenticity and freshness.
Bloodshot Eyeball Pasta

For a spooky yet delicious Halloween dinner, Bloodshot Eyeball Pasta will surely captivate both the young and the young-at-heart. This dish combines a rich, savory tomato sauce with eye-catching mozzarella “eyeballs” to create a meal that’s as eerie as it’s tasty. The combination of flavors and the eerie presentation will make this a memorable dish for your Halloween gathering.
The Bloodshot Eyeball Pasta isn’t only visually striking but also simple to prepare, making it an ideal choice for a festive dinner. The “eyeballs” are made from mozzarella balls and sliced black olives, nestled in a bed of pasta and sauce. This dish serves 4-6 people, providing enough for everyone to enjoy a hearty portion of this spooky delight.
Ingredients:
- 1 pound (450g) spaghetti or linguine
- 2 tablespoons olive oil
- 3 cloves garlic, minced
- 1 medium onion, finely chopped
- 1 can (28 ounces) crushed tomatoes
- 1 tablespoon tomato paste
- 1 teaspoon dried oregano
- 1 teaspoon dried basil
- Salt and pepper to taste
- 12-18 mini mozzarella balls
- 12-18 black olive slices
- Red food coloring (optional, for more dramatic effect)
- Fresh basil leaves, for garnish
- Grated Parmesan cheese, for serving
Cooking Instructions:
- Cook the Pasta: Begin by bringing a large pot of salted water to a boil. Add the spaghetti or linguine and cook according to the package instructions until al dente. Drain and set aside.
- Prepare the Sauce: In a large skillet, heat the olive oil over medium heat. Add the minced garlic and chopped onion, sautéing until the onion is translucent, about 5 minutes.
- Add Tomatoes and Seasonings: Stir in the crushed tomatoes, tomato paste, dried oregano, and dried basil. Season with salt and pepper. Allow the sauce to simmer on low heat for about 15-20 minutes, stirring occasionally.
- Assemble the Eyeballs: While the sauce simmers, prepare the mozzarella “eyeballs.” Place a slice of black olive on top of each mini mozzarella ball to create the pupil. For an extra spooky touch, you can add a small drop of red food coloring on each mozzarella ball to create a bloodshot effect.
- Combine Pasta and Sauce: Once the sauce has thickened, add the drained pasta to the skillet and toss to coat the noodles thoroughly with the sauce.
- Serve the Dish: Divide the pasta among serving plates. Arrange the mozzarella “eyeballs” on top of the pasta. Garnish with fresh basil leaves and a sprinkle of grated Parmesan cheese.
Extra Tips: For a more dramatic presentation, consider serving the pasta in a dark-colored bowl to enhance the eerie effect of the eyeballs. If you prefer a bit of heat, add a pinch of red pepper flakes to the sauce for a spicy kick.
Also, be sure not to overcook the pasta; it should be firm to the bite to hold up well under the sauce and toppings. Enjoy your hauntingly delicious Halloween dinner!
Jack-o’-Lantern Stuffed Peppers

Jack-o’-Lantern Stuffed Peppers are a festive and fun way to celebrate Halloween while enjoying a delicious and nutritious meal. These adorable stuffed peppers are carved to resemble little jack-o’-lanterns, making them a perfect centerpiece for a spooky dinner party or a cozy family meal. Filled with a flavorful mixture of ground meat, rice, and seasonal vegetables, they’re both satisfying and visually appealing.
The dish isn’t only a delightful way to get into the Halloween spirit but also a great way to incorporate vegetables into your meal. The vibrant orange bell peppers mimic the appearance of traditional pumpkins, and the detailed carvings add a playful touch to your dining table. This recipe serves 4-6 people, making it ideal for a small gathering or a family meal.
Ingredients (for 4-6 servings):
- 6 large orange bell peppers
- 1 pound ground beef or turkey
- 1 cup cooked rice
- 1 medium onion, finely chopped
- 2 cloves garlic, minced
- 1 cup canned diced tomatoes
- 1 tablespoon tomato paste
- 1 teaspoon dried oregano
- 1 teaspoon dried basil
- ½ teaspoon salt
- ½ teaspoon black pepper
- 1 cup shredded mozzarella cheese
- 2 tablespoons olive oil
Cooking Instructions:
- Preheat the Oven: Preheat your oven to 375°F (190°C) to guarantee it’s hot and ready for baking the stuffed peppers.
- Prepare the Peppers: Carefully cut the tops off the bell peppers and remove the seeds and membranes. Using a small paring knife, carve jack-o’-lantern faces into one side of each pepper. Set the peppers aside.
- Cook the Filling: In a large skillet over medium heat, add olive oil and sauté the chopped onion and garlic until they become translucent. Add the ground beef or turkey to the skillet, cooking until browned and fully cooked. Drain any excess fat.
- Mix the Ingredients: Add the canned diced tomatoes, tomato paste, cooked rice, oregano, basil, salt, and pepper to the skillet. Stir well to combine all the ingredients. Allow the mixture to simmer for about 5 minutes to let the flavors meld together.
- Stuff the Peppers: Spoon the meat and rice mixture into each carved bell pepper, pressing down gently to pack the filling. Place the stuffed peppers upright in a baking dish.
- Bake the Peppers: Cover the baking dish with aluminum foil and bake in the preheated oven for 30 minutes. Remove the foil, sprinkle the tops of the peppers with shredded mozzarella cheese, and return to the oven for an additional 10-15 minutes, or until the cheese is melted and bubbly.
- Serve: Allow the stuffed peppers to cool for a few minutes before serving. Enjoy your Jack-o’-Lantern Stuffed Peppers warm.
Extra Tips:
When carving the jack-o’-lantern faces, be gentle to avoid tearing the peppers. You can use a small, sharp paring knife for more precise cuts.
If you prefer a vegetarian version, substitute the ground meat with cooked lentils or black beans. Additionally, you can customize the filling by adding other vegetables such as mushrooms or zucchini.
For extra flavor, consider sprinkling some grated Parmesan cheese on top of the mozzarella before baking.
Vampire Bat Wings

Transform your Halloween dinner into a spooktacular feast with these deliciously eerie Vampire Bat Wings. Perfectly seasoned and baked to crispy perfection, these wings are a surefire way to add a ghoulish touch to your Halloween celebration. The deep, dark glaze not only gives them a mysterious appearance but also packs a flavorful punch that will have your guests howling for more.
The secret to these Vampire Bat Wings lies in their tantalizing marinade, which combines classic flavors with a twist of the unexpected. Whether you’re hosting a Halloween party or just want to add a little frightful fun to your dinner table, this recipe promises to thrill and chill. Designed to serve 4-6 people, these wings are a great appetizer or main course for your Halloween festivities.
Ingredients (serving size: 4-6 people):
- 3 pounds of chicken wings
- 1/2 cup soy sauce
- 1/4 cup balsamic vinegar
- 1/4 cup honey
- 2 tablespoons olive oil
- 4 cloves garlic, minced
- 1 tablespoon fresh ginger, grated
- 1 tablespoon smoked paprika
- 1 teaspoon ground black pepper
- 1 teaspoon salt
- 1/2 teaspoon cayenne pepper (optional for heat)
- 1/4 cup black food coloring (optional for a darker effect)
- 2 tablespoons sesame seeds (for garnish)
- Fresh parsley, chopped (for garnish)
Cooking Instructions:
- Prepare the Marinade: In a large bowl, combine the soy sauce, balsamic vinegar, honey, olive oil, minced garlic, grated ginger, smoked paprika, black pepper, salt, and cayenne pepper. If using, add the black food coloring to achieve a darker appearance. Whisk everything together until well combined.
- Marinate the Wings: Add the chicken wings to the marinade, making sure each wing is thoroughly coated. Cover the bowl with plastic wrap and marinate in the refrigerator for at least 2 hours, or preferably overnight, to allow the flavors to fully penetrate the wings.
- Preheat the Oven: When ready to cook, preheat your oven to 400°F (200°C). Line a baking sheet with foil and place a wire rack on top. This will help the wings cook evenly and become crispy.
- Arrange and Bake: Remove the wings from the marinade, allowing any excess to drip off, and arrange them in a single layer on the wire rack. Bake in the preheated oven for 35-40 minutes, flipping the wings halfway through to guarantee even cooking.
- Check for Doneness: The wings are done when they’re crispy and the internal temperature reaches 165°F (74°C). You may place them under the broiler for an additional 2-3 minutes if you desire extra crispiness.
- Garnish and Serve: Once cooked, transfer the wings to a serving platter. Sprinkle with sesame seeds and chopped parsley for garnish. Serve immediately, and watch your guests enjoy these spooky treats!
Extra Tips:
For an extra layer of flavor, try adding a splash of apple cider vinegar to the marinade. If you prefer a smokier taste, consider adding a dash of liquid smoke.
To save time on the day of your event, you can prepare the marinade in advance and store it in the refrigerator until you’re ready to use it.
Finally, if you want to make these wings even more festive, consider pairing them with a blood-red dipping sauce, such as a spicy sriracha ketchup or a tangy cranberry sauce.
Slithering Snake Calzone

The Slithering Snake Calzone is a fun and spooky dish perfect for a Halloween dinner. Shaped like a snake, this calzone is filled with delicious ingredients that will delight both kids and adults alike. The dough is carefully crafted to resemble a snake’s body, complete with scales, eyes, and a tongue, creating a visually striking centerpiece for your Halloween table.
Craft a spooky centerpiece with a Slithering Snake Calzone, perfect for delighting kids and adults this Halloween.
Not only is it a feast for the eyes, but the combination of savory fillings like mozzarella, pepperoni, and bell peppers will have everyone coming back for seconds. This creative calzone is surprisingly easy to make, letting you spend more time enjoying the festivities rather than being stuck in the kitchen.
The recipe serves 4-6 people, making it a great option for a small gathering or family dinner. With a few simple ingredients and some creativity, you can bring this slithering creature to life in your own kitchen. Follow the steps below to create this ghoulishly good dish.
Ingredients:
- 1 pound pizza dough
- 1 cup marinara sauce
- 2 cups shredded mozzarella cheese
- 1 cup sliced pepperoni
- 1/2 cup chopped green bell pepper
- 1/2 cup sliced black olives
- 1 egg, beaten
- Black sesame seeds (for eyes)
- Red bell pepper (for tongue)
Instructions:
- Preheat Oven: Start by preheating your oven to 375°F (190°C) to guarantee it’s ready to bake the calzone to perfection.
- Prepare the Dough: Roll out the pizza dough on a floured surface into a large rectangle, approximately 18×12 inches. This will be the base for your snake.
- Add Fillings: Spread the marinara sauce evenly over the dough, leaving about an inch border on all sides. Sprinkle the mozzarella cheese over the sauce, followed by the pepperoni, chopped green bell pepper, and sliced black olives.
- Form the Snake: Carefully roll the dough from one long side to the other, forming a log shape. Pinch the edges to seal the dough. Gently shape the log into an ‘S’ shape on a baking sheet lined with parchment paper to mimic a snake’s body.
- Decorate the Snake: Use the black sesame seeds to create the eyes, pressing them into the dough near one end of the calzone. Cut a small piece of red bell pepper to resemble a tongue and place it at the head of the snake.
- Egg Wash: Brush the entire surface of the calzone with the beaten egg to give it a golden, shiny appearance once baked.
- Bake: Place the calzone in the preheated oven and bake for 25-30 minutes, or until the crust is golden brown and crisp.
- Cool and Serve: Allow the calzone to cool for a few minutes before slicing. Serve warm and enjoy the delicious flavors of your spooky creation!
Extra Tips:
When shaping the snake, feel free to add additional details like scales using a knife to lightly score the dough before baking. If you’re short on time, you can use pre-made pizza dough to speed up the process.
Additionally, get creative with the fillings—try adding cooked sausage or different types of cheese for extra flavor. Finally, for a more dramatic presentation, place the calzone on a serving platter lined with lettuce or spinach to resemble a snake slithering through grass.
Haunted Graveyard Taco Dip

Halloween is the perfect time to get creative in the kitchen, and the Haunted Graveyard Taco Dip is a spooky yet delicious way to do just that. This layered dip not only tastes fantastic, but it’s also a fun and interactive dish for your Halloween gathering.
The presentation is key here, as you’ll be transforming a classic taco dip into a graveyard scene complete with tombstones and eerie decorations that will delight both kids and adults.
The dish is designed to serve 4-6 people, making it ideal for a small party or family gathering. Combining the flavors of seasoned ground beef, creamy refried beans, and tangy salsa, this dip is topped with a variety of Halloween-themed garnishes.
The use of dark olives and vibrant green onions enhances the graveyard aesthetic, while tortilla chips shaped like tombstones add a festive touch. It’s a dish that promises to be as entertaining as it’s tasty.
Ingredients (Serves 4-6):
- 1 pound ground beef
- 1 packet taco seasoning
- 1 can (16 oz) refried beans
- 1 cup sour cream
- 1 cup salsa
- 1 cup shredded cheddar cheese
- 1/2 cup sliced black olives
- 1/4 cup chopped green onions
- 1 bag of tortilla chips
- Optional: guacamole, cherry tomatoes, or jalapeños for additional toppings
Instructions:
- Cook the Ground Beef: In a skillet over medium heat, cook the ground beef until it’s browned and fully cooked. Drain any excess fat. Stir in the taco seasoning with a little water according to the package instructions, and mix well until the beef is coated evenly. Let it simmer for about 5 minutes to develop the flavors.
- Prepare the Bean Layer: In a medium-sized mixing bowl, combine the refried beans and half of the sour cream. Mix them until smooth. Spread this mixture evenly at the bottom of your serving dish to form the first layer.
- Layer the Beef: Once the ground beef is ready, spread it over the bean layer in the serving dish. Make sure it’s evenly distributed for consistent flavor in every bite.
- Add the Toppings: Pour the salsa over the beef layer, spreading it evenly. Sprinkle the shredded cheddar cheese on top of the salsa. For the final touches, scatter the black olives and chopped green onions over the cheese.
- Decorate the Graveyard: For the haunted graveyard effect, take tortilla chips and cut them into tombstone shapes. Gently insert them into the dip, standing up to mimic a graveyard scene. You can also add guacamole “grass” or use cherry tomatoes and jalapeños for additional elements.
Extra Tips:
To make your Haunted Graveyard Taco Dip even more thematic, consider drawing spooky designs on the tortilla tombstones using sour cream or a small tube of black food coloring gel.
If you have time, chilling the dip for an hour before serving can help the flavors meld together. Don’t hesitate to get creative with your decorations; small plastic spiders or gummy worms can add a fun, creepy twist.
With these tips, your dip won’t only be a treat for the taste buds but also a centerpiece of your Halloween spread.
Zombie Finger Hot Dogs

Zombie Finger Hot Dogs are a spooky and fun addition to any Halloween dinner table. This eerie dish puts a playful twist on a classic snack, making it perfect for both kids and adults. The hot dogs are cleverly transformed into zombie fingers with the use of simple ingredients and a little creativity. Not only are they delicious, but they also add a festive atmosphere to your Halloween gathering.
Zombie Finger Hot Dogs are incredibly easy to make and require minimal preparation time. The key to their creepy appearance is in the details: a carefully cut hot dog, strategically placed ketchup, and a sliced almond for the fingernail. Serve these gory-looking snacks with a side of your favorite condiments and a creepy dipping sauce for a complete Halloween treat. This recipe serves 4-6 people, ensuring there’s plenty of spooky fun for everyone at your Halloween party.
Ingredients:
- 8 hot dogs
- 8 hot dog buns
- 1/4 cup ketchup
- 8 sliced almonds
- 1 tablespoon butter
- 1/4 teaspoon garlic powder
Instructions:
- Prepare the Hot Dogs: Start by taking each hot dog and making a few shallow cuts on one end to resemble knuckles. These cuts will give the hot dogs a more realistic finger-like appearance once cooked.
- Create the Fingernail: At the opposite end from the knuckle cuts, slice a small piece off the top of each hot dog to create a flat surface. Place a sliced almond on the flat surface to resemble a fingernail. Press gently to secure it in place.
- Cook the Hot Dogs: In a skillet, melt the butter over medium heat. Add the garlic powder to the butter for added flavor. Place the prepared hot dogs in the skillet and cook for about 5-7 minutes, turning occasionally, until they’re heated through and slightly browned.
- Assemble the Hot Dogs: Place each cooked hot dog in a bun. Apply a generous amount of ketchup at the base of each hot dog to give the appearance of blood. Be creative with how you drizzle the ketchup, as this will contribute to the zombie-like effect.
- Serve: Arrange your Zombie Finger Hot Dogs on a serving platter. Add any additional condiments or dipping sauces on the side for your guests to enjoy.
Extra Tips:
To make your Zombie Finger Hot Dogs even more realistic, you can use a toothpick to add extra grooves and details to the knuckles.
If you want to take the eeriness up a notch, consider using food coloring to tint the hot dogs a slightly off color.
You can also experiment with different types of buns to add texture and flavor, such as using toasted brioche buns for a buttery contrast.
Remember to keep an eye on your hot dogs while cooking to prevent them from burning, as this can detract from their overall appearance.
