
Crafting the perfect Halloween spread for our work party fills me with excitement. I’m already picturing the joy on everyone’s faces. From spooky spider deviled eggs to Frankenstein Rice Krispie treats, each dish is a delightful blend of fun and flavor. These creative ideas are more than just recipes. They promise to transform your office gathering into a hauntingly memorable feast.
Spooky Spider Deviled Eggs
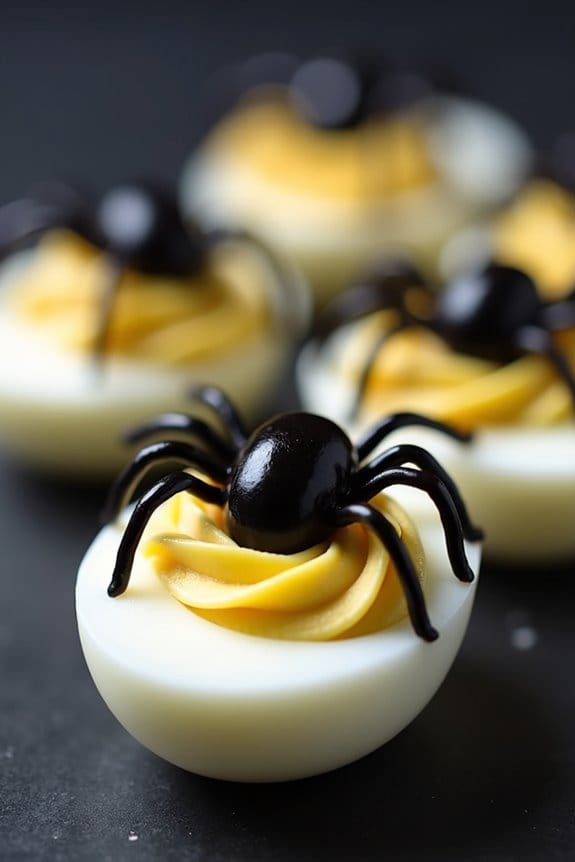
Add a creepy twist to the classic deviled eggs with this Spooky Spider Deviled Eggs recipe. Perfect for a work Halloween party, these eggs aren’t only delicious but also bound to be a conversation starter. The combination of tangy yolk filling and decorative olive spiders on top creates an eerie yet delightful treat that everyone will want to try. With minimal ingredients and simple preparation, you can whip up this spooky dish in no time.
These deviled eggs are transformed into a Halloween masterpiece with the clever use of black olives to create the spider decorations. The creamy yolk filling, seasoned with mustard and mayonnaise, provides a rich and flavorful base, while the olives add a salty contrast and a spooky visual appeal. Whether you’re hosting a party or contributing to a potluck, these Spooky Spider Deviled Eggs will add a festive and fun touch to your Halloween celebration.
The perfect blend of spooky and delicious for your Halloween gathering.
Ingredients for 4-6 servings:
- 6 large eggs
- 3 tablespoons mayonnaise
- 1 teaspoon Dijon mustard
- Salt and pepper to taste
- 12 black olives
Cooking Instructions:
- Boil the Eggs: Place the eggs in a medium saucepan and cover them with water. Bring the water to a boil over medium-high heat. Once boiling, cover the saucepan, remove it from the heat, and let the eggs sit for 10 minutes.
- Prepare the Eggs: After 10 minutes, transfer the eggs to a bowl of ice water to cool for about 5 minutes. Once cooled, gently tap the eggs on a hard surface to crack the shells, then peel them.
- Make the Filling: Slice the eggs in half lengthwise and carefully remove the yolks, placing them in a small bowl. Add the mayonnaise, Dijon mustard, salt, and pepper to the yolks, mashing and mixing until smooth and creamy.
- Fill the Egg Whites: Spoon or pipe the yolk mixture back into the egg white halves, filling each cavity generously.
- Create the Spiders: Cut 6 olives in half and use them as the spider bodies by placing one half on top of each filled egg. Slice the remaining 6 olives into thin strips to form spider legs, positioning 4 legs on each side of the olive body on the eggs.
- Serve and Enjoy: Arrange the Spooky Spider Deviled Eggs on a festive platter and serve immediately or refrigerate until serving time.
Extra Tips:
For the best results, use fresh eggs to guarantee they peel easily after boiling. If you want to add more flavor to the filling, consider mixing in a dash of hot sauce or a sprinkle of paprika.
To make the spider assembly easier, use a small, sharp knife to cut the olives into precise pieces. These deviled eggs can be prepared a few hours in advance and stored in the refrigerator, but for best presentation, add the olive spiders just before serving to keep them looking fresh.
Graveyard Taco Dip
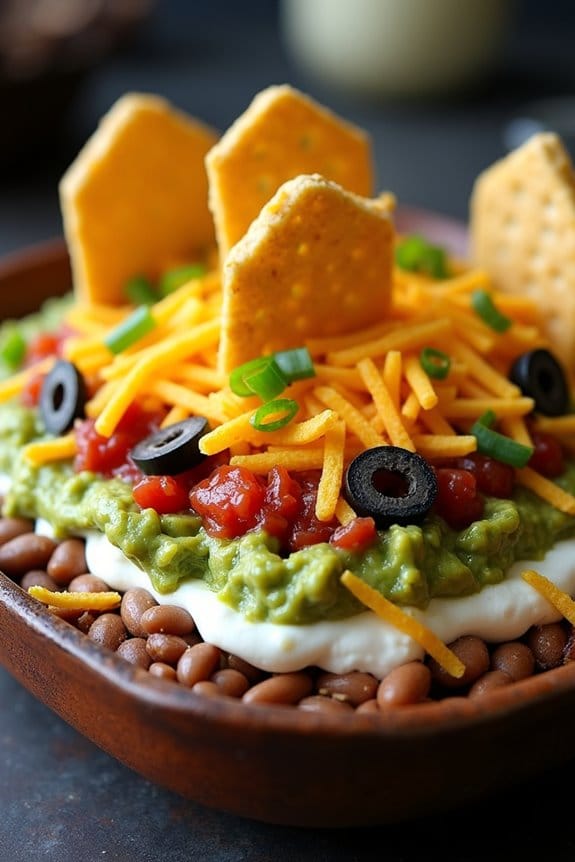
Graveyard Taco Dip is a spooktacular addition to any Halloween-themed work party. This dish isn’t only visually appealing with its eerie graveyard scene but also deliciously layered with flavors that will delight your taste buds. The dip is made with a combination of creamy, spicy, and fresh ingredients that come together to create a crowd-pleaser. Perfect for sharing, it’s a fantastic way to bring a bit of festive fun to the office.
The Graveyard Taco Dip is designed to serve 4-6 people, making it an ideal choice for a small gathering or potluck. The dip starts with a base of creamy refried beans and is layered with seasoned ground beef, tangy sour cream, fresh guacamole, salsa, and shredded cheese. The top is creatively decorated with crumbled tortilla chips to resemble dirt and chopped green onions for a pop of color. To complete the spooky effect, use tortilla chips cut into the shape of tombstones and garnish with spooky edible decorations.
Ingredients:
- 1 can (16 oz) refried beans
- 1 lb ground beef
- 1 packet taco seasoning
- 1 cup sour cream
- 1 cup guacamole
- 1 cup salsa
- 1 cup shredded cheddar cheese
- 1/2 cup chopped green onions
- 1 cup crumbled tortilla chips
- Tortilla chips (tombstone-shaped for garnish)
- Optional: Black olives, sliced (for decoration)
Instructions:
- Prepare the Ground Beef: In a medium-sized skillet over medium heat, cook the ground beef until it’s browned, breaking it apart with a spatula. Drain any excess fat, then add the taco seasoning packet according to the instructions on the package. Mix well and set aside to cool slightly.
- Layer the Dip: Spread the refried beans in an even layer on the bottom of a serving dish or shallow bowl. This will be the base layer of your graveyard dip.
- Add the Beef: Once the seasoned ground beef has cooled, spread it evenly over the refried beans.
- Add Creamy Layers: Layer the sour cream over the ground beef, followed by the guacamole. Spread each layer evenly to guarantee every bite is flavorful.
- Top with Salsa and Cheese: Spoon the salsa over the guacamole, then sprinkle the shredded cheddar cheese on top.
- Create the Graveyard Scene: Sprinkle the crumbled tortilla chips over the cheese to resemble dirt. Add chopped green onions for a burst of color.
- Decorate: Stick the tombstone-shaped tortilla chips upright into the dip to create the appearance of a graveyard. Use sliced black olives for additional decoration if desired.
Extra Tips: For an added Halloween effect, consider using edible markers to write spooky messages on the tombstone tortilla chips before placing them into the dip. To prevent the guacamole from browning, you can squeeze a little lime juice on top before spreading it in the dish. If you’re preparing the dip ahead of time, keep it covered and refrigerated, adding the tortilla chip decorations just before serving to maintain their crunch. Enjoy your Halloween festivities with this fun and flavorful dish!
Mummy Hot Dogs

Mummy Hot Dogs are a delightful and spooky treat that’s perfect for any Halloween-themed work party. These fun and easy-to-make appetizers will surely be a hit with your colleagues, bringing a festive and whimsical touch to your gathering.
Wrapped in crescent roll bandages, these hot dogs are transformed into mini mummies that are both delicious and amusing to look at. They’re not only kid-friendly but also a crowd favorite among adults, making them a versatile addition to your party menu.
The key to making Mummy Hot Dogs not only lies in their adorable presentation but also in their flavor. The combination of the warm, savory hot dog with the buttery, flaky crescent dough creates a delightful bite.
Plus, the simple preparation means you can whip these up quickly, even if you’re short on time. Whether you serve them as an appetizer or a main dish, Mummy Hot Dogs are sure to bring smiles and satisfy appetites during your Halloween celebration.
Ingredients (Serves 4-6 people):
- 1 can (8 oz) refrigerated crescent roll dough
- 8 hot dogs
- 2 tablespoons mustard or ketchup (for decoration)
- Cooking spray or parchment paper
Cooking Instructions:
- Preheat the Oven: Start by preheating your oven to 375°F (190°C). This guarantees that the crescent roll dough bakes evenly and achieves a golden-brown color.
- Prepare the Dough: Open the can of crescent roll dough and unroll it onto a clean, flat surface. Using a sharp knife or a pizza cutter, slice the dough into thin strips, approximately 1/4 inch wide. These strips will serve as the “bandages” for your mummies.
- Wrap the Hot Dogs: Take one hot dog and begin wrapping it with the dough strips, leaving a small gap for the mummy’s face. Make sure to overlap the strips slightly to mimic the look of bandages. Repeat this process for all eight hot dogs.
- Arrange on Baking Sheet: Place the wrapped hot dogs on a baking sheet lined with parchment paper or sprayed with cooking spray to prevent sticking.
- Bake: Transfer the baking sheet to the preheated oven and bake for 12-15 minutes, or until the dough is golden brown and cooked through.
- Decorate the Faces: Once baked, remove the Mummy Hot Dogs from the oven and allow them to cool slightly. Use a small amount of mustard or ketchup to add eyes to each mummy, giving them a playful expression.
Extra Tips:
For an added touch, you can use edible eyes instead of mustard or ketchup for a more authentic mummy look. If you prefer vegetarian options, substitute the hot dogs with veggie dogs.
Be sure to watch the oven closely during the last few minutes of baking, as the crescent rolls can brown quickly. For a spicier version, consider using jalapeño or cheese-filled hot dogs. Serve these mummies warm with a side of your favorite dipping sauces for an ultimate Halloween treat.
Witch Finger Pretzels
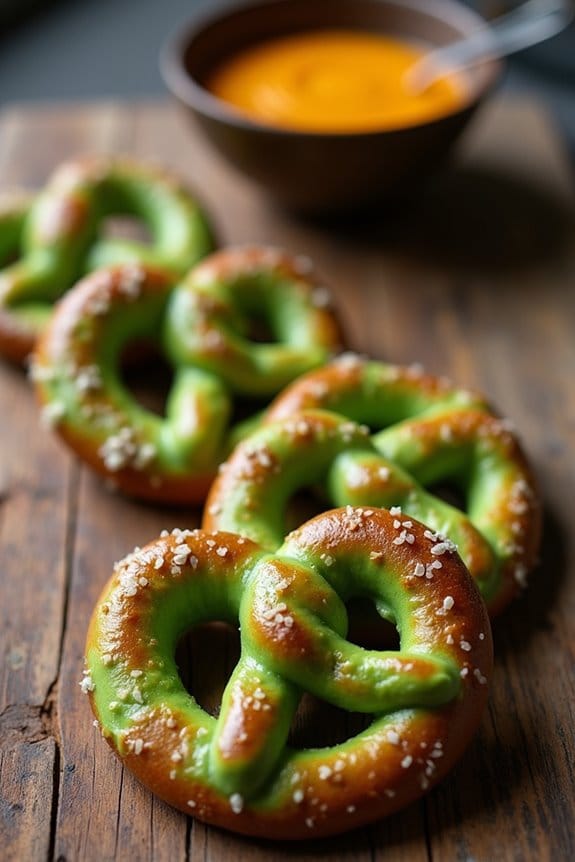
Witch Finger Pretzels are a fun and spooky snack perfect for a Halloween work party. These pretzels are shaped like creepy witch fingers, complete with an almond “fingernail” and a spooky green hue. Not only are they visually striking, but they also pack a satisfying crunch and a delightful salty-sweet flavor that will have your colleagues reaching for more.
They’re easy to make and can be prepared in advance, allowing you to focus on other party preparations.
The pretzels are made using refrigerated breadstick dough, which is dyed green to give them their eerie appearance. The dough is rolled and shaped into fingers, then baked to perfection. The finishing touch is an almond slice at the tip of each pretzel finger, which acts as the “fingernail.” You can serve these Witch Finger Pretzels with a side of mustard or cheese dip to enhance the flavor and make them even more irresistible.
Ingredients (Serves 4-6):
- 1 can (11 oz) refrigerated breadstick dough
- Green food coloring
- 24 whole blanched almonds
- 1 tablespoon unsalted butter, melted
- Coarse sea salt
- Mustard or cheese dip (optional, for serving)
Cooking Instructions:
- Preheat the Oven: Begin by preheating your oven to 375°F (190°C). Line a baking sheet with parchment paper to prevent the pretzels from sticking.
- Prepare the Dough: Open the can of refrigerated breadstick dough and separate the dough strips. Add a few drops of green food coloring to each strip and knead it gently until the color is evenly distributed throughout the dough.
- Shape the Fingers: Take each strip of dough and roll it between your hands until it’s about the thickness of a finger. Pinch the dough at intervals to create knuckle shapes, mimicking the natural look of a finger.
- Add the Fingernails: Press a whole blanched almond onto one end of each dough strip to create a fingernail. Make sure it’s firmly attached.
- Bake the Pretzels: Arrange the shaped dough on the prepared baking sheet, ensuring they’re spaced evenly apart. Brush each finger with melted butter and sprinkle a pinch of coarse sea salt on top.
- Bake: Place the baking sheet in the preheated oven and bake for about 10-12 minutes or until the pretzels are golden and puffed.
- Cool and Serve: Once baked, remove the pretzels from the oven and let them cool slightly on a wire rack. Serve them warm or at room temperature with mustard or cheese dip if desired.
Extra Tips:
To enhance the spooky effect, you can add a small amount of cocoa powder to the dough before adding the food coloring, giving the witch fingers a slightly dirty look.
If you want to add more flavor, consider sprinkling some garlic or onion powder along with the salt before baking. Store any leftover pretzels in an airtight container to keep them fresh.
For a sweeter variation, you can dip the tips of the fingers in melted chocolate instead of using almonds.
Ghostly Popcorn Balls

Searching for a spooky yet delicious treat to serve at your work Halloween party? Search no more than Ghostly Popcorn Balls! These delightful snacks aren’t only easy to make but also add a touch of ghostly fun to your party spread.
Each popcorn ball is coated with a sweet, marshmallowy mixture and shaped to resemble a playful ghost, complete with charming candy eyes that are sure to catch everyone’s attention. Perfect for serving a crowd, these Ghostly Popcorn Balls are a treat that will have your colleagues talking long after the party is over.
This recipe yields enough for 4-6 people, making it ideal for small gatherings or as part of a larger buffet. The combination of crunchy popcorn and gooey marshmallow is a classic that never goes out of style, and the ghostly theme adds a whimsical twist that’s perfect for Halloween.
Plus, they’re easy to personalize with different candies or decorations to suit your preferences. Get ready to impress your coworkers with this fun and festive treat!
Ingredients (Serves 4-6):
- 8 cups popped popcorn
- 1 cup mini marshmallows
- 1/2 cup granulated sugar
- 1/4 cup unsalted butter
- 1/4 cup light corn syrup
- 1/2 teaspoon vanilla extract
- Pinch of salt
- Candy eyes or mini chocolate chips
Instructions:
- Prepare the Popcorn: Start by popping 8 cups of popcorn. You can use an air popper or stovetop method. Once popped, place the popcorn in a large mixing bowl, removing any unpopped kernels.
- Create the Marshmallow Mixture: In a medium saucepan, combine the mini marshmallows, granulated sugar, unsalted butter, light corn syrup, salt, and vanilla extract. Cook over medium heat, stirring constantly, until the mixture is smooth and all the ingredients are well incorporated.
- Combine Popcorn and Mixture: Pour the marshmallow mixture over the popcorn in the mixing bowl. Quickly and gently stir to coat all the popcorn pieces with the mixture. Be careful as the mixture will be hot.
- Form the Popcorn Balls: Once the popcorn is fully coated, let it cool slightly until it’s safe to handle. Grease your hands with a little butter or cooking spray to prevent sticking, then form the popcorn into balls about the size of a small fist. Press firmly to guarantee they hold their shape.
- Add the Eyes: While the popcorn balls are still slightly warm and sticky, press candy eyes or mini chocolate chips onto each one to create ghostly faces. Allow the popcorn balls to set and cool completely on a sheet of wax paper.
Extra Tips:
When making Ghostly Popcorn Balls, remember to work quickly when shaping the balls, as the marshmallow mixture can harden as it cools. If you’re making a larger batch, you might want to enlist help to shape the balls faster.
Additionally, if you prefer a less sweet treat, you can reduce the amount of sugar or corn syrup. For a fun variation, consider adding a few drops of food coloring to the marshmallow mixture for a colorful twist, or mix in some themed sprinkles for extra flair. Enjoy your spooky creations!
Pumpkin Patch Brownies
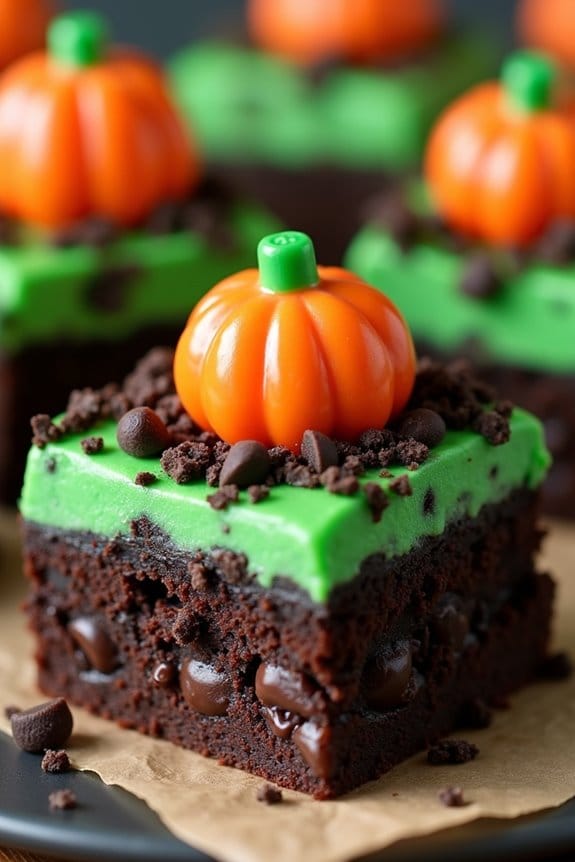
Pumpkin Patch Brownies are the perfect spooky treat to bring to your work party this Halloween. These delectable brownies aren’t only rich and chocolatey but also come with a festive twist that will surely impress your colleagues.
The top of the brownies is decorated to resemble a pumpkin patch, complete with candy pumpkins and crushed cookie “dirt.” They’re both delicious and fun to make, providing a visually appealing centerpiece for your Halloween dessert table.
The combination of fudgy brownies and the whimsical pumpkin patch decoration makes this dessert a crowd-pleaser. You can easily customize the decorations to suit your style, adding more candy pumpkins or even some candy corn for an extra pop of color.
Fudgy brownies with a whimsical pumpkin patch decoration make for a delightfully customizable Halloween treat.
Plus, this recipe is simple enough for bakers of all skill levels, so you can whip these up with ease and focus on enjoying the party with your coworkers.
Ingredients for Pumpkin Patch Brownies (Serves 4-6):
- 1 box of brownie mix (and ingredients required per box instructions)
- 1 cup of chocolate chips
- 1 cup of crushed chocolate sandwich cookies
- 1/2 cup of green frosting
- 12-16 candy pumpkins
- Optional: candy corn or other Halloween-themed candies
Cooking Instructions:
- Preheat the Oven: Begin by preheating your oven to 350°F (175°C) or as directed on the brownie mix box.
- Prepare the Brownie Mix: Follow the instructions on the brownie mix box to prepare the batter. Stir in the chocolate chips for extra chocolaty goodness.
- Bake the Brownies: Pour the prepared brownie batter into a greased baking pan. Bake in the preheated oven for the time specified on the brownie mix box, typically 20-25 minutes, or until a toothpick inserted into the center comes out with a few moist crumbs.
- Cool the Brownies: Once baked, allow the brownies to cool completely in the pan. This will guarantee they set properly and are easier to decorate.
- Decorate the Pumpkin Patch: Once the brownies are cool, spread the green frosting over the entire surface to create a grassy base. Sprinkle the crushed chocolate sandwich cookies over the frosting to mimic dirt.
- Create the Pumpkin Patch: Place candy pumpkins on top of the “dirt,” spacing them as desired to create the appearance of a pumpkin patch. Add any additional candies like candy corn for extra decoration.
- Serve and Enjoy: Carefully cut the decorated brownies into squares, making sure each piece has at least one candy pumpkin, and serve at your Halloween work party.
Extra Tips:
For an even more festive touch, you can use a piping bag with a small round tip to add green frosting vines and leaves around the candy pumpkins.
If you’re short on time, you can make the brownies a day in advance and store them in an airtight container after cooling. Just wait to add the frosting and decorations until the day of the party to keep them fresh and vibrant.
Enjoy this fun and delicious Halloween treat!
Eyeball Caprese Bites

Halloween is a time for creativity, and what better way to bring some spooky fun to your work party than with Eyeball Caprese Bites? This delightful twist on a classic Italian appetizer combines the fresh flavors of mozzarella, tomatoes, and basil with a creepy Halloween theme.
These bite-sized treats aren’t only delicious but also visually striking, making them a perfect addition to your Halloween spread. Each Eyeball Caprese Bite is designed to look like a spooky eyeball, complete with a “pupil” made from an olive slice.
These bites are easy to assemble, require no cooking, and can be prepared in advance, making them an excellent choice for busy hosts. Whether you’re catering for a small gathering or a larger office party, these ghoulishly good snacks will surely impress your colleagues and get everyone in the Halloween spirit.
Ingredients for Serving Size of 4-6 People:
- 12 cherry or grape tomatoes
- 12 small mozzarella balls (bocconcini)
- 6 large fresh basil leaves
- 12 black olive slices
- 1 tablespoon balsamic glaze
- Salt and pepper to taste
- 12 toothpicks
Cooking Instructions:
- Prepare the Tomatoes and Mozzarella: Begin by washing the cherry tomatoes thoroughly. Pat them dry with a paper towel. Using a small knife, carefully cut a small slice off the bottom of each tomato to create a flat surface so they can stand upright. Set the tomatoes aside.
- Slice the Olives: Take the black olives and slice them into thin, round pieces. These will serve as the “pupils” of your eyeballs. Each slice should be thin enough to stick to the mozzarella but thick enough to stand out.
- Assemble the Bites: Take a toothpick and gently skewer through a mozzarella ball. Place a basil leaf on top of the mozzarella, followed by a cherry tomato. Make sure that the flat side of the tomato is at the bottom. Finally, place an olive slice on top of the mozzarella, pressing it down gently so it adheres.
- Plate and Season: Arrange the assembled Caprese bites on a serving platter. Drizzle them lightly with balsamic glaze. Season with a pinch of salt and pepper to enhance the flavors.
- Serve and Enjoy: Your Eyeball Caprese Bites are ready to serve. Confirm they’re refrigerated until ready to serve to keep the mozzarella fresh.
Extra Tips:
For a more intense flavor, you can marinate the mozzarella balls in a little olive oil, minced garlic, and herbs for an hour before assembling the bites.
If you’re preparing these in advance, store them in the refrigerator and drizzle the balsamic glaze just before serving to prevent the basil leaves from wilting. Additionally, if you want to add a touch of color, consider using heirloom cherry tomatoes for a festive look.
Monster Mouth Apple Slices

If you’re planning a Halloween-themed work party, these Monster Mouth Apple Slices are a fun and spooky treat that’s sure to impress your colleagues. Not only are they easy to make, but they also offer a healthy snack option amid all the sugary treats typically found at Halloween festivities.
The combination of apples, peanut butter, and marshmallows creates a delicious balance of flavors and textures, while the creative presentation adds a festive touch to your party spread.
This recipe for Monster Mouth Apple Slices is designed to serve 4-6 people, making it perfect for a small gathering or as part of a larger array of Halloween goodies. These playful snacks are made by sandwiching peanut butter between apple slices and using small marshmallows to create the appearance of monster teeth. They’re a delightful and nutritious addition to any Halloween celebration, guaranteeing that your party menu has both charm and taste.
Ingredients (Serving Size: 4-6 people):
- 3 large apples (Granny Smith, Honeycrisp, or your preferred variety)
- 1 cup creamy peanut butter
- 1/2 cup small marshmallows
- Lemon juice (optional, to prevent browning)
Cooking Instructions:
- Prepare the Apples: Start by washing and drying the apples thoroughly. Then, slice each apple into even wedges. Aim for about 8 wedges per apple. If you want to prevent the apples from browning, you can lightly brush each slice with a bit of lemon juice.
- Apply Peanut Butter: Take one apple slice and spread about a teaspoon of creamy peanut butter on one side. Be generous, but make sure the peanut butter doesn’t spill over too much as it will help hold the marshmallows in place.
- Create the Monster Mouth: Place 6-8 small marshmallows along the edge of the peanut butter-covered side of the apple slice. These will act as the “teeth” of the monster mouth.
- Complete the Mouth: Take another apple slice and spread a small amount of peanut butter on one side. Place this slice on top of the marshmallows, peanut butter side down, to form a sandwich with marshmallow teeth peeking out.
- Repeat the Process: Continue this process with the remaining apple slices and ingredients until all the Monster Mouths are assembled.
- Serve and Enjoy: Arrange the completed Monster Mouth Apple Slices on a platter and serve immediately, or store them in the refrigerator until your party begins.
Extra Tips:
When selecting apples for this dish, consider using a variety with a good balance of sweetness and tartness, such as Honeycrisp or Granny Smith, to complement the peanut butter.
If you want to make these treats nut-free, substitute the peanut butter with sunflower seed butter or any other nut-free alternative. To add more Halloween flair, consider using food-safe edible markers to draw spooky faces on the outer skin of the apple slices, enhancing the festive look of your Monster Mouths.
Creepy Crawly Cupcakes
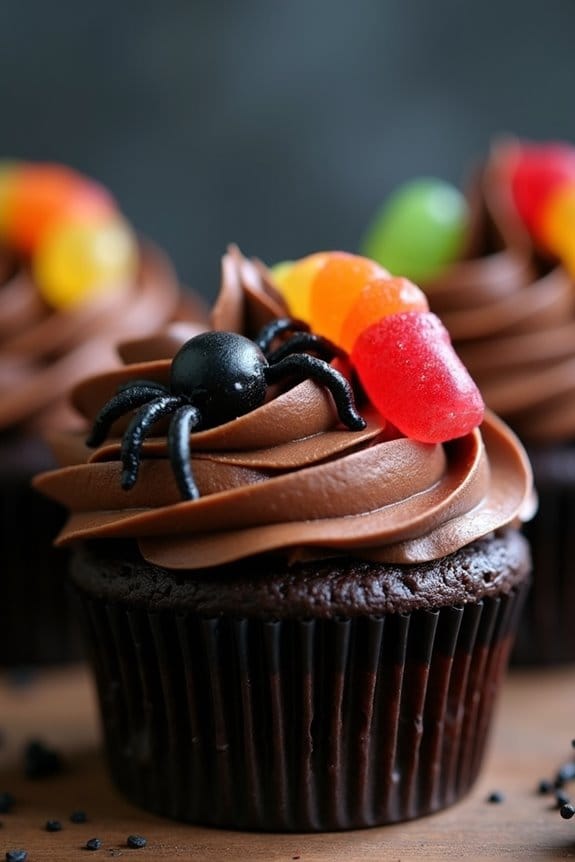
Halloween is the perfect time to release your creativity in the kitchen, and Creepy Crawly Cupcakes are sure to be a spine-tingling hit at any work party. These cupcakes aren’t just visually appealing but also deliciously chocolatey, making them an irresistible treat. The combination of rich chocolate cupcakes topped with eerie, edible decorations will have your colleagues talking about your culinary skills long after the party ends.
To bring these spooky cupcakes to life, the cake base is infused with cocoa and a hint of vanilla, while the frosting is a smooth and creamy chocolate buttercream. The real fun begins with the decorations, where you can let your imagination run wild. Use gummy worms, candy spiders, and other creepy crawlies to adorn your cupcakes, creating a scene straight out of a haunted garden. This recipe serves 4-6 people, making it perfect for a small gathering or a contribution to a larger dessert table.
Ingredients:
- 1 cup all-purpose flour
- 1 cup granulated sugar
- 1/2 cup unsweetened cocoa powder
- 1 teaspoon baking powder
- 1/2 teaspoon baking soda
- 1/4 teaspoon salt
- 1/2 cup milk
- 1/4 cup vegetable oil
- 1 large egg
- 1 teaspoon vanilla extract
- 1/2 cup boiling water
For the Frosting:
- 1/2 cup unsalted butter, softened
- 1 1/2 cups powdered sugar
- 1/4 cup unsweetened cocoa powder
- 2 tablespoons milk
- 1 teaspoon vanilla extract
For Decoration:
- Gummy worms
- Candy spiders
- Edible googly eyes
Instructions:
- Preheat the Oven: Start by preheating your oven to 350°F (175°C). Line a muffin tin with paper cupcake liners to prevent sticking and guarantee easy removal.
- Prepare the Dry Ingredients: In a large mixing bowl, sift together the flour, sugar, cocoa powder, baking powder, baking soda, and salt. This guarantees that the dry ingredients are well combined and free from lumps.
- Mix Wet Ingredients: In a separate bowl, whisk together the milk, vegetable oil, egg, and vanilla extract until fully combined. Pour the wet mixture into the dry ingredients and stir until just combined.
- Add Boiling Water: Carefully add the boiling water to the batter, mixing slowly. The batter will be thin, but this is normal and will result in moist cupcakes.
- Fill the Cupcake Liners: Pour the batter into the cupcake liners, filling each about two-thirds full to allow room for rising.
- Bake the Cupcakes: Place the muffin tin in the preheated oven and bake for 18-22 minutes, or until a toothpick inserted into the center of a cupcake comes out clean. Remove from the oven and let cool completely.
- Prepare the Frosting: In a medium bowl, beat the softened butter until smooth. Gradually add the powdered sugar and cocoa powder, beating until fully combined. Add the milk and vanilla extract, continuing to beat until the frosting is light and fluffy.
- Decorate the Cupcakes: Once the cupcakes are completely cool, spread or pipe the chocolate frosting on top. Decorate with gummy worms, candy spiders, and googly eyes to create your creepy crawly theme.
Extra Tips:
For an extra touch of spooky flair, consider using a fork to create a dirt-like texture on the frosting before adding the decorations. If you want the cupcakes to have an even more pronounced creepy theme, use food coloring to tint the frosting green or orange.
Vampire Bat Cheese Platter
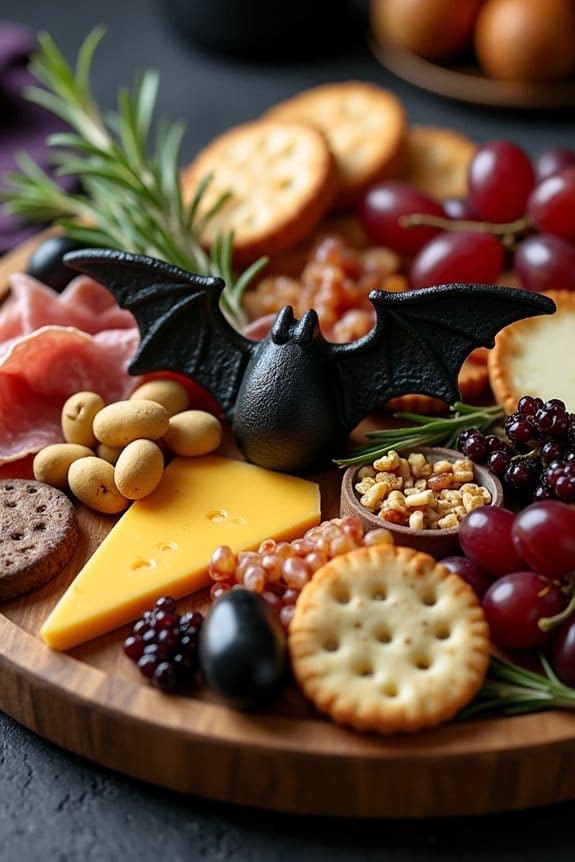
If you’re looking for a spooktacular treat for your work Halloween party, a Vampire Bat Cheese Platter is the perfect choice! This platter isn’t only visually impressive but also offers a delightful mix of flavors that your colleagues will love. The key to this platter is the creative assembly of ingredients to resemble a vampire bat, complete with dark, savory cheese and an assortment of delicious accompaniments.
It’s both a treat for the eyes and for the taste buds, making it an ideal centerpiece for your Halloween gathering. This Vampire Bat Cheese Platter serves 4-6 people and includes a variety of cheeses, cured meats, and other tasty snacks. The star of the platter is the bat-shaped cheese, which can be made using a stencil or freehand cutting.
To add to the Halloween theme, we’ll use dark, moody ingredients that complement the bat motif. The platter can be as elaborate or simple as you like, but attention to detail will make it stand out. Here’s how to make this festive and frightfully delicious dish:
Ingredients:
- 1 block of aged cheddar cheese
- 1 block of gouda cheese
- 1 small log of goat cheese
- 1 cup black olives
- 1 cup Kalamata olives
- 1 cup grapes (preferably black or red)
- 100g prosciutto
- 100g salami
- 1 cup mixed nuts
- 1 cup dried cranberries
- Fresh rosemary sprigs for garnish
- Black food coloring
- Crackers and breadsticks
Instructions:
- Prepare the Cheese Bat:
- Begin by cutting the aged cheddar cheese into a bat shape. You can use a bat-shaped cookie cutter or a stencil to trace the shape with a knife. If using a knife, be careful to make clean cuts for a neat shape.
- Use black food coloring to lightly brush over the surface of the cheddar bat to give it a spooky appearance. Set aside to dry.
- Assemble the Platter:
- On a large serving board, place the bat-shaped cheddar cheese as the centerpiece.
- Arrange the gouda cheese and goat cheese around the bat, slicing them into wedges or rounds for easy serving.
- Neatly place the prosciutto and salami around the cheeses, folding them into different shapes for variety and visual appeal.
- Add the Accompaniments:
- Scatter black and Kalamata olives around the platter, clustering them in small groups.
- Place the grapes in bunches around the platter to add a pop of color and sweetness.
- Add mixed nuts and dried cranberries to fill in any gaps and add texture to the platter.
- Garnish with fresh rosemary sprigs for a touch of greenery and aromatic flair.
- Arrange the Crackers and Breadsticks:
- Place crackers and breadsticks around the edges of the platter or in a separate dish nearby for easy access.
- Consider using a variety of crackers for different textures and flavors.
Extra Tips:
For an extra spooky touch, use a small amount of black food coloring to dye portions of the goat cheese black and create eyes or other bat features on the cheddar bat.
When arranging the platter, think about balance and symmetry to make it visually appealing. Feel free to customize the platter with your favorite cheeses and accompaniments, but try to maintain the dark and moody color palette to keep the Halloween theme consistent.
Make sure to prepare the platter a few hours before the party to allow the flavors to meld and the presentation to remain fresh.
Bloody Mary Shrimp Shooters
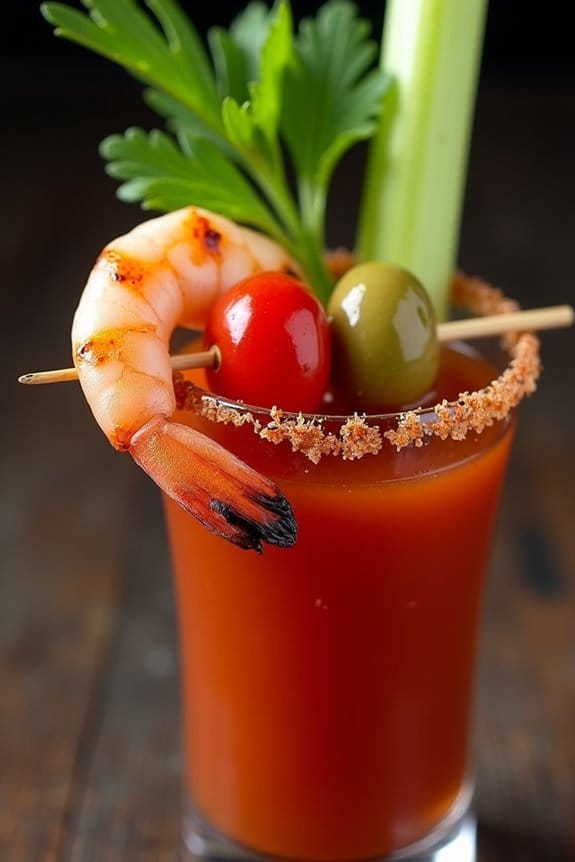
Adding a spooky yet sophisticated touch to your Halloween work party has never been easier with these Bloody Mary Shrimp Shooters. Not only do they serve as a visually striking appetizer, but they also pack a flavorful punch that perfectly complements the Halloween theme. The combination of succulent shrimp, zesty Bloody Mary mix, and an array of garnishes make this dish both delicious and memorable.
These shooters are easy to prepare and can be made ahead of time, allowing you to focus on other party preparations. The spicy kick from the Bloody Mary mix pairs beautifully with the chilled shrimp, and the garnishes add layers of flavor and texture. Whether served as a starter or part of a larger buffet, these Bloody Mary Shrimp Shooters are sure to be a hit among your colleagues.
Ingredients for 4-6 people:
- 24 large shrimp, peeled and deveined
- 1 tablespoon olive oil
- Salt and pepper to taste
- 2 cups Bloody Mary mix
- 1 tablespoon Worcestershire sauce
- 1 tablespoon hot sauce (adjust to taste)
- 1 teaspoon prepared horseradish
- Celery salt, for rimming the glasses
- 2 stalks of celery, cut into 4-6 inch sticks
- 1 lemon, quartered
- Cherry tomatoes, for garnish
- Olives, for garnish
- Fresh parsley, for garnish
Instructions:
- Prepare the shrimp: Preheat your grill or a grill pan over medium-high heat. Toss the peeled and deveined shrimp with olive oil, salt, and pepper. Grill the shrimp for 2-3 minutes on each side until they’re pink and opaque. Remove from heat and set aside to cool.
- Make the Bloody Mary mix: In a large pitcher, combine the Bloody Mary mix, Worcestershire sauce, hot sauce, and horseradish. Stir well to verify the flavors are evenly distributed.
- Rim the glasses: Pour a small amount of celery salt onto a plate. Moisten the rims of your shot glasses with a lemon wedge, then dip the rims into the celery salt to coat.
- Assemble the shooters: Pour the Bloody Mary mix evenly into each shot glass, filling them about three-quarters full. Place one grilled shrimp onto the rim of each glass.
- Garnish: Add a celery stick to each glass, along with a cherry tomato and an olive on a cocktail skewer. Finish with a sprig of fresh parsley for a pop of color.
Extra Tips:
For an extra touch of flavor, consider marinating the shrimp in a bit of lemon juice and garlic before grilling. This will enhance the shrimp’s taste and create a more cohesive flavor profile with the Bloody Mary mix.
Additionally, you can adjust the spiciness of the mix by adding more or less hot sauce according to your preference. Finally, confirm that your shrimp are chilled before serving for a revitalizing contrast with the spicy, tangy Bloody Mary mix.
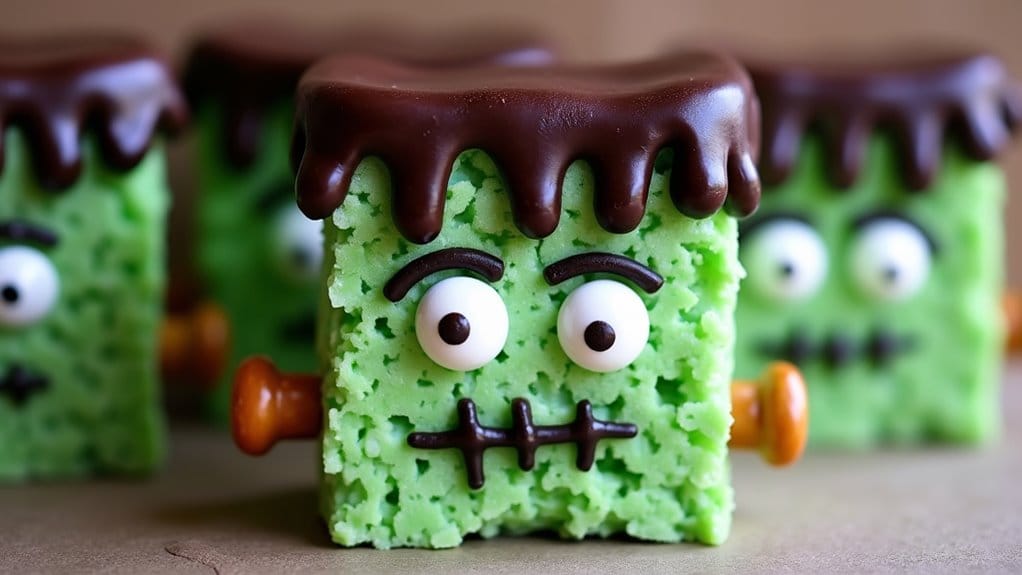
Frankenstein Rice Krispie Treats
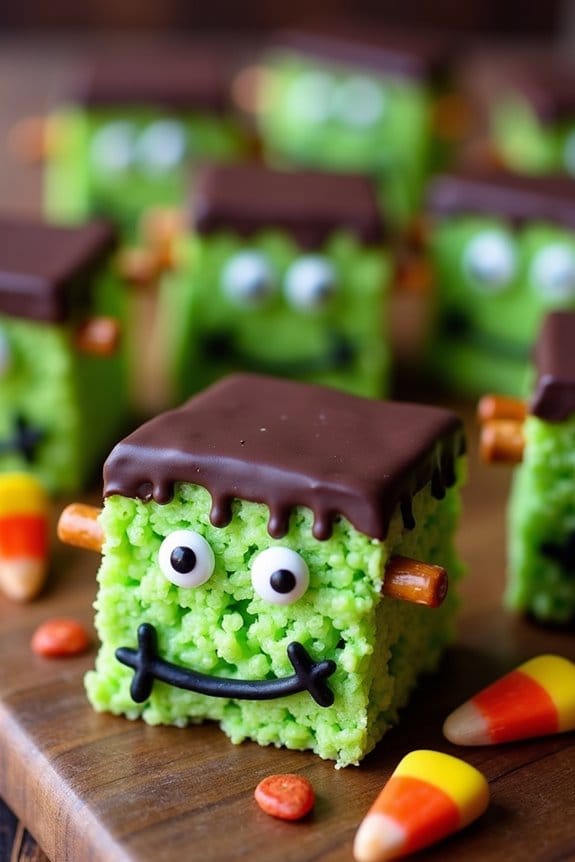
Frankenstein Rice Krispie Treats are a fun and festive way to bring the spirit of Halloween into your workplace party. These treats aren’t only delicious but also visually appealing, certain to catch the eye of your colleagues. With a simple twist on the classic Rice Krispie treats, you can create adorable Frankenstein-inspired snacks that are perfect for sharing. The combination of marshmallows, crispy rice cereal, and vibrant decorations makes them a hit among both children and adults.
Transform your workplace party with these delightful and eye-catching Frankenstein Rice Krispie Treats, perfect for sharing!
This recipe is designed for a serving size of 4-6 people, making it ideal for small gatherings. The process involves making the traditional Rice Krispie treats and then transforming them into mini Frankenstein monsters with the help of some creative decorating. You can easily customize the decorations to suit your preferences or stick to the classic green and black Frankenstein colors. The result is a batch of spooky and delightful treats that everyone will love.
Ingredients:
- 3 tablespoons unsalted butter
- 1 package (10 ounces) mini marshmallows
- 6 cups crispy rice cereal
- Green food coloring
- 1 cup chocolate chips
- 1 tablespoon coconut oil
- Black icing
- Candy eyes
- Pretzel sticks
- Edible candy corn or colored candy for decoration
Instructions:
- Prepare the Base: In a large saucepan, melt the unsalted butter over low heat. Once melted, add the mini marshmallows and stir continuously until they’re completely melted and smooth. Add a few drops of green food coloring to the melted mixture and stir well until you reach the desired shade of green.
- Mix in the Cereal: Remove the saucepan from heat and immediately add the crispy rice cereal. Stir the mixture until all the cereal is evenly coated with the green marshmallow mixture.
- Form the Treats: Lightly grease a 9×13-inch baking dish with butter or non-stick spray. Press the green Rice Krispie mixture into the dish, using a spatula or your hands to flatten and spread it evenly. Allow it to cool and set for about 30 minutes.
- Cut the Shapes: Once set, remove the entire block of Rice Krispie treats from the dish and place it on a cutting board. Using a sharp knife, cut the block into rectangular shapes that resemble small heads (approximately 2×3 inches each).
- Melt Chocolate: In a microwave-safe bowl, combine the chocolate chips and coconut oil. Microwave in 30-second intervals, stirring in between, until the chocolate is completely melted and smooth.
- Decorate the Tops: Dip the top edge of each rectangular treat into the melted chocolate to create Frankenstein’s hair. Place the dipped treats on a parchment-lined tray and attach two candy eyes below the chocolate section.
- Add Facial Features: Use black icing to draw a mouth and add any other facial details you desire, such as stitches. Break pretzel sticks into small pieces and insert them into the sides of the treats to resemble bolts.
- Final Touches: Add candy corn or any other edible decorations to give your Frankenstein treats additional personality. Let the treats sit until the chocolate is fully set.
Extra Tips:
For the best results, ascertain that your marshmallow mixture is completely smooth before adding the green food coloring and crispy rice cereal. If you prefer a more vibrant green, you can always add more food coloring.
When decorating, feel free to get creative with your designs and use different types of candies for varied expressions. To prevent sticking, you can lightly coat your hands with butter or non-stick spray when pressing the mixture into the dish.
These treats can be made a day in advance and stored in an airtight container, making them a convenient option for busy schedules.
