
This Halloween, let’s sprinkle some magic on our treat tables with whimsical and healthy fruit snacks. These 12 delightful ideas are perfect for adding a festive touch while keeping things nutritious. Think ghostly banana pops and spooky spider grapes that are fun to create and a joy to eat. Ready to enchant your Halloween gathering and impress your guests? Let’s explore the enchanting world of creative fruit snacks that are sure to be a hit!
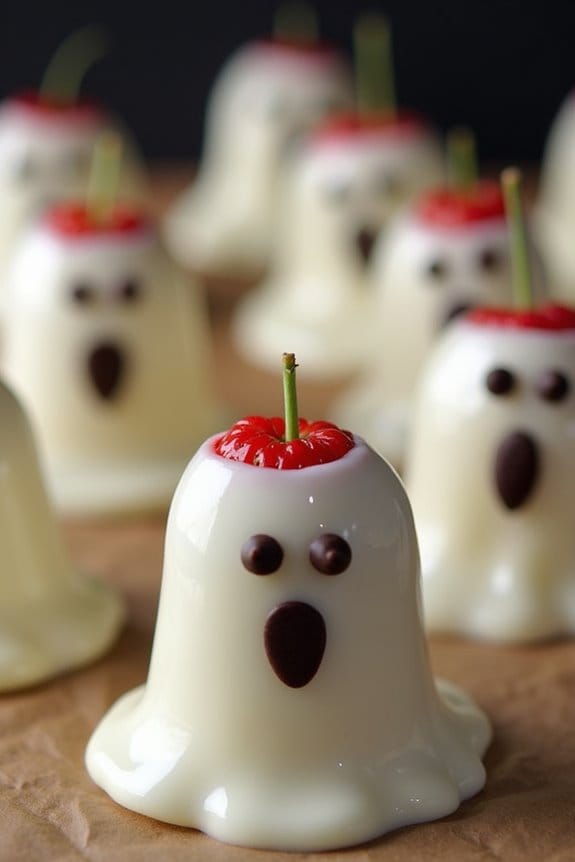
Ghostly Banana Pops

Ghostly Banana Pops are a delightful and healthy treat perfect for Halloween festivities. These spooky snacks combine the natural sweetness of bananas with the richness of white chocolate, creating a treat that’s both fun and easy to make. With their ghostly appearance, they’re sure to be a hit among children and adults alike at any Halloween party.
The recipe requires minimal ingredients and little preparation time, making it an excellent choice for a last-minute Halloween snack idea.
These Halloween Fruit Snacks aren’t only visually appealing but also provide a slight nutritional boost, thanks to the bananas. The bananas are dipped in melted white chocolate and decorated with chocolate chips to create adorable ghost faces. The result is a treat that captures the spirit of Halloween without compromising on health.
The preparation process is straightforward, making it a fun activity to involve kids in. With just a few easy steps, you can have a batch of Ghostly Banana Pops ready to delight your guests.
Ingredients (Serves 4-6 people):
- 3 large bananas
- 1 cup of white chocolate chips
- Mini chocolate chips for eyes
- Popsicle sticks or lollipop sticks
Instructions:
- Prepare the Bananas: Start by peeling the bananas and cutting them in half crosswise. This will give you six banana halves, which will serve as the base for your ghost pops.
- Insert the Sticks: Carefully insert a popsicle stick or lollipop stick into the flat end of each banana half. Confirm that the stick is securely positioned so that the banana doesn’t slip off during dipping.
- Melt the White Chocolate: In a microwave-safe bowl, melt the white chocolate chips. Heat them in the microwave in 30-second intervals, stirring in between, until the chocolate is fully melted and smooth. Be careful not to overheat the chocolate, as it can become clumpy and unusable.
- Dip the Bananas: Dip each banana half into the melted white chocolate, confirming it’s fully covered. Hold the banana over the bowl and gently shake off any excess chocolate.
- Add the Eyes: Before the chocolate sets, press two mini chocolate chips into the banana to create the eyes of the ghost. Position them towards the top of the banana, with the pointed ends facing inwards.
- Chill the Pops: Place the coated bananas on a baking sheet lined with parchment paper. Refrigerate them for about 20-30 minutes, or until the white chocolate has hardened completely.
- Serve and Enjoy: Once the chocolate has set, remove the Ghostly Banana Pops from the refrigerator and serve them chilled.
Extra Tips:
For an extra touch of spookiness, consider adding a small amount of coconut oil to the white chocolate during melting to make it smoother and easier to work with.
If you’re serving these at a party, keep them refrigerated until just before serving to prevent the chocolate from melting. Additionally, you can experiment with different decorations, like using candy eyes or colored icing for extra ghostly features.
If you don’t have mini chocolate chips, you can use small dots of melted dark chocolate for the eyes, applied with a toothpick for precision.
Spooky Spider Grapes

Get ready to delight your family and friends with a ghoulishly fun and healthy treat this Halloween – Spooky Spider Grapes! This easy-to-make snack is perfect for your haunted gatherings or as a thrilling addition to your Halloween party spread.
By transforming ordinary grapes into creepy-crawly spiders, you’ll be able to serve up a nutritious snack that’s both festive and frightfully delicious. With just a few simple ingredients and a pinch of creativity, you can whip up these spine-chilling snacks in no time.
Spooky Spider Grapes aren’t only visually appealing but also incredibly easy and quick to prepare. They’re an excellent way to get kids involved in the kitchen, allowing them to express their creativity while sneaking in some healthy fruit.
Serve these eerie little creatures on a platter, and watch as your guests marvel at your culinary creativity. With their delightful combination of sweet grapes and crunchy pretzel legs, these spiders are sure to be a hit at any Halloween celebration.
Ingredients (Serves 4-6):
- 2 cups seedless black or red grapes
- 24 small pretzel sticks
- 24 candy eyes
- 2 tablespoons melted chocolate or frosting (for attaching eyes)
Cooking Instructions:
- Prepare the Grapes: Rinse the grapes thoroughly under cold water and pat them dry with a paper towel. Make sure they’re completely dry to confirm that the chocolate or frosting will adhere properly.
- Insert the Legs: Take each grape and carefully insert four pretzel sticks into each side to create the spider’s legs. Be gentle to avoid breaking the pretzels or splitting the grapes.
- Attach the Eyes: Dip a toothpick into the melted chocolate or frosting and use it to apply a small dot on the back of each candy eye. Gently press two candy eyes onto the top of each grape to form the spider’s eyes.
- Chill and Serve: Place the assembled Spooky Spider Grapes on a tray and refrigerate for about 10 minutes to allow the chocolate or frosting to set. Once set, serve your creepy creations on a Halloween-themed platter.
Extra Tips:
For an extra spooky effect, consider using a mix of both black and red grapes to add variety to your platter.
If you’re serving these treats to very young children, consider substituting the pretzel sticks with softer alternatives, such as licorice strings, to guarantee safety.
Additionally, if candy eyes are unavailable, you can make eyes using small dots of white icing with a tiny chocolate chip as a pupil.
Keep these snacks chilled until serving to confirm the pretzel sticks maintain their crunch and the grapes stay fresh. Enjoy your frightful feast!
Pumpkin-Style Oranges

Pumpkin-Style Oranges are a delightful and healthy Halloween treat that’s perfect for both kids and adults. These fun, easy-to-make snacks mimic the look of festive pumpkins, adding a splash of creativity to your Halloween spread. Not only are they visually appealing, but they also provide a nutritious alternative to candy and other sugary snacks commonly associated with the holiday.
To create these charming Pumpkin-Style Oranges, you simply need a few ingredients and a little bit of time. This recipe serves 4-6 people and is perfect for a small Halloween gathering or family treat. The oranges are transformed into mini-pumpkins with the help of a few clever touches, making them an instant hit at any party or event.
Ingredients (serving size: 4-6 people):
- 6 medium-sized oranges
- 1 small cucumber
- 6 small mint leaves (optional)
Instructions:
- Prepare the Oranges:
- Begin by washing the oranges thoroughly to remove any dirt or pesticides. Dry them with a clean towel.
- Using a sharp paring knife, carefully slice a small circle off the top of each orange, making sure not to cut too deeply into the flesh.
- Carve the Faces:
- With the same paring knife, gently carve a simple jack-o’-lantern face into the side of each orange. You can create triangle eyes and a jagged mouth, or get creative with different designs.
- Be cautious to not pierce through to the other side of the orange.
- Prepare the Stems:
- Slice the cucumber into small, thick slices. Then, cut each slice into small rectangles to resemble pumpkin stems.
- Insert a cucumber stem into the top opening of each orange where you removed the circular slice. This will give the appearance of a pumpkin stem.
- Final Touches:
- For an optional aromatic touch, you can tuck a mint leaf next to the cucumber stem on each orange.
- Arrange the Pumpkin-Style Oranges on a serving platter for presentation.
Extra Tips:
When carving the oranges, make sure your knife is sharp and handle it with care to avoid injury. If you find it difficult to carve faces, you can use a fine-tipped permanent marker to draw on the orange peel.
This alternative is especially useful for younger kids who wish to help in the kitchen. Additionally, if you’re short on time, consider using clementines or tangerines, as their thinner skins are easier to work with.
Enjoy these festive snacks, knowing they’re as healthy as they’re fun!
Witchy Apple Bites
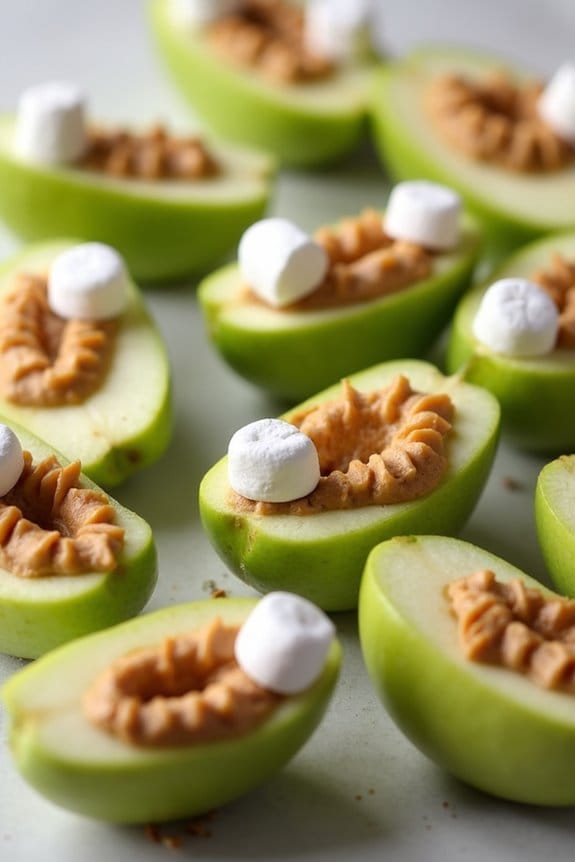
Halloween is the perfect time to get creative in the kitchen, and Witchy Apple Bites are a fun and healthy snack that will delight both kids and adults. These spooky treats aren’t only eye-catching but also provide a revitalizing twist to the usual sugary Halloween snacks. With a crispy apple base and spooky almond slivers, these bites are sure to be a hit at any Halloween festivity.
Not only are Witchy Apple Bites easy to make, but they also offer a nutritious option amidst the candy overload. The tartness of the green apples pairs perfectly with the sweetness of peanut butter, while the almond slivers add a crunchy texture that resembles witchy teeth. This recipe is perfect for serving 4-6 people, making it an ideal choice for a small Halloween gathering or party.
Ingredients for 4-6 servings:
- 3 large green apples
- 1/2 cup creamy peanut butter
- 1/4 cup sliced almonds
- 1/4 cup mini marshmallows
- 1 tablespoon lemon juice (optional)
Cooking Instructions:
- Prepare the Apples: Wash the apples thoroughly and pat them dry. Cut each apple into quarters and remove the core. Optionally, brush the apple slices with lemon juice to prevent browning.
- Create the Mouths: Take each apple quarter and cut a wedge out of the skin side to form a mouth-like opening. Be careful not to cut all the way through the apple slice.
- Add the Peanut Butter: Use a small spoon or a butter knife to spread a thin layer of peanut butter onto the inside of the ‘mouth’ of each apple slice.
- Place the Teeth: Insert sliced almonds into the peanut butter to resemble sharp, witchy teeth. Position them creatively to give each apple bite its unique spooky character.
- Add the Tongue: Use mini marshmallows to create a tongue by inserting one or two at the bottom of the mouth. Press gently so they stick to the peanut butter.
- Serve and Enjoy: Arrange the completed Witchy Apple Bites on a platter and serve immediately for the best texture and flavor.
Extra Tips:
When selecting apples, choose firm varieties like Granny Smith to guarantee they hold their shape well. If you’re serving these at a party, prepare them as close to serving time as possible to maintain their freshness and prevent the apples from browning.
For a nut-free version, substitute the peanut butter with sunflower seed butter or cream cheese. Feel free to get creative with the decorations, using candies or edible eyes to enhance the spooky effect. Enjoy these delightful bites as a fun and healthy addition to your Halloween celebrations!
Monster Melon Balls

Monster Melon Balls are a fun and spooky addition to your Halloween fruit snack lineup. These vibrant fruit snacks aren’t only tasty but also visually appealing, making them a hit at any Halloween party. Using a mix of melons such as watermelon, cantaloupe, and honeydew, you can create a colorful and nutritious treat that resembles eerie eyeballs.
This creative dish is perfect for kids and adults alike, providing a healthy alternative to the usual sugar-laden Halloween candies.
To create Monster Melon Balls, you’ll need a melon baller, which is crucial for achieving the perfect spherical shape. The melon balls are then dressed in a creepy citrus glaze that adds a tangy flavor, enhancing the sweetness of the melons. The glaze is made with fresh lime juice and a touch of honey, giving these monster-themed snacks a zesty twist.
Serve them in a hollowed-out melon or a festive bowl to complete the spooky presentation. This recipe is designed to serve 4-6 people, making it ideal for small gatherings or family parties.
Ingredients:
- 1 small watermelon
- 1 cantaloupe
- 1 honeydew melon
- 2 limes
- 2 tablespoons honey
- Optional: 1-2 tablespoons of mint leaves for garnish
Instructions:
- Prepare the Melons: Cut each melon in half and remove the seeds. Using a melon baller, scoop out as many balls as possible from the watermelon, cantaloupe, and honeydew. Place the melon balls into a large mixing bowl.
- Make the Citrus Glaze: In a small bowl, combine the juice of two limes with 2 tablespoons of honey. Whisk the mixture until the honey is fully dissolved and the glaze is smooth.
- Dress the Melon Balls: Pour the citrus glaze over the melon balls. Gently toss the balls in the glaze until they’re evenly coated. This will enhance their flavor and keep them moist.
- Chill: Cover the bowl with plastic wrap and refrigerate the melon balls for at least 30 minutes. This allows the flavors to meld together and guarantees the melon balls are invigoratingly cool when served.
- Serve: Transfer the chilled melon balls to a serving bowl or a hollowed-out half of a watermelon for a dramatic presentation. For an extra touch of freshness, garnish with mint leaves if desired.
Extra Tips:
When selecting melons, choose ones that are ripe but still firm to guarantee that the melon balls hold their shape. If you don’t have a melon baller, you can use a small ice cream scoop or a spoon, though the presentation may differ slightly.
For added fun, you can mix in some blueberries or grapes to mimic monster eyes. If you’re preparing this dish in advance, keep the melon balls and citrus glaze separate until just before serving to maintain their texture and freshness.
Creepy Crawly Kiwi Slices
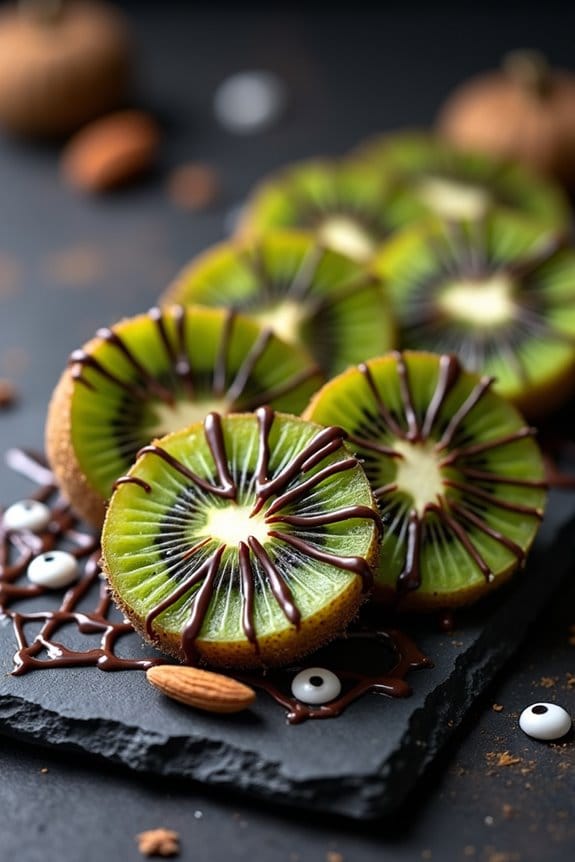
Creepy Crawly Kiwi Slices are a delightful and spooky treat that can add a fun twist to your Halloween festivities. These fruit snacks aren’t only delicious but also healthy, making them a perfect option for a Halloween party or a fun family activity.
A delightful and healthy Halloween treat for parties or family fun.
The vibrant green color of the kiwi paired with dark chocolate creates an eerie yet appetizing visual, reminiscent of slithering creatures. Easy to prepare, Creepy Crawly Kiwi Slices require minimal ingredients and effort, allowing you to focus more on enjoying the festivities rather than spending too much time in the kitchen.
This recipe is designed to serve 4-6 people, making it ideal for small gatherings or family get-togethers. By using fresh, ripe kiwis and a hint of chocolate, these snacks provide a revitalizing taste with a touch of sweetness.
The addition of almond slivers mimics the appearance of insect legs, adding to the creepy factor without sacrificing flavor. Whether you’re looking to impress guests with your creativity or need a quick treat for the kids, these kiwi slices are sure to be a hit.
Ingredients (Serving Size: 4-6 people)
- 4 ripe kiwis
- 1/2 cup dark chocolate chips
- 1 tablespoon coconut oil
- 1/4 cup almond slivers
- Edible googly eyes (optional)
Instructions
- Prepare the Kiwis: Start by peeling the kiwis using a knife or a vegetable peeler. Once peeled, slice each kiwi into 1/4-inch thick rounds. Place the kiwi slices on a parchment-lined baking sheet.
- Melt the Chocolate: In a microwave-safe bowl, combine the dark chocolate chips and coconut oil. Microwave in 30-second intervals, stirring in between, until the chocolate is completely melted and smooth.
- Decorate the Kiwi Slices: Using a spoon, drizzle the melted chocolate over each kiwi slice to create a web-like pattern. Alternatively, you can dip half of each kiwi slice in chocolate for a different look.
- Add the Almond Slivers: Before the chocolate sets, insert almond slivers into the chocolate on each kiwi slice to resemble the legs of a spider or creepy crawly creature.
- Add Googly Eyes: If using edible googly eyes, place them on the chocolate-covered part of each kiwi slice. Press gently to verify they stick.
- Chill: Transfer the decorated kiwi slices to the refrigerator. Let them chill for at least 15 minutes, or until the chocolate hardens.
- Serve: Once the chocolate is set, remove the kiwi slices from the refrigerator and serve on a platter. Enjoy your Creepy Crawly Kiwi Slices as a frightfully fun Halloween snack!
Extra Tips
For the best results, confirm that the kiwis are ripe but firm, as overly soft kiwis may not hold their shape well.
If you don’t have coconut oil, you can use vegetable oil as a substitute to help the chocolate melt smoothly. Feel free to experiment with different types of chocolate or toppings, like crushed nuts or sprinkles, to customize the treats to your liking.
If you have leftover melted chocolate, consider drizzling it over other fruits or snacks to avoid waste. Finally, always store any leftovers in the refrigerator to maintain freshness and prevent the chocolate from melting.
Ghoulish Grape Skewers

Ghoulish Grape Skewers are a fun and healthy Halloween fruit snack perfect for parties and gatherings. These skewers aren’t only easy to make but also a creative way to serve fruit that both kids and adults will enjoy. By using a combination of green and black grapes, you can create a spooky effect that fits perfectly with the Halloween theme.
Pairing these grapes with additional fruit or fun Halloween-themed adornments makes for an eye-catching treat that’s just as delicious as it’s festive. The versatility of Ghoulish Grape Skewers allows you to get creative with your presentation and ingredients. You can decorate the skewers with Halloween-themed picks or add other fruits like melon balls or berries to enhance the look and taste.
This recipe is simple enough to prepare in advance, leaving you more time to enjoy the festivities. Whether you’re hosting a Halloween party or simply looking for a fun snack, these skewers are a perfect choice.
Ingredients for 4-6 servings:
- 1 ½ cups green grapes
- 1 ½ cups black grapes
- 12 wooden skewers
- 1 cup melon balls (optional)
- Halloween-themed picks or stickers (optional)
Cooking Instructions:
- Prepare the Grapes: Wash the green and black grapes thoroughly under cold water and drain them in a colander. Pat the grapes dry with a clean towel to remove excess moisture.
- Prepare the Skewers: If using wooden skewers, make sure they’re clean and dry. Optionally, soak them in water for about 10 minutes if you plan to serve the skewers chilled, as this prevents the wood from splitting.
- Assemble the Skewers: Begin threading the grapes onto the skewers, alternating between green and black grapes. You can add a melon ball between every few grapes for an additional pop of color and flavor.
- Decorate the Skewers: If desired, use Halloween-themed picks or stickers to decorate the top of each skewer. This adds a festive touch and enhances the spooky theme.
- Chill and Serve: Once assembled, place the skewers on a platter and chill in the refrigerator for about 30 minutes before serving. This keeps the grapes fresh and crisp.
Extra Tips:
To add more variety, consider using different types of fruit like strawberries or pineapple chunks. You can also drizzle a bit of honey or melted chocolate over the skewers for an added treat.
If time allows, involve kids in assembling the skewers, as it’s a fun activity that lets them get creative with their designs. Remember, presentation is key, so arranging the skewers in a fun or spooky way on a platter will make this dish the star of any Halloween spread.
Frightful Fruit Kabobs

If you’re looking to add a spooky yet healthy twist to your Halloween festivities, Frightful Fruit Kabobs are the perfect treat. These kabobs aren’t only colorful and delicious, but they also provide a nutritious alternative to the usual sugary treats that dominate the holiday.
Ideal for both kids and adults, these skewers of fruit are creatively designed to resemble eerie creatures and creepy crawlies, making them an eye-catching addition to any Halloween party table.
Creating these kabobs is simple and requires only a few ingredients. You can customize them based on your favorite fruits or what you have available. The key is to select a variety of fruits that offer a mix of colors and textures, adding to the visual appeal of the dish.
With just a little bit of preparation, you’ll have a platter of Frightful Fruit Kabobs that are sure to impress your guests and provide a revitalizing break from the sugar rush.
Ingredients (for 4-6 people):
- 1 cup of green grapes
- 1 cup of black grapes
- 2 bananas
- 1 pineapple, cut into chunks
- 1 cup of strawberries
- 1 apple, cored and sliced
- 1 orange, peeled and segmented
- Wooden skewers
Cooking Instructions:
- Prepare the Fruits: Start by washing all the fruits thoroughly. Peel the bananas and cut them into bite-sized chunks. Core and slice the apple, and cut the pineapple into chunks if not already done.
- Assemble the Kabobs: Take a wooden skewer and begin threading the fruits. Alternate the fruits to create a visually appealing pattern. You can start with a green grape, followed by a chunk of pineapple, a slice of apple, a piece of banana, a strawberry, and a black grape. Continue this pattern until the skewer is full, leaving some space at the end to hold.
- Create Spooky Faces: For an extra Halloween touch, use a small knife to carve little faces into the bananas before threading them onto the skewers. You can also use small edible markers to draw faces on the strawberries or apples.
- Serve the Kabobs: Place the completed kabobs onto a serving platter. Arrange them in a way that showcases the variety of colors and the fun fruit faces.
- Chill Before Serving: For best results, chill the kabobs in the refrigerator for about 30 minutes before serving. This will help keep the fruits fresh and crisp.
Extra Tips:
When creating Frightful Fruit Kabobs, feel free to experiment with different types of fruit to suit your taste or dietary restrictions. You can add marshmallows or chocolate chips to enhance the spooky effect, or drizzle a little bit of dark chocolate over the kabobs for an extra treat.
Additionally, if you want to prevent the bananas and apples from browning, squeeze a bit of lemon juice over them before assembling the kabobs. This simple trick will keep your Frightful Fruit Kabobs looking fresh and appealing throughout your Halloween event.
Terrifying Tangerine Pumpkins
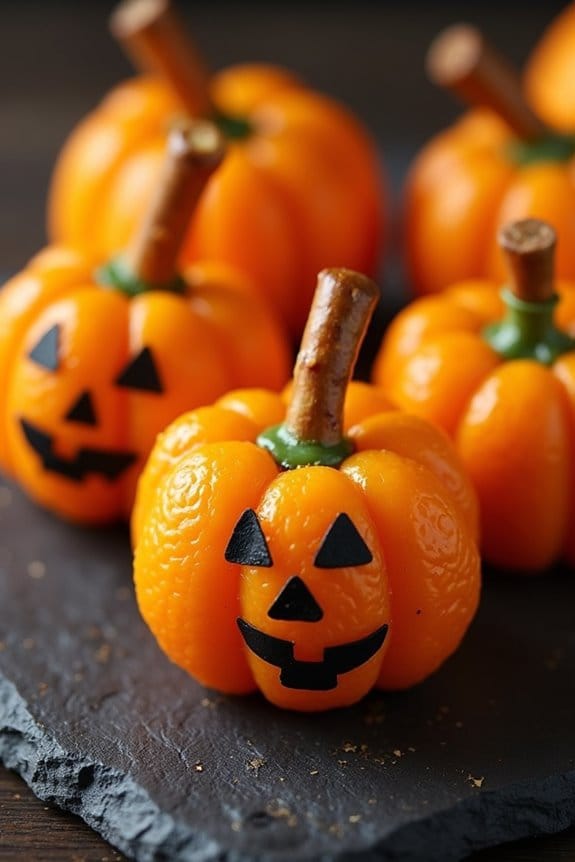
Terrifying Tangerine Pumpkins are a delightful and healthy addition to your Halloween festivities. These adorable treats are perfect for both kids and adults, adding a pop of color and a revitalizing taste to your snack table. The combination of juicy tangerines and crunchy pretzel sticks creates a fun and spooky pumpkin look that’s sure to impress your guests. Not only are these snacks simple to make, but they also offer a nutritious alternative to the usual sugary Halloween candies.
Preparing these Terrifying Tangerine Pumpkins is a breeze and doesn’t require any cooking, making it a perfect activity for involving children in the kitchen. The sweet, citrusy flavor of the tangerines pairs wonderfully with the slightly salty, crisp pretzel sticks. For a serving size of 4-6 people, you can make a batch of these festive treats in no time. They’re portable, easy to handle, and can be stored in the refrigerator until your guests arrive, keeping them fresh and ready to enjoy.
A fun, no-cook activity perfect for kids, offering a sweet and salty Halloween treat.
Ingredients (for 4-6 people):
- 12 tangerines
- 24 small pretzel sticks
- 1 edible black food marker (optional, for decoration)
Instructions:
- Peel the Tangerines: Begin by peeling all 12 tangerines. Make sure to remove as much of the white pith as possible to achieve a clean, bright orange look, as this enhances the visual appeal of your pumpkin.
- Prepare the Pretzel Stems: Break the pretzel sticks in half. Each piece will serve as the stem of your pumpkin, so you’ll need 24 pieces in total.
- Assemble the Pumpkins: Insert one pretzel stick piece into the top center of each tangerine. Push it in gently but firmly so that it stays in place, resembling a pumpkin stem.
- Add Faces (Optional): If you’re feeling creative, use the edible black food marker to draw spooky faces on the tangerines. This step is optional but adds a fun, personal touch to each pumpkin.
- Serve and Enjoy: Arrange your Terrifying Tangerine Pumpkins on a platter for a festive display. They’re ready to be enjoyed immediately or can be stored in the refrigerator for up to a day.
Extra Tips:
For best results, choose tangerines that are uniform in size and have a deep orange color, as they mimic the look of pumpkins more effectively. Additionally, make sure the pretzel sticks are fresh to guarantee they don’t break easily when inserted. If you don’t have an edible food marker, you can skip the face decorations, as the plain pumpkins are still visually appealing.
These treats are best served chilled, as the cool temperature enhances their revitalizing taste.
Bewitched Berry Cups

Ingredients (Serves 4-6):
- 2 cups fresh strawberries, hulled and quartered
- 1 cup fresh blueberries
- 1 cup fresh raspberries
- 1 cup fresh blackberries
- 1/4 cup honey or agave nectar
- 1 teaspoon vanilla extract
- 1 tablespoon fresh lemon juice
- Whipped cream or vanilla yogurt (optional for topping)
- 1/4 cup granola (optional for topping)
Cooking Instructions:
1. Prepare the Berries: Rinse all the berries thoroughly under cold water, making certain they’re clean and free of any debris.
Pat them dry with paper towels to remove excess moisture.
2. Mix the Berries: In a large mixing bowl, combine the strawberries, blueberries, raspberries, and blackberries.
Gently toss them together to make sure of even distribution.
3. Create the Dressing: In a small bowl, whisk together the honey (or agave nectar), vanilla extract, and lemon juice until well combined.
4. Combine: Pour the dressing over the mixed berries and gently toss again to coat all the berries evenly with the mixture.
5. Chill: Cover the bowl with plastic wrap or a lid and place it in the refrigerator for at least 30 minutes.
This allows the flavors to meld and the berries to absorb the dressing.
6. Serve: Once chilled, divide the berry mixture into individual cups or bowls.
If desired, top each cup with a dollop of whipped cream or a spoonful of vanilla yogurt, and sprinkle with granola for added texture and flavor.
Extra Tips:
To make your Bewitched Berry Cups even more festive, consider adding a few edible decorations, such as candy eyes or spooky toothpicks.
If you prefer a less sweet version, you can reduce the amount of honey or agave nectar.
Additionally, these berry cups can be made a few hours in advance and stored in the refrigerator until ready to serve, making them a convenient option for busy party preparations.
Scary Strawberry Ghosts
Scary Strawberry Ghosts are a delightful and spooky treat perfect for celebrating Halloween. These ghostly snacks aren’t only fun to make but also provide a healthier alternative to candy, utilizing the natural sweetness of strawberries paired with a creamy and rich white chocolate coating.
Scary Strawberry Ghosts offer a fun and healthier Halloween treat with strawberries and white chocolate.
The playful design of these ghostly strawberries will surely be a hit with kids and adults alike, making them a great addition to any Halloween party or gathering. This recipe is simple enough for even the youngest chefs to help with, making it an excellent family activity.
The process involves dipping fresh strawberries in melted white chocolate, then decorating them with spooky ghost faces. The final result is a batch of adorable, slightly eerie treats that are both delicious and festive. Perfect for serving 4-6 people, these Scary Strawberry Ghosts will add a touch of whimsy to your Halloween celebrations.
Ingredients (serves 4-6):
- 18-24 fresh strawberries
- 1 cup white chocolate chips
- 1 tablespoon coconut oil or vegetable shortening
- Mini chocolate chips or black icing for decorating
Cooking Instructions:
- Prepare the Strawberries: Wash the strawberries thoroughly and pat them dry with a paper towel. Verify they’re completely dry to help the chocolate adhere properly.
- Melt the White Chocolate: In a microwave-safe bowl, combine the white chocolate chips and coconut oil or shortening. Microwave the mixture in 30-second intervals, stirring between each interval until the chocolate is fully melted and smooth.
- Dip the Strawberries: Hold each strawberry by the stem (or use a skewer if preferred) and dip it into the melted white chocolate, swirling to coat it evenly. Allow any excess chocolate to drip off before placing the strawberry on a parchment-lined baking sheet.
- Create Ghost Faces: Before the chocolate sets, place two mini chocolate chips onto the dipped strawberries to create eyes. If using black icing, wait until the chocolate is set, then pipe small dots for eyes and an oval for the mouth.
- Set the Chocolate: Once all strawberries are decorated, place the baking sheet in the refrigerator for about 15-20 minutes, or until the chocolate is firm and set.
Extra Tips:
For an extra spooky touch, consider using dark chocolate or black icing to create more detailed ghost faces. If you find the chocolate too thick for dipping, add a little more coconut oil or shortening to achieve the desired consistency.
Make sure the strawberries are completely dry before dipping; any moisture can cause the chocolate to seize or not adhere properly. These ghostly treats are best served the same day to guarantee maximum freshness and appeal.
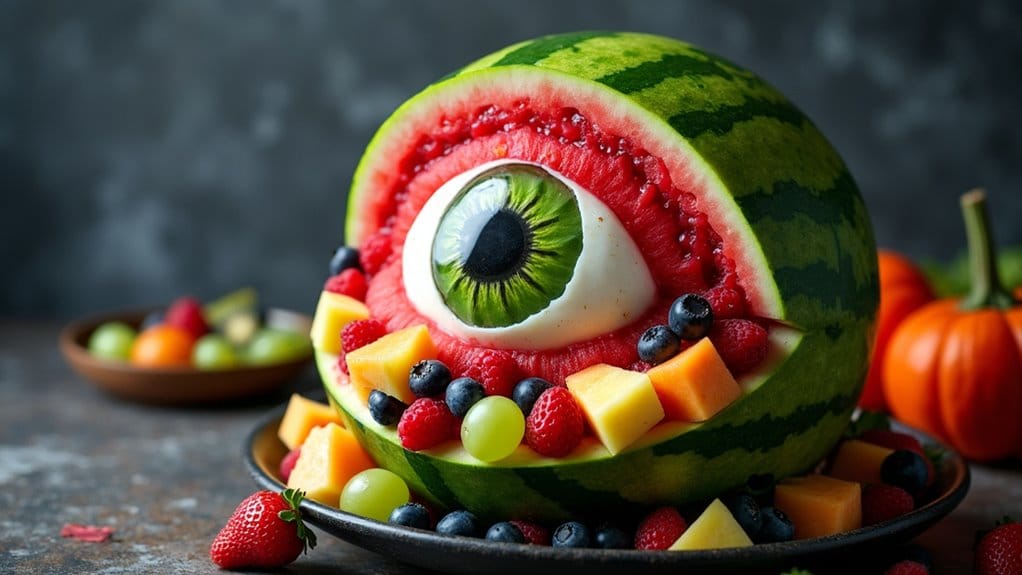
Eerie Eyeball Watermelon

Eerie Eyeball Watermelon is a spooky and delicious treat perfect for Halloween parties. This fun and creative fruit snack will surely be a hit with both kids and adults alike. The centerpiece of this dish is a carved watermelon that resembles a creepy eyeball, making it an eye-catching addition to your Halloween spread. Not only is it visually striking, but it also offers a revitalizing burst of juicy fruit flavors that everyone will enjoy.
Creating an Eerie Eyeball Watermelon involves a bit of creativity and a steady hand, but the result is worth the effort. The key is to carve the watermelon to mimic the appearance of an eyeball, complete with veins and a spooky pupil. This dish isn’t only a feast for the eyes but also a healthy option among the usual sugary Halloween treats.
Ingredients (Serves 4-6):
- 1 large watermelon
- 1 cup blueberries
- 1 cup raspberries
- 1 cup green grapes
- 1 cup pineapple chunks
- 1 cup strawberries, hulled and halved
- 2 kiwis, peeled and sliced
- 1 small cantaloupe, balled
- 1 lime, juiced
- 1 tablespoon honey
Instructions:
- Prepare the Watermelon: Begin by cutting off a small slice from the bottom of the watermelon to create a stable base. This will prevent the watermelon from rolling while you carve it.
- Carve the Eyeball Design: Using a paring knife, carve a circular shape on the top of the watermelon to mimic the iris of an eyeball. Remove the top layer of the rind to expose the pink flesh underneath. Continue carving thin lines outward from the iris to create the appearance of veins.
- Hollow Out the Watermelon: Carefully scoop out the flesh of the watermelon using a melon baller or spoon, making sure to leave a shell about 1 inch thick. Reserve the watermelon balls in a separate bowl.
- Prepare the Fruit Filling: In a large bowl, combine the watermelon balls, blueberries, raspberries, grapes, pineapple chunks, strawberries, kiwi slices, and cantaloupe balls.
- Mix Dressing: In a small bowl, whisk together the lime juice and honey. Pour this mixture over the fruit and gently toss to combine.
- Assemble the Eyeball: Place the mixed fruit back into the hollowed-out watermelon shell. Use a few blueberries to create a pupil within the iris area of the watermelon for added effect.
- Chill and Serve: Refrigerate the Eerie Eyeball Watermelon for at least 30 minutes before serving. This allows the flavors to meld and guarantees the fruit is revitalizing and cool.
Extra Tips:
When carving the watermelon, take your time to guarantee precision and safety. A sharp paring knife is essential for getting clean lines while carving the design.
If you have leftover watermelon flesh, consider using it for smoothies or other fruit salads. Additionally, feel free to customize the fruit filling with your favorite seasonal fruits for added variety.
Finally, for an extra creepy touch, consider adding edible googly eyes to the fruit salad before serving.
