

Halloween is just around the corner, and I am so excited to share some spook-tacular treats for your eerie celebrations! These 13 recipes are not only delicious but also perfect for adding that extra touch of magic to your Halloween party. From spine-chilling spider deviled eggs to ghostly guacamole, each dish is designed to enchant your guests with delightful frights. Get ready to serve up some wickedly wonderful eats that will leave everyone spellbound. Let’s make this Halloween a hauntingly memorable culinary adventure!
Spooky Spider Deviled Eggs

Get ready to thrill your guests with these Spooky Spider Deviled Eggs, a creepy twist on a classic appetizer that’s certain to be a hit at your Halloween party.
These deliciously eerie eggs aren’t only fun to look at but also packed with flavor, making them the perfect addition to your festive spread. With their spooky spider topping crafted from black olives, these deviled eggs will add a touch of fright to your table while tantalizing your taste buds.
These deviled eggs are ideal for serving 4-6 people, making them a great option for small gatherings or as part of a larger array of Halloween treats. The creamy filling, made from a mixture of egg yolks, mayonnaise, mustard, and a hint of paprika, is perfectly complemented by the whimsical spider decoration.
Whether you’re hosting a ghoulish gathering or just want to bring a little Halloween spirit to your dinner table, these Spooky Spider Deviled Eggs are bound to impress.
Ingredients for 4-6 servings:
- 6 large eggs
- 3 tablespoons mayonnaise
- 1 teaspoon yellow mustard
- 1/2 teaspoon white vinegar
- Salt and pepper to taste
- Paprika for garnish
- 12 black olives
Cooking Instructions:
- Boil the Eggs: Place the eggs in a saucepan and cover them with cold water. Bring the water to a boil over high heat. Once boiling, remove the pan from heat, cover, and let the eggs sit for 10-12 minutes. This method guarantees perfectly cooked hard-boiled eggs.
- Cool and Peel the Eggs: Using a slotted spoon, transfer the eggs to a bowl of ice water to cool for about 5 minutes. Once cooled, gently crack and peel the eggs, ensuring the shells are completely removed.
- Prepare the Filling: Slice each egg in half lengthwise and carefully remove the yolks. Place the yolks in a mixing bowl and mash them with a fork. Add mayonnaise, mustard, vinegar, salt, and pepper. Mix until smooth and creamy.
- Fill the Egg Whites: Spoon or pipe the yolk mixture back into the egg white halves, creating a small mound in each.
- Create the Spider Topping: Slice the black olives in half. Place one half in the center of each filled egg as the spider’s body. Cut the remaining halves into thin slices to form legs, arranging them around the “body” to resemble a spider.
- Garnish and Serve: Lightly sprinkle paprika over the deviled eggs for added flavor and a pop of color. Arrange the Spooky Spider Deviled Eggs on a platter and serve immediately.
Extra Tips:
For best results, use fresh eggs that are at least a week old, as they tend to peel more easily after boiling. If you find the filling mixture is too thick, add a little more mayonnaise until you reach your desired consistency.
For an extra touch of creepiness, consider using food coloring to tint the egg yolk mixture an eerie green or purple. These deviled eggs can be prepared a few hours in advance and stored in the refrigerator, but wait to add the olive spiders until just before serving to maintain their best appearance.
Witch’s Brew Cheesy Breadsticks

Witch’s Brew Cheesy Breadsticks are a spooky and delicious addition to any Halloween party spread. These breadsticks aren’t only easy to make but also fun to serve, especially when paired with a ghoulish dip or sauce. Shaped to look like eerie wands or twisted branches, they bring a festive touch to your Halloween table. The combination of gooey cheese and soft bread creates a delightful treat that guests of all ages will enjoy.
Perfect for serving 4-6 people, these Witch’s Brew Cheesy Breadsticks are made with simple ingredients and require minimal prep time. Whether you’re hosting a Halloween gathering or simply want to enjoy a themed snack, these breadsticks are guaranteed to be a hit. They’re best served warm, right out of the oven, allowing the cheese to melt perfectly while the bread remains soft and chewy.
Ingredients:
- 1 pound pizza dough
- 1 cup shredded mozzarella cheese
- 1/4 cup grated Parmesan cheese
- 2 tablespoons unsalted butter, melted
- 1 teaspoon garlic powder
- 1 teaspoon Italian seasoning
- Pinch of salt
- Marinara sauce for dipping (optional)
Cooking Instructions:
- Preheat the Oven: Start by preheating your oven to 400°F (200°C). This guarantees that the breadsticks will bake evenly and develop a nice golden color.
- Prepare the Dough: On a lightly floured surface, roll out the pizza dough into a rectangle about 12 inches by 8 inches. Confirm that the dough is evenly rolled to maintain uniform baking.
- Add the Cheese: Sprinkle the shredded mozzarella cheese evenly over the entire surface of the dough. Follow by sprinkling the grated Parmesan cheese on top for extra flavor.
- Season the Breadsticks: In a small bowl, mix the melted butter with garlic powder, Italian seasoning, and a pinch of salt. Brush this mixture over the surface of the cheese-covered dough, guaranteeing even coverage for maximum flavor.
- Cut and Twist: Use a sharp knife or pizza cutter to cut the dough into strips, about 1 inch wide. Carefully twist each strip to create a spiral effect, then place them on a baking sheet lined with parchment paper.
- Bake: Place the baking sheet in the preheated oven and bake for 12-15 minutes, or until the breadsticks are golden brown and the cheese is bubbling.
- Cool and Serve: Allow the breadsticks to cool slightly before serving. They’re best enjoyed warm, accompanied by a side of marinara sauce for dipping if desired.
Extra Tips:
For an extra spooky touch, consider adding a few drops of green food coloring to the melted butter mixture before brushing it on the breadsticks. This will give them an eerie glow that fits perfectly with the Halloween theme.
Additionally, if you prefer a spicier kick, sprinkle a bit of crushed red pepper flakes over the cheese before baking.
Finally, these breadsticks can be made ahead of time and reheated in the oven for a few minutes before serving, making them a convenient option for party planning.
Mummy Jalapeño Poppers

Mummy Jalapeño Poppers are a spooky and delicious appetizer perfect for a Halloween party. These tasty bites combine the heat of jalapeños with creamy cheese filling, all wrapped in a golden crescent dough that resembles a mummy. Not only do they look festive, but they also offer a delightful mix of flavors and textures that will be a hit with guests of all ages.
Whether you’re hosting a large Halloween bash or a small gathering of friends, these Mummy Jalapeño Poppers are certain to add a touch of eerie elegance to your table. They’re relatively easy to prepare, making them an ideal choice for party hosts who want to impress without spending too much time in the kitchen. This recipe serves 4-6 people, guaranteeing there’s enough for everyone to enjoy a few poppers each.
Ingredients
- 12 fresh jalapeño peppers
- 8 oz cream cheese, softened
- 1 cup shredded cheddar cheese
- 1/2 teaspoon garlic powder
- 1/2 teaspoon onion powder
- 1/4 teaspoon smoked paprika
- Salt and pepper to taste
- 1 can of crescent roll dough
- 24 small candy eyeballs (optional, for decoration)
Instructions
- Preheat the Oven: Start by preheating your oven to 375°F (190°C). This will guarantee it’s ready to bake the poppers once they’re assembled.
- Prepare the Jalapeños: Wash the jalapeños thoroughly. Slice each one in half lengthwise and remove the seeds and membranes carefully using a small spoon. This reduces the heat, but if you prefer spicier poppers, leave some seeds in.
- Mix the Filling: In a medium-sized bowl, blend the softened cream cheese, shredded cheddar cheese, garlic powder, onion powder, smoked paprika, salt, and pepper until well combined. This mixture will be the creamy filling for your poppers.
- Fill the Jalapeños: Using a spoon or piping bag, carefully fill each jalapeño half with the cheese mixture. Be generous with the filling, making sure it’s evenly distributed.
- Wrap with Dough: Roll out the crescent dough and cut it into thin strips. Wrap a strip around each filled jalapeño half, leaving some space for the “mummy” eyes. The dough should resemble the bandages of a mummy.
- Bake the Poppers: Place the wrapped jalapeños on a baking sheet lined with parchment paper. Bake in the preheated oven for 12-14 minutes or until the dough is golden brown and crispy.
- Add the Eyes: If using candy eyeballs, press them gently onto the top of each popper as soon as they come out of the oven, while still warm. This will help them stick.
Extra Tips
When handling jalapeños, consider wearing gloves to protect your skin from the capsaicin, which can cause irritation. If you don’t have candy eyeballs, you can use small dots of sour cream or cream cheese as a substitute.
These poppers are best served warm, but they can also be made a few hours in advance and reheated in the oven just before serving. Experiment with the cheese filling by adding different spices or even some crispy bacon bits for extra flavor.
Ghostly Guacamole Dip

As Halloween approaches, it’s the perfect time to add a spooky spin to your party dishes. Ghostly Guacamole Dip is a delightful treat that combines the creamy goodness of traditional guacamole with a haunting presentation that will thrill your guests. This dish isn’t only delicious but also visually enchanting, making it a must-have at any Halloween gathering.
Serve this dip with a side of tortilla chips or crudités, and watch it disappear as quickly as a ghost at midnight.
This recipe for Ghostly Guacamole Dip serves 4-6 people and is incredibly easy to make. With just a few fresh ingredients and some crafty decoration techniques, you can transform ordinary guacamole into a centerpiece that’s as fun to eat as it’s to look at.
Whether you’re hosting a large party or a small get-together, this dip will be a hit, leaving everyone enchanted and asking for more.
Ingredients:
- 3 ripe avocados
- 1 lime, juiced
- 1 small onion, finely chopped
- 2 small tomatoes, diced
- 1 clove garlic, minced
- 1 jalapeño pepper, seeded and finely chopped
- Salt to taste
- 1/4 cup fresh cilantro, chopped
- 1/4 cup sour cream
- Black olives, sliced (for decoration)
Instructions:
- Prepare the Avocados: Cut the avocados in half, remove the pits, and scoop the flesh into a mixing bowl. Use a fork to mash the avocado to your desired consistency. For a smoother dip, mash thoroughly; for a chunkier texture, leave some avocado pieces intact.
- Add Fresh Ingredients: Stir in the lime juice, chopped onion, diced tomatoes, minced garlic, and chopped jalapeño pepper. Mix well to combine all the ingredients evenly.
- Season the Dip: Add salt to taste and fold in the fresh cilantro. Stir the mixture thoroughly to make sure the flavors are well distributed throughout the dip.
- Create the Ghostly Effect: Transfer the guacamole into a serving dish. Use a spoon to smooth the surface, creating an even layer. Spoon the sour cream into a piping bag or a plastic bag with a small corner cut off, and pipe ghost shapes onto the surface of the guacamole.
- Decorate with Eyes: Place two slices of black olives on each ghost shape to form the eyes, giving your ghosts a spooky look.
- Serve and Enjoy: Serve the Ghostly Guacamole Dip with a side of tortilla chips or vegetable sticks. Make sure to present it freshly made for the best flavor and appearance.
Extra Tips:
For an added Halloween touch, consider serving the guacamole in a hollowed-out mini pumpkin or use a black serving dish to enhance the eerie theme.
To keep the guacamole fresh and prevent browning, press a piece of plastic wrap directly onto the surface of the dip before refrigerating. This simple trick helps maintain its vibrant green color until you’re ready to serve.
If you want to spice things up, consider adding more jalapeño or a dash of hot sauce for an extra kick.
Frankenstein’s Monster Burgers

Crafting these monstrous delights is easier than you might think. By using a few clever techniques and a handful of ingredients, you can transform ordinary burgers into a festive feast. The key is in the details, from the vibrant green buns that mimic the monster’s skin to the creative use of toppings for eyes, hair, and bolts. With a little bit of imagination, you’ll have your guests raving about your Halloween culinary skills.
Ingredients for 4-6 servings:
- 4-6 hamburger buns (preferably spinach buns or dyed green with food coloring)
- 1.5 lbs ground beef
- Salt and pepper, to taste
- 4-6 slices of cheddar cheese
- 4-6 slices of mozzarella cheese (for eyes)
- 8-12 black olives (pitted)
- 1 small red onion, sliced into rings
- 1 head of lettuce
- 1 large tomato, sliced
- Ketchup and mustard for decoration
- Toothpicks
Cooking Instructions:
- Prepare the Patties: In a bowl, combine the ground beef with salt and pepper. Mix well and divide into 4-6 equal portions, shaping each into a patty that’s slightly larger than the diameter of the buns to account for shrinkage during cooking.
- Cook the Patties: Heat a grill or skillet over medium-high heat. Cook each patty for about 4-5 minutes on each side, or until they reach your desired level of doneness. During the last minute of cooking, place a slice of cheddar cheese on each patty to melt.
- Prepare the Buns: If using plain buns, dye them green using food coloring by brushing the tops gently. Toast the buns lightly on the grill or in a toaster for a crispy texture.
- Assemble the Monster Faces: Start by placing a lettuce leaf on the bottom half of each bun. Add a tomato slice on top, followed by the cooked patty with melted cheese.
- Create the Monster Eyes: Cut mozzarella cheese slices into small circles for eyes. Use slices of black olives as pupils and place them on top of the mozzarella circles. Secure the eyes onto the top bun with toothpicks.
- Add Monster Features: Use thin red onion rings for the mouth, arranging them on the cheese. Place additional olive slices on the sides of the bun to resemble bolts. Use ketchup and mustard to add scars or other details on the top bun.
- Final Assembly: Place the top bun carefully on each burger and secure it with a toothpick if needed to hold the components in place.
Extra Tips: For a more authentic look, consider using spinach buns for a natural green color, or add a few drops of green food coloring to the bun dough before baking. You can customize each burger with additional ingredients like pickles, jalapeños, or even bacon strips to create hair or other features.
Also, when shaping the patties, make a small indentation in the center to prevent them from puffing up during cooking, ensuring a flat surface for easier assembly. Enjoy your creative culinary masterpiece and have a monstrously good time at your Halloween party!
Bloody Finger Hot Dogs

If you’re looking to add a spooky touch to your Halloween party menu, Bloody Finger Hot Dogs are a perfect choice. These ghoulish treats aren’t only delicious but also eerily realistic, making them a great conversation starter at your gathering.
With just a few simple ingredients, you can transform ordinary hot dogs into creepy fingers that are sure to delight and frighten your guests.
Bloody Finger Hot Dogs are a fun and easy addition to any Halloween celebration. They’re perfect for serving both kids and adults, offering a playful yet delicious twist on a classic snack.
By using ketchup as “blood,” you’ll have a visually striking dish that captures the essence of Halloween. This recipe serves 4-6 people, ensuring everyone gets a taste of these gory goodies.
Ingredients (Serves 4-6):
- 8 hot dogs
- 8 hot dog buns
- Ketchup
- 1 small onion (for fingernail effect)
- Water for boiling
- Mustard (optional, for serving)
Cooking Instructions:
1. Prepare the Hot Dogs: Start by cooking the hot dogs. Fill a pot with water and bring it to a boil over medium-high heat. Once boiling, add the hot dogs and let them cook for about 5 minutes or until heated through.
Remove them from the water and let them cool slightly.
2. Create the Finger Effect: Take each hot dog and use a small, sharp knife to make shallow cuts to create the appearance of knuckles. To do this, make one cut about a third of the way down the hot dog and another cut two-thirds down.
Then, make three small cuts in between to mimic the knuckle lines.
3. Add the Fingernails: Slice a small piece of onion into a thin, nail-shaped piece. Affix the onion slice to the tip of each hot dog with a small dab of ketchup, giving it the appearance of a fingernail.
4. Assemble the Bloody Fingers: Place each hot dog into a bun. Drizzle ketchup generously around the base of the hot dog to represent blood.
Optionally, you can add mustard for extra flavor.
5. Serve: Arrange your Bloody Finger Hot Dogs on a platter for a dramatic effect. Serve immediately, while the hot dogs are warm.
Extra Tips:
For an added touch of realism, you can use food coloring to slightly tint the onion pieces for a more “natural” fingernail appearance.
If you want to get even more creative, consider adding a few drops of green food coloring to your ketchup to give it a more eerie, undead look.
Additionally, for a vegetarian option, you can substitute regular hot dogs with plant-based alternatives to cater to all dietary preferences.
Make sure to have plenty of napkins on hand, as these creepy creations can get delightfully messy!
Vampire Bat Wings

Transform your Halloween party table into a spine-chilling spectacle with these delectable Vampire Bat Wings. The perfect blend of sweet and spicy, these wings are sure to be a hit with your guests. They get their sinister name from their appearance: a deep, dark hue that resembles a bat’s wings, thanks to a flavorful marinade featuring soy sauce and dark brown sugar. Not only do they look frightfully fun, but they taste absolutely fang-tastic!
These Vampire Bat Wings aren’t only a treat for the eyes but also a delight for the taste buds. With a crispy exterior and juicy interior, the wings are smothered in a sticky, savory sauce that has a hint of garlic and ginger to elevate the flavors. Whether you’re hosting a full-blown spooky-themed party or just want to enjoy a Halloween night in, these wings will definitely impress. Perfect for serving 4-6 people, these wings are a must-try for anyone looking to add a little bite to their Halloween festivities.
Ingredients (serves 4-6 people):
- 3 pounds of chicken wings
- 1 cup soy sauce
- 1 cup dark brown sugar
- 2 tablespoons honey
- 1 tablespoon freshly grated ginger
- 4 cloves garlic, minced
- 1 teaspoon black food coloring (optional)
- 1 tablespoon sesame oil
- 1 teaspoon chili powder
- 1 tablespoon cornstarch
- 2 tablespoons water
- Sesame seeds for garnish
- Chopped green onions for garnish
Cooking Instructions:
- Prepare the Marinade: In a large mixing bowl, combine the soy sauce, dark brown sugar, honey, grated ginger, minced garlic, sesame oil, and chili powder. If you want to enhance the spooky look, add the black food coloring. Stir the mixture until the sugar is completely dissolved and all ingredients are well combined.
- Marinate the Wings: Add the chicken wings to the marinade, making sure they’re fully coated. Cover the bowl with plastic wrap and refrigerate for at least 2 hours. For best results, marinate overnight to let the flavors fully penetrate the chicken.
- Preheat the Oven: Once the wings have marinated to your liking, preheat your oven to 400°F (200°C). Line a baking sheet with aluminum foil for easy clean-up and place a wire rack on top.
- Bake the Wings: Arrange the marinated wings on the wire rack, leaving space between each one. Bake them in the preheated oven for 35-40 minutes, or until they’re crispy and cooked through, turning them halfway through the cooking time for even crispness.
- Thicken the Sauce: While the wings are baking, pour the remaining marinade into a small saucepan. Bring it to a boil over medium heat. Mix the cornstarch with water in a separate bowl, then add it to the boiling marinade. Stir continuously until the sauce thickens to a glaze-like consistency.
- Coat the Wings: Once the wings are done, remove them from the oven and brush them generously with the thickened sauce. Confirm each wing is well-coated.
- Garnish and Serve: Transfer the coated wings to a serving platter. Sprinkle with sesame seeds and chopped green onions for an extra burst of flavor and color. Serve immediately while warm.
Extra Tips:
For an even more authentic “bat wing” appearance, you can use a small amount of black food coloring in the marinade to achieve a darker hue. Be sure not to overdo it, as too much can alter the taste of the wings.
If you’re sensitive to spice, you can adjust the chili powder to your preference or substitute it with a milder spice. Additionally, using a wire rack in the oven allows the heat to circulate around the wings, making sure they cook evenly and achieve a deliciously crisp texture. Enjoy your spooky, savory creation!
Eyeball Caprese Salad
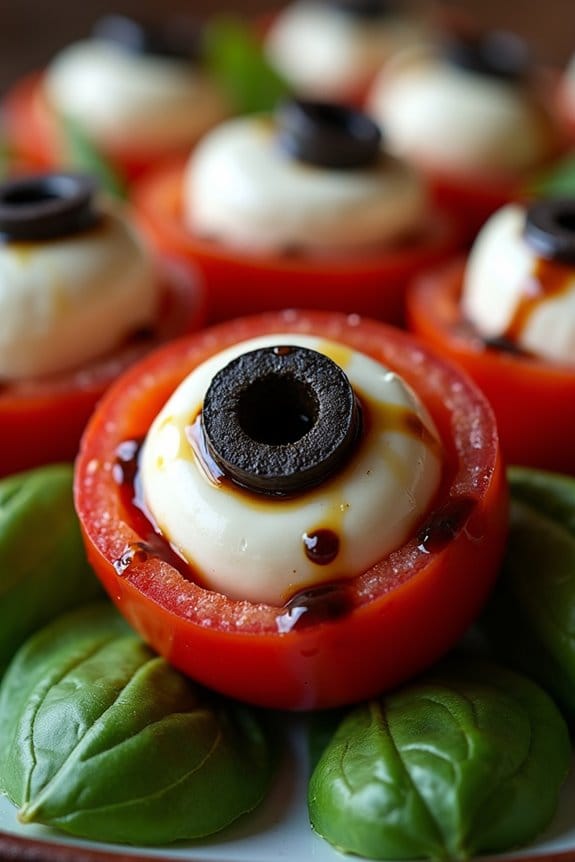
Transform a classic Caprese salad into a spooky Halloween-themed dish with this Eyeball Caprese Salad. Perfect for a Halloween party, this dish combines the fresh and vibrant flavors of mozzarella, tomatoes, and basil with a creepy twist.
By using small mozzarella balls and slicing cherry tomatoes just right, you can create eerie eyeballs that will captivate your guests. This playful presentation isn’t only fun but also delicious, offering a revitalizing and healthy option amidst the typically indulgent Halloween treats.
This recipe is designed to serve 4-6 people, making it an ideal addition to a small gathering or dinner party. The ingredients are simple and easily accessible, yet the final presentation will leave a lasting impression.
The key to this dish is the assembly, where attention to detail transforms everyday ingredients into a festive delight. Let’s plunge into the specifics of how to create this spooky yet appetizing salad for your next Halloween celebration.
Ingredients:
- 16 small mozzarella balls (bocconcini)
- 16 cherry tomatoes
- 16 black olives
- Fresh basil leaves
- 2 tablespoons balsamic glaze
- 2 tablespoons extra virgin olive oil
- Salt and pepper to taste
Instructions:
- Prepare the Tomatoes: Rinse the cherry tomatoes and carefully slice off the top of each tomato. Use a small spoon or a melon baller to scoop out a small portion from the center where the mozzarella ball will sit.
- Prepare the Mozzarella Balls: Drain the mozzarella balls and gently pat them dry with a paper towel. This will help them adhere better to the tomatoes.
- Assemble the Eyeballs: Place a mozzarella ball into the hollowed-out portion of each cherry tomato, allowing it to sit snugly.
- Add the Pupils: Slice the black olives into small rings. Place one olive slice on top of each mozzarella ball to create the “pupil” of the eyeball.
- Plate the Salad: Arrange the basil leaves on a serving platter. Place the assembled eyeball caprese on top of the basil leaves.
- Dress the Salad: Drizzle the balsamic glaze and extra virgin olive oil over the assembled salad. Season with salt and pepper to taste.
- Serve: Present your Eyeball Caprese Salad to your guests and enjoy the mix of eerie visuals and delightful flavors.
Extra Tips:
For an even spookier effect, consider using different colored cherry tomatoes, such as yellow or orange, to add variety and enhance the Halloween theme.
It’s important to use fresh mozzarella for the best texture and flavor, and be sure to serve the salad shortly after preparation to maintain its visual appeal.
If you want to make the salad ahead of time, wait to assemble the eyeballs until just before serving to guarantee the mozzarella and tomatoes remain fresh.
Graveyard Taco Dip

Graveyard Taco Dip is a delightfully spooky addition to any Halloween party spread. This multi-layered dip isn’t only delicious but also creatively decorated to resemble a graveyard, complete with tombstone tortilla chips and a sprinkle of green onions resembling grass. The combination of refried beans, guacamole, sour cream, cheese, and other classic taco ingredients guarantees that it’s both flavorful and fun for guests of all ages. Its imaginative presentation will certainly make it a centerpiece at any Halloween gathering.
A deliciously spooky centerpiece, the Graveyard Taco Dip thrills with its hauntingly creative and tasty layers.
The Graveyard Taco Dip is designed to serve a group of 4-6 people, making it perfect for intimate gatherings or as one of several dishes at a larger party. The layers of this dip are easy to assemble and can be prepared in advance, allowing you to focus on other party preparations. Furthermore, it’s versatile enough to accommodate various dietary preferences by adjusting specific ingredients. When served with tortilla chips, this dip will have your guests coming back for more with its rich, creamy texture and robust flavors.
Ingredients for Graveyard Taco Dip (Serves 4-6):
- 1 can (16 oz) refried beans
- 1 package (8 oz) cream cheese, softened
- 1 cup sour cream
- 1 packet taco seasoning
- 1 cup guacamole
- 1 cup salsa
- 1 cup shredded cheddar cheese
- 1/4 cup sliced black olives
- 1/4 cup chopped green onions
- 6-8 small flour tortillas (for tombstones)
Cooking Instructions:
- Prepare the Tombstones: Preheat your oven to 350°F (175°C). Using a knife or cookie cutter, cut tombstone shapes out of the flour tortillas. Place them on a baking sheet and bake for about 5-7 minutes, or until they’re lightly golden and crispy. Set aside to cool.
- Layer the Base: Spread the refried beans evenly across the bottom of a large rectangular serving dish or a shallow baking dish. This will serve as the base layer of your dip.
- Mix the Creamy Layer: In a medium mixing bowl, combine the softened cream cheese, sour cream, and taco seasoning. Stir until the mixture is smooth and well blended. Spread this mixture over the refried beans layer.
- Add Guacamole and Salsa: Carefully spread the guacamole over the cream cheese mixture, followed by an even layer of salsa. Make sure to distribute each layer evenly to confirm every scoop has all the flavors.
- Top with Cheese and Olives: Sprinkle the shredded cheddar cheese over the salsa layer. Then, scatter the sliced black olives on top of the cheese.
- Decorate the Graveyard: Insert the tortilla tombstones upright into the dip along one side to resemble a graveyard. Use chopped green onions to create grass around the tombstones for an added effect.
- Chill and Serve: Cover the dish with plastic wrap and refrigerate for at least an hour to allow the flavors to meld together. Serve chilled with additional tortilla chips on the side for dipping.
Extra Tips:
For an extra spooky touch, you can use edible food markers to write fun or scary messages on the tortilla tombstones before baking them. If you prefer a spicier dip, consider adding chopped jalapeños to the salsa layer or incorporating spicy taco seasoning.
Jack-o’-Lantern Stuffed Peppers

Celebrate Halloween with a creative and delicious dish that will delight both kids and adults alike. Jack-o’-Lantern Stuffed Peppers aren’t only festive but also healthy, combining colorful bell peppers carved like pumpkins with a flavorful filling of meat, rice, and spices. This dish is a perfect choice for a Halloween party or a family dinner, adding a spooky touch to your table.
With a serving size that caters to 4-6 people, these stuffed peppers are easy to prepare and can be customized with your favorite ingredients. The carved peppers serve as both a delightful decoration and a hearty vessel for the savory stuffing. Whether you prefer your filling with ground beef, turkey, or a vegetarian option, these Jack-o’-Lantern Stuffed Peppers are sure to be a hit at your next Halloween gathering.
Ingredients:
- 6 medium orange bell peppers
- 1 pound ground beef or turkey
- 1 cup cooked rice
- 1 medium onion, finely chopped
- 2 cloves garlic, minced
- 1 can (14.5 oz) diced tomatoes, drained
- 1 cup shredded cheese (cheddar or mozzarella)
- 1 teaspoon Italian seasoning
- Salt and pepper to taste
- Olive oil for cooking
Instructions:
- Prepare the Peppers: Preheat your oven to 375°F (190°C). Cut the tops off the bell peppers and remove the seeds and membranes. Using a small knife, carefully carve jack-o’-lantern faces into the sides of the peppers. Place the peppers in a lightly greased baking dish.
- Cook the Filling: In a large skillet, heat a small amount of olive oil over medium heat. Add the chopped onion and garlic, sautéing until the onion is translucent. Add the ground meat and cook until browned, breaking it apart with a spatula. Drain any excess fat.
- Mix the Stuffing: Stir in the drained diced tomatoes, cooked rice, Italian seasoning, salt, and pepper. Cook for another 5 minutes, allowing the flavors to meld together. Remove from heat and stir in half of the shredded cheese.
- Stuff the Peppers: Carefully spoon the meat mixture into each prepared bell pepper, pressing down gently to pack the filling. Sprinkle the remaining shredded cheese over the top of each pepper.
- Bake the Peppers: Cover the baking dish with aluminum foil and bake in the preheated oven for 25 minutes. Remove the foil and bake for an additional 10-15 minutes, or until the peppers are tender and the cheese is melted and bubbly.
Extra Tips:
For a vegetarian version, you can replace the ground meat with a mix of black beans and corn, adding a bit of cumin for extra flavor.
Feel free to experiment with different types of cheese or spices according to your taste preference. If you find the peppers aren’t standing upright in the baking dish, trim a small slice off the bottom to create a flat surface.
To save time, you can prepare the stuffing a day in advance and simply assemble and bake the peppers before serving. Enjoy your spooky and tasty creation!
Creepy-Crawly Pasta Salad

Halloween is the perfect time to whip up dishes that aren’t only delicious but also fun and playful. The Creepy-Crawly Pasta Salad is a fantastic addition to your Halloween party spread. With its eerie appearance and delightful taste, it’s sure to be a hit among both kids and adults. This dish combines the classic flavors of pasta salad with a spooky twist, using ingredients that mimic the look of creepy crawlies to delight and perhaps frighten party guests.
This pasta salad isn’t just about the aesthetics; it’s also packed with flavors and textures that make it a stand-out dish. The combination of vibrant vegetables, savory dressing, and pasta offers a well-rounded dish that’s satisfying to the taste buds. Perfect for a serving size of 4-6 people, this recipe allows you to bring a little bit of Halloween magic to your table with minimal effort. So, let’s plunge into creating this ghoulishly delightful dish!
Ingredients (Serves 4-6):
- 12 oz rotini pasta
- 1 cup black olives, sliced
- 1 cup cherry tomatoes, halved
- 1 cup mozzarella balls
- 1/2 cup green bell pepper, diced
- 1/2 cup red onion, finely chopped
- 1/2 cup Italian dressing
- 1 tablespoon olive oil
- 1/4 teaspoon black pepper
- 1/4 teaspoon salt
- Fresh parsley for garnish
Cooking Instructions:
- Cook the Pasta: Begin by bringing a large pot of salted water to a boil. Add the rotini pasta and cook according to the package instructions until al dente. Once cooked, drain the pasta and rinse it under cold water to stop the cooking process. Drizzle with olive oil and toss to prevent sticking.
- Prepare the Ingredients: While the pasta is cooking, slice the black olives into rings, halve the cherry tomatoes, dice the green bell pepper, and finely chop the red onion. Set these aside.
- Mix the Salad: In a large mixing bowl, combine the cooked pasta, sliced black olives, cherry tomatoes, mozzarella balls, green bell pepper, and red onion.
- Dress the Salad: Pour the Italian dressing over the pasta mixture. Add black pepper and salt to taste. Toss everything together gently until the ingredients are well coated with the dressing.
- Chill and Serve: Transfer the pasta salad to the refrigerator and let it chill for at least 30 minutes before serving. This allows the flavors to meld together beautifully.
- Garnish and Enjoy: Before serving, garnish with fresh parsley for a pop of color. Serve the salad in a Halloween-themed bowl to add to the spooky ambiance.
Extra Tips:
For an added spooky effect, consider using food coloring to tint the mozzarella balls or pasta in eerie shades such as green or purple. You can also get creative with your vegetable choices; for example, use spiralized zucchini or carrots to mimic worms for an extra creepy touch.
Haunted Brownie Bites

Get ready to impress your guests with these delightful Haunted Brownie Bites, perfect for any Halloween party. These spooky treats aren’t just visually appealing but also deliciously scrumptious. Each bite-sized piece is a combination of rich, chocolatey goodness with a hauntingly fun twist, making them the perfect addition to your Halloween festivities.
They’re easy to prepare and certain to bring a smile to both kids and adults alike. The Haunted Brownie Bites are crafted using a classic brownie base, topped with creative decorations that transform them into eerie little sweet treats.
With a serving size of 4-6 people, this recipe yields enough for everyone to enjoy a couple of these ghostly goodies. Whether you’re hosting a big party or a small gathering, these brownie bites are bound to be a hit among your guests.
Ingredients:
- 1 cup unsalted butter
- 2 cups granulated sugar
- 4 large eggs
- 1 teaspoon vanilla extract
- 1 cup all-purpose flour
- 1 cup cocoa powder
- 1/2 teaspoon salt
- 1/2 teaspoon baking powder
- 1 cup semisweet chocolate chips
- White icing or melted white chocolate (for decoration)
- Candy eyeballs (for decoration)
- Assorted Halloween-themed sprinkles (for decoration)
Cooking Instructions:
- Preheat the Oven: Begin by preheating your oven to 350°F (175°C). Line a 9×13 inch baking pan with parchment paper, leaving some overhang on the sides for easy removal of the brownies.
- Mix the Wet Ingredients: In a large mixing bowl, melt the butter. Add the sugar and mix well until combined. Beat in the eggs one at a time, followed by the vanilla extract, confirming everything is well incorporated.
- Combine Dry Ingredients: In a separate bowl, sift together the flour, cocoa powder, salt, and baking powder. Gradually add these dry ingredients to the wet mixture, stirring until just combined. Be careful not to overmix.
- Add Chocolate Chips: Fold in the semisweet chocolate chips, ensuring they’re evenly distributed throughout the batter.
- Bake the Brownies: Pour the brownie batter into the prepared baking pan, spreading it out evenly. Bake in the preheated oven for 25-30 minutes, or until a toothpick inserted into the center comes out with a few moist crumbs.
- Cool and Cut: Allow the brownies to cool completely in the pan on a wire rack. Once cooled, lift them out using the parchment overhang and cut them into bite-sized squares or circles using a cookie cutter.
- Decorate: Use white icing or melted white chocolate to create ghostly shapes on each brownie bite. Add candy eyeballs and assorted Halloween-themed sprinkles to bring your haunted brownie bites to life.
Extra Tips:
For an extra layer of flavor, consider adding a teaspoon of espresso powder to the dry ingredients to enhance the chocolate taste.
If you want to make the brownies even spookier, use orange or green food coloring in the white chocolate for decoration. To guarantee your brownies don’t overbake, start checking them a few minutes before the suggested baking time.
Poison Apple Punch

If you’re seeking to add a touch of spooky enchantment to your Halloween party, search no further than this bewitching Poison Apple Punch. This vibrant, ruby-red concoction is both visually enchanting and deliciously revitalizing, making it a perfect centerpiece for your festive gathering.
The punch combines the juicy sweetness of apples with a hint of tartness and a dash of mystery, guaranteeing that every sip is a delightful surprise for your taste buds. Serve it in a large cauldron-style bowl with plenty of ice, and watch as your guests marvel at the eerie, bubbling brew.
Crafted to serve 4-6 people, this Poison Apple Punch is sure to be a hit among both adults and children alike. Its eye-catching color and tantalizing flavors will leave a lasting impression, making it a memorable highlight of your Halloween festivities.
Whether you’re hosting a spooky soirée or a family-friendly get-together, this punch is an easy and effective way to set the mood and keep the party spirited from start to finish.
Ingredients (serving size: 4-6 people):
- 4 cups apple cider
- 2 cups cranberry juice
- 1 cup pomegranate juice
- 1 cup soda water
- 1/2 cup fresh lime juice
- 1/4 cup grenadine syrup
- 1-2 teaspoons edible black glitter or black sugar for rimming (optional)
- Ice cubes
- Apple slices for garnish (optional)
- Fresh mint leaves for garnish (optional)
Instructions:
- Prepare the Rim (Optional): If desired, rim your glasses with edible black glitter or black sugar for an extra spooky touch. To do this, pour the glitter or sugar onto a small plate. Moisten the rim of each glass with a lime wedge, and then dip it into the glitter or sugar until well-coated. Set the glasses aside to dry slightly.
- Mix the Base: In a large punch bowl or pitcher, combine the apple cider, cranberry juice, and pomegranate juice. Stir well to confirm all the juices are thoroughly mixed.
- Add the Fizz: Pour the soda water into the juice mixture, stirring gently to combine. This will give your punch a delightful fizz that makes it feel like a magical brew.
- Incorporate the Tartness: Add the fresh lime juice and grenadine syrup to the mixture. Stir again to blend all the flavors together, ensuring the punch has a balanced sweet-tart taste.
- Chill: Add a generous amount of ice cubes to the punch, either directly into the bowl or into individual glasses if you prefer. This will keep the punch revitalizing cold throughout your event.
- Garnish and Serve: Just before serving, add apple slices and fresh mint leaves to the punch for an added touch of elegance and aroma. If you’ve rimmed your glasses, carefully pour the punch into each one, ensuring the rims remain intact.
Extra Tips:
For an added touch of drama, consider using dry ice to create a fog effect around your punch bowl, but make sure to handle it safely and keep it out of the drink itself.
If you want to create a less sweet version, you can adjust the amount of grenadine syrup to taste, or substitute with a sugar-free alternative. Additionally, feel free to experiment with different juices or garnishes to make the punch uniquely yours.
