
Planning a Halloween party for the little ones is always such a treat, especially when you’re crafting the perfect menu. I’ve found that mixing spooky and scrumptious is the secret to a memorable celebration. From eerie Spider Pizzas to adorable Ghostly Marshmallow Pops, every dish is a hit. The trick is to find that sweet spot between festive fun and irresistible flavors. Ready to create some unforgettable Halloween memories?
Spooky Spider Pizzas

Halloween is the perfect time to get creative in the kitchen, especially when it comes to making fun and festive foods that kids will love. One such treat that combines the spooky spirit of Halloween with deliciousness is the Spooky Spider Pizza. This dish isn’t only tasty but also visually appealing, making it a hit at any Halloween party. The best part is that it’s easy to prepare, allowing you to engage the young ones in the process, making it a fun family activity.
Spooky Spider Pizzas are mini pizzas topped with adorable yet eerie olive spiders, melted cheese, and your choice of toppings, all nestled on a crispy crust. This recipe serves 4-6 people, making it perfect for a small gathering or as a centerpiece for a kid’s Halloween party spread. With simple ingredients and straightforward instructions, you’ll have these creepy crawly pizzas ready in no time, delighting both children and adults alike.
Perfect for Halloween, Spooky Spider Pizzas excite with eerie olive spiders and melted cheese on crispy crusts.
Ingredients (serving size: 4-6 people)
- 6 English muffins, halved
- 1 cup tomato pizza sauce
- 2 cups shredded mozzarella cheese
- 1 cup mini pepperoni slices (optional)
- 1 can (6 ounces) black olives
- Olive oil (for brushing)
- Salt and pepper to taste
Instructions
- Prepare the Base: Preheat your oven to 375°F (190°C). Lay the English muffin halves on a baking sheet, cut side up. Lightly brush each muffin half with olive oil to help achieve a crispy base.
- Add the Sauce: Spread about 1-2 tablespoons of tomato pizza sauce on each English muffin half. Make sure the sauce is evenly distributed, covering the entire surface.
- Top with Cheese: Sprinkle a generous amount of shredded mozzarella cheese over the sauce. Make sure the cheese covers the sauce completely and to your desired thickness.
- Decorate with Spiders: To create the spider toppings, cut the black olives in half. Use one half for the spider’s body. Slice the remaining halves into thin strips to create the spider’s legs. Arrange one olive half and the legs on each pizza to resemble a spider. Add mini pepperoni slices if desired for more flavor.
- Season and Bake: Lightly season each pizza with salt and pepper. Place the baking sheet in the preheated oven and bake for 10-12 minutes, or until the cheese is melted and bubbly, and the edges of the muffins are golden brown.
- Serve: Once baked, remove the pizzas from the oven and let them cool slightly. Serve warm and watch your guests enjoy the spooky treat!
Extra Tips
When making Spooky Spider Pizzas, feel free to get creative with the toppings. You can add other vegetables or meats to suit your kids’ preferences.
If you prefer a spicier kick, consider adding a sprinkle of red pepper flakes. To engage the kids, let them assemble the spiders on the pizzas – it’s a fun way to involve them in the kitchen.
Finally, if you’re short on time, you can use pre-made pizza bases instead of English muffins. This recipe is versatile and forgiving, so feel free to adjust it according to your needs.
Monster Mash Guacamole

Monster Mash Guacamole is a fun and spooky treat perfect for any Halloween party, especially for kids who enjoy a little fright with their bite. This ghoulishly green guacamole isn’t only delicious but also a healthier option compared to many sugary Halloween treats. With just the right amount of spice and a playful presentation, Monster Mash Guacamole will enchant young ones while keeping them nourished and satisfied.
This recipe takes the classic guacamole and gives it a festive twist. The secret to getting kids excited about this dish is all in the presentation. By adding a few edible decorations, you can transform a simple dip into a centerpiece that screams Halloween. Serve it with a side of colorful tortilla chips or veggie sticks, and watch as your little monsters dig in with delight.
Ingredients (serves 4-6):
- 3 ripe avocados
- 1 lime, juiced
- 1 teaspoon salt
- 1/2 cup diced red onion
- 3 tablespoons chopped fresh cilantro
- 2 Roma tomatoes, diced
- 1 teaspoon minced garlic
- 1 pinch ground cayenne pepper (optional)
- 1 handful of black olives (for decoration)
- 1 small cucumber (for decoration)
- 1 red bell pepper (for decoration)
Cooking Instructions:
- Prepare the Avocados: Begin by cutting the avocados in half, removing the pits, and scooping the flesh into a medium bowl. Use a fork to mash the avocado until it reaches a creamy consistency, leaving some small chunks for texture.
- Mix in the Flavors: Add lime juice and salt to the mashed avocados. Stir in the diced red onion, chopped cilantro, diced Roma tomatoes, and minced garlic. If you like a bit of heat, add a pinch of cayenne pepper. Mix everything until well combined.
- Create Monster Faces: For a spooky touch, slice olives, cucumber, and red bell pepper into shapes that can be used to create monster faces. Think olive slices for eyes, cucumber slices for the mouth, and thin strips of bell pepper for hair or facial features.
- Assemble the Guacamole: Transfer the guacamole to a serving bowl. Decorate the top of the guacamole with your prepared veggie pieces to create fun and frightening monster faces.
- Serve: Pair the Monster Mash Guacamole with a variety of dippers such as colorful tortilla chips or veggie sticks. Serve immediately to guarantee the avocados don’t brown.
Extra Tips:
To keep the guacamole fresh and prevent it from browning, press a piece of plastic wrap directly onto the surface of the guacamole before covering the bowl with a lid. This reduces exposure to air.
If you’re preparing the dish ahead of time, store it in the refrigerator and add the decorative features just before serving to maintain their vibrant colors and freshness. Additionally, encourage kids to help create the monster faces – it’s a great way to get them involved in the kitchen and make the dish even more fun!
Ghostly Marshmallow Pops

Halloween is a time for spooky fun, and what better way to celebrate than with some Ghostly Marshmallow Pops? These treats are a delightful combination of marshmallows and candy, perfect for kids’ parties or simply as a festive snack.
With their eerie yet adorable appearance, they’re sure to be a hit among the little ones. Plus, they’re incredibly simple to make, requiring only a few ingredients and minimal preparation time.
The Ghostly Marshmallow Pops not only look great but they also taste delicious. The sweet, gooey marshmallows are coated in a white candy shell, giving them a ghostly appearance.
With the added touch of chocolate chip eyes, these pops are brought to life in the most delightful way. With just a little bit of creativity and some basic supplies, you can have a batch of these spooky treats ready in no time.
Ingredients (Serves 4-6 people):
- 12 large marshmallows
- 1 cup white candy melts
- 24 mini chocolate chips
- 12 lollipop sticks
- Wax paper
Cooking Instructions:
- Prepare the Marshmallows: Begin by inserting a lollipop stick into each marshmallow, making sure it’s securely in place. This will serve as the base for your ghostly pop.
- Melt the Candy: Place the white candy melts in a microwave-safe bowl. Microwave them in 30-second intervals, stirring in between, until the candy is completely melted and smooth.
- Coat the Marshmallows: Dip each marshmallow into the melted candy, using a spoon to help cover them completely. Make sure the marshmallow is fully coated with the candy for an even ghostly appearance.
- Add Eyes: Before the candy coating sets, place two mini chocolate chips on each marshmallow to create the ghost’s eyes. Press them gently into the candy to guarantee they stick.
- Dry the Pops: Place the coated marshmallows onto a sheet of wax paper. Allow them to set for about 30 minutes, or until the candy shell is firm to the touch.
- Serve and Enjoy: Once the pops are set, they’re ready to be served. Arrange them on a decorative plate or stick them upright into a block of foam for a fun presentation.
Extra Tips:
For best results, make sure the candy melts aren’t overheated, as this can cause the coating to become too thick or clumpy.
If the candy is too thick, you can add a teaspoon of vegetable shortening to thin it out. Additionally, for a more personalized touch, you can use edible markers to draw spooky faces on the pops once the candy has set.
This will add an extra layer of creativity and fun to your Ghostly Marshmallow Pops!
Creepy-Crawly Veggie Platter
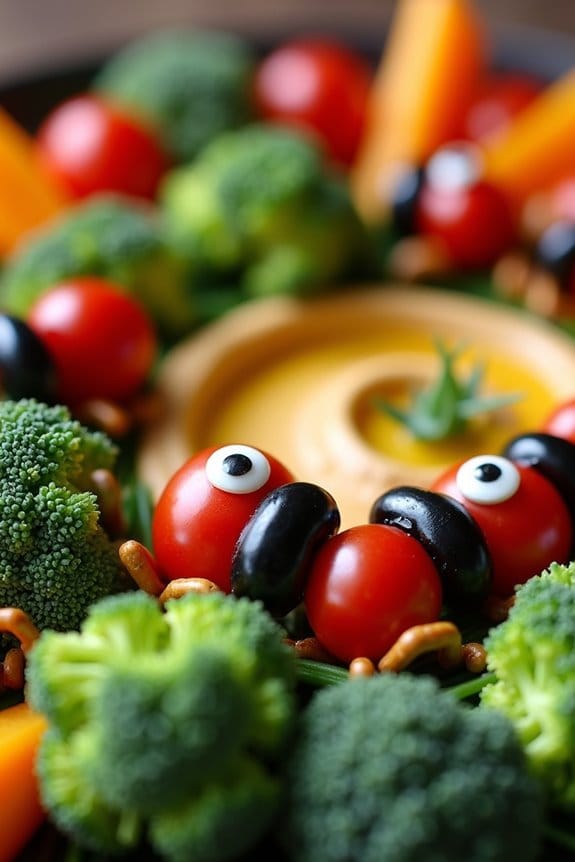
Hosting a Halloween party for kids and looking for a fun and healthy snack option? The Creepy-Crawly Veggie Platter is a fantastic choice that combines creativity and nutrition. This platter is designed to resemble a colorful garden crawling with spooky insects and creepy creatures made entirely out of vegetables. Not only is this dish visually appealing, but it also encourages kids to enjoy their veggies in a playful and engaging manner.
The Creepy-Crawly Veggie Platter is perfect for a party serving size of 4-6 people. It’s a versatile dish that can be customized according to your preferences and the vegetables available. The key is to use a variety of colors and shapes to create an inviting and eerie landscape. With this platter, you can be sure that the kids will be excited to dig into their greens while celebrating Halloween in style.
Ingredients (Serving Size: 4-6 people):
- 1 head of broccoli
- 1 red bell pepper
- 1 yellow bell pepper
- 1 cucumber
- 1 carrot
- 1 small bunch of cherry tomatoes
- 1 small can of black olives
- 1 package of pretzel sticks
- 1 cup of hummus or ranch dressing
- 1 handful of edible googly eyes (optional)
Cooking Instructions:
- Prepare the Vegetables: Wash all vegetables thoroughly. Cut the broccoli into small florets. Slice the bell peppers into thin strips. Peel the cucumber and slice it into rounds. Peel the carrot and cut it into sticks or rounds.
- Assemble the Platter Base: On a large serving platter, arrange the broccoli florets in clusters to mimic bushes. Place the cucumber rounds and carrot sticks around the broccoli to create a garden-like effect.
- Add Creepy-Crawlies: Use the cherry tomatoes and black olives to form the bodies of insects. For instance, place two or three olives or tomatoes in a line to resemble a caterpillar.
- Create Spider Legs: Use pretzel sticks as legs for spiders or other insects. Insert them into the sides of cherry tomatoes or olives to resemble legs.
- Add Details: Use edible googly eyes to bring your veggie insects to life, placing them on the olives or tomatoes.
- Serve with Dip: Place a bowl of hummus or ranch dressing in the center of the platter for dipping. This will serve as a tasty “swamp” or “pond” for the veggies.
Extra Tips:
To make this platter even more fun, consider using cookie cutters to shape some of the vegetables into spooky forms like bats or ghosts. If you don’t have edible googly eyes, you can create eyes using small dollops of cream cheese or yogurt with a tiny piece of olive for the pupil.
Encourage kids to create their own creepy-crawly designs as they snack on the platter. This interactive element not only makes the platter more entertaining but also fosters creativity and healthy eating habits.
Pumpkin Patch Fruit Cups

Halloween is the perfect time for creating deliciously spooky treats that kids will love, and Pumpkin Patch Fruit Cups are a fun and healthy option to include in your party menu. This delightful dish combines the vibrant colors and flavors of fresh fruits, presented in a way that will capture the imagination of young trick-or-treaters.
These fruit cups aren’t only easy to prepare but also offer a rejuvenating balance to the usually sugar-laden Halloween spread. The concept is simple: transform ordinary fruit cups into mini pumpkin patches using a variety of fruits and creative arrangements.
Create fun and healthy pumpkin patch fruit cups to balance the sugary treats this Halloween.
These fruit cups are perfect for little hands and make for an eye-catching addition to your Halloween table. With the right mix of fruits, these Pumpkin Patch Fruit Cups are sure to be a hit with both kids and parents alike, providing a nutritious treat that doesn’t compromise on fun.
Ingredients for 4-6 servings:
- 4 medium-sized oranges
- 1 cup of green grapes
- 1 cup of diced pineapple
- 1/2 cup of blueberries
- 1/2 cup of diced strawberries
- 1/4 cup of kiwi, peeled and diced
- 1/4 cup of mini pretzel sticks
Instructions:
- Prepare the Oranges: Begin by thoroughly washing the oranges. Using a sharp knife, slice off the top quarter of each orange, and keep these tops aside. Carefully scoop out the insides of the oranges using a spoon, ensuring you don’t puncture the rind. This will create a hollow space to hold the fruit salad.
- Create the Fruit Mix: In a large mixing bowl, combine the diced pineapple, blueberries, strawberries, and kiwi. Stir gently to mix the fruits evenly, ensuring that they’re well distributed for a colorful and tasty combination.
- Assemble the Fruit Cups: Fill each hollowed-out orange shell with the mixed fruit salad. Ensure that each cup is filled to the top for a generous serving.
- Add the Grapes and Pretzel Sticks: Place a handful of green grapes on top of each fruit-filled orange to resemble a pumpkin patch. Insert a mini pretzel stick into the center of each cup, standing upright, to mimic a pumpkin stem.
- Present the Fruit Cups: Place the orange tops back onto the filled oranges at an angle to add to the pumpkin patch effect. Arrange the completed Pumpkin Patch Fruit Cups on a serving tray for a delightful presentation.
Extra Tips:
To enhance the festive look, consider using a food-safe marker to draw little jack-o’-lantern faces on the outside of the orange rinds. Additionally, feel free to customize the fruit selection based on seasonal availability or personal preference.
If preparing in advance, keep the fruit salad mixture chilled and assemble the cups just before serving to maintain freshness. These Pumpkin Patch Fruit Cups are a fantastic way to get kids excited about eating fruit while celebrating Halloween.
Witch’s Brew Punch

Witch’s Brew Punch is a magical and spooky drink that’s perfect for a Halloween party. This vibrant and fizzy punch will captivate kids with its fun colors and mysterious flavors, making it an essential addition to your Halloween menu.
The bubbling and colorful nature of the punch creates an enchanting atmosphere, making it a delightful experience for kids as they indulge in the excitement of Halloween. This Witch’s Brew Punch isn’t only visually appealing but also easy to prepare, allowing you to focus on other party elements.
The combination of flavors caters to a child’s palate, guaranteeing that they enjoy every sip. Perfect for a serving size of 4-6 people, this recipe will provide enough punch for your little ones to enjoy. Gather your ingredients and follow the instructions to create this delightful brew.
Ingredients:
- 4 cups of lemon-lime soda
- 2 cups of pineapple juice
- 1 cup of orange juice
- 1 cup of grape juice
- 1 cup of ginger ale
- 1/2 cup of grenadine
- 1-2 cups of ice cubes
- Gummy worms or other Halloween-themed candies for garnish
Instructions:
- Prepare the Base: In a large punch bowl, combine the lemon-lime soda, pineapple juice, orange juice, and grape juice. Stir gently with a large spoon to blend the juices together without losing too much carbonation from the soda.
- Add the Fizz: Slowly pour in the ginger ale, which will add a nice fizz to the punch. Stir gently to mix the ginger ale with the other juices.
- Sweeten the Mix: Add the grenadine to the punch mixture. This won’t only give your punch a sweet flavor but also enhance the color, giving it a rich, spooky hue. Stir well until the grenadine is fully incorporated.
- Chill the Brew: Add 1-2 cups of ice cubes to the punch bowl to keep the drink cool and invigorating. Confirm the ice is evenly distributed throughout the punch.
- Serve with a Twist: Garnish the punch with gummy worms or other Halloween-themed candies. Let them float on top or hang over the edge of the bowl for a fun, creepy effect.
Extra Tips:
For an extra spooky touch, consider using dry ice to create a fog effect around your Witch’s Brew Punch. Remember to handle dry ice with care, using gloves or tongs, and never place it directly in the drink to avoid ingestion.
If you want a less sweet version, you can reduce the amount of grenadine or choose a naturally sweetened juice. Feel free to adjust the quantities to suit your taste preferences and add more candies for a festive look.
Mummy Hot Dogs
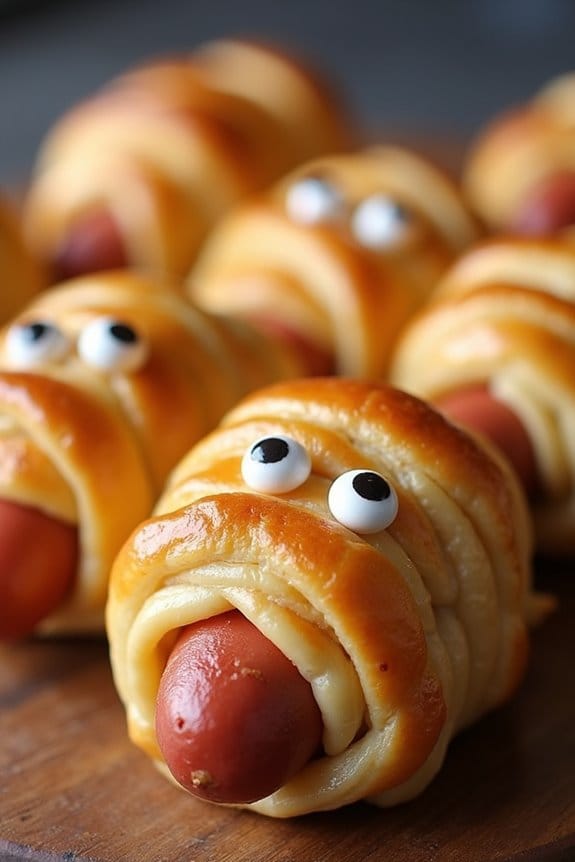
This recipe transforms ordinary hot dogs into adorable mummy-like figures by wrapping them with strips of dough to mimic bandages. The process isn’t only simple but also a great way to involve kids in the kitchen. They can have fun wrapping the dough and decorating the mummies with edible eyes, making it an entertaining activity leading up to the party.
Transform ordinary hot dogs into fun mummy figures; a perfect kitchen activity for kids!
Ingredients (Serves 4-6 people):
- 1 package (8 ounces) of refrigerated crescent roll dough
- 8 hot dogs
- 2 tablespoons of mustard (for decoration)
- Optional: 1 egg, beaten (for egg wash)
- Optional: candy eyes or small dots of mayonnaise for eyes
Cooking Instructions:
- Preheat the Oven: Start by preheating your oven to 375°F (190°C). This guarantees that your mummy hot dogs will cook evenly.
- Prepare the Dough: Unroll the crescent roll dough and separate it into four rectangles by pressing the perforations together. Use a knife or a pizza cutter to cut each rectangle into 10 thin strips, making 40 strips in total.
- Wrap the Hot Dogs: Take one hot dog and wrap it with 4 to 5 strips of dough, leaving a little space at the top for the mummy’s face. Overlap the strips slightly to create the appearance of bandages. Repeat this process with all the hot dogs.
- Add an Egg Wash: If you like, brush the wrapped hot dogs with a beaten egg. This will give them a golden brown finish when baked.
- Bake the Mummies: Place the wrapped hot dogs on a baking sheet lined with parchment paper. Bake in the preheated oven for 12-15 minutes, or until the dough is golden brown and cooked through.
- Decorate: Once baked, let the mummy hot dogs cool slightly. Use mustard to dot two eyes on each mummy. Alternatively, you can use candy eyes or small dots of mayonnaise for a fun effect.
Extra Tips:
For a more personalized touch, you can use different types of sausages or veggie dogs to cater to dietary preferences.
If you want the dough to have a more seasoned flavor, try sprinkling a little garlic powder or Italian seasoning on the dough strips before wrapping.
Remember that the dough will expand slightly during baking, so don’t wrap the hot dogs too tightly.
Enjoy these mummy hot dogs warm for the best taste and texture.
Dracula’s Bloody Good Salsa

Dracula’s Bloody Good Salsa is a devilishly delightful treat perfect for a Halloween party, especially for kids who enjoy a little spooky fun. This vibrant, blood-red salsa isn’t only visually engaging but also packed with fresh flavors that will have the young ones coming back for more. The combination of ripe tomatoes, zesty lime, and a hint of spice creates a delicious balance that pairs wonderfully with crispy tortilla chips or as a topping for mini tacos or quesadillas.
This recipe is simple to prepare and can be made ahead of time, allowing you to focus on the rest of your Halloween festivities. The rich red color of the salsa is achieved naturally using fresh tomatoes and a bit of red bell pepper, making it a healthier alternative to store-bought options. Whether you’re hosting a large gathering or a small get-together, Dracula’s Bloody Good Salsa is sure to be a hit with both kids and adults alike.
Ingredients for 4-6 servings:
- 4 ripe medium tomatoes, diced
- 1 small red bell pepper, finely chopped
- 1/2 cup red onion, finely chopped
- 2 cloves garlic, minced
- 1 jalapeño pepper, seeded and finely chopped
- 1/4 cup fresh cilantro, chopped
- Juice of 1 lime
- 1 teaspoon salt
- 1/2 teaspoon black pepper
Cooking Instructions:
- Prepare the Ingredients: Begin by washing all the fresh produce thoroughly. Dice the tomatoes and red bell pepper into small, even pieces. Finely chop the red onion, garlic, and jalapeño pepper, ensuring you remove the seeds from the jalapeño to control the heat level.
- Mix Ingredients: In a large mixing bowl, combine the diced tomatoes, red bell pepper, red onion, garlic, jalapeño, and cilantro. Stir the ingredients gently to guarantee they’re mixed evenly.
- Add Seasoning: Squeeze the juice of one lime over the mixture and sprinkle with salt and black pepper. Lime juice adds a revitalizing tang, while the salt and pepper enhance the natural flavors of the vegetables.
- Combine Thoroughly: Use a large spoon to mix all the ingredients together until the salsa is well combined. Taste the salsa and adjust the seasoning if necessary, adding more lime juice, salt, or pepper to suit your preference.
- Chill the Salsa: Cover the bowl with plastic wrap or a lid and place it in the refrigerator for at least 30 minutes before serving. Chilling the salsa allows the flavors to meld together, enhancing the overall taste.
- Serve: Once chilled, give the salsa a final stir and transfer it to a serving bowl. Pair it with a platter of tortilla chips or use it as a topping for various dishes at your Halloween party.
Extra Tips:
For a milder version, consider substituting the jalapeño pepper with a milder pepper, such as a poblano. If you want to add a little more heat, leave some of the jalapeño seeds or add a dash of hot sauce. This salsa can be made a day in advance, which will further enhance the flavors. Just be sure to store it in an airtight container in the refrigerator.
Additionally, for a fun Halloween twist, serve the salsa in a carved-out pumpkin or a spooky-themed bowl to add an extra festive touch to your party setup.
Eyeball Pasta Salad
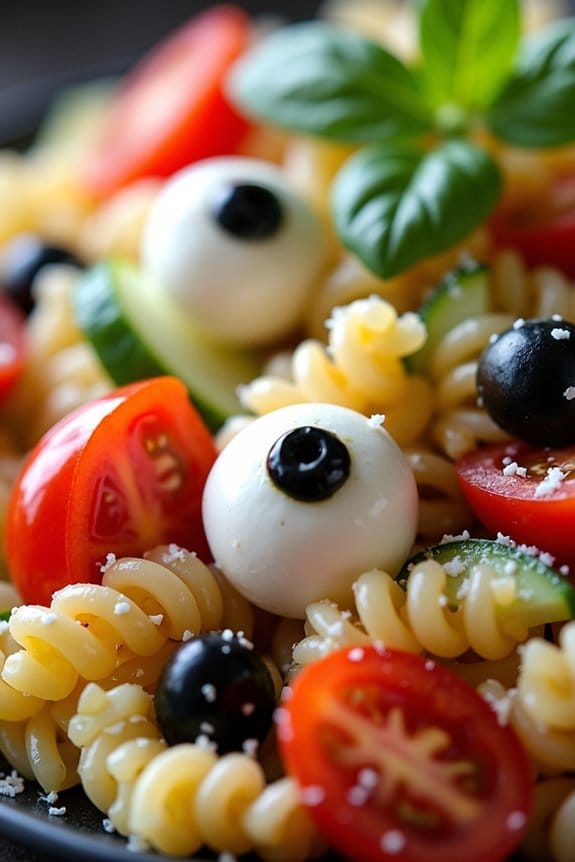
Transform your Halloween party into a spooky affair with this fun and eerie Eyeball Pasta Salad. Perfect for kids, this dish isn’t only visually exciting but also deliciously satisfying. The pasta salad combines savory flavors with an eye-catching presentation that will surely become the highlight of your festive spread.
Whether you’re hosting a party or just making a fun meal for the family, this recipe is bound to be a hit. The Eyeball Pasta Salad is designed to serve 4-6 people, making it ideal for small gatherings or family dinners. The combination of fresh vegetables, flavorful dressing, and creatively crafted “eyeballs” made from mozzarella balls and olives guarantees that each bite is both delicious and fun.
Perfect for small gatherings, Eyeball Pasta Salad combines fun, flavor, and festive flair in every delicious bite.
Plus, it’s a great way to sneak in some healthy ingredients while keeping the spooky spirit alive.
Ingredients (for 4-6 servings):
- 12 oz rotini pasta
- 1 cup cherry tomatoes, halved
- 1 cup cucumber, diced
- 1 cup black olives, sliced
- 1/2 cup red bell pepper, diced
- 1/2 cup green bell pepper, diced
- 8 oz mini mozzarella balls
- 1/4 cup black olives, whole (for eyeballs)
- 1/2 cup Italian dressing
- 1/4 cup grated Parmesan cheese
- Salt and pepper to taste
- Fresh basil leaves for garnish
Cooking Instructions:
- Cook the Pasta: Begin by bringing a large pot of salted water to a boil. Add the rotini pasta and cook according to the package instructions until al dente. Once cooked, drain the pasta and rinse it under cold water to stop the cooking process. Set it aside to cool completely.
- Prepare the Vegetables: While the pasta is cooling, prepare the vegetables. Halve the cherry tomatoes, dice the cucumbers, and chop the bell peppers. Place all the chopped vegetables into a large mixing bowl.
- Create the Eyeballs: Take the mini mozzarella balls and gently press a whole black olive into each one to create the appearance of an eyeball. Set these aside for later assembly.
- Mix the Salad: Once the pasta is cooled, add it to the bowl of vegetables. Toss everything together gently to combine. Pour the Italian dressing over the salad, and sprinkle the grated Parmesan cheese. Season with salt and pepper to taste.
- Assemble the Eyeballs: Carefully place the mozzarella “eyeballs” on top of the pasta salad. Confirm they’re evenly distributed for a spooky effect.
- Garnish and Serve: Garnish the salad with fresh basil leaves for added color and flavor. Serve immediately, or refrigerate for up to 2 hours before serving to allow the flavors to meld.
Extra Tips:
When preparing the Eyeball Pasta Salad, consider using different shapes of pasta to add variety to the dish. Additionally, you can customize the vegetables according to your preference or what you have on hand.
For a more robust flavor, consider marinating the mozzarella balls in Italian dressing for a few hours prior to assembling the eyeballs. If your party includes younger children, make sure to cut the olives and mozzarella balls into smaller pieces to reduce any choking hazards.
Enjoy the creativity and fun that this dish brings to your Halloween celebration!
Bat Wing Nachos

Halloween is the perfect time to get creative with your food, and Bat Wing Nachos are a spooky and delicious treat that’s sure to be a hit at any kids’ party. These nachos aren’t only fun to look at, but they’re also a tasty snack that combines the classic flavors of regular nachos with a ghoulish twist. The black tortilla chips mimic bat wings, and when paired with a variety of colorful toppings, they create an eye-catching and appetizing dish.
Whether you’re hosting a Halloween party or just want to add some festive fun to your dinner table, Bat Wing Nachos are a simple yet impressive dish to serve. This recipe is designed for a serving size of 4-6 people, making it perfect for a small gathering or family dinner. With just a few ingredients and easy-to-follow instructions, you’ll have a spooky snack ready in no time.
Ingredients for Bat Wing Nachos (Serves 4-6):
- 1 large bag of black tortilla chips
- 1 cup shredded cheddar cheese
- 1/2 cup black beans, drained and rinsed
- 1/2 cup corn kernels (fresh, frozen, or canned)
- 1/4 cup sliced black olives
- 1/4 cup diced red bell pepper
- 1/4 cup chopped green onions
- 1/2 cup salsa
- 1/2 cup sour cream
- 1 tablespoon olive oil
- 1 teaspoon chili powder
- Salt and pepper to taste
Cooking Instructions:
- Preheat the Oven: Start by preheating your oven to 350°F (175°C). This guarantees that the nachos will cook evenly and the cheese will melt perfectly.
- Prepare the Baking Sheet: Line a large baking sheet with aluminum foil or parchment paper. This will prevent the nachos from sticking and make cleanup a breeze.
- Arrange the Chips: Spread the black tortilla chips evenly across the prepared baking sheet. Try to create an even layer so that all chips get a bit of the toppings.
- Layer the Toppings: In a small bowl, mix the olive oil and chili powder. Drizzle this mixture over the chips for an extra kick. Then sprinkle the shredded cheddar cheese evenly over the chips, followed by the black beans, corn kernels, black olives, diced red bell pepper, and green onions.
- Bake the Nachos: Place the baking sheet in the preheated oven and bake for about 10-12 minutes, or until the cheese is fully melted and the edges of the chips are slightly crispy.
- Serve and Garnish: Remove the nachos from the oven and let them cool for a minute. Transfer them to a serving platter and garnish with dollops of salsa and sour cream. Add additional chili powder or a dash of salt and pepper if desired.
Extra Tips:
To make your Bat Wing Nachos even more festive, consider using Halloween-themed serving dishes or adding small edible decorations like candy eyes.
If you’re making this dish for young children, you can easily adjust the spice level by reducing the chili powder or opting for a milder salsa.
For a healthier twist, try using baked chips or adding more vegetables like diced tomatoes or avocado.
Remember to serve these nachos immediately after baking for the best taste and texture. Enjoy your spooky snack!
Frankenstein Rice Krispie Treats

Frankenstein Rice Krispie Treats are a delightful and spooky addition to any Halloween party menu, perfect for delighting young partygoers. These treats combine the classic, beloved taste of Rice Krispie squares with a festive twist, transforming them into adorable Frankenstein faces. The vibrant green hue, along with carefully placed decorations, brings these characters to life, making them an exciting project for both children and adults.
Not only are they fun to assemble, but they also offer a tasty treat that’s sure to satisfy sweet cravings. This recipe is straightforward and involves preparing a batch of Rice Krispie squares, tinting them with green food coloring, and decorating them with chocolate and candy to create Frankenstein’s face.
It’s an engaging and creative activity for kids, allowing them to participate in the kitchen while exercising their artistic skills. The end result is a batch of delightful treats with a monstrous twist, ready to be devoured at your Halloween gathering. This recipe serves 4-6 people, making it an excellent choice for a small party or family gathering.
Ingredients:
- 6 cups Rice Krispies cereal
- 3 tablespoons butter
- 1 package (10 oz.) marshmallows
- Green food coloring
- 1 cup mini chocolate chips
- Black decorating gel
- Candy eyes
- Pretzel sticks
Instructions:
- Prepare Your Materials: Gather all your ingredients and line a 9×13 inch pan with parchment paper. This will make it easier to remove the treats later.
- Melt the Butter and Marshmallows: In a large saucepan, melt the butter over low heat. Add the marshmallows and stir continuously until they’re completely melted and smooth. Be careful not to burn the mixture.
- Add Food Coloring: Remove the saucepan from the heat and add several drops of green food coloring to the melted marshmallow mixture. Stir well until the color is evenly distributed.
- Mix in the Cereal: Add the Rice Krispies cereal to the saucepan and stir until all the cereal is well coated with the marshmallow mixture.
- Shape and Cool: Pour the mixture into the prepared pan. Press it down evenly with a spatula coated with butter or non-stick spray. Allow to cool at room temperature.
- Cut into Squares: Once cooled, remove from the pan and cut the treats into rectangles to form the base of Frankenstein’s head.
- Decorate the Faces: Use the black decorating gel to draw hair and a mouth on each rectangle. Place candy eyes below the hairline. Insert a half pretzel stick on each side of the rectangle to form Frankenstein’s neck bolts.
- Add Details: Use mini chocolate chips for additional features like eyebrows or scars, pressing them gently into the treats.
Extra Tips:
When melting the marshmallows, make sure to keep the heat low to prevent them from burning, as this can affect the taste and texture of your treats. If you want a more vibrant green color, feel free to add more food coloring until you reach the desired hue.
For a smoother finish on your Frankenstein faces, try letting the treats sit for a few minutes after cutting and before decorating; this will make them less sticky. Enjoy experimenting with different candy and chocolate decorations to give each treat its own unique personality!
Goblin Popcorn Mix

Goblin Popcorn Mix is a spooktacular treat perfect for any Halloween party, especially one with kids on the guest list. This fun and colorful snack isn’t only delicious but also visually appealing, making it a hit among the little goblins and witches. The combination of sweet and salty flavors, along with a crunchy texture, is bound to be a crowd-pleaser. Plus, it’s easy to make in advance, leaving you more time to focus on other party preparations.
A spooktacular Halloween treat that’s both delicious and visually appealing for kids and party-goers alike.
Incorporating a variety of candies and colorful ingredients, Goblin Popcorn Mix is a delightful blend of popcorn, candy corn, pretzels, and chocolate pieces. It’s a versatile recipe that allows for creativity, so you can swap out ingredients based on your kids’ preferences or dietary needs. This recipe serves 4-6 people, making it ideal for a small gathering or for kids to enjoy during a Halloween movie night.
Ingredients
- 8 cups of popped popcorn
- 1 cup of candy corn
- 1 cup of mini pretzels
- 1 cup of chocolate-covered candies (such as M&Ms)
- 1 cup of gummy worms
- 1/2 cup of white chocolate chips
- 1/2 cup of mini marshmallows
- 1/4 cup of melted butter
- 1/2 teaspoon of salt
Cooking Instructions
- Prepare the Popcorn: Start by popping the popcorn if it’s not already done. You can use microwave popcorn or pop it on the stove, depending on your preference.
- Mix the Dry Ingredients: In a large bowl, combine the popped popcorn, candy corn, mini pretzels, chocolate-covered candies, gummy worms, and mini marshmallows. Toss them together gently to guarantee even distribution.
- Melt the White Chocolate: In a microwave-safe bowl, melt the white chocolate chips by microwaving them for 30-second intervals, stirring in between until smooth and fully melted.
- Combine with Butter: Mix the melted white chocolate with the melted butter and salt. Stir until smooth and well combined.
- Coat the Mix: Drizzle the white chocolate and butter mixture over the popcorn and candy mix. Use a spatula to gently toss the mixture, ensuring that all pieces are lightly coated.
- Let it Set: Spread the Goblin Popcorn Mix onto a baking sheet lined with parchment paper. Allow it to set at room temperature for about 20-30 minutes, or until the white chocolate hardens.
- Serve: Once set, break apart any large clusters and transfer the mix to a serving bowl or individual cups for the kids to enjoy.
Extra Tips
For an extra touch of Halloween fun, consider adding themed sprinkles or edible glitter to the mix before the white chocolate sets. If you’re looking to make this recipe a bit healthier, you can use air-popped popcorn and reduce the amount of candy.
Additionally, feel free to customize the Goblin Popcorn Mix with your kids’ favorite treats, such as adding nuts for a bit more crunch or using dark chocolate for a richer flavor. Remember to store any leftovers in an airtight container to maintain the freshness and keep it ready for the next round of trick-or-treaters!
Haunted Cheese Sticks

Looking to add a spooky twist to your Halloween party menu? Haunted Cheese Sticks are the perfect ghoulish treat that will delight kids and adults alike. These deliciously eerie snacks aren’t only easy to make but are also a fun way to get creative in the kitchen. With a little bit of imagination, you can transform ordinary cheese sticks into creepy, haunting figures that will surely be a hit at your Halloween gathering.
These cheesy snacks are made with mozzarella cheese sticks, wrapped in a crispy coating, and baked to perfection. A few simple ingredients can turn them into ghostly apparitions that’ll be devoured in no time. Perfect for a serving size of 4-6 people, these Haunted Cheese Sticks are a fantastic addition to your Halloween party spread.
Ingredients (serving size: 4-6 people):
- 12 mozzarella cheese sticks
- 1 cup all-purpose flour
- 2 large eggs
- 1 cup seasoned breadcrumbs
- 1 cup crushed pretzels
- Black olives (for decoration)
- Cooking spray or vegetable oil
- Marinara sauce (for dipping)
Instructions:
- Prepare the Cheese Sticks: Unwrap the mozzarella cheese sticks and lay them on a baking sheet lined with parchment paper. Place them in the freezer for about 30 minutes to firm up, which will help prevent them from melting too quickly during cooking.
- Set Up Dredging Station: In three separate shallow bowls, place the flour, beaten eggs, and a mixture of seasoned breadcrumbs and crushed pretzels. This will be your dredging station.
- Coat the Cheese Sticks: Take each cheese stick and roll it in the flour, ensuring it’s fully coated. Dip it into the beaten eggs, allowing excess egg to drip off, and then roll it in the breadcrumb and pretzel mixture, pressing gently to adhere. For extra crunch, repeat the egg and breadcrumb coating one more time.
- Add Faces: Use small pieces of black olives to create eyes and a mouth on one end of each coated cheese stick to resemble a ghost. Gently press them into the coating.
- Bake the Cheese Sticks: Preheat your oven to 400°F (200°C). Spray a baking sheet with cooking spray or lightly coat it with vegetable oil. Arrange the coated cheese sticks on the sheet, ensuring they aren’t touching. Spray the tops lightly with cooking spray to help them brown.
- Bake Until Golden: Place the baking sheet in the preheated oven and bake for 10-12 minutes, or until the cheese sticks are golden brown and the cheese begins to ooze slightly.
- Serve: Remove from the oven and let them cool slightly before serving with marinara sauce for dipping. Enjoy your haunted creations!
Extra Tips: To prevent the cheese from melting too quickly, make sure to freeze the cheese sticks longer if needed. You can also experiment with different shapes by cutting the cheese sticks into smaller pieces or using other types of cheese. If breadcrumbs aren’t available, you can substitute with crushed crackers or cereal for a different texture. For a gluten-free version, use gluten-free flour and breadcrumbs. Finally, be sure to monitor the cheese sticks closely while baking to avoid over-browning.
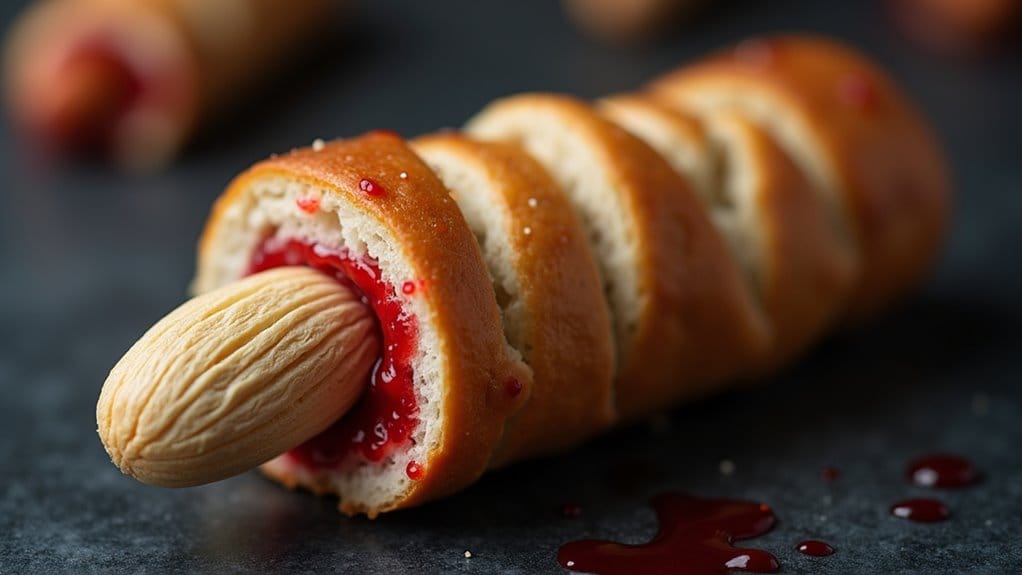
Zombie Finger Sandwiches

Zombie Finger Sandwiches are a spooky and delightful addition to any Halloween party, especially for kids. These eerie treats are designed to look like severed fingers, adding a touch of the macabre to your festive spread. Despite their creepy appearance, they’re deliciously edible and perfect for little ghouls and goblins. The soft bread paired with a savory filling makes them a hit among children and adults alike, guaranteeing your Halloween gathering is a memorable one.
The fun part about making Zombie Finger Sandwiches is that you can customize them to suit your taste preferences. Whether you opt for a classic peanut butter and jelly filling or lean towards something savory like ham and cheese or cream cheese with cucumber, the possibilities are endless. The key is to make them look convincingly creepy while still being tasty. This recipe serves 4-6 people, making it perfect for a small gathering or as part of a larger Halloween buffet.
Ingredients:
- 12 slices of white or whole wheat bread
- 1/2 cup of your choice of filling (e.g., peanut butter and jelly, ham and cheese, cream cheese and cucumber)
- 12 whole almonds
- Red food coloring or strawberry jam
- 2 tablespoons butter, softened (optional for spreading on bread)
- Salt to taste (optional, depending on filling)
Instructions:
- Prepare the Bread: Cut the crusts off the bread slices to create rectangles. These will form the base of your fingers. If desired, you can lightly spread butter on one side of each slice for added flavor.
- Assemble the Sandwiches: Spread your chosen filling on each slice of bread, leaving a small margin around the edges to prevent spillage. If using a savory filling, you may want to add a pinch of salt for enhanced flavor.
- Roll the Fingers: Starting from one end, gently roll up each slice of bread to form a finger-like shape. Press down lightly to guarantee they hold their shape.
- Create the Fingernails: Attach a whole almond to one end of each rolled sandwich using a dab of filling or a small amount of red food coloring to act as glue. This will resemble a fingernail.
- Add Details: Use a sharp knife to make small, shallow slashes across each roll to mimic knuckles and joints. This will give your Zombie Fingers a more realistic look.
- Finish with Blood: To add a gory effect, dip a toothpick into red food coloring or use a small amount of strawberry jam to create blood-like streaks along the edges of the fingers.
- Serve: Arrange the Zombie Finger Sandwiches on a platter, making sure the almond fingernails are visible for the full creepy effect.
Extra Tips:
When making Zombie Finger Sandwiches, it’s important to confirm the bread is fresh and soft, as this makes it easier to roll without cracking.
If you’re using a sweet filling like peanut butter and jelly, consider using whole wheat bread to balance the sweetness. For a vegan version, substitute dairy-based ingredients with plant-based alternatives.
Finally, get creative with the presentation—serve these alongside a bowl of tomato soup or a platter of eyeball grapes for a full Halloween-themed spread!
