

As Halloween approaches, I can’t help but feel the thrill of crafting a spread of enchanting snacks for everyone to enjoy. From savory bites like Mummy Jalapeño Poppers to sweet delights like Bewitching Black Cat Cookies, there’s a spooky treat for every taste. Picture your party table adorned with a vibrant Spooky Spider Web Dip and eerie Crawly Gummy Worm Cups. Are you ready to turn your gathering into a haunted celebration? Let’s get started on these festive ideas!
Spooky Spider Web Dip

Transform your Halloween party with a spine-chilling appetizer that’s guaranteed to impress your guests: the Spooky Spider Web Dip. This deliciously eerie dish combines layers of creamy, tangy, and savory flavors, making it a perfect addition to your festive feast.
The dip itself is a delightful concoction of guacamole, sour cream, and salsa, topped with a decorative spider web made from sour cream. Serve it with crispy tortilla chips, and watch your guests enthusiastically immerse themselves in this ghoulish treat.
Not only is the Spooky Spider Web Dip visually enchanting, but it’s also incredibly easy to assemble. The layers of the dip create a beautiful presentation, while the spider web design adds a touch of Halloween magic. With just a few simple ingredients, you can serve a dish that’s both fun and flavorful, making it a hit at any party. This recipe serves 4-6 people, so make sure you have enough for everyone to enjoy!
Ingredients (for 4-6 servings):
- 2 cups guacamole
- 1 cup sour cream, divided
- 1 cup salsa
- 1 cup shredded cheddar cheese
- 1 can (15 oz) refried beans
- 1 tablespoon taco seasoning
- 1 small tomato, diced
- 2 tablespoons sliced black olives
- Tortilla chips, for serving
Cooking Instructions:
1. Prepare the Base Layer: In a medium-sized mixing bowl, combine the refried beans and taco seasoning. Stir until the seasoning is evenly distributed throughout the beans.
2. Layer the Dip: In a large serving dish or a shallow round pie dish, spread the refried beans evenly across the bottom. This will be the base layer of your dip.
3. Add the Guacamole: Carefully spread the guacamole over the bean layer, making sure it covers the entire surface.
4. Salsa Layer: Gently spoon the salsa over the guacamole, spreading it evenly. Be cautious not to mix the layers.
5. Cheese Layer: Sprinkle the shredded cheddar cheese over the salsa.
6. Decorate with Sour Cream: Fill a small plastic sandwich bag with 1/2 cup of sour cream. Cut a small tip off one of the corners of the bag to create a piping bag. Pipe the sour cream in concentric circles over the cheese layer.
Then, using a toothpick, gently drag lines from the center to the edges of the dish to create a spider web effect.
7. Garnish: Scatter diced tomato and sliced black olives over the top for added color and flavor.
8. Serve: Pair with a bowl of tortilla chips and serve immediately.
Extra Tips:
For the best presentation, use a clear glass dish that showcases the layers of the dip. If you’re making this dish ahead of time, keep it covered and refrigerated until ready to serve.
To prevent the guacamole from browning, press a piece of plastic wrap directly onto its surface before adding the next layer. If you want to enhance the Halloween theme, consider adding a plastic spider on the web for an extra spooky touch, but make sure to remove it before serving so guests don’t mistake it for an edible decoration!
Ghostly Cheese Puffs

Ghostly Cheese Puffs are an enchanting addition to any Halloween party spread. These delightful snacks aren’t only spooky in appearance but also pack a cheesy punch that both kids and adults will love. Shaped like little ghosts, these puffs bring a playful, eerie element to the table without sacrificing taste.
Hauntingly delightful, Ghostly Cheese Puffs add a spooky yet tasty touch to any Halloween festivity.
They’re easy to make and require minimal ingredients, making them a favorite among busy hosts looking for a quick yet impressive treat. These cheese puffs are perfect for serving 4-6 people and can be made in under an hour. The blend of sharp cheese and light, airy pastry creates a melt-in-your-mouth experience that will have your guests reaching for more.
Whether you’re planning a full Halloween feast or just a small gathering, Ghostly Cheese Puffs are guaranteed to be a hit. Follow this simple recipe to add a ghostly charm to your party menu.
Ingredients:
- 1 cup water
- 1/2 cup unsalted butter
- 1/2 teaspoon salt
- 1 cup all-purpose flour
- 4 large eggs
- 1 cup grated sharp cheddar cheese
- 1/4 teaspoon cayenne pepper (optional)
- Black sesame seeds or poppy seeds for ghost eyes
Instructions:
- Preheat and Prepare: Preheat your oven to 400°F (200°C). Line two baking sheets with parchment paper.
- Boil the Mixture: In a medium saucepan, combine the water, butter, and salt. Heat over medium-high until the butter is melted and the mixture begins to boil.
- Add Flour: Reduce the heat to low, add the flour all at once, and stir vigorously with a wooden spoon until the mixture forms a ball and pulls away from the sides of the pan. Continue to cook for about 1-2 minutes to remove excess moisture.
- Incorporate Eggs: Transfer the dough to a large mixing bowl and let it cool for 5 minutes. Beat in the eggs one at a time, making sure each egg is fully incorporated before adding the next. The dough should be smooth and glossy.
- Add Cheese and Spice: Stir in the grated cheddar cheese and cayenne pepper until evenly distributed.
- Shape the Puffs: Using a pastry bag fitted with a large round tip or a spoon, pipe or drop tablespoon-sized mounds of dough onto the prepared baking sheets, leaving about 2 inches between each puff. Shape them into ghostly forms by pulling up the tops to create a peak.
- Create Eyes: Press two black sesame seeds or poppy seeds into each puff to form the ghost’s eyes.
- Bake: Bake in the preheated oven for 20-25 minutes, or until the puffs are golden brown and crispy. Don’t open the oven door during the first 15 minutes of baking to prevent deflation.
- Cool: Remove from the oven and let the cheese puffs cool slightly on wire racks before serving.
Extra Tips:
For the best results, confirm all ingredients are at room temperature before starting, especially the eggs, to help them incorporate more smoothly into the dough.
If you don’t have a pastry bag, simply use a plastic zip-top bag with a corner cut off. Be sure to serve these puffs fresh from the oven for peak crispiness. If you need to prepare them in advance, reheat in a 350°F (175°C) oven for a few minutes before serving.
Feel free to experiment with different types of cheese or add herbs like chives or parsley for additional flavor.
Mummy Jalapeño Poppers
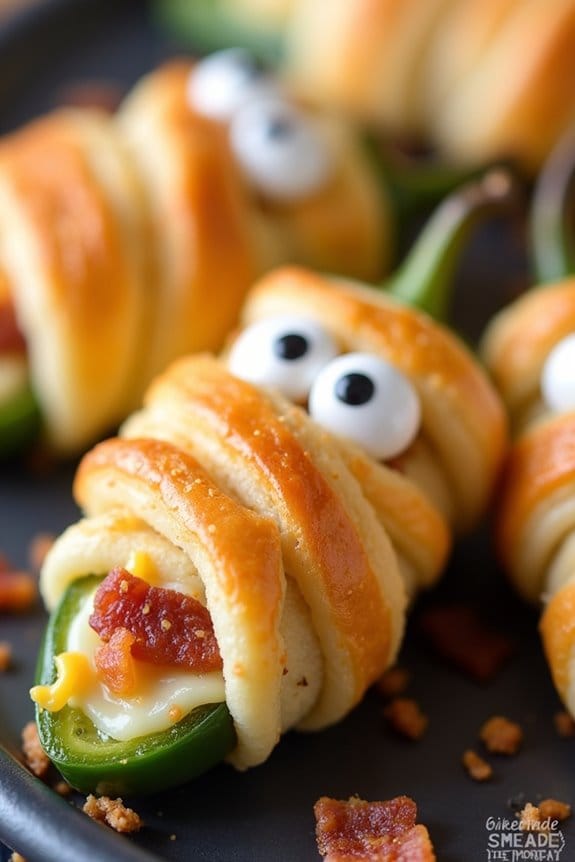
Mummy Jalapeño Poppers are a fun and spooky treat that will delight your Halloween party guests. These deliciously spicy and creamy snacks aren’t only visually appealing but also pack a punch of flavor. The combination of jalapeños, cream cheese, and bacon, all wrapped in crescent dough to resemble mummies, makes for a perfect party appetizer.
Whether you’re hosting a Halloween gathering or just want a festive treat, these mummy poppers are certain to be a hit.
These poppers are easy to prepare and can be made ahead of time, allowing you to focus on other party preparations. The creamy filling pairs perfectly with the heat of the jalapeños, and the crispy bacon adds an extra layer of flavor. The crescent dough wraps everything together, creating a delightful contrast of textures.
Serve these Mummy Jalapeño Poppers warm, and watch them disappear from the platter in no time.
Ingredients for 4-6 servings:
- 12 medium-sized jalapeños
- 8 ounces cream cheese, softened
- 1 cup shredded cheddar cheese
- 12 slices of bacon, cooked and crumbled
- 2 cans refrigerated crescent roll dough
- 24 small candy eyes
- Cooking spray
Cooking Instructions:
- Prepare the Jalapeños: Preheat your oven to 375°F (190°C). Slice each jalapeño in half lengthwise and remove the seeds and membranes to reduce the heat. Set the halved jalapeños aside.
- Make the Filling: In a medium-sized bowl, mix together the softened cream cheese, shredded cheddar cheese, and crumbled bacon until well combined. Fill each jalapeño half with the cheese mixture, pressing it in firmly.
- Wrap the Mummies: Unroll the crescent roll dough and separate it into individual triangles. Cut each triangle into thin strips, about ¼ inch wide. Wrap two or three strips around each stuffed jalapeño half, leaving a small gap for the eyes. Be creative in your wrapping to give each popper a unique mummy appearance.
- Bake the Poppers: Place the wrapped jalapeños on a baking sheet lined with parchment paper or lightly greased with cooking spray. Bake in the preheated oven for 12-15 minutes, or until the dough is golden brown and crispy.
- Add the Eyes: Once baked, remove the poppers from the oven and allow them to cool slightly. Place two candy eyes on each popper where you left gaps in the dough. The warmth of the popper should help the eyes stick.
Extra Tips:
When handling jalapeños, it’s a good idea to wear gloves to protect your skin from the capsaicin, which can cause irritation. If you prefer less heat, consider using milder peppers like mini sweet peppers.
For an added twist, you can experiment with different cheeses in the filling, such as pepper jack or mozzarella, to suit your taste preferences. Additionally, these poppers can be prepared a day in advance and stored in the refrigerator; just bake them right before serving to verify they’re nice and warm.
Witch’s Broomstick Pretzels

These broomstick snacks aren’t only simple to prepare but also require minimal ingredients, making them a quick and convenient option for busy hosts. With a little bit of assembly, you’ll have a platter of broomsticks ready to serve in no time.
The recipe is versatile and can be adapted to suit different dietary preferences by choosing alternative cheese or pretzel types. For a serving size of 4-6 people, here’s what you’ll need to get started on crafting these magical snacks.
Ingredients:
- 12 pretzel sticks
- 6 mozzarella cheese sticks
- Chives or thin strips of green onion
Instructions:
1. Prepare the Cheese: Start by unwrapping the mozzarella cheese sticks. Cut each cheese stick into halves, resulting in a total of 12 pieces. These will form the broom bristles of your snack.
2. Create the Broom Bristles: Gently flatten the bottom half of each cheese piece with your fingers or a rolling pin. Use a small knife to carefully make lengthwise cuts into the flattened part, creating fringes that resemble broom bristles.
Be sure to leave the top portion of the cheese stick uncut, as this will be where the pretzel stick is inserted.
3. Assemble the Broomsticks: Take a pretzel stick and gently press it into the uncut top portion of the cheese stick to form the broom handle. Be careful not to press too hard to avoid breaking the pretzel.
4. Secure the Bristles: To keep the cheese in place, wrap a chive or a thin strip of green onion around the top of the cheese where it meets the pretzel stick. Tie it tightly but carefully, so as not to break the cheese.
5. Serve: Arrange your Witch’s Broomstick Pretzels on a platter and serve immediately. They make a delightful centerpiece for your Halloween spread.
Extra Tips:
When preparing Witch’s Broomstick Pretzels, consider chilling the cheese sticks in the refrigerator for about 15 minutes before cutting them. This will make the cheese firmer and easier to handle, especially when cutting the fringes.
If using green onions to secure the bristles, soak them briefly in warm water to make them more pliable for tying. Feel free to get creative with your choice of cheese and pretzel varieties to cater to different tastes and dietary needs.
For an added touch, serve these broomsticks with a side of your favorite dipping sauce, such as marinara or honey mustard, to enhance the flavor experience.
Bloody Eyeball Deviled Eggs

Bloody Eyeball Deviled Eggs are a spooky and delicious addition to any Halloween party spread. These creepy yet tasty treats are sure to be a hit with your guests, combining the classic flavors of deviled eggs with a gory twist. The dish features hard-boiled eggs that are transformed into eerie eyeballs using a few clever techniques and ingredients.
With just a little bit of creative flair, you can whip up this fun appetizer that’s both visually striking and satisfyingly savory. Ideal for a serving size of 4-6 people, Bloody Eyeball Deviled Eggs are easy to prepare and require minimal ingredients. The key to their unsettling appearance is in the details – a bright red “vein” effect is achieved with food coloring, while an olive slice serves as the eyeball’s “pupil.”
This recipe is perfect for anyone who wants to add some Halloween horror to their party without sacrificing flavor or presentation. Let’s explore the ingredients and instructions to create your own batch of these frightfully fun snacks.
Ingredients (serves 4-6):
- 6 large eggs
- 2 tablespoons mayonnaise
- 1 teaspoon Dijon mustard
- Salt and pepper, to taste
- Red food coloring
- 6 black olives, pitted
- Paprika (optional)
Cooking Instructions:
- Boil the Eggs: Place the eggs in a saucepan and cover them with cold water. Bring the water to a boil over medium-high heat. Once boiling, turn off the heat and cover the saucepan. Let the eggs sit for 10-12 minutes, then transfer them to a bowl of ice water to cool.
- Prepare the Egg Whites: Once the eggs are cool, peel them carefully and cut each egg in half lengthwise. Gently remove the yolks and place them in a separate bowl. Arrange the egg white halves on a serving platter.
- Make the Filling: Mash the egg yolks with a fork until smooth. Add the mayonnaise, Dijon mustard, salt, and pepper. Mix well until the filling is creamy and well combined.
- Color the Filling: Add a few drops of red food coloring to the yolk mixture and stir until the desired blood-red color is achieved.
- Fill the Egg Whites: Spoon or pipe the red yolk mixture back into the hollowed egg white halves, filling them generously.
- Create the Eyeball Effect: Slice the black olives into thin rings and place one ring on top of each filled egg to resemble the pupil of an eyeball.
- Add Veins: To create a veiny effect, use a toothpick dipped in red food coloring to draw thin lines radiating out from the olive “pupil” across the surface of the egg whites.
- Finish and Serve: Lightly sprinkle paprika over the eggs for added flavor and visual effect. Serve immediately or refrigerate until ready to serve.
Extra Tips: When creating the veiny effect on the eggs, use a light hand with the food coloring to avoid overwhelming the flavor of the dish. If you prefer a less intense red color, consider diluting the food coloring with a small amount of water before applying it.
For a more dramatic presentation, serve the Bloody Eyeball Deviled Eggs on a bed of lettuce or kale to enhance the gory theme. Additionally, these deviled eggs can be made a few hours in advance and kept chilled until party time, making them a convenient choice for busy hosts.
Frankenstein Rice Krispie Treats

Frankenstein Rice Krispie Treats are a delightful and spooky addition to your Halloween party spread. These treats put a fun twist on the classic Rice Krispie Treats by transforming them into little green monsters inspired by everyone’s favorite Halloween creature, Frankenstein. With a simple combination of ingredients and a bit of creativity, you can whip up a batch of these adorable and delicious snacks that are bound to impress your guests.
These treats are made by adding a bit of green food coloring to the traditional Rice Krispie Treat mixture to give it that iconic Frankenstein hue. To complete the look, you’ll add chocolate icing and candy eyes to create a face that resembles the legendary monster. Perfectly gooey and crunchy, these treats aren’t only a hit with kids but also bring out the playful spirit in adults. Serve them at your Halloween party and watch them disappear in no time!
Ingredients for 4-6 People:
- 6 cups Rice Krispies cereal
- 3 tablespoons butter
- 1 10-ounce package marshmallows
- Green food coloring
- 1 cup chocolate chips or chocolate icing
- Candy eyes
- Black decorating gel or icing
Cooking Instructions:
- Prepare the Ingredients: Begin by measuring out all your ingredients. This includes the Rice Krispies cereal, marshmallows, and setting aside the butter. Having everything ready will facilitate a smooth cooking process.
- Melt the Butter and Marshmallows: In a large saucepan over low heat, melt the butter. Once melted, add the marshmallows and stir continuously until they’re completely melted and smooth.
- Add Green Food Coloring: Remove the saucepan from the heat and add several drops of green food coloring to the melted marshmallow mixture. Stir until you achieve the desired shade of green, resembling Frankenstein’s skin.
- Combine with Rice Krispies: Gently fold the Rice Krispies cereal into the green marshmallow mixture. Stir until the cereal is well coated and evenly mixed.
- Shape the Treats: Transfer the mixture into a greased 9×13 inch pan. Using a spatula, press the mixture evenly into the pan. Allow it to cool slightly before cutting into rectangles or squares to form the “heads.”
- Decorate the Faces: Melt the chocolate chips in a microwave-safe bowl or use ready-to-spread chocolate icing. Spread a thin layer on top of each treat for Frankenstein’s hair. Place candy eyes below the chocolate layer and use the black decorating gel to draw a mouth and any additional features to complete the monster’s face.
- Set and Serve: Allow the treats to set at room temperature for about 15 minutes before serving. This guarantees the decoration stays put and the treats hold their shape.
Extra Tips:
For a more vibrant color, be generous with the green food coloring, but add it gradually to avoid an overly intense hue.
When spreading the marshmallow mixture into the pan, lightly grease your spatula or hands to prevent sticking.
If you want to add more personality to each Frankenstein treat, consider using different colored icing for unique expressions or add extra candies for creative flair.
Vampire Bat Wings

Transform your Halloween party into a spooky celebration with these delicious Vampire Bat Wings. Created to surprise and delight your guests, these wings aren’t only visually appealing but also packed with flavor. The deep, dark hue of the wings, reminiscent of a vampire bat’s wings, is achieved with a savory marinade that includes soy sauce and balsamic vinegar. These ingredients not only add color but also infuse the chicken wings with a rich, umami taste that will have everyone reaching for more.
Perfect for serving a crowd, this recipe makes enough for 4-6 people. The process is simple, involving marinating the wings overnight and then baking them to perfection. The result is a plate of succulent, tangy, and slightly sweet wings that are sure to be the highlight of your Halloween spread. Plus, they pair wonderfully with a variety of dipping sauces, allowing you to customize the flavor to your liking.
Ingredients (Serving Size: 4-6 people)
- 2 pounds chicken wings
- 1/2 cup soy sauce
- 1/4 cup balsamic vinegar
- 2 tablespoons honey
- 2 tablespoons olive oil
- 4 cloves garlic, minced
- 1 teaspoon smoked paprika
- 1 teaspoon black pepper
- 1 teaspoon onion powder
- 1/2 teaspoon salt
- Red food coloring (optional, for a more dramatic effect)
Cooking Instructions
- Prepare the Marinade: In a large mixing bowl, combine the soy sauce, balsamic vinegar, honey, olive oil, minced garlic, smoked paprika, black pepper, onion powder, and salt. Stir until all ingredients are well incorporated. If desired, add a few drops of red food coloring to enhance the dark color of the wings.
- Marinate the Wings: Add the chicken wings to the marinade, making certain each wing is thoroughly coated. Cover the bowl with plastic wrap and refrigerate for a minimum of 4 hours, preferably overnight, to allow the flavors to penetrate the meat.
- Preheat the Oven: When ready to cook, preheat your oven to 400°F (200°C). Line a baking sheet with aluminum foil and place a wire rack on top. This will allow the wings to cook evenly and become crispy.
- Bake the Wings: Arrange the marinated wings on the wire rack, ensuring they’re spaced apart to allow air circulation. Reserve the remaining marinade. Bake the wings in the preheated oven for 20 minutes.
- Baste and Continue Baking: Remove the wings from the oven and baste them with the reserved marinade. Return the wings to the oven and bake for an additional 15-20 minutes, or until they’re cooked through and have a deep, rich color.
- Rest and Serve: Once done, remove the wings from the oven and let them rest for a few minutes before serving. This will guarantee the juices distribute evenly, keeping the wings moist and flavorful.
Extra Tips
To enhance the presentation of your Vampire Bat Wings, consider garnishing them with finely chopped green onions or sesame seeds for added color and texture.
If you’re looking for even more flavor, try serving the wings with a selection of dipping sauces such as ranch, blue cheese, or a spicy sriracha mayo.
For an extra crispy finish, you can broil the wings for 1-2 minutes at the end of baking, keeping a close watch to prevent burning.
Remember to adjust the level of food coloring based on your desired intensity, or omit it completely for a more natural look.
Monster Mouth Apple Slices

Halloween is the perfect occasion to bring out the creativity in your culinary skills, and Monster Mouth Apple Slices are a fun and spooky snack that will delight your party guests. These treats aren’t only visually striking but also healthy and easy to prepare. With just a few ingredients, you can create a snack that combines the crisp sweetness of apples with a playful presentation that looks like a monster’s mouth.
They’re perfect for kids and adults alike, offering a delightful combination of textures and flavors. The best part about Monster Mouth Apple Slices is that they can be customized to fit your taste preferences. By simply adjusting the type of nut butter or the kind of seeds you use, you can create a variety of “mouths” that will add a festive touch to your Halloween spread.
Plus, they’re a great way to incorporate fruits and nuts into your party menu, guaranteeing that your guests have a healthier option amidst the sugary treats. This recipe serves 4-6 people, making it ideal for small gatherings or as a component of a larger Halloween buffet.
Ingredients for 4-6 People:
- 3 large apples (Granny Smith or any preferred variety)
- 1/2 cup smooth peanut butter or almond butter
- 1/4 cup sunflower seeds
- 1/4 cup slivered almonds
- 1/4 cup mini marshmallows or white chocolate chips
- 1 tablespoon lemon juice (optional, to prevent browning)
Cooking Instructions:
- Prepare the Apples: Wash the apples thoroughly under running water. Core and slice each apple into 8 wedges. If using, brush the apple slices with a little lemon juice to prevent browning.
- Form the Mouths: Take one apple slice and spread a generous layer of peanut butter or almond butter on one side. This will act like glue to hold the other ingredients in place.
- Create the Teeth: Arrange sunflower seeds along the edge of the apple slice where you applied the nut butter. These will resemble the monster’s sharp teeth.
- Assemble the Mouths: Place another apple slice on top of the first slice, nut butter side facing down, to form a sandwich. Press gently to make sure the seeds stick and the two slices hold together.
- Add Eyes: Use mini marshmallows or white chocolate chips as eyes. Stick them on the top apple slice using a small dab of nut butter as adhesive. You can get creative by adding additional features, like using slivered almonds as ears or horns.
- Serve: Arrange the Monster Mouth Apple Slices on a platter and serve immediately, or refrigerate until ready to serve.
Extra Tips:
To make your Monster Mouth Apple Slices even more interesting, consider using different types of apples for varied colors and flavors. If you or your guests have nut allergies, you can substitute the nut butter with sunflower seed butter or cookie butter.
For an added touch, use food coloring pens to draw spooky designs on the marshmallow eyes. Always prepare the apple slices close to serving time to maintain freshness and prevent them from turning brown. Enjoy being creative and have fun with this delightful Halloween snack!
Graveyard Taco Dip

Graveyard Taco Dip is a spooktacular addition to any Halloween party spread, combining the festive fun of the holiday with delicious Mexican flavors. This layered dip not only looks impressive with its graveyard-themed decorations but also offers a delightful taste experience that will have your guests coming back for more.
A spooktacular dip that blends Halloween fun with irresistible Mexican flavors, leaving guests craving another bite.
Perfect for a gathering of 4-6 people, the Graveyard Taco Dip is a creative and tasty way to indulge your party guests with a touch of Halloween magic. The layers of this dip offer a variety of textures and flavors, from creamy to tangy, and spicy to savory.
Whether you’re hosting a costume party or a casual get-together, this dish will surely become the centerpiece of your snack table. The Graveyard Taco Dip is as easy to make as it’s to enjoy, giving you more time to focus on other party preparations or simply enjoy the festivities with your friends and family.
Ingredients (Serves 4-6)
- 1 can (16 oz) refried beans
- 1 packet taco seasoning
- 1 cup sour cream
- 1 cup guacamole
- 1 cup salsa
- 1 cup shredded Mexican cheese blend
- 1/2 cup sliced black olives
- 1/4 cup chopped green onions
- 1/4 cup chopped fresh cilantro
- 6-8 tortilla chips
- 2-3 large flour tortillas
Cooking Instructions
- Prepare the Base Layer: In a medium mixing bowl, combine the refried beans with the taco seasoning. Mix well until the seasoning is fully incorporated into the beans. Spread this mixture evenly on the bottom of a shallow serving dish.
- Layer the Dip: Carefully spread the sour cream over the refried bean layer, followed by an even layer of guacamole. Next, add a layer of salsa, ensuring each layer is smooth and evenly distributed.
- Add Cheese and Garnishes: Sprinkle the shredded Mexican cheese blend over the salsa layer. Then, evenly distribute the sliced black olives, chopped green onions, and chopped cilantro on top of the cheese.
- Create Tombstone Decorations: Cut the large flour tortillas into tombstone shapes using a knife or cookie cutter. To achieve a realistic look, you can use a food-safe marker to write spooky phrases or draw symbols on the tortillas.
- Assemble the Graveyard Scene: Insert the tombstone tortilla chips vertically into the dip, spacing them out to create a graveyard effect. Use the tortilla chips to represent gravestones, and add any additional decorations, such as small plastic spiders or a sprinkle of crushed tortilla chips to mimic dirt.
Extra Tips
For an extra touch of Halloween flair, consider using food coloring to dye the sour cream or guacamole in ghoulish shades of green or purple. To keep the guacamole from browning, add a bit of lime juice to the mixture.
You can also toast the tortilla tombstones in the oven for a few minutes to give them a crispy texture. Finally, make sure to serve the dip with extra tortilla chips or veggies for dipping, so your guests can fully enjoy every flavorful layer.
Pumpkin Patch Brownies

Pumpkin Patch Brownies are the perfect Halloween treat for your party guests. With their rich chocolatey base, these brownies get a festive twist with the addition of candy pumpkins and a crumbly topping that resembles a pumpkin patch. Not only are they delicious, but they also make for an eye-catching addition to your Halloween spread.
Whether you’re hosting a spooky soirée or just enjoying a cozy night in, these brownies are certain to satisfy your sweet tooth and bring a smile to your face. The combination of fudgy chocolate brownies and a playful pumpkin topping makes this dessert a hit among both kids and adults.
The vibrant orange of the candy pumpkins against the dark chocolate creates a delightful contrast that’s both tasty and visually appealing. Plus, they’re easy to make, allowing you to spend more time enjoying the party rather than being stuck in the kitchen. Serve these Pumpkin Patch Brownies to 4-6 people and watch them disappear in no time!
Ingredients:
- 1 cup unsalted butter
- 2 cups granulated sugar
- 4 large eggs
- 1 teaspoon vanilla extract
- 1 cup all-purpose flour
- 1/2 cup cocoa powder
- 1/4 teaspoon salt
- 1/2 teaspoon baking powder
- 1 cup semi-sweet chocolate chips
- 1 cup crushed chocolate cookies (for topping)
- 12-16 candy pumpkins
Instructions:
- Preheat the Oven: Preheat your oven to 350°F (175°C) and line a 9×13-inch baking pan with parchment paper, leaving some overhang on the sides for easy removal later.
- Melt the Butter: In a medium saucepan over medium heat, melt the unsalted butter. Remove from heat and stir in the granulated sugar, mixing until well combined.
- Mix Wet Ingredients: Add the eggs one at a time to the butter and sugar mixture, beating well after each addition. Stir in the vanilla extract.
- Combine Dry Ingredients: In a separate bowl, whisk together the flour, cocoa powder, salt, and baking powder until thoroughly mixed.
- Combine Wet and Dry Ingredients: Gradually add the dry ingredients to the wet mixture, stirring gently until just combined. Be careful not to overmix.
- Add Chocolate Chips: Fold in the semi-sweet chocolate chips until evenly distributed throughout the batter.
- Bake the Brownies: Pour the brownie batter into the prepared baking pan and spread it evenly with a spatula. Bake in the preheated oven for 25-30 minutes, or until a toothpick inserted into the center comes out with a few moist crumbs.
- Prepare the Topping: While the brownies are baking, crush the chocolate cookies into fine crumbs and set aside.
- Cool and Decorate: Once the brownies are baked, remove them from the oven and let them cool in the pan for about 10 minutes. Lift the brownies out using the parchment overhang and place them on a wire rack to cool completely.
- Assemble the Pumpkin Patch: Once the brownies are completely cooled, spread the crushed chocolate cookies over the top to resemble soil. Arrange the candy pumpkins on top, pressing them gently into the brownies.
Extra Tips:
For the best results, make sure not to overbake the brownies, as they should remain fudgy and moist. You can customize the look of your pumpkin patch by adding green frosting vines or edible grass for an extra festive touch.
If you’re making these brownies ahead of time, store them in an airtight container at room temperature for up to three days. This will guarantee they stay fresh and delicious for your Halloween celebration.
Creepy Crawly Gummy Worm Cups

Transform your Halloween party into a spooky feast with these Creepy Crawly Gummy Worm Cups. This ghoulishly delightful treat combines rich chocolate pudding and crumbly cookie dirt with gummy worms slithering atop. Perfect for party guests of all ages, these cups aren’t only a visual treat but also a deliciously sweet indulgence.
They’re easy to prepare and can be made ahead of time, giving you more time to focus on other party preparations. Whether you’re hosting a kids’ party or an adult Halloween gathering, these Creepy Crawly Gummy Worm Cups are sure to be a hit.
The combination of creamy pudding and crunchy cookies creates a delightful texture contrast, while the gummy worms add a touch of fun and fright. Perfect for a serving size of 4-6 people, this recipe is designed to cater to a small crowd, making it ideal for intimate Halloween parties or as part of a larger dessert spread.
Ingredients (for 4-6 servings):
- 2 cups of chocolate pudding mix
- 2 cups of cold milk
- 1 package (about 10-12) chocolate sandwich cookies
- 1 package of gummy worms
- Whipped cream (optional, for topping)
- Clear plastic cups (4-6, depending on size)
Cooking Instructions:
- Prepare the Chocolate Pudding: In a large mixing bowl, combine the chocolate pudding mix with cold milk. Whisk the mixture for about 2 minutes until it thickens. Set aside in the refrigerator to chill for at least 5 minutes.
- Create the Cookie ‘Dirt’: While the pudding sets, place the chocolate sandwich cookies in a plastic bag and crush them using a rolling pin until they resemble coarse crumbs. This will serve as the ‘dirt’ topping for your cups.
- Assemble the Cups: Divide the chilled pudding evenly among the clear plastic cups. Sprinkle a generous layer of crushed cookies on top of each pudding cup to create the appearance of dirt.
- Add the Gummy Worms: Decoratively place a few gummy worms on the surface of the cookie dirt in each cup. Let some of the worms hang over the edge for an extra creepy effect.
- Optional Topping: If desired, add a dollop of whipped cream on top of the cookie dirt before adding the gummy worms for an added layer of flavor and texture.
- Chill Until Serving: Place the assembled cups back in the refrigerator until ready to serve. This will guarantee the pudding remains firm and the presentation stays intact.
Extra Tips:
For an even spookier effect, consider using different colored gummy worms to add more visual appeal. If you want to prepare the pudding cups in advance, assemble them without the gummy worms and add them just before serving to keep them from becoming soggy.
Additionally, you can experiment with other candy toppings, such as candy eyes or small chocolate spiders, to further enhance the Halloween theme. Remember to adjust the serving size based on your party needs, as this recipe is quite flexible and scalable.
Bewitching Black Cat Cookies
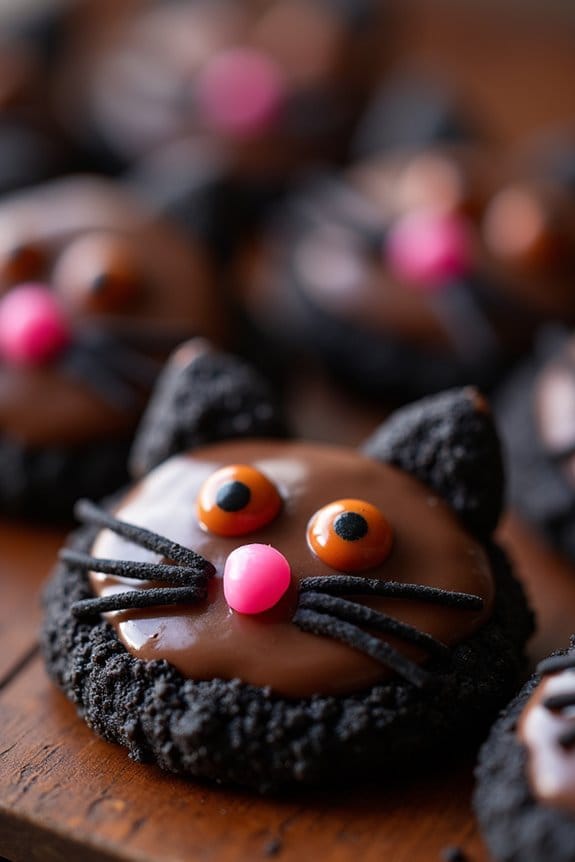
Bewitching Black Cat Cookies are the perfect spooky treat for your Halloween party guests. These delightful cookies aren’t only delicious but also visually enchanting, making them a hit among both kids and adults.
The rich, chocolatey base of the cookies is complemented by a cute cat design, which is achieved with simple decorations that bring these Halloween treats to life. Plus, the process of making these cookies can be a fun activity to include your family or friends in the Halloween festivities.
To create these Bewitching Black Cat Cookies, you’ll start by preparing a basic chocolate cookie dough, which will serve as the canvas for your cat designs. The dough is rolled out and cut into cat shapes using a cookie cutter, then baked to perfection.
Once cooled, the cookies are adorned with chocolate frosting and candies to transform them into adorable black cats. This recipe yields enough cookies to serve 4-6 people, making it suitable for a small gathering or as part of a larger spread of Halloween treats.
Ingredients:
- 1 cup unsalted butter, softened
- 1 cup granulated sugar
- 1 large egg
- 1 teaspoon vanilla extract
- 2 cups all-purpose flour
- 2/3 cup unsweetened cocoa powder
- 1/2 teaspoon baking powder
- 1/4 teaspoon salt
- 1 cup chocolate frosting
- 24 small chocolate candies (for eyes)
- 12 pink jelly beans (for noses)
- 1/2 cup shredded coconut, tinted with black food coloring (for whiskers)
Instructions:
1. Preheat the Oven:
Preheat your oven to 350°F (175°C). Line two baking sheets with parchment paper or silicone baking mats to prevent sticking.
2. Prepare the Dough:
In a large mixing bowl, cream together the softened butter and granulated sugar until light and fluffy. Beat in the egg and vanilla extract until well combined.
3. Mix Dry Ingredients:
In a separate bowl, whisk together the flour, cocoa powder, baking powder, and salt. Gradually add the dry ingredients to the butter mixture, mixing until a dough forms.
4. Roll and Cut:
On a lightly floured surface, roll out the dough to about 1/4 inch thickness. Use a cat-shaped cookie cutter to cut out the cookies, and place them on the prepared baking sheets about 2 inches apart.
5. Bake the Cookies:
Bake in the preheated oven for 10-12 minutes, or until the edges are firm. Remove from the oven and allow them to cool on the baking sheets for 5 minutes before transferring to a wire rack to cool completely.
6. Decorate the Cookies:
Once the cookies are cooled, spread a thin layer of chocolate frosting on each one. Place two chocolate candies on each cookie for the eyes, a pink jelly bean for the nose, and arrange pieces of shredded coconut as whiskers.
Extra Tips:
For an extra touch of Halloween magic, consider using edible glitter or a dusting of powdered sugar to give your black cat cookies a mystical sheen.
If you’re short on time, you can use store-bought chocolate cookie dough and frosting to speed up the process. Additionally, if you don’t have a cat-shaped cookie cutter, you can shape the cookies by hand or use a template to guide your cuts.
Happy baking and enjoy your spooky treats!
Zombie Finger Breadsticks

Zombie Finger Breadsticks are a fun and spooky addition to any Halloween party spread. These eerie breadsticks aren’t only delicious but will also add a ghoulish touch to your table setting. Made from simple ingredients, they can be prepared ahead of time and baked just before your guests arrive. The result is a batch of crispy, golden breadsticks that look like creepy fingers, complete with almond nails painted in a blood-red hue.
Eerie and delicious, these spooky breadsticks will add a ghoulish touch to your Halloween spread.
With their soft and chewy interior and a slightly crisp crust, these Zombie Finger Breadsticks are sure to be a hit with both kids and adults. Easy to make, they can be paired with a variety of dips like marinara or garlic butter, making them a versatile snack that will satisfy your party guests. Serve them alongside other Halloween-themed snacks for a truly spooky buffet.
Ingredients for 4-6 servings:
- 1 packet (2 1/4 teaspoons) of active dry yeast
- 1 cup warm water (110°F/45°C)
- 2 tablespoons olive oil
- 3 cups all-purpose flour
- 1 teaspoon salt
- 1 tablespoon sugar
- 1 egg (beaten)
- 18-24 whole blanched almonds
- Red food coloring
- Optional: Marinara sauce or garlic butter for dipping
Cooking Instructions:
- Activate the Yeast: In a large mixing bowl, dissolve the active dry yeast and sugar in warm water. Leave it to sit for about 5 minutes, or until it becomes frothy. This indicates that the yeast is active and ready to work its magic.
- Create the Dough: Add olive oil, flour, and salt to the yeast mixture. Mix until a dough begins to form. Turn the dough out onto a floured surface and knead for about 5-7 minutes until smooth and elastic. If the dough is too sticky, add a bit more flour.
- First Rise: Place the dough in a lightly oiled bowl, cover with a damp cloth or plastic wrap, and allow it to rise in a warm area for about 1 hour, or until it has doubled in size.
- Shape the Fingers: After the dough has risen, punch it down to release the air. Divide the dough into 18-24 equal pieces. Roll each piece into a finger-like shape, making the ends slightly tapered to resemble a fingertip.
- Add the Almond Nails: Press a whole almond firmly into the tip of each dough finger to create the appearance of a fingernail.
- Second Rise and Preheat: Place the shaped fingers on a parchment-lined baking sheet. Cover them with a cloth and let them rise for another 20 minutes. Preheat your oven to 375°F (190°C) during this time.
- Egg Wash and Bake: Brush each finger with the beaten egg to give them a nice golden color once baked. Bake the breadsticks in the preheated oven for 15-20 minutes, or until they’re golden brown.
- Color the Almonds: Once baked and cooled slightly, use a small brush or a toothpick to apply red food coloring to the almonds to mimic a bloody effect.
Extra Tips: To make your Zombie Finger Breadsticks even more realistic, use a knife to create small knuckle-like marks along each finger before baking. If you want a more intense spooky effect, mix some black food coloring into the egg wash for a darker appearance.
Additionally, these breadsticks can be made a day ahead and stored in an airtight container; simply reheat them in the oven for a few minutes before serving to crisp them up.
Haunted House Popcorn Mix

Prepare to delight your party guests with a spooky and scrumptious snack that’s sure to be a hit at your Halloween gathering. The Haunted House Popcorn Mix is a frightfully fun treat that combines the classic crunch of popcorn with a ghoulish mix of candy and chocolate.
This recipe is perfect for a crowd and will add a festive touch to your Halloween snack table. The mix of salty and sweet flavors, along with the colorful candies, make it a visually appealing and deliciously addictive treat.
This recipe serves 4-6 people, making it an ideal choice for small gatherings or as a delightful addition to a larger party spread. With its easy preparation and no-bake simplicity, you can whip up this spooky snack in no time.
Whether you’re hosting a haunted house party or a cozy get-together, the Haunted House Popcorn Mix will be a crowd-pleaser for guests of all ages.
Ingredients:
- 8 cups popped popcorn
- 1 cup candy corn
- 1 cup pretzel sticks
- 1 cup mini marshmallows
- 1 cup chocolate-covered peanuts
- 1/2 cup chocolate chips
- 1/2 cup white chocolate chips
- 1/4 cup Halloween-themed sprinkles
Instructions:
- Pop the Popcorn: Begin by popping your popcorn using your preferred method, whether it’s on the stovetop, in a popcorn maker, or with microwave popcorn. You’ll need about 8 cups of popped popcorn. Once popped, spread the popcorn on a large baking sheet or in a large mixing bowl to cool and remove any unpopped kernels.
- Mix in the Candy and Snacks: In a large bowl, combine the popcorn with candy corn, pretzel sticks, mini marshmallows, and chocolate-covered peanuts. Gently toss the ingredients together to guarantee an even distribution throughout the popcorn.
- Melt the Chocolate Chips: In a microwave-safe bowl, melt the chocolate chips and white chocolate chips separately. Heat each type of chocolate in 30-second intervals, stirring in between, until fully melted and smooth.
- Drizzle the Chocolate: Drizzle the melted chocolate over the popcorn mixture. Use a spoon or fork to make sure the chocolate is spread evenly over the entire mix. This will help everything stick together slightly while adding a rich, sweet flavor.
- Add the Sprinkles: Immediately after drizzling the chocolate, sprinkle the Halloween-themed sprinkles over the popcorn mix. The sprinkles will stick to the melted chocolate, adding a festive and colorful touch to the snack.
- Let it Set: Allow the popcorn mix to sit at room temperature for about 15-20 minutes, or until the chocolate has hardened. You can also speed up the process by placing the mix in the refrigerator for a few minutes.
- Serve and Enjoy: Once the chocolate is set, transfer the Haunted House Popcorn Mix to a serving bowl or individual bags for your guests to enjoy.
Extra Tips:
For a personalized touch, consider adding or substituting other favorite candies or nuts to the mix, such as M&M’s, roasted almonds, or gummy worms.
If you’re preparing this snack ahead of time, store it in an airtight container to maintain freshness and crunch. Be sure to choose popcorn that’s lightly salted or unsalted to avoid overpowering the sweet elements.
Finally, for an extra layer of flavor, consider adding a pinch of sea salt over the melted chocolate before it sets.
