

As the leaves turn and the air grows crisp, it’s the perfect time to stir up some kitchen magic with Halloween-themed dinners that will enchant your taste buds. Picture spooky stuffed peppers perched on your plate and monster meatball mummies peeking up from their pastry wrappings. These playful yet delicious ideas promise to transform your mealtime into a spellbinding feast. Are you ready to uncover the secrets behind these ghoulishly delightful dishes? Let’s get cooking and make this Halloween extra special!
Spooky Stuffed Peppers

Celebrate Halloween with a festive and delicious dish that will delight both the eyes and the taste buds. Spooky Stuffed Peppers are a creative twist on the classic stuffed pepper recipe, with a fun Halloween theme. These peppers are carved into jack-o’-lantern faces, filled with a savory mixture of seasoned ground beef, rice, and vegetables, and then baked until tender. Perfect for a Halloween dinner or party, these peppers offer a delightful combination of flavors and are sure to be a hit with both kids and adults.
Spooky Stuffed Peppers: A Halloween-themed delight for both eyes and taste buds, perfect for kids and adults alike.
The key to Spooky Stuffed Peppers is in the presentation. Use orange bell peppers to mimic the look of pumpkins, and carve out simple jack-o’-lantern faces to add a touch of Halloween spirit. The filling is hearty and flavorful, made with ingredients like ground beef, cooked rice, onions, and a blend of spices. Once stuffed, the peppers are topped with cheese and baked to perfection. Not only are these peppers fun to make and eat, but they also provide a nutritious meal that’s easy to prepare and serve.
Ingredients for 4-6 people:
- 6 medium-sized orange bell peppers
- 1 pound ground beef
- 1 cup cooked rice
- 1 cup chopped onion
- 1 cup diced tomatoes
- 2 cloves garlic, minced
- 1 teaspoon salt
- 1/2 teaspoon black pepper
- 1 teaspoon paprika
- 1 teaspoon oregano
- 1 cup shredded cheddar cheese
- 2 tablespoons olive oil
Cooking Instructions:
- Preheat the oven: Begin by preheating your oven to 375°F (190°C).
- Prepare the peppers: Cut the tops off the bell peppers and remove the seeds and membranes. Using a small knife, carefully carve jack-o’-lantern faces into one side of each pepper. Set aside.
- Cook the filling: In a large skillet over medium heat, add olive oil and sauté the chopped onion and minced garlic until fragrant and translucent, about 3-4 minutes.
- Brown the beef: Add the ground beef to the skillet and cook until browned, breaking it apart with a spoon, for about 5-7 minutes.
- Add tomatoes and seasoning: Stir in the diced tomatoes, cooked rice, salt, pepper, paprika, and oregano. Mix well and let the mixture simmer for an additional 5 minutes to allow the flavors to meld.
- Stuff the peppers: Carefully spoon the beef and rice mixture into each carved pepper, filling them to the top. Place the stuffed peppers in a baking dish.
- Top with cheese: Sprinkle the shredded cheddar cheese evenly over the top of each stuffed pepper.
- Bake: Cover the baking dish with foil and bake in the preheated oven for 25 minutes. Remove the foil and bake for an additional 10-15 minutes, or until the peppers are tender and the cheese is melted and bubbly.
- Serve: Remove the peppers from the oven and let them cool slightly before serving.
Extra Tips:
When carving the peppers, make sure to cut the faces carefully, as they can be fragile. If you prefer a vegetarian version, substitute the ground beef with black beans or quinoa. You can also customize the spice levels in the filling by adding chili powder or cayenne pepper for a little heat.
To make the dish even more festive, consider using a variety of colored bell peppers for a vibrant presentation. Enjoy these Spooky Stuffed Peppers as a fun and delicious addition to your Halloween celebration!
Monster Meatball Mummies
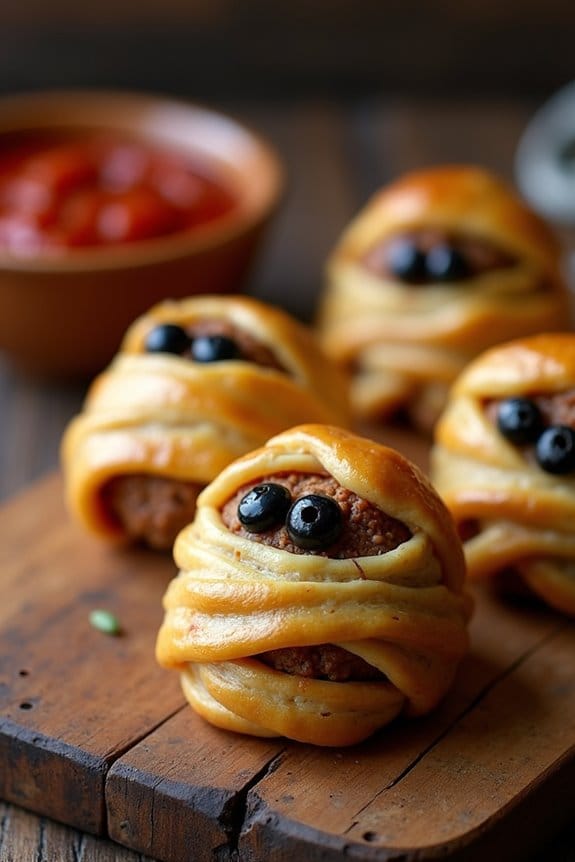
Monster Meatball Mummies are a spooktacular dish perfect for adding a fun and eerie twist to your Halloween-themed dinner. These deliciously creepy appetizers are sure to be a hit with both kids and adults. Juicy meatballs are wrapped in strips of dough to resemble mummies, with olives or pepper slices for eyes, making them not only tasty but visually engaging as well.
Perfect for parties or a cozy family dinner, these mummies are easy to prepare and certain to bring a smile to everyone’s face. The combination of savory meatballs and buttery, flaky dough creates a delightful texture that pairs well with a zesty marinara dipping sauce. This dish is as versatile as it’s enjoyable, allowing you to experiment with different types of meat or even vegetarian options.
Whether you’re an experienced chef or a cooking novice, you’ll find this recipe simple and rewarding. Let’s explore the ingredients needed to create enough Monster Meatball Mummies to serve 4-6 people.
Ingredients:
- 1 pound ground beef or turkey
- 1/2 cup breadcrumbs
- 1/4 cup grated Parmesan cheese
- 1 egg
- 1 teaspoon garlic powder
- 1 teaspoon onion powder
- 1 teaspoon Italian seasoning
- Salt and pepper to taste
- 1 can of refrigerated crescent roll dough
- Sliced black olives or small slices of red bell pepper for eyes
- Marinara sauce for dipping
Cooking Instructions:
- Prepare the Meatball Mixture: In a large mixing bowl, combine the ground beef or turkey, breadcrumbs, grated Parmesan cheese, egg, garlic powder, onion powder, Italian seasoning, salt, and pepper. Mix well until all the ingredients are fully incorporated.
- Form the Meatballs: Preheat your oven to 375°F (190°C). Roll the meat mixture into small, evenly-sized balls, approximately 1 inch in diameter, and place them on a baking sheet lined with parchment paper.
- Bake the Meatballs: Place the baking sheet in the preheated oven and bake the meatballs for about 15-20 minutes, or until they’re fully cooked and browned on the outside.
- Prepare the Dough Strips: While the meatballs are baking, unroll the crescent roll dough and cut it into thin strips using a sharp knife or pizza cutter. Aim for strips that are about 1/4 inch wide.
- Wrap the Meatballs: Once the meatballs are cooked and slightly cooled, wrap each meatball with the dough strips. Leave small gaps to resemble the bandages of a mummy. Press the ends of the dough strips gently to secure them.
- Add the Eyes: Use the sliced olives or red bell pepper pieces to create eyes for each mummy. Gently press them into the dough-wrapped meatball.
- Bake the Mummies: Place the wrapped meatballs back on the baking sheet and bake in the oven for an additional 10-12 minutes, or until the dough is golden brown and crispy.
- Serve: Allow the Monster Meatball Mummies to cool slightly before serving with warm marinara sauce for dipping.
Extra Tips:
For added flavor, consider incorporating chopped fresh herbs like parsley or basil into the meatball mixture. You can also experiment with different cheeses by substituting mozzarella or cheddar for the Parmesan.
If you’re hosting a party, these mummies can be made ahead of time and simply reheated in the oven before serving. For a vegetarian version, try using plant-based meat or filling options. Remember to keep an eye on the dough while baking to guarantee it doesn’t over-brown. With these tips, your Monster Meatball Mummies will surely be the highlight of your Halloween feast!
Witch’s Brew Stew
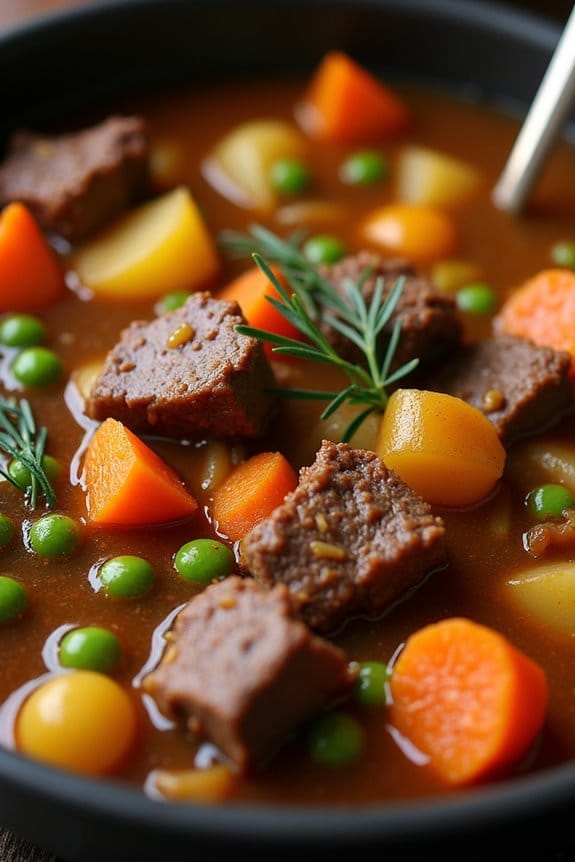
Get ready to cast a culinary spell with our Witch’s Brew Stew—a hearty, flavorful concoction sure to warm the bones on a chilly Halloween night. This magical stew combines tender chunks of beef with an array of autumn vegetables, all simmered together in a rich, savory broth. The result is a dish that not only delights the taste buds but also adds a touch of spooky fun to your Halloween-themed dinner.
Perfect for serving 4-6 people, Witch’s Brew Stew is an ideal main course for your haunted festivities. The combination of beef, seasonal vegetables, and aromatic herbs creates a deeply satisfying meal that’s both comforting and delicious. Whether you’re gathering around the cauldron with family or hosting a Halloween party, this stew is sure to become a seasonal favorite.
Ingredients:
- 2 pounds beef stew meat, cut into 1-inch cubes
- 3 tablespoons olive oil
- 1 large onion, chopped
- 3 cloves garlic, minced
- 4 cups beef broth
- 2 cups water
- 3 large carrots, sliced
- 3 potatoes, cubed
- 2 cups butternut squash, cubed
- 1 cup peas
- 1 tablespoon Worcestershire sauce
- 1 tablespoon tomato paste
- 1 teaspoon dried thyme
- 1 teaspoon dried rosemary
- 1 bay leaf
- Salt and pepper to taste
Cooking Instructions:
- Prepare the Ingredients: Begin by cutting the beef into 1-inch cubes and chopping the onion, carrots, potatoes, and butternut squash. Mince the garlic cloves for added flavor.
- Brown the Beef: In a large pot or Dutch oven, heat the olive oil over medium-high heat. Add the beef cubes in batches, searing them on all sides until browned. Remove the beef and set it aside.
- Sauté the Aromatics: In the same pot, add the chopped onion and garlic. Sauté for about 3-4 minutes until the onion becomes translucent and aromatic.
- Combine Ingredients: Return the beef to the pot and pour in the beef broth and water. Stir in the Worcestershire sauce and tomato paste, ensuring they’re well mixed.
- Add Vegetables and Herbs: Add the carrots, potatoes, butternut squash, and peas to the pot. Stir in the thyme, rosemary, and bay leaf. Season with salt and pepper to taste.
- Simmer the Stew: Bring the mixture to a boil, then reduce the heat to low. Cover the pot and let the stew simmer for about 1.5 to 2 hours, or until the beef and vegetables are tender.
- Adjust Seasoning: Before serving, taste the stew and adjust the seasoning if necessary. Remove the bay leaf before ladling the stew into bowls.
Extra Tips:
For an even richer flavor, try deglazing the pot with a splash of red wine after sautéing the onions and garlic. This will lift any browned bits from the bottom, enhancing the overall depth of the stew.
Feel free to customize the vegetables based on what’s in season or your personal preference—parsnips or mushrooms make great additions.
Finally, serving the Witch’s Brew Stew with crusty bread or over a bed of mashed potatoes can add an extra layer of comfort to this spooky dish.
Creepy Crawly Pasta
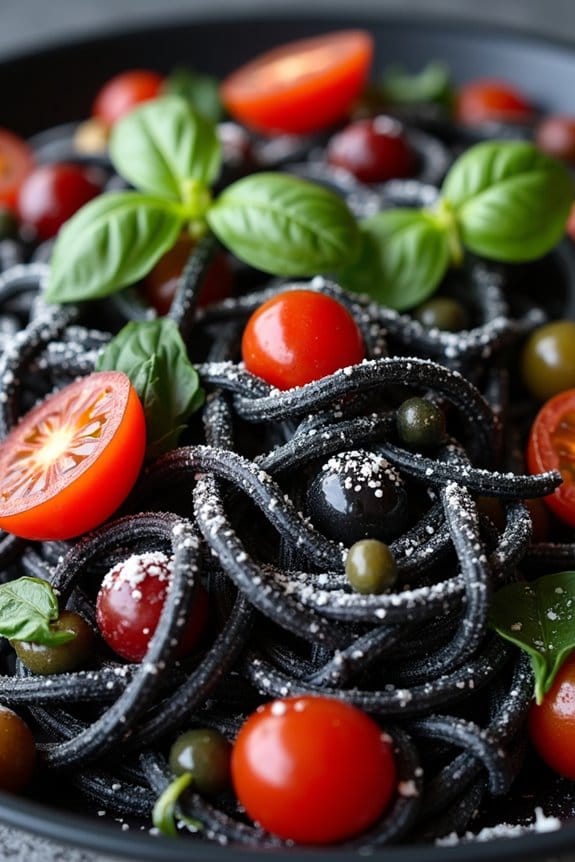
Embrace the spooky spirit of Halloween with this Creepy Crawly Pasta, a dish that combines the whimsy of the season with a deliciously satisfying meal. This pasta dish is sure to impress both kids and adults alike with its eerie presentation and flavorful taste.
Dive into the Halloween spirit with Creepy Crawly Pasta, a whimsically eerie yet deliciously satisfying dish for all ages.
The recipe incorporates black pasta to mimic the look of a dark and mysterious web, while the “creepy crawly” elements are brought to life with creative garnishes and ingredients that evoke the essence of Halloween.
This recipe serves 4-6 people, making it perfect for a festive family dinner or a gathering of friends. The Creepy Crawly Pasta isn’t only a visual treat but also a culinary delight, with a sauce that’s both rich and savory. The addition of ingredients such as olives and cherry tomatoes adds a pop of color and flavor, creating a dish that’s as fun to eat as it’s to look at.
Get ready to plunge into this Halloween-themed dinner and enjoy the spooky yet scrumptious experience it offers.
Ingredients (serves 4-6):
- 1 pound black spaghetti or black squid ink pasta
- 2 tablespoons olive oil
- 4 cloves garlic, minced
- 1/4 teaspoon red pepper flakes
- 1 cup cherry tomatoes, halved
- 1/2 cup black olives, sliced
- 1/2 cup green olives, sliced
- 1/2 cup capers, drained
- 1/2 cup fresh basil leaves, torn
- 1/2 cup grated Parmesan cheese
- Salt and pepper to taste
- 1/4 cup toasted pine nuts (optional, for garnish)
Cooking Instructions:
- Cook the Pasta: Bring a large pot of salted water to a boil. Add the black pasta and cook until al dente according to the package instructions. Drain the pasta, reserving 1/2 cup of the pasta water for later use.
- Prepare the Sauce: In a large skillet, heat the olive oil over medium heat. Add the minced garlic and red pepper flakes, sautéing for 1-2 minutes until the garlic is fragrant and lightly golden.
- Add the Tomatoes and Olives: Stir in the cherry tomatoes, black olives, green olives, and capers. Cook for an additional 3-4 minutes, allowing the tomatoes to soften slightly and the flavors to meld together.
- Combine Pasta and Sauce: Add the cooked pasta to the skillet, along with the reserved pasta water. Toss everything together to coat the pasta in the sauce. Cook for another 2-3 minutes to confirm the pasta absorbs the flavors.
- Finish with Garnishes: Remove the skillet from the heat and stir in the torn basil leaves and grated Parmesan cheese. Season with salt and pepper to taste. If using, sprinkle toasted pine nuts on top for an extra crunch.
Extra Tips:
To enhance the spooky presentation of this dish, consider using a fork to twirl the pasta into nests before serving, resembling spider webs.
You can also use small mozzarella balls or slices of hard-boiled eggs with olive slices as “eyeballs” to add more creepy elements. If you can’t find black pasta, you can dye regular pasta using black food coloring to achieve a similar effect.
Remember to taste and adjust the seasoning as needed, and feel free to add more chili flakes if you prefer a spicier kick.
Ghostly Shepherd’s Pie
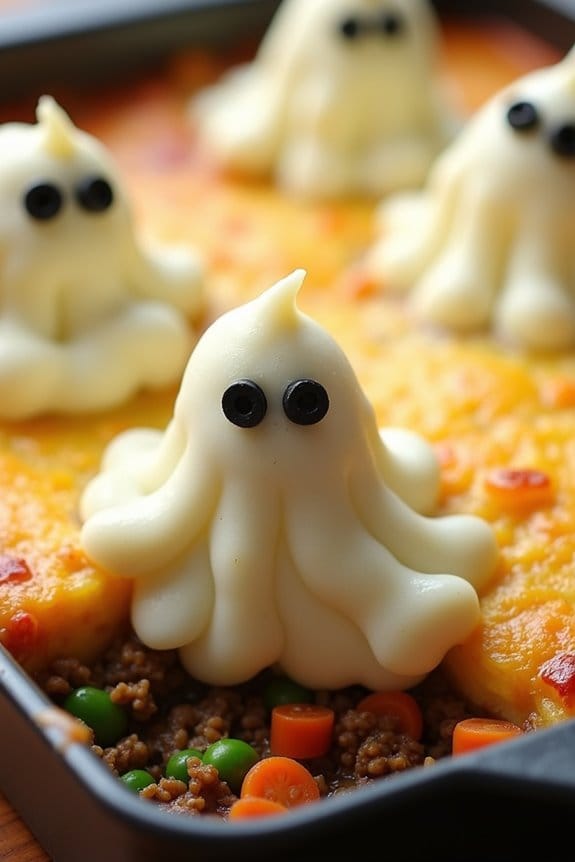
Transform your traditional Shepherd’s Pie into a spooktacular Halloween treat with this Ghostly Shepherd’s Pie recipe. This dish is perfect for a family gathering or a Halloween party, and it combines the comforting flavors of a classic Shepherd’s Pie with a festive twist. The ghostly aspect comes from the mashed potatoes, piped into ghost shapes on top of the savory filling, creating an eerie yet delightful presentation.
This recipe is hearty and flavorful, featuring a rich, savory filling of seasoned ground beef and vegetables, topped with creamy mashed potato ghosts that are bound to delight both kids and adults. It’s an ideal way to enjoy a warm, comforting meal while embracing the Halloween spirit. The serving size for this recipe is suitable for 4-6 people, making it perfect for a small family dinner or a spooky soiree with friends.
Ingredients (Serves 4-6):
- 1 tablespoon olive oil
- 1 medium onion, chopped
- 2 cloves garlic, minced
- 1 pound ground beef or lamb
- 2 tablespoons tomato paste
- 1 tablespoon Worcestershire sauce
- 1 cup beef broth
- 1 teaspoon dried thyme
- 1 teaspoon dried rosemary
- Salt and pepper to taste
- 1 cup frozen peas
- 1 cup frozen carrots
- 4 large potatoes, peeled and quartered
- 4 tablespoons butter
- 1/2 cup milk
- Salt and pepper to taste
- Black olives, sliced (for ghost eyes)
Cooking Instructions:
- Preheat the Oven: Begin by preheating your oven to 400°F (200°C) to make sure it’s ready for baking the pie.
- Prepare the Filling: Heat the olive oil in a large skillet over medium heat. Add the chopped onion and minced garlic, sautéing until the onion becomes translucent, about 3-4 minutes.
- Cook the Meat: Add the ground beef (or lamb) to the skillet, breaking it up with a spoon. Cook until browned, about 5-7 minutes. Drain excess fat if necessary.
- Add Seasonings: Stir in the tomato paste, Worcestershire sauce, beef broth, dried thyme, and rosemary. Season with salt and pepper to taste. Simmer for about 10 minutes, allowing the flavors to meld and the mixture to thicken slightly.
- Incorporate Vegetables: Add the frozen peas and carrots to the meat mixture, stirring them in until well combined. Cook for an additional 5 minutes. Remove from heat and set aside.
- Prepare Mashed Potatoes: While the filling is cooking, place the peeled and quartered potatoes in a large pot of salted water. Bring to a boil and cook until tender, about 15-20 minutes.
- Mash and Season Potatoes: Drain the potatoes and return them to the pot. Add butter and milk, mashing until smooth and creamy. Season with salt and pepper to taste.
- Assemble the Pie: Transfer the meat mixture into a baking dish. Spoon the mashed potatoes into a piping bag fitted with a large round tip. Pipe ghost shapes on top of the meat mixture, creating peaks for a spooky effect.
- Add Ghostly Features: Place two slices of black olives on each ghost for eyes.
- Bake: Place the assembled pie in the preheated oven and bake for 25-30 minutes, or until the mashed potatoes are golden brown and the filling is bubbly.
Extra Tips:
To make the mashed potato ghosts extra fluffy, consider using a potato ricer or food mill for mashing. If you don’t have a piping bag, you can use a zip-top bag with a corner snipped off to pipe the ghost shapes.
For a vegetarian version, replace the meat with lentils or mushrooms, and use vegetable broth instead of beef broth. This dish can be prepared a day ahead and refrigerated, then simply baked before serving. Enjoy your Ghostly Shepherd’s Pie with a side of crusty bread for a complete Halloween meal.
Bat Wing Chicken Tenders
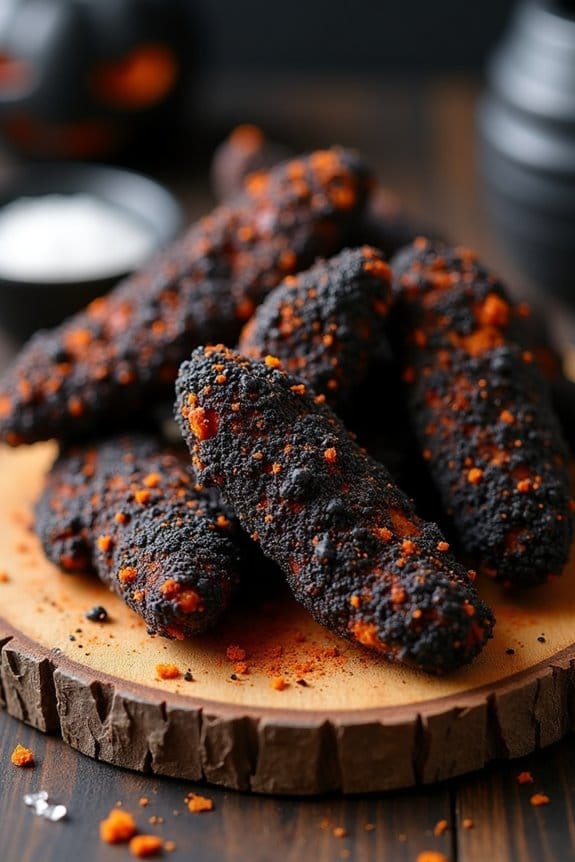
Get ready to spook your taste buds this Halloween with a wickedly delicious treat – Bat Wing Chicken Tenders. This dish is perfect for adding a touch of the macabre to your Halloween dinner spread. By infusing the classic chicken tenders with dark colors and eerie flavors, you’ll have a dish that’s both visually striking and devilishly tasty.
These Bat Wing Chicken Tenders are coated in a dark, crispy crust that mimics the look of bat wings, making them the perfect centerpiece for your Halloween-themed dinner. The secret to achieving the hauntingly dark color lies in the use of black food coloring and a few creative ingredients that add both flavor and festive flair. The tenders are seasoned with a blend of spices that offer a savory and slightly smoky taste, complementing the spooky look with a burst of flavor.
Serve these alongside your favorite dipping sauces, and watch as your guests devour these creepy creations with delight. Whether you’re hosting a Halloween party or enjoying a themed dinner with family, these Bat Wing Chicken Tenders are sure to be a hit.
Ingredients (Serves 4-6):
- 1.5 pounds of chicken tenders
- 1 cup buttermilk
- 2 tablespoons hot sauce
- 1 cup all-purpose flour
- 1 cup panko breadcrumbs
- 1 teaspoon garlic powder
- 1 teaspoon onion powder
- 1 teaspoon smoked paprika
- 1 teaspoon salt
- 1/2 teaspoon black pepper
- Black gel food coloring
- Vegetable oil for frying
Cooking Instructions:
- Marinate the Chicken: In a large bowl, combine the buttermilk and hot sauce. Add a few drops of black food coloring to achieve a dark mixture. Submerge the chicken tenders in the buttermilk mixture, cover, and refrigerate for at least 1 hour or overnight for best results. This step helps tenderize the chicken and infuse it with flavor.
- Prepare the Coating: In a shallow dish, mix together the flour, panko breadcrumbs, garlic powder, onion powder, smoked paprika, salt, and black pepper. Stir to guarantee the spices are evenly distributed throughout the mixture.
- Color the Coating: Add a few drops of black food coloring to the dry mixture and mix thoroughly until the coating takes on a uniform dark color. Adjust the amount of coloring to achieve your desired shade.
- Coat the Chicken: Remove the marinated chicken tenders from the refrigerator. One by one, dredge each tender in the flour mixture, pressing firmly to confirm the coating adheres well. Shake off any excess coating.
- Heat the Oil: In a large skillet, heat vegetable oil over medium-high heat. The oil should be about 1 inch deep to allow for even frying. To test if the oil is ready, drop a small piece of the coating into the oil; it should sizzle immediately.
- Fry the Tenders: Carefully place the coated chicken tenders into the hot oil, ensuring not to overcrowd the skillet. Fry in batches if necessary. Cook each side for about 3-4 minutes until the chicken is cooked through and the coating is crispy and dark. Use a slotted spoon to remove the tenders and place them on a paper towel-lined plate to drain excess oil.
- Serve: Arrange the Bat Wing Chicken Tenders on a serving platter. Pair them with a selection of your favorite dipping sauces to complete the spooky presentation.
Extra Tips:
For an even darker coating, consider using activated charcoal powder, which is food-safe and adds an extra layer of mystery to the tenders.
If you’re not a fan of deep frying, you can also bake the tenders in the oven at 400°F (200°C) for about 20-25 minutes, flipping halfway through. Just spray the tenders lightly with cooking spray before baking to confirm they get crispy.
Additionally, you can experiment with different spices such as cayenne pepper or chili powder to add a bit of heat to the dish.
Frankenstein’s Veggie Burgers

Frankenstein’s Veggie Burgers are the perfect addition to your Halloween-themed dinner, offering a spooky yet delicious twist on traditional veggie burgers. These burgers aren’t only fun to make but also packed with flavor and nutrients, making them a great choice for both kids and adults.
The greenish hue of the patties, achieved with spinach and zucchini, gives them a monstrous appearance, while the addition of herbs and spices guarantees they’re anything but bland. Serve them with your favorite toppings for a delightful Halloween feast.
This recipe yields 4-6 servings, making it ideal for a small gathering or family dinner. The key to achieving the right texture and flavor lies in the combination of vegetables, legumes, and a few well-chosen spices. The burgers are easy to prepare and can be cooked on a skillet or grill, depending on your preference. Pair them with whole-grain buns and a variety of toppings to satisfy every palate.
Ingredients:
- 1 cup spinach leaves
- 1 zucchini, grated
- 1 cup canned chickpeas, drained and rinsed
- 1/2 cup breadcrumbs
- 1/4 cup oats
- 2 garlic cloves, minced
- 1 small onion, finely chopped
- 1 tablespoon soy sauce
- 1 teaspoon ground cumin
- 1 teaspoon smoked paprika
- Salt and pepper to taste
- Olive oil for cooking
- Whole-grain buns
- Sliced cheese (optional)
- Lettuce, tomato slices, and other desired toppings
Cooking Instructions:
- Prepare the Vegetables: Start by washing the spinach thoroughly and patting it dry. Grate the zucchini and set it aside. In a food processor, combine the spinach, grated zucchini, chickpeas, breadcrumbs, oats, minced garlic, and chopped onion. Pulse until the mixture is well combined but still slightly chunky.
- Season the Mixture: Transfer the mixture to a large mixing bowl. Add the soy sauce, ground cumin, smoked paprika, salt, and pepper. Mix well until all ingredients are evenly distributed. The mixture should be moist but firm enough to hold together. If it’s too wet, add a little more breadcrumbs.
- Shape the Patties: Divide the mixture into 4-6 equal portions, depending on your desired patty size. Shape each portion into a patty by rolling it into a ball and then flattening it gently with your hands.
- Cook the Patties: Heat a drizzle of olive oil in a large skillet over medium heat. Once hot, add the patties to the skillet, being careful not to overcrowd them. Cook for about 4-5 minutes on each side, or until they’re golden brown and heated through. If you prefer grilling, preheat the grill and cook the patties for the same amount of time on each side.
- Assemble the Burgers: Toast the whole-grain buns lightly, if desired. Place each patty on a bun and top with cheese, lettuce, tomato slices, or any other preferred toppings. Serve immediately while the patties are warm.
Extra Tips:
To guarantee that the patties hold together well, make sure not to over-process the mixture in the food processor; it should still have some texture.
If the mixture seems too dry, a little olive oil or an egg can be added to help bind the ingredients. For a more intense flavor, feel free to experiment with additional spices or herbs, such as chili powder or fresh parsley.
These burgers can be prepared ahead of time and stored in the refrigerator for up to two days before cooking, making them a convenient option for busy Halloween gatherings.
Pumpkin Patch Pizza

Get ready to delight your family and friends with this Halloween-inspired Pumpkin Patch Pizza. This unique twist on the classic pizza incorporates the rich, earthy flavors of pumpkin and savory toppings that are sure to make your spooky season extra special.
Perfect for a Halloween dinner party or a fun family meal, this pizza isn’t only delicious but also visually appealing, with its vibrant orange pumpkin spread and toppings resembling a festive pumpkin patch.
The secret to this hauntingly good pizza lies in its creamy pumpkin sauce, which serves as a delightful alternative to traditional tomato sauce. Paired with a crispy crust and an array of toppings such as mozzarella cheese, spinach, and optional pepperoni slices, this pizza is both flavorful and fun.
Let’s explore the recipe and bring this spooky dish to life!
Ingredients for Serving Size of 4-6 People:
- 1 large pizza dough (store-bought or homemade)
- 1 cup pumpkin puree
- 1/2 cup heavy cream
- 1 tablespoon olive oil
- 2 cloves garlic, minced
- 1 teaspoon dried thyme
- 1 teaspoon dried sage
- Salt and pepper to taste
- 2 cups shredded mozzarella cheese
- 1 cup fresh spinach leaves
- 1/2 cup thinly sliced red onion
- Optional: 1/2 cup pepperoni slices
- Optional: 1/4 cup roasted pumpkin seeds
- Flour for dusting
Cooking Instructions:
1. Preheat the Oven: Preheat your oven to 475°F (245°C). If using a pizza stone, place it in the oven to heat up.
2. Prepare the Pumpkin Sauce: In a medium saucepan over medium heat, add olive oil and minced garlic. Sauté until fragrant, about 1 minute.
Stir in the pumpkin puree, heavy cream, thyme, and sage. Season with salt and pepper to taste. Cook, stirring occasionally, for about 5 minutes until the sauce thickens slightly. Remove from heat and set aside.
3. Roll Out the Dough: On a floured surface, roll out the pizza dough to your desired thickness. Transfer the rolled dough onto a pizza peel or a baking sheet lined with parchment paper.
4. Assemble the Pizza: Spread the prepared pumpkin sauce evenly over the pizza dough, leaving a small border for the crust.
Sprinkle the shredded mozzarella cheese over the sauce. Arrange the spinach leaves, red onion slices, and optional pepperoni slices on top.
5. Bake the Pizza: Carefully transfer the pizza onto the preheated pizza stone or place the baking sheet in the oven. Bake for 10-12 minutes or until the crust is golden brown and the cheese is bubbly and slightly browned.
6. Garnish and Serve: Remove the pizza from the oven and let it cool for a couple of minutes. If desired, sprinkle roasted pumpkin seeds over the top for added crunch. Slice and serve warm.
Extra Tips:
For an extra crispy crust, try pre-baking the pizza dough for 5 minutes before adding the toppings. This can help prevent a soggy base.
If you’re feeling creative, use a cookie cutter to cut the pepperoni slices into pumpkin shapes for added Halloween flair. When spreading the pumpkin sauce, be sure to go easy on it to prevent overpowering the other flavors.
Enjoy your Pumpkin Patch Pizza with a side of spooky-themed beverages for the ultimate Halloween dinner experience!
Vampire Fang Quesadillas

This recipe makes for a fun family activity, as everyone can participate in assembling their own quesadillas and adding their favorite fillings.
Whether you’re hosting a Halloween party or simply looking to add a thematic twist to your dinner, Vampire Fang Quesadillas are sure to be a hit. This recipe serves 4-6 people, making it an ideal choice for small gatherings or a family dinner.
Ingredients:
- 8 large flour tortillas
- 2 cups shredded cheddar cheese
- 1 cup shredded mozzarella cheese
- 1 cup cooked chicken, shredded
- 1 red bell pepper, sliced
- 1/2 cup black olives, sliced
- 1/2 cup salsa
- 1/4 cup sour cream
- 1 small bunch of fresh cilantro, chopped
Instructions:
- Prepare the Filling: In a large bowl, mix together the shredded cheddar and mozzarella cheeses with the shredded chicken. This will serve as the filling for the quesadillas.
- Assemble the Quesadillas: Lay out the flour tortillas on a clean, flat surface. Evenly distribute the cheese and chicken mixture over half of each tortilla. Add slices of red bell pepper and black olives to each.
- Cook the Quesadillas: Heat a non-stick skillet over medium heat. Fold each tortilla in half to enclose the filling and place in the skillet. Cook each side for about 3-4 minutes, or until the tortilla is golden brown and the cheese has melted.
- Create the Vampire Fangs: Once cooked, remove the quesadillas from the skillet. Using a sharp knife, cut each folded quesadilla into three triangles. Arrange the triangles on a serving platter to resemble an open mouth, with the pointed ends pointing outward as fangs.
- Serve with Dipping Sauces: Serve the quesadillas with small bowls of salsa and sour cream for dipping. Sprinkle chopped cilantro over the top for added flavor and a pop of color.
Extra Tips:
For an added touch of Halloween flair, consider using colored tortillas, such as spinach or sun-dried tomato, to give your Vampire Fang Quesadillas an extra spooky look.
You can also experiment with different fillings based on your taste preferences, such as adding jalapeños for a spicy kick or using a blend of different cheeses for a richer flavor.
If you’re serving these at a party, prepare the quesadillas in advance and simply reheat them in the oven before serving to save time.
Eyeball Soup

Immerse yourself in the spooky spirit of Halloween with a dish that’s as eerie as it’s delicious—Eyeball Soup. This creepy concoction is perfect for a Halloween-themed dinner party, adding a touch of fright to your festive spread. The soup is a hearty tomato and vegetable base, filled with floating “eyeballs” made from seasoned meatballs and mozzarella “iris” to give it an unsettlingly realistic look.
The soup serves as a fun and interactive dish for both kids and adults, who’ll delight in the creepy presentation while savoring the rich, comforting flavors. It’s a perfect blend of creativity and taste, making it an instant hit at any Halloween gathering. The recipe is simple to follow and can be made ahead of time, allowing you to enjoy the festivities instead of being stuck in the kitchen.
Ingredients (Serving Size: 4-6 people):
- 1 lb ground beef
- 1/2 cup breadcrumbs
- 1/4 cup grated Parmesan cheese
- 1 egg
- 1 teaspoon Italian seasoning
- Salt and pepper to taste
- 1 tablespoon olive oil
- 1 large onion, chopped
- 2 cloves garlic, minced
- 1 carrot, diced
- 1 stalk celery, diced
- 1 (28 oz) can crushed tomatoes
- 4 cups chicken or vegetable broth
- 1 teaspoon sugar
- 1 cup small mozzarella balls
- 1/4 cup black olives, sliced
- Fresh basil for garnish (optional)
Cooking Instructions:
- Prepare the Meatballs (Eyeballs): In a large bowl, combine the ground beef, breadcrumbs, Parmesan cheese, egg, Italian seasoning, salt, and pepper. Mix well until all ingredients are thoroughly combined. Shape the mixture into small meatballs, about 1 inch in diameter, to resemble eyeballs.
- Cook the Meatballs: In a large pot, heat the olive oil over medium heat. Add the meatballs and cook until they’re browned on all sides, about 5-7 minutes. Remove the meatballs from the pot and set aside.
- Make the Soup Base: In the same pot, add the chopped onion, garlic, carrot, and celery. Sauté until the vegetables are softened, about 5 minutes. Stir in the crushed tomatoes, broth, and sugar. Bring the mixture to a boil, then reduce the heat to a simmer.
- Simmer the Soup: Return the meatballs to the pot. Simmer the soup for 20-25 minutes or until the meatballs are cooked through and the flavors have melded together.
- Assemble the Eyeballs: Just before serving, place a mozzarella ball on top of each meatball in the soup. Top each mozzarella ball with a slice of black olive to create the appearance of an eyeball.
- Garnish and Serve: Serve the Eyeball Soup hot, garnished with fresh basil if desired. Enjoy the spooky delight of this Halloween-themed dish!
Extra Tips:
For a more intense flavor, consider making the soup base a day ahead to allow the flavors to develop overnight. If you want to give the soup an extra kick, add a pinch of red pepper flakes when sautéing the vegetables.
When shaping the meatballs, confirm they’re uniform in size for even cooking. For a vegetarian version, use plant-based meat substitutes and vegetable broth instead of chicken broth. Finally, for a more gruesome look, you can add a few drops of red food coloring to the soup to deepen the “bloody” appearance.
Zombie Ribs With Brain Mashed Potatoes
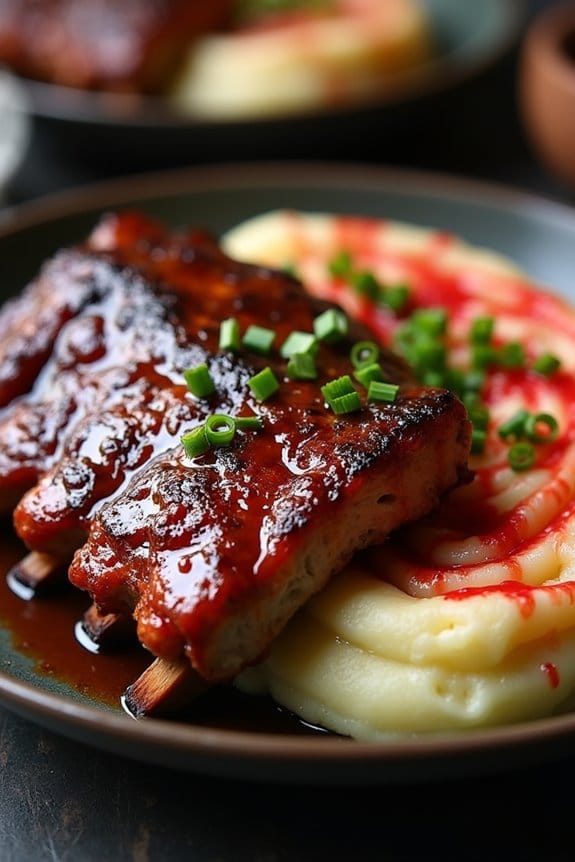
Zombie Ribs With Brain Mashed Potatoes is the perfect Halloween-themed dinner that will tantalize your taste buds and set the spooky mood for your evening. This dish combines succulent, fall-off-the-bone ribs with a side of creamy mashed potatoes creatively styled to resemble brains.
It’s both a visual treat and a culinary delight, ensuring that your Halloween dinner is as memorable as it’s delicious. Whether you’re hosting a full-blown Halloween party or just enjoying a themed dinner with family, this dish is sure to be a hit.
To create this eerie yet appetizing meal, you’ll start by marinating the ribs in a flavorful blend of spices and sauces to give them a rich, savory taste. While the ribs are cooking to perfection, you’ll whip up mashed potatoes with a twist.
By adding a few simple ingredients, you can easily transform ordinary mashed potatoes into a creepy, brain-like accompaniment. The combination of tender ribs and creamy, brain-like potatoes will leave your guests both thrilled and satisfied.
Ingredients (Serves 4-6):
- 2 racks of baby back ribs
- 1/2 cup barbecue sauce
- 1/4 cup soy sauce
- 1 tablespoon garlic powder
- 1 tablespoon onion powder
- 1 teaspoon smoked paprika
- Salt and pepper to taste
- 3 pounds potatoes, peeled and cubed
- 1/2 cup milk
- 4 tablespoons butter
- 1/2 cup sour cream
- Red food coloring (optional, for effect)
- Chopped chives (optional, for garnish)
Cooking Instructions:
- Prepare the Ribs:
- Preheat your oven to 300°F (150°C).
- In a small bowl, mix together the barbecue sauce, soy sauce, garlic powder, onion powder, smoked paprika, salt, and pepper.
- Rub the marinade generously over the ribs, ensuring they’re fully coated.
- Place the ribs on a baking sheet lined with aluminum foil, bone side down, and cover with another sheet of foil to keep the moisture in.
- Cook the Ribs:
- Bake the ribs in the preheated oven for about 2.5 to 3 hours, or until the meat is tender and easily pulls away from the bone.
- For a sticky glaze, remove the top foil in the last 20 minutes and brush on additional barbecue sauce.
- Prepare the Mashed Potatoes:
- While the ribs are cooking, boil the peeled and cubed potatoes in a large pot of salted water until tender, about 15-20 minutes.
- Drain the potatoes and return them to the pot. Add milk, butter, and sour cream.
- Use a potato masher or electric mixer to mash the potatoes until smooth and creamy.
- For a brainy effect, add a few drops of red food coloring and swirl lightly to create a marbled look.
- Serve:
- Arrange the ribs on a serving platter. Scoop the mashed potatoes onto the plate and shape them into a rough brain-like form.
- Garnish with chopped chives if desired for an added touch of green.
Extra Tips:
For the best flavor, marinate the ribs overnight to allow the spices to fully penetrate the meat. If you’re short on time, pressure cooking the ribs before baking can greatly reduce cooking time without sacrificing tenderness.
When creating the brain effect with mashed potatoes, remember less is more with the food coloring; too much can make the potatoes look unappetizing. Serve this dish with spooky Halloween decor to enhance the theme of your meal.
Mummy Dogs in a Blanket

Transform your dinner table into a spooky feast with Mummy Dogs in a Blanket, a delightful Halloween-themed dish that both kids and adults will love. These playful snacks are a twist on the classic pigs in a blanket, incorporating a festive touch to your Halloween spread. Perfect for parties or a themed dinner, they’re quick to prepare, fun to assemble, and deliciously satisfying.
This recipe serves 4-6 people and is ideal for a casual get-together or family dinner. The combination of savory hot dogs wrapped in flaky crescent roll dough, paired with the visual appeal of “mummified” snacks, makes this dish both a treat for the taste buds and a visual delight. Accompanied by your favorite dipping sauces, these mummy dogs are sure to be a hit at any Halloween celebration.
Ingredients:
- 1 can (8 oz) refrigerated crescent roll dough
- 8 hot dogs
- 2 tablespoons mustard or ketchup (for decorating)
- Cooking spray
- Optional: small edible eyes for decoration
Cooking Instructions:
- Preheat the Oven: Set your oven to 375°F (190°C) to guarantee it’s hot and ready for baking your mummy dogs. This temperature is ideal for getting that golden-brown crust on the crescent rolls.
- Prepare the Dough: Open the can of crescent roll dough and unroll it on a clean, flat surface. Press the perforations to seal them, creating one large sheet of dough. If your dough is pre-cut, you may need to use a rolling pin to guarantee it’s all in one piece.
- Cut the Dough: Using a pizza cutter or sharp knife, cut the dough into thin strips, approximately 1/4 inch wide. These strips will be used to wrap around the hot dogs to create the mummy effect.
- Wrap the Hot Dogs: Take one hot dog and begin wrapping a dough strip around it, leaving a small gap near the top for the “face” of the mummy. Continue wrapping until the hot dog is mostly covered, then tuck the end of the strip under the wrapped dough to secure it. Repeat for all hot dogs.
- Place on Baking Sheet: Lightly spray a baking sheet with cooking spray to prevent sticking. Arrange the wrapped hot dogs on the sheet, leaving space between each one to allow for even cooking.
- Bake the Mummy Dogs: Place the baking sheet in the preheated oven and bake for approximately 10-15 minutes, or until the dough is golden brown and cooked through.
- Decorate the Faces: Remove the mummy dogs from the oven and allow them to cool slightly. Use mustard or ketchup to dot eyes onto each mummy. For added fun, you can also stick on small edible eyes.
- Serve: Arrange the mummy dogs on a platter and serve them warm with your choice of dipping sauces.
Extra Tips:
To make your Mummy Dogs even more festive, consider using different types of sausages or adding a slice of cheese underneath the dough for a surprise cheesy center.
If you prefer a more gourmet touch, try adding seasoning or herbs to the dough before wrapping the hot dogs. For a spookier presentation, serve them alongside other Halloween-themed dishes and decorate the table with cobwebs and eerie lighting.
Remember to keep an eye on the baking time as ovens may vary, confirming your mummy dogs come out perfectly golden and flaky.
