

As Halloween creeps around the corner, the excitement for crafting festive feasts fills the air.
Envision serving up eerie delights like Spooky Spiderweb Soup or Ghostly Guacamole Dip that are sure to enchant both kids and adults.
Picture a table adorned with Monster Eyeball Meatballs and Jack-o’-Lantern Stuffed Peppers, each dish a delightful blend of fun and flavor.
Hungry for more hauntingly good ideas?
Let’s explore these spooktacular treats together!
Spooky Spiderweb Soup
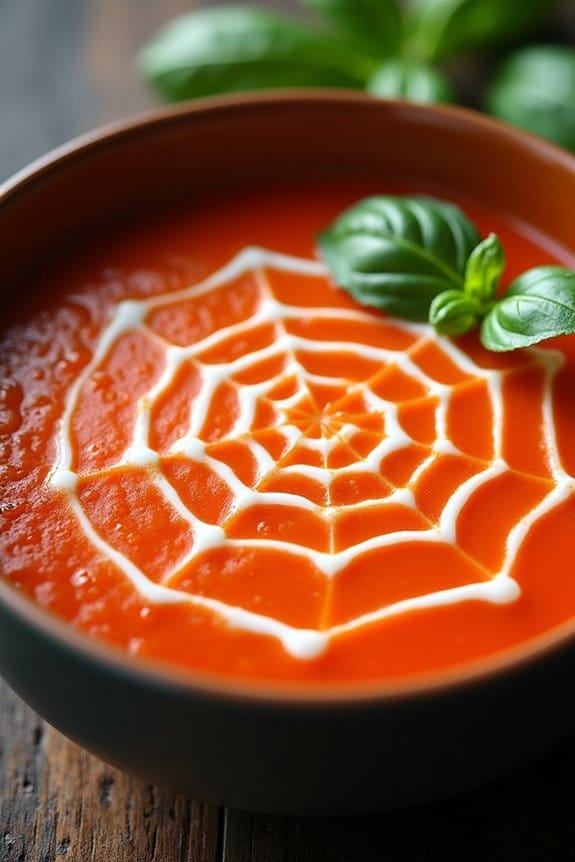
Creating a dish that captures the essence of Halloween can be both fun and delicious. Spooky Spiderweb Soup is an excellent choice for a Halloween-themed meal, offering not only a visually appealing presentation but also a comforting taste perfect for a chilly autumn evening.
This soup is a delightful combination of creamy tomato base with a dramatic spiderweb design on top, created using sour cream. It’s a simple yet effective way to add some festive flair to your Halloween spread.
This recipe is designed to serve 4-6 people, making it ideal for a small gathering or family dinner. The key to achieving the spooky spiderweb design lies in the careful application of sour cream, which contrasts beautifully with the vibrant red soup.
Alongside its striking appearance, the soup is flavorful, with a blend of herbs and spices that enhance the natural sweetness of tomatoes. Whether you’re hosting a Halloween party or simply looking to surprise your family with a themed dinner, Spooky Spiderweb Soup is sure to impress.
Ingredients:
- 2 tablespoons olive oil
- 1 medium onion, chopped
- 2 cloves garlic, minced
- 1 can (28 ounces) crushed tomatoes
- 3 cups vegetable broth
- 1 teaspoon sugar
- 1 teaspoon dried basil
- 1/2 teaspoon dried oregano
- Salt and black pepper to taste
- 1/2 cup heavy cream
- 1/4 cup sour cream
- Fresh basil leaves for garnish (optional)
Instructions:
- Sauté the Aromatics: In a large pot, heat the olive oil over medium heat. Add the chopped onion and sauté for about 5 minutes until the onion is translucent. Stir in the minced garlic and cook for another minute until fragrant.
- Create the Base: Pour in the crushed tomatoes and vegetable broth. Stir in the sugar, dried basil, and oregano. Season with salt and black pepper to taste. Bring the mixture to a gentle simmer.
- Simmer the Soup: Reduce the heat to low and let the soup simmer uncovered for about 20 minutes. This allows the flavors to meld together and the soup to thicken slightly.
- Blend the Soup: Using an immersion blender, blend the soup until smooth. Alternatively, you can transfer the soup in batches to a countertop blender and blend until smooth, then return it to the pot.
- Add Cream: Stir in the heavy cream and let the soup heat through for another 5 minutes, stirring occasionally.
- Create the Spiderweb: To make the spiderweb, fill a small ziplock bag with sour cream and snip off a tiny corner. Pipe concentric circles on the surface of the soup. Use a toothpick or the tip of a knife to drag lines from the center circle outward to create a web effect.
- Serve: Ladle the soup into bowls, garnish with fresh basil leaves if desired, and serve immediately.
Extra Tips:
For an even more dramatic effect, consider adding a drop or two of black food coloring to the sour cream to make the spiderweb stand out even more.
If you prefer a chunkier soup, blend only half of the soup and leave the rest as is. Adjust the seasoning to your taste, and feel free to add a pinch of cayenne pepper for a bit of heat.
Remember to serve the soup warm to fully enjoy its rich flavors and creamy texture.
Ghostly Guacamole Dip

Halloween is the perfect time to get creative with your food, and what better way to spook your guests than with a Ghostly Guacamole Dip? This ghoulishly green dip isn’t only fun to look at but delicious and healthy too. Made with ripe avocados and a blend of seasonings, it’s the perfect accompaniment for your Halloween party snacks.
Whether you’re serving it with tortilla chips, vegetable sticks, or using it as a spooky spread for sandwiches, this guacamole will be a hit with both kids and adults.
Perfect for tortilla chips, veggie sticks, or as a spooky sandwich spread, this guacamole delights kids and adults alike.
The key to making this guacamole festive is in the presentation. By using sour cream and some clever piping techniques, you can create ghostly shapes that will haunt your snack table. Add a few edible eyes, and you’ll have a dip that looks like it came straight out of a Halloween story. Not only will this dish add a festive touch to your table, but it’s also a great way to incorporate some healthy eats into your holiday feast!
Ingredients for 4-6 Servings:
- 4 ripe avocados
- 2 tablespoons lime juice
- 1 teaspoon salt
- 1/2 teaspoon ground cumin
- 1/2 teaspoon cayenne pepper
- 1 medium onion, finely chopped
- 2 Roma tomatoes, diced
- 1 tablespoon chopped cilantro
- 1 clove garlic, minced
- 1/2 cup sour cream
- Edible candy eyes
Cooking Instructions:
- Prepare the Avocados: Cut the avocados in half, remove the pits, and scoop the flesh into a mixing bowl. Use a fork or potato masher to mash the avocados to your desired consistency – smooth or chunky.
- Mix the Base Ingredients: Add the lime juice, salt, ground cumin, and cayenne pepper to the mashed avocados. Stir well to evenly distribute the seasonings throughout the mixture.
- Add the Vegetables: Mix in the chopped onion, diced tomatoes, chopped cilantro, and minced garlic. Stir until all ingredients are well combined.
- Create the Ghost Shapes: Transfer the guacamole to a serving dish, smoothing the top with the back of a spoon.
- Piping the Ghosts: Fill a piping bag with sour cream. If you don’t have a piping bag, a plastic sandwich bag with a small corner snipped off will work. Pipe ghost shapes onto the surface of the guacamole.
- Add the Eyes: Place edible candy eyes on the ghost shapes to complete the spooky look. Serve immediately with your choice of dippers.
Extra Tips:
To guarantee your guacamole stays vibrant green, make sure to cover it tightly with plastic wrap, pressing the wrap directly onto the surface of the dip to prevent oxidation.
If you’re preparing this dish in advance, you can also add an extra touch of lime juice to help preserve the color. Additionally, feel free to customize the heat level by adjusting the cayenne pepper or adding jalapeños for an extra kick!
Monster Eyeball Meatballs
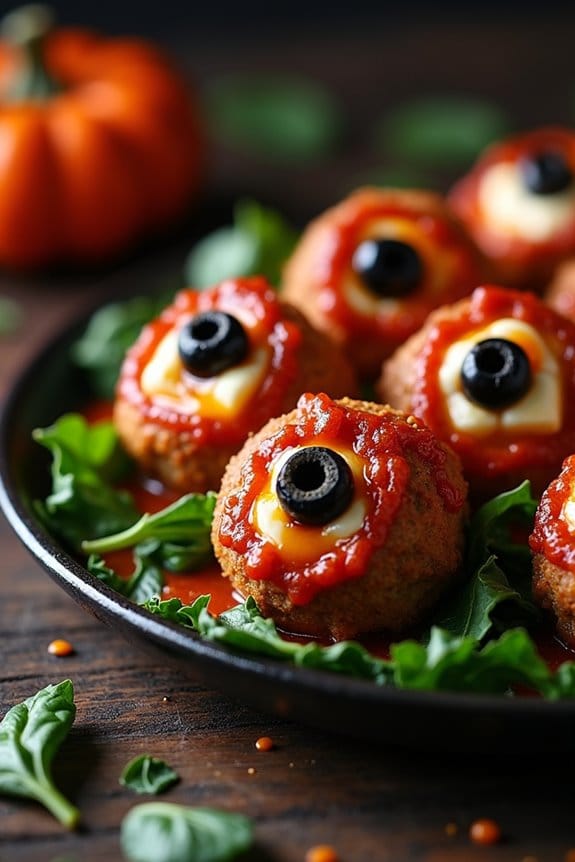
Monster Eyeball Meatballs are a frightfully fun and delicious addition to any Halloween gathering. Combining the savory flavors of ground meat with the whimsical appearance of creepy eyeballs, this dish will surely delight both children and adults alike. With a gooey cheese center and an olive “iris,” these meatballs are both a feast for the taste buds and an eye-catching centerpiece for your spooky spread.
Perfect for a Halloween party or a themed family dinner, Monster Eyeball Meatballs are bound to be a crowd-pleaser. These meatballs are easy to prepare and can be made ahead of time, allowing you to focus on other aspects of your Halloween festivities. The recipe uses a combination of beef and pork to create a juicy and flavorful meatball, while the addition of mozzarella cheese adds a delightful surprise in every bite.
The finishing touch is a slice of black olive, which gives the meatballs their signature “eyeball” look. Serve them with a side of marinara or your favorite dipping sauce for a ghoulishly good appetizer or main dish.
Ingredients (Serves 4-6):
- 1 pound ground beef
- 1/2 pound ground pork
- 1/2 cup breadcrumbs
- 1/4 cup grated Parmesan cheese
- 1 large egg
- 2 cloves garlic, minced
- 1 teaspoon Italian seasoning
- Salt and pepper, to taste
- 4 ounces mozzarella cheese, cut into small cubes
- 12 black olives, pitted and sliced into rings
- 1 cup marinara sauce (optional, for serving)
Cooking Instructions:
- Preheat the Oven: Start by preheating your oven to 375°F (190°C). This will guarantee that the oven is at the right temperature when you’re ready to bake the meatballs.
- Mix the Ingredients: In a large mixing bowl, combine the ground beef, ground pork, breadcrumbs, Parmesan cheese, egg, minced garlic, Italian seasoning, salt, and pepper. Use your hands to mix everything together until well combined. Be careful not to overmix, as this can make the meatballs dense.
- Form the Meatballs: Take a small portion of the meat mixture and flatten it slightly in your hand. Place a cube of mozzarella cheese in the center, then fold the meat around the cheese to form a ball. Make sure the cheese is completely enclosed. Repeat with the remaining meat mixture and cheese cubes.
- Add the Olive Slices: Once all the meatballs are formed, press a slice of black olive into the top of each meatball. This will create the “eyeball” effect.
- Bake the Meatballs: Place the meatballs on a baking sheet lined with parchment paper. Bake in the preheated oven for 20-25 minutes, or until the meatballs are browned and cooked through.
- Serve: If desired, heat the marinara sauce and serve it on the side for dipping. Arrange the Monster Eyeball Meatballs on a platter and enjoy!
Extra Tips:
For an extra spooky presentation, serve the meatballs on a bed of spinach or kale to resemble a nest of monster hair. If you’re making these ahead of time, you can prepare the meatballs and refrigerate them for up to a day before baking. Just be sure to let them come to room temperature before popping them into the oven.
Additionally, if you prefer a spicier kick, add a pinch of red pepper flakes to the meat mixture. Enjoy your Monster Eyeball Meatballs, and have a monstrously fun Halloween!
Witch’s Finger Breadsticks

Witch’s Finger Breadsticks are a spooktacular addition to any Halloween party spread. These creepy treats aren’t only fun to make but also deliciously crispy and savory. Shaped like gnarled, eerie fingers, these breadsticks are sure to delight and frighten your guests in equal measure.
Whether you’re hosting a spooky dinner or just want to surprise your family with a Halloween-themed snack, these witch’s fingers are an ideal choice. The breadsticks are made using simple ingredients that are transformed into something truly magical with the help of a few clever tricks.
By adding almonds to mimic fingernails and creating knuckles with a knife, these breadsticks come to life (or undeath) in a way that’s both humorous and haunting. Perfect for dipping into a blood-red marinara sauce, these Witch’s Finger Breadsticks will surely cast a spell on anyone who dares to taste them.
Ingredients for 4-6 servings:
- 1 package refrigerated breadstick dough or pizza dough
- 24 whole blanched almonds
- 1 egg, lightly beaten
- Red food coloring
- Flour, for dusting
- Salt, to taste
- Optional: Marinara sauce for dipping
Instructions:
- Preheat and Prepare: Preheat your oven to 375°F (190°C). Line a baking sheet with parchment paper to prevent sticking.
- Shape the Breadsticks: On a lightly floured surface, roll out the breadstick or pizza dough into a rectangle. Using a sharp knife or a pizza cutter, cut the dough into strips about 4-5 inches long and 1/2 inch wide. These will form the “fingers.”
- Form the Fingers: Take each strip and gently shape it into a finger form, making sure to slightly taper one end to resemble a fingertip. Press an almond into the tapered end to create a “fingernail.”
- Create the Knuckles: Using a sharp knife, make small horizontal slashes in the dough to mimic knuckle creases. This adds to the realistic look of the fingers.
- Egg Wash: In a small bowl, mix a few drops of red food coloring into the beaten egg. Brush the colored egg wash over each breadstick, being careful not to dislodge the almonds.
- Bake: Place the breadsticks on the prepared baking sheet. Sprinkle a little salt over them if desired. Bake in the preheated oven for about 10-12 minutes, or until golden brown and cooked through.
- Cool and Serve: Allow the breadsticks to cool slightly on a wire rack. Serve them with a side of marinara sauce for dipping, if desired.
Extra Tips:
To guarantee the almonds stick well to the dough, press them in firmly and consider brushing a small amount of the egg wash beneath them for extra adherence.
If you want an even more ghoulish appearance, use a toothpick to add more detailed lines and wrinkles to the fingers before baking. Additionally, for a gluten-free version, substitute regular dough with a gluten-free dough alternative. Enjoy your Witch’s Finger Breadsticks fresh out of the oven for the best texture and taste!
Jack-o’-Lantern Stuffed Peppers
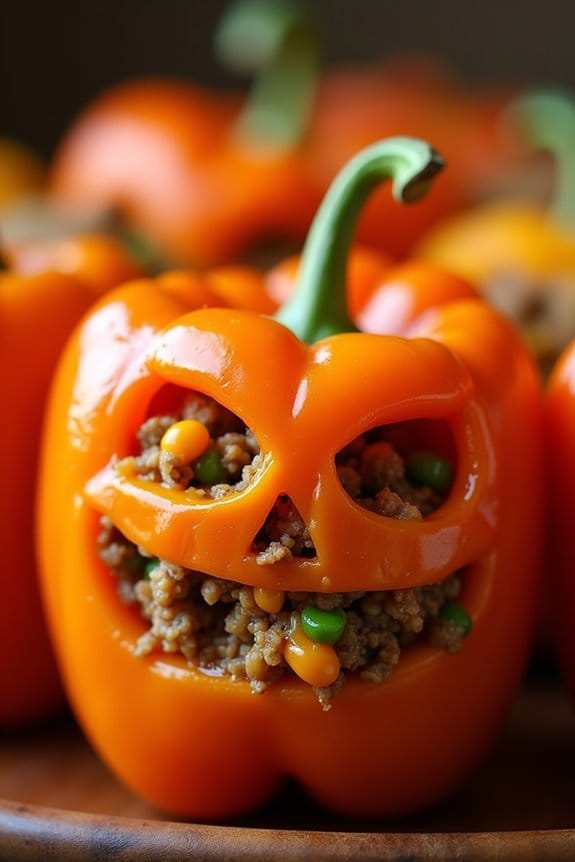
Jack-o’-Lantern Stuffed Peppers are a delightful and spooky addition to your Halloween-themed menu. These festive stuffed peppers are carved to resemble the iconic jack-o’-lantern, making them not only delicious but also a fun and decorative dish for your gathering. The peppers are hollowed out and filled with a savory mixture of ground meat, rice, vegetables, and spices, creating a hearty meal that’s as eye-catching as it’s tasty.
This recipe serves 4-6 people, making it perfect for a small Halloween party or family dinner. Each pepper is carefully carved with a jack-o’-lantern face, then baked until the peppers are tender and the filling is cooked to perfection. Not only do these stuffed peppers make a great main course, but they also add a playful touch to your Halloween spread, delighting both kids and adults alike.
Ingredients for 4-6 servings:
- 6 medium-sized orange bell peppers
- 1 pound ground beef or turkey
- 1 cup cooked rice
- 1 small onion, diced
- 2 cloves garlic, minced
- 1 can (14.5 oz) diced tomatoes, drained
- 1 cup shredded cheddar cheese
- 1 teaspoon dried oregano
- 1 teaspoon ground cumin
- Salt and pepper to taste
- 1 tablespoon olive oil
Cooking Instructions:
- Prepare the Peppers: Preheat your oven to 375°F (190°C). Cut the tops off the bell peppers and remove the seeds and membranes. Use a small paring knife to carve jack-o’-lantern faces into one side of each pepper, being careful not to cut too large or too small so the peppers maintain their shape during baking.
- Cook the Filling: In a large skillet over medium heat, add olive oil and sauté the diced onion and minced garlic until they become translucent, about 3-4 minutes. Add the ground meat and cook until browned, breaking it into small pieces with a spatula.
- Mix the Ingredients: Once the meat is cooked, stir in the cooked rice, diced tomatoes, oregano, cumin, salt, and pepper. Let the mixture simmer for 5 minutes to allow the flavors to meld together. Remove from heat and stir in half of the shredded cheddar cheese.
- Stuff the Peppers: Spoon the meat and rice mixture into each carved pepper, filling them generously but not overflowing. Place the peppers upright in a baking dish. If they don’t stand up on their own, you can trim a small slice from the bottom to create a flat surface.
- Bake the Peppers: Cover the baking dish with aluminum foil and bake in the preheated oven for 25-30 minutes, or until the peppers are tender. Remove the foil, sprinkle the remaining cheese on top of each pepper, and bake for an additional 5-10 minutes until the cheese is melted and bubbly.
- Serve and Enjoy: Allow the stuffed peppers to cool slightly before serving. Arrange them on a platter for a festive presentation, with their jack-o’-lantern faces prominently displayed.
Extra Tips:
When carving the jack-o’-lantern faces, you might find it helpful to sketch the design lightly with a toothpick before making the cuts with a knife. This guarantees even and symmetrical faces.
Feel free to customize the filling by adding different vegetables or using ground chicken or plant-based meat for a healthier or vegetarian option. Additionally, you can prepare the stuffed peppers ahead of time and bake them just before serving, making this dish a convenient choice for a busy Halloween celebration.
Mummy Hot Dogs

Mummy Hot Dogs are a fun and easy Halloween treat that will delight kids and adults alike. This spooky twist on a classic hot dog is perfect for Halloween parties or a themed dinner. Wrapped in strips of crescent roll dough to resemble mummy bandages, these hot dogs are baked to golden perfection and can be served with your favorite condiments.
With just a few ingredients and simple steps, you’ll have a festive dish that adds a playful touch to your Halloween celebrations.
These Mummy Hot Dogs aren’t only delicious but also a great way to get creative in the kitchen with your family. Kids will love helping to wrap the dough around the hot dogs, and you can even let them add their own scary faces using mustard or ketchup.
Whether you’re hosting a Halloween bash or just want to make a special meal to celebrate the spooky season, these Mummy Hot Dogs are sure to be a hit.
Ingredients (serving size: 4-6 people):
- 1 package of crescent roll dough (8 oz)
- 8 hot dogs
- 1 egg, beaten
- Mustard or ketchup for decoration and serving
Cooking Instructions:
- Preheat the Oven: Begin by preheating your oven to 375°F (190°C). This will guarantee that your mummy hot dogs cook evenly and have a nice, golden-brown finish.
- Prepare the Crescent Roll Dough: Unroll the crescent roll dough onto a flat surface. Use a pizza cutter or knife to cut the dough into thin strips, approximately 1/4 inch wide. These strips will act as the mummy bandages.
- Wrap the Hot Dogs: Take each hot dog and wrap it with the dough strips. Start at the bottom and work your way up, leaving a small gap near the top for the “face.” Make sure to wrap the dough loosely so it expands a little while baking.
- Place on Baking Sheet: Once all the hot dogs are wrapped, place them on a baking sheet lined with parchment paper to prevent sticking.
- Brush with Egg Wash: Lightly brush each wrapped hot dog with the beaten egg. This will give them a nice sheen and help them turn golden brown in the oven.
- Bake: Place the baking sheet in the preheated oven and bake for 15-20 minutes, or until the dough is golden brown and cooked through.
- Decorate: Remove the mummy hot dogs from the oven and let them cool slightly. Use mustard or ketchup to add eyes or other fun details to the mummy faces.
- Serve: Serve warm with additional mustard or ketchup for dipping.
Extra Tips:
To make your Mummy Hot Dogs even more festive, consider using different types of sausages or hot dogs, such as chicken or turkey, for a variety of flavors.
You can also experiment with different dipping sauces like honey mustard or spicy ketchup for an extra kick. If you’re short on time, using pre-sliced dough can speed up the preparation process.
Remember to monitor the baking closely, as oven temperatures can vary, to guarantee your mummies don’t get too crispy. Enjoy the process and have fun creating these spooky treats!
Pumpkin Patch Cupcakes

Indulge in the whimsical spirit of Halloween with delightful Pumpkin Patch Cupcakes that are both visually charming and deliciously sweet. These cupcakes are designed to mimic a tiny pumpkin patch, complete with colorful frosting, candy pumpkins, and a hint of spices that echo the flavors of the fall season. Perfect for Halloween parties, family gatherings, or any autumn celebration, these cupcakes will enchant both kids and adults alike.
Imagine these little edible pumpkin patches adorning your dessert table, inviting everyone to take a bite into the season. These cupcakes aren’t only a treat for the taste buds but also a fun and creative project that can be enjoyed by the whole family. With a moist pumpkin-flavored cake as the base, topped with creamy frosting and decorated with miniature pumpkins and green vines, these cupcakes will surely capture the essence of Halloween.
Whether you’re an experienced baker or a novice looking to create a seasonal treat, this recipe offers an enjoyable baking experience that results in a delightful centerpiece for your Halloween festivities.
Ingredients for 4-6 servings:
- 1 1/2 cups all-purpose flour
- 1 teaspoon baking powder
- 1/2 teaspoon baking soda
- 1/2 teaspoon salt
- 1 teaspoon ground cinnamon
- 1/2 teaspoon ground nutmeg
- 1/2 cup unsalted butter, softened
- 1 cup granulated sugar
- 2 large eggs
- 1 teaspoon vanilla extract
- 1 cup canned pumpkin puree
- 1/4 cup milk
- 1/2 cup cream cheese, softened
- 1/4 cup unsalted butter, softened (for frosting)
- 2 cups powdered sugar
- 1/2 teaspoon vanilla extract (for frosting)
- Orange food coloring
- Green food coloring
- Candy pumpkins for topping
Cooking Instructions:
- Preheat and Prepare: Preheat your oven to 350°F (175°C). Line a muffin tin with cupcake liners to prevent sticking.
- Mix Dry Ingredients: In a medium bowl, whisk together the flour, baking powder, baking soda, salt, cinnamon, and nutmeg. This guarantees the spices and leavening agents are evenly distributed.
- Cream Butter and Sugar: In a large mixing bowl, cream the softened butter and granulated sugar together using an electric mixer until the mixture is light and fluffy, approximately 3-4 minutes.
- Add Eggs and Pumpkin: Beat in the eggs one at a time, ensuring each egg is fully incorporated before adding the next. Mix in the vanilla extract and pumpkin puree until smooth.
- Combine Wet and Dry: Gradually add the dry ingredients to the wet mixture, alternating with the milk. Begin and end with the dry ingredients, mixing until just combined to avoid over-mixing.
- Fill and Bake: Divide the batter evenly among the prepared cupcake liners, filling each about two-thirds full. Bake for 18-20 minutes or until a toothpick inserted into the center of a cupcake comes out clean. Allow to cool completely on a wire rack.
- Prepare Frosting: In a medium bowl, beat together the cream cheese and butter until smooth. Gradually add powdered sugar and vanilla extract, beating until fully combined and creamy.
- Color and Decorate: Divide the frosting into two bowls. Tint one bowl with orange food coloring and the other with green food coloring. Frost the cooled cupcakes with the orange frosting to resemble pumpkins, then use a piping bag fitted with a small round tip to pipe green vines on each cupcake. Top with candy pumpkins for decoration.
Extra Tips:
When making Pumpkin Patch Cupcakes, verify all ingredients are at room temperature for a smoother batter and frosting. If you prefer less sweet frosting, you can adjust the amount of powdered sugar to taste.
Additionally, for a more authentic pumpkin flavor, feel free to add a pinch of ground ginger or cloves to the dry ingredients. If you don’t have candy pumpkins available, you can use orange-colored candies or small pieces of fondant shaped into pumpkins as a substitute.
Enjoy the process of decorating, and feel free to get creative with your pumpkin patch designs!
Vampire Bat Wings

Get ready to spook your taste buds with these delicious and eerie Vampire Bat Wings! Perfect for a Halloween party or a themed dinner, these wings are irresistibly crispy and glazed with a sweet and tangy sauce that will have your guests coming back for more.
The deep red color of the glaze gives the wings a sinister appearance, making them a fantastic addition to your Halloween spread. Not only are they visually striking, but they also pack a flavorful punch that combines the savory goodness of chicken wings with the zesty delight of a homemade sauce.
Visually striking and packed with a flavorful punch, these wings elevate any Halloween feast.
To achieve the perfect Vampire Bat Wings, the chicken wings are first baked until they’re golden and crispy. Then, they’re coated in a homemade glaze that includes ingredients like soy sauce, honey, and a touch of red food coloring to give them their signature vampire look.
The dish is simple to prepare and can be made in advance to save time on the day of your event. Serve these wings with a side of ranch or blue cheese dressing for dipping, and watch them disappear before your eyes!
Ingredients for Vampire Bat Wings (serves 4-6):
- 3 pounds chicken wings
- 1/2 cup soy sauce
- 1/2 cup honey
- 1/4 cup ketchup
- 2 tablespoons apple cider vinegar
- 2 tablespoons sriracha sauce
- 2 cloves garlic, minced
- 1 teaspoon ground ginger
- 1 teaspoon red food coloring
- Salt and pepper to taste
- Chopped green onions (optional, for garnish)
- Sesame seeds (optional, for garnish)
Instructions:
1. Preheat Oven: Preheat your oven to 400°F (200°C) and line two large baking sheets with aluminum foil. Place a wire rack on each baking sheet to allow the wings to cook evenly.
2. Prepare the Wings: Pat the chicken wings dry with paper towels, then season them with salt and pepper. Arrange the wings in a single layer on the wire racks, ensuring they aren’t touching.
3. Bake the Wings: Place the wings in the preheated oven and bake for 45-50 minutes, flipping them halfway through, until they’re golden brown and crispy.
4. Make the Glaze: In a medium saucepan, combine soy sauce, honey, ketchup, apple cider vinegar, sriracha sauce, minced garlic, ground ginger, and red food coloring. Stir the ingredients over medium heat until well combined and the glaze begins to simmer.
Reduce the heat to low and let the glaze thicken slightly for about 5 minutes.
5. Coat the Wings: Once the wings are baked, transfer them to a large mixing bowl. Pour the glaze over the wings and toss them until they’re evenly coated.
6. Final Bake: Return the glazed wings to the wire racks and bake for an additional 10 minutes, allowing the glaze to caramelize slightly.
7. Garnish and Serve: Remove the wings from the oven and let them cool for a few minutes. Garnish with chopped green onions and sesame seeds if desired, and serve warm with your favorite dipping sauce.
Extra Tips:
For extra crispy wings, make sure to thoroughly pat them dry before baking, as moisture can prevent them from achieving the desired crispiness.
If you prefer a spicier kick, feel free to increase the amount of sriracha sauce in the glaze. For a more vibrant color, you can adjust the quantity of red food coloring to your liking.
To save time, you can prepare the glaze a day in advance and store it in the refrigerator until ready to use.
Creepy Crawly Pasta Salad
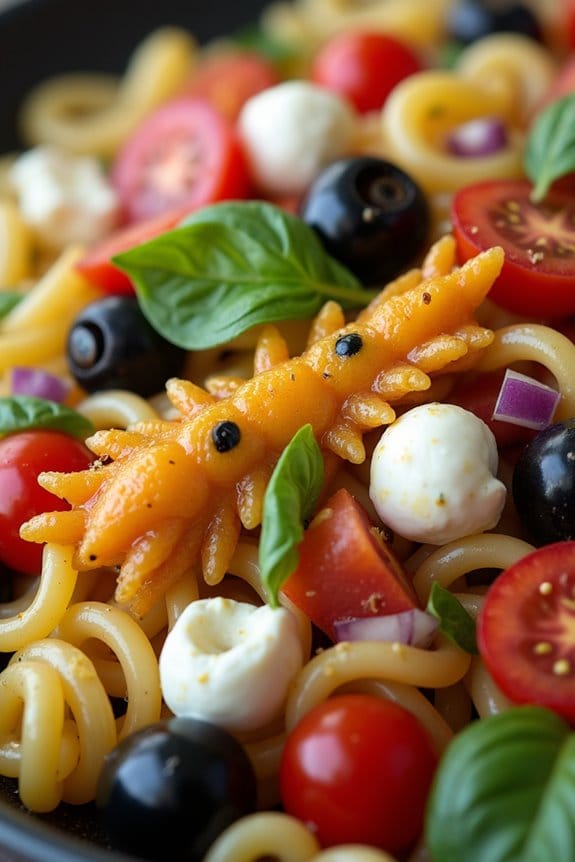
Get ready to spook your guests with a deliciously eerie dish: Creepy Crawly Pasta Salad. Perfect for a Halloween party or a themed dinner, this salad combines the fun of Halloween with the savory flavors of a classic pasta salad. The dish features pasta shaped like creepy crawlies, tossed with a colorful array of vegetables and a zesty dressing that will tantalize your taste buds.
It’s a visual delight that’s both appetizing and a bit spine-chilling, making it an ideal centerpiece for your spooky celebration. The Creepy Crawly Pasta Salad isn’t only fun and engaging but also easy to prepare, making it a great choice for cooks of all levels.
With a few simple ingredients and some creative presentation, you can transform an ordinary pasta salad into something extraordinary. Surprise your guests with edible creepy crawlies that aren’t just for decoration but are also delicious to eat. This recipe is designed to serve 4-6 people, making it perfect for a small gathering or as a part of a larger Halloween feast.
Ingredients (serves 4-6):
- 12 oz (340g) pasta (choose Halloween-themed shapes or fusilli for a “wormy” effect)
- 1 cup cherry tomatoes, halved
- 1 cup black olives, pitted and sliced
- 1 green bell pepper, diced
- 1 cup mini mozzarella balls
- 1/4 cup red onion, finely chopped
- 1/2 cup Italian dressing
- 1 tablespoon balsamic vinegar
- Salt and pepper to taste
- Handful of fresh basil leaves, torn
Cooking Instructions:
1. Cook the Pasta: Begin by boiling a pot of salted water. Add the pasta and cook according to the package instructions until al dente. This typically takes about 8-10 minutes.
Drain the pasta and rinse it under cold water to stop the cooking process and cool it down for the salad.
2. Prepare the Vegetables: While the pasta is cooking, prepare the vegetables. Halve the cherry tomatoes, slice the black olives, dice the green bell pepper, and finely chop the red onion. Having all your ingredients prepped will make mixing the salad quick and easy.
3. Mix the Salad: In a large mixing bowl, combine the cooked and cooled pasta with the cherry tomatoes, black olives, green bell pepper, mini mozzarella balls, and red onion. Stir gently to guarantee everything is well distributed.
4. Dress the Salad: Pour the Italian dressing and balsamic vinegar over the pasta and vegetable mixture. Toss everything together until the pasta is evenly coated with the dressing.
Season with salt and pepper to taste, then add the torn basil leaves for a fresh flavor.
5. Chill and Serve: Cover the salad and refrigerate for at least 30 minutes before serving. This allows the flavors to meld together. Serve cold for the best experience, confirming that each serving has a good mix of pasta and veggies.
Extra Tips:
For an extra spooky touch, try adding edible fake spiders or gummy worms as garnishes right before serving. You can also use food coloring to tint the pasta water to give your pasta a more eerie hue; black or green pasta can add to the creepy effect.
Remember to adjust the seasoning by tasting the salad after it has chilled, as flavors can mellow out in the fridge. Enjoy your deliciously spooky Creepy Crawly Pasta Salad!
Bloody Finger Pretzels

Nothing screams Halloween more than a table full of creepy, themed snacks. Bloody Finger Pretzels are a fun and spooky addition to any Halloween gathering. These eerie treats aren’t only visually chilling but also deliciously addictive. With a combination of crunchy pretzels, sweet almond nails, and a touch of “bloody” raspberry jam, these edible fingers are sure to thrill both kids and adults alike.
Whether you’re hosting a Halloween party or just looking to entertain the family, Bloody Finger Pretzels are the perfect addition to your eerie spread. Crafting these gory-looking snacks is straightforward and requires only a few ingredients. The key to making them convincingly creepy is in the details—almond slivers serve as the nails, while raspberry jam provides the “blood.” The result is a snack that’s tasty, spooky, and easy to make.
They’re ideal for a serving size of 4-6 people, guaranteeing everyone gets their fair share of frightful fun.
Ingredients:
- 24 pretzel rods
- 24 almond slivers
- 1/2 cup white chocolate chips
- Red food coloring
- 1/4 cup raspberry jam
- 1 tablespoon powdered sugar
Cooking Instructions:
- Prepare the Chocolate: Melt the white chocolate chips in a microwave-safe bowl. Heat in 20-second intervals, stirring between each, until the chocolate is smooth and fully melted.
- Add Color: Add a few drops of red food coloring to the melted chocolate to achieve a light pink or flesh-colored hue, stirring well to guarantee even coloring.
- Dip the Pretzels: Dip the end of each pretzel rod into the colored chocolate, covering about 1-2 inches to create the “finger.” Allow the excess chocolate to drip off before placing them on a sheet of parchment paper to set.
- Attach the Nails: Before the chocolate sets completely, press an almond sliver at the tip of the chocolate-coated end to form the “nail.” Repeat this process for all pretzel rods and let them dry completely.
- Apply the “Blood”: In a small bowl, mix the raspberry jam with powdered sugar until thickened. Using a small spoon or clean brush, carefully apply the jam to the base of the almond nail and along the pretzel to simulate blood.
- Set and Serve: Allow the pretzels to dry completely at room temperature or refrigerate them for quicker setting. Once set, arrange them on a platter and serve.
Extra Tips: Be mindful of the chocolate temperature; if it’s too hot, it may not adhere well to the pretzels. If the chocolate begins to harden while you’re working, reheat it in the microwave in short bursts.
For a more realistic effect, consider using a toothpick to create lines or wrinkles in the chocolate before it sets, mimicking knuckles. Finally, while raspberry jam is used for the “blood,” strawberry jam or any red-colored syrup can be a suitable substitute if preferred.
Eerie Eyeball Punch
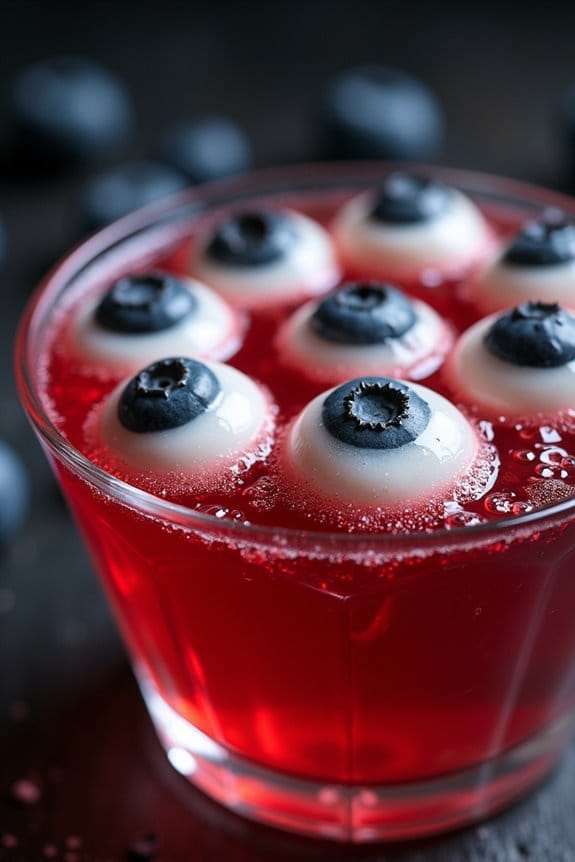
Looking for a spooky and invigorating drink to serve at your Halloween party? Eerie Eyeball Punch will be the star of your festive table, sure to fascinate your guests with its gory garnishes and deliciously chilling taste.
This punch combines fruity flavors and a chilling presentation that will add to the eerie ambiance of your Halloween festivities. The secret to making this punch truly haunting lies in the “eyeballs” that float eerily in the drink, made from lychees and blueberries.
This drink isn’t only a visual treat but also incredibly easy to prepare and serve. It provides the perfect balance of sweetness and tartness, thanks to the combination of fruit juices and sodas. The eyeballs are a creative touch that can be made quickly, yet add an extra layer of spookiness to the punch.
Whether you’re hosting a big party or a small gathering, Eerie Eyeball Punch is sure to be a hit among your guests, both young and old.
Perfect for any Halloween event, Eerie Eyeball Punch will captivate guests of all ages with its spooky charm.
Ingredients for 4-6 servings:
- 1 can (15 oz) canned lychees, drained
- 1 pint fresh blueberries
- 4 cups cranberry juice
- 2 cups pineapple juice
- 1 cup sparkling water or lemon-lime soda
- 1 cup orange juice
- Ice cubes
- Optional: red food coloring for added effect
Instructions:
- Prepare the Eyeballs:
- Take the drained lychees and gently insert a fresh blueberry into the hollow center of each lychee. Make sure the stem side of the blueberry is facing outwards to resemble an eyeball. Set these aside for later use.
- Mix the Base:
- In a large punch bowl, combine the cranberry juice, pineapple juice, and orange juice. Stir well to guarantee all the juices are thoroughly mixed, creating a vibrant red base for your punch.
- Add the Bubbles:
- Right before serving, add sparkling water or lemon-lime soda to the juice mixture. This will create a fizzy effect in the punch, making it more invigorating and appealing.
- Decorate with Eyeballs:
- Gently place the lychee eyeballs into the punch bowl. They should float on the surface, adding the eerie effect desired for your Halloween-themed punch.
- Serve and Enjoy:
- Fill glasses with ice cubes and ladle the punch over the ice, ensuring each glass gets at least one lychee eyeball for effect. For an added spooky touch, consider adding a drop of red food coloring to the punch for a bloodier appearance.
Extra Tips:
For an even more dramatic presentation, freeze some of the cranberry juice in ice cube trays with a lychee eyeball in each cube. This way, as the ice cubes melt, the eyeballs will gradually surface, adding to the eerie effect.
If you want a stronger flavor, you can replace the sparkling water with ginger ale, which will also add a slight spiciness to the punch. Remember to prepare the punch just before your guests arrive to keep the fizz intact and the presentation fresh!
Graveyard Dirt Cups

Halloween is the perfect time to get creative in the kitchen, and Graveyard Dirt Cups are a fun, spooky treat that will delight both kids and adults. This no-bake dessert isn’t only easy to make but also allows for plenty of creativity in its presentation. Layered with chocolatey goodness, these dirt cups resemble a mini graveyard, complete with tombstones and gummy worms peeking out of the “soil.” It’s a deliciously eerie addition to your Halloween festivities that will surely be a hit at any party.
The beauty of Graveyard Dirt Cups lies in their simplicity and versatility. You can customize the flavors and decorations to suit your taste or theme. Whether you’re hosting a Halloween bash or simply looking for a fun activity with the kids, these dirt cups are a perfect choice. They’re made using a combination of chocolate pudding, crushed cookies, and various candies, creating a delightful mix of textures that mimic the appearance of dirt and creepy crawlies.
Ingredients (Serves 4-6):
- 2 cups of cold milk
- 1 package (3.9 oz) of instant chocolate pudding mix
- 1 package (14 oz) of chocolate sandwich cookies
- 1 cup of whipped topping (like Cool Whip)
- Gummy worms
- Milano cookies or graham crackers (for tombstones)
- Black decorating gel or icing (for writing on tombstones)
- Clear plastic cups or small glass jars
Cooking Instructions:
- Prepare the Pudding: In a mixing bowl, combine the instant chocolate pudding mix with cold milk. Whisk for about 2 minutes until it starts to thicken, then let it sit for another 5 minutes to set completely.
- Crush the Cookies: Place the chocolate sandwich cookies in a resealable plastic bag. Use a rolling pin to crush them into fine crumbs, resembling dirt. Set aside.
- Assemble the Dirt Cups: In each clear cup or jar, start by adding a layer of chocolate pudding. On top of the pudding, add a layer of the crushed cookies. Repeat these layers until the cup is about 3/4 full, finishing with a cookie crumb layer on top.
- Add the Decorations: Insert gummy worms into the top layer of cookie crumbs, allowing them to peek out like they’re crawling through the dirt. Use Milano cookies or graham crackers as tombstones by writing spooky messages on them with black decorating gel or icing. Place these “tombstones” into the dirt cup.
- Top with Whipped Topping: Add a dollop of whipped topping to resemble a ghost or just for extra creaminess, if desired. Serve immediately or refrigerate until ready to serve.
Extra Tips:
When creating these Graveyard Dirt Cups, feel free to get creative with the decorations. Add candy pumpkins, edible bones, or other Halloween-themed sprinkles to enhance the spooky effect.
If you prefer a different flavor, you can substitute vanilla or butterscotch pudding for the chocolate. For a more personalized touch, have kids write their own messages on the tombstones.
If you’re preparing these in advance, make sure to store them in the refrigerator, but only add the gummy worms and decorations right before serving to keep them fresh and visually appealing.
Haunted Haystack Cookies
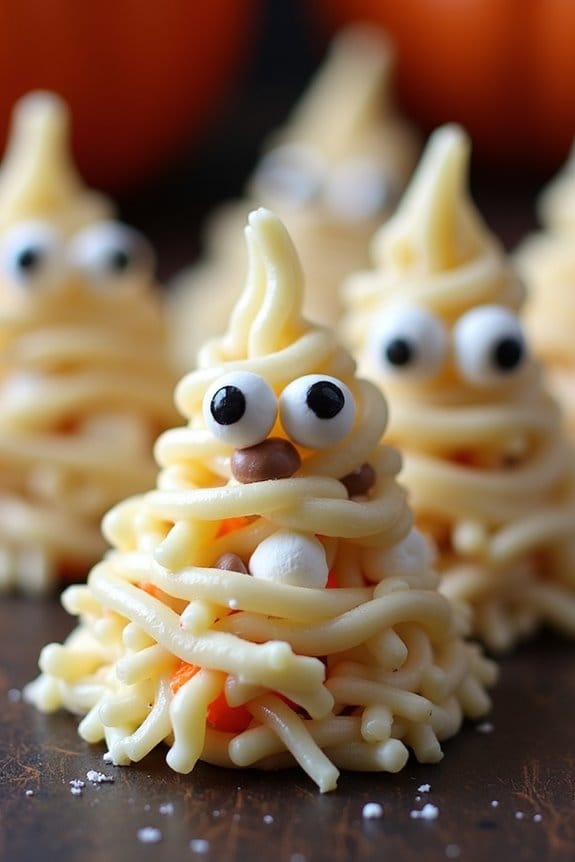
This recipe is ideal for serving 4-6 people and requires minimal ingredients and effort. The cookies take on a ghostly appearance with the help of white chocolate and candy eyes, bringing a playful element to your Halloween party table.
Whether you’re planning a big bash or a quiet family night in, these Haunted Haystack Cookies are sure to delight and satisfy your sweet tooth.
Ingredients for 4-6 people:
- 2 cups chow mein noodles
- 1 cup creamy peanut butter
- 1 cup white chocolate chips
- 1/2 cup semi-sweet chocolate chips
- 1/2 cup butterscotch chips
- 1/2 cup mini marshmallows
- Candy eyes for decoration
Cooking Instructions:
- Prepare the base: Begin by lining a baking sheet with parchment paper. This will prevent the cookies from sticking and make cleanup easier.
- Melt the mixture: In a large microwave-safe bowl, combine the white chocolate chips, semi-sweet chocolate chips, and butterscotch chips. Microwave in 30-second intervals, stirring well between each session, until the mixture is smooth and fully melted.
- Combine the ingredients: Add the creamy peanut butter to the melted chocolate mixture and stir until completely incorporated. The mixture should be smooth and creamy.
- Create the haystacks: Gently fold in the chow mein noodles and mini marshmallows until they’re thoroughly coated with the chocolate-peanut butter mixture.
- Shape the cookies: Using a tablespoon, scoop the mixture onto the prepared baking sheet, forming small mounds or “haystacks.” Leave enough space between each to guarantee they don’t stick together.
- Add the spooky touch: While the cookies are still soft, gently press candy eyes into the top of each mound to give your haystacks a haunting appearance.
- Cool and set: Allow the cookies to cool at room temperature for about 30 minutes, or until they’re firm. For a quicker set, you can place them in the refrigerator for 15 minutes.
Extra Tips:
For an added eerie effect, try using food coloring in the white chocolate to create different spooky shades such as green or purple.
You can also add other decorative items like sprinkles or candy corn to enhance the festive look. If you have a peanut allergy, substitute the peanut butter with almond or sunflower seed butter.
To make the cookies extra crunchy, toast the chow mein noodles lightly before mixing them with the chocolate. Enjoy these Haunted Haystack Cookies as a fun and frightful treat!
Skeleton Bone Breadsticks

Skeleton Bone Breadsticks are a spine-chilling yet delicious addition to any Halloween feast. These breadsticks aren’t only fun to make but also make for a great conversation starter at any Halloween party. Shaped like eerie bones, they’re crispy on the outside and soft on the inside, making them a perfect appetizer or a spooky side dish to serve with soups or pasta.
Creating Skeleton Bone Breadsticks is a fun activity for the whole family. The dough is simple to prepare, and shaping it into bone-like structures is a creative task that even kids will enjoy. Whether you’re hosting a Halloween gathering or simply want to surprise your loved ones with a themed dinner, these breadsticks are sure to impress.
Plus, they pair perfectly with a marinara dipping sauce, which adds a tangy contrast to the savory breadsticks.
Ingredients (serves 4-6 people):
- 1 package (1/4 ounce) active dry yeast
- 1 cup warm water (110°F to 115°F)
- 2 tablespoons sugar
- 2 tablespoons olive oil
- 1 teaspoon salt
- 3 cups all-purpose flour
- 2 tablespoons melted butter
- 1 tablespoon garlic powder
- 1 tablespoon Italian seasoning
- 1/4 cup grated Parmesan cheese
- Marinara sauce for dipping (optional)
Instructions:
- Activate the Yeast: In a large bowl, dissolve the yeast and sugar in warm water. Let it sit for about 5 minutes until the mixture becomes frothy, indicating that the yeast is activated.
- Prepare the Dough: Stir olive oil and salt into the yeast mixture. Gradually add the flour, one cup at a time, mixing until a soft dough forms. Turn the dough onto a floured surface and knead for about 6-8 minutes until smooth and elastic.
- Let the Dough Rise: Place the dough in a greased bowl, turning once to grease the top. Cover with a clean towel and let it rise in a warm place until doubled in size, about 1 hour.
- Shape the Breadsticks: Preheat your oven to 400°F (200°C). Punch down the risen dough and divide it into 16-20 equal pieces. Roll each piece into a 6-inch long strip. To create the bone shape, tie a loose knot at each end of the strip.
- Flavor the Breadsticks: Arrange the shaped dough on a parchment-lined baking sheet. Brush each breadstick with melted butter and sprinkle with garlic powder, Italian seasoning, and Parmesan cheese.
- Bake the Breadsticks: Bake in the preheated oven for 15-20 minutes or until golden brown. Keep an eye on them as baking times may vary depending on your oven.
- Serve and Enjoy: Allow the breadsticks to cool slightly before serving. Serve with a side of marinara sauce for dipping.
Extra Tips: For an extra spooky effect, you can use a toothpick to create cracks or lines in the breadsticks before baking, mimicking the texture of real bones. If you prefer a softer breadstick, cover them with aluminum foil for the last 5 minutes of baking.
You can also add a pinch of red pepper flakes to the seasoning for a bit of heat, or substitute the Parmesan with your favorite cheese for a different flavor profile. Enjoy these Skeleton Bone Breadsticks as a delightful Halloween treat!
