

As Halloween approaches, I’m beyond excited to share some spine-tingling party food ideas that will enchant your celebration. Picture a buffet filled with Witch’s Finger Breadsticks, Ghostly Deviled Eggs, and Mummy Jalapeño Poppers. Each dish is a delicious masterpiece, designed to delight and spook in equal measure. Get ready to turn your party into a haunted culinary adventure. Let’s uncover the mysterious menu together.
Witch’s Finger Breadsticks
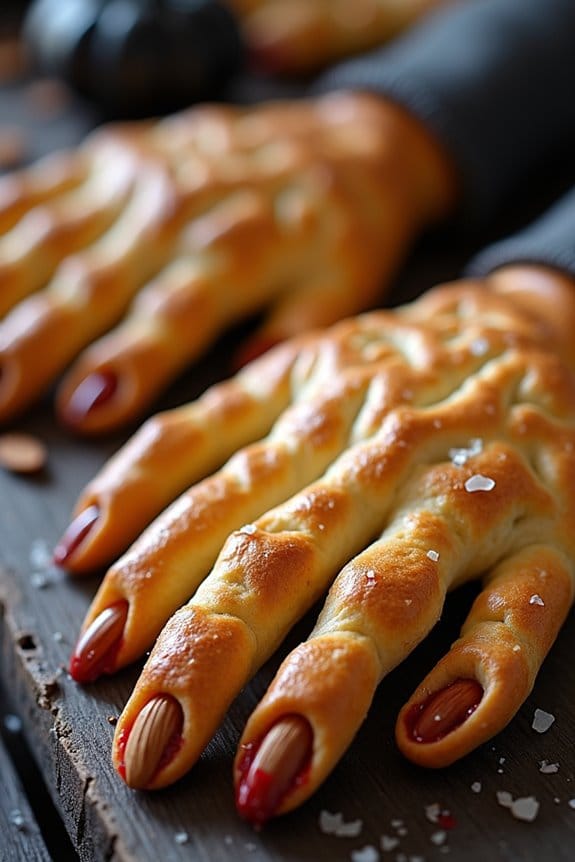
Witch’s Finger Breadsticks are a perfect addition to any Halloween party spread, offering a spooky yet delicious treat that guests of all ages will enjoy. These breadsticks aren’t only fun to make but also bring an eerie element to your table setting, mimicking gnarled witch fingers with precision.
With a golden, crispy exterior and a soft, chewy interior, Witch’s Finger Breadsticks are bound to be a hit, combining the whimsical fun of Halloween with a satisfying snack. Crafting these breadsticks is a creative process that allows you to incorporate simple ingredients in a unique way.
The dough is shaped into finger-like forms, complete with almond “fingernails” and knuckle lines to enhance the creepy effect. This recipe is suitable for serving 4-6 people, making it ideal for small gatherings or family celebrations. Whether you’re hosting a Halloween party or simply looking to entertain your kids with a themed snack, these Witch’s Finger Breadsticks are easy to prepare and certain to impress.
Ingredients:
- 2 cups all-purpose flour
- 1 packet (2 1/4 tsp) active dry yeast
- 3/4 cup warm water (110°F)
- 1 tablespoon sugar
- 1 teaspoon salt
- 2 tablespoons olive oil
- 1 egg, beaten (for egg wash)
- 10-12 whole almonds (for fingernails)
- 1 teaspoon sea salt (for sprinkling)
- Optional: red food coloring gel (for added effect)
Instructions:
- Prepare the Yeast Mixture: In a small bowl, combine the warm water, sugar, and yeast. Stir gently, and let the mixture sit for about 5-10 minutes until it becomes frothy, indicating the yeast is active.
- Mix the Dough: In a large mixing bowl, combine the flour and salt. Make a well in the center and pour in the yeast mixture and olive oil. Mix until a rough dough forms.
- Knead the Dough: Transfer the dough onto a lightly floured surface and knead for about 5-7 minutes until it becomes smooth and elastic. Form the dough into a ball.
- First Rise: Place the dough ball in a lightly oiled bowl, cover it with a damp cloth, and let it rise in a warm place for about 1 hour, or until it has doubled in size.
- Shape the Fingers: Preheat your oven to 375°F (190°C). Punch down the dough and divide it into 10-12 equal portions. Roll each portion into a finger-like shape, about 4-5 inches long. Press a whole almond firmly into one end to create a fingernail.
- Add Knuckle Details: Using a paring knife, gently score lines in the dough to resemble knuckles. For added effect, you can slightly bend the fingers to give them a more realistic appearance.
- Egg Wash and Salt: Place the shaped fingers on a baking sheet lined with parchment paper. Brush each finger with beaten egg and sprinkle a little sea salt over them for texture.
- Bake: Bake in the preheated oven for 15-18 minutes, or until the breadsticks are golden brown. Remove from the oven and cool slightly on a wire rack.
- Optional Decoration: If desired, use a small brush to add red food coloring gel around the almond “fingernail” for a bloody effect.
Extra Tips: For the most realistic-looking Witch’s Finger Breadsticks, consider using irregularly shaped almonds to mimic natural nails. You can also experiment with adding herbs like rosemary or garlic powder into the dough for extra flavor.
If you want to prepare the dough in advance, you can refrigerate it after the first rise, but allow it to come to room temperature before shaping the fingers. Finally, when baking, keep a close eye on the breadsticks to make sure they don’t brown too quickly, adjusting the oven temperature slightly if necessary.
Mummy Jalapeño Poppers
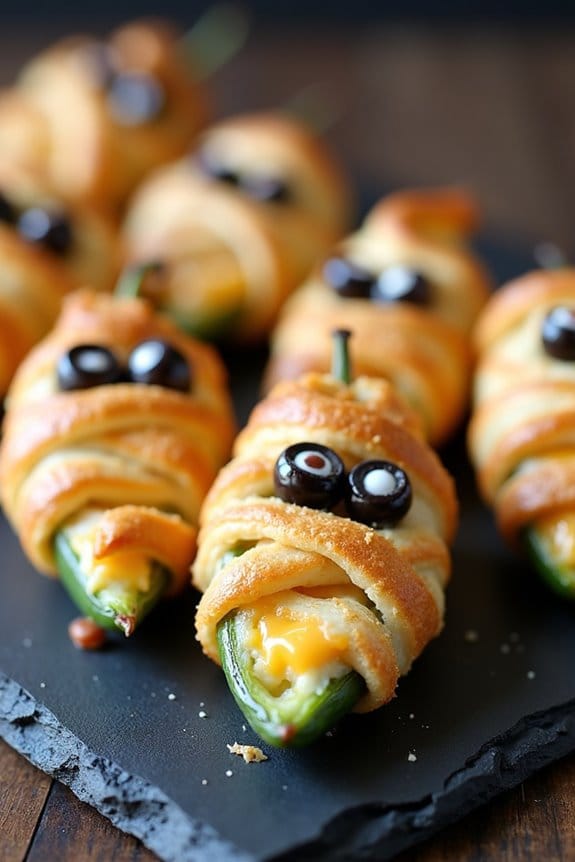
Mummy Jalapeño Poppers are the perfect spooky treat to serve at your Halloween-themed party. These flavorful bites combine the heat of jalapeños with creamy cheese and the buttery goodness of crescent rolls, all wrapped up in a fun, mummy-like appearance. Not only are they delicious, but they also add a festive touch to your buffet table, making them a hit with both kids and adults alike.
The perfect spooky treat, combining jalapeño heat, creamy cheese, and buttery crescent rolls in a fun, mummy appearance.
To create these mummy poppers, you’ll need to hollow out fresh jalapeños and stuff them with a cheesy filling before wrapping them with strips of crescent roll dough. Once baked to golden perfection, these poppers look like adorable little mummies with eyes made from edible decorations like sliced olives or candy eyeballs. This recipe serves 4-6 people, making it a great appetizer or snack for your Halloween gathering.
Ingredients:
- 12 fresh jalapeños
- 8 ounces cream cheese, softened
- 1 cup shredded cheddar cheese
- 1 teaspoon garlic powder
- 1 teaspoon onion powder
- 1/2 teaspoon smoked paprika
- Salt and pepper to taste
- 1 can (8 ounces) crescent roll dough
- 24 candy eyeballs or small slices of black olives
Cooking Instructions:
- Prepare Jalapeños: Preheat your oven to 375°F (190°C). Slice each jalapeño in half lengthwise and remove seeds and membranes with a small spoon or paring knife. Be sure to wear gloves to protect your hands from the capsaicin in jalapeños.
- Make the Filling: In a medium bowl, combine the softened cream cheese, shredded cheddar cheese, garlic powder, onion powder, smoked paprika, salt, and pepper. Mix until well blended and smooth.
- Stuff the Jalapeños: Using a small spoon or piping bag, fill each jalapeño half with the cheese mixture, mounding it slightly over the edges.
- Wrap with Dough: Unroll the crescent roll dough and cut it into thin strips, about 1/4 inch wide. Wrap each stuffed jalapeño with the dough strips, leaving a small space to attach the eyes later. Use excess dough to create a mummy-like pattern.
- Bake the Poppers: Place the wrapped jalapeños on a baking sheet lined with parchment paper. Bake in the preheated oven for 15-20 minutes or until the dough is golden brown and crispy.
- Add the Eyes: Remove the poppers from the oven and allow them to cool for a few minutes. Press the candy eyeballs or olive slices onto the top of each popper to create the mummy eyes.
Extra Tips:
When handling jalapeños, using gloves is essential to prevent irritation from the spicy oils. If you prefer less heat, you can use milder peppers like mini sweet peppers.
For a fun twist, try adding some cooked bacon bits or chopped chives to the cheese filling. If you’re short on time, pre-made puff pastry sheets can be used instead of crescent roll dough.
Be sure to keep an eye on the poppers while baking, as different ovens may vary in cooking time.
Ghostly Deviled Eggs

Ghostly Deviled Eggs are a fun and spooky twist on the classic appetizer, perfect for your Halloween-themed party. These eerie snacks are as delicious as they’re visually enchanting, with a creamy, tangy filling and a ghostly appearance that will delight both kids and adults. The secret to achieving the ghostly look lies in using black olives to create hauntingly cute faces, making these eggs not just a treat for the taste buds but also a feast for the eyes.
This recipe serves 4-6 people and is easy to prepare, ensuring that you can whip up a batch without any hassle. The combination of mayonnaise, mustard, and vinegar creates a smooth and flavorful filling, while the olives add a touch of spookiness. Whether you’re hosting a Halloween party or simply want to surprise your family with a themed snack, Ghostly Deviled Eggs will surely be a hit.
Ingredients (Serves 4-6):
- 6 large eggs
- 3 tablespoons mayonnaise
- 1 teaspoon Dijon mustard
- 1 teaspoon white vinegar
- Salt and pepper, to taste
- Black olives (pitted)
Instructions:
- Boil the Eggs: Place the eggs in a saucepan and cover them with water. Bring the water to a boil over medium-high heat. Once boiling, cover the pan with a lid, remove it from heat, and let the eggs sit for about 10-12 minutes.
- Cool and Peel: Drain the hot water and transfer the eggs to an ice bath to cool them quickly. Once cooled, peel the eggs carefully to keep the whites intact.
- Prepare the Filling: Slice the eggs in half lengthwise and gently remove the yolks, placing them in a mixing bowl. To the yolks, add mayonnaise, Dijon mustard, and white vinegar. Season with salt and pepper, and mix until smooth and creamy.
- Fill the Eggs: Spoon or pipe the yolk mixture back into the egg white halves, filling them generously.
- Create Ghost Faces: Slice the black olives into small pieces and use them to create eyes and mouths on each filled egg, giving them a ghostly appearance.
- Serve: Arrange the Ghostly Deviled Eggs on a platter and serve immediately or refrigerate until ready to serve.
Extra Tips:
For an extra spooky touch, consider placing the Ghostly Deviled Eggs on a bed of greens or kale to mimic a graveyard scene.
When preparing the egg yolk filling, make sure it’s smooth by mashing the yolks thoroughly before adding other ingredients.
If you prefer a spicier version, add a dash of hot sauce or a pinch of cayenne pepper to the yolk mixture.
Finally, make sure the olives are well-drained to prevent any excess moisture from affecting the appearance of the ghost faces.
Pumpkin Cheese Ball

The Pumpkin Cheese Ball is a delightful and festive addition to any Halloween-themed party. This dish not only embodies the spirit of the season with its pumpkin-like appearance but also delivers a creamy and savory flavor that guests will love. Ideal for serving as an appetizer, this cheese ball is crafted to resemble a small pumpkin, complete with a pretzel stick stem, making it a charming centerpiece for your party spread. The combination of cream cheese, cheddar cheese, and spices creates a rich and flavorful treat that pairs perfectly with crackers or fresh vegetables.
A festive, creamy, and savory pumpkin-inspired appetizer perfect for Halloween gatherings.
Creating the Pumpkin Cheese Ball is a simple yet rewarding process that requires minimal ingredients and effort. With a mix of cheeses, spices, and a bit of creativity, you can craft a dish that’s as pleasing to the eye as it’s to the palate. This recipe serves 4-6 people, making it perfect for small gatherings or as part of a larger buffet. By following the steps below, you’ll be able to assemble this visually appealing and tasty appetizer in no time.
Ingredients:
- 16 oz cream cheese, softened
- 2 cups sharp cheddar cheese, shredded
- 1 tablespoon Worcestershire sauce
- 1 teaspoon garlic powder
- 1 teaspoon onion powder
- 1 teaspoon smoked paprika
- 1/2 teaspoon salt
- 1/4 teaspoon black pepper
- 1/4 cup finely chopped chives
- 1/4 cup finely chopped pecans
- 1 pretzel rod (for stem)
- Crackers and vegetables for serving
Cooking Instructions:
- Prepare the Cheese Mixture: In a large mixing bowl, combine the softened cream cheese, shredded cheddar cheese, Worcestershire sauce, garlic powder, onion powder, smoked paprika, salt, and black pepper. Mix thoroughly until all ingredients are well incorporated and the mixture is smooth.
- Shape the Cheese Ball: Transfer the cheese mixture onto a piece of plastic wrap. Using your hands, mold the mixture into a round ball shape. Wrap the plastic tightly around the ball to maintain its shape, and refrigerate for at least 2 hours or until firm.
- Create the Pumpkin Look: Once the cheese ball is firm, remove it from the refrigerator. Unwrap and gently press the sides to form a more defined pumpkin shape. Use a butter knife or a spoon to create vertical grooves around the ball, mimicking the appearance of a pumpkin.
- Add the Finishing Touches: Roll the cheese ball in a mixture of finely chopped chives and pecans, pressing gently to make sure they adhere to the surface. Insert a pretzel rod into the top center of the cheese ball to represent the pumpkin’s stem.
- Serve and Enjoy: Place the Pumpkin Cheese Ball on a serving platter surrounded by an assortment of crackers and fresh vegetables. Serve immediately or refrigerate until ready to serve.
Extra Tips:
To guarantee your Pumpkin Cheese Ball holds its shape well, make sure the cream cheese is sufficiently softened before mixing. This will allow for easier blending and smoother consistency.
If you’re preparing this dish ahead of time, keep it wrapped in plastic wrap until just before serving to maintain freshness. You can experiment with different coatings, such as crushed nuts or herbs, to add variety to the presentation.
Adjust the spices to your taste preferences, and feel free to add a dash of hot sauce for a spicy kick if desired.
Monster Eye Tacos

Monster Eye Tacos are a spooky and fun twist on traditional tacos, perfect for adding a touch of whimsy to your Halloween party spread. These tacos aren’t only delicious but also visually intriguing, as they resemble eerie monster eyes staring back at you from the plate. The combination of seasoned ground beef, vibrant toppings, and cleverly crafted “eyeballs” made from olives and cheese make these tacos a hit among both kids and adults.
Whether you’re hosting a Halloween bash or simply want to surprise your family with a themed dinner, Monster Eye Tacos are bound to be a crowd-pleaser.
The preparation of Monster Eye Tacos involves crafting each taco with attention to detail to guarantee they maintain their spooky appearance. The “eyes” of the monster tacos are created using slices of cheese and black olives, adding an unexpected twist to the classic taco look. The tacos are assembled with flavorful ingredients, providing a delightful mix of textures and tastes.
These tacos aren’t only a visual treat but also a feast for the taste buds, combining savory, spicy, and fresh flavors in every bite. Here’s how you can make Monster Eye Tacos for 4-6 people:
Ingredients:
- 1 pound ground beef
- 1 packet taco seasoning
- 1 cup water
- 8-12 taco shells
- 1 cup shredded lettuce
- 1 cup diced tomatoes
- 1 cup shredded cheddar cheese
- 1/2 cup sour cream
- 12-18 black olives, pitted
- 12-18 small round cheese slices (such as mozzarella or provolone)
- 1/4 cup sliced jalapeños (optional, for added spiciness)
Cooking Instructions:
- Cook the Ground Beef: In a large skillet over medium heat, cook the ground beef until browned, breaking it apart with a spatula. Once cooked, drain the excess fat.
- Season the Beef: Add the taco seasoning and water to the cooked ground beef. Stir well to combine and let it simmer for about 5 minutes, or until the sauce thickens.
- Prepare the Toppings: While the beef is simmering, prepare the toppings. Shred the lettuce, dice the tomatoes, and set them aside. Slice the cheese into small rounds, approximately the size of the olives.
- Assemble the Tacos: Warm the taco shells according to package instructions. Fill each shell with the seasoned beef, followed by a layer of shredded lettuce and diced tomatoes.
- Create the Monster Eyes: Place a cheese slice on top of the taco fillings, then position an olive in the center of each cheese slice to create the “eye.” If desired, add a slice of jalapeño as a pupil for extra spookiness.
- Finish with Cheese and Sour Cream: Sprinkle shredded cheddar cheese over the top and add a dollop of sour cream for extra creaminess.
- Serve and Enjoy: Arrange the Monster Eye Tacos on a platter and serve immediately while they’re still warm.
Extra Tips:
To enhance the spooky aesthetic of your Monster Eye Tacos, consider using different colored cheese slices for a more vibrant look. You can also experiment with additional toppings like guacamole or salsa for added flavor.
If you’re serving these tacos to children, you might want to use mild taco seasoning and skip the jalapeños to avoid making them too spicy. Finally, for a vegetarian option, substitute the ground beef with seasoned black beans or a meat substitute of your choice.
Spider Web Taco Dip
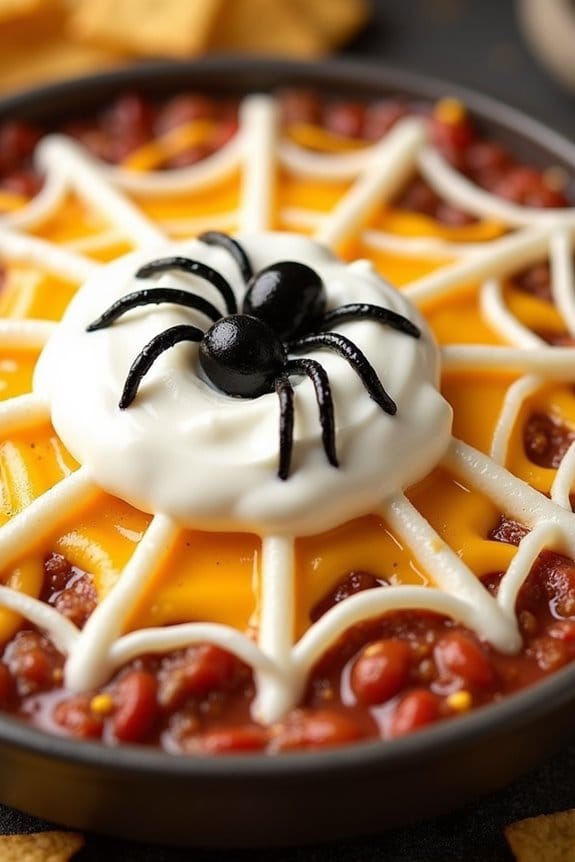
Spider Web Taco Dip is the perfect festive appetizer for your Halloween-themed party. This spooky dish isn’t only delicious but also visually appealing, with a creamy base topped with a web of sour cream and creepy little olive “spiders.” The flavors of this dip are inspired by traditional Mexican cuisine, combining layers of refried beans, seasoned ground beef, and a blend of cheeses. It’s a crowd-pleaser that will have your guests coming back for more.
This dip is easy to assemble and can be prepared in advance, making it a convenient choice for busy hosts. The spider web design on top adds a fun and eerie touch that’s sure to impress both kids and adults. Serve it with tortilla chips or fresh veggies for a complete Halloween experience. Whether you’re hosting a large gathering or a small get-together, this dip will make a fantastic addition to your spooky spread.
Ingredients for Spider Web Taco Dip (serves 4-6):
- 1 lb ground beef
- 1 packet taco seasoning mix
- 1 cup refried beans
- 1 cup salsa
- 1 cup shredded cheddar cheese
- 1 cup shredded Monterey Jack cheese
- 1 cup sour cream
- 1/2 cup sliced black olives
- Tortilla chips, for serving
Cooking Instructions:
- Brown the Beef: In a large skillet, cook the ground beef over medium heat until it’s browned and no longer pink. Drain any excess fat from the skillet.
- Season the Beef: Add the taco seasoning mix to the cooked beef along with 1/4 cup of water. Stir well to combine, and let it simmer for about 5 minutes until the mixture thickens.
- Assemble the Dip Base: In a serving dish or a shallow baking dish, spread an even layer of refried beans. This will be the base of your taco dip.
- Add the Beef Layer: Spoon the seasoned ground beef over the refried beans, spreading it evenly across the dish.
- Layer the Salsa: Pour the salsa over the beef layer, spreading it evenly.
- Add Cheese: Sprinkle the shredded cheddar and Monterey Jack cheese evenly over the salsa layer.
- Create the Spider Web: Fill a small piping bag or a resealable plastic bag with the sour cream. Cut a small hole in the tip of the bag and pipe concentric circles over the top of the dip. Use a toothpick to drag lines from the center to the edges, creating a web-like pattern.
- Finish with Olives: Cut a few black olive slices in half and place them on the dip to resemble spiders, using small pieces for legs.
- Chill Until Serving: Refrigerate the dip for at least 30 minutes to let the flavors meld. Serve with tortilla chips.
Extra Tips:
When creating the spider web design, verify the sour cream is at room temperature for easier piping. If you don’t have a piping bag, a plastic sandwich bag with a small corner cut off works well as a substitute.
For added flavor, consider adding layers of guacamole or chopped green onions. To make it vegetarian, simply skip the ground beef and increase the amount of beans or add some sautéed vegetables.
Bloody Mary Shrimp Cocktails
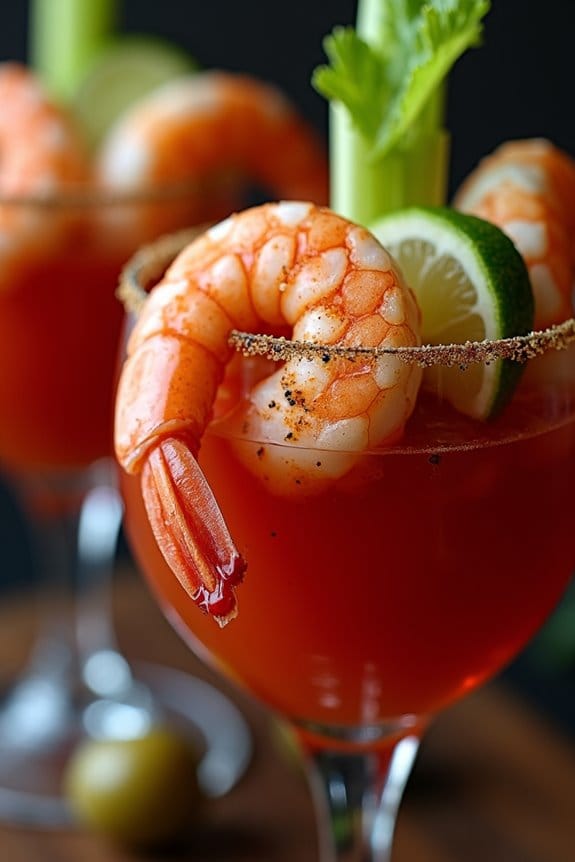
Elevate your Halloween party with a spine-chilling appetizer that will both surprise and delight your guests: Bloody Mary Shrimp Cocktails. This vibrant and flavorful dish combines the classic flavors of a Bloody Mary with succulent shrimp, delivering a sophisticated yet eerie treat.
Perfect for a crowd, these cocktails offer a revitalizing and spicy kick, complemented by the tender, juicy shrimp. Served in individual cocktail glasses, they make for a devilishly good presentation that will have everyone reaching for more.
A tantalizing blend of spice and elegance, these cocktails are the ultimate Halloween party treat.
The Bloody Mary Shrimp Cocktails aren’t only delicious but also versatile. You can adjust the spice level to suit your guests’ preferences, making it as mild or as fiery as you like. The cocktail sauce, infused with vodka and a hint of horseradish, brings a unique twist to the traditional shrimp cocktail, while the addition of fresh lime juice and celery salt adds a zesty, savory flavor.
For an extra touch of Halloween spirit, consider garnishing with spooky accompaniments like celery stalk “broomsticks” or olive “eyeballs.”
Ingredients for 4-6 servings:
- 1 pound large shrimp, peeled and deveined
- 1 cup vodka
- 1 cup tomato juice
- 2 tablespoons Worcestershire sauce
- 2 tablespoons prepared horseradish
- 1 tablespoon hot sauce
- 1 tablespoon lemon juice
- 1 teaspoon celery salt
- 1 teaspoon black pepper
- 1 teaspoon smoked paprika
- 1 lime, cut into wedges
- Celery stalks, for garnish
- Green olives, for garnish
Cooking Instructions:
- Prepare the Shrimp: Fill a large pot with water and bring it to a boil. Add the shrimp and cook for 2-3 minutes, or until they’re pink and opaque. Drain the shrimp and transfer them to an ice bath to stop the cooking process. Once chilled, drain the shrimp again and set aside.
- Make the Cocktail Sauce: In a mixing bowl, combine the vodka, tomato juice, Worcestershire sauce, horseradish, hot sauce, lemon juice, celery salt, black pepper, and smoked paprika. Stir well to confirm all ingredients are thoroughly mixed.
- Assemble the Cocktails: Divide the cocktail sauce evenly among 4-6 individual cocktail glasses. Arrange the cooked shrimp around the rim of each glass.
- Garnish: Garnish each cocktail with a lime wedge, a celery stalk, and a couple of green olives. For a Halloween touch, you can use a toothpick to attach two olives together to resemble eyes.
- Serve: Serve the Bloody Mary Shrimp Cocktails chilled, encouraging guests to squeeze their lime wedge over the shrimp for added zest.
Extra Tips:
When preparing Bloody Mary Shrimp Cocktails, consider making the cocktail sauce a day in advance to allow the flavors to meld and intensify. If you prefer a non-alcoholic version, simply omit the vodka and adjust the tomato juice quantity.
For added flair, rim the glasses with a mixture of celery salt and smoked paprika before filling them with the cocktail sauce. If you want to save some time, pre-cooked shrimp can be used, but be sure to rinse them thoroughly before serving to maintain freshness.
Graveyard Meatloaf
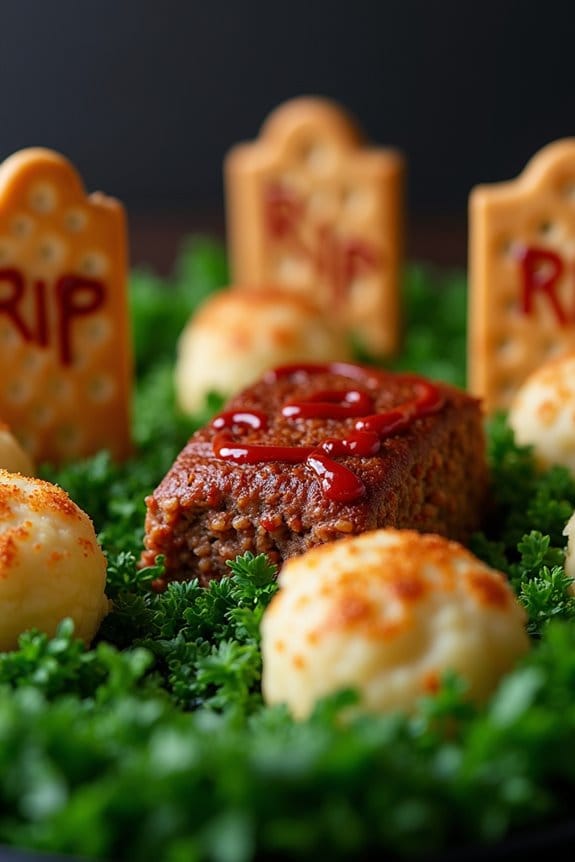
Graveyard Meatloaf is the perfect spooky centerpiece for your Halloween-themed party. This dish combines the classic comfort of meatloaf with a ghoulish twist, turning your dinner table into a creepy yet delicious graveyard scene. The meatloaf itself is succulent and flavorful, while the creative decoration transforms it into an eerie graveyard, complete with tombstones and edible grass. Not only is it a culinary delight, but it also serves as a conversation starter that will surely impress your guests.
Crafting a Graveyard Meatloaf is both fun and simple. It involves shaping your meatloaf into a rectangular form to mimic the look of a graveyard, then decorating it with mashed potato mounds, cracker tombstones, and parsley or spinach for grass. You can get as creative as you like with the decorations, adding ketchup or barbecue sauce for a blood-like effect or using olives to mimic creepy crawlies. Designed to serve 4-6 people, this dish is about equal parts artistry and deliciousness, making it a memorable addition to your Halloween festivities.
Ingredients for 4-6 People:
- 2 lbs ground beef
- 1 cup breadcrumbs
- 1/2 cup finely chopped onion
- 2 cloves garlic, minced
- 1/4 cup milk
- 2 eggs
- 1/4 cup ketchup (plus extra for decoration)
- 2 tbsp Worcestershire sauce
- 1 tsp salt
- 1/2 tsp black pepper
- 1 tsp dried thyme
- 1/2 cup mashed potatoes (for decoration)
- 6 rectangular crackers (for tombstones)
- Fresh parsley or spinach leaves (for grass decoration)
Cooking Instructions:
- Preheat and Prepare: Preheat your oven to 350°F (175°C). Lightly grease a baking dish or line it with parchment paper.
- Mix the Meatloaf Ingredients: In a large bowl, combine the ground beef, breadcrumbs, chopped onion, garlic, milk, eggs, ketchup, Worcestershire sauce, salt, pepper, and thyme. Mix everything thoroughly using your hands or a spatula until all ingredients are well incorporated.
- Shape the Meatloaf: Transfer the meat mixture into the prepared baking dish and shape it into a rectangular loaf, which will serve as the “graveyard” base.
- Bake the Meatloaf: Place the baking dish in the preheated oven and bake for 60-75 minutes, or until the meatloaf is cooked through and reaches an internal temperature of 160°F (71°C).
- Create the Graveyard Scene: Once the meatloaf is cooked, remove it from the oven and let it rest for about 10 minutes. Use mashed potatoes to create small mounds on top of the meatloaf, resembling freshly dug graves.
- Decorate with Tombstones and Grass: Insert the rectangular crackers into the mashed potato mounds to mimic tombstones. Use ketchup to write “RIP” or draw spooky symbols on the crackers. Garnish around the meatloaf with parsley or spinach to create the appearance of grass.
- Serve and Enjoy: Carefully transfer the decorated meatloaf to a serving platter and present your creepy creation to your guests.
Extra Tips:
For an extra eerie effect, consider using food coloring to dye the mashed potatoes a ghastly green or purple. If you want to add more detail to your graveyard, use black olives cut into spider shapes or small candy eyes scattered around.
Adjust the seasoning to your preference by adding more garlic or experimenting with different herbs. Remember, the key to a great Graveyard Meatloaf is in the presentation, so have fun and let your creativity run wild!
Vampire Bat Wings
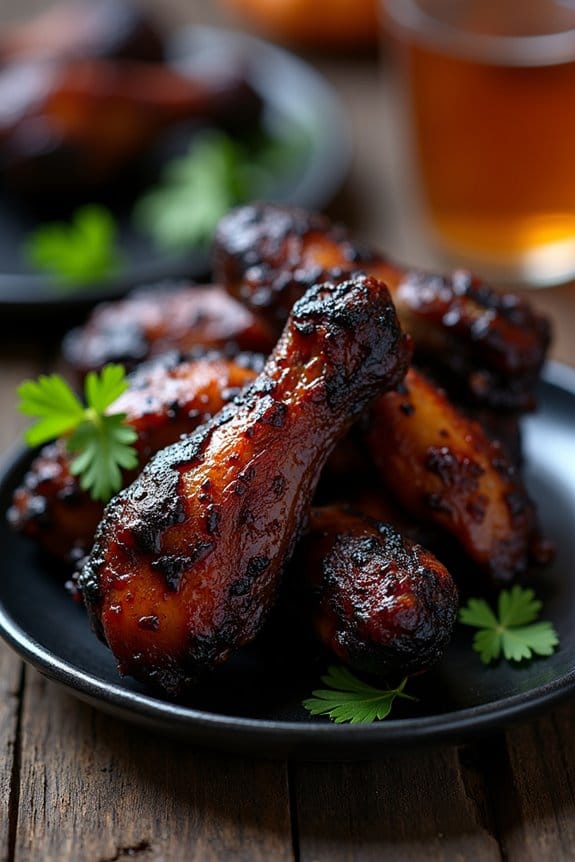
Transform your Halloween party into a spooktacular event with these deliciously eerie Vampire Bat Wings. These wings aren’t only visually appealing with their dark and mysterious hue, but they’re also packed with bold flavors that will leave your guests craving more. Perfect for a festive gathering, these wings are marinated in a mixture of soy sauce, garlic, and spices, then baked until perfectly crispy, making them a delectable addition to your Halloween-themed spread.
The key to achieving the dark, vampiric appearance of these wings is in the marinade. By using a combination of dark soy sauce and a touch of black food coloring, you can create a dramatic effect that’s sure to catch the eye of your guests. The marinade infuses the chicken with rich flavors, while the baking process guarantees a crispy texture that contrasts beautifully with the tender meat inside. Serve these wings with a side of your favorite dipping sauce, and watch as they disappear as quickly as a bat into the night.
Ingredients for 4-6 servings:
- 2 pounds chicken wings
- 1/2 cup dark soy sauce
- 1 tablespoon honey
- 1 tablespoon hoisin sauce
- 2 teaspoons black food coloring
- 4 cloves garlic, minced
- 1 teaspoon ground ginger
- 1 teaspoon smoked paprika
- 1/2 teaspoon black pepper
- 1/2 teaspoon salt
- 2 tablespoons vegetable oil
- Fresh parsley or cilantro for garnish (optional)
Cooking Instructions:
- Prepare the Marinade: In a large mixing bowl, combine the dark soy sauce, honey, hoisin sauce, black food coloring, minced garlic, ground ginger, smoked paprika, black pepper, and salt. Mix well until all ingredients are thoroughly combined.
- Marinate the Wings: Add the chicken wings to the bowl and toss them in the marinade, making certain they’re fully coated. Cover the bowl with plastic wrap and refrigerate for at least 2 hours, or preferably overnight, to allow the flavors to penetrate the meat.
- Preheat the Oven: Preheat your oven to 400°F (200°C) and line a baking sheet with aluminum foil or parchment paper to prevent sticking and make for easier cleanup.
- Arrange the Wings: Remove the wings from the marinade and arrange them in a single layer on the prepared baking sheet. Drizzle the vegetable oil over the wings to help them crisp up during baking.
- Bake the Wings: Place the baking sheet in the preheated oven and bake for 30-35 minutes, flipping the wings halfway through, until they’re cooked through and have a crispy exterior.
- Garnish and Serve: Once cooked, remove the wings from the oven and let them cool for a few minutes. Garnish with chopped fresh parsley or cilantro if desired and serve with your favorite dipping sauce.
Extra Tips:
For the perfect Vampire Bat Wings, make sure to marinate the wings for at least a few hours to allow the flavors to fully develop. If you’re short on time, you can enhance the marinade‘s effect by gently scoring the wings with a knife before marinating. This will help the sauce penetrate deeper into the meat.
Adjust the amount of black food coloring to achieve your desired level of darkness. If you prefer spicier wings, consider adding a dash of hot sauce or cayenne pepper to the marinade for an extra kick.
Creepy Crawly Pasta Salad
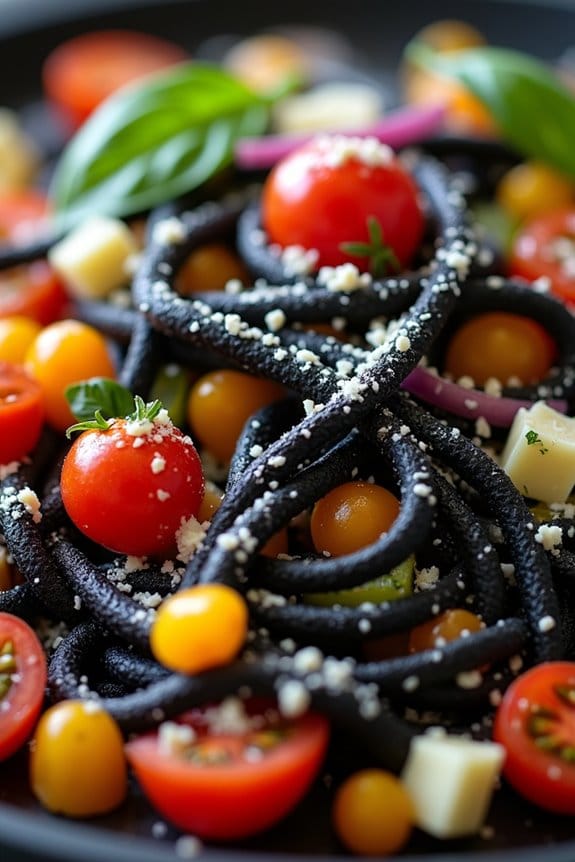
Creepy Crawly Pasta Salad is the perfect dish to spook up your Halloween party while tantalizing your guests’ taste buds. This eerie creation combines black pasta, fresh vegetables, and a hauntingly delicious dressing to create a salad that looks like it belongs in a haunted house. The black pasta resembles creepy crawly creatures, making it an ideal addition to your Halloween table. The vibrant colors from the vegetables contrast beautifully with the dark pasta, creating a visually striking dish.
This recipe isn’t only fun to make, but it’s also packed with flavor and nutrition. By using fresh ingredients and a homemade dressing, you can guarantee your guests enjoy a healthy and tasty meal amidst the Halloween festivities. The Creepy Crawly Pasta Salad can be prepared in advance, allowing you to focus on other party preparations. It’s a versatile dish that can be served as a side or a main course, depending on your party menu.
Ingredients (serves 4-6):
- 12 oz black squid ink pasta (or any black-colored pasta)
- 1 cup cherry tomatoes, halved
- 1 cup black olives, sliced
- 1/2 cup red bell pepper, diced
- 1/2 cup yellow bell pepper, diced
- 1 small red onion, thinly sliced
- 1/4 cup fresh basil leaves, chopped
- 1/4 cup grated Parmesan cheese
- 1/4 cup olive oil
- 2 tablespoons balsamic vinegar
- 1 clove garlic, minced
- Salt and pepper to taste
Cooking Instructions:
- Cook the Pasta: Bring a large pot of salted water to a boil. Add the black pasta and cook according to the package instructions until al dente. Drain and rinse under cold water to stop the cooking process. Set aside.
- Prepare the Vegetables: While the pasta is cooking, prepare the vegetables. Halve the cherry tomatoes, slice the olives, dice the bell peppers, and thinly slice the red onion. Chop the fresh basil leaves.
- Make the Dressing: In a small bowl, whisk together the olive oil, balsamic vinegar, minced garlic, salt, and pepper until well combined.
- Combine Ingredients: In a large mixing bowl, combine the cooked and cooled pasta, cherry tomatoes, black olives, red and yellow bell peppers, red onion, and basil leaves. Pour the dressing over the salad and toss gently to coat all ingredients evenly.
- Garnish and Serve: Transfer the pasta salad to a serving dish and sprinkle with grated Parmesan cheese. Serve immediately or refrigerate for up to two hours to let the flavors meld before serving.
Extra Tips: For an extra creepy effect, consider adding edible black food-safe glitter to the pasta for a glossy, eerie shine. If squid ink pasta isn’t available, use regular pasta and add a few drops of black food coloring to the cooking water. This salad can easily be made vegan by omitting the Parmesan cheese or using a vegan cheese alternative. Adjust the seasoning to your liking, and feel free to add any other Halloween-themed garnishes, like edible eyes or gummy worms, for an added spooky touch.
Ghoulish Guacamole
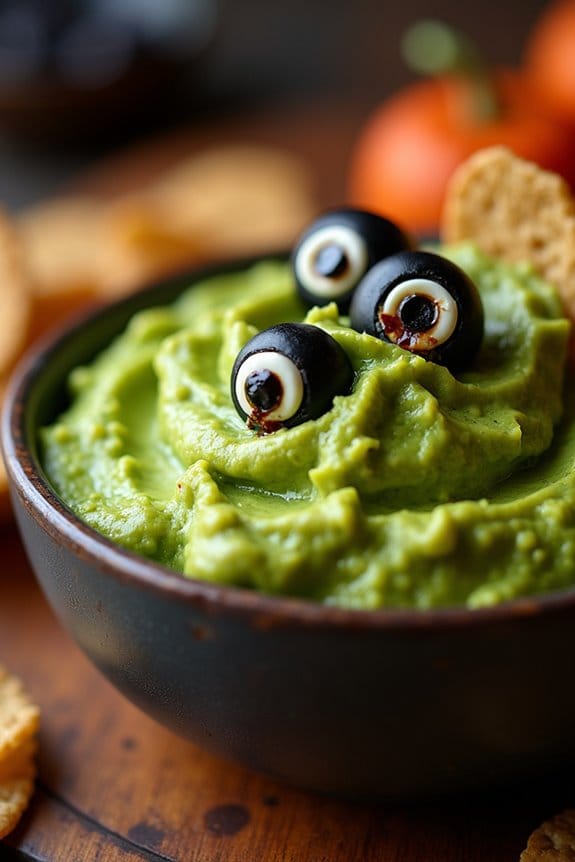
Transform your traditional guacamole into a spooky sensation with this Ghoulish Guacamole recipe, perfect for any Halloween-themed party. This dish combines the creamy texture of ripe avocados with the vibrant flavors of fresh lime juice, cilantro, and a hint of jalapeño for a little kick.
To give it a spooky twist, we’ll top it with edible eyes, made from sliced olives and cheese, so it looks like a bubbling cauldron of green goo with eerie peepers staring back at your guests.
This Ghoulish Guacamole not only provides a visually thrilling centerpiece for your snack table but also serves as a deliciously healthy option amidst the sweet treats of Halloween. With just a handful of ingredients, you can whip up a batch in no time and watch as it becomes the talk of the party.
Perfect for dipping with tortilla chips or serving with your favorite Halloween-themed appetizers, this guacamole will guarantee your celebration is both fun and frightfully tasty.
Ingredients (Serves 4-6):
- 4 ripe avocados
- 1 medium lime, juiced
- 1 small red onion, finely chopped
- 2 small tomatoes, diced
- 1 jalapeño pepper, seeded and minced
- 2 garlic cloves, minced
- 1/4 cup fresh cilantro, chopped
- Salt and pepper to taste
- 8 black olives, sliced
- 1 small block of mozzarella cheese
Instructions:
- Prepare the Avocados: Slice the avocados in half, remove the pits, and scoop the flesh into a mixing bowl. Use a fork or potato masher to mash the avocados to your desired consistency, whether you prefer it chunky or smooth.
- Add Lime Juice: Immediately pour the freshly squeezed lime juice over the mashed avocados to prevent browning and to enhance the flavor.
- Mix in Vegetables and Seasoning: Add the finely chopped red onion, diced tomatoes, minced jalapeño, and minced garlic to the avocado. Stir well to combine.
- Add Cilantro and Season: Gently fold in the chopped cilantro, then season the guacamole with salt and pepper according to your taste preference.
- Create Edible Eyes: Slice the mozzarella cheese into small circles to fit on top of the olive slices. Place a cheese circle onto each olive slice to create the “eyeballs.”
- Decorate the Guacamole: Spoon the guacamole into a serving bowl and strategically place the “eyeballs” on top, pressing them slightly into the guacamole so they appear as if they’re peering out.
- Serve: Serve immediately with a side of tortilla chips or as a topping for your favorite Halloween-themed dishes.
Extra Tips:
For an even spookier presentation, consider serving the Ghoulish Guacamole in a hollowed-out pumpkin or a bowl surrounded by dry ice for a foggy effect.
If you prefer a milder guacamole, you can omit the jalapeño or replace it with a milder pepper.
To keep your guacamole fresh for longer, cover it tightly with plastic wrap, pressing it directly onto the surface of the guacamole to minimize air exposure.
Enjoy your Halloween festivities with this deliciously eerie dip!
Eyeball Caprese Bites
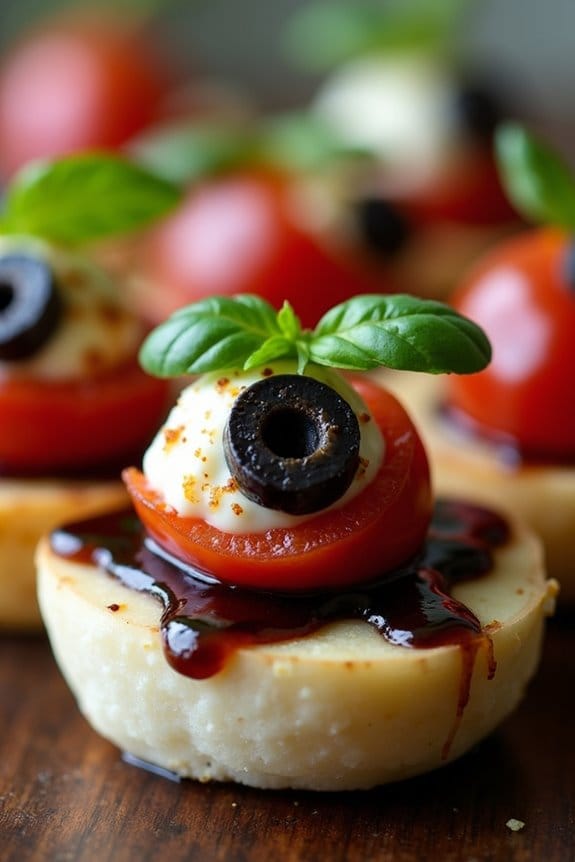
Eyeball Caprese Bites are a spooktacular twist on the classic Italian Caprese salad, perfect for setting a creepy yet delicious tone at your Halloween-themed party. These bite-sized treats are both visually striking and tantalizingly tasty, making them an ideal appetizer for guests to enjoy. The combination of fresh mozzarella, ripe cherry tomatoes, and fragrant basil creates a familiar flavor profile, while the addition of olive slices gives them the eerie appearance of tiny eyeballs. This playful presentation is sure to be a hit with both kids and adults, adding a touch of whimsy to your festive spread.
Preparing Eyeball Caprese Bites is a straightforward process that requires minimal time and effort, making it an excellent choice for busy hosts. The ingredients are fresh and simple, guaranteeing that the flavors are vibrant and authentic. The key to achieving the perfect balance of flavors is to use high-quality ingredients, such as fresh mozzarella and vine-ripened tomatoes. With a few easy steps, you can transform these classic ingredients into a ghoulishly delightful snack that will have your guests coming back for more.
Ingredients (Serves 4-6):
- 20 fresh mozzarella balls (bocconcini)
- 20 cherry tomatoes
- 20 fresh basil leaves
- 20 black olive slices
- 2 tablespoons balsamic glaze
- Salt and pepper to taste
- 20 toothpicks or small skewers
Cooking Instructions:
- Prepare Ingredients: Begin by rinsing the cherry tomatoes and basil leaves under cold water. Pat them dry with a paper towel to remove excess moisture. Drain the fresh mozzarella balls and set them aside.
- Assemble the Bites: Take a toothpick or small skewer and thread it with one mozzarella ball. Follow this with a fresh basil leaf, then a cherry tomato. Confirm the tomato is at the top of the skewer with the mozzarella ball at the bottom.
- Create the Eyeball Effect: Cut a small slice off the top of each cherry tomato to reveal the inside. Place a slice of black olive on the exposed part of the tomato. This will create the appearance of a pupil on an eyeball.
- Season and Garnish: Arrange the skewers on a serving platter. Drizzle the balsamic glaze over the assembled bites. Sprinkle with a pinch of salt and pepper to enhance the flavors.
- Serve: Present the Eyeball Caprese Bites as a centerpiece on your party table, allowing guests to help themselves.
For an extra touch, consider using a variety of tomato colors, such as yellow or orange, to create a more diverse and eye-catching platter. If you prefer a more intense flavor, marinate the mozzarella balls in a mixture of olive oil, garlic, and herbs for a few hours before assembly.
Additionally, using a high-quality balsamic glaze will elevate the overall taste, providing a sweet and tangy contrast to the savory ingredients. Remember, these bites are best served fresh, so prepare them shortly before your guests arrive to guarantee the highest quality and freshness.
Witch’s Brew Punch

Halloween is the perfect time to let your culinary creativity flow with spooky and fun treats. Among the various party foods that you can prepare, a Witch’s Brew Punch will surely stand out and enchant your guests. This vibrant and mysterious-looking punch isn’t only visually appealing, but it also offers a deliciously invigorating taste that’s perfect for a Halloween celebration. It combines fruity flavors with a hint of fizz, making it a delightful drink for both kids and adults.
The beauty of this Witch’s Brew Punch is in its simplicity and versatility. It requires minimal ingredients and can be easily adjusted to suit your taste preferences. Whether you want to keep it non-alcoholic for a family-friendly party or add a bit of a spirited kick for the adults, this punch can be tailored to your needs.
With its deep green or purple hue and smoky, bubbling effect, it adds an element of theatricality to your Halloween table spread, and it’ll surely become a conversation starter among your guests.
Ingredients (Serves 4-6):
- 4 cups of lemon-lime soda
- 2 cups of pineapple juice
- 2 cups of grape juice
- 1 cup of orange sherbet
- 1/4 cup of lime juice
- 1/4 cup of grenadine
- Dry ice (optional, for effect)
- Gummy worms or candy eyeballs for garnish
Instructions:
- Prepare the Base: In a large punch bowl, combine the lemon-lime soda, pineapple juice, and grape juice. Stir the mixture gently to blend the flavors evenly.
- Add Dimension: Slowly pour in the lime juice and grenadine. These ingredients will add a tangy twist and a hint of sweetness to balance the fruit flavors. Stir gently to mix.
- Create the Frosty Layer: Add the orange sherbet to the punch. Use a spoon to break it up slightly and allow it to float on the surface, creating a frothy, magical top layer.
- Garnish and Decorate: For a spooky touch, add gummy worms or candy eyeballs to the punch. They’ll float and bob around, adding a creepy, fun element to your Witch’s Brew.
- Add the Smoky Effect: If you opt for theatrical presentation, carefully use small pieces of dry ice. Make sure the dry ice is placed in a separate, non-touchable compartment within the punch bowl to prevent direct contact with the drink. This will create a foggy, bubbling effect that will amaze your guests.
- Serve: Once everything is well-mixed and the effects are in place, serve the punch in clear cups to showcase its eerie appearance. Enjoy the delightful taste and watch your guests marvel at this Halloween spectacle.
Extra Tips:
When using dry ice, handle it with care using gloves, as it can cause burns if touched directly. Always make sure that the dry ice is completely evaporated before drinking the punch to avoid ingestion.
For a more adult version, consider adding a splash of vodka or rum to give the punch an extra kick. Adjust the sweetness according to your preference by varying the amount of grenadine or using a diet soda if you prefer a less sugary option.
If you want to experiment with colors, add a few drops of food coloring to achieve your desired spooky shade.
Frankenstein’s Monster Cupcakes
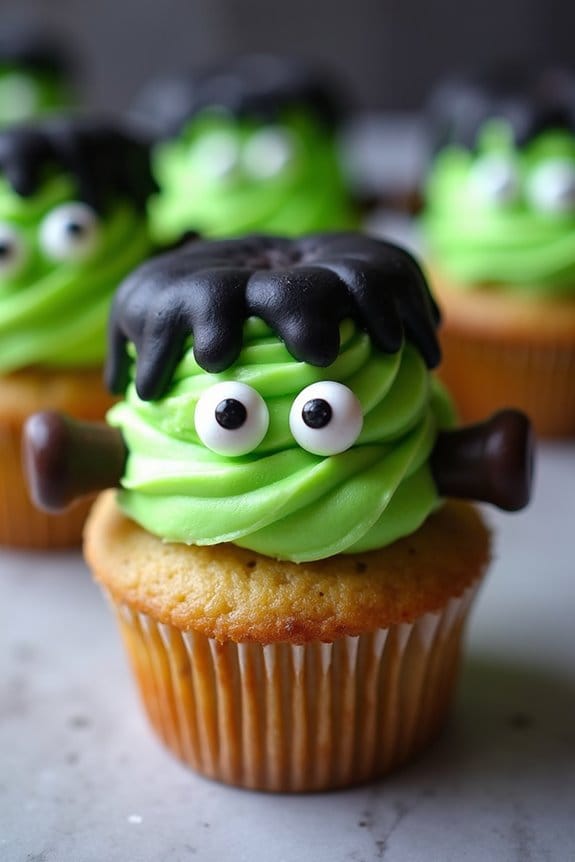
Halloween is a time for spooky fun and creative treats, and what better way to celebrate than with a batch of Frankenstein’s Monster Cupcakes? These delightful cupcakes aren’t only delicious but also a visual treat, perfect for adding a touch of eerie charm to your Halloween party.
With their bright green frosting, chocolate bolts, and goofy candy eyes, they’re sure to be a hit with both kids and adults. Whether you’re hosting a party or just want to surprise your family with a festive treat, these cupcakes will certainly bring out the spirit of Halloween.
Frankenstein’s Monster Cupcakes are made by baking rich chocolate cupcakes, which are then topped with a fluffy green buttercream frosting. The cupcakes are decorated to resemble Frankenstein’s iconic monster, complete with chocolate “bolts” on the sides and candy eyes peering out from beneath a shock of black icing hair.
The process is simple and fun, making it a great activity to do with kids or friends. The result is a batch of cupcakes that are as much fun to make as they’re to eat!
Ingredients (for 4-6 servings)
- 1 cup all-purpose flour
- 1 cup granulated sugar
- 1/2 cup unsweetened cocoa powder
- 1 teaspoon baking powder
- 1/2 teaspoon baking soda
- 1/4 teaspoon salt
- 1/2 cup milk
- 1/4 cup vegetable oil
- 1 teaspoon vanilla extract
- 1 large egg
- 1/2 cup boiling water
- 1 cup unsalted butter, softened
- 4 cups powdered sugar
- 2-3 tablespoons milk (for frosting)
- 1 teaspoon vanilla extract (for frosting)
- Green food coloring
- Black decorating gel
- Candy eyes
- Chocolate squares or chocolate-covered pretzels (for bolts)
Instructions
- Preheat and Prep: Preheat your oven to 350°F (175°C) and line a muffin tin with cupcake liners. This guarantees your cupcakes bake evenly and are easy to remove from the pan.
- Mix Dry Ingredients: In a large bowl, whisk together the flour, sugar, cocoa powder, baking powder, baking soda, and salt. Make sure everything is well combined to guarantee even distribution of leavening agents.
- Combine Wet Ingredients: In a separate bowl, whisk together the milk, vegetable oil, vanilla extract, and egg until well combined. Gradually add this mixture to the dry ingredients, stirring until just combined.
- Add Boiling Water: Carefully stir in the boiling water. The batter will be thin, but this is normal. The hot water helps to bloom the cocoa, giving a more intense chocolate flavor.
- Bake Cupcakes: Pour the batter evenly into the prepared muffin tin, filling each liner about two-thirds full. Bake for 18-20 minutes or until a toothpick inserted into the center comes out clean. Let them cool completely on a wire rack.
- Make the Frosting: In a large mixing bowl, beat the softened butter until creamy. Gradually add powdered sugar, alternating with tablespoons of milk and vanilla extract, until the frosting reaches a spreadable consistency. Add green food coloring until you achieve the desired shade.
- Decorate Cupcakes: Once the cupcakes are completely cool, spread a generous amount of green frosting on top of each one. Use black decorating gel to create hair and a mouth. Place candy eyes on each cupcake and insert chocolate squares or pretzels on the sides to resemble bolts.
Extra Tips
When making the green buttercream frosting, start with a small amount of food coloring and gradually add more until you reach the perfect Frankenstein green. It’s always easier to add more color than to try to lighten it.
For the chocolate bolts, you can use mini chocolate bars or cut-up pieces of chocolate-covered pretzels, depending on what you have available. Decorating gel can be used to add extra details like scars or stitches for a more authentic Frankenstein’s monster look.
Remember to have fun with the decorating process – the more personality your cupcakes have, the more they’ll be appreciated by your guests!
Poison Apple Candy Apples
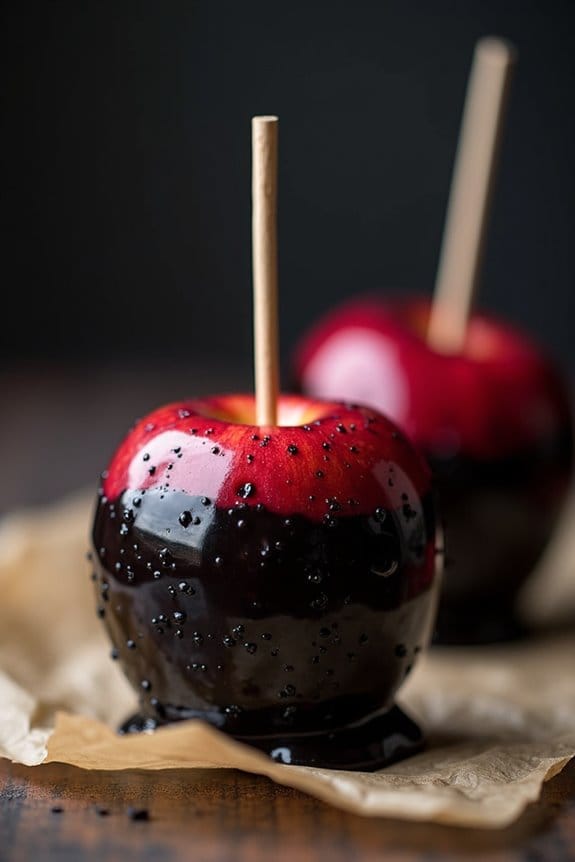
Poison Apple Candy Apples are a wickedly delightful treat that adds a spooky touch to any Halloween-themed party. These glossy, dark candy apples are inspired by the classic fairy tale, making them a perfect addition to your eerie celebration. The contrast of the shiny black candy coating against the vibrant red apples creates a visually striking dessert that’s sure to impress your guests and tantalize their taste buds.
The recipe for Poison Apple Candy Apples is surprisingly simple, yet requires some patience and attention to detail to achieve that perfectly smooth and glossy finish. The candy coating, made from sugar, corn syrup, and food coloring, forms a hard shell around the juicy apples, offering a satisfying crunch with every bite. With just a few ingredients and some basic kitchen tools, you can transform ordinary apples into a spine-chilling centerpiece for your Halloween festivities.
Ingredients (serving size: 4-6 people):
- 6 medium-sized red apples
- 6 wooden sticks
- 2 cups granulated sugar
- 1 cup light corn syrup
- 1/2 cup water
- Black gel food coloring
- 1/2 teaspoon vanilla extract (optional)
Instructions:
- Prepare the Apples: Wash the apples thoroughly and dry them completely. Remove the stems and insert a wooden stick into the top of each apple, making sure it’s secure.
- Set Up: Line a baking sheet with parchment paper and lightly grease it to prevent sticking. This will serve as the cooling area for your candy apples.
- Make the Candy Coating: In a medium-sized saucepan, combine the sugar, corn syrup, and water. Stir the mixture over medium heat until the sugar dissolves completely.
- Boil the Candy: Once the sugar is dissolved, increase the heat to high and bring the mixture to a boil. Attach a candy thermometer to the side of the saucepan and continue boiling without stirring until the mixture reaches 300°F (hard crack stage).
- Add Color and Flavor: Remove the saucepan from the heat and quickly stir in the black gel food coloring and vanilla extract, if using. Mix until the color is evenly distributed.
- Coat the Apples: Working quickly, dip each apple into the hot candy mixture, turning it to coat evenly. Allow any excess candy to drip off before placing the apple onto the prepared baking sheet. Repeat for all apples.
- Cool and Set: Let the candy apples cool at room temperature until the coating is hard and shiny. This should take about 30 minutes.
Extra Tips:
When making Poison Apple Candy Apples, it’s essential to work quickly during the coating process, as the candy mixture can harden rapidly. Verify your apples are completely dry before dipping to help the candy adhere properly.
If the candy mixture begins to thicken or cool too much while coating, you can gently reheat it over low heat until it’s workable again. Additionally, using gel food coloring rather than liquid will yield a more vibrant color without altering the consistency of the candy.
