
As Halloween approaches, I’ve been on a quest to find snacks that are both healthy and delicious, and I think I’ve hit the jackpot. Spooky spider deviled eggs and pumpkin patch hummus cups are sure to be a hit at your next gathering. Intrigued? Mummy apple bites and eerie eyeball caprese bites are ready to spook your taste buds. There’s a delightful array of choices that promise to add a nutritious twist to your Halloween celebrations. Ready to explore these tasty creations?
Spooky Spider Deviled Eggs
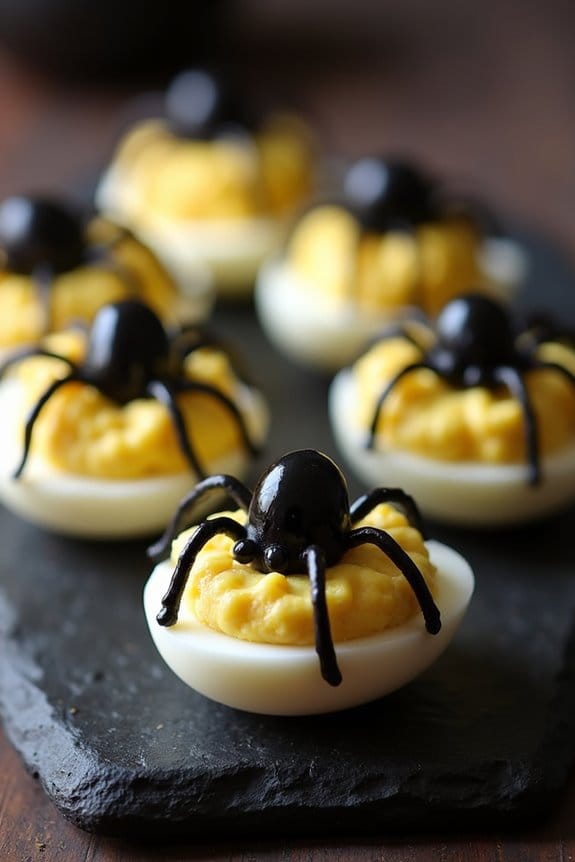
Perfect for serving 4-6 people, these Spooky Spider Deviled Eggs transform a beloved appetizer into a Halloween delight. The rich, velvety filling is crafted with a combination of egg yolks, mustard, and a hint of mayonnaise, offering a creamy texture that pairs beautifully with the slight tang of vinegar.
A Halloween treat with creamy yolk filling and tangy vinegar, perfect for delighting your spooky gathering.
Topped with olive “spiders,” these deviled eggs are certain to be the life of your Halloween spread, delighting both kids and adults alike with their taste and appearance.
Ingredients for 4-6 servings:
- 6 large eggs
- 3 tablespoons mayonnaise
- 1 teaspoon Dijon mustard
- 1 teaspoon white vinegar
- Salt and pepper to taste
- 12 black olives
Cooking Instructions:
- Boil the Eggs: Place the eggs in a saucepan and cover them with cold water. Bring the water to a rolling boil over medium-high heat. Once boiling, remove the saucepan from the heat, cover it, and let the eggs sit for about 10-12 minutes.
- Cool and Peel: After the eggs have cooked, drain the hot water and transfer the eggs to a bowl of ice water. Let them cool for at least 5 minutes. Once cooled, gently peel the eggs, making sure no shell fragments remain.
- Prepare the Filling: Slice each egg in half lengthwise. Carefully remove the yolks and place them in a separate bowl. Add mayonnaise, Dijon mustard, vinegar, salt, and pepper to the yolks. Mash and mix the ingredients until smooth and creamy.
- Fill the Egg Whites: Using a spoon or a piping bag, fill the hollowed-out egg whites with the yolk mixture. Be generous with the filling to guarantee each egg half is adequately topped.
- Create the Spider Garnish: Cut the black olives in half. Use one half as the spider body and slice the other half into thin strips to create legs. Arrange one olive half on top of each filled egg half, then place the olive strips around it to form spider legs.
- Serve: Arrange the Spooky Spider Deviled Eggs on a platter and serve immediately or refrigerate until ready to serve.
Extra Tips:
For a more distinct spider look, consider using olives with a glossy sheen, as they contrast nicely with the creamy filling.
If you’re short on time, you can use pre-cooked and peeled eggs available at most grocery stores.
When creating the spiders, make sure the olive legs are evenly spaced for a realistic appearance.
Adjust the seasoning of the yolk mixture according to taste, and feel free to experiment with additional flavorings like pickle relish or a dash of hot sauce for an extra kick.
Pumpkin Patch Hummus Cups

Pumpkin Patch Hummus Cups are a fun and festive way to bring a touch of Halloween spirit to your snack table while keeping it healthy. These adorable cups are perfect for both kids and adults, offering a nutritious alternative with a seasonal twist. Made with creamy hummus and topped with a delightful blend of vegetables, these cups are designed to mimic a miniature pumpkin patch, adding a charming visual treat to your Halloween spread.
Rich in protein and fiber, hummus serves as the base for this snack, providing a satisfying and filling experience. The vibrant colors of the vegetables not only enhance the visual appeal but also contribute to a range of nutrients. Whether you’re hosting a Halloween party or simply want to surprise your family with a creative snack, Pumpkin Patch Hummus Cups are sure to be a hit. This recipe serves 4-6 people, making it ideal for small gatherings or family fun.
Ingredients (Serves 4-6):
- 2 cups of plain hummus
- 1 cup of cherry tomatoes
- 1/2 cup of sliced black olives
- 1/2 cup of shredded carrots
- 1/4 cup of diced cucumbers
- 1 tablespoon of olive oil
- 1 teaspoon of smoked paprika
- 1/2 teaspoon of salt
- 1/4 teaspoon of black pepper
- 6 small plastic or glass cups
Cooking Instructions:
- Prepare the Hummus Base: In a mixing bowl, combine the hummus with olive oil, smoked paprika, salt, and black pepper. Stir well until all the ingredients are thoroughly mixed, creating a flavorful hummus base.
- Assemble the Cups: Evenly distribute the seasoned hummus into each of the 6 small cups. Fill each cup about halfway to allow room for toppings.
- Create the Pumpkin Patch: Cut the cherry tomatoes in half and place them on top of the hummus in each cup to represent mini pumpkins. Arrange them in clusters to enhance the pumpkin patch effect.
- Add the Vegetables: Scatter sliced black olives across the top to mimic soil or rocks. Add shredded carrots for a touch of greenery and sprinkle diced cucumbers to bring a pop of color and freshness.
- Chill and Serve: Place the assembled cups in the refrigerator for at least 15 minutes to allow the flavors to meld together. Serve chilled and enjoy your delightful Pumpkin Patch Hummus Cups.
Extra Tips: For an added festive touch, consider using mini pumpkin or Halloween-themed cups to serve the hummus. You can also experiment with different vegetables like bell peppers or snap peas for additional color and flavor. If you want to make the hummus from scratch, simply blend cooked chickpeas, tahini, lemon juice, garlic, and olive oil until smooth.
These cups can be prepared a few hours in advance and stored in the refrigerator, making them a convenient option for party planning.
Mummy Apple Bites
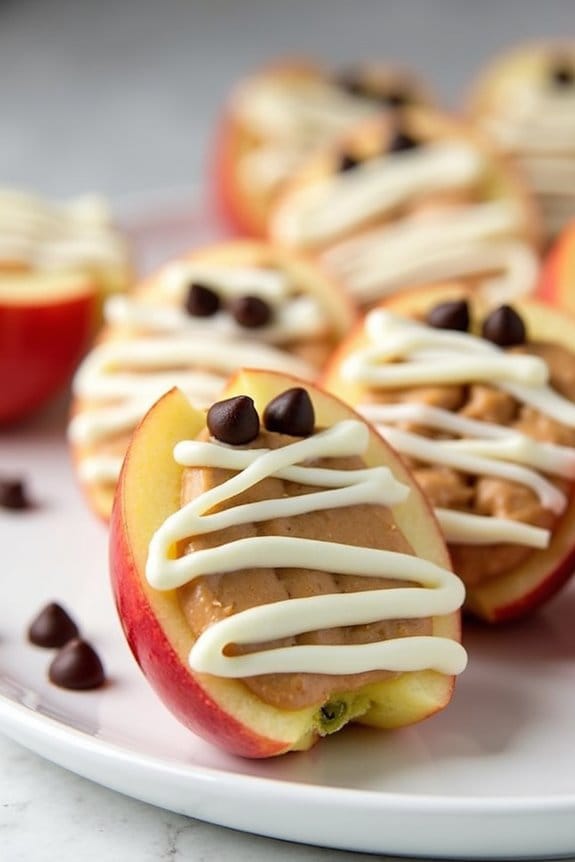
Mummy Apple Bites are a fun and spooky treat perfect for a healthy Halloween snack. These delicious bites combine crisp apples, creamy peanut butter, and sweet chocolate to create a delightful combination of flavors and textures. Not only are they easy to make, but they also add a festive touch to your Halloween spread, making them a hit among both kids and adults.
This recipe is perfect for serving a group of 4-6 people, making it ideal for parties or family gatherings. With a few simple ingredients and minimal preparation time, you can whip up these Mummy Apple Bites in no time. They’re a great alternative to sugary Halloween candies, offering a nutritious option that doesn’t skimp on taste.
Ingredients (for 4-6 people):
- 3 medium apples (any variety)
- ½ cup creamy peanut butter
- ½ cup mini chocolate chips or candy eyes
- ½ cup white chocolate chips
- 1 tablespoon coconut oil (optional, for melting white chocolate)
- 3-4 tablespoons lemon juice (to prevent browning)
Instructions:
- Prepare the Apples: Wash the apples thoroughly and pat them dry. Using a sharp knife, slice each apple into wedges, approximately ½ inch thick. Remove any seeds and the core. To prevent the apple slices from browning, lightly brush them with lemon juice or dip them briefly in a bowl of lemon juice.
- Spread Peanut Butter: Take each apple wedge and spread a thin layer of creamy peanut butter on the top flat side. Be generous enough to cover the surface, which will help the chocolate chips stick.
- Add Eyes: Place two mini chocolate chips or candy eyes on one end of each peanut butter-covered apple slice to create the mummy’s eyes. Gently press them into the peanut butter so they adhere well.
- Melt White Chocolate: In a microwave-safe bowl, combine the white chocolate chips with the coconut oil (if using). Microwave in 20-second intervals, stirring in between, until the chocolate is completely melted and smooth. Alternatively, you can use a double boiler to melt the chocolate.
- Drizzle the White Chocolate: Once the white chocolate is melted, use a spoon or a small piping bag to drizzle it over the peanut butter-covered apple slices in a zigzag pattern, mimicking the mummy’s bandages. Allow the chocolate to harden at room temperature or in the refrigerator for about 10-15 minutes.
- Serve: Arrange the Mummy Apple Bites on a platter and serve them immediately for the best taste and texture. Enjoy these healthy Halloween snacks with friends and family!
Extra Tips:
For the best results, select firm and crisp apples like Honeycrisp or Granny Smith, as they hold up well and provide a nice contrast to the creamy peanut butter and chocolate.
If you’re making these treats in advance, keep the drizzled apple bites refrigerated to maintain their texture and prevent the chocolate from melting. You can also experiment with different nut butters or add a sprinkle of cinnamon for extra flavor.
Ghostly Yogurt Parfaits
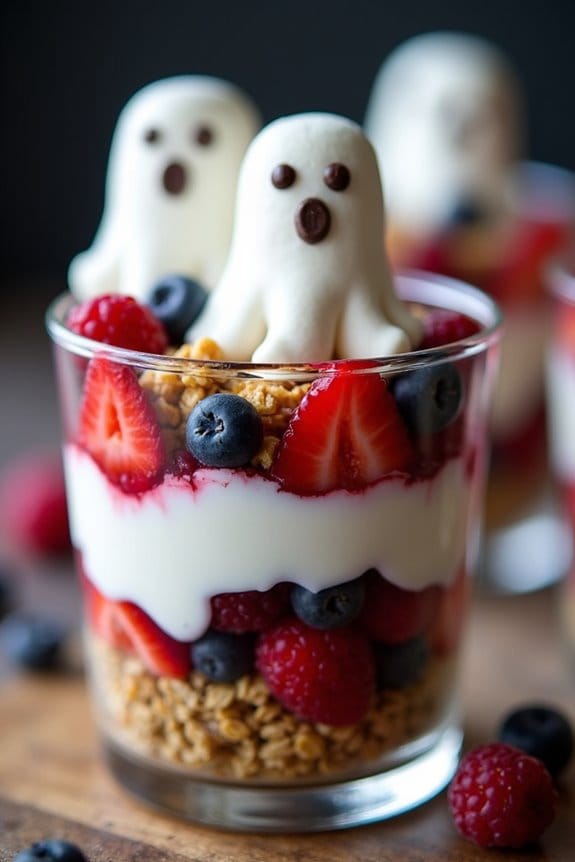
Halloween is a time for fun and festivities, but it’s also important to maintain a balance with healthy eating. One way to do this is by preparing Ghostly Yogurt Parfaits, a delightful and nutritious treat that will bring a spooky touch to your Halloween celebrations. These parfaits are made with layers of creamy yogurt, crunchy granola, and fresh fruit, all topped with ghostly marshmallow shapes to add a touch of Halloween magic. This recipe is perfect for a guilt-free indulgence that both kids and adults will enjoy.
Creating these Ghostly Yogurt Parfaits isn’t only simple but also a fun activity to do with family or friends. Each layer brings a different texture and flavor, making every spoonful a delightful experience. By using Greek yogurt, you add a good dose of protein and probiotics to the mix, while fresh fruit provides vitamins and natural sweetness. The granola layer adds a satisfying crunch, making this parfait a well-rounded snack. Perfect for a Halloween party or a cozy night in, these parfaits will satisfy your sweet tooth without any of the guilt.
Ingredients (Serves 4-6):
- 3 cups Greek yogurt (vanilla or plain)
- 2 cups granola
- 2 cups fresh mixed berries (such as strawberries, blueberries, and raspberries)
- 12-18 mini marshmallows
- 1 tablespoon honey or maple syrup (optional)
- Chocolate chips or edible markers for ghost faces
Cooking Instructions:
- Prepare the Fruit: Wash and dry the mixed berries. Slice any larger fruits like strawberries into bite-sized pieces.
- Mix the Yogurt: In a medium-sized bowl, mix the Greek yogurt with honey or maple syrup if desired. This adds a touch of sweetness to plain yogurt.
- Assemble the Parfaits: Take 4-6 clear cups or glasses to show off the layers. Start by adding a generous scoop of granola as the base layer in each cup.
- Add Fruit Layer: Evenly distribute a layer of mixed berries on top of the granola. This adds a burst of color and flavor.
- Add Yogurt Layer: Spoon a layer of yogurt over the berries, filling each cup about halfway.
- Repeat Layers: Add another layer of granola, followed by more berries, and then another layer of yogurt until the cups are full, leaving about an inch at the top for the marshmallow ghosts.
- Create Ghosts: Use mini marshmallows to create ghostly figures on top of each parfait. Use chocolate chips or edible markers to draw ghost faces on the marshmallows.
- Chill and Serve: Refrigerate the parfaits for at least 30 minutes to allow the flavors to meld. Serve chilled and enjoy your ghostly creation!
Extra Tips:
For an extra festive touch, consider using Halloween-themed cups or decorations to serve the parfaits. You can also experiment with different types of fruit or flavored yogurts to suit personal preferences.
If you’re preparing these in advance for a party, keep the granola separate and add it just before serving to maintain its crispiness. Finally, for those watching sugar intake, opt for plain Greek yogurt and fresh fruits instead of sweetened versions.
Witch Hat Cheese and Crackers
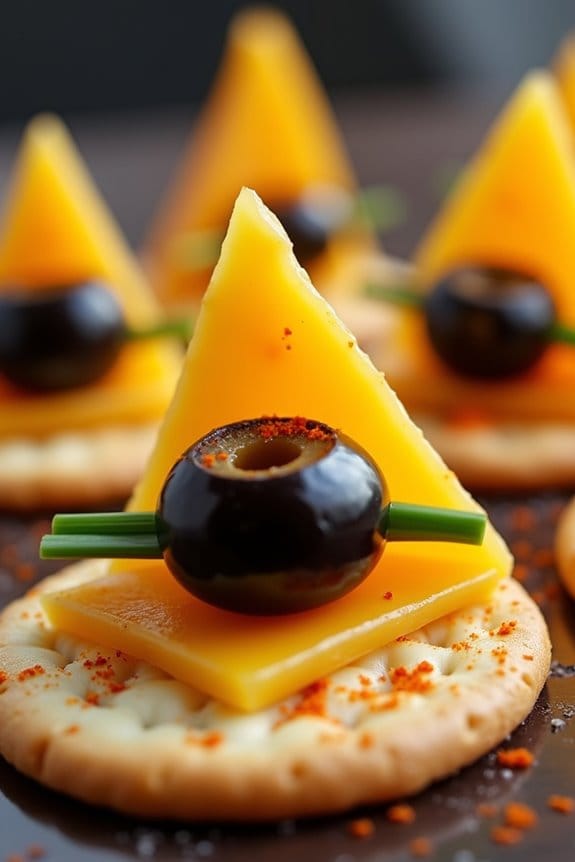
Witch Hat Cheese and Crackers are a fun and festive way to celebrate Halloween with a healthy twist. This delightful snack combines the savory flavors of cheese and crackers with a touch of whimsy, making it perfect for Halloween parties, kids’ gatherings, or a spooky snack time at home.
The witch hat design adds an element of creativity and fun, turning an ordinary snack into a conversation starter. Plus, these snacks are easy to prepare and can be made in advance, allowing you to focus on other Halloween festivities.
Transform a simple snack into a whimsical, festive delight, perfect for sparking conversations.
This recipe is designed to serve 4-6 people, making it ideal for small gatherings or family fun. The key to this snack is the use of high-quality cheese and crackers, as well as some creative crafting to bring the witch hat to life.
With simple ingredients and a few easy steps, you can whip up these witch hat cheese and crackers in no time, providing a healthy alternative to the usual sugary treats associated with Halloween.
Ingredients (for 4-6 servings):
- 12 round crackers
- 6 triangular cheese slices (such as cheddar or Swiss)
- 6 black olives
- 6 chive stems
- 6 dollops of cream cheese
- Paprika for garnish (optional)
Instructions:
- Prepare the Cheese: Start by cutting each triangular slice of cheese into a shape resembling a witch’s hat. The bottom should be slightly wider, tapering up to a point. You can use a small knife or a cookie cutter for precision.
- Assemble the Base: Place a round cracker on a clean surface. This will serve as the base of the witch hat. Repeat this step for all crackers.
- Construct the Hat: Place a triangular cheese slice on top of each cracker, with the base of the triangle aligned with the edge of the cracker. Press gently to confirm it stays in place.
- Add the Olive: Cut each black olive in half and place one half on top of the cheese, at the point where the triangle begins to taper. This will represent the top of the witch hat.
- Secure with Chives: Wrap a chive stem around the base of each olive, tying a small knot if possible, to mimic the hat’s band. Trim any excess chive with scissors.
- Add Cream Cheese: Use a small spoon or piping bag to add a dollop of cream cheese at the base of the olive on each witch hat. This will help secure the olive and add a touch of creamy texture.
- Garnish with Paprika (Optional): For an extra touch of color and flavor, lightly sprinkle paprika over the cheese and crackers.
Extra Tips:
When making Witch Hat Cheese and Crackers, consider using a variety of cracker flavors to match the cheese, such as whole wheat or herb-infused, to enhance the taste profile.
If you find the olives too big, try slicing them thinner to fit better on the cheese. You can also experiment with different types of cheese to suit your preference or dietary needs, such as using reduced-fat cheese for a lighter option.
Finally, if you’re preparing these in advance, store them in an airtight container in the refrigerator to maintain freshness until serving.
Monster Mouths With Almond Fangs
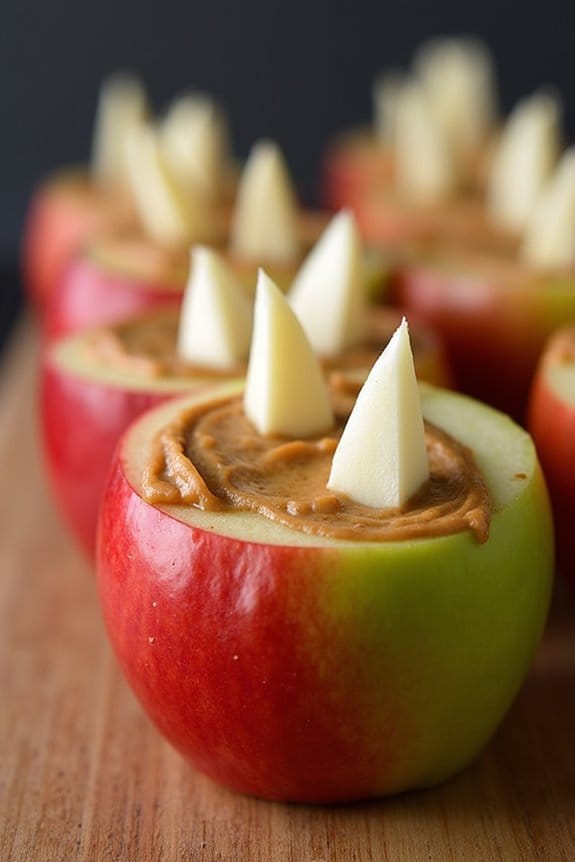
Creating a spooky yet healthy treat for Halloween is easier than you think with Monster Mouths With Almond Fangs. This playful snack not only looks creepy-cool, but it also provides a nutritious alternative to candy-loaded options. The combination of crisp apples, creamy nut butter, and crunchy almonds makes for a delightful bite that both kids and adults will enjoy.
Plus, it’s a fun way to get everyone involved in the kitchen, letting creativity shine as they assemble their own monstrous creations. Monster Mouths are perfect for Halloween parties, classroom events, or just a festive snack at home. They’re simple to make and require minimal ingredients, yet they pack a punch regarding flavor and visual appeal.
This recipe is versatile, allowing for substitutions and variations to suit dietary preferences or restrictions. Gather your ingredients and let’s get ready to make 4-6 servings of these ghoulishly delicious Monster Mouths!
Ingredients:
- 3 large apples (any variety)
- 1 cup of almond butter (or any nut/seed butter of choice)
- 1/2 cup of slivered almonds
- 1 tablespoon of lemon juice (optional, to prevent browning)
- 1 tablespoon honey (optional, for extra sweetness)
Instructions:
- Prepare the Apples: Begin by washing the apples thoroughly under cold water. Pat them dry with a clean towel. Core the apples and slice each one into quarters, then cut each quarter into 2 or 3 wedges, depending on the size of your apples. If desired, brush the cut sides with lemon juice to prevent browning.
- Assemble the Monster Mouths: Take one apple wedge and spread a generous amount of almond butter on one side. This will act as the “glue” to hold the fangs in place. Place another apple wedge on top, creating a mouth shape.
- Add the Fangs: Insert slivered almonds into the almond butter along the edge of one apple wedge, creating the appearance of pointy teeth. Space them as desired to give each monster a unique expression.
- Optional Sweet Touch: If you prefer a sweeter treat, drizzle a small amount of honey over the almond butter before closing the apple wedges together.
- Serve and Enjoy: Arrange the Monster Mouths on a platter and serve immediately. These treats are best enjoyed fresh to maintain the crisp texture of the apples.
Extra Tips: When preparing Monster Mouths, feel free to experiment with different types of apples for varying flavors and colors. Granny Smith apples provide a tart contrast to the sweet almond butter, while Red Delicious adds a pop of vibrant red.
If you want to make this snack allergy-friendly, sunflower seed butter is a great substitute for almond butter. To create more detailed faces, use additional items like raisins or chocolate chips for eyes, or thinly sliced strawberries for tongues. This recipe is an excellent opportunity to engage children in the kitchen, allowing them to customize their own edible monsters.
Jack-O’-Lantern Stuffed Peppers
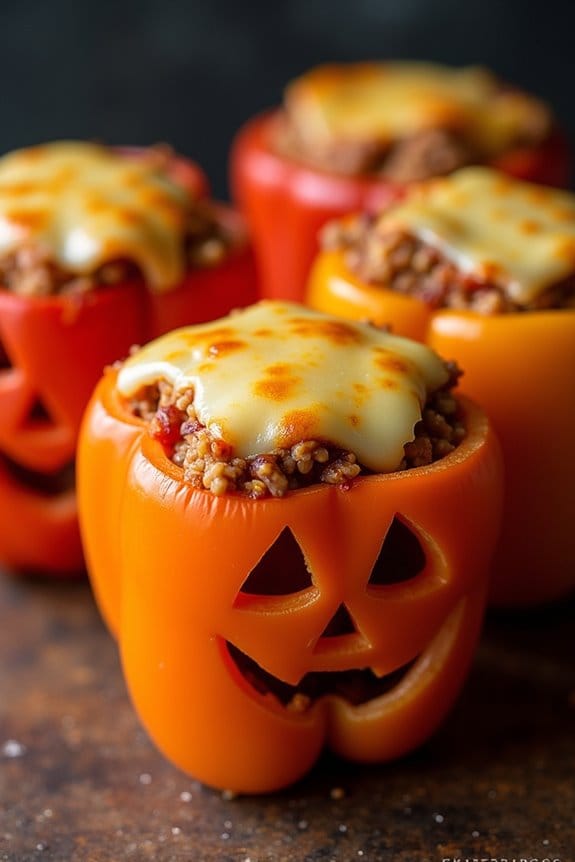
Jack-O’-Lantern Stuffed Peppers are the perfect festive and healthy treat for Halloween. These delightful creations involve carving bright orange bell peppers to resemble mini Jack-O’-Lanterns and then stuffing them with a savory filling. This dish not only captures the spooky spirit of the holiday but also provides a nutritious alternative to the usual sugar-laden Halloween treats. The combination of vibrant vegetables and flavorful stuffing makes these peppers both visually appealing and delicious.
This recipe is designed to serve 4-6 people, making it ideal for a small gathering or family dinner. The filling, which is typically a mixture of ground meat, rice, vegetables, and spices, can be customized to suit your tastes. The carved peppers serve as edible bowls, adding a playful touch to your dinner table. Whether you’re hosting a Halloween party or looking for a fun family meal, these Jack-O’-Lantern Stuffed Peppers are sure to impress.
Ingredients:
- 6 large orange bell peppers
- 1 pound ground turkey or beef
- 1 cup cooked rice
- 1 small onion, diced
- 2 cloves garlic, minced
- 1 can (14.5 oz) diced tomatoes, drained
- 1 cup shredded mozzarella cheese
- 1 teaspoon dried oregano
- 1 teaspoon dried basil
- Salt and pepper to taste
- Olive oil
Cooking Instructions:
- Preheat and Prepare Peppers: Preheat your oven to 375°F (190°C). Cut the tops off the bell peppers and remove the seeds and membranes. Using a small knife, carefully carve a Jack-O’-Lantern face into one side of each pepper.
- Cook the Filling: In a large skillet, heat a tablespoon of olive oil over medium heat. Add the diced onion and minced garlic, sautéing until the onions are translucent. Add the ground turkey or beef, cooking until browned. Drain any excess fat from the skillet.
- Mix Ingredients: Stir in the cooked rice, drained diced tomatoes, oregano, basil, salt, and pepper. Mix well to combine all the flavors, then remove the skillet from heat.
- Stuff the Peppers: Place the carved peppers upright in a baking dish. Carefully spoon the meat and rice mixture into each pepper, filling them almost to the top. Sprinkle shredded mozzarella cheese over the filling in each pepper.
- Bake: Cover the baking dish with aluminum foil and bake in the preheated oven for 30 minutes. Remove the foil and bake for an additional 10-15 minutes, or until the peppers are tender and the cheese is bubbly and golden brown.
- Serve: Allow the peppers to cool slightly before serving. Enjoy your festive and healthy Jack-O’-Lantern Stuffed Peppers!
Extra Tips:
When selecting bell peppers, choose ones that are evenly shaped and can stand upright on their own. If a pepper is slightly wobbly, you can trim a small slice off the bottom to create a flat surface.
For added flavor, consider mixing in other vegetables, like chopped mushrooms or spinach, into the filling. If you prefer a vegetarian version, substitute the meat with black beans or lentils.
Finally, verify that your knife is sharp when carving the faces to make the process easier and safer. Enjoy making this dish as a fun family activity and a delicious meal!
Creepy Crawler Celery Sticks

Creepy Crawler Celery Sticks are a fun and healthy Halloween snack that will delight both kids and adults alike. These spooky snacks aren’t only visually appealing but also packed with nutrients. Perfect for a Halloween party or just a festive treat, these celery sticks are transformed into creepy crawlers with a few simple ingredients.
Whether you’re a fan of crunchy veggies or need a creative way to get your kids to eat more greens, this recipe is sure to be a hit. The combination of creamy peanut butter, sweet raisins, and crunchy celery creates a deliciously balanced snack that’s both satisfying and nutritious.
The addition of pretzel sticks as legs gives the snack its distinctive “creepy crawler” look, making it an eye-catching centerpiece for your Halloween table. Best of all, this recipe is quick and easy to prepare, requiring just a few ingredients and minimal effort.
Gather your family or friends, and enjoy making these Creepy Crawler Celery Sticks together!
Ingredients (serving size: 4-6 people):
- 6 celery stalks
- 1 cup peanut butter
- 1/2 cup raisins
- 24 pretzel sticks (approximately)
- 1/4 cup candy eyes or chocolate chips
Instructions:
- Prepare the Celery: Wash and dry the celery stalks thoroughly. Cut each stalk into 3-inch pieces to create the base for the creepy crawlers.
- Fill with Peanut Butter: Using a butter knife or small spoon, spread peanut butter into the hollow part of each celery piece, filling it generously. This will serve as the “body” of the crawler.
- Add the Raisins: Place raisins along the peanut butter-filled celery. These will act as the “bumps” on the crawler’s back, giving it a more realistic and fun appearance.
- Attach the Legs: Break the pretzel sticks in half and insert them into the sides of the celery, three on each side, to serve as the crawler’s legs. The pretzels should stick out, resembling the legs of an insect.
- Add Eyes: Place candy eyes or chocolate chips on the peanut butter at one end of the celery stick to create the eyes. Gently press them into the peanut butter to secure them in place.
- Arrange and Serve: Arrange the Creepy Crawler Celery Sticks on a platter, spacing them out to showcase their quirky design. Serve immediately or refrigerate for a firmer texture.
Extra Tips: For a nut-free version, consider using sunflower seed butter or any other nut-free spread. If you’re making these snacks in advance, it’s best to store them in the refrigerator to maintain their crunchiness and freshness.
Additionally, feel free to customize the design by using different types of dried fruits or decorative edible items to match your Halloween theme.
Frightening Fruit Kabobs

Halloween is the perfect time to get creative with snacks, and Frightening Fruit Kabobs are a delightful and healthy option. These spooky treats aren’t only visually appealing but also packed with nutrients, making them a great choice for both kids and adults.
Using a variety of fruits, you can create eerie patterns and faces that will add a festive touch to any Halloween gathering. The fun part about Frightening Fruit Kabobs is that you can customize them according to your preferences and the fruits available.
By selecting fruits of different colors and textures, you can make each kabob unique. Whether you’re hosting a Halloween party or simply want to enjoy a fun, nutritious snack, these kabobs are sure to be a hit. Easy to prepare and enjoyable to eat, they’re the perfect combination of health and creativity.
Ingredients (serving size: 4-6 people):
- 2 bananas
- 1 pint of strawberries
- 1 bunch of green grapes
- 1 small cantaloupe
- 1 small watermelon
- ½ cup of blueberries
- 12 wooden skewers
- Edible candy eyes (optional)
Cooking Instructions:
- Prepare the Fruits: Start by washing all the fruits thoroughly. Peel the bananas and cut them into thick slices. Hull the strawberries and keep them whole. Remove the skin and seeds from the cantaloupe and watermelon, and cut them into small cubes. Verify the grapes are free from stems.
- Assemble the Kabobs: Take a wooden skewer and begin threading the fruits in a pattern. For a spooky effect, alternate between the bananas and strawberries to create “ghosts” and use blueberries as “eyes”. Add grapes and melon cubes to fill the spaces and enhance the color variety.
- Add Decorative Features: If using, attach the edible candy eyes onto the banana slices to create ghost faces. You can also carve small faces into the watermelon or cantaloupe cubes to mimic jack-o’-lanterns.
- Presentation: Arrange the completed kabobs on a serving platter. For added Halloween flair, think about using a themed platter or adding decorative elements like fake cobwebs or mini pumpkins around the kabobs.
Extra Tips:
When making Frightening Fruit Kabobs, it’s important to reflect on the ripeness of the fruits. Ripe but firm fruits are ideal as they’re easier to thread onto skewers and hold their shape better.
If you’re preparing these kabobs in advance, store them in the refrigerator to keep them fresh. However, avoid storing them for too long, as bananas can brown and lose their visual appeal. For added sweetness, you can drizzle a bit of honey over the kabobs before serving or serve with a yogurt dip on the side.
Boo-nana Popsicles

Boo-nana Popsicles are a delightfully spooky treat that will bring a smile to both kids and adults alike during the Halloween season. This healthier alternative to the usual sugary snacks guarantees that you can indulge in the spirit of the holiday without the guilt. The combination of sweet bananas and rich, creamy yogurt makes for a delicious and rejuvenating treat.
Plus, they’re incredibly easy to make, requiring just a few ingredients and a bit of creativity to transform them into ghostly delights.
These Boo-nana Popsicles are perfect for a Halloween party or as a special after-school snack. With a serving size of 4-6 people, they’re sure to be a hit. Not only do they look adorable with their spooky ghost faces, but they also provide a nutritious boost with the natural sweetness of bananas and the calcium from yogurt.
Making these popsicles can be a fun activity for kids to help with, as they can decorate their own ghost faces using mini chocolate chips or other small edible decorations.
Ingredients for Boo-nana Popsicles (Serves 4-6):
- 3 large ripe bananas
- 1 cup vanilla yogurt
- 12 mini chocolate chips
- 6 popsicle sticks
Instructions:
- Prepare the Bananas: Peel the bananas and cut each one in half crosswise. This will give you six banana halves, which will serve as the base for your popsicles.
- Insert Popsicle Sticks: Carefully insert a popsicle stick into the cut end of each banana half, making sure it’s secure but not pushing through the top of the banana.
- Coat with Yogurt: Using a spoon, coat each banana half with a generous layer of vanilla yogurt. Make sure the yogurt covers the entire banana to give it that ghostly white appearance.
- Create the Ghost Faces: Press two mini chocolate chips into the yogurt-covered banana to create the eyes of the ghost. You can also add a third chocolate chip to make a mouth if desired.
- Freeze the Popsicles: Place the yogurt-coated bananas on a baking sheet lined with parchment paper. Place the sheet in the freezer for at least 2 hours or until the yogurt is completely frozen and the popsicles are firm.
- Serve: Once frozen, remove the popsicles from the freezer and serve immediately for a fun Halloween treat.
Extra Tips: For an even creamier texture, consider blending the yogurt with a little bit of honey or maple syrup before coating the bananas. If you want to make these popsicles in advance, they can be stored in an airtight container in the freezer for up to one week.
When removing the popsicles from the baking sheet, it may be helpful to let them sit at room temperature for a minute or two to make them easier to release. Enjoy your spooky yet healthy Boo-nana Popsicles!
Vampire Veggie Platter
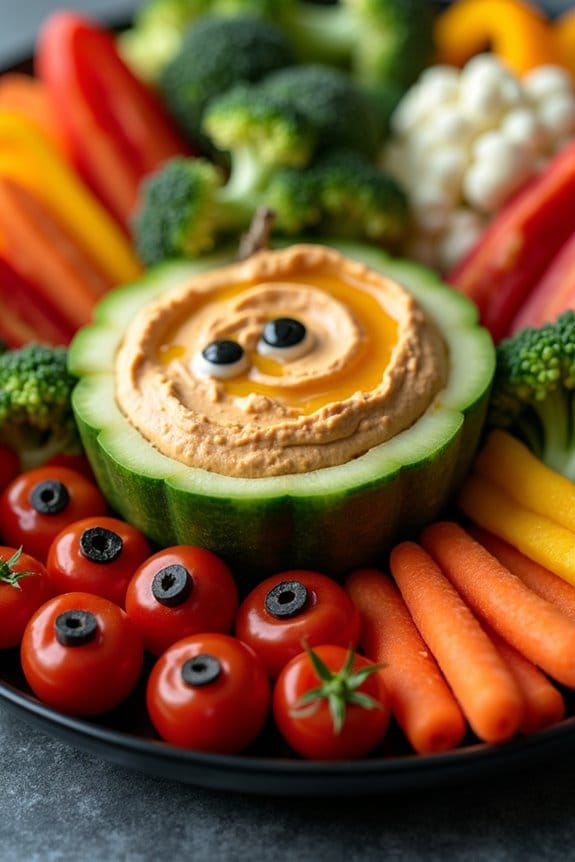
This Halloween, treat your guests to a spooktacular appetizer with the Vampire Veggie Platter. This healthy snack is perfect for adding a festive touch to your Halloween spread while ensuring that everyone gets a dose of nutritious vegetables. The platter combines a colorful array of fresh veggies with a deliciously spooky presentation that’s sure to impress.
Whether you’re hosting a Halloween party or simply enjoying a night in with the family, this creative dish will be a hit for all ages.
The Vampire Veggie Platter isn’t only visually appealing but also packed with vitamins and minerals. Using a variety of vegetables not only provides a range of nutrients but also contributes to the vibrant, ghoulish look of the platter.
With a little creativity and a few simple steps, you can transform ordinary vegetables into a fang-tastic centerpiece. Read on for a detailed guide to creating this eerie yet healthy Halloween snack, perfect for serving 4-6 people.
Ingredients:
- 1 cup cherry tomatoes
- 1 red bell pepper
- 1 yellow bell pepper
- 1 cucumber
- 1 small bunch of broccoli
- 1 small bunch of cauliflower
- 1 cup baby carrots
- 1/2 cup black olives
- 1/2 cup hummus or ranch dressing
- 1 small pumpkin or a Halloween-themed bowl (for dip)
- Assorted decorative skewers or toothpicks
Instructions:
1. Prepare the Vegetables: Wash all the vegetables thoroughly under running water. Pat them dry with a clean towel to remove excess moisture.
2. Cut the Vegetables:
- Slice the cucumbers into thin rounds.
- Cut the cherry tomatoes in half.
- Slice the red and yellow bell peppers into strips after removing the seeds and stems.
- Break the broccoli and cauliflower into small, bite-sized florets.
3. Assemble the Vampire Face:
- Choose a large, flat platter or tray.
- Arrange the red bell pepper strips in a circular pattern around the edge to create the vampire’s hair.
- Place the cauliflower florets at the top to form a widow’s peak.
- Use the cucumber slices to create the vampire’s eyes, placing a black olive in the center of each slice.
- Form the nose using a small piece of red bell pepper.
- Arrange the cherry tomato halves into a mouth shape, and add baby carrots as fangs.
4. Create the Fang-tastic Display:
- Place the small pumpkin or Halloween-themed bowl in the center of the platter.
- Fill the bowl with hummus or ranch dressing for dipping.
- Surround the bowl with broccoli florets, adding additional veggies around the platter as desired.
5. Add Finishing Touches:
- Decorate the platter with assorted decorative skewers or toothpicks for easy serving.
- Feel free to add any additional Halloween-themed decorations around the platter for extra flair.
Extra Tips:
To make the Vampire Veggie Platter even more festive, consider using small cookie cutters to shape some of the vegetables into Halloween-themed designs like bats or pumpkins.
You can also add a splash of creativity by using edible markers to draw spooky faces on the cucumber slices or cherry tomatoes. If you want to make the dish more filling, serve it alongside whole grain crackers or breadsticks.
The key to a successful Vampire Veggie Platter is having fun with the presentation, so don’t be afraid to get creative and let your imagination run wild!
Haunted Trail Mix

Embrace the spooky spirit of Halloween while keeping it healthy with a delightful batch of Haunted Trail Mix. This concoction is a blend of sweet, salty, and crunchy ingredients that will tantalize your taste buds and provide a nutritious snacking option. It’s perfect for parties, trick-or-treat handouts, or just a festive snack at home.
The mix includes a variety of textures and flavors, making it an exciting treat for both kids and adults. This Haunted Trail Mix is perfect for serving a crowd, providing enough servings for 4-6 people. The combination of nuts, seeds, dried fruits, and a few Halloween-themed treats guarantees that everyone will find something they enjoy.
The best part is that it’s incredibly easy to customize according to dietary preferences or allergies, making it a versatile addition to any Halloween celebration.
Ingredients for 4-6 servings:
- 1 cup unsalted almonds
- 1 cup cashews
- 1 cup pumpkin seeds
- 1 cup dried cranberries
- 1 cup dried apricots (chopped)
- 1/2 cup dark chocolate chips
- 1 cup pretzel sticks
- 1/2 cup candy corn
- 1 teaspoon cinnamon
- 1/2 teaspoon sea salt
Cooking Instructions:
- Prepare Your Workspace: Begin by gathering all your ingredients and a large mixing bowl. Confirm the bowl is clean and dry, as moisture can affect the texture of the trail mix.
- Mix the Nuts and Seeds: Add the unsalted almonds, cashews, and pumpkin seeds to the mixing bowl. These provide a crunchy base and are packed with healthy fats and protein.
- Add Dried Fruits: Incorporate the dried cranberries and chopped dried apricots into the nut mixture. These fruits add a sweet, chewy texture to the mix, balancing the crunchiness of the nuts and seeds.
- Include Sweet Treats: Sprinkle in the dark chocolate chips and candy corn. The chocolate adds a rich flavor, while the candy corn contributes a festive Halloween touch.
- Season the Mix: Add the cinnamon and sea salt, then gently toss all ingredients together with a large spoon or your hands. The cinnamon enhances the flavor, and the sea salt brings out the sweetness of the other ingredients.
- Finish with Pretzel Sticks: Finally, add the pretzel sticks to the bowl. They provide a salty crunch that contrasts nicely with the other flavors in the mix.
- Combine Thoroughly: Confirm all ingredients are evenly distributed by giving the mix a final stir. This guarantees that each serving has a bit of everything.
- Serve or Store: Serve the Haunted Trail Mix immediately in individual cups or bowls. If you’re preparing it ahead of time, store it in an airtight container to maintain freshness.
Extra Tips:
When preparing Haunted Trail Mix, consider using unsweetened or lightly sweetened dried fruits to keep the sugar content in check. If you prefer a nut-free version, substitute the nuts with extra seeds or whole grain cereal.
For a gluten-free option, ensure that the pretzels you choose are certified gluten-free. Additionally, feel free to experiment with other spices like nutmeg or ginger for a more complex flavor profile.
This mix can be made ahead of time and stored for up to two weeks, making it a convenient snack option throughout the Halloween season.
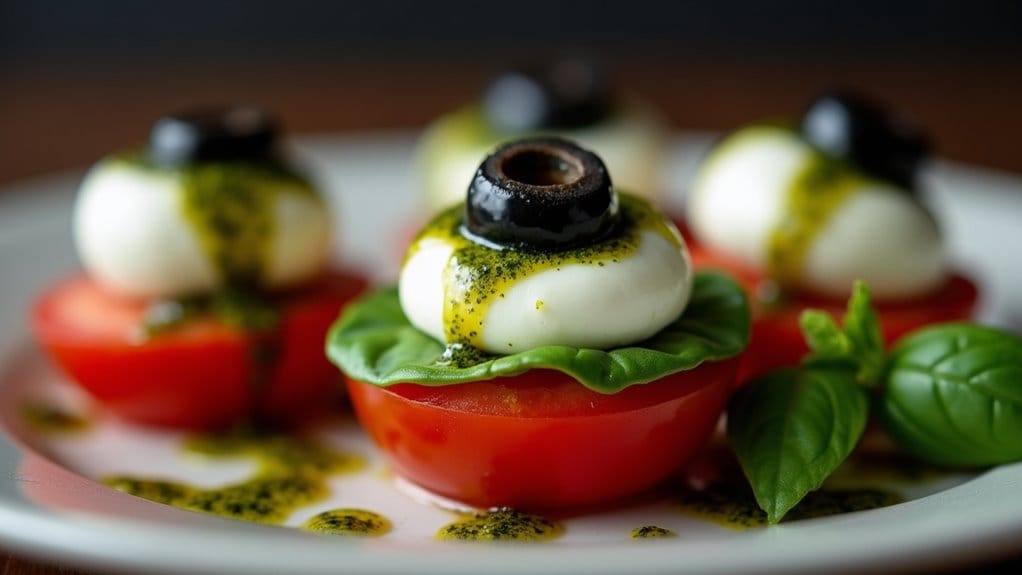
Eerie Eyeball Caprese Bites

Get ready to wow your Halloween guests with these spooky yet delicious Eerie Eyeball Caprese Bites! Perfect for a party platter, these creepy creations bring a ghoulish twist to the classic caprese salad. Combining fresh mozzarella, cherry tomatoes, black olives, and a basil pesto drizzle, these eerie eyeballs are as delightful to look at as they’re to eat. Your guests will be thrilled by their appearance and delighted by their taste – an ideal combination for a healthy Halloween treat.
These Eerie Eyeball Caprese Bites aren’t only visually striking but also quick and simple to prepare, making them a fantastic choice for your Halloween festivities. The contrasting colors of the ingredients create an eye-catching display, while the flavors meld together beautifully to deliver a fresh and savory bite.
Whether you’re hosting a big Halloween bash or a small gathering, this recipe serves 4-6 people, providing a perfect appetizer that’s sure to be a hit.
Ingredients:
- 12 cherry tomatoes
- 12 fresh mozzarella balls (bocconcini)
- 12 black olives
- 1/4 cup fresh basil pesto
- 12 fresh basil leaves
- Salt and pepper to taste
- 12 toothpicks
Cooking Instructions:
- Prepare the Tomatoes: Begin by washing and drying the cherry tomatoes. Cut a small slice off the top of each tomato to create a flat surface, allowing them to stand upright without rolling.
- Assemble the Eyeballs: Take each mozzarella ball and place it on top of each tomato, using the flat side for stability. This forms the base of the eyeball.
- Create the Pupil: Slice the black olives into rings. Place one olive ring on top of each mozzarella ball to form the eyeball’s pupil. Secure the entire stack with a toothpick inserted right through the center of the olive, mozzarella, and tomato.
- Add the Basil Touch: Tuck a fresh basil leaf under the mozzarella ball on each toothpick, letting it drape over the tomato to resemble an eerie green eyelid.
- Drizzle with Pesto: Arrange the assembled eyeballs on a serving platter. Drizzle the basil pesto over the top of each eyeball for an added burst of flavor and a gory green effect. Season with salt and pepper to taste.
Extra Tips:
To guarantee your Eerie Eyeball Caprese Bites are at their best, make sure to use fresh and quality ingredients. Fresh mozzarella and basil will provide the best flavor, while ripe, juicy cherry tomatoes will add a delightful sweetness.
You can prepare the components in advance and assemble them shortly before serving to maintain their freshness and visual appeal. For an extra spooky touch, consider using different colored olives or adding a drop of balsamic glaze to enhance the creepy effect. Enjoy your healthy Halloween creations!
