

The holiday season is the perfect time to gather with loved ones and share delicious treats. I’m on the lookout for finger foods that will keep everyone coming back for more. From cheesy stuffed mushrooms to chocolate-dipped pretzel rods, I’ve put together a list of 12 irresistible bites. Each recipe is a guaranteed hit and will make your party unforgettable. Ready to discover these must-try holiday snacks?
Cheesy Stuffed Mushrooms

Cheesy Stuffed Mushrooms are a perfect addition to your Christmas party finger food spread. These delightful bites aren’t only easy to make but are packed with flavor that’s sure to impress your guests. Perfectly sized for a single bite, these mushrooms are filled with a creamy, cheesy mixture that melts in your mouth, making them an irresistible treat.
Your guests will love the combination of the earthy mushroom flavor paired with the rich and cheesy stuffing. The mushrooms are hollowed out to create a perfect vessel for the stuffing, which is made from a blend of cheeses, herbs, and breadcrumbs. The cheese mix can be customized to your taste, allowing you to play around with different flavors.
Once the stuffing is prepared, it’s spooned into each mushroom cap and baked until golden brown and bubbly. Serve these Cheesy Stuffed Mushrooms as a delicious appetizer or alongside other finger foods to keep your holiday festivities merry and bright.
Ingredients (serving size: 4-6 people):
- 24 large button mushrooms
- 1 cup cream cheese, softened
- 1 cup shredded mozzarella cheese
- 1/2 cup grated Parmesan cheese
- 1/2 cup breadcrumbs
- 2 cloves garlic, minced
- 2 tablespoons fresh parsley, chopped
- 1 tablespoon olive oil
- Salt and pepper to taste
Cooking Instructions:
- Preheat the Oven: Preheat your oven to 375°F (190°C) to get it ready for baking the stuffed mushrooms.
- Prepare the Mushrooms: Clean the mushrooms with a damp cloth to remove any dirt. Gently twist and remove the stems, creating a cavity for the stuffing.
- Make the Stuffing: In a mixing bowl, combine cream cheese, mozzarella, Parmesan, breadcrumbs, minced garlic, and parsley. Mix until everything is well combined. Season with salt and pepper to taste.
- Stuff the Mushrooms: Using a spoon, carefully fill each mushroom cap with the cheese mixture, ensuring it’s packed nicely without overflowing.
- Prepare the Baking Sheet: Line a baking sheet with parchment paper or lightly grease it with olive oil to prevent sticking.
- Place the Mushrooms: Arrange the stuffed mushrooms on the prepared baking sheet, ensuring they’re evenly spaced.
- Bake: Drizzle a little olive oil over the mushrooms and bake them in the preheated oven for 20-25 minutes, or until the tops are golden brown and the mushrooms are tender.
- Serve: Once done, remove the mushrooms from the oven and let them cool slightly before serving. Garnish with a sprinkle of fresh parsley if desired.
Extra Tips: When selecting mushrooms, try to choose ones that are uniform in size so they cook evenly. For an added depth of flavor, consider adding a dash of hot sauce or some finely chopped sun-dried tomatoes to the cheese mixture.
Be careful not to overstuff the mushroom caps, as the cheese will expand as it melts. These mushrooms are best served warm, but they can also be reheated in the oven just before serving. Enjoy these bites of cheesy goodness as part of your holiday celebrations!
Cranberry Brie Bites
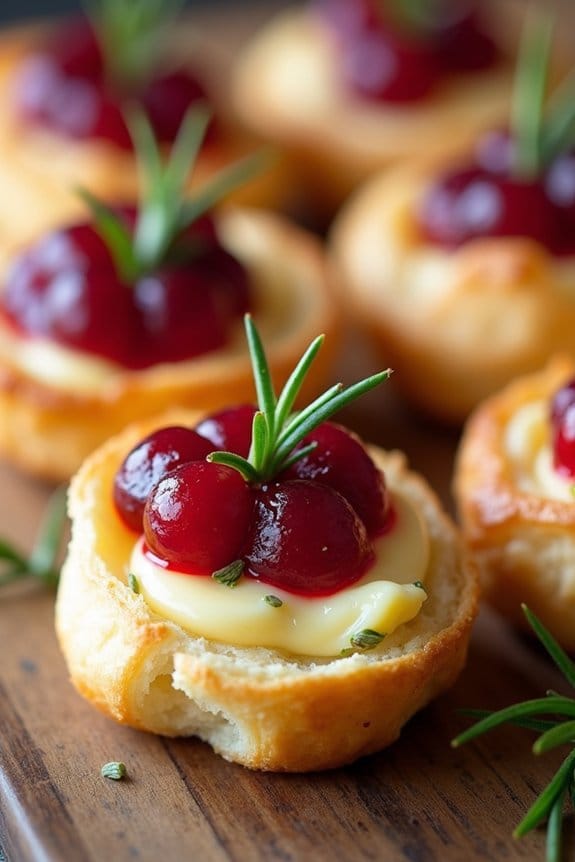
Cranberry Brie Bites are a delightful and festive appetizer perfect for any Christmas party. These bite-sized treats combine the creamy richness of Brie cheese with the tart sweetness of cranberry sauce, all encased in a flaky, buttery puff pastry.
They’re not only delicious but also visually appealing, adding a touch of elegance to your holiday spread. Easy to prepare and bake, these bites can be made in advance, allowing you to enjoy the festivities without spending too much time in the kitchen.
The combination of flavors in Cranberry Brie Bites is a crowd-pleaser, making them an excellent choice for both adults and children. The warm, melted Brie pairs perfectly with the tangy cranberry sauce, while the crisp pastry provides a satisfying crunch.
Whether you’re hosting a large gathering or an intimate affair, these appetizers will surely impress your guests and become a staple in your holiday recipe collection.
Ingredients for 4-6 servings:
- 1 sheet of puff pastry, thawed
- 8 ounces of Brie cheese
- 1/2 cup of cranberry sauce (homemade or store-bought)
- 1 tablespoon of chopped fresh rosemary (optional)
- 1 egg, beaten (for egg wash)
Cooking Instructions:
- Preheat the Oven: Start by preheating your oven to 375°F (190°C). This will guarantee that your puff pastry cooks evenly and becomes golden brown.
- Prepare the Puff Pastry: Unroll the thawed sheet of puff pastry on a lightly floured surface. Using a sharp knife or a pizza cutter, cut the pastry into 12 equal squares. This will give you the perfect size for bite-sized appetizers.
- Cube the Brie: Cut the Brie cheese into small cubes, roughly 1/2 inch in size. This allows for easy melting and even distribution in the pastry squares.
- Assemble the Bites: Place a cube of Brie in the center of each pastry square. Top the cheese with a teaspoon of cranberry sauce. If desired, sprinkle a small pinch of chopped rosemary over the cranberry sauce for an extra burst of flavor.
- Seal the Pastry: Fold the corners of each pastry square up and over the filling, pinching the edges together to seal. This will create a small, enclosed parcel to prevent the cheese and sauce from leaking out during baking.
- Apply Egg Wash: Place the assembled bites onto a baking sheet lined with parchment paper. Brush the tops and sides of each pastry with the beaten egg to give them a beautiful golden sheen once baked.
- Bake: Bake the bites in the preheated oven for 15-20 minutes, or until the puff pastry is puffed and golden brown. Confirm the Brie is melted and the cranberry sauce is bubbly.
- Cool and Serve: Allow the bites to cool for a few minutes before serving. They’re best enjoyed warm, but can also be served at room temperature.
Extra Tips:
When working with puff pastry, confirm it’s kept chilled until you’re ready to use it; this helps maintain its structure and flakiness. If you don’t have fresh rosemary, dried rosemary can be used sparingly for flavor.
For an added touch, you can garnish the finished bites with a small sprig of rosemary or a few fresh cranberries for presentation. If you’re preparing these in advance, assemble and store them in the refrigerator, then bake just before serving to keep them fresh and crispy.
Caprese Skewers
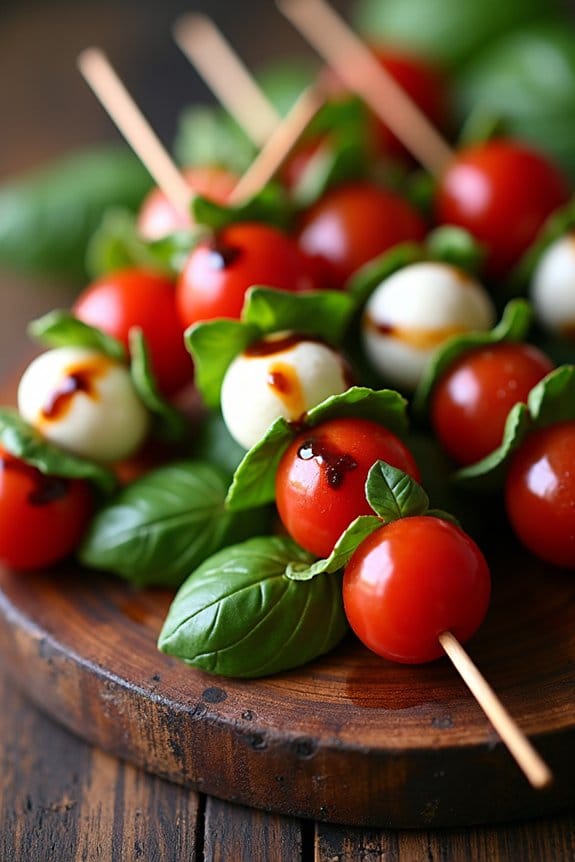
Caprese Skewers are a delightful and easy-to-make finger food option that brings the classic flavors of a Caprese salad into a convenient, bite-sized form. Perfect for a Christmas party, these skewers combine fresh mozzarella, juicy cherry tomatoes, and fragrant basil leaves drizzled with balsamic glaze, offering a burst of freshness and flavor in every bite.
Not only are they visually appealing with their vibrant colors, but they’re also incredibly simple to prepare, making them an ideal addition to your festive spread. The beauty of Caprese Skewers lies in their simplicity and the quality of ingredients used. By choosing ripe, fresh ingredients, you’ll guarantee that each skewer is both delicious and satisfying.
What’s more, these skewers are versatile; they can be assembled ahead of time, allowing you to spend more time enjoying the party with your guests. Whether you’re an experienced home cook or a beginner, this recipe will guide you through creating this impressive appetizer effortlessly.
Ingredients for 4-6 people:
- 24 cherry tomatoes
- 24 small fresh mozzarella balls (bocconcini)
- 24 fresh basil leaves
- 2 tablespoons extra-virgin olive oil
- Salt to taste
- Freshly ground black pepper to taste
- Balsamic glaze, for drizzling
- 24 wooden skewers or toothpicks
Cooking Instructions:
- Prepare the Ingredients: Begin by rinsing the cherry tomatoes and basil leaves under cold water. Pat them dry with a paper towel. Drain the mozzarella balls from their liquid and set aside.
- Assemble the Skewers: Take a wooden skewer or toothpick and start by threading a cherry tomato onto the skewer. Follow it with a basil leaf, gently folding it if necessary to fit. Next, add a mozzarella ball. Repeat the sequence until you have used up all the ingredients, guaranteeing each skewer holds one tomato, one basil leaf, and one mozzarella ball.
- Season the Skewers: Once all the skewers are assembled, place them on a serving platter. Drizzle the extra-virgin olive oil evenly over the skewers. Sprinkle a pinch of salt and freshly ground black pepper over the top to taste.
- Add the Finishing Touch: Just before serving, drizzle a small amount of balsamic glaze over each skewer. This will add a touch of sweetness and a beautiful glossy finish to the dish.
Extra Tips:
For the freshest taste, it’s important to use high-quality ingredients. Opt for vine-ripened cherry tomatoes and fresh basil leaves that are brightly colored and aromatic. If possible, choose buffalo mozzarella for a creamier texture.
You can prepare these skewers a few hours in advance; just store them in the refrigerator until ready to serve. However, remember to add the balsamic glaze just before serving to prevent the skewers from becoming soggy. Enjoy your Caprese Skewers as a vibrant and delicious addition to your Christmas party menu!
Sausage Rolls With a Twist
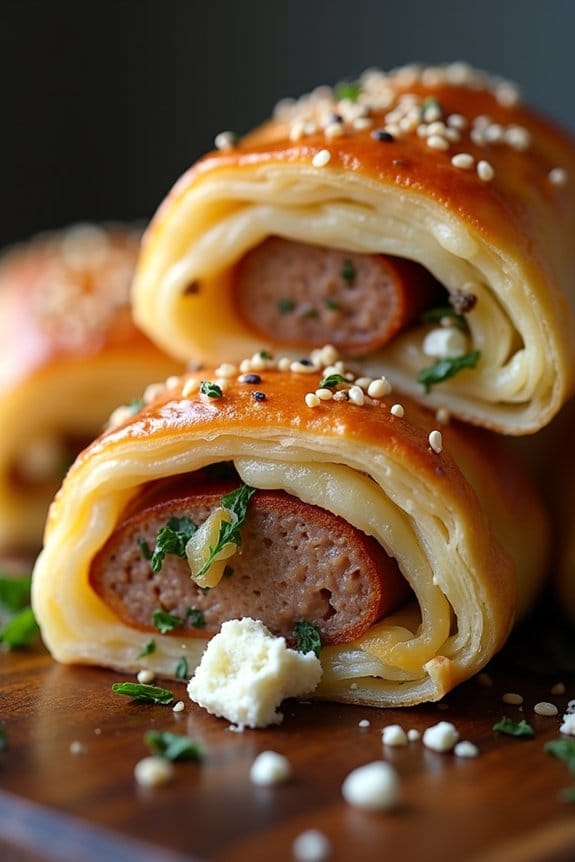
Sausage rolls are a classic finger food that never fails to please a crowd, but why not give them a little twist this Christmas? By adding some unexpected ingredients, you can elevate this traditional treat into something truly special. Imagine flaky, golden pastry encasing a flavorful filling that surprises and delights with every bite.
The key is to retain the beloved essence of sausage rolls while introducing a few innovative elements that will have your guests reaching for seconds. This version of sausage rolls includes a hint of sweetness from caramelized onions, a touch of sharpness from crumbled feta cheese, and a sprinkle of aromatic herbs to brighten the flavors.
The combination of these ingredients creates a perfect balance that dances on the palate, making these sausage rolls an irresistible addition to your Christmas party spread. Whether you serve them fresh out of the oven or at room temperature, these rolls are sure to be a hit.
Ingredients (Serves 4-6):
- 500g sausage meat
- 1 sheet of puff pastry (ready-rolled)
- 1 medium onion, finely sliced
- 2 tablespoons olive oil
- 100g crumbled feta cheese
- 1 tablespoon fresh thyme leaves
- 1 tablespoon fresh parsley, chopped
- 1 egg, beaten
- Salt and pepper to taste
- Sesame seeds (optional)
Instructions:
1. Preheat the Oven: Begin by preheating your oven to 200°C (400°F). Line a baking tray with parchment paper to guarantee your sausage rolls don’t stick during baking.
2. Caramelize the Onions: Heat the olive oil in a frying pan over medium heat. Add the sliced onions and cook them slowly, stirring occasionally, until they’re golden brown and caramelized. This should take about 10-15 minutes. Once done, set aside to cool.
3. Prepare the Filling: In a large mixing bowl, combine the sausage meat, crumbled feta cheese, caramelized onions, fresh thyme, and parsley. Season the mixture with salt and pepper to taste. Mix everything thoroughly until well combined.
4. Assemble the Sausage Rolls: Unroll the puff pastry on a lightly floured surface. Cut the sheet in half lengthwise to create two long rectangles. Spoon the sausage mixture along the length of each piece of pastry, leaving a small border.
Roll the pastry over the filling tightly to enclose it, and seal the edges by brushing with a little beaten egg.
5. Cut and Prepare for Baking: Cut each long roll into smaller pieces, about 4-5 cm each. Place them seam-side down on the prepared baking tray. Brush the tops with the remaining beaten egg and sprinkle with sesame seeds if desired.
6. Bake: Place the tray in the preheated oven and Bake for 20-25 minutes, or until the pastry is golden brown and the filling is cooked through.
7. Serve: Allow the sausage rolls to cool slightly on a wire rack before serving. They can be enjoyed warm or at room temperature.
Extra Tips:
For an even more flavorful filling, consider adding a teaspoon of whole grain mustard or a few chopped sun-dried tomatoes to the sausage mixture.
If you’re preparing these sausage rolls in advance, you can freeze them before baking. When you’re ready to serve, simply bake them from frozen, adding a few extra minutes to the cooking time.
Additionally, confirm that the pastry isn’t too cold, as this can make it difficult to roll tightly around the filling. Enjoy your festive creation!
Parmesan Crusted Asparagus
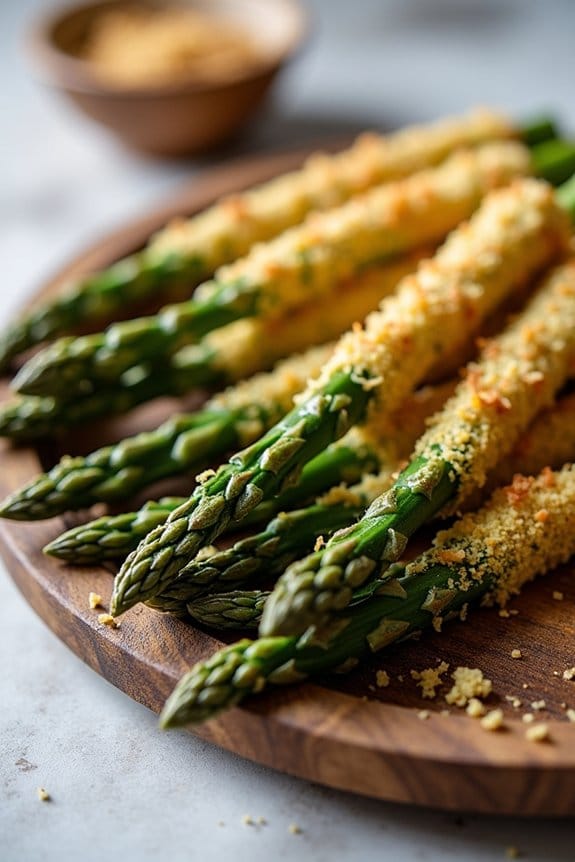
Parmesan Crusted Asparagus is a delightful and sophisticated finger food that’s perfect for your Christmas party. This dish combines the tender, earthy flavors of asparagus with a crispy, cheesy coating that’s certain to be a hit with your guests. The asparagus spears are coated in a mixture of breadcrumbs and Parmesan cheese, then baked to perfection, resulting in a deliciously crunchy exterior and a tender interior.
It’s a simple yet elegant dish that can be prepared in advance and served warm or at room temperature, making it a convenient option for entertaining. This recipe isn’t only easy to prepare but also adds a touch of elegance to your holiday spread. The combination of Parmesan cheese and breadcrumbs provides a wonderfully savory crust that perfectly complements the natural flavor of the asparagus.
The dish isn’t only visually appealing with its golden-brown coating but also offers a delightful contrast in textures. Whether you’re hosting a large gathering or a small get-together, this Parmesan Crusted Asparagus will undoubtedly impress your guests and leave them asking for the recipe.
Ingredients (serving size: 4-6 people):
- 1 pound fresh asparagus, trimmed
- 1/2 cup grated Parmesan cheese
- 1/2 cup panko breadcrumbs
- 1/4 teaspoon garlic powder
- 1/4 teaspoon salt
- 1/4 teaspoon black pepper
- 2 large eggs
- 2 tablespoons olive oil
Cooking Instructions:
- Preheat the Oven: Preheat your oven to 400°F (200°C). Line a baking sheet with parchment paper or lightly grease it with olive oil to prevent sticking.
- Prepare the Coating: In a shallow dish, combine the grated Parmesan cheese, panko breadcrumbs, garlic powder, salt, and black pepper. Mix thoroughly to guarantee the seasoning is evenly distributed.
- Beat the Eggs: In another shallow dish, beat the eggs until they’re well mixed. This will be used to help the Parmesan and breadcrumb mixture adhere to the asparagus.
- Coat the Asparagus: Dip each asparagus spear into the beaten eggs, ensuring it’s completely coated. Then, roll the spear in the Parmesan and breadcrumb mixture, pressing gently to adhere the coating. Repeat with all asparagus spears.
- Arrange on Baking Sheet: Place the coated asparagus spears onto the prepared baking sheet in a single layer. Drizzle with olive oil to help the coating crisp up during baking.
- Bake the Asparagus: Transfer the baking sheet to the preheated oven. Bake for 12-15 minutes, or until the asparagus is tender and the coating is golden brown and crispy.
- Serve: Remove from the oven and let cool slightly before serving. Arrange on a platter and serve warm or at room temperature.
Extra Tips:
For the best results, choose fresh, firm asparagus stalks that are roughly the same thickness to guarantee even cooking. Trimming the woody ends of the asparagus will make the spears more tender and easier to eat.
If you prefer a spicier kick, consider adding a pinch of cayenne pepper to the breadcrumb mixture. Additionally, if you’re preparing this dish in advance, you can coat the asparagus and store it covered in the refrigerator for a few hours before baking, allowing you to enjoy more time with your guests during your party.
Mini Chicken and Waffles
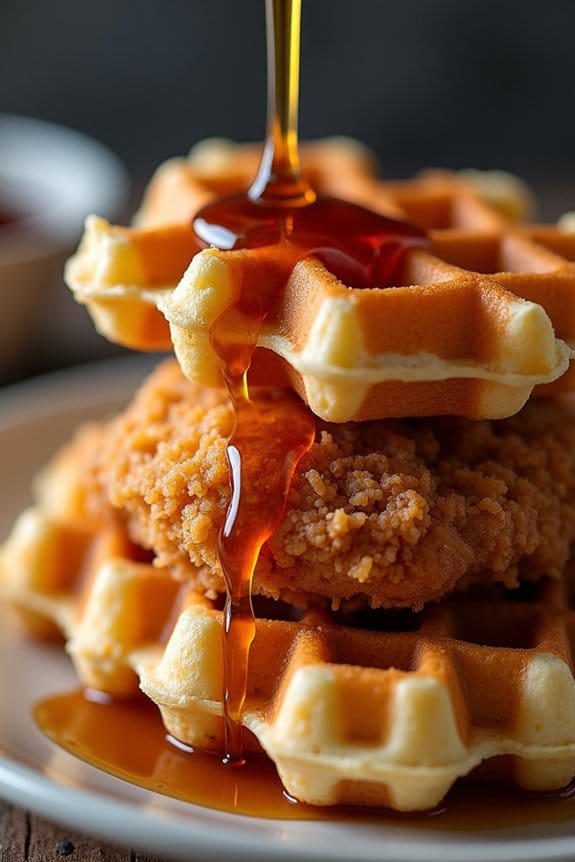
Mini Chicken and Waffles are a delightful and whimsical finger food option perfect for any Christmas party. Combining the savory taste of crispy fried chicken with the sweet, fluffy texture of mini waffles, this dish offers a perfect balance of flavors and textures. Not only are they delicious, but their bite-sized nature makes them easy to enjoy while mingling with guests. These mini treats are sure to be a hit and leave your friends and family wanting more.
This recipe is designed to serve 4-6 people, making it an ideal choice for a small to medium-sized gathering. The dish involves preparing both the chicken and the waffles from scratch, guaranteeing a fresh and homemade taste that’s bound to impress. The chicken is seasoned to perfection and fried until golden brown, while the waffles are light and airy, providing the perfect vessel for the succulent chicken pieces. A drizzle of maple syrup ties all the flavors together, creating a harmonious blend that’s both comforting and festive.
Ingredients:
- 1 pound boneless, skinless chicken breasts
- 1 cup buttermilk
- 1 cup all-purpose flour
- 1 teaspoon paprika
- 1 teaspoon garlic powder
- 1 teaspoon salt
- 1/2 teaspoon black pepper
- 1/2 teaspoon cayenne pepper (optional for extra spice)
- Vegetable oil for frying
- 1 1/2 cups waffle mix
- 1 cup milk
- 1 egg
- 2 tablespoons melted butter
- Maple syrup for drizzling
Cooking Instructions:
- Prepare the Chicken: Begin by cutting the chicken breasts into bite-sized pieces. Place the chicken pieces in a bowl and pour the buttermilk over them, making certain they’re well-coated. Let the chicken marinate in the refrigerator for at least 30 minutes to an hour. This tenderizes the chicken and infuses it with flavor.
- Season and Coat the Chicken: In a shallow dish, mix together the flour, paprika, garlic powder, salt, black pepper, and cayenne pepper. Remove the chicken from the buttermilk, allowing any excess to drip off, then dredge each piece in the seasoned flour mixture until thoroughly coated.
- Fry the Chicken: Heat about 2 inches of vegetable oil in a deep skillet or large pot over medium-high heat. Once the oil reaches 350°F (175°C), carefully add the chicken pieces in batches, making sure not to overcrowd the pan. Fry the chicken for about 3-4 minutes on each side, or until golden brown and cooked through. Remove the chicken with a slotted spoon and drain on paper towels to remove excess oil.
- Make the Waffles: While the chicken is frying, prepare the waffle batter. In a mixing bowl, combine the waffle mix, milk, egg, and melted butter, stirring until smooth. Heat a mini waffle maker and pour a small amount of batter into the center, cooking according to the waffle maker’s instructions until the waffles are golden brown.
- Assemble the Mini Chicken and Waffles: Place a piece of fried chicken on top of each mini waffle. Secure with a toothpick if desired for easy handling. Arrange them on a serving platter.
- Finish with Maple Syrup: Just before serving, drizzle each mini chicken and waffle stack with a generous amount of maple syrup to add a sweet finish.
Extra Tips: For added flavor, consider adding a pinch of cinnamon or nutmeg to the waffle batter for a festive touch. If you’re short on time, store-bought mini waffles can be used as a substitute for homemade ones. Additionally, you can prepare the chicken and waffles in advance and reheat them in the oven at 350°F for 5-10 minutes before serving. This guarantees that everything is warm and crispy when guests arrive.
Prosciutto-Wrapped Melon
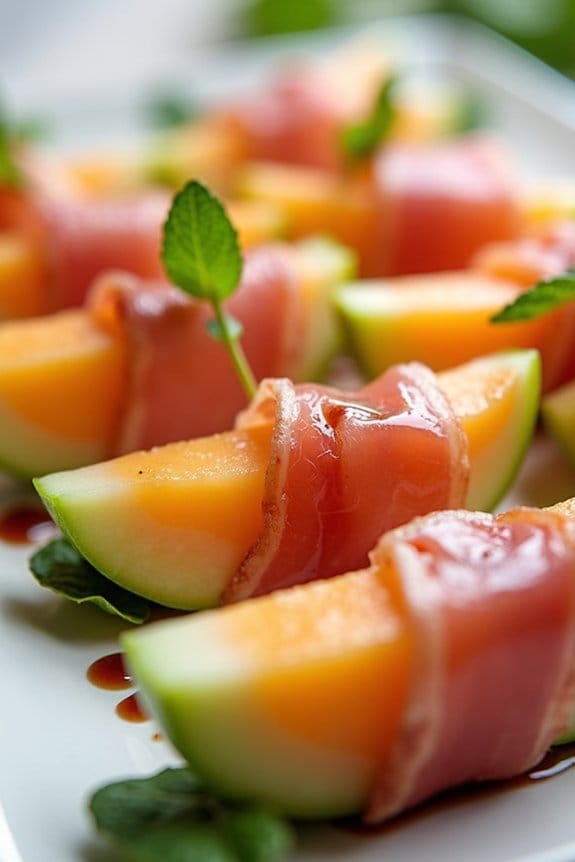
Prosciutto-wrapped melon is a classic Italian appetizer that combines the sweet, juicy flavor of ripe melon with the savory, salty taste of prosciutto. This delightful combination makes it an ideal finger food for any Christmas party, offering a rejuvenating contrast to heavier holiday fare. Not only is it incredibly easy to prepare, but it also adds a touch of elegance to any table setting.
The key to achieving the perfect balance of flavors lies in selecting high-quality ingredients: a perfectly ripe melon and thinly sliced prosciutto. This dish isn’t only visually appealing but also versatile, allowing you to customize it with additional ingredients such as fresh mint leaves or a drizzle of balsamic glaze.
It can be prepared in advance and served chilled, making it a stress-free option for entertaining. The best part is that it requires no cooking, so you can focus on enjoying the festivities with your guests. Here’s how to make this delicious appetizer for a serving size of 4-6 people.
Ingredients:
- 1 ripe cantaloupe or honeydew melon
- 12 slices of prosciutto
- Fresh mint leaves (optional)
- Balsamic glaze (optional)
- Toothpicks or cocktail skewers
Cooking Instructions:
- Prepare the Melon: Start by cutting the melon in half and removing the seeds with a spoon. Once the seeds are removed, cut the melon into wedges or bite-sized cubes, depending on your preference.
- Wrap with Prosciutto: Take a slice of prosciutto and gently wrap it around each piece of melon. The prosciutto should fit snugly without being too tight. If the slices are too wide, you can cut them in half lengthwise.
- Add Optional Ingredients: If you’re using fresh mint leaves, tuck a small leaf under the prosciutto for an extra burst of flavor. Similarly, if you prefer a touch of sweetness, drizzle a small amount of balsamic glaze over the wrapped melon.
- Secure with Toothpicks: To make handling easier, insert a toothpick or cocktail skewer through each piece of prosciutto-wrapped melon. This step guarantees that the prosciutto stays in place and makes it easier for guests to pick up.
- Chill Before Serving: Place the prepared melon pieces on a serving platter and refrigerate for at least 30 minutes before serving. This allows the flavors to meld together and guarantees that the melon is delightfully cool.
Extra Tips:
For the best results, choose a melon that’s ripe but still firm, as an overly ripe melon may become too soft and difficult to handle. When selecting prosciutto, opt for thinly sliced, high-quality options for the best flavor.
If you want to add a gourmet touch, consider sprinkling a bit of freshly ground black pepper over the top before serving. Remember to keep the dish chilled until just before serving to maintain its freshness and vibrant taste.
Honey Garlic Shrimp Skewers
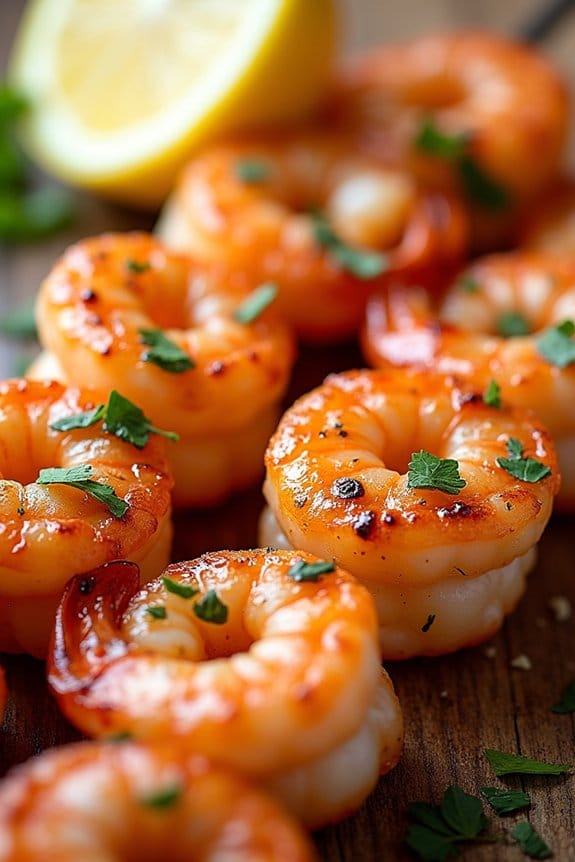
Honey Garlic Shrimp Skewers are a delightful dish that combines the savory taste of shrimp with the sweetness of honey and the aromatic flavor of garlic. Perfect for a Christmas party, these skewers are easy to prepare and are certain to be a hit with your guests. The combination of tender shrimp, a hint of citrus from lemon juice, and the nutty aroma of sesame oil makes this dish irresistibly delicious.
These skewers can be served as an appetizer or as part of the main course. The marinating process allows the shrimp to soak up all the flavors, making each bite a burst of sweet and savory goodness. The short cooking time guarantees that the shrimp remain juicy and tender, providing a perfect balance of texture and taste.
Whether you’re hosting a large gathering or a small festive dinner, these Honey Garlic Shrimp Skewers will add a touch of elegance and flavor to your holiday spread.
Ingredients for 4-6 servings:
- 1 1/2 pounds of large shrimp, peeled and deveined
- 1/4 cup of honey
- 1/4 cup of soy sauce
- 2 tablespoons of lemon juice
- 3 cloves of garlic, minced
- 1 tablespoon of sesame oil
- 1 teaspoon of ground ginger
- 1/4 teaspoon of red pepper flakes (optional)
- 2 tablespoons of chopped fresh parsley
- Wooden or metal skewers
Cooking Instructions:
- Prepare the Marinade: In a medium bowl, whisk together honey, soy sauce, lemon juice, minced garlic, sesame oil, ground ginger, and red pepper flakes. Mix until well combined to create a flavorful marinade.
- Marinate the Shrimp: Add the shrimp to the bowl of marinade, ensuring they’re fully submerged. Cover the bowl and refrigerate for at least 30 minutes, allowing the shrimp to absorb the flavors.
- Preheat the Grill: If using a grill, preheat it to medium-high heat. If using an oven, preheat to 400°F (200°C). If using wooden skewers, soak them in water for at least 10 minutes to prevent burning.
- Assemble the Skewers: Thread the marinated shrimp onto the skewers, dividing them evenly. Reserve the marinade for basting during cooking.
- Cook the Skewers: Place the skewers on the grill or in the oven. Cook for 2-3 minutes on each side, basting occasionally with the reserved marinade, until the shrimp turn pink and opaque.
- Garnish and Serve: Once cooked, remove the skewers from the heat. Sprinkle with chopped fresh parsley for added color and flavor. Serve immediately as a delightful appetizer or alongside your favorite sides.
Extra Tips:
When cooking Honey Garlic Shrimp Skewers, make sure not to overcook the shrimp, as they can become tough and rubbery. Keep an eye on them as they cook, as they only need a few minutes on each side.
If you’re using an oven, consider using a broiler setting for a slightly charred finish on the shrimp. Additionally, you can adjust the level of heat by increasing or omitting the red pepper flakes according to your preference.
For an extra touch, serve the skewers with a wedge of lemon for added freshness.
Pigs in a Blanket

Pigs in a Blanket are a classic, crowd-pleasing appetizer perfect for any Christmas party. These savory snacks combine flaky, buttery pastry with juicy cocktail sausages, making them irresistible to guests of all ages.
Whether you’re hosting a large gathering or a cozy family get-together, Pigs in a Blanket are certain to be a hit on your holiday table. This recipe is designed to serve 4-6 people, making enough to satisfy your guests while still leaving room for other festive treats.
With a few simple ingredients and minimal preparation time, these delightful morsels are as easy to make as they’re delicious. Follow the steps below to create the perfect batch of Pigs in a Blanket for your Christmas celebration.
Ingredients (serving size: 4-6 people):
- 1 package (14 oz) cocktail sausages
- 1 package (8 oz) refrigerated crescent roll dough
- 2 tablespoons Dijon or yellow mustard (optional)
- 1 egg, beaten
- 1 tablespoon poppy seeds or sesame seeds (optional)
Cooking Instructions:
- Preheat the Oven: Start by preheating your oven to 375°F (190°C). Line a baking sheet with parchment paper to prevent sticking and facilitate easy cleanup.
- Prepare the Crescent Dough: Unroll the crescent roll dough onto a clean work surface. Separate the dough into individual triangles as per the perforations.
- Cut the Dough: Depending on the size of your cocktail sausages, cut each triangle into smaller strips. Each strip should be wide enough to wrap around a sausage once.
- Wrap the Sausages: If using mustard, spread a thin layer onto each dough strip. Place one cocktail sausage at the wide end of a strip and roll it up towards the narrow end, making sure the sausage is completely enclosed. Repeat for all sausages.
- Arrange on Baking Sheet: Place the wrapped sausages seam side down on the prepared baking sheet, leaving some space between each one to allow for expansion during baking.
- Add the Egg Wash: Brush the tops of the wrapped sausages with the beaten egg. This will give them a golden, glossy finish once baked.
- Sprinkle Seeds: Optionally, sprinkle poppy seeds or sesame seeds over the egg-washed dough for added flavor and texture.
- Bake: Place the baking sheet in the preheated oven and bake for 12-15 minutes, or until the dough is golden brown and puffed.
- Cool and Serve: Remove the Pigs in a Blanket from the oven and allow them to cool slightly before serving. They can be enjoyed warm or at room temperature.
Extra Tips:
For a flavor twist, consider experimenting with different types of sausages, such as smoked or spicy varieties, to cater to different taste preferences.
If you have dietary restrictions, there are gluten-free crescent roll options available in most grocery stores. To save time on the day of your event, you can assemble the Pigs in a Blanket a few hours in advance and store them in the refrigerator until ready to bake.
Additionally, serve these treats with a variety of dipping sauces like honey mustard, barbecue sauce, or ketchup for an extra burst of flavor.
Spinach and Artichoke Cups

Spinach and Artichoke Cups are a delightful addition to your Christmas party finger food spread. These bite-sized treats aren’t only delicious but also visually appealing, with a creamy and cheesy filling nestled inside a crispy phyllo pastry shell.
They’re easy to prepare, allowing you to whip up a batch without spending all day in the kitchen, so you can enjoy the festivities along with your guests. The combination of spinach and artichoke is a classic pairing that never fails to impress.
The earthy flavors of the spinach blend beautifully with the tangy artichokes, while the addition of cream cheese and Parmesan adds a rich, savory flavor that’s hard to resist. These cups are versatile enough to be served hot or at room temperature, making them a convenient option for a party where you want to keep the food flowing throughout the evening.
Ingredients for 4-6 servings:
- 1 package of phyllo pastry sheets
- 1 cup frozen spinach, thawed and drained
- 1 cup canned artichoke hearts, chopped
- 4 oz cream cheese, softened
- 1/2 cup grated Parmesan cheese
- 1/4 cup sour cream
- 1/4 cup mayonnaise
- 1 clove garlic, minced
- 1/4 teaspoon salt
- 1/4 teaspoon black pepper
- 1/4 teaspoon red pepper flakes (optional)
- Non-stick cooking spray or melted butter
Cooking Instructions:
- Preheat the oven to 375°F (190°C). This will guarantee that your phyllo cups bake evenly and become golden and crispy.
- Prepare the phyllo pastry: Carefully unroll the phyllo sheets and cover them with a damp cloth to prevent drying out. Cut the sheets into 3-inch squares. You’ll need about 24 squares for this recipe.
- Layer the phyllo: Lightly spray a mini muffin tin with non-stick cooking spray or brush with melted butter. Layer 3 squares of phyllo in each muffin cup, brushing lightly with butter between each layer to help them stick together and crisp up nicely.
- Make the filling: In a medium mixing bowl, combine the softened cream cheese, drained spinach, chopped artichoke hearts, grated Parmesan, sour cream, mayonnaise, minced garlic, salt, black pepper, and red pepper flakes. Mix until all ingredients are well incorporated.
- Fill the cups: Spoon about a tablespoon of the spinach and artichoke mixture into each phyllo cup, confirming the filling is evenly distributed.
- Bake the cups: Place the filled muffin tin in the preheated oven and bake for 15-18 minutes, or until the phyllo is golden brown and the filling is bubbling.
- Cool slightly and serve: Allow the Spinach and Artichoke Cups to cool for a few minutes before gently removing them from the muffin tin. Serve warm or at room temperature.
Extra Tips:
To make your Spinach and Artichoke Cups even more flavorful, consider adding a squeeze of lemon juice to the filling for a fresh, zesty touch. If you prefer a bit of a kick, increase the amount of red pepper flakes or add a dash of hot sauce.
These cups can be made a day in advance; simply store them in an airtight container in the refrigerator and reheat in the oven for a few minutes before serving to restore their crispiness.
Festive Cheese Ball Bites
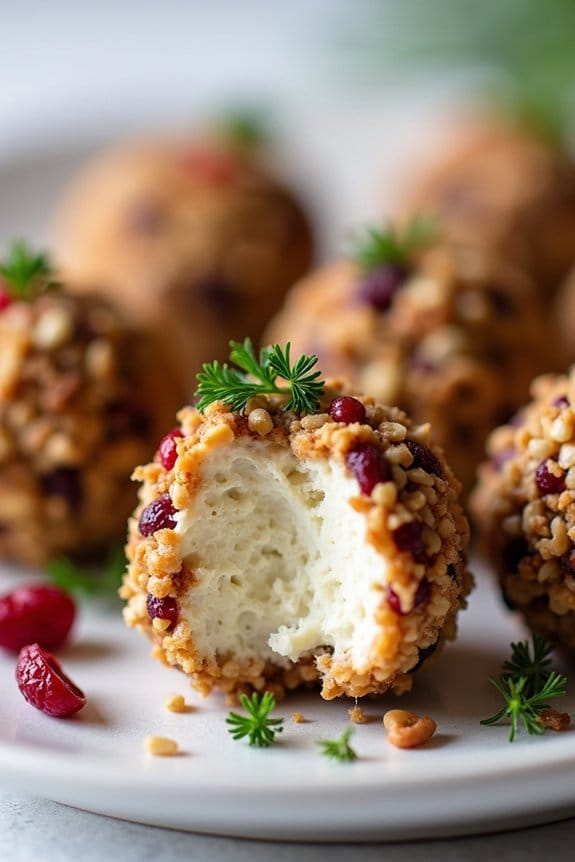
Festive Cheese Ball Bites are a delightful addition to any Christmas party, offering a burst of flavor in every bite. These bite-sized treats are perfect for mingling guests, allowing them to enjoy a savory snack without the need for utensils. The recipe combines cream cheese, cheddar, and a mix of flavorful ingredients to create a rich and creamy base, which is then rolled in various toppings for an added crunch and festive appearance.
Whether served on a platter with toothpicks or arranged in decorative bowls, these cheese balls are sure to be a hit at your holiday gathering.
The beauty of these cheese ball bites lies in their versatility and ease of preparation. You can customize them to suit your taste preferences or dietary needs by adjusting the spices, cheeses, or coatings. This recipe yields enough for 4-6 people, making it ideal for small gatherings or as part of a larger spread. Plus, they can be prepared in advance, allowing you more time to enjoy the festivities with your guests.
Ingredients (Serves 4-6):
- 8 oz cream cheese, softened
- 1 cup sharp cheddar cheese, shredded
- 2 tablespoons finely chopped chives
- 1 tablespoon Worcestershire sauce
- 1 teaspoon garlic powder
- 1/2 teaspoon onion powder
- 1/4 teaspoon salt
- 1/4 teaspoon black pepper
- 1 cup mixed nuts, finely chopped
- 1/4 cup dried cranberries, finely chopped
- 1/4 cup fresh parsley, finely chopped
Instructions:
- Prepare the Cheese Mixture: In a large mixing bowl, combine the softened cream cheese, shredded sharp cheddar cheese, chopped chives, Worcestershire sauce, garlic powder, onion powder, salt, and black pepper. Mix all the ingredients thoroughly until well combined, making sure the cheese and seasonings are evenly distributed throughout the cream cheese.
- Shape the Cheese Balls: Once the cheese mixture is ready, use a tablespoon to scoop out small portions of the mixture. Roll each portion between your palms to form smooth, round balls. Aim for a uniform size to guarantee even coating and presentation, approximately 1 inch in diameter.
- Prepare the Coatings: On a large plate or shallow dish, arrange the chopped nuts, dried cranberries, and fresh parsley in separate sections. This setup allows you to easily roll the cheese balls in different coatings, offering a variety of flavors and textures.
- Coat the Cheese Balls: Roll each cheese ball in your choice of coating, pressing gently to make sure the nuts, cranberries, or parsley adhere to the surface. You can mix and match the coatings to create a colorful and diverse platter of cheese ball bites.
- Chill the Cheese Balls: Once all the cheese balls are coated, place them on a tray and refrigerate for at least 1 hour. Chilling helps the cheese balls firm up and enhances the flavors, making them easier to serve and enjoy.
Extra Tips:
For an added touch of elegance, consider placing each cheese ball on a mini cracker or a slice of cucumber before serving. This not only adds a crunchy base but also makes the cheese balls easier to pick up.
If you’re preparing these bites in advance, store them in an airtight container in the fridge for up to 2 days, making sure they’re fresh for your event. Finally, feel free to experiment with different cheeses or spices to create your signature festive cheese ball bites.
Chocolate-Dipped Pretzel Rods

Chocolate-Dipped Pretzel Rods are a delightful and easy-to-make treat perfect for any Christmas party. They combine the salty crunch of pretzels with the sweet, smooth taste of chocolate, creating a delicious contrast that’s sure to please your guests.
These treats aren’t only tasty but also visually appealing, as they can be decorated with a variety of toppings to suit your festive theme. Preparing these chocolate-dipped pretzel rods is a fun activity that can involve the whole family. The recipe requires minimal ingredients and can be made in advance, saving you time on the day of the party.
Whether you prefer dark, milk, or white chocolate, these pretzel rods can be customized to your liking. With a serving size for 4-6 people, this recipe will make enough for everyone to enjoy.
Ingredients:
- 24 pretzel rods
- 12 ounces of semi-sweet chocolate chips
- 12 ounces of white chocolate chips
- Assorted sprinkles
- Crushed candy canes
- Chopped nuts (optional)
Cooking Instructions:
- Prepare the Workspace: Begin by lining two large baking sheets with parchment paper. This will prevent the chocolate-dipped pretzels from sticking and make clean-up easier.
- Melt the Chocolate: Place the semi-sweet chocolate chips in a microwave-safe bowl and microwave them in 30-second intervals, stirring in between until fully melted and smooth. Repeat the process for the white chocolate chips in a separate bowl.
- Dip the Pretzel Rods: Holding a pretzel rod by one end, dip it into the melted chocolate, covering about two-thirds of the rod. Allow any excess chocolate to drip back into the bowl.
- Decorate the Pretzels: Immediately after dipping, lay the pretzel rod on the prepared baking sheet and quickly sprinkle with your choice of sprinkles, crushed candy canes, or chopped nuts. This step must be done quickly before the chocolate hardens.
- Cool and Set: Allow the chocolate-dipped pretzel rods to cool and harden completely. You can expedite this process by placing the baking sheets in the refrigerator for about 15-20 minutes.
- Serve or Store: Once the chocolate has set, arrange the pretzel rods on a festive platter for serving or store them in an airtight container until ready to serve.
Extra Tips:
For an even smoother texture, consider adding a teaspoon of coconut oil to the chocolate before melting, which will help it adhere better to the pretzels.
Be creative with your toppings; crushed nuts, mini chocolate chips, or even edible glitter can add an extra festive touch. If you want to add some color, you can also use colored candy melts instead of chocolate chips.
Remember to work quickly when decorating the pretzels, as the chocolate can harden rapidly. Enjoy the process and have fun creating these holiday treats!
