
Planning a Christmas lunch can feel overwhelming, right? Last year, I found myself missing out on the fun while managing the chaos in the kitchen. But this year, I’ve found a game-changer: make-ahead recipes. Picture having Herb Butter Roast Turkey and Cheesy Potato Gratin ready before the festivities begin. Let’s discover how to create a delicious and stress-free holiday feast together.
Classic Roast Turkey With Herb Butter
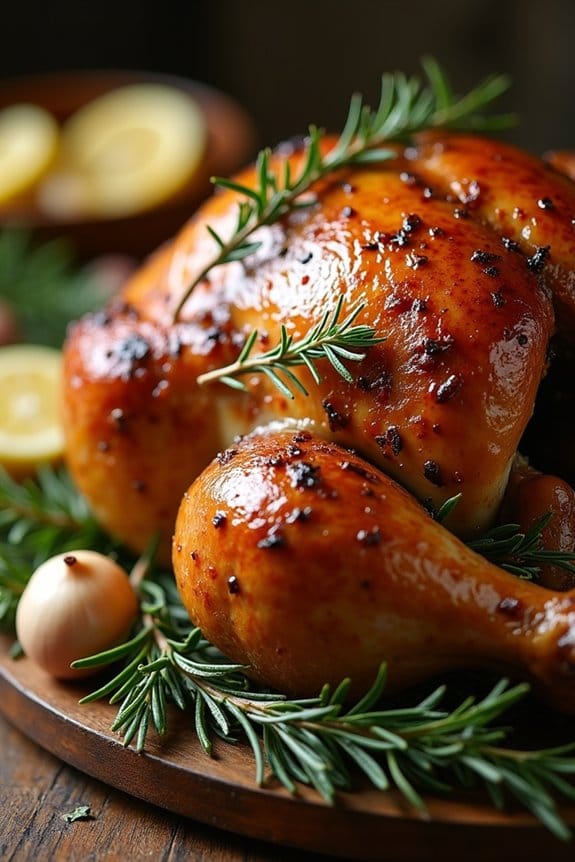
This Classic Roast Turkey With Herb Butter is the epitome of a traditional Christmas lunch that everyone looks forward to. The succulent turkey, infused with aromatic herbs and spices, pairs beautifully with the rich and flavorful herb butter, creating a mouth-watering centerpiece for your holiday gathering.
Preparing the turkey ahead of time guarantees that you can enjoy a stress-free Christmas day with your family, as much of the work is done in advance. This recipe serves 4-6 people, making it perfect for a small family gathering or an intimate holiday lunch.
The key to this dish is in the preparation of the herb butter, which not only flavors the turkey but also helps it achieve a perfectly golden and crispy skin. With the make-ahead option, you can marinate the turkey overnight, allowing the flavors to meld and intensify, guaranteeing a delicious and memorable meal.
Ingredients:
- 1 whole turkey (8-10 pounds)
- 1 cup unsalted butter, softened
- 2 tablespoons fresh rosemary, chopped
- 2 tablespoons fresh thyme, chopped
- 1 tablespoon fresh sage, chopped
- 4 cloves garlic, minced
- Salt and pepper, to taste
- 1 lemon, halved
- 1 onion, quartered
- 1 cup chicken broth
- 2 tablespoons olive oil
Cooking Instructions:
- Prepare the Herb Butter: In a bowl, combine the softened butter, chopped rosemary, thyme, sage, and minced garlic. Mix well until all ingredients are thoroughly combined. Season with salt and pepper to taste.
- Prepare the Turkey: Remove the turkey giblets and pat the turkey dry with paper towels. Gently loosen the skin over the breast and thighs by sliding your fingers underneath it, being careful not to tear it.
- Apply the Herb Butter: Take half of the herb butter and rub it generously under the loosened skin, ensuring an even distribution. Rub the remaining herb butter over the entire surface of the turkey.
- Season the Cavity: Season the inside of the turkey cavity with salt and pepper. Stuff it with the lemon halves and onion quarters.
- Truss the Turkey: Tie the turkey legs together with kitchen twine and tuck the wings underneath the body to guarantee even cooking.
- Roast the Turkey: Preheat your oven to 325°F (165°C). Place the turkey on a roasting rack inside a roasting pan. Drizzle olive oil over the turkey and pour chicken broth into the bottom of the pan.
- Cook the Turkey: Roast the turkey in the preheated oven for approximately 3 to 3.5 hours, or until the internal temperature reaches 165°F (74°C) in the thickest part of the breast. Baste the turkey every 30 minutes with the pan juices for a moist and flavorful result.
- Rest the Turkey: Once cooked, remove the turkey from the oven and let it rest for 20-30 minutes before carving. This allows the juices to redistribute, resulting in a more tender and juicy turkey.
Extra Tips:
To guarantee the turkey stays moist, avoid overcooking by checking the internal temperature with a meat thermometer. If the skin begins to brown too quickly, tent the turkey with aluminum foil to prevent burning.
Preparing the herb butter and seasoning the turkey a day in advance can enhance the flavors, making for a more flavorful dish. Additionally, using a roasting rack elevates the turkey, allowing for even cooking and a crispier skin.
Enjoy your make-ahead Christmas lunch with this delicious roast turkey as the star attraction.
Honey-Glazed Spiral Ham
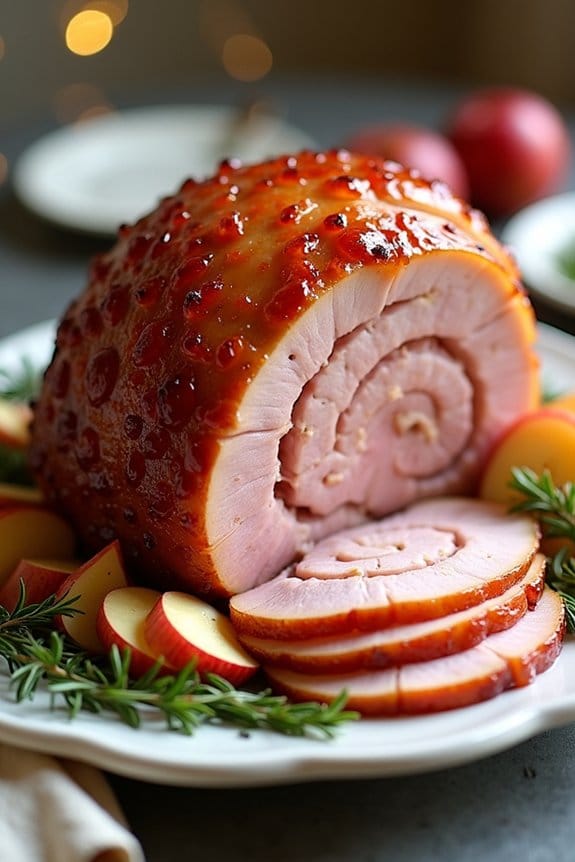
Make your Christmas lunch extra special with a succulent Honey-Glazed Spiral Ham. This dish is a classic holiday favorite, easy to prepare, and impressively delicious. The sweet and savory glaze complements the ham’s natural flavors, making it a centerpiece worthy of your festive table.
Best of all, this recipe can be prepared ahead of time, giving you more freedom to enjoy the holiday festivities with your loved ones.
A spiral ham is pre-cooked, which means it only needs to be warmed and glazed, making it an ideal choice for a stress-free Christmas lunch. The honey glaze adds a hint of sweetness and a beautiful glossy finish, elevating the ham to a new level of deliciousness. This recipe serves 4-6 people, perfect for a family gathering or a small group of friends.
Ingredients (serves 4-6):
- 1 (4-5 pound) spiral-cut ham
- 1 cup honey
- 1/2 cup brown sugar
- 1/4 cup Dijon mustard
- 1/4 cup apple cider vinegar
- 1 teaspoon ground cinnamon
- 1/2 teaspoon ground cloves
- 1/2 teaspoon ground ginger
Cooking Instructions:
- Preheat the Oven: Preheat your oven to 325°F (165°C) to guarantee a consistent temperature for warming the ham.
- Prepare the Ham: Place the spiral ham in a roasting pan, cut side down. This helps to retain moisture during cooking.
- Make the Honey Glaze: In a medium saucepan, combine the honey, brown sugar, Dijon mustard, apple cider vinegar, cinnamon, cloves, and ginger. Cook over medium heat, stirring constantly, until the sugar has dissolved and the mixture is smooth.
- Apply the Glaze: Brush the glaze generously over the ham, making sure it seeps into the spiral cuts for maximum flavor infusion.
- Cover and Cook: Cover the ham loosely with aluminum foil to prevent the glaze from burning. Place it in the preheated oven and bake for about 10-12 minutes per pound, or until the internal temperature reaches 140°F (60°C).
- Baste and Finish: About 15 minutes before the ham is done, remove the foil and baste the ham with additional glaze. This will enhance its flavor and create a beautiful caramelized finish.
- Rest and Serve: Once cooked, remove the ham from the oven and let it rest for about 10 minutes before slicing. This allows the juices to redistribute, guaranteeing every slice is juicy and flavorful.
Extra Tips:
For a more intense flavor, consider glazing the ham the night before and letting it marinate in the refrigerator.
When reheating leftovers, cover the ham with foil to maintain its moisture. To add a festive touch, garnish your serving platter with fresh herbs or fruit slices.
This dish pairs beautifully with traditional sides such as mashed potatoes or roasted vegetables, making your Christmas lunch a memorable feast.
Make-Ahead Beef Wellington
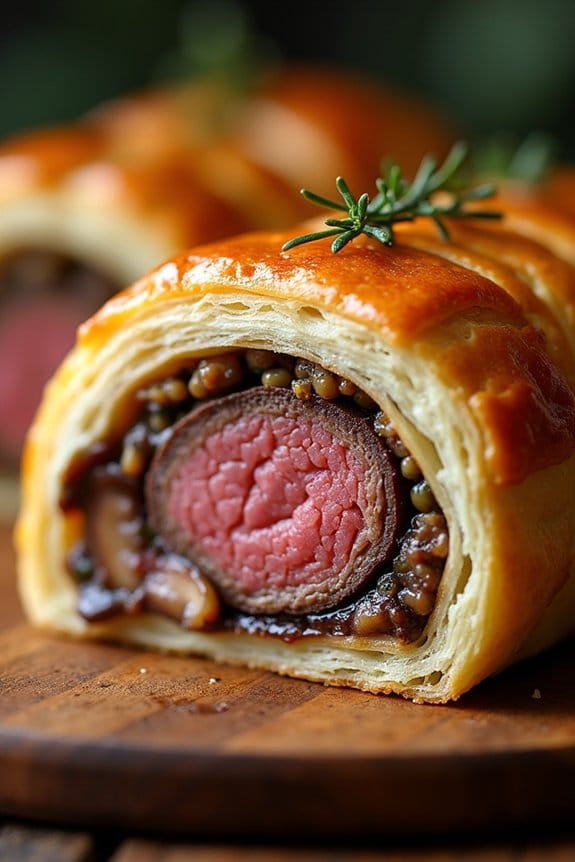
Make-Ahead Beef Wellington is a perfect centerpiece for a Christmas lunch, allowing you to prepare most of the elements in advance, so you can enjoy more time with your family and guests on the big day. This classic dish combines a succulent beef tenderloin with an earthy mushroom duxelles, all encased in a flaky puff pastry. By preparing the components ahead of time, you can reduce the stress of cooking on Christmas Day and still serve a show-stopping meal.
The key to a successful Make-Ahead Beef Wellington is in the preparation. You can complete most of the steps a day or two in advance, such as searing the beef, making the duxelles, and even assembling the Wellington up to the point of baking. On Christmas Day, all you’ll need to do is brush the pastry with egg wash and bake it to golden perfection. This recipe serves 4-6 people, making it ideal for an intimate family gathering or a small party with friends.
Ingredients (Serves 4-6):
- 1.5 lbs beef tenderloin
- 2 tablespoons olive oil
- Salt and pepper to taste
- 2 tablespoons Dijon mustard
- 1 lb mushrooms, finely chopped
- 1 medium onion, finely chopped
- 2 cloves garlic, minced
- 2 tablespoons butter
- 1 sheet puff pastry
- 6 slices prosciutto
- 1 egg, beaten
Instructions:
- Prepare the Beef: Season the beef tenderloin with salt and pepper. Heat olive oil in a pan over medium-high heat. Sear the beef on all sides until browned, about 2-3 minutes per side. Remove from heat and allow to cool. Brush the beef with Dijon mustard and set aside.
- Make the Duxelles: In the same pan, add butter and melt over medium heat. Add onions and garlic, sautéing until translucent. Add mushrooms and cook until all moisture evaporates and the mixture becomes paste-like. Season with salt and pepper, then let cool.
- Assemble the Wellington: Roll out the puff pastry on a floured surface. Lay the prosciutto slices over the pastry in a single layer. Spread the mushroom duxelles evenly over the prosciutto. Place the beef tenderloin on top of the duxelles. Carefully roll the pastry around the beef, sealing the edges with beaten egg to make sure it stays closed.
- Refrigerate: Wrap the Wellington tightly in plastic wrap and refrigerate for at least 30 minutes, or overnight if making ahead.
- Bake the Wellington: Preheat the oven to 400°F (200°C). Remove the Wellington from the refrigerator and brush the top with the remaining beaten egg. Place it on a baking sheet lined with parchment paper. Bake for 25-30 minutes or until the pastry is golden brown and the internal temperature of the beef reaches 130°F (54°C) for medium-rare.
- Rest and Serve: Allow the Beef Wellington to rest for 10 minutes before slicing. This will help the juices redistribute throughout the meat, making sure each slice is juicy and flavorful.
Extra Tips:
When making the duxelles, be sure to chop the mushrooms finely to make certain they cook down properly and release all their moisture. This will prevent the pastry from becoming soggy.
If preparing the Wellington in advance, make sure it’s tightly wrapped in plastic wrap to maintain its shape and prevent the pastry from drying out.
Avoid overcooking the beef by using a meat thermometer, and remember that the beef will continue to cook slightly while resting. If you prefer your beef well-done, adjust the baking time accordingly, but be cautious of overcooking as the tenderloin is a lean cut and can dry out if cooked too long.
Slow Cooker Pork Loin With Apples
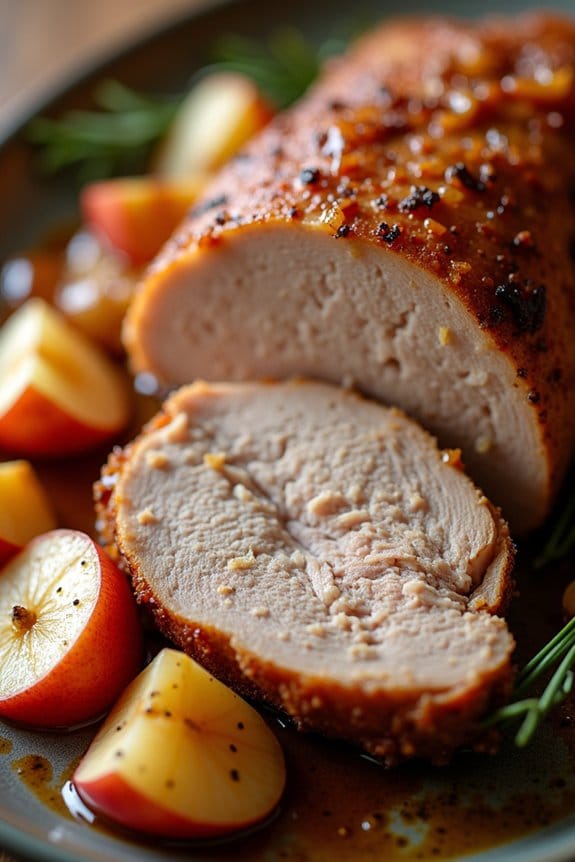
Slow Cooker Pork Loin With Apples is a delightful and festive dish perfect for a make-ahead Christmas lunch. The combination of tender pork loin with the sweet and slightly tart flavors of apples creates a harmonious balance that’s sure to impress your family and guests. The slow cooker does most of the work, allowing you to spend more time enjoying the holiday festivities rather than in the kitchen.
This dish not only fills your home with a warm, comforting aroma but also delivers a mouthwatering meal that feels both special and comforting. The beauty of this recipe is its simplicity, yet it yields a sophisticated result. The pork loin is seasoned and placed in the slow cooker with sliced apples and a few other ingredients that enhance the natural flavors of the meat and fruit.
As it cooks slowly over several hours, the pork becomes incredibly tender and absorbs the delicious flavors of the apples and spices. This recipe serves 4-6 people, making it ideal for a medium-sized holiday gathering.
Ingredients:
- 2 to 3 pounds boneless pork loin
- 4 large apples, cored and sliced
- 1 large onion, sliced
- 1 cup apple cider
- 2 tablespoons Dijon mustard
- 2 tablespoons honey
- 1 tablespoon olive oil
- 1 teaspoon dried thyme
- 1 teaspoon ground cinnamon
- Salt and pepper to taste
Cooking Instructions:
- Prepare the Pork Loin: Season the pork loin generously on all sides with salt, pepper, and dried thyme. This will help to enhance the flavor of the meat as it cooks.
- Sear the Pork: In a large skillet over medium-high heat, add olive oil. Once hot, add the pork loin and sear it on all sides until it’s browned. This usually takes about 3-4 minutes per side and helps to lock in the juices.
- Layer the Slow Cooker: Place the sliced onions and half of the sliced apples at the bottom of the slow cooker. This will act as a bed for the pork loin, infusing it with flavor as it cooks.
- Mix the Sauce: In a small bowl, combine apple cider, Dijon mustard, honey, and ground cinnamon. Stir until well mixed.
- Combine Ingredients: Place the seared pork loin on top of the onions and apples. Pour the apple cider mixture over the pork. Add the remaining apple slices on top of the pork.
- Cook: Cover the slow cooker and set it on low. Cook for 6-8 hours, or until the pork is tender and easily pulls apart.
- Rest and Serve: Once cooked, remove the pork loin from the slow cooker and let it rest for about 10 minutes before slicing. Serve the pork slices with the apples and onions, drizzling some of the cooking juices over the top for added flavor.
Extra Tips:
For an added depth of flavor, consider using a variety of apples, such as Granny Smith for a tart contrast or Honeycrisp for additional sweetness.
The pork loin can be prepped and seared the night before, then placed in the refrigerator. This means on Christmas morning, all you need to do is assemble and turn on the slow cooker.
If you prefer a thicker sauce, remove the liquid from the slow cooker after cooking, bring it to a simmer in a saucepan, and whisk in a cornstarch slurry until the desired consistency is reached.
Cheesy Potato Gratin
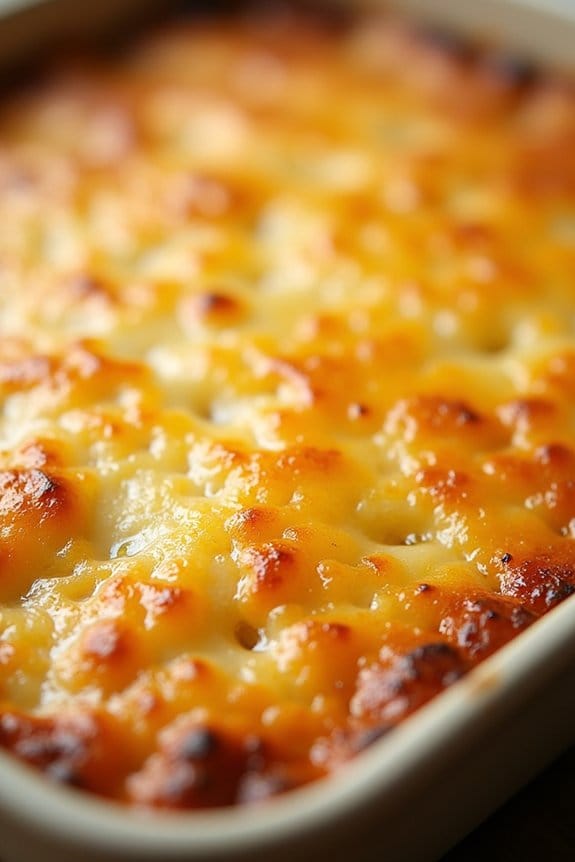
Cheesy Potato Gratin is the perfect side dish to prepare for a festive Christmas lunch. This classic dish combines layers of thinly sliced potatoes with a rich and creamy cheese sauce, resulting in a comforting and indulgent accompaniment to any holiday meal.
The gratin isn’t only delicious but also simple to make ahead, allowing you more time to enjoy the festivities with your loved ones. This recipe is designed to serve 4-6 people, making it ideal for a small family gathering or as part of a larger spread.
By preparing the Cheesy Potato Gratin in advance, you can easily reheat it just before serving, ensuring a warm and satisfying dish without the last-minute hassle. The blend of cheeses in this recipe adds depth of flavor, while the golden, crispy top provides a delightful contrast to the soft, creamy interior.
Ingredients:
- 2 pounds russet potatoes, peeled and thinly sliced
- 2 cups heavy cream
- 1 cup grated Gruyère cheese
- 1 cup grated cheddar cheese
- 2 cloves garlic, minced
- 1 teaspoon salt
- 1/2 teaspoon black pepper
- 1/4 teaspoon ground nutmeg
- 2 tablespoons unsalted butter, divided
- 1/4 cup grated Parmesan cheese
Cooking Instructions:
- Preheat the Oven: Preheat your oven to 375°F (190°C). Butter a 9×13 inch baking dish with 1 tablespoon of the unsalted butter.
- Prepare the Cream Mixture: In a medium saucepan over medium heat, combine the heavy cream, minced garlic, salt, black pepper, and nutmeg. Bring the mixture to a simmer, stirring occasionally, then remove from heat.
- Layer the Potatoes and Cheeses: Arrange a layer of sliced potatoes in the prepared baking dish. Sprinkle a portion of Gruyère and cheddar cheeses over the potatoes. Repeat the layering process, finishing with a layer of potatoes on top.
- Pour the Cream Mixture: Carefully pour the cream mixture over the layered potatoes, ensuring even coverage. Use a spatula to press down and submerge the potatoes in the cream.
- Add the Final Touches: Top the potatoes with the remaining Gruyère and cheddar cheeses. Dot the top with the remaining tablespoon of butter and sprinkle the grated Parmesan cheese evenly.
- Bake the Gratin: Cover the dish with aluminum foil and bake in the preheated oven for 45 minutes. Remove the foil and continue baking for an additional 20-25 minutes, or until the top is golden brown and the potatoes are tender when pierced with a fork.
- Cool and Serve: Allow the gratin to cool for about 10 minutes before serving. This resting time will help the dish set, making it easier to slice and serve.
Extra Tips: To make this dish ahead, follow all steps up to baking, then cover and refrigerate for up to 24 hours. When ready to serve, bring the gratin to room temperature and bake as directed.
If you want a crispier top, consider broiling the gratin for a couple of minutes after baking. For added flavor, you can experiment with different cheese combinations or include a pinch of cayenne pepper for a subtle kick.
Creamy Green Bean Casserole
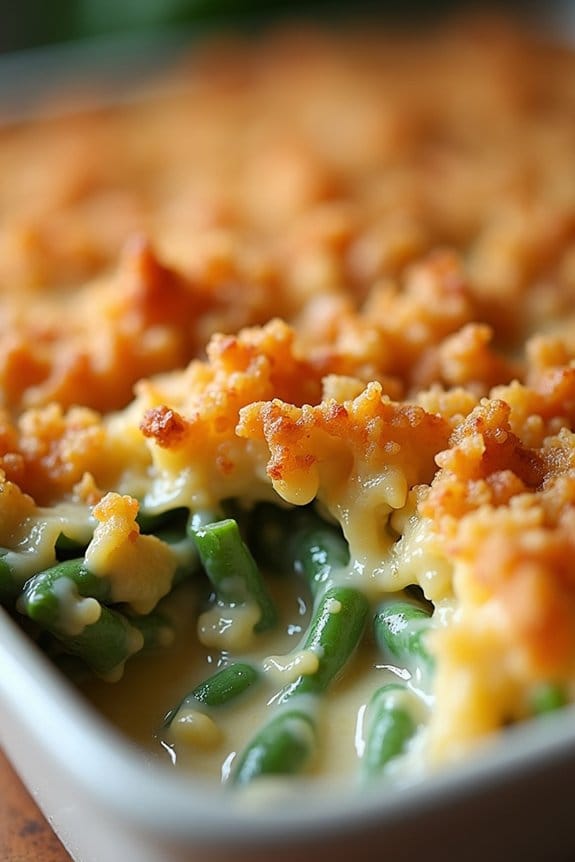
Creamy Green Bean Casserole is a classic side dish that’s perfect for your make-ahead Christmas lunch. This dish combines tender green beans with a rich, creamy sauce and a crispy topping, bringing a touch of nostalgia and comfort to your holiday meal.
Preparing this casserole in advance allows you to enjoy more time with your loved ones on Christmas day, as the flavors meld together beautifully when made ahead.
This recipe serves 4-6 people, making it an ideal size for a small family gathering or as part of a larger holiday buffet. The use of fresh green beans provides a vibrant and slightly crunchy texture, while the creamy sauce adds depth and richness. Topped with crispy fried onions, this dish offers a delightful contrast of flavors and textures that everyone will love.
Ingredients:
- 1 pound fresh green beans, trimmed and cut into 2-inch pieces
- 2 tablespoons unsalted butter
- 1 small onion, diced
- 2 cloves garlic, minced
- 8 ounces mushrooms, sliced
- 1/4 cup all-purpose flour
- 1 1/2 cups chicken or vegetable broth
- 1 cup heavy cream
- Salt and pepper to taste
- 1 cup crispy fried onions
Cooking Instructions:
- Preheat the oven: Set your oven to 350°F (175°C) to get it ready for baking the casserole.
- Blanch the green beans: Bring a large pot of salted water to a boil. Add the green beans and cook for about 4-5 minutes until they’re bright green and tender-crisp. Drain and immediately transfer them to a bowl of ice water to stop the cooking process. Drain again and set aside.
- Prepare the sauce: In a large skillet over medium heat, melt the butter. Add the diced onion and minced garlic, sautéing until the onion is translucent, about 3-4 minutes. Add the sliced mushrooms and cook until they’re browned and tender.
- Thicken the sauce: Sprinkle the flour over the sautéed vegetables and stir to coat. Gradually whisk in the chicken or vegetable broth, followed by the heavy cream. Bring the mixture to a simmer, stirring constantly until it thickens, about 5-7 minutes. Season with salt and pepper to taste.
- Combine and bake: In a large mixing bowl, combine the green beans and the creamy mushroom sauce, tossing until well coated. Transfer the mixture to a 9×13 inch baking dish. Spread the crispy fried onions evenly over the top.
- Bake the casserole: Place the baking dish in the preheated oven and bake for 25-30 minutes, or until the top is golden brown and the sauce is bubbling. Remove from the oven and let it cool slightly before serving.
Extra Tips:
To save time on Christmas day, prepare the casserole up to the baking step the day before and store it in the refrigerator. When you’re ready to bake, remove it from the fridge about 30 minutes before baking to bring it to room temperature.
If you prefer a thicker sauce, add an additional tablespoon of flour during the thickening step. For added flavor, try incorporating a splash of soy sauce or a teaspoon of Dijon mustard into the sauce. Make sure to taste and adjust the seasoning as needed, especially if using low-sodium broth.
Cranberry and Pecan Stuffed Acorn Squash
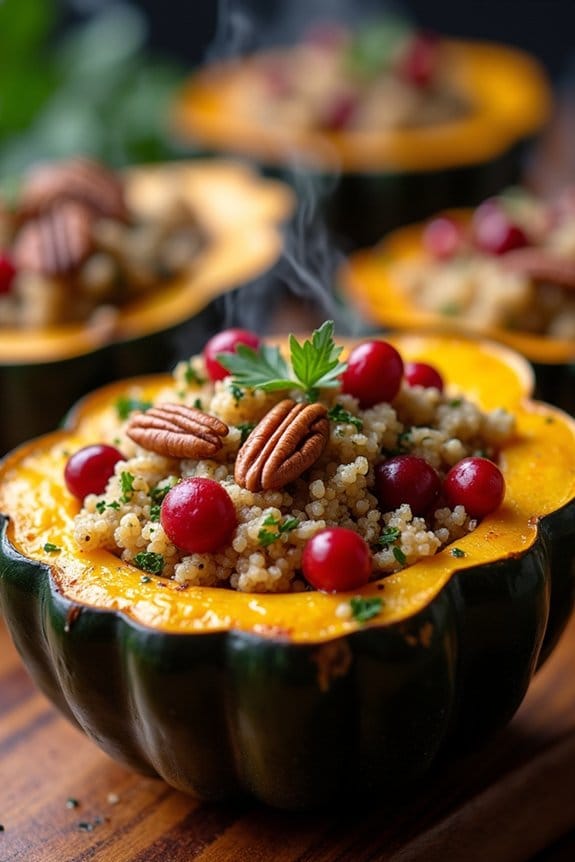
Cranberry and Pecan Stuffed Acorn Squash is a delightful and festive dish that perfectly embodies the flavors of the holiday season. This make-ahead recipe isn’t only visually appealing but also packed with nutritious ingredients that will leave your guests impressed. The sweetness of the cranberries combined with the nutty crunch of pecans creates a wonderful contrast to the tender acorn squash, making it an ideal addition to your Christmas lunch menu.
Preparing this dish in advance allows you to focus on spending quality time with your loved ones on Christmas day without the stress of cooking last-minute. The stuffed acorn squash can be assembled ahead of time and simply baked when needed, making it a convenient yet elegant option. Its vibrant colors and rich flavors make it a standout centerpiece on any holiday table.
Ingredients (Serves 4-6):
- 3 medium acorn squashes
- 1 cup cooked quinoa
- 1 cup dried cranberries
- 1 cup chopped pecans
- 1/2 cup chopped fresh parsley
- 1 small onion, finely chopped
- 2 cloves garlic, minced
- 1 tablespoon olive oil
- 1 teaspoon ground cinnamon
- 1/2 teaspoon ground nutmeg
- Salt and pepper to taste
Instructions:
- Prepare the Squash: Preheat your oven to 400°F (200°C). Cut each acorn squash in half lengthwise and remove the seeds and stringy pulp using a spoon. Place the squash halves cut-side up on a baking sheet.
- Season the Squash: Drizzle the olive oil over the squash halves, and season them with salt and pepper to taste. Roast in the preheated oven for about 25-30 minutes, or until the flesh is tender when pierced with a fork.
- Prepare the Stuffing: While the squash is roasting, heat a skillet over medium heat and add a bit of olive oil. Sauté the onion and garlic until they’re soft and translucent, about 5 minutes. In a large mixing bowl, combine the cooked quinoa, sautéed onion and garlic, dried cranberries, chopped pecans, parsley, cinnamon, nutmeg, salt, and pepper. Mix well to guarantee all ingredients are evenly distributed.
- Stuff the Squash: Once the squash is cooked, remove it from the oven and fill each squash half with the prepared stuffing mixture. Pack the stuffing firmly but gently into the cavities.
- Final Bake: Return the stuffed squashes to the oven and bake for an additional 15-20 minutes, until the stuffing is heated through and slightly golden on top.
- Serve: Allow the stuffed acorn squash to cool for a few minutes before serving. Garnish with additional parsley if desired for a pop of color.
Extra Tips:
When choosing acorn squash, look for ones that are firm and heavy for their size, with a dull, even-colored rind. You can prepare the quinoa and stuffing mixture a day ahead, and store it in an airtight container in the fridge. On the day of your gathering, simply stuff and bake the squash.
For a vegan variation, verify all ingredients are plant-based, and enjoy this dish as a delicious main course or a hearty side. Feel free to experiment with the stuffing by adding ingredients like feta cheese or roasted vegetables for an extra layer of flavor.
Maple Roasted Carrots and Parsnips
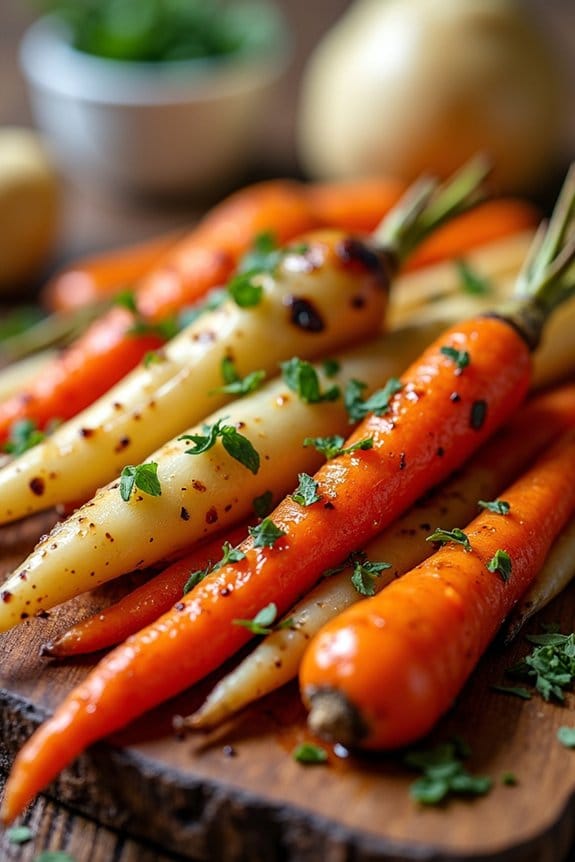
Maple Roasted Carrots and Parsnips are the perfect side dish for a festive Christmas lunch. This dish combines the natural sweetness of carrots and parsnips with the rich flavor of maple syrup, creating a delicious and comforting combination. The vegetables are roasted to perfection, giving them a lovely caramelized exterior and a tender interior.
This recipe can be easily prepared in advance, allowing you to focus on other aspects of your holiday meal when the moment arrives. The beauty of Maple Roasted Carrots and Parsnips lies in its simplicity and ease of preparation. With just a few ingredients and minimal effort, you can create a dish that’s both visually appealing and packed with flavor.
The recipe serves 4-6 people, making it perfect for a family gathering or a small holiday party. Whether you’re a seasoned cook or a beginner, this recipe is sure to be a hit at your Christmas table.
Ingredients for 4-6 people:
- 4 large carrots, peeled and cut into sticks
- 4 large parsnips, peeled and cut into sticks
- 3 tablespoons olive oil
- 3 tablespoons maple syrup
- 1 teaspoon salt
- 1/2 teaspoon black pepper
- 1 tablespoon fresh thyme leaves (optional)
- 1 tablespoon fresh parsley, chopped for garnish
Cooking Instructions:
- Preheat & Prepare: Preheat your oven to 400°F (200°C). Line a large baking sheet with parchment paper for easy clean-up.
- Prepare Vegetables: Peel the carrots and parsnips, then cut them into evenly sized sticks. This guarantees they cook uniformly.
- Mix Ingredients: In a large mixing bowl, combine the olive oil, maple syrup, salt, and black pepper. Add the carrot and parsnip sticks to the bowl and toss them until they’re well coated with the mixture.
- Arrange on Baking Sheet: Spread the coated vegetables in a single layer on the prepared baking sheet. Make sure they aren’t overlapping to guarantee even roasting.
- Roast: Place the baking sheet in the preheated oven and roast for 25-30 minutes. Halfway through roasting, turn the vegetables to guarantee they brown on all sides.
- Check for Doneness: The carrots and parsnips should be golden brown and tender when pierced with a fork. If they need more time, continue roasting and check every few minutes.
- Garnish & Serve: Once roasted, remove the baking sheet from the oven. If using, sprinkle fresh thyme leaves over the vegetables for added flavor. Garnish with chopped parsley before serving warm.
Extra Tips:
To save time on the day of your Christmas lunch, you can prepare the carrots and parsnips in advance by peeling and cutting them the day before. Store them in an airtight container in the refrigerator.
On the day of your meal, simply toss them with the maple syrup mixture and roast. Additionally, you can experiment with different herbs and spices to tailor the flavor to your liking, such as adding a pinch of cinnamon or nutmeg for a more festive touch.
Festive Wild Rice and Quinoa Salad
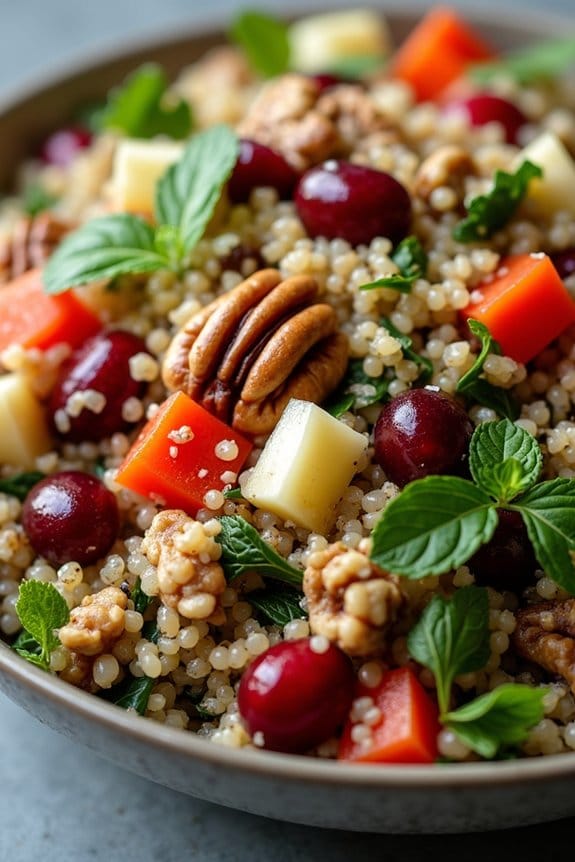
As Christmas approaches, having a few make-ahead dishes in your culinary arsenal can make the festive season less stressful and more enjoyable. One such dish is the Festive Wild Rice and Quinoa Salad, a vibrant and nutritious option that can be prepared in advance and served as a side or even a light main meal.
This salad combines the earthy flavors of wild rice and quinoa with the sweetness of dried fruits and the crunch of toasted nuts, offering a delightful blend of textures and tastes that will complement any holiday spread. Not only is this salad delicious, but it’s also packed with nutrients, thanks to its wholesome ingredients.
Wild rice and quinoa provide a hearty base rich in protein and fiber, while the addition of fresh herbs, dried cranberries, nuts, and a zesty citrus dressing adds layers of flavor. The best part? It can be made a day ahead, allowing the flavors to meld together beautifully, making it an ideal choice for Christmas lunch.
Ingredients (Serves 4-6):
- 1 cup wild rice
- 1 cup quinoa
- 1/2 cup dried cranberries
- 1/2 cup chopped walnuts or pecans
- 1 red bell pepper, diced
- 1/2 cup chopped fresh parsley
- 1/4 cup chopped fresh mint
- 1/4 cup olive oil
- Juice of 1 lemon
- 1 tablespoon honey
- Salt and pepper to taste
Cooking Instructions:
- Cook the Wild Rice: Rinse the wild rice under cold water. In a medium saucepan, combine the wild rice with 3 cups of water and a pinch of salt. Bring to a boil, then reduce the heat to low, cover, and simmer for about 45-50 minutes or until the rice is tender and has absorbed most of the water. Drain any excess water and set aside to cool.
- Cook the Quinoa: Rinse the quinoa under cold water. In another saucepan, combine the quinoa with 2 cups of water and a pinch of salt. Bring to a boil, then reduce the heat to low, cover, and simmer for about 15 minutes or until the quinoa is cooked through and the water is absorbed. Fluff with a fork and set aside to cool.
- Prepare the Dressing: In a small bowl, whisk together the olive oil, lemon juice, honey, salt, and pepper until well combined.
- Toast the Nuts: In a dry skillet over medium heat, add the chopped walnuts or pecans. Stir frequently until the nuts are golden brown and fragrant, about 5 minutes. Remove from heat and let them cool.
- Assemble the Salad: In a large mixing bowl, combine the cooked wild rice, quinoa, dried cranberries, diced red bell pepper, toasted nuts, chopped parsley, and mint. Pour the dressing over the salad and gently toss until all the ingredients are evenly coated.
- Chill and Serve: Cover the salad and refrigerate for at least an hour before serving to allow the flavors to meld together. Serve chilled or at room temperature.
Extra Tips:
For an added burst of flavor, consider incorporating some citrus zest from the lemon into the dressing. This salad can be easily customized; feel free to substitute the dried cranberries with dried apricots or cherries.
If you prefer a more savory touch, add some crumbled feta cheese or goat cheese just before serving. Remember to taste and adjust the seasoning before serving, as refrigeration can sometimes dampen the flavors.
No-Bake Chocolate Peppermint Bark Cheesecake

No-Bake Chocolate Peppermint Bark Cheesecake is a perfect make-ahead dessert that combines the rich flavors of chocolate with the invigorating zest of peppermint.
This luscious cheesecake requires no oven time, making it an ideal choice for a stress-free Christmas lunch. With its creamy texture and festive topping, it’s sure to be a hit with family and friends. The combination of chocolate and peppermint is both classic and contemporary, bringing a touch of holiday magic to your meal.
This cheesecake features a crunchy chocolate cookie crust, a smooth and creamy peppermint-flavored cheesecake filling, and a delightful topping of chocolate peppermint bark. It can be prepared in advance and stored in the refrigerator, freeing up your time to focus on other aspects of your holiday celebration.
The recipe serves 4-6 people, making it perfect for an intimate gathering or a special treat for your loved ones.
Ingredients (serves 4-6):
- 1 1/2 cups chocolate cookie crumbs
- 1/4 cup melted unsalted butter
- 16 oz cream cheese, softened
- 1 cup powdered sugar
- 1 teaspoon peppermint extract
- 1 teaspoon vanilla extract
- 1 cup heavy whipping cream
- 4 oz dark chocolate, melted
- 1/2 cup crushed peppermint candies or candy canes
- 6 oz peppermint bark, chopped
Instructions:
- Prepare the Crust: In a medium bowl, combine the chocolate cookie crumbs and melted butter. Stir until the mixture resembles wet sand. Press the mixture into the bottom of a 9-inch springform pan evenly. Place in the refrigerator to set while preparing the filling.
- Make the Cheesecake Filling: In a large mixing bowl, beat the softened cream cheese and powdered sugar together until smooth and creamy. Add the peppermint extract and vanilla extract, mixing until fully incorporated.
- Whip the Cream: In a separate bowl, whip the heavy cream until soft peaks form. Gently fold the whipped cream into the cream cheese mixture until fully combined, taking care not to deflate the mixture.
- Assemble the Cheesecake: Remove the crust from the refrigerator. Pour half of the cheesecake filling over the crust and spread evenly. Drizzle the melted dark chocolate over the filling and sprinkle with half of the crushed peppermint candies. Top with the remaining cheesecake filling, smoothing the top with a spatula.
- Chill: Cover the cheesecake with plastic wrap and refrigerate for at least 4 hours, or until set. For best results, leave it overnight.
- Decorate Before Serving: Just before serving, remove the cheesecake from the springform pan. Top with chopped peppermint bark and the remaining crushed peppermint candies for a festive touch.
Extra Tips: Verify the cream cheese is fully softened before mixing to avoid lumps in the filling. You can make this cheesecake up to two days in advance, storing it in the refrigerator until ready to serve.
For a cleaner cut, use a hot knife to slice the cheesecake, wiping the blade clean between cuts. If peppermint bark isn’t readily available, you can substitute with a mix of white and dark chocolate chips, adding extra crushed peppermint candies for flavor.
Traditional Christmas Pudding With Brandy Sauce

Christmas pudding is a quintessential holiday dessert that brings warmth and nostalgia to any festive gathering. This make-ahead recipe allows you to prepare this rich and flavorful pudding well in advance, so you can focus on enjoying the festivities with your loved ones. The combination of dried fruits, spices, and brandy creates a wonderfully aromatic and indulgent pudding that’s perfect for a Christmas lunch. The accompanying brandy sauce adds a luxurious touch, making this dessert an unforgettable part of your holiday meal.
Preparing a Traditional Christmas Pudding does require a bit of time and patience, but the results are truly worth it. By allowing the pudding to mature for a few weeks, the flavors deepen and meld beautifully. This recipe serves 4-6 people, making it ideal for a small family gathering. With the following ingredients and step-by-step instructions, you’ll be able to create a delightful dessert that will impress your guests and become a cherished holiday tradition.
Ingredients for the Pudding (Serves 4-6):
- 150g currants
- 150g sultanas
- 150g raisins
- 100g mixed peel
- 100g plain flour
- 100g fresh breadcrumbs
- 100g suet or unsalted butter (grated)
- 100g dark brown sugar
- 1 tsp mixed spice
- 1/2 tsp ground cinnamon
- 1/4 tsp ground nutmeg
- Zest of 1 lemon
- Zest of 1 orange
- 3 large eggs
- 150ml brandy
- 50ml stout or dark ale
Ingredients for the Brandy Sauce:
- 50g unsalted butter
- 50g plain flour
- 500ml milk
- 100g caster sugar
- 4 tbsp brandy
Cooking Instructions:
- Prepare the Fruit Mixture: In a large mixing bowl, combine the currants, sultanas, raisins, and mixed peel. Add the lemon and orange zests, and pour in the brandy. Stir well, cover the bowl with a clean cloth, and let it soak overnight to allow the fruits to absorb the flavors.
- Mix the Dry Ingredients: In another bowl, sift together the flour, mixed spice, cinnamon, and nutmeg. Add the breadcrumbs, suet or grated butter, and dark brown sugar. Mix until well combined.
- Combine Wet and Dry Ingredients: Beat the eggs in a separate bowl. Add the soaked fruit mixture and the stout or dark ale to the dry ingredients, then pour in the beaten eggs. Stir until everything is well incorporated.
- Steam the Pudding: Grease a 1.2-liter pudding basin and spoon the pudding mixture into it. Cover the basin with a double layer of greased parchment paper and a layer of foil, securing it tightly with string. Place the basin in a large pan with enough water to come halfway up the sides. Steam the pudding for 6 hours, making sure the water is topped up as needed.
- Store and Mature: Once steamed, allow the pudding to cool completely. Replace the parchment and foil with fresh ones and store it in a cool, dry place for at least 4 weeks to mature.
- Make the Brandy Sauce: Melt the butter in a saucepan over medium heat. Stir in the flour and cook for 1 minute. Gradually whisk in the milk until smooth. Add the caster sugar and cook, stirring, until the sauce thickens. Remove from heat and stir in the brandy.
- Reheat and Serve: On the day of serving, steam the pudding for 2 hours to reheat. Serve warm with the prepared brandy sauce drizzled over the top.
Extra Tips:
When making the pudding, ascertain that the fruit is well covered and soaked in brandy overnight for maximum flavor. If you prefer a non-alcoholic version, you can substitute the brandy with orange juice, but keep in mind that this will alter the traditional taste.
For an added touch, you can flame the pudding by pouring a little warm brandy over it and lighting it just before serving—ensure you do this safely and with caution. Enjoy your delicious Traditional Christmas Pudding With Brandy Sauce as a perfect ending to your festive meal!
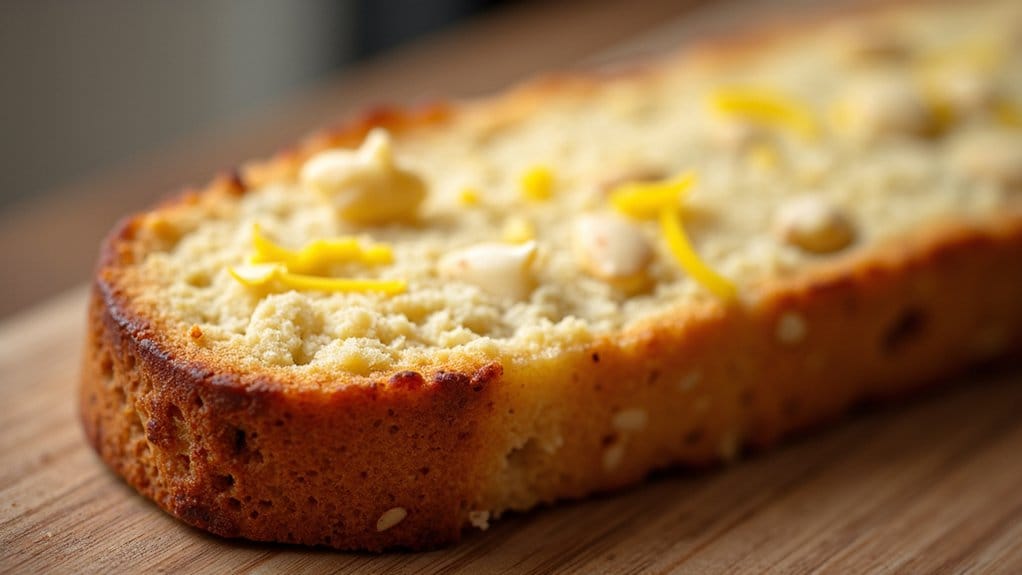
Lemon and Almond Biscotti

Lemon and Almond Biscotti are a delightful treat perfect for a festive Christmas lunch. These twice-baked Italian cookies are crisp, aromatic, and full of flavor, making them an ideal accompaniment to a hot cup of coffee or tea. The zesty hint of lemon combined with the nutty flavor of almonds creates a well-balanced taste that’s bound to please everyone at the table.
Plus, biscotti keep well for days, making them an excellent choice for making ahead of your holiday gathering.
Preparing Lemon and Almond Biscotti is quite straightforward, and they can be easily made in advance, allowing you more time to focus on other aspects of your Christmas lunch. The recipe below yields enough biscotti to serve 4-6 people, guaranteeing that you have just the right amount of these crunchy delights to share with family and friends.
With the right ingredients and a few simple steps, you can create a batch of biscotti that will be the perfect sweet ending to your festive meal.
Ingredients (Serves 4-6):
- 1 cup granulated sugar
- 1/2 cup unsalted butter, softened
- 2 large eggs
- 1 tablespoon lemon zest
- 1 teaspoon vanilla extract
- 2 cups all-purpose flour
- 1 teaspoon baking powder
- 1/4 teaspoon salt
- 1 cup whole almonds, coarsely chopped
- 1/2 cup sliced almonds
- 1 tablespoon lemon juice
Instructions:
- Preheat the Oven: Begin by preheating your oven to 350°F (175°C). Line a large baking sheet with parchment paper or a silicone baking mat.
- Mix the Wet Ingredients: In a large mixing bowl, cream together the sugar and softened butter until light and fluffy. Beat in the eggs, one at a time, making sure each is fully incorporated before adding the next. Stir in the lemon zest, lemon juice, and vanilla extract.
- Combine Dry Ingredients: In a separate bowl, whisk together the flour, baking powder, and salt. Gradually add the dry ingredients to the wet mixture, mixing until just combined.
- Add Almonds: Gently fold in the coarsely chopped whole almonds into the dough, making certain they’re evenly distributed.
- Shape the Dough: Divide the dough in half and shape each half into a log approximately 12 inches long and 2 inches wide. Place the logs onto the prepared baking sheet, leaving space between them as they’ll spread during baking.
- First Bake: Bake in the preheated oven for 25-30 minutes, or until the logs are lightly golden and firm to the touch. Remove from the oven and allow them to cool for about 10 minutes.
- Slice the Biscotti: Using a serrated knife, carefully slice each log diagonally into 1/2-inch thick slices.
- Second Bake: Arrange the slices cut side down on the baking sheet. Return to the oven and bake for an additional 10-12 minutes. Flip the biscotti over and bake for another 10-12 minutes, or until they’re crisp and golden on both sides.
- Cool Completely: Remove the biscotti from the oven and allow them to cool completely on a wire rack before serving or storing.
Extra Tips:
When baking biscotti, make sure that the logs aren’t overbaked during the first bake to prevent them from becoming too hard after the second bake. If you prefer a softer texture, you can reduce the baking time slightly.
For an added festive touch, consider drizzling the cooled biscotti with melted white chocolate. Store the biscotti in an airtight container to keep them crunchy and fresh for up to two weeks. Enjoy your Lemon and Almond Biscotti as a delightful treat during your Christmas celebrations or any time you desire a sweet and zesty snack.
