

The holiday season is almost here, bringing back memories of the delightful scents and tastes from my childhood home. Classic recipes like gingerbread cookies and spiced apple cider are more than just treats—they are a trip down memory lane. I’m excited to share these nostalgic recipes with you, each one a reminder of simpler, cozy times. Creating these festive favorites together can fill your home with warmth and joy. Curious to learn more?
Classic Gingerbread Cookies

Classic Gingerbread Cookies are a staple during the festive season, bringing warmth and nostalgia to any holiday gathering. Their rich, spiced aroma fills the kitchen, while their intricate designs and decorations add a personal touch to holiday festivities. Perfect for both children and adults, these cookies aren’t only delicious but also a delightful activity, as making and decorating them can become a cherished holiday tradition.
These gingerbread cookies are made with a blend of warm spices and molasses, giving them their characteristic flavor and color. The dough is easy to work with, allowing you to roll it out and cut it into various festive shapes like stars, trees, and gingerbread men.
Once baked and cooled, these cookies can be decorated with royal icing, sprinkles, and candies, making them as beautiful as they’re tasty. This recipe serves 4-6 people, guaranteeing there’s enough to share with friends or keep for yourself to enjoy throughout the holiday season.
Ingredients:
- 3 cups all-purpose flour
- 3/4 cup brown sugar
- 3/4 cup molasses
- 1/2 cup unsalted butter, softened
- 1 large egg
- 1 teaspoon baking soda
- 1/2 teaspoon salt
- 1 tablespoon ground ginger
- 1 tablespoon ground cinnamon
- 1/2 teaspoon ground cloves
- 1/2 teaspoon ground nutmeg
Cooking Instructions:
- Prepare the Ingredients: Before starting, gather all ingredients and verify the butter is softened to room temperature. This will make it easier to cream with the sugar.
- Mix the Dry Ingredients: In a medium bowl, whisk together the flour, baking soda, salt, ginger, cinnamon, cloves, and nutmeg. Set aside.
- Cream Butter and Sugar: In a large mixing bowl, cream the softened butter and brown sugar until light and fluffy. This should take about 2-3 minutes using an electric mixer.
- Add Wet Ingredients: Add the egg and molasses to the butter mixture, mixing until fully incorporated.
- Combine Dry and Wet Mixtures: Gradually add the dry ingredients to the wet mixture, mixing on low speed until a dough forms. It should be slightly sticky but manageable.
- Chill the Dough: Divide the dough in half, flatten into disks, wrap in plastic wrap, and refrigerate for at least 2 hours or until firm. This helps the dough maintain its shape when baking.
- Preheat the Oven: Preheat your oven to 350°F (175°C) and line two baking sheets with parchment paper.
- Roll Out the Dough: On a lightly floured surface, roll out one disk of dough to about 1/4 inch thickness. Use cookie cutters to cut into desired shapes and arrange them on the prepared baking sheets.
- Bake the Cookies: Bake in the preheated oven for 8-10 minutes, or until the edges are firm. The cookies will harden as they cool, so don’t overbake them.
- Cool and Decorate: Allow the cookies to cool on the baking sheets for 5 minutes before transferring them to a wire rack to cool completely. Once cool, decorate with royal icing and your choice of sprinkles or candies.
Extra Tips:
When making Classic Gingerbread Cookies, verify the dough is properly chilled before rolling it out. This step is fundamental for maintaining the shape of the cookies during baking.
If the dough becomes too soft while working with it, simply return it to the refrigerator for a few minutes. When decorating, let your creativity shine through, and remember that any leftover dough can be re-rolled and cut into more shapes.
Enjoy the process, and let these cookies bring joy to your holiday season!
Spiced Apple Cider
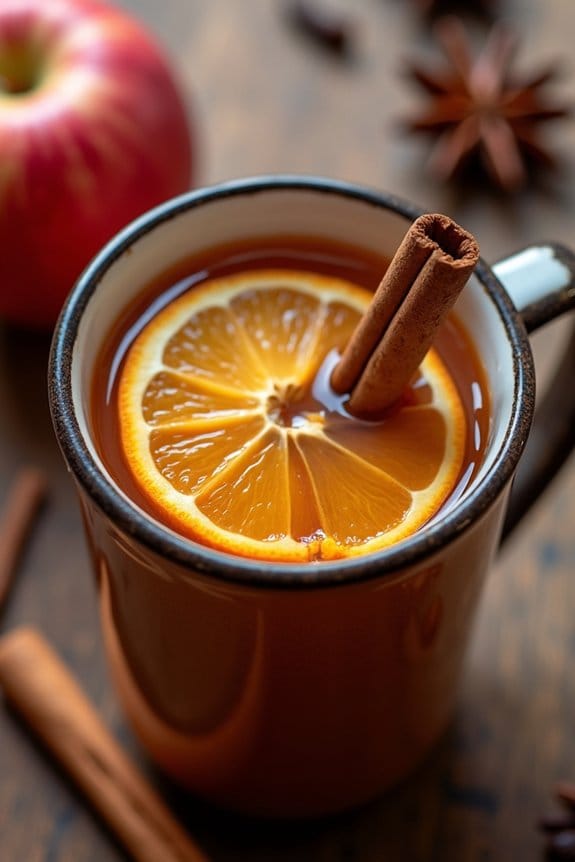
Spiced Apple Cider is a quintessential holiday drink that evokes the warmth and cheer of the Christmas season. This aromatic and flavorful beverage combines the natural sweetness of apples with the comforting spices of cinnamon, cloves, and star anise. Perfect for entertaining or simply enjoying a cozy night in, Spiced Apple Cider is a delightful way to embrace the festive spirit.
Whether served hot or chilled, its inviting aroma will fill your home with the scent of the holidays.
The preparation of Spiced Apple Cider is simple and requires only a few ingredients, most of which you might already have in your pantry. The key to its rich flavor is allowing the cider and spices to simmer together, allowing each ingredient to infuse the liquid with its unique essence. This recipe yields enough for 4-6 servings, making it ideal for a small gathering or family treat.
Ingredients (Serves 4-6):
- 8 cups apple cider
- 3 cinnamon sticks
- 4 whole cloves
- 2 star anise pods
- 1 orange, sliced
- 1/4 cup brown sugar
- 1/2 teaspoon ground nutmeg
- 1 teaspoon vanilla extract
- Optional: rum or bourbon for spiking
- Optional: apple slices and additional cinnamon sticks for garnish
Instructions:
- Prepare the Ingredients: Start by gathering all the ingredients. Wash the orange thoroughly and slice it into rounds. This citrus addition will add a zesty layer to your cider.
- Combine the Ingredients: In a large pot, pour the 8 cups of apple cider. Add the cinnamon sticks, whole cloves, star anise pods, orange slices, brown sugar, and ground nutmeg. Stir gently to combine the ingredients.
- Simmer the Cider: Place the pot over medium heat and allow the cider to come to a simmer. Once simmering, reduce the heat to low and let it simmer for about 30 minutes. This will allow the spices to infuse the cider thoroughly.
- Add Vanilla: After 30 minutes, stir in the vanilla extract. This will add a subtle sweetness and aroma to the cider, enhancing its overall flavor profile.
- Strain the Cider: Once the cider has simmered and the flavors are well combined, carefully remove the pot from heat. Use a fine mesh strainer to strain the cider into a heatproof bowl or another pot, removing the spices and orange slices.
- Serve and Garnish: Serve the cider hot in mugs. If you wish, spike each serving with a splash of rum or bourbon for an adult version. Garnish with apple slices and an additional cinnamon stick if desired.
- Optional Chilling: If you prefer cold cider, allow the strained cider to cool to room temperature, then refrigerate until chilled before serving.
Extra Tips:
When making Spiced Apple Cider, consider using fresh, high-quality apple cider for the best flavor. Avoid using apple juice, as it lacks the depth and richness of cider.
If you like your cider sweeter, you can adjust the brown sugar to taste. For an added twist, you can also experiment with other spices like allspice or cardamom.
Finally, if serving to a mixed crowd, keep the alcohol on the side to let guests choose whether to spike their drink.
Traditional Eggnog
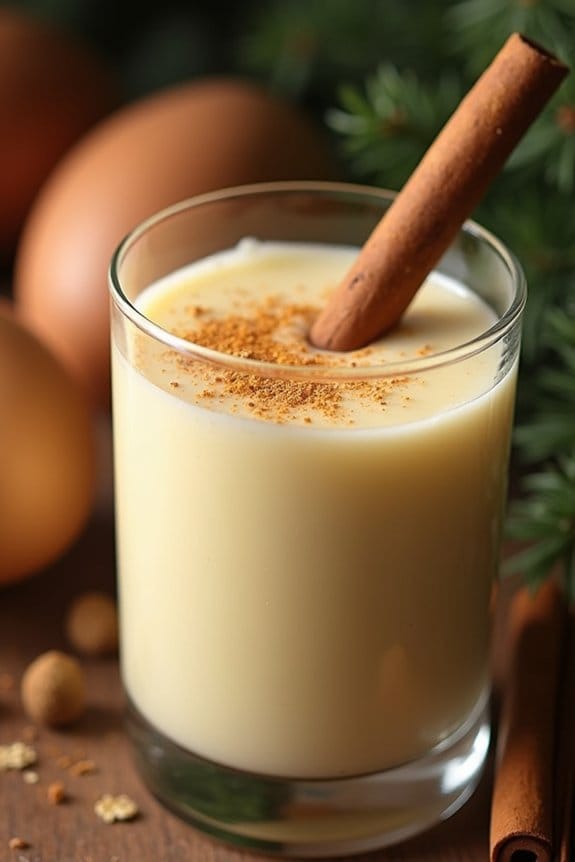
Traditional Eggnog is a classic holiday beverage that warms the heart and soul during the festive season. This creamy and rich drink has been a staple in Christmas celebrations for generations, often enjoyed by a crackling fire or shared among family and friends at a holiday gathering.
The essence of eggnog lies in its comforting blend of milk, cream, sugar, and spices, with the option of adding a touch of alcohol for an extra festive flair. Whether served chilled or warmed, this delightful concoction is bound to bring a sense of nostalgia and cheer to any holiday occasion.
Making Traditional Eggnog from scratch is a simple yet rewarding process that allows you to tailor the flavors to your liking. The homemade version captures the authentic taste and texture that store-bought varieties often lack.
By carefully choosing your ingredients and following the steps, you can create a deliciously smooth and indulgent drink that embodies the spirit of the season. The following recipe serves 4-6 people, making it perfect for intimate gatherings or a cozy evening at home.
Ingredients:
- 4 large eggs
- 3/4 cup granulated sugar
- 2 cups whole milk
- 1 cup heavy cream
- 1/2 teaspoon vanilla extract
- 1/2 teaspoon ground nutmeg
- 1/4 teaspoon ground cinnamon
- Optional: 1/2 to 1 cup of bourbon, rum, or brandy
Instructions:
- Prepare the Egg Mixture: In a medium-sized mixing bowl, crack the eggs and add the granulated sugar. Using a whisk or an electric mixer, beat the eggs and sugar together until the mixture is light and creamy. This should take about 2-3 minutes.
- Heat the Milk and Cream: In a saucepan, combine the whole milk and heavy cream and place it over medium heat. Stir occasionally and heat the mixture until it’s just about to simmer. Don’t let it boil, as this may cause the milk to curdle.
- Temper the Eggs: Slowly pour the hot milk and cream mixture into the bowl with the beaten eggs and sugar, whisking continuously. This gradual process, called tempering, prevents the eggs from cooking too quickly and guarantees a smooth consistency.
- Cook the Eggnog: Pour the tempered egg mixture back into the saucepan. Cook over low heat, stirring constantly with a wooden spoon or spatula, until the eggnog thickens slightly and reaches about 160°F (71°C) on a candy thermometer. This process should take around 5-7 minutes.
- Flavor the Eggnog: Remove the saucepan from the heat and stir in the vanilla extract, ground nutmeg, and ground cinnamon. If you’re including alcohol, add it at this stage and stir until well combined.
- Chill and Serve: Transfer the eggnog to a pitcher or serving bowl and refrigerate for at least 2 hours, or until thoroughly chilled. Once ready to serve, give it a good stir and pour it into glasses. Optionally, garnish with a sprinkle of nutmeg or a cinnamon stick.
Extra Tips: When making Traditional Eggnog, make certain that you use fresh, high-quality eggs for the best flavor and texture. If you’re concerned about raw eggs, you can purchase pasteurized eggs or use an egg substitute.
For a non-alcoholic version, simply omit the alcohol, or try substituting with a splash of vanilla or almond extract for added depth of flavor. If you prefer your eggnog thicker, you can increase the amount of heavy cream or reduce the milk slightly.
Finally, remember to taste and adjust the spices to your preference, as the perfect eggnog is all about balancing the flavors to suit your taste buds.
Old-Fashioned Sugar Cookies
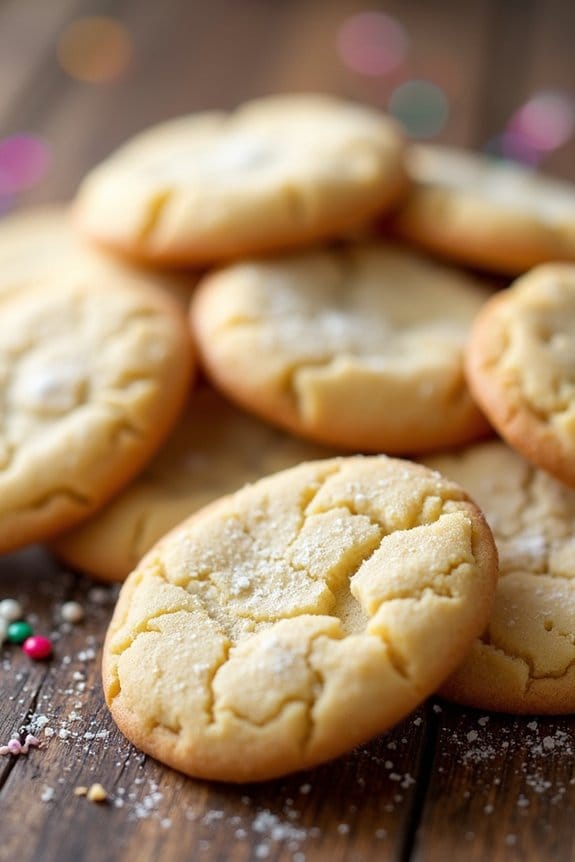
Old-Fashioned Sugar Cookies are a classic holiday favorite, bringing back fond memories of festive gatherings and cozy family kitchens. These cookies are characterized by their sweet, buttery flavor and crisp edges with a slightly chewy center. Perfect for making with kids or as a gift for neighbors and friends, these cookies are a versatile treat that can be decorated with icing, sprinkles, or left plain to enjoy with a steaming cup of cocoa.
This recipe makes enough Old-Fashioned Sugar Cookies to serve 4-6 people, making it ideal for a small holiday get-together or for creating a modest-sized batch to enjoy over a few days. The simple ingredients and straightforward method guarantee that these cookies can be whipped up without much fuss, allowing you to focus on the joy of baking and the spirit of the season.
Ingredients:
- 2 3/4 cups all-purpose flour
- 1 teaspoon baking soda
- 1/2 teaspoon baking powder
- 1 cup unsalted butter, softened
- 1 1/2 cups granulated sugar
- 1 large egg
- 1 teaspoon vanilla extract
- 1/2 teaspoon almond extract (optional)
- 3-4 tablespoons granulated sugar (for rolling)
Instructions:
1. Preheat the Oven and Prepare Baking Sheets:
Preheat your oven to 375°F (190°C). Line two baking sheets with parchment paper or silicone baking mats to prevent the cookies from sticking.
2. Mix Dry Ingredients:
In a medium bowl, whisk together the flour, baking soda, and baking powder. This guarantees that the leavening agents are evenly distributed throughout the flour.
3. Cream Butter and Sugar:
In a large bowl, use an electric mixer to beat the softened butter and sugar together until light and fluffy. This should take about 2-3 minutes. Proper creaming is essential for achieving the right cookie texture.
4. Add Wet Ingredients:
Beat in the egg, vanilla extract, and almond extract (if using) until fully incorporated. Confirm that the mixture is smooth and uniform in texture.
5. Combine Wet and Dry Ingredients:
Gradually add the dry ingredients to the wet ingredients, mixing on low speed until just combined. Avoid over-mixing, as this can lead to tough cookies.
6. Shape the Cookies:
Scoop tablespoon-sized amounts of dough and roll them into balls. Roll each ball in the additional granulated sugar to coat them lightly.
7. Bake the Cookies:
Place the sugar-coated dough balls on the prepared baking sheets, spacing them about 2 inches apart. Bake in the preheated oven for 8-10 minutes, or until the edges are lightly golden. The centers will look soft but will firm up as they cool.
8. Cool the Cookies:
Allow the cookies to cool on the baking sheets for 5 minutes before transferring them to wire racks to cool completely.
Extra Tips:
For the best results, confirm that your butter is at room temperature before starting. This helps it to cream properly with the sugar, creating a lighter texture.
If you prefer your cookies on the chewier side, you can slightly underbake them by removing them from the oven when the centers are just set. For a festive touch, consider adding colored sugar or sprinkles to the tops of the cookies before baking.
Finally, store your Old-Fashioned Sugar Cookies in an airtight container to maintain their freshness for several days.
Grandma’s Fruitcake
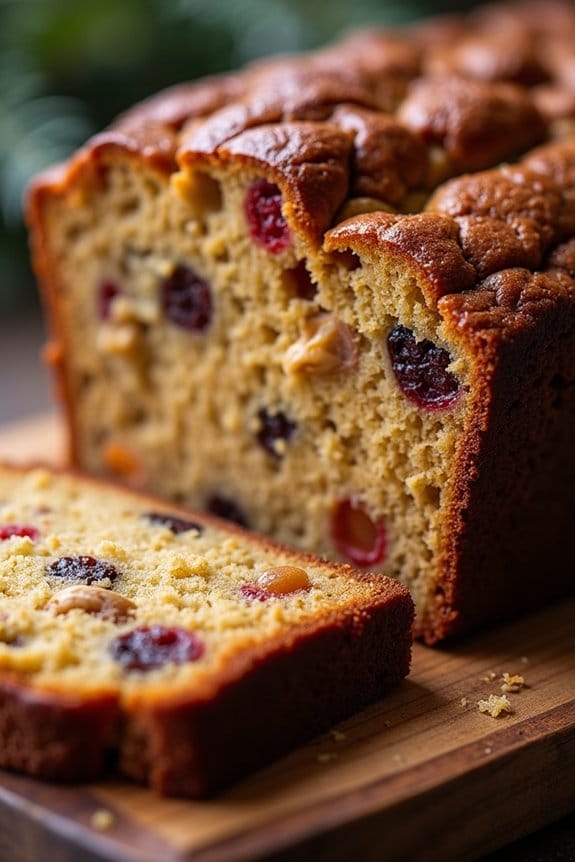
Grandma’s Fruitcake is a cherished holiday tradition that brings warmth and flavor to the festive season. This classic dessert, packed with dried fruits and nuts, is often associated with Christmas celebrations and is loved for its rich taste and dense texture. The combination of spices and the sweet, boozy aroma make it a delightful treat that evokes nostalgia and the comfort of home-cooked meals.
Perfect for holiday gatherings, this fruitcake can be enjoyed on its own or paired with a warm cup of tea or coffee. The beauty of Grandma’s Fruitcake lies in its versatility; it can be made well in advance and stored to enhance the flavors even more over time. This recipe serves 4-6 people and is perfect for sharing with family and friends. Let’s explore this traditional recipe and create a fruitcake that’s bound to become a staple in your holiday festivities.
Ingredients (Serves 4-6):
- 1 cup unsalted butter, softened
- 1 cup brown sugar, packed
- 4 large eggs
- 2 cups all-purpose flour
- 1 teaspoon baking powder
- 1/2 teaspoon salt
- 1 teaspoon ground cinnamon
- 1/2 teaspoon ground nutmeg
- 1/2 teaspoon ground cloves
- 1 cup chopped walnuts or pecans
- 1 cup chopped dried apricots
- 1 cup raisins
- 1 cup mixed candied peel
- 1/2 cup brandy or rum
- 1 teaspoon vanilla extract
Cooking Instructions:
- Prepare the Fruit Mixture: In a large bowl, combine the chopped dried apricots, raisins, mixed candied peel, and brandy or rum. Cover and let the mixture soak overnight to allow the fruits to absorb the alcohol and become plump and flavorful.
- Preheat the Oven and Prepare the Pan: Preheat your oven to 325°F (160°C). Grease and line a 9-inch loaf pan with parchment paper to prevent the fruitcake from sticking.
- Cream the Butter and Sugar: In a separate large mixing bowl, cream together the softened butter and brown sugar until light and fluffy. This should take about 3-5 minutes using a hand mixer or stand mixer.
- Add the Eggs and Flavorings: Beat in the eggs one at a time, ensuring each egg is fully incorporated before adding the next. Then, mix in the vanilla extract.
- Combine Dry Ingredients: In another bowl, sift together the all-purpose flour, baking powder, salt, ground cinnamon, nutmeg, and cloves. Gradually add the dry ingredients to the creamed mixture, mixing until just combined.
- Incorporate Fruits and Nuts: Fold in the soaked fruit mixture and chopped walnuts or pecans until evenly distributed throughout the batter.
- Bake the Fruitcake: Pour the batter into the prepared loaf pan and smooth the top with a spatula. Bake in the preheated oven for about 1 hour and 30 minutes, or until a toothpick inserted into the center comes out clean.
- Cool and Store: Allow the fruitcake to cool in the pan for 15 minutes before transferring it to a wire rack to cool completely. Once cooled, wrap the fruitcake in parchment paper and aluminum foil and store in an airtight container.
Extra Tips:
For an added depth of flavor, consider brushing the fruitcake with a little extra brandy or rum every few days while it’s being stored. This will keep the cake moist and enhance its rich taste.
If you’re not a fan of alcohol, you can substitute fruit juice in the soaking process. Additionally, the fruitcake can be made a few weeks in advance to allow the flavors to mature, making it an ideal make-ahead dessert for the busy holiday season.
Serve in thin slices as it’s quite dense and rich, and enjoy the love and warmth it brings to your table.
Holiday Cinnamon Rolls
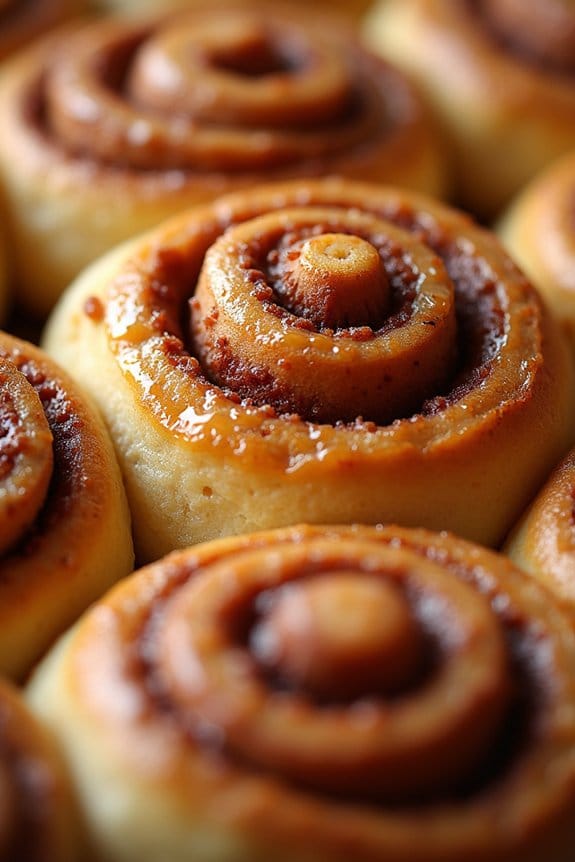
Holiday Cinnamon Rolls are a delightful addition to your Christmas morning spread. These rolls are soft, fluffy, and have a rich cinnamon flavor that brings warmth and cheer to your holiday breakfast table. With their sweet, sticky glaze and the comforting aroma of cinnamon, they’re sure to become a family favorite.
Whether you’re enjoying them fresh out of the oven or as a part of a festive brunch, these rolls are bound to bring smiles and joy to everyone gathered around the table. This recipe is perfect for serving 4-6 people, making it an ideal choice for a family breakfast or a small holiday gathering.
The process involves making a soft dough, a spiced filling, and a sweet glaze, which comes together to create the perfect cinnamon roll. While they require some time to rise, the end result is worth the effort. These rolls can be prepared in advance and baked fresh on Christmas morning, allowing you to enjoy the holiday festivities without spending too much time in the kitchen.
Ingredients:
- 3 1/2 cups all-purpose flour
- 1/4 cup granulated sugar
- 1 packet (2 1/4 teaspoons) active dry yeast
- 1 teaspoon salt
- 1 cup whole milk
- 1/4 cup unsalted butter, softened
- 1 large egg
- 1/2 cup packed light brown sugar
- 2 tablespoons ground cinnamon
- 1/4 cup unsalted butter, melted
- 1 cup powdered sugar
- 2 tablespoons milk
- 1 teaspoon vanilla extract
Instructions:
- Prepare the Dough: In a large mixing bowl, combine the flour, granulated sugar, yeast, and salt. In a small saucepan, heat the milk and 1/4 cup unsalted butter until the butter is melted and the mixture is warm (about 110°F). Add the milk mixture and the egg to the dry ingredients. Mix until a soft dough forms.
- Knead and Rise: Transfer the dough to a floured surface and knead for about 5-7 minutes, or until smooth and elastic. Place the dough in a greased bowl, cover with a damp cloth, and let it rise in a warm place for about 1 hour, or until doubled in size.
- Prepare the Filling: In a small bowl, mix together the brown sugar and cinnamon. Set aside.
- Roll Out the Dough: Once the dough has risen, punch it down and roll it out on a floured surface into a rectangle about 16×12 inches in size.
- Add the Filling: Brush the rolled-out dough with the melted butter, then evenly sprinkle the cinnamon-sugar mixture over the buttered dough.
- Roll and Cut: Starting at the long edge, tightly roll the dough into a log. Cut the log into 12 equal slices and place them in a greased 9×13 inch baking pan.
- Second Rise: Cover the pan with a damp cloth and let the rolls rise for another 30 minutes, or until they’ve doubled in size.
- Bake: Preheat the oven to 350°F (175°C). Bake the rolls for 25-30 minutes, or until golden brown.
- Prepare the Glaze: While the rolls are baking, whisk together the powdered sugar, milk, and vanilla extract until smooth.
- Glaze the Rolls: Once the rolls are done, remove them from the oven and let them cool for about 10 minutes. Drizzle the prepared glaze over the warm rolls before serving.
Extra Tips: For an extra delicious twist, you can add chopped nuts or raisins to the cinnamon-sugar filling. If you want to prepare these rolls in advance, you can make the dough and complete the first rise the night before.
Simply cover the unbaked rolls tightly and store them in the refrigerator overnight. In the morning, let them come to room temperature and complete the second rise before baking. Adjust the baking time if necessary, and always check for a golden brown color to ascertain they’re cooked through.
Mulled Wine

Mulled wine is the quintessential holiday drink, perfect for warming up on a cold winter’s night. This fragrant and spiced wine is a staple at Christmas markets and holiday gatherings across Europe and has gained popularity worldwide. The combination of red wine, spices, citrus, and a touch of sweetness creates a comforting and festive beverage that not only tastes delightful but also fills your home with the scent of the holiday season.
Whether you’re hosting a Christmas party or simply enjoying a quiet evening by the fire, mulled wine is a must-try recipe for the holiday season.
Making mulled wine is surprisingly simple and can be easily customized to suit your taste preferences. The key to a good mulled wine is using a decent quality red wine and balancing the spices and sweetness. The spices typically include cinnamon, cloves, and star anise, while the sweetness can come from sugar or honey. Fresh oranges add a citrusy note that complements the spices beautifully. This recipe serves 4-6 people, making it ideal for small gatherings or family dinners.
Ingredients for 4-6 Servings:
- 1 bottle of red wine (750 ml)
- 2 cups of apple cider
- 1/4 cup of honey or sugar
- 1 orange, sliced
- 4 cinnamon sticks
- 6 whole cloves
- 3 star anise
- 1/2 teaspoon of freshly grated nutmeg
- 1/4 cup of brandy (optional)
Cooking Instructions:
- Prepare the Ingredients: Gather all your ingredients and verify you have a large saucepan or pot that can hold the entire mixture. Slice the orange into thin rounds.
- Combine the Ingredients: In the saucepan, combine the red wine, apple cider, and honey or sugar. Stir to dissolve the sugar or honey into the liquids.
- Add Spices and Orange: Add the sliced orange, cinnamon sticks, cloves, star anise, and freshly grated nutmeg to the pot. Stir gently to mix the ingredients.
- Heat the Mixture: Place the saucepan over medium heat. Allow the mixture to heat up slowly, but be careful not to let it reach a boil. You want the wine to be hot but not boiling, as boiling will cook off the alcohol and alter the flavor.
- Simmer: Reduce the heat to low and let the mixture simmer for at least 20 minutes, allowing the flavors to meld together. If you have more time, you can let it simmer for up to an hour for a more intense flavor.
- Add Brandy (Optional): If using, stir in the brandy just before serving. This adds an extra depth of flavor and a bit more warmth to the drink.
- Strain and Serve: Use a fine-mesh sieve to strain out the spices and orange slices before serving. Pour the mulled wine into mugs or heatproof glasses and enjoy warm.
Extra Tips:
For the best results, choose a medium-bodied red wine like Merlot, Zinfandel, or Cabernet Sauvignon. Avoid overly tannic or high-acid wines, as they can overpower the spices.
If you prefer a sweeter mulled wine, feel free to adjust the amount of honey or sugar to taste. For a non-alcoholic version, substitute the red wine with more apple cider or cranberry juice.
Remember to keep the heat low to prevent boiling, which can lead to a loss of flavor and alcohol. Enjoy your mulled wine fresh, as it doesn’t store well once made.
Peppermint Bark
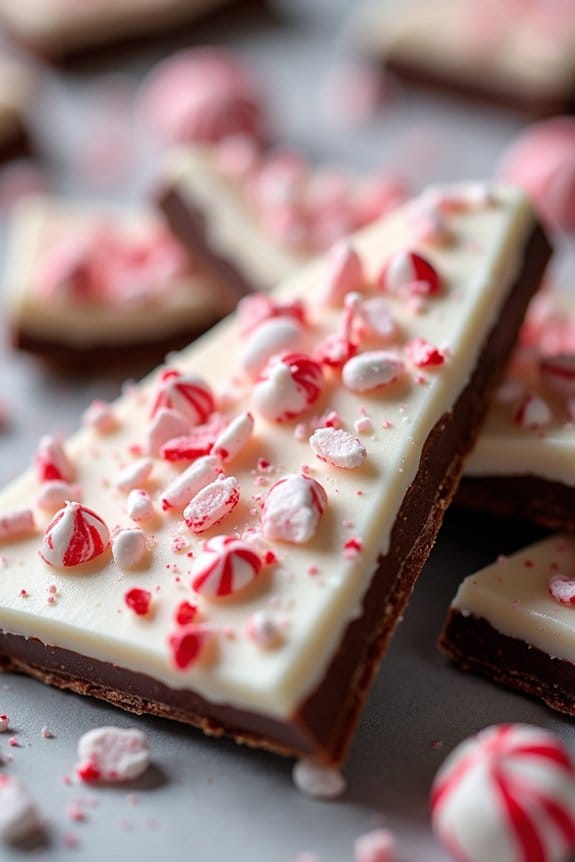
Peppermint bark is a delightful treat that combines the invigorating taste of peppermint with the rich flavors of chocolate. It’s perfect for the holiday season and is a great homemade gift idea. Whether you’re entertaining guests or simply looking to satisfy your sweet tooth, peppermint bark is both delicious and simple to make. Its distinct layers of dark and white chocolate, sprinkled with crushed candy canes, make it visually appealing and festive.
This recipe for peppermint bark serves 4-6 people and requires only a few ingredients and minimal preparation time. The key to a successful peppermint bark is using good quality chocolate and guaranteeing that the layers are set properly. Follow these instructions to create a delightful holiday treat that’s sure to impress your family and friends.
Ingredients:
- 12 ounces of high-quality dark chocolate, chopped
- 12 ounces of high-quality white chocolate, chopped
- 1 teaspoon peppermint extract
- 6 candy canes, crushed
Instructions:
- Prepare the Baking Sheet: Line a baking sheet with parchment paper or a silicone baking mat. This will prevent the chocolate from sticking and make it easier to remove once set.
- Melt the Dark Chocolate: In a microwave-safe bowl, melt the dark chocolate in 30-second intervals, stirring in between until completely smooth. Alternatively, you can use a double boiler to melt the chocolate gently over simmering water.
- Spread the Dark Chocolate: Pour the melted dark chocolate onto the prepared baking sheet and spread it into an even layer using a spatula. Let it cool slightly at room temperature.
- Melt the White Chocolate: Repeat the melting process with the white chocolate, either using the microwave or a double boiler.
- Add Peppermint Extract: Once the white chocolate is melted, stir in the peppermint extract until well combined.
- Layer the White Chocolate: Gently pour the melted white chocolate over the set dark chocolate layer. Use a spatula to spread it evenly, making sure it covers the dark chocolate completely.
- Sprinkle Crushed Candy Canes: Before the white chocolate sets, sprinkle the crushed candy canes evenly over the top. Press them lightly into the chocolate using your fingers or the back of a spoon.
- Set the Bark: Allow the peppermint bark to cool and harden at room temperature or place it in the refrigerator for faster setting. This usually takes about 1-2 hours.
- Break into Pieces: Once set, remove the peppermint bark from the baking sheet and break it into pieces using your hands or a knife. Serve and enjoy!
Extra Tips:
- For a smoother texture, guarantee that both types of chocolate are completely melted and free from lumps before layering.
- If you prefer a thicker bark, use a smaller baking sheet and adjust the chocolate quantities accordingly.
- Store the peppermint bark in an airtight container to maintain its freshness and crispness. It can be kept at room temperature for up to two weeks.
- Experiment with different types of chocolate or add nuts for variation, but remember that the classic combination of dark and white chocolate with peppermint is a timeless favorite.
Roasted Chestnuts
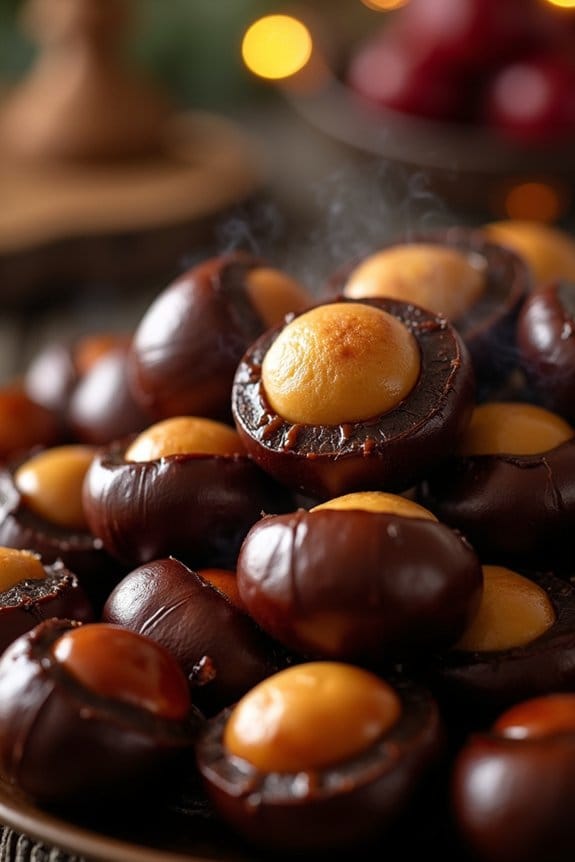
Roasted chestnuts are a traditional holiday treat that evoke the warmth and coziness of the festive season. With their sweet, nutty flavor and soft, buttery texture, they’re perfect for snacking on a chilly winter’s day or serving as a delightful addition to your Christmas feast.
The aroma of chestnuts roasting is sure to fill your home with the comforting scent of the holidays, making it a wonderful experience for both the cook and the guests.
Preparing roasted chestnuts is a simple process that requires only a few ingredients and some careful attention to detail. The key to success lies in selecting high-quality, fresh chestnuts and verifying they’re properly prepared before roasting.
Follow this easy recipe to achieve perfect roasted chestnuts that will impress your family and friends. This recipe serves 4-6 people.
Ingredients:
- 2 pounds of fresh chestnuts
- Salt (optional)
- Butter (optional)
Cooking Instructions:
- Preheat the Oven: Start by preheating your oven to 425°F (220°C). This will guarantee that the chestnuts roast evenly and develop a nice, crisp outer shell.
- Prepare the Chestnuts: Rinse the chestnuts under cold water to remove any dirt. Using a sharp knife, carefully make an “X” incision on the flat side of each chestnut. This will allow steam to escape during roasting and prevent the chestnuts from bursting.
- Arrange on Baking Sheet: Place the prepared chestnuts in a single layer on a baking sheet, verifying the slits are facing up. This helps them roast evenly.
- Roast the Chestnuts: Place the baking sheet in the preheated oven and roast the chestnuts for about 20-25 minutes. Halfway through roasting, you may want to shake the pan slightly to verify even cooking. The chestnuts are done when the shells begin to peel back and the nut inside is tender.
- Cool and Peel: Remove the chestnuts from the oven and let them cool for a few minutes. While they’re still warm, peel away the outer shell and the thin brown skin. Be careful, as they can be hot!
- Serve: Serve the roasted chestnuts warm. You can sprinkle a little salt or a dab of butter on them if desired for extra flavor.
Extra Tips:
For the best results, choose plump and glossy chestnuts without any signs of mold or wormholes. If possible, buy chestnuts shortly before you plan to roast them, as they can dry out over time.
To make peeling easier, you can wrap the chestnuts in a clean kitchen towel after roasting and let them steam briefly. This will help loosen the shells.
Enjoy these roasted chestnuts as a warm, seasonal snack that captures the essence of Christmas!
Cranberry Sauce
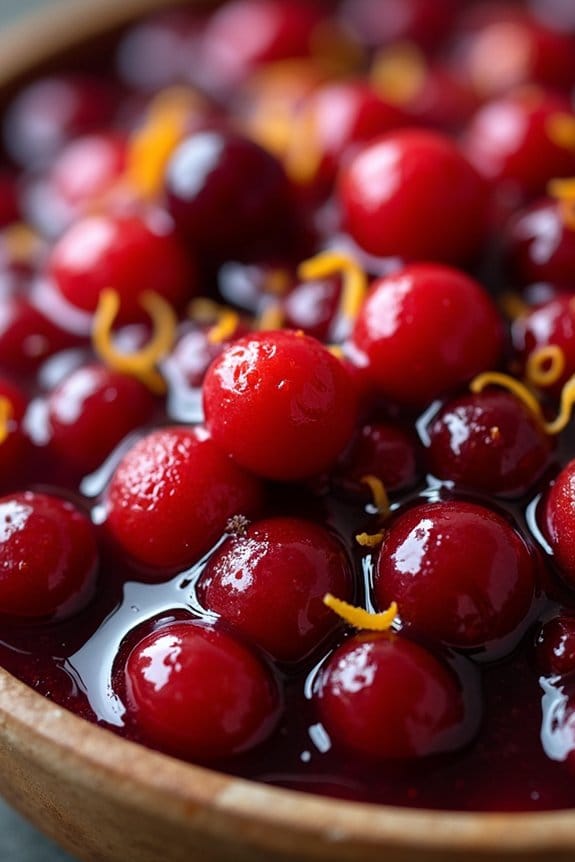
Cranberry sauce is a quintessential part of the Christmas feast, offering a perfect balance of tartness and sweetness that complements the savory flavors of a holiday meal. This delightful condiment can elevate the taste of turkey, stuffing, and even mashed potatoes, making it an indispensable item on the festive table.
Homemade cranberry sauce is simple to prepare and can be made ahead of time, allowing you to focus on other elements of your holiday preparations. Plus, the vibrant red color of the sauce adds a beautiful splash of color to your dinner spread.
Crafting your own cranberry sauce allows you to control the sweetness and texture, tailoring it to your family’s preferences. Whether you like it chunky or smooth, or prefer a hint of citrus or spice, this recipe can be easily adapted to suit your taste. The fresh cranberries burst with flavor, and when combined with sugar, orange juice, and a touch of zest, they create a sauce that’s both invigorating and comforting.
Here’s how to make a delicious cranberry sauce that serves 4-6 people.
Ingredients:
- 12 ounces fresh or frozen cranberries
- 1 cup granulated sugar
- 1 cup orange juice (preferably freshly squeezed)
- 1 tablespoon orange zest
- 1/4 teaspoon ground cinnamon (optional)
- 1/4 teaspoon vanilla extract (optional)
Instructions:
- Prepare Ingredients: Begin by rinsing the cranberries under cold water, discarding any that are soft or discolored. If using frozen cranberries, there’s no need to thaw them.
- Combine Ingredients: In a medium saucepan, combine the cranberries, sugar, orange juice, and orange zest. If you choose to add cinnamon and vanilla extract for additional flavor complexity, do so at this stage.
- Cook the Sauce: Place the saucepan over medium-high heat and bring the mixture to a boil. Stir occasionally to verify the sugar dissolves completely.
- Simmer: Once boiling, reduce the heat to low and let the mixture simmer gently. Continue cooking and stirring occasionally until the cranberries burst and the sauce thickens, which should take about 10-15 minutes.
- Check Consistency: Once the sauce reaches your desired thickness, remove it from the heat. Remember, the sauce will thicken further as it cools.
- Cool and Store: Allow the cranberry sauce to cool to room temperature. Transfer it to a serving dish or airtight container. You can store it in the refrigerator for up to a week, making it a convenient make-ahead dish.
Extra Tips: For a more textured sauce, you can lightly mash the cranberries with the back of a spoon while cooking. If you prefer a smoother sauce, use a blender or food processor after the sauce has cooled slightly.
Adjust the sweetness by adding more sugar if needed, or for a tangier flavor, incorporate a tablespoon of lemon juice. Cranberry sauce pairs wonderfully with a zest of lime or a pinch of nutmeg for a unique twist.
Baked Ham With Pineapple Glaze

A baked ham with pineapple glaze is a classic holiday dish that brings a festive spirit to any Christmas table. The combination of succulent ham and the sweet, tangy glaze made from pineapple creates a delightful balance of savory and sweet flavors that’s sure to impress your guests.
This dish isn’t only delicious but also visually stunning, with golden brown caramelized edges and a beautifully decorated exterior. Perfect for serving 4-6 people, this recipe provides a centerpiece that can be enjoyed by family and friends alike.
The preparation is straightforward, allowing you to focus on spending time with your loved ones while the ham bakes to perfection in the oven. Whether you’re an experienced chef or a novice cook, this recipe for baked ham with pineapple glaze is sure to be a hit at your holiday gathering.
Ingredients for Baked Ham With Pineapple Glaze (serves 4-6):
- 1 (4-5 pound) fully cooked, bone-in ham
- 1 cup brown sugar
- 1/2 cup honey
- 1/4 cup Dijon mustard
- 1/4 cup apple cider vinegar
- 1 (20-ounce) can pineapple slices in juice (reserve juice)
- 1/4 teaspoon ground cloves
- Maraschino cherries (optional, for decoration)
Cooking Instructions:
- Preheat the Oven: Begin by preheating your oven to 325°F (163°C). This temperature will allow the ham to warm through and develop a beautiful crust without drying out.
- Prepare the Glaze: In a medium saucepan, combine the brown sugar, honey, Dijon mustard, apple cider vinegar, reserved pineapple juice, and ground cloves. Stir the mixture over medium heat until the sugar dissolves and the glaze thickens slightly, about 5-7 minutes. Remove from heat and set aside.
- Prepare the Ham: Place the ham in a large roasting pan. Score the surface of the ham in a diamond pattern using a sharp knife, being careful not to cut too deep. This will allow the glaze to penetrate and flavor the ham.
- Apply the Glaze: Brush a generous amount of the glaze over the entire surface of the ham. Arrange the pineapple slices over the ham, securing each slice with a toothpick. If desired, place a maraschino cherry in the center of each pineapple slice for an extra festive touch.
- Bake the Ham: Cover the ham loosely with aluminum foil and place it in the preheated oven. Bake for 1 1/2 to 2 hours, or until a meat thermometer inserted into the thickest part of the ham reads 140°F (60°C). Baste the ham with the remaining glaze every 30 minutes, removing the foil for the last 30 minutes to allow the glaze to caramelize.
- Rest and Serve: Once baked, remove the ham from the oven and let it rest for 10-15 minutes before slicing. This resting period allows the juices to redistribute, keeping the meat tender and juicy. Remove the toothpicks before serving.
Extra Tips: When selecting your ham, opt for a bone-in variety as it tends to be more flavorful and juicy. If you prefer a spicier glaze, consider adding a pinch of cayenne pepper to the mixture.
Additionally, if you have leftover glaze, you can serve it on the side as a sauce for those who enjoy an extra kick of sweetness. To store leftovers, wrap slices tightly in foil and refrigerate for up to four days, or freeze for up to two months.
Christmas Pudding
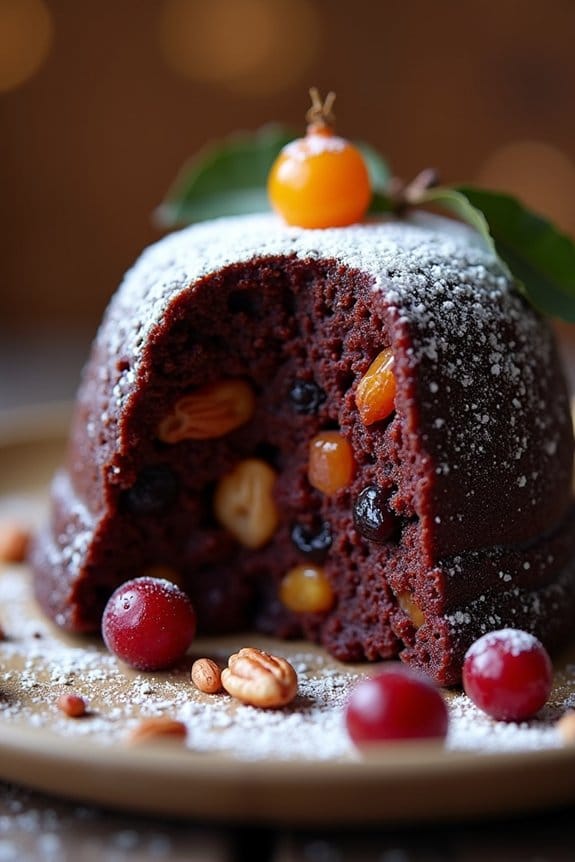
Christmas pudding is a quintessential part of the festive season, a rich and flavorful dessert that has been a staple on holiday tables for centuries. This traditional British dish is known for its dense, moist texture, packed with fruits and spices, and often doused with brandy to enhance its aromatic flavors.
The process of making Christmas pudding involves a slow steaming method that allows the flavors to meld together, resulting in a decadent treat that’s enjoyed by many during the holiday season.
The beauty of Christmas pudding lies in its ability to be prepared well in advance, with some families opting to make it weeks or even months before Christmas to let the flavors mature. This pudding is typically served with brandy butter, cream, or custard, providing a luxurious finish to any Christmas meal.
The following recipe serves 4-6 people and offers a delightful combination of traditional ingredients that embody the spirit of Christmas.
Ingredients:
- 150g suet or grated butter
- 150g dark brown sugar
- 150g breadcrumbs
- 150g plain flour
- 1 teaspoon mixed spice
- 1 teaspoon ground cinnamon
- 1/4 teaspoon ground nutmeg
- 150g sultanas
- 150g currants
- 100g raisins
- 50g chopped mixed peel
- 50g chopped almonds
- 1 small apple, peeled and grated
- Zest of 1 lemon
- 2 large eggs
- 75ml stout or dark beer
- 75ml brandy
- 1 tablespoon black treacle
Cooking Instructions:
- Prepare the Pudding Basin: Grease a 1.2-liter pudding basin with butter. Cut a small circle of greaseproof paper to fit the bottom and place it inside the basin.
- Mix Dry Ingredients: In a large bowl, combine the suet or grated butter, dark brown sugar, breadcrumbs, plain flour, mixed spice, ground cinnamon, and ground nutmeg. Stir together until well mixed.
- Add Fruits and Nuts: Add the sultanas, currants, raisins, chopped mixed peel, and chopped almonds to the dry ingredients. Stir well to guarantee the fruits are evenly distributed.
- Incorporate Apple and Zest: Add the grated apple and lemon zest to the mixture, stirring again to combine.
- Bind with Wet Ingredients: In a separate bowl, beat the eggs and then mix in the stout, brandy, and black treacle. Pour this liquid mixture into the dry ingredients, stirring thoroughly to form a thick batter.
- Transfer to Basin: Spoon the mixture into the prepared pudding basin, pressing it down firmly. Cover the top with a circle of greaseproof paper, then cover the basin with foil, securing it tightly with string.
- Steam the Pudding: Place an upturned saucer in the bottom of a large saucepan and put the pudding basin on top. Fill the saucepan with water halfway up the sides of the basin. Cover the pan with a lid and steam the pudding over low heat for about 6 hours, checking occasionally to verify the water level is maintained.
- Cool and Store: Once cooked, remove the pudding from the saucepan and allow it to cool completely. Store in a cool, dark place until ready to serve.
Extra Tips:
For the best flavor, make your Christmas pudding a month or two in advance. This allows the spices and fruits to develop a deeper taste.
When reheating the pudding on Christmas Day, steam it for about 2 hours to warm it through. If you like a bit of drama, flambé the pudding by heating a little brandy, lighting it, and pouring it over the pudding before serving.
Don’t forget to serve with a generous helping of brandy butter, cream, or custard to balance the rich flavors of the pudding.
Homemade Hot Chocolate

There’s nothing quite like a steaming mug of homemade hot chocolate to warm you up on a chilly winter’s day. This rich and creamy beverage is a delightful treat that brings comfort and joy during the festive season. Perfect for sipping by the fire or serving at a holiday gathering, homemade hot chocolate is easy to prepare and can be customized to suit your taste preferences.
With just a few simple ingredients, you can create a decadent drink that will make you feel as though you’re indulging in a luxurious café-style experience right in your own home.
This recipe for homemade hot chocolate serves 4-6 people, making it ideal for sharing with family and friends. By using high-quality chocolate and milk, you’ll achieve a smooth and velvety texture that will make each sip a delight. The addition of a few spices and a hint of vanilla elevates the flavor, creating a perfectly balanced drink that’s both sweet and satisfying.
Whether you’re looking to impress your guests or simply want to treat yourself to a little festive cheer, this homemade hot chocolate is sure to become a holiday favorite.
Ingredients (Serves 4-6):
- 4 cups whole milk
- 1 cup heavy cream
- 8 ounces semisweet or dark chocolate, chopped
- 1/4 cup granulated sugar
- 1 teaspoon vanilla extract
- 1/2 teaspoon ground cinnamon
- 1/4 teaspoon salt
- Optional toppings: whipped cream, marshmallows, chocolate shavings, or a sprinkle of cocoa powder
Cooking Instructions:
- Heat the Milk and Cream: In a medium-sized saucepan, combine the milk and heavy cream. Place the saucepan over medium heat and warm the mixture until it begins to steam, but don’t let it come to a boil. Stir occasionally to prevent the milk from scorching.
- Melt the Chocolate: Add the chopped chocolate to the heated milk and cream mixture. Reduce the heat to low and stir continuously until the chocolate is completely melted and the mixture is smooth and creamy.
- Add Sugar and Spices: Stir in the granulated sugar, vanilla extract, ground cinnamon, and salt. Continue to cook over low heat, stirring frequently, until all the ingredients are fully incorporated and the hot chocolate is heated through.
- Serve: Once the hot chocolate is ready, remove it from the heat and ladle it into mugs. Optionally, top each serving with whipped cream, marshmallows, chocolate shavings, or a sprinkle of cocoa powder for added indulgence.
Extra Tips:
For an even richer flavor, consider using a combination of semisweet and dark chocolate. Adjust the sweetness by varying the amount of sugar, especially if you prefer a less sweet drink.
If you like a spicier kick, add a pinch of cayenne pepper or nutmeg along with the cinnamon. When serving, pre-warm the mugs by rinsing them with hot water to keep the hot chocolate warmer for longer.
Finally, for a dairy-free version, substitute the milk and cream with almond milk or coconut milk, keeping in mind that this might alter the flavor slightly.
