

When holiday plans come together unexpectedly, things can feel a bit overwhelming. No worries, though, because I’ve put together a list of 13 quick and easy Christmas lunch recipes that are sure to impress. From a cozy Classic Tomato Basil Soup to stylish Festive Cranberry Brie Bites, each dish is simple yet full of flavor. Curious about creating a feast with ease? Let’s explore these delightful options together.
Classic Tomato Basil Soup
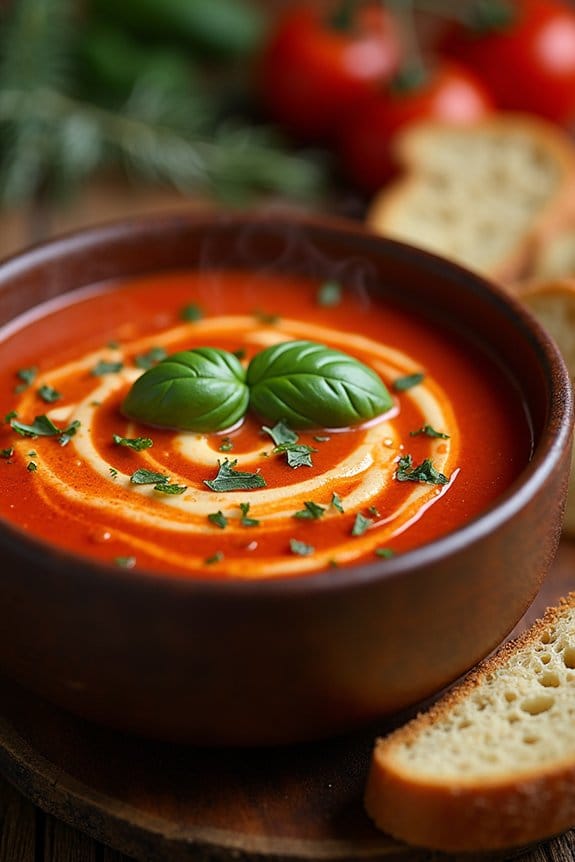
This Christmas, warm up your holiday lunch with a comforting bowl of Classic Tomato Basil Soup. This timeless dish is the perfect starter or side to complement your festive spread. Rich in flavor and velvety in texture, the combination of ripe tomatoes, fresh basil, and aromatic herbs makes this soup a crowd-pleaser at any table.
Its vibrant red hue and inviting aroma create a cozy atmosphere, perfect for gathering around with loved ones during the holiday season.
Tomato Basil Soup isn’t only delicious but also simple to prepare, making it an excellent choice for busy holiday cooks. With just a few fresh ingredients and a bit of patience, you can create a homemade soup that tastes like it’s been simmering all day.
Whether you’re a seasoned chef or a kitchen novice, this recipe is easy to follow and yields a satisfying dish that will have your guests coming back for seconds.
Ingredients (Serves 4-6)
- 2 tablespoons olive oil
- 1 medium onion, chopped
- 2 cloves garlic, minced
- 2 cans (28 ounces each) whole peeled tomatoes
- 1 cup vegetable broth
- 1/4 cup fresh basil leaves, chopped
- 1 teaspoon sugar
- 1 teaspoon salt
- 1/2 teaspoon black pepper
- 1/2 cup heavy cream (optional)
- Additional fresh basil leaves for garnish
Instructions
- Prepare Ingredients: Begin by preparing your ingredients. Chop the onion and mince the garlic. Rinse the basil leaves and chop them finely. Set these aside for later use.
- Sauté Aromatics: In a large pot, heat the olive oil over medium heat. Add the chopped onion and sauté for about 5 minutes, or until the onion becomes translucent. Stir in the minced garlic and cook for an additional minute, until fragrant.
- Add Tomatoes and Broth: Pour in the whole peeled tomatoes with their juice, breaking them up with a spoon as they cook. Add the vegetable broth and stir to combine. Bring the mixture to a gentle simmer.
- Season the Soup: Stir in the chopped basil, sugar, salt, and black pepper. Let the soup simmer uncovered for about 20-25 minutes, allowing the flavors to meld and the soup to thicken slightly.
- Blend the Soup: Using an immersion blender, carefully blend the soup directly in the pot until smooth. Alternatively, transfer the soup in batches to a countertop blender and blend until smooth, then return it to the pot.
- Finish with Cream: If desired, stir in the heavy cream for a richer, creamier texture. Heat the soup for an additional 2-3 minutes, but don’t let it boil.
- Serve: Ladle the soup into bowls and garnish with additional fresh basil leaves. Serve warm alongside crusty bread for dipping, if desired.
Extra Tips
For a deeper flavor, consider roasting the tomatoes before adding them to the soup. Simply place them on a baking sheet, drizzle with olive oil, and roast at 400°F (200°C) for about 25 minutes.
This step adds a caramelized sweetness to the tomatoes, enhancing the overall taste of the soup. Additionally, if you prefer a thicker consistency, reduce the amount of vegetable broth slightly or simmer the soup longer to allow it to reduce further.
Festive Cranberry Brie Bites
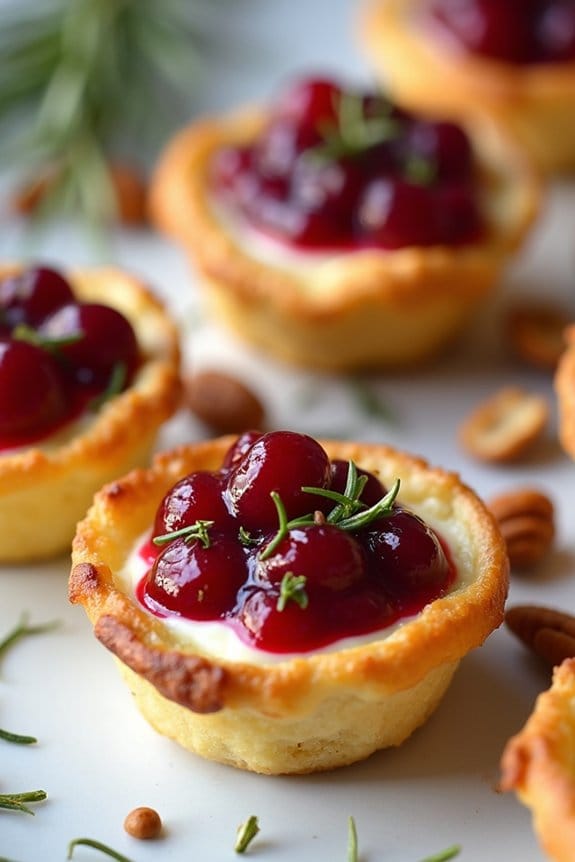
Festive Cranberry Brie Bites are the perfect appetizer to add a touch of elegance and flavor to your Christmas lunch spread. These delightful bites combine the rich creaminess of brie cheese with the tart sweetness of cranberry sauce, all encased in a flaky puff pastry shell. Ideal for entertaining, they aren’t only delicious but also visually appealing, providing a burst of color and taste that captures the holiday spirit.
Whether you’re hosting a large gathering or a small family lunch, these cranberry brie bites are bound to impress your guests and set the tone for a festive meal.
The beauty of this recipe lies in its simplicity and the capability to prepare it ahead of time, allowing you to enjoy the company of your guests rather than being stuck in the kitchen. The combination of flavors and textures makes these bites a crowd-pleaser, and they can be easily adapted to suit dietary needs by using gluten-free pastry or vegan cheese alternatives.
Prepare these delightful bites in advance and simply pop them in the oven before serving for a warm, gooey treat that everyone will love.
Ingredients for 4-6 people:
- 1 sheet puff pastry, thawed
- 8 ounces brie cheese, cut into small pieces
- 1/2 cup cranberry sauce
- 1/4 cup chopped pecans (optional)
- 1 tablespoon fresh rosemary, finely chopped
- 1 egg, beaten (for egg wash)
Cooking Instructions:
- Preheat the Oven: Start by preheating your oven to 375°F (190°C). This guarantees that the oven reaches the right temperature for baking the pastry evenly.
- Prepare the Puff Pastry: Roll out the puff pastry sheet on a lightly floured surface to smooth out any creases. Cut the pastry into 3-inch squares, which should give you about 12 squares from one sheet.
- Assemble the Bites: Place each pastry square into the cups of a mini muffin tin, pressing down gently to form a cup shape. Add a small piece of brie cheese into each cup, followed by a teaspoon of cranberry sauce. Sprinkle some chopped pecans and a pinch of rosemary over the top for added flavor.
- Apply Egg Wash: Brush the edges of the pastry with the beaten egg. This will give the pastry a beautiful golden-brown finish as it bakes.
- Bake: Place the muffin tin in the preheated oven and bake for 15-20 minutes, or until the pastry is puffed and golden brown and the cheese is bubbly. Keep an eye on them to prevent burning.
- Cool and Serve: Once baked, remove the bites from the oven and allow them to cool in the pan for a few minutes. Then, carefully transfer them to a serving platter. Serve warm for the best taste experience.
Extra Tips:
For an extra festive touch, you can garnish the bites with additional rosemary sprigs or a sprinkle of powdered sugar for a snow-dusted effect. If you prefer a sweeter version, consider adding a drizzle of honey over the top before serving.
To save time on the day of your event, assemble the bites ahead of time and keep them refrigerated until you’re ready to bake. Just make sure the pastry is properly thawed before you start assembling.
Enjoy these Festive Cranberry Brie Bites with a glass of your favorite holiday wine or a sparkling beverage for a truly indulgent experience.
Garlic Butter Shrimp Skewers
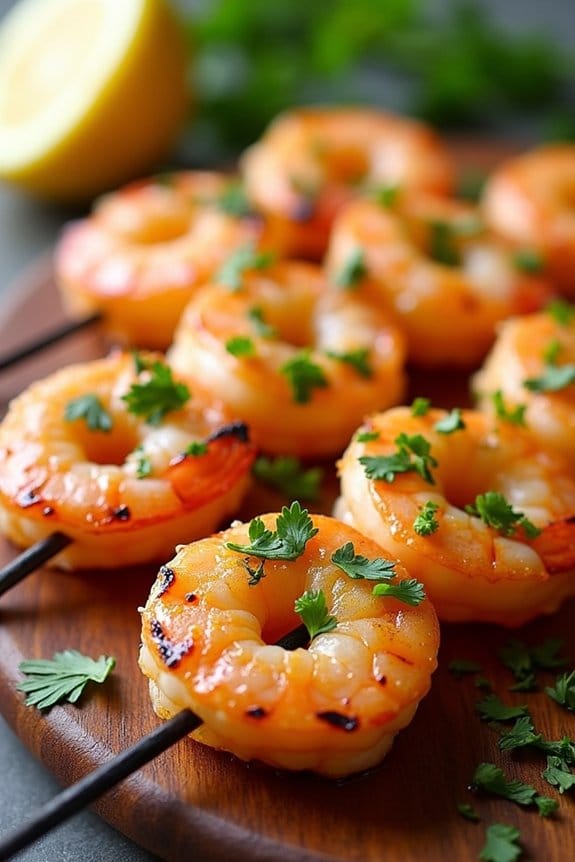
Garlic Butter Shrimp Skewers are a delightful addition to any Christmas lunch, offering a savory and aromatic flavor that’s sure to impress your guests.
These skewers aren’t only visually appealing but also packed with the rich taste of buttery garlic, which complements the sweetness of the shrimp perfectly. Perfect as an appetizer or a main dish, these skewers are versatile and easy to prepare, making them an ideal choice for a festive gathering.
The dish brings together the succulent texture of shrimp with the robust flavor of garlic and the richness of butter, creating a combination that’s both elegant and satisfying.
The skewers can be cooked on a grill or stovetop, making them adaptable to different cooking preferences and equipment availability. Whether you’re planning a large family feast or an intimate holiday meal, Garlic Butter Shrimp Skewers are sure to be a hit, bringing joy and deliciousness to your Christmas table.
Ingredients for 4-6 people
- 2 pounds large shrimp, peeled and deveined
- 1/2 cup unsalted butter
- 4 cloves garlic, minced
- 2 tablespoons fresh lemon juice
- 1 teaspoon lemon zest
- 1/4 cup fresh parsley, chopped
- Salt and pepper to taste
- Wooden or metal skewers
Cooking Instructions
- Prepare the Shrimp: Rinse the shrimp under cold water and pat them dry with paper towels. Season the shrimp with salt and pepper, ensuring they’re evenly coated.
- Melt the Butter: In a small saucepan over medium heat, melt the butter. Once melted, add the minced garlic and sauté for about 1-2 minutes until fragrant. Be careful not to burn the garlic.
- Add Lemon and Parsley: Stir in the lemon juice, lemon zest, and chopped parsley into the butter and garlic mixture. This will create a flavorful garlic butter sauce for the shrimp.
- Thread the Shrimp: Thread the shrimp onto the skewers, piercing each shrimp twice to secure them in place. Place the skewers on a tray or plate, ready for grilling.
- Brush with Garlic Butter: Using a brush, generously coat each shrimp skewer with the garlic butter mixture. Make sure each piece of shrimp is well covered to absorb the flavors.
- Grill the Skewers: Preheat your grill to medium-high heat. Place the shrimp skewers on the grill and cook for about 2-3 minutes on each side, or until the shrimp are opaque and cooked through.
- Serve Hot: Remove the skewers from the grill and transfer them to a serving platter. Garnish with extra parsley if desired, and serve immediately while hot.
Extra Tips
For the best results, soak wooden skewers in water for at least 30 minutes before threading the shrimp to prevent them from burning on the grill.
If you prefer a spicier version, consider adding a pinch of red pepper flakes to the garlic butter sauce. Additionally, to enhance the flavor, let the shrimp marinate in the garlic butter sauce for 15-30 minutes before threading them onto the skewers.
This dish pairs wonderfully with a crisp white wine or a light beer, complementing the rich buttery flavors.
Spinach and Feta Stuffed Chicken Breasts
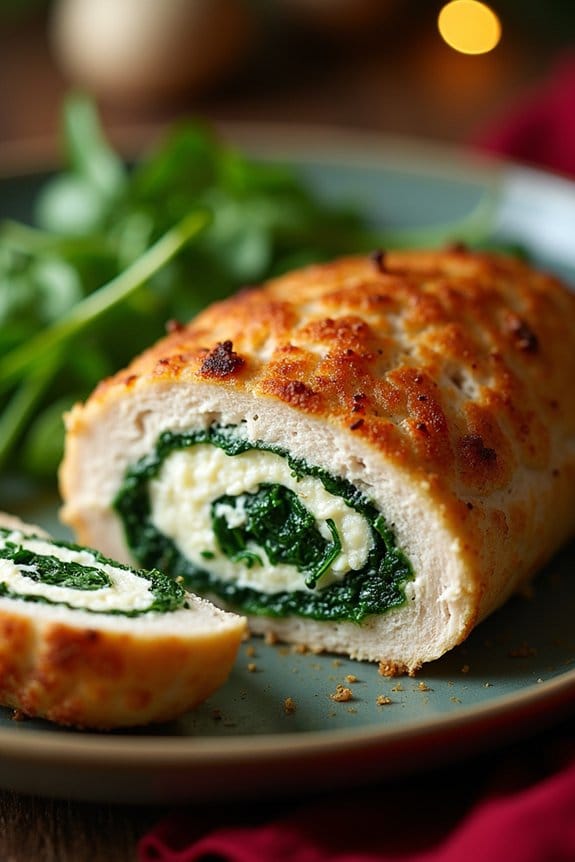
Spinach and Feta Stuffed Chicken Breasts are a delightful twist on your traditional chicken recipe, perfect for elevating your Christmas lunch to a new level of gourmet. The savory blend of spinach and feta cheese, combined with juicy chicken breasts, offers a mouthwatering experience that will impress your guests.
The recipe involves stuffing the chicken breasts with a mixture of sautéed spinach, crumbled feta, and a hint of garlic, then baking them to perfection. The end result is a tender and flavorful dish that pairs wonderfully with a variety of sides.
This dish isn’t only delicious but also visually appealing, making it a standout centerpiece for your holiday spread. The contrasting colors of the vibrant green spinach and the creamy white feta against the golden-brown chicken create an inviting presentation.
It’s a dish that’s both elegant and comforting, embodying the warmth and joy of the festive season. Whether you’re hosting a large family gathering or an intimate dinner, Spinach and Feta Stuffed Chicken Breasts are sure to be a hit.
Ingredients (Serves 4-6):
- 4 large boneless, skinless chicken breasts
- 2 cups fresh spinach leaves
- 1 cup crumbled feta cheese
- 2 cloves garlic, minced
- 2 tablespoons olive oil
- Salt and pepper, to taste
- 1 teaspoon dried oregano
- 1 teaspoon lemon zest
- 1 tablespoon lemon juice
- Toothpicks or kitchen twine
Cooking Instructions:
- Prepare the Filling: In a large skillet over medium heat, add 1 tablespoon of olive oil. Once hot, add the minced garlic and sauté for about 1 minute until fragrant. Add the spinach and cook until wilted, about 2-3 minutes. Remove from heat and let cool slightly before mixing in the crumbled feta, lemon zest, and a pinch of salt and pepper.
- Prepare the Chicken: Preheat your oven to 375°F (190°C). Take the chicken breasts and, using a sharp knife, cut a pocket into each breast by slicing horizontally without cutting all the way through. This will create a space for stuffing.
- Stuff the Chicken: Spoon the spinach and feta mixture into each chicken pocket, dividing evenly among the breasts. Secure the openings with toothpicks or tie with kitchen twine to guarantee the filling stays inside during cooking.
- Season the Chicken: Rub the outside of each stuffed chicken breast with the remaining olive oil, and season with salt, pepper, and oregano.
- Bake the Chicken: Place the stuffed chicken breasts in a baking dish. Drizzle with lemon juice, then cover with foil. Bake in the preheated oven for 25-30 minutes. Remove the foil and bake for an additional 10-15 minutes, or until the chicken is cooked through and golden brown.
- Serve: Once done, allow the chicken to rest for 5 minutes before slicing. Remove the toothpicks or twine before serving to guarantee safety.
Extra Tips:
Confirm the chicken breasts are of even thickness to promote uniform cooking. If necessary, gently pound them to achieve this.
When stuffing the chicken, don’t overfill, as this can cause the filling to spill out during cooking. If feta cheese is too salty for your taste, consider mixing it with a milder cheese like ricotta.
For added flavor, you can marinate the chicken in lemon juice and herbs a few hours before cooking. Serve these delicious stuffed breasts with a fresh salad or roasted vegetables to complete your Christmas lunch menu.
Easy Caprese Salad
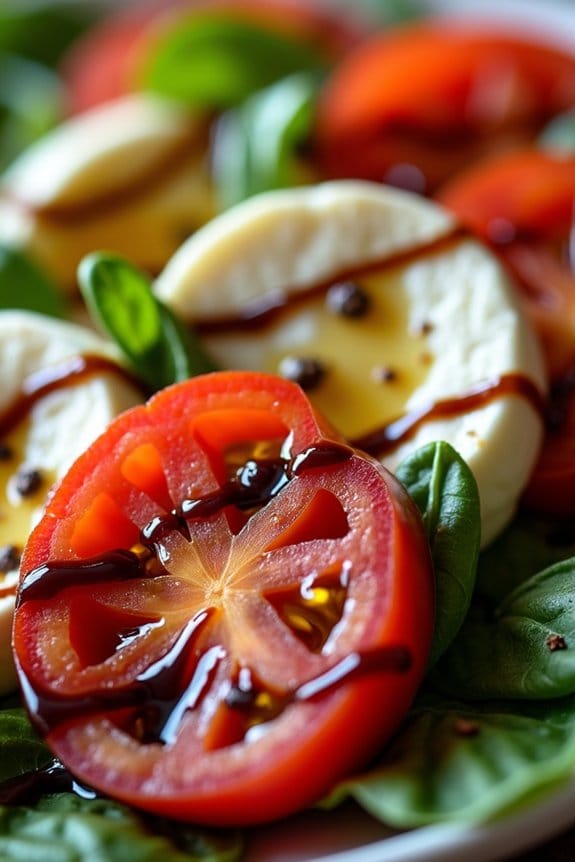
The Easy Caprese Salad is a delightful and vibrant dish that’s perfect for a Christmas lunch. This classic Italian salad isn’t only simple to prepare but also a feast for the eyes and palate. With its fresh ingredients and delicious flavors, it’s certain to be a hit with family and friends. The combination of ripe tomatoes, creamy mozzarella, and fragrant basil leaves is dressed with a drizzle of balsamic glaze, offering a balance of tanginess and sweetness.
Ideal for serving 4-6 people, this salad can be prepared in just a few minutes, making it a stress-free addition to your holiday table. It’s a rejuvenating and light dish, perfect for cutting through the richness of other holiday dishes. Whether you’re looking to add a splash of color to your spread or want something quick and easy, the Easy Caprese Salad is a must-try.
Ingredients:
- 4 large ripe tomatoes
- 1 pound fresh mozzarella cheese
- 1 bunch fresh basil leaves
- 2 tablespoons extra virgin olive oil
- Salt and freshly ground black pepper to taste
- Balsamic glaze, for drizzling
Instructions:
- Prepare the Ingredients: Begin by washing the tomatoes and basil leaves thoroughly. Pat them dry with a clean paper towel. Slice the tomatoes into 1/4-inch thick slices. Similarly, slice the mozzarella cheese into 1/4-inch thick pieces.
- Assemble the Salad: On a large serving platter or individual plates, alternate layers of tomato slices and mozzarella slices. Tuck whole basil leaves between the layers. You can arrange them in a circular pattern or any design that you find appealing.
- Season the Salad: Once assembled, drizzle the extra virgin olive oil over the salad. Confirm even coverage for flavor in every bite.
- Add Final Touches: Sprinkle salt and freshly ground black pepper over the top to taste. Finish by drizzling a generous amount of balsamic glaze over the salad. This will add a sweet and tangy contrast to the creamy and savory elements.
- Serve Immediately: The salad is best served fresh. If not serving immediately, cover and refrigerate for no more than an hour to confirm the flavors remain vibrant.
Extra Tips:
For the best flavor, choose tomatoes that are at their peak ripeness and mozzarella that’s fresh and soft. If you can’t find balsamic glaze, you can make your own by reducing balsamic vinegar over low heat until it thickens and becomes syrupy.
Consider using heirloom tomatoes for added color and flavor variations. Finally, be mindful not to over-season; the freshness of the ingredients should shine through in this simple yet elegant dish.
Honey Mustard Glazed Salmon
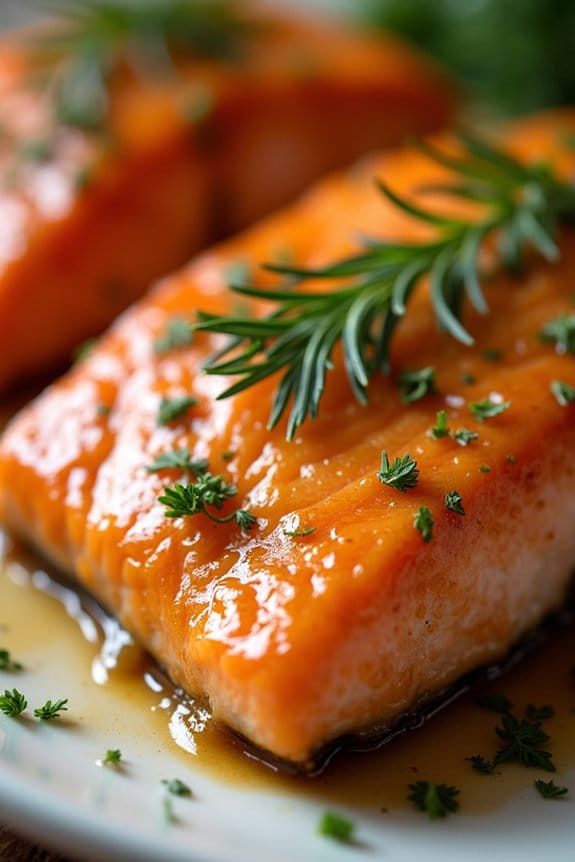
Impress your family and guests this holiday season with a delicious Honey Mustard Glazed Salmon, a perfect centerpiece for your Christmas lunch. This dish combines the rich, buttery flavor of salmon with the sweet and tangy notes of honey mustard, creating a mouthwatering combination that will leave everyone wanting more.
The recipe is straightforward and requires minimal preparation, making it a perfect choice for both seasoned chefs and kitchen novices alike. The beauty of this dish lies in its simplicity and the way it highlights the natural flavors of the salmon. The honey mustard glaze not only adds a delightful taste but also gives the salmon a beautiful golden finish.
Whether you’re serving a small family gathering or a larger holiday feast, this dish is sure to impress and become a festive favorite.
Ingredients for 4-6 people:
- 4-6 salmon fillets (about 6 oz each)
- 1/4 cup honey
- 1/4 cup Dijon mustard
- 2 tablespoons whole grain mustard
- 2 tablespoons soy sauce
- 2 tablespoons olive oil
- 1 tablespoon lemon juice
- 1 teaspoon garlic powder
- Salt to taste
- Black pepper to taste
- Fresh dill or parsley for garnish (optional)
Cooking Instructions:
- Preheat the Oven: Start by preheating your oven to 400°F (200°C). This guarantees the oven is hot enough to cook the salmon evenly and to perfection.
- Prepare the Glaze: In a small mixing bowl, combine the honey, Dijon mustard, whole grain mustard, soy sauce, olive oil, lemon juice, and garlic powder. Mix well until all the ingredients are fully incorporated, creating a smooth glaze.
- Season the Salmon: Place the salmon fillets skin-side down on a lined baking sheet. Lightly season the fillets with salt and black pepper according to your taste preferences.
- Apply the Glaze: Generously brush the honey mustard glaze over the top and sides of each salmon fillet. Confirm each fillet is well-coated to absorb all the flavors.
- Bake the Salmon: Transfer the baking sheet to the preheated oven and bake for approximately 12-15 minutes, or until the salmon is cooked through and flakes easily with a fork.
- Garnish and Serve: Once done, remove the salmon from the oven and let it rest for a minute or two. Garnish with freshly chopped dill or parsley if desired, and serve immediately for the best taste and texture.
Extra Tips:
When selecting salmon, opt for fresh, high-quality fillets for the best outcome. If possible, choose wild-caught salmon for its superior flavor and texture.
To prevent sticking, you can line your baking sheet with aluminum foil or parchment paper, and lightly oil it before placing the salmon. Additionally, adjust the amount of honey in the glaze to suit your sweetness preference, and feel free to experiment with different types of mustard for varied flavor profiles.
Enjoy this delightful dish with your favorite sides to complete your festive meal!
Roasted Vegetable Medley
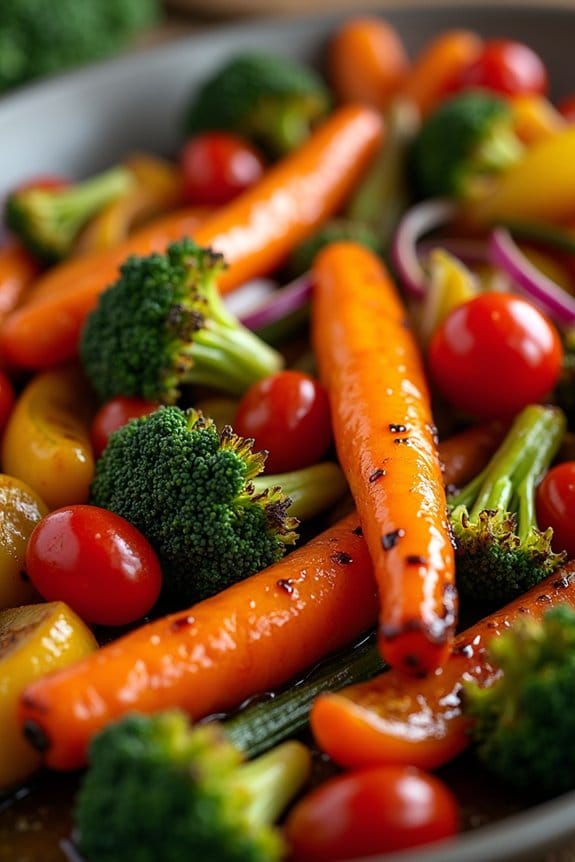
Roasted Vegetable Medley is a colorful and delicious addition to any Christmas lunch, combining a variety of seasonal vegetables that are roasted to perfection. This dish not only adds vibrant colors to your table but also offers a delightful mix of flavors and textures. The caramelization process during roasting brings out the natural sweetness and enhances the savory notes of the vegetables, making it a crowd-pleaser for both vegetarians and non-vegetarians alike.
This recipe is designed to serve 4-6 people and is incredibly versatile, allowing you to customize it based on your preferences or the vegetables you have on hand. The preparation is simple, making it a stress-free side dish for your festive meal. With minimal ingredients and a straightforward cooking method, you’ll find that this Roasted Vegetable Medley is both a time-saver and a flavor-packed addition to your holiday menu.
Ingredients:
- 2 medium carrots, peeled and sliced
- 2 bell peppers (any color), seeded and chopped
- 1 medium zucchini, sliced
- 1 medium red onion, cut into wedges
- 1 cup cherry tomatoes, halved
- 1 cup broccoli florets
- 3 tablespoons olive oil
- 2 teaspoons dried Italian herbs
- Salt and pepper to taste
- 2 tablespoons balsamic vinegar (optional)
Instructions:
- Preheat the Oven: Start by preheating your oven to 425°F (220°C). This guarantees that the oven is hot enough to roast the vegetables evenly and effectively.
- Prepare the Vegetables: Wash all the vegetables thoroughly. Peel and slice the carrots, chop the bell peppers, slice the zucchini, cut the red onion into wedges, halve the cherry tomatoes, and prepare the broccoli florets.
- Mix the Vegetables: In a large mixing bowl, combine the sliced carrots, bell peppers, zucchini, red onion, cherry tomatoes, and broccoli florets.
- Season the Vegetables: Drizzle the olive oil over the vegetables in the bowl. Add the dried Italian herbs, salt, and pepper. Toss everything together to make sure the vegetables are evenly coated with oil and seasonings.
- Arrange on Baking Sheet: Spread the seasoned vegetables in a single layer on a large baking sheet. Avoid overcrowding the pan, as this can prevent proper roasting.
- Roast the Vegetables: Place the baking sheet in the preheated oven. Roast for 25-30 minutes, stirring halfway through, until the vegetables are tender and slightly caramelized.
- Add Balsamic Vinegar (Optional): If using balsamic vinegar, drizzle it over the roasted vegetables immediately after removing them from the oven. Toss gently to coat.
- Serve: Transfer the Roasted Vegetable Medley to a serving platter and serve warm as a side dish.
Extra Tips: To enhance the flavor, consider adding a sprinkle of freshly grated Parmesan cheese or a handful of fresh herbs like parsley or basil before serving. If you prefer a spicier kick, add a pinch of red pepper flakes to the seasoning mix. Be mindful of the roasting time, as different vegetables may cook at slightly different rates; adjust the sizes of your cuts accordingly to guarantee even cooking.
Quick Lemon Herb Pasta
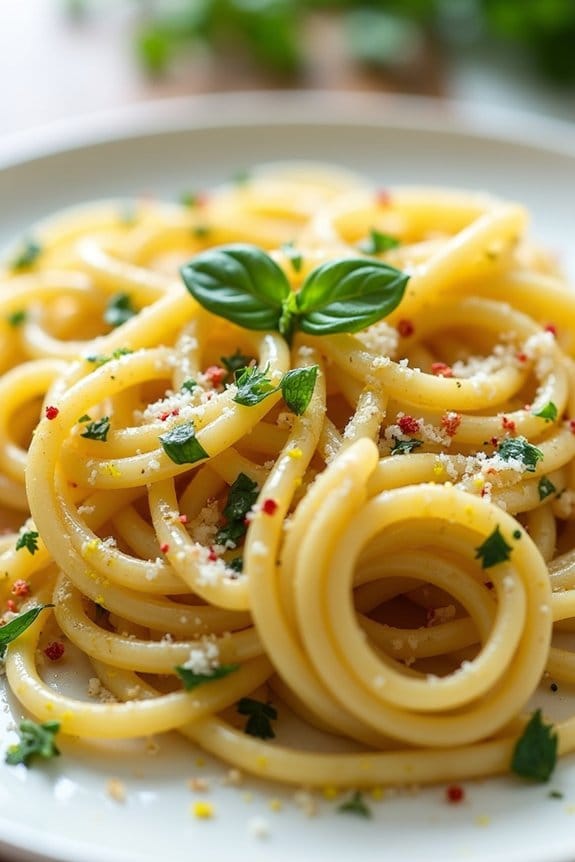
Liven up your Christmas lunch with this Quick Lemon Herb Pasta, a delightful dish that combines simplicity with fresh, vibrant flavors. Perfect for feeding 4-6 people, this pasta dish is a great addition to your holiday table, offering a light and invigorating option amidst the heavier fare.
With the tangy zing of lemon, aromatic herbs, and a touch of garlic, this pasta is sure to please both vegetarians and meat-lovers alike, providing a versatile side dish or a satisfying main course.
In just under 30 minutes, you can create a memorable dish that requires minimal effort but delivers maximum flavor. This recipe is ideal for busy holiday hosts who want to impress their guests without spending hours in the kitchen.
Pair it with a crisp white wine and a fresh green salad for a complete meal that captures the essence of the festive season.
Ingredients for 4-6 servings:
- 1 pound (450g) of pasta (spaghetti or linguine)
- 1/4 cup olive oil
- 4 cloves garlic, minced
- Zest of 2 lemons
- Juice of 2 lemons
- 1/4 teaspoon red pepper flakes
- Salt and pepper to taste
- 1/2 cup grated Parmesan cheese
- 1/4 cup fresh parsley, chopped
- 1/4 cup fresh basil, chopped
- 1/4 cup pine nuts, toasted (optional)
Instructions:
- Cook the Pasta: Bring a large pot of salted water to a boil. Add the pasta and cook according to package instructions until al dente. Reserve 1 cup of pasta water, then drain the pasta and set aside.
- Prepare the Sauce: In a large skillet over medium heat, add the olive oil. Once the oil is hot, add the minced garlic and sauté for about 1 minute until fragrant.
- Add Lemon and Spices: Stir in the lemon zest, lemon juice, red pepper flakes, salt, and pepper. Let it cook together for 1-2 minutes to allow the flavors to meld.
- Combine Pasta and Sauce: Add the cooked pasta to the skillet with the lemon sauce. Toss the pasta to coat evenly, adding reserved pasta water a little at a time if the pasta seems dry.
- Finish with Cheese and Herbs: Remove the skillet from the heat and stir in the grated Parmesan cheese, chopped parsley, and basil. Toss until the cheese is melted and everything is well combined.
- Serve: Transfer the pasta to a serving dish and sprinkle with toasted pine nuts, if using. Serve immediately while hot.
Extra Tips:
For an added depth of flavor, consider using a combination of olive oil and a knob of unsalted butter when making the sauce. This will provide a richer texture and taste.
If you prefer a protein addition, grilled chicken or shrimp pairs beautifully with the lemon and herbs. Always taste and adjust the seasoning before serving, as the acidity of lemons can vary.
Fresh herbs are key to this dish, so opt for fresh over dried whenever possible to guarantee the best flavor.
Cheesy Garlic Breadsticks
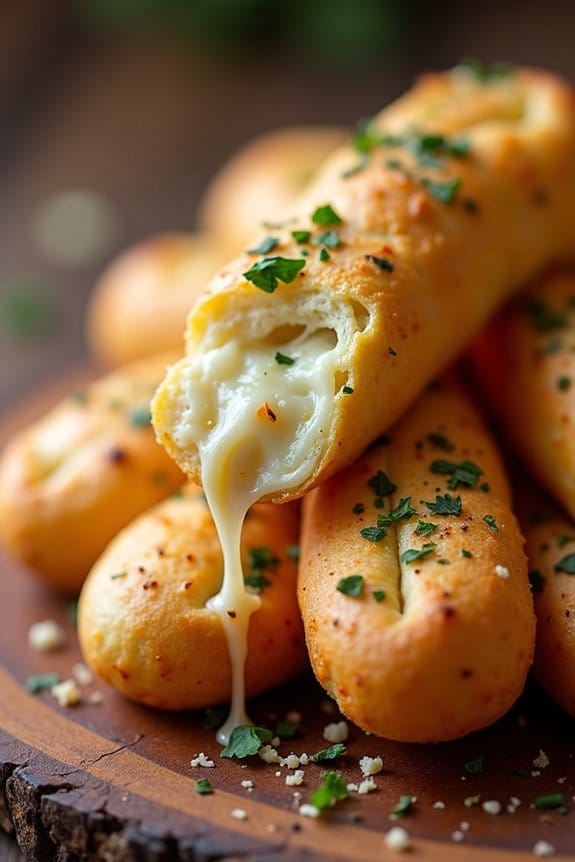
Cheesy Garlic Breadsticks are a delightful addition to any Christmas lunch, offering a comforting blend of flavors and a perfect side to accompany your festive meal. These breadsticks are crispy on the outside, soft on the inside, and infused with the savory taste of garlic and melted cheese.
They’re simple to prepare and will be a sure hit with guests of all ages. Whether served alongside a hearty soup or as a standalone appetizer, these breadsticks are bound to bring a touch of warmth and flavor to your holiday table.
The secret to these mouthwatering Cheesy Garlic Breadsticks lies in the perfect balance of garlic, cheese, and herbs. By using fresh ingredients and high-quality cheese, you can elevate the taste considerably. The aroma of freshly baked breadsticks wafting through your kitchen will certainly set the festive mood, making them an irresistible part of your holiday spread.
Designed to serve 4-6 people, this recipe guarantees that you have enough to share with family and friends, while still tempting enough to leave everyone craving more.
Ingredients (Serves 4-6):
- 1 pound pizza dough
- 3 tablespoons unsalted butter, melted
- 2 cloves garlic, minced
- 1 teaspoon Italian seasoning
- 1 cup shredded mozzarella cheese
- 1/4 cup grated Parmesan cheese
- Salt, to taste
- Fresh parsley, chopped (for garnish)
Cooking Instructions:
- Preheat the Oven: Begin by preheating your oven to 400°F (200°C). This guarantees that the breadsticks will bake evenly and develop a golden crust.
- Prepare the Baking Sheet: Line a large baking sheet with parchment paper or lightly grease it to prevent the breadsticks from sticking.
- Roll Out the Dough: On a lightly floured surface, roll out the pizza dough into a rectangle, approximately 12×8 inches in size. This will be the base for your breadsticks.
- Prepare the Garlic Butter: In a small bowl, mix together the melted butter, minced garlic, and Italian seasoning. This will infuse the breadsticks with a rich garlic flavor.
- Brush the Dough: Evenly brush the garlic butter mixture over the rolled-out dough, ensuring that it covers the entire surface.
- Add the Cheese: Sprinkle the shredded mozzarella and grated Parmesan cheese evenly over the dough. Make sure to cover all areas to achieve a cheesy consistency.
- Cut the Dough: Using a pizza cutter or sharp knife, slice the dough into strips, about 1 inch wide. Then, gently twist each strip to form the breadsticks.
- Bake the Breadsticks: Transfer the twisted strips to the prepared baking sheet, leaving a small gap between each one. Bake in the preheated oven for 12-15 minutes or until the breadsticks are golden brown and the cheese is bubbly.
- Garnish and Serve: Once baked, remove the breadsticks from the oven and let them cool slightly. Garnish with chopped parsley for a fresh touch before serving.
Extra Tips:
To guarantee your Cheesy Garlic Breadsticks are the best they can be, use fresh pizza dough from your local bakery or make it from scratch for the freshest taste. If you’re short on time, store-bought dough can also work well.
Experiment with different types of cheese, like cheddar or gouda, to add a unique twist to the flavor. Additionally, for an extra kick, consider adding a pinch of red pepper flakes to the garlic butter mixture.
Finally, serve the breadsticks with a side of marinara sauce or a creamy dip for an extra layer of flavor that your guests will love.
Prosciutto Wrapped Asparagus
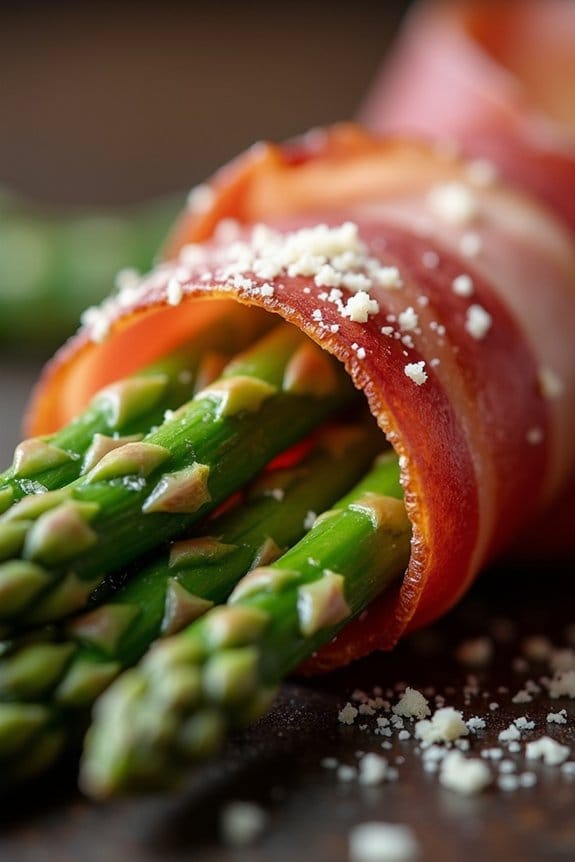
When it comes to elevating your Christmas lunch, Prosciutto Wrapped Asparagus is a dish that effortlessly combines elegance and simplicity. This delightful appetizer brings together the tender, fresh flavors of asparagus with the rich, savory taste of prosciutto. It’s a perfect starter to tantalize your taste buds and is sure to impress your guests with its sophisticated presentation.
The beauty of this dish lies in its minimalistic approach, allowing the natural flavors of the ingredients to shine. With just a handful of components, Prosciutto Wrapped Asparagus isn’t only easy to prepare but also visually appealing, making it a festive addition to your holiday spread. Whether you’re hosting a large gathering or an intimate family meal, this recipe serves 4-6 people and can be easily adjusted to accommodate more.
Ingredients:
- 1 pound (about 20 spears) of fresh asparagus
- 8-10 slices of prosciutto
- 1 tablespoon olive oil
- Salt and pepper to taste
- Optional: Grated Parmesan cheese for garnish
Instructions:
- Prepare the Asparagus: Begin by rinsing the asparagus under cold water and patting them dry with a clean towel. Trim the woody ends of the asparagus by snapping off the bottom part where it naturally breaks.
- Wrap with Prosciutto: Lay a slice of prosciutto on a clean surface. Place a spear of asparagus on one end of the slice. Roll the prosciutto around the asparagus spear, ensuring it’s tightly wrapped. Repeat this process with the remaining asparagus and prosciutto slices.
- Season the Wrapped Spears: Once all asparagus spears are wrapped, place them on a baking sheet lined with parchment paper. Drizzle olive oil over the wrapped asparagus and sprinkle lightly with salt and pepper. Be cautious with the salt, as prosciutto is already salty.
- Bake the Asparagus: Preheat your oven to 400°F (200°C). Place the baking sheet with the prosciutto wrapped asparagus in the oven and bake for 10-12 minutes. You want the prosciutto to be crisp and the asparagus tender.
- Serve: Once cooked, remove the asparagus from the oven and transfer them to a serving platter. For an extra touch of flavor, sprinkle some grated Parmesan cheese over the top before serving.
Extra Tips:
When selecting asparagus, look for spears that are firm and bright green with tightly closed tips, as these are the freshest.
If you want a slightly smokier flavor, consider grilling the wrapped asparagus on a barbecue instead of baking.
You can also experiment by adding a hint of lemon zest or a sprinkle of crushed red pepper flakes for a bit of zing.
Remember to adjust the baking time if your asparagus spears are particularly thick or thin, ensuring they’re perfectly cooked without becoming too soft.
No-Bake Chocolate Peppermint Bars
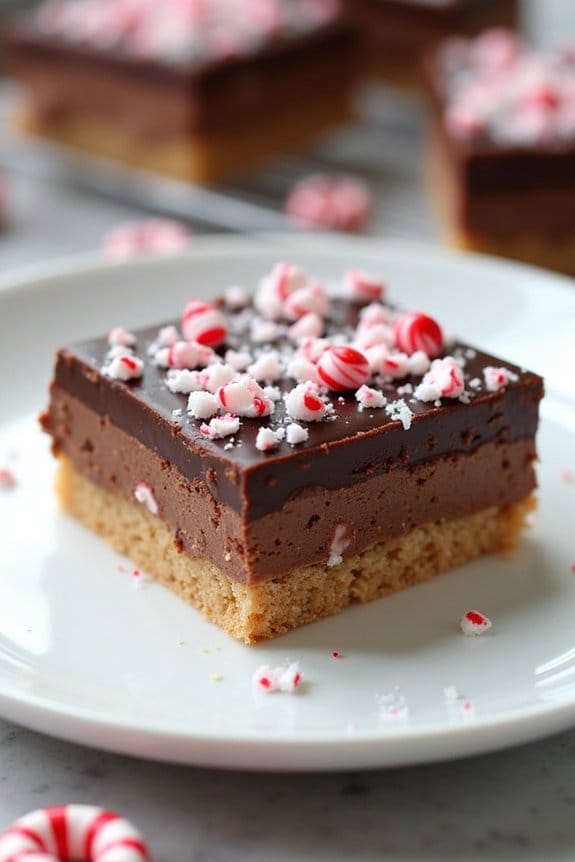
Indulge in the festive flavors of the season with these delightful No-Bake Chocolate Peppermint Bars. Perfect for a Christmas lunch dessert, these bars combine the rich taste of chocolate with the invigorating zing of peppermint, making them an irresistible treat for any holiday gathering.
The best part? You don’t need to turn on the oven, allowing you to focus on other holiday preparations while these sweet delights set in the fridge. With a smooth, creamy texture and a perfect balance of sweet and minty flavors, these bars are sure to become a holiday favorite.
These No-Bake Chocolate Peppermint Bars aren’t only easy to make but also allow for some creative holiday decorating. You can sprinkle crushed peppermint candies on top for a festive touch, or drizzle melted white chocolate for an extra layer of richness.
Whether you’re serving them as part of a Christmas lunch or wrapping them up as edible gifts, these bars are a surefire way to spread holiday cheer. This recipe yields approximately 16 bars, making it perfect for serving 4-6 people.
Ingredients:
- 1 cup graham cracker crumbs
- 1/2 cup unsalted butter, melted
- 2 cups powdered sugar
- 1/4 cup unsweetened cocoa powder
- 1/4 cup milk
- 1 teaspoon vanilla extract
- 1 teaspoon peppermint extract
- 2 cups semisweet chocolate chips
- 1/4 cup heavy cream
- 1/2 cup crushed peppermint candies
Instructions:
- Prepare the Base: In a medium bowl, combine the graham cracker crumbs and melted butter. Mix until the crumbs are evenly coated and the mixture has a sandy texture. Press this mixture firmly into the bottom of a greased 9×9-inch baking pan to form an even crust.
- Make the Filling: In a separate large bowl, whisk together the powdered sugar, cocoa powder, milk, vanilla extract, and peppermint extract. Mix until smooth and well combined. Pour this mixture over the graham cracker crust, spreading it evenly with a spatula.
- Prepare the Chocolate Topping: In a microwave-safe bowl, combine the semisweet chocolate chips and heavy cream. Microwave in 30-second intervals, stirring in between, until the chocolate is completely melted and smooth. Pour the melted chocolate over the peppermint layer, spreading it evenly to cover.
- Add the Peppermint Crunch: Immediately sprinkle the crushed peppermint candies over the chocolate layer while it’s still warm to guarantee they stick.
- Set the Bars: Place the pan in the refrigerator for at least 2 hours, or until the bars are firm and set. Once chilled, remove from the pan and cut into 16 squares.
- Serve: Serve the bars chilled or at room temperature, depending on your preference.
Extra Tips:
For a more intense peppermint flavor, consider adding a few drops more of peppermint extract, but be cautious as it can quickly become overpowering.
When cutting the bars, use a sharp knife warmed under hot water for cleaner edges. If you want to get creative, try adding a layer of crushed Oreos in the base for an extra crunch, or substitute dark chocolate chips for a richer chocolate layer.
Mini Pecan Pies

Mini Pecan Pies are a delightful addition to any Christmas lunch, offering a bite-sized version of a classic dessert. These sweet, nutty treats are perfect for satisfying your guests’ cravings without overwhelming them after a hearty meal. With a buttery crust and rich, caramel-like filling, Mini Pecan Pies encapsulate the essence of the holiday season in each bite.
They aren’t only easy to make but also convenient to serve, making them an ideal choice for holiday gatherings. The beauty of Mini Pecan Pies lies in their simplicity and elegance. You can prepare them ahead of time and store them until you’re ready to serve, allowing you to focus on other aspects of your Christmas celebration.
The combination of crunchy pecans and smooth filling wrapped in a flaky crust is sure to be a crowd-pleaser, leaving your guests asking for more. Now let’s plunge into the recipe to create these delicious treats for your holiday table.
Ingredients (Serving Size: 4-6 people)
- 1 cup all-purpose flour
- 1/2 cup unsalted butter, chilled and diced
- 2 tablespoons granulated sugar
- 1/4 teaspoon salt
- 2 tablespoons ice water
- 1 cup pecans, chopped
- 1/2 cup packed brown sugar
- 1/2 cup light corn syrup
- 2 large eggs
- 2 tablespoons unsalted butter, melted
- 1 teaspoon vanilla extract
- 1/4 teaspoon salt
Cooking Instructions
1. Preheat the Oven: Start by preheating your oven to 350°F (175°C). This guarantees that the oven is at the right temperature when you’re ready to bake the pies.
2. Prepare the Crust: In a medium bowl, combine the flour, granulated sugar, and salt. Add the chilled, diced butter and use a pastry cutter or your fingers to mix until the mixture resembles coarse crumbs.
Slowly add the ice water, one tablespoon at a time, mixing until the dough holds together. Wrap the dough in plastic wrap and refrigerate for 30 minutes.
3. Roll and Cut the Dough: Once the dough is chilled, roll it out on a lightly floured surface to about 1/8 inch thickness. Use a round cookie cutter or a glass to cut circles slightly larger than the cups of a mini muffin tin.
Gently press the dough circles into the muffin tin cups.
4. Prepare the Filling: In a separate bowl, whisk together the brown sugar, corn syrup, eggs, melted butter, vanilla extract, and salt until smooth. Stir in the chopped pecans.
5. Fill and Bake: Spoon the pecan mixture into each crust-lined muffin cup, filling them about 3/4 full. Be careful not to overfill, as the filling will expand during baking.
Place the muffin tin in the preheated oven and bake for 20-25 minutes, or until the filling is set and the crust is golden brown.
6. Cool and Serve: Remove the mini pecan pies from the oven and allow them to cool in the muffin tin for about 10 minutes.
Then, carefully remove them and let them cool completely on a wire rack before serving.
Extra Tips
For best results, make sure all your ingredients, especially the butter, are cold when preparing the crust. This helps create a flaky texture. If you’re short on time, you can use store-bought pie crust as a shortcut.
When making the filling, verify the pecans are chopped finely enough so that they distribute evenly in each mini pie, providing a balanced flavor and texture. Finally, keep an eye on the pies while baking; if the edges of the crust start to brown too quickly, cover them with a strip of foil to prevent burning.
Enjoy your delightful Mini Pecan Pies!
Holiday Fruit Salad
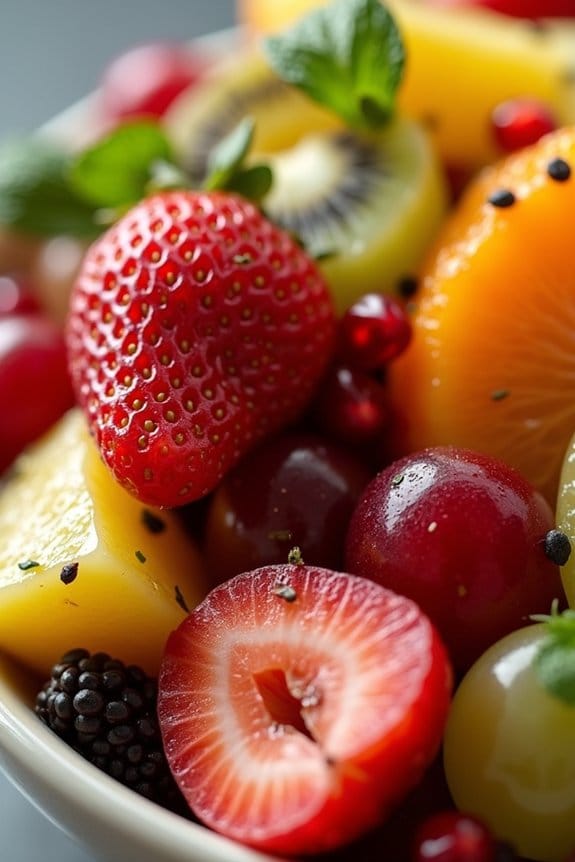
The Holiday Fruit Salad is a revitalizing and vibrant addition to your Christmas lunch spread, offering a delightful mix of colors and flavors. This dish isn’t only visually appealing but also a healthy option to balance out the richer foods typically enjoyed during the festive season. It combines a variety of fresh fruits with a light dressing that enhances the natural sweetness without overpowering it.
This salad is perfect for those who enjoy a crisp and juicy side dish that complements the heavier main courses of a holiday feast.
Preparing this Holiday Fruit Salad is simple and requires minimal cooking, making it an ideal choice for busy holiday preparations. The recipe includes a mix of seasonal fruits that are easily available during winter, guaranteeing freshness and flavor. You can also customize the salad by adding your favorite fruits or nuts to suit your personal taste.
Whether served as a side dish or a light dessert, this fruit salad is sure to be a hit with family and friends.
Ingredients (Serves 4-6 people):
- 2 cups of fresh strawberries, hulled and sliced
- 2 cups of seedless grapes (red or green), halved
- 2 cups of fresh pineapple, diced
- 2 kiwis, peeled and sliced
- 2 oranges, peeled and segmented
- 1 apple, cored and diced
- 1 pomegranate, seeds only
- 1/4 cup of fresh mint leaves, chopped
- 1 tablespoon of honey
- 1 tablespoon of freshly squeezed lemon juice
- 1/2 teaspoon of vanilla extract
Cooking Instructions:
- Prepare the Fruits: Begin by washing all the fruits thoroughly under running water. Pat them dry with a clean kitchen towel. Hull and slice the strawberries, halve the grapes, dice the pineapple, peel and slice the kiwis, peel and segment the oranges, and core and dice the apple. Remove the seeds from the pomegranate and set them aside.
- Mix the Dressing: In a small bowl, combine the honey, freshly squeezed lemon juice, and vanilla extract. Whisk these ingredients together until they’re well blended to form a light dressing.
- Assemble the Salad: In a large mixing bowl, combine all the prepared fruits: strawberries, grapes, pineapple, kiwis, oranges, apple, and pomegranate seeds. Gently toss them together to guarantee even distribution.
- Add the Dressing: Pour the honey-lemon dressing over the mixed fruits. Use a large spoon to gently toss the salad, guaranteeing that the dressing coats each piece of fruit evenly.
- Garnish and Serve: Sprinkle the chopped fresh mint leaves over the top of the salad. Transfer the salad to a serving dish or individual bowls. Serve immediately or cover and refrigerate for up to an hour before serving to allow the flavors to meld.
Extra Tips:
When preparing the Holiday Fruit Salad, it’s important to select ripe, fresh fruits to guarantee the best flavor and texture.
If you prefer a more substantial salad, consider adding a handful of nuts, such as walnuts or almonds, for added crunch. For a more festive presentation, serve the salad in a hollowed-out pineapple or melon half.
If preparing the salad in advance, wait to add the dressing and mint until just before serving to maintain the salad’s freshness and crispness.
