

As the holiday season kicks into high gear, getting a delicious Christmas lunch on the table doesn’t have to be stressful. With dishes like festive Caprese skewers and cranberry brie bites, your spread will be both beautiful and easy to prepare. Think honey glazed ham sliders and mini quiche Lorraine as savory options that everyone will love. Finish it off with gingerbread cupcakes for a sweet touch. These quick and cheerful recipes are sure to bring joy to your holiday gathering.
Festive Caprese Skewers
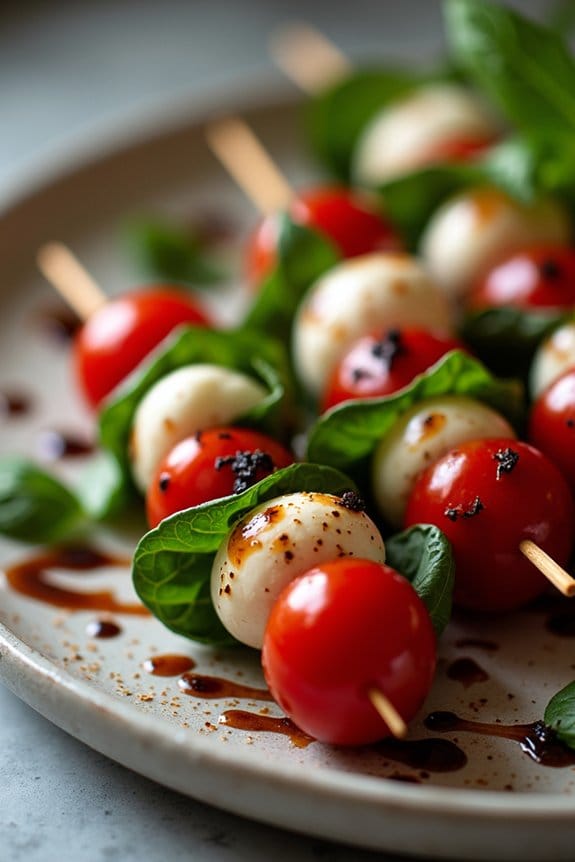
Celebrate the season with these delightful Festive Caprese Skewers, a perfect appetizer for your Christmas lunch. These vibrant skewers embody the colors of the holiday with their rich reds, bright greens, and creamy whites. The combination of fresh mozzarella, juicy cherry tomatoes, and aromatic basil leaves, all drizzled with a balsamic glaze, creates a harmonious blend of flavors that will tantalize your taste buds.
Easy to prepare and visually appealing, these skewers are certain to be a hit with your guests. The beauty of Caprese Skewers lies in their simplicity and the quality of ingredients. Selecting the freshest produce and the finest mozzarella will elevate this dish beyond a mere starter to a memorable culinary experience.
Whether you’re hosting a large gathering or a cozy family meal, these skewers are an excellent choice, as they require minimal preparation time and can be assembled in advance. This recipe serves 4-6 people, making it an ideal addition to your festive menu.
Ingredients (for 4-6 people)
- 16 cherry tomatoes
- 16 fresh mozzarella balls (bocconcini)
- 16 fresh basil leaves
- 2 tablespoons extra-virgin olive oil
- 1 tablespoon balsamic glaze
- Salt and pepper to taste
- 16 wooden or bamboo skewers
Cooking Instructions
- Prepare the Ingredients: Start by rinsing the cherry tomatoes and basil leaves under cool water. Pat them dry with a clean kitchen towel. Drain the mozzarella balls from their packaging liquid and set them aside.
- Assemble the Skewers: Begin assembling the skewers by threading one cherry tomato onto a skewer, followed by a basil leaf, then a mozzarella ball. Repeat this sequence until you have used all the ingredients, making sure each skewer has an equal number of each item.
- Season the Skewers: Arrange the assembled skewers on a serving platter. Drizzle the extra-virgin olive oil evenly over them. Sprinkle a pinch of salt and a dash of pepper to enhance the flavors.
- Add the Finishing Touches: Just before serving, drizzle the balsamic glaze over the skewers. This will add a touch of sweetness and a beautiful sheen, making the dish even more appealing.
- Serve and Enjoy: Serve the skewers immediately, or refrigerate them for up to an hour if preparing in advance. If refrigerated, let them sit at room temperature for a few minutes before serving to bring out the full flavors.
Extra Tips
For an added twist, consider marinating the mozzarella balls in olive oil, a pinch of salt, and some crushed garlic for a few hours before assembly. This will infuse them with additional flavor.
Additionally, using high-quality balsamic glaze can make a significant difference in the overall taste of the skewers. If you prefer a more robust flavor, try using heirloom cherry tomatoes, which come in a variety of colors and add an extra festive touch.
Cranberry Brie Bites
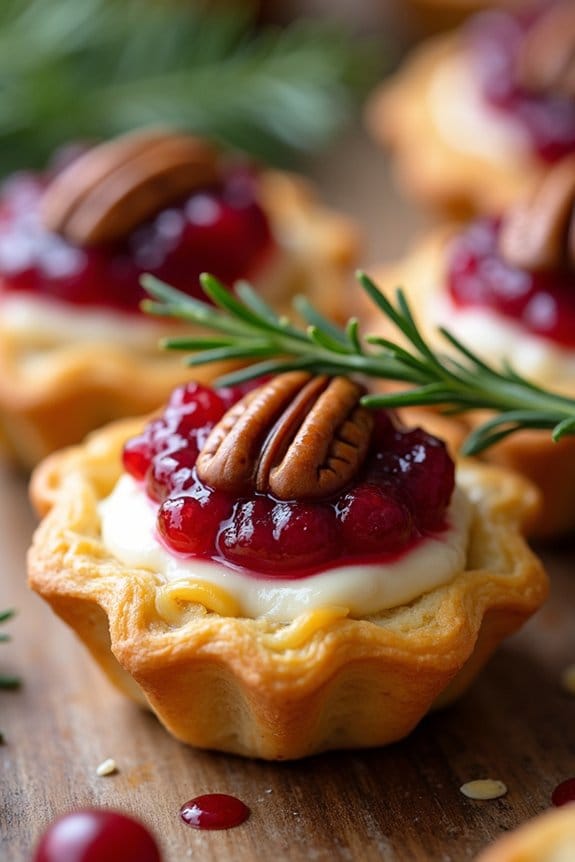
Cranberry Brie Bites are a delightful and festive appetizer perfect for Christmas lunch. These delicious bites combine the creamy richness of Brie cheese with the tart sweetness of cranberry sauce, all wrapped up in flaky pastry. Not only are they visually appealing, but they also offer a perfect balance of flavors and textures that will impress your guests.
Whether you’re planning a small family gathering or a larger festive celebration, these bites are bound to be a hit. This recipe is designed to serve 4-6 people, making it an ideal choice for a cozy Christmas lunch. The preparation is simple and doesn’t require extensive cooking skills, so even a beginner can achieve excellent results.
The key is to use high-quality ingredients and follow the steps carefully to guarantee perfectly baked and delicious bites. With the holiday season in full swing, Cranberry Brie Bites are a quick and easy way to add a touch of elegance to your festive meal.
Ingredients:
- 1 sheet of puff pastry (thawed if frozen)
- 8 oz Brie cheese
- 1/2 cup cranberry sauce
- 1/4 cup chopped pecans (optional)
- Fresh rosemary sprigs for garnish (optional)
- Flour for dusting
Instructions:
- Preheat Oven: Start by preheating your oven to 375°F (190°C). This will guarantee that the oven is at the right temperature for baking once the bites are prepared.
- Prepare Puff Pastry: Lightly flour a clean surface and roll out the puff pastry sheet to smooth out any creases. Cut the pastry into 24 equal squares (about 2 inches each).
- Prepare Brie: Cut the Brie cheese into small cubes, approximately 1 inch in size. You should have enough cubes to place one in each pastry square.
- Assemble Bites: Place each puff pastry square into a mini muffin tin, gently pressing down to form a cup. Add a Brie cube to each pastry cup and top with about 1 teaspoon of cranberry sauce.
- Add Pecans (Optional): If using, sprinkle a few chopped pecans on top of the cranberry sauce for added crunch and flavor.
- Bake: Place the muffin tin in the preheated oven and bake for 15-20 minutes, or until the pastry is golden brown and the cheese is melted and bubbly.
- Garnish and Serve: Remove the bites from the oven and let them cool slightly. Garnish each bite with a small sprig of fresh rosemary if desired. Serve warm for the best flavor.
Extra Tips:
When making Cranberry Brie Bites, make sure your puff pastry is cold when you work with it; this helps achieve a flaky texture. If you prefer a tangier flavor, consider using whole cranberry sauce with orange zest.
Additionally, you can prepare these bites ahead of time and store them in the fridge; simply bake them right before serving to make sure they’re warm and delicious. If you’re short on time, pre-made cranberry sauce works perfectly fine, but homemade adds a personal touch. Enjoy these bites as a delightful start to your Christmas feast!
Honey Glazed Ham Sliders

Preparing these sliders is straightforward and can be done in advance, making your holiday meal prep a breeze. The combination of honey, brown sugar, and a hint of mustard creates a delectable glaze that enhances the natural flavors of the ham. Serving them on buttery, soft rolls with a touch of mayonnaise or mustard adds a creamy texture that complements the glazed ham perfectly. Let’s explore the ingredients and instructions to make these delightful Honey Glazed Ham Sliders for 4-6 people.
Ingredients:
- 1 ½ pounds of cooked ham, thinly sliced
- 12 slider buns
- ½ cup of honey
- ¼ cup of brown sugar
- 2 tablespoons of Dijon mustard
- 2 tablespoons of butter
- ½ teaspoon of ground black pepper
- ¼ teaspoon of ground cloves
- 1 tablespoon of apple cider vinegar
- ½ cup of mayonnaise or mustard (optional, for serving)
Instructions:
- Prepare the Glaze: In a medium saucepan over medium heat, combine the honey, brown sugar, Dijon mustard, butter, black pepper, ground cloves, and apple cider vinegar. Stir the mixture continuously until the sugar is fully dissolved and the glaze is smooth. This should take about 5 minutes. Remove from heat and set aside to cool slightly.
- Preheat the Oven: Preheat your oven to 350°F (175°C). This guarantees the oven is at the right temperature when you’re ready to bake the sliders.
- Glaze the Ham: Place the sliced ham in a baking dish and pour the prepared glaze over the ham slices, making sure they’re evenly coated. Use a brush or spoon to spread the glaze if necessary.
- Bake the Ham: Cover the baking dish with aluminum foil and place it in the preheated oven. Bake for about 20 minutes, then remove the foil and bake for an additional 5-10 minutes, allowing the glaze to caramelize slightly.
- Prepare the Slider Buns: While the ham is baking, slice the slider buns in half and, if desired, toast them slightly in the oven or a toaster for a minute or two until they’re golden brown.
- Assemble the Sliders: Once the ham is baked and slightly cooled, place a slice or two of glazed ham on each slider bun. Add a dollop of mayonnaise or mustard on the top bun if desired, then place it on top of the ham.
- Serve: Arrange the sliders on a serving platter and serve warm. They’re ready to be enjoyed by your guests!
Extra Tips:
For an added touch of flavor, consider brushing the tops of the slider buns with melted butter and sprinkling them with sesame seeds before serving.
You can also add slices of cheese, such as Swiss or cheddar, to the sliders for an extra layer of flavor.
If you make the ham ahead of time, simply reheat it gently in the oven before assembling the sliders.
This recipe is versatile, so feel free to customize the sliders with your favorite condiments or toppings, like pickles or arugula, to suit your taste preferences.
Spinach and Feta Stuffed Chicken
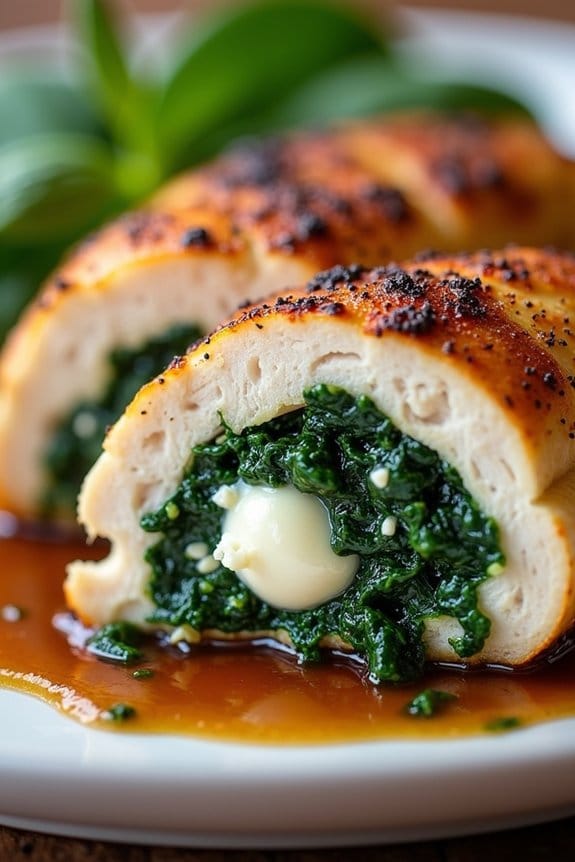
Spinach and Feta Stuffed Chicken is a delightful and flavorful dish that combines juicy chicken breasts with a savory filling made from fresh spinach and creamy feta cheese. This dish is perfect for a festive Christmas lunch, offering a healthy yet indulgent option that’s sure to impress your guests.
The combination of the tender chicken and the rich, cheesy filling creates a perfect harmony of flavors that will leave everyone at the table satisfied. This dish not only boasts a beautiful presentation but is also surprisingly easy to prepare. The spinach and feta stuffing is packed with nutrients, making it a nutritious choice for a holiday feast.
The process involves carefully creating a pocket in each chicken breast to encase the delicious filling, resulting in a moist and flavorful end product. Served with your choice of sides, this main course will be the highlight of your Christmas lunch menu.
Ingredients for 4-6 servings:
- 4-6 boneless, skinless chicken breasts
- 2 cups fresh spinach, chopped
- 1 cup crumbled feta cheese
- 2 cloves garlic, minced
- 1 tablespoon olive oil
- 1 teaspoon dried oregano
- 1 teaspoon salt
- 1/2 teaspoon black pepper
- 1 tablespoon lemon juice
- Toothpicks or kitchen twine
Cooking Instructions:
- Prepare the Filling: In a medium skillet, heat the olive oil over medium heat. Add the minced garlic and sauté until fragrant, about 1 minute. Add the chopped spinach and cook until wilted, about 2-3 minutes. Remove from heat and let cool slightly. Once cooled, mix in the crumbled feta cheese, dried oregano, salt, and black pepper. Stir until well combined.
- Prepare the Chicken: Preheat your oven to 375°F (190°C). Using a sharp knife, carefully cut a pocket into each chicken breast. Be sure not to slice all the way through, as you want to create a secure pocket for the filling.
- Stuff the Chicken: Spoon the spinach and feta mixture evenly into each chicken breast pocket. Use toothpicks or kitchen twine to secure the opening, making sure the filling stays inside during cooking.
- Sear the Chicken: In a large oven-safe skillet, heat a little olive oil over medium-high heat. Sear the stuffed chicken breasts for about 2-3 minutes on each side, or until golden brown. This step helps lock in the juices and gives the chicken a beautiful color.
- Bake the Chicken: Transfer the skillet to the preheated oven and bake for 20-25 minutes, or until the chicken is cooked through and reaches an internal temperature of 165°F (74°C).
- Finish and Serve: Once cooked, remove the chicken from the oven and let it rest for a few minutes. Drizzle with lemon juice before serving to enhance the flavors. Serve warm with your choice of sides.
Extra Tips:
For an extra burst of flavor, consider adding some sun-dried tomatoes or chopped olives to the spinach and feta mixture. If you don’t have an oven-safe skillet, sear the chicken in a regular skillet and then transfer it to a baking dish for the oven phase.
Make sure each chicken breast is sealed properly with toothpicks or twine to prevent the filling from spilling out. Finally, resting the chicken after baking is vital, as it allows the juices to redistribute, making certain each bite is juicy and delicious.
Pesto Pasta Salad
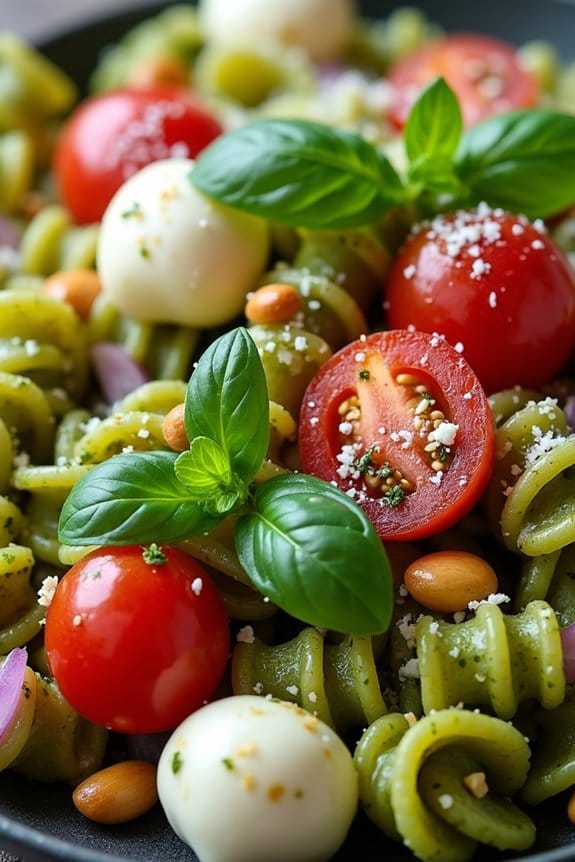
Pesto Pasta Salad is a vibrant and invigorating dish that’s perfect for a Christmas lunch. It combines the rich and aromatic flavors of pesto with the lightness of pasta salad, creating a delicious dish that can be served either as a main course or a side dish. The variety of textures from the fresh vegetables and the creamy pesto sauce make this salad a crowd-pleaser, and it’s easy to prepare in advance, allowing you to enjoy the festive season without spending too much time in the kitchen.
This recipe is designed to serve 4-6 people, making it ideal for a small gathering or family holiday meal. With its colorful presentation and delightful taste, Pesto Pasta Salad will surely add a festive touch to your Christmas lunch. Whether you’re serving vegetarians or simply looking to add a fresh and healthy option to your holiday menu, this dish is sure to satisfy all your guests.
Ingredients:
- 12 ounces of fusilli or rotini pasta
- 1 cup of cherry tomatoes, halved
- 1/2 cup of fresh mozzarella balls, halved
- 1/4 cup of red onion, thinly sliced
- 1 cup of pesto sauce
- 1/4 cup of freshly grated Parmesan cheese
- 1/4 cup of pine nuts, toasted
- Salt and pepper to taste
- Fresh basil leaves for garnish
Cooking Instructions:
- Cook the Pasta: Begin by bringing a large pot of salted water to a boil. Add the fusilli or rotini pasta and cook according to the package instructions until al dente. Once cooked, drain the pasta and rinse it under cold water to stop the cooking process. This will also help cool the pasta down, which is essential for a salad.
- Prepare the Vegetables and Cheese: While the pasta is cooking, halve the cherry tomatoes and mozzarella balls, and thinly slice the red onion. Set these aside.
- Toast the Pine Nuts: Place the pine nuts in a small, dry skillet over medium heat. Stir frequently for about 3-5 minutes until they’re golden and fragrant. Be careful not to burn them. Once toasted, remove from heat and set aside to cool.
- Combine Ingredients: In a large mixing bowl, combine the cooked pasta, cherry tomatoes, mozzarella balls, sliced red onion, and toasted pine nuts. Pour the pesto sauce over the mixture and gently toss everything together until the pasta and vegetables are evenly coated with the pesto.
- Add Cheese and Seasoning: Sprinkle the freshly grated Parmesan cheese over the salad. Season with salt and pepper to taste, and toss gently to combine.
- Serve and Garnish: Transfer the pesto pasta salad to a serving dish. Garnish with fresh basil leaves to add a pop of color and an extra layer of flavor. Serve immediately or refrigerate for up to 2 hours before serving for a chilled option.
Extra Tips:
For the best flavor, use high-quality pesto sauce, preferably homemade or from a reputable brand. If making the salad in advance, wait to add the fresh basil garnish until just before serving to keep it looking fresh.
Feel free to customize the salad by adding other ingredients like sun-dried tomatoes, roasted red peppers, or olives to suit your taste. If you prefer a little more protein, grilled chicken or shrimp can be excellent additions.
Finally, remember that the pasta will absorb some of the pesto over time, so you might want to reserve a little extra pesto to freshen up the salad before serving.
Sweet Potato and Goat Cheese Tart

Sweet Potato and Goat Cheese Tart is a delightful dish that balances the sweetness of roasted sweet potatoes with the tanginess of creamy goat cheese. This tart is perfect for a festive Christmas lunch, offering a visually appealing and flavorful addition to your holiday table.
It combines a buttery, flaky crust with a rich filling that’s certain to impress your guests. This recipe is designed to serve 4-6 people, making it an ideal choice for a small gathering with family and friends.
The preparation of this tart involves layering roasted sweet potatoes, crumbled goat cheese, and a savory custard within a golden pastry crust. The sweet potatoes provide a hearty base while the goat cheese adds a luxurious creaminess. Complemented by a simple custard of eggs and cream, this tart bakes to perfection, resulting in a dish that’s both comforting and sophisticated.
Whether served as a main course or a side dish, this Sweet Potato and Goat Cheese Tart will certainly become a holiday favorite.
Ingredients:
- 1 sheet of puff pastry, thawed
- 2 medium sweet potatoes, peeled and thinly sliced
- 150g goat cheese, crumbled
- 3 large eggs
- 1 cup heavy cream
- 2 tablespoons olive oil
- 1 teaspoon fresh thyme leaves
- Salt and pepper to taste
Instructions:
- Preheat and Prepare: Preheat your oven to 200°C (400°F). Roll out the puff pastry on a floured surface and place it into a tart pan, trimming any excess. Prick the base with a fork and chill in the refrigerator for 10 minutes.
- Roast Sweet Potatoes: Arrange the sliced sweet potatoes on a baking sheet. Drizzle with olive oil, season with salt and pepper, and sprinkle with thyme. Roast in the preheated oven for 20-25 minutes, or until tender and slightly caramelized. Remove and allow to cool slightly.
- Prepare the Filling: In a mixing bowl, whisk together the eggs and cream until smooth. Season with salt and pepper.
- Assemble the Tart: Layer the roasted sweet potatoes evenly over the chilled pastry base. Sprinkle the crumbled goat cheese over the sweet potatoes. Pour the egg and cream mixture over the top, allowing it to fill all gaps.
- Bake the Tart: Place the tart in the oven and bake for 30-35 minutes, or until the filling is set and the top is golden brown. Remove from the oven and allow to cool slightly before serving.
- Serve: Once cooled to your desired temperature, slice the tart and serve as a main course or alongside other Christmas dishes.
Extra Tips:
When preparing the Sweet Potato and Goat Cheese Tart, make sure that the puff pastry is well-chilled before baking to prevent shrinkage. You can use a pie weight or dry beans on parchment paper over the crust for blind baking if you prefer a crisper base.
For an added touch of flavor, consider incorporating a sprinkle of nutmeg or a dash of smoked paprika into the custard mixture. Experiment with different herbs like rosemary or sage to tailor the tart to your taste.
Enjoy this delicious tart warm or at room temperature for the best texture and flavor.
Smoked Salmon and Cream Cheese Bagels
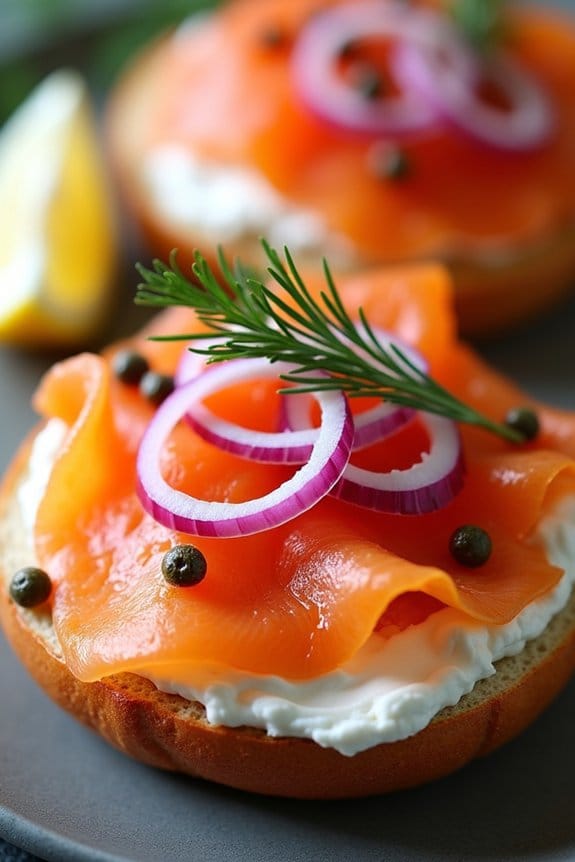
Smoked Salmon and Cream Cheese Bagels are a classic and elegant choice for a delightful Christmas lunch. This dish, with its combination of flavors and textures, isn’t only delicious but also quick and easy to prepare, making it ideal for a festive gathering. The smoky richness of the salmon pairs beautifully with the creamy and tangy cream cheese, while the bagels provide a satisfying chewy base.
This dish can be served as an appetizer or a light main course, perfect for those who want to enjoy a sophisticated meal without spending too much time in the kitchen. To elevate the flavors even further, you can add a variety of toppings and garnishes such as capers, red onion, and fresh dill. These ingredients not only enhance the taste but also add a pop of color, making the presentation visually appealing.
The freshness of the dill and the slight sharpness of the red onion complement the creaminess of the cheese and the smokiness of the salmon. Whether you’re having a cozy family gathering or a more formal celebration, these Smoked Salmon and Cream Cheese Bagels are sure to impress your guests with minimal effort.
Ingredients for 4-6 people:
- 4-6 bagels, halved
- 8 ounces of cream cheese, softened
- 200 grams of smoked salmon
- 1 small red onion, thinly sliced
- 1 tablespoon of capers, drained
- Fresh dill sprigs for garnish
- Lemon wedges, for serving
- Salt and freshly ground black pepper, to taste
Cooking Instructions:
- Prepare the Bagels: Slice the bagels in half horizontally. For a crispier texture, you may lightly toast them in a toaster or under a broiler for a few minutes until golden brown.
- Spread the Cream Cheese: Once the bagels are ready, generously spread the softened cream cheese over each half. Make sure to cover the entire surface for an even flavor.
- Layer the Smoked Salmon: Place slices of smoked salmon over the cream cheese layer. Ascertain that the salmon is evenly distributed on each bagel half to provide a balanced taste in every bite.
- Add the Toppings: Top the salmon with thin slices of red onion and a few capers for a burst of flavor. Adjust the amount of onion and capers based on your preference.
- Garnish and Serve: Add fresh dill sprigs on top for a touch of freshness and aromatic flavor. Arrange the bagels on a serving platter, and serve with lemon wedges on the side for an optional squeeze of citrus.
- Season to Taste: Just before serving, sprinkle a pinch of salt and freshly ground black pepper over the bagels to enhance the flavors.
Extra Tips:
When selecting smoked salmon, opt for high-quality, thinly sliced varieties for the best flavor and texture. Feel free to experiment with different types of bagels, such as whole wheat or everything bagels, to add more depth to the dish.
If you’re preparing these bagels ahead of time, keep the salmon and cream cheese refrigerated until just before assembly to maintain freshness. Additionally, consider offering a variety of toppings on the side so guests can customize their bagels to their liking.
Mini Quiche Lorraine

Mini Quiche Lorraine is a delightful and savory dish that makes for a perfect addition to your Christmas lunch spread.
These bite-sized quiches capture the classic flavors of a traditional Quiche Lorraine but in a convenient, mini form. Ideal for entertaining, these quiches can be prepared ahead of time and are guaranteed to impress your guests with their rich, creamy filling and crisp, buttery crust.
Originating from the Lorraine region of France, the traditional Quiche Lorraine is known for its simple yet delectable combination of eggs, cream, and bacon.
This recipe takes that classic base and transforms it into individual servings, making it easy to enjoy at a festive gathering. Whether served warm or at room temperature, Mini Quiche Lorraine is a versatile dish that pairs wonderfully with a variety of side dishes and festive beverages.
Ingredients (Serves 4-6):
- 1 ready-made puff pastry sheet
- 4 large eggs
- 1 cup heavy cream
- 1 cup Gruyère cheese, grated
- 6 slices of bacon, cooked and crumbled
- 1/4 cup onion, finely chopped
- Salt and pepper to taste
- 1 tablespoon butter
Cooking Instructions:
- Prepare the Pastry: Preheat your oven to 375°F (190°C). Roll out the puff pastry sheet on a lightly floured surface. Using a round cutter, cut out circles large enough to line the cups of a mini muffin tin. Press the pastry circles into the muffin cups, making sure they’re evenly lined.
- Cook the Bacon and Onion: In a skillet over medium heat, melt the butter. Add the chopped onion and cook until soft and translucent, about 3-4 minutes. Add the crumbled bacon and cook for an additional 2 minutes. Remove from heat and let cool slightly.
- Make the Filling: In a mixing bowl, whisk together the eggs and heavy cream until well combined. Stir in the grated Gruyère cheese, then add the cooked bacon and onion mixture. Season with salt and pepper to taste.
- Assemble the Quiches: Spoon the egg mixture into the prepared pastry-lined muffin cups, filling each about three-quarters full. Make sure the filling is evenly distributed among the cups.
- Bake: Place the muffin tin in the preheated oven and bake for 20-25 minutes, or until the quiches are golden brown and the filling is set. Remove from the oven and allow to cool slightly before serving.
Extra Tips:
For a more flavorful quiche, consider adding a pinch of nutmeg to the egg mixture, which complements the creaminess of the filling.
You can also customize the recipe by incorporating other ingredients such as spinach, mushrooms, or different types of cheese to suit your taste preferences.
If preparing ahead of time, the quiches can be stored in an airtight container in the refrigerator for up to two days and gently reheated before serving.
Roasted Vegetable Platter
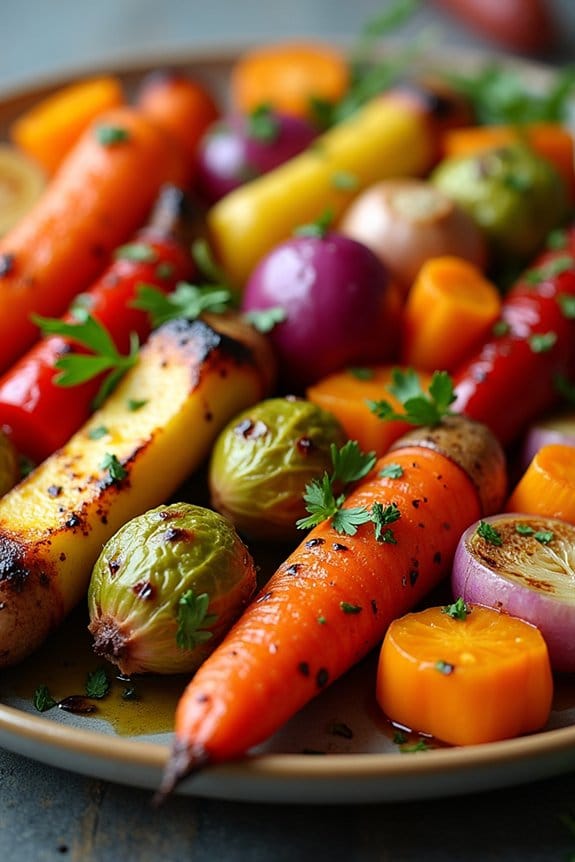
A Roasted Vegetable Platter is a vibrant and delicious addition to any Christmas lunch spread. This dish not only adds a burst of color to your table but also offers a delightful medley of flavors that complement the rest of your holiday menu.
With a variety of vegetables roasted to perfection, this platter is sure to satisfy both vegetarians and meat-lovers alike, making it a versatile and crowd-pleasing option for your festive feast.
The beauty of a Roasted Vegetable Platter lies in its simplicity and versatility. By selecting a mix of your favorite seasonal vegetables, you can create a dish that’s both nutritious and visually appealing.
The roasting process enhances the natural sweetness and depth of flavor in each vegetable, while a sprinkle of herbs and a drizzle of olive oil provide an aromatic and mouthwatering finish. This dish serves 4-6 people, making it a perfect side for your holiday gathering.
Ingredients:
- 2 medium carrots
- 2 medium parsnips
- 1 large red bell pepper
- 1 large yellow bell pepper
- 1 small butternut squash
- 1 red onion
- 200g Brussels sprouts
- 3 tablespoons olive oil
- 1 teaspoon salt
- 1/2 teaspoon black pepper
- 1 teaspoon dried thyme
- 1 teaspoon dried rosemary
- 1 teaspoon garlic powder
- Fresh parsley, for garnish
Instructions:
- Preheat the Oven: Start by preheating your oven to 425°F (220°C). This high temperature is crucial for achieving perfectly roasted vegetables with a crispy exterior and tender interior.
- Prepare the Vegetables: Wash and peel the carrots and parsnips, then cut them into 2-inch sticks. Deseed the bell peppers and cut them into thick strips. Peel the butternut squash and cut it into 1-inch cubes. Peel and slice the red onion into thick wedges. Trim the ends of the Brussels sprouts and halve them.
- Season the Vegetables: Place all the prepared vegetables in a large mixing bowl. Drizzle with olive oil and sprinkle with salt, black pepper, dried thyme, rosemary, and garlic powder. Toss the vegetables well to make certain they’re evenly coated with the oil and seasonings.
- Roast the Vegetables: Spread the seasoned vegetables in a single layer on a large baking sheet. Make sure not to overcrowd the pan, as this will steam the vegetables rather than roast them. Place the baking sheet in the preheated oven and roast for 25-30 minutes, or until the vegetables are golden brown and tender. Stir the vegetables halfway through the cooking time to make certain of even roasting.
- Garnish and Serve: Once the vegetables are roasted to perfection, remove the baking sheet from the oven. Transfer the vegetables to a serving platter and garnish with freshly chopped parsley. Serve the roasted vegetable platter warm as a side dish to your Christmas lunch.
Extra Tips:
For the best results, try to cut the vegetables into similar sizes to make certain of even cooking.
Feel free to experiment with different herbs and spices to suit your taste preferences. If you prefer a more caramelized finish, you can add a teaspoon of balsamic vinegar or honey to the seasoning mix.
Additionally, this dish can be prepared ahead of time and reheated just before serving, making it a convenient option for a stress-free holiday meal.
Easy Shrimp Cocktail

Easy Shrimp Cocktail is a classic and elegant appetizer that’s perfect for your Christmas lunch. This dish combines the briny sweetness of shrimp with a zesty, tangy cocktail sauce that will tantalize your taste buds. Not only is it delicious, but it’s also incredibly easy to prepare, making it a fantastic choice for any festive gathering.
The balance of flavors and the simplicity of preparation make this shrimp cocktail a crowd-pleaser that will surely impress your guests. Preparing this dish involves minimal cooking and a bit of chilling time, ensuring that you can focus on other aspects of your Christmas lunch.
By following a few simple steps, you can have a delightful appetizer ready to serve in no time. This recipe is designed to serve 4-6 people, making it ideal for a small to medium-sized gathering. With a few fresh ingredients and a bit of attention to detail, you’ll have a shrimp cocktail that’s as beautiful as it’s tasty.
Ingredients (Serves 4-6):
- 1 1/2 pounds large shrimp, peeled and deveined
- 1 tablespoon olive oil
- Salt, to taste
- 1 cup ketchup
- 2 tablespoons prepared horseradish
- 1 tablespoon lemon juice
- 1 teaspoon Worcestershire sauce
- 1/2 teaspoon hot sauce (optional)
- Lemon wedges, for serving
- Fresh parsley, for garnish
Cooking Instructions:
- Prepare the Shrimp: Rinse the shrimp thoroughly under cold water and pat dry with paper towels. Place the shrimp in a large bowl, drizzle with olive oil, and sprinkle with a little salt. Toss to coat the shrimp evenly.
- Cook the Shrimp: Preheat a large skillet over medium-high heat. Add the shrimp to the skillet in a single layer. Cook for 2-3 minutes on each side, or until the shrimp are opaque and cooked through. Remove the shrimp from the skillet and let them cool slightly.
- Make the Cocktail Sauce: In a medium bowl, combine the ketchup, horseradish, lemon juice, Worcestershire sauce, and hot sauce (if using). Stir until the ingredients are well blended. Adjust the seasonings to taste, if necessary.
- Chill the Shrimp: Once the shrimp have cooled, transfer them to a serving platter. Cover the platter with plastic wrap and refrigerate for at least 30 minutes, allowing the shrimp to chill thoroughly.
- Serve: Arrange the chilled shrimp around a small bowl filled with the cocktail sauce. Garnish the platter with lemon wedges and fresh parsley for a pop of color and added flavor. Serve immediately to enjoy at its freshest.
Extra Tips:
When preparing shrimp cocktail, quality matters. Choose fresh, high-quality shrimp for the best flavor and texture. You can opt for pre-cooked shrimp to save time, but make sure they’re fresh and not overly processed.
Adjust the spiciness of the cocktail sauce by varying the amount of horseradish and hot sauce to suit your preference. For an extra touch, consider serving the shrimp on a bed of crushed ice to keep them chilled longer and enhance the presentation.
Turkey and Cranberry Sandwiches
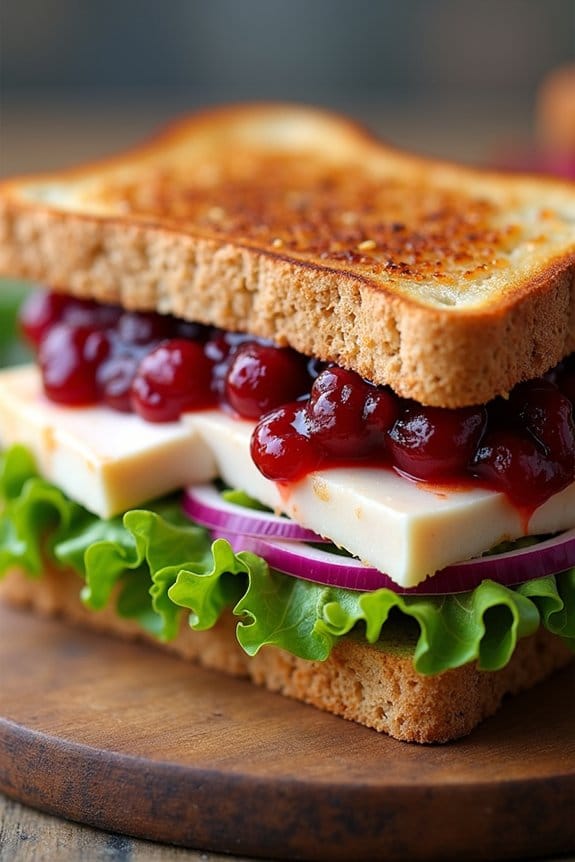
The magic of these sandwiches lies in their balance of textures and flavors. The soft yet hearty bread cradles layers of tender turkey, juicy cranberry sauce, and crisp greens, creating a harmonious blend in every bite.
Adding a touch of mayonnaise or a slice of cheese can elevate the richness, while fresh herbs like thyme or rosemary can introduce a fragrant, earthy note. Whether served warm or cold, these sandwiches are certain to please family and friends alike during your holiday gathering.
Ingredients (Serves 4-6):
- 8-12 slices of sourdough or whole grain bread
- 2 cups cooked turkey breast, sliced or shredded
- 1 cup cranberry sauce
- 1/2 cup mayonnaise
- 8-12 leaves of romaine lettuce or mixed greens
- 8 slices of cheddar or Swiss cheese (optional)
- 1 small red onion, thinly sliced
- Salt and pepper to taste
- 2 tablespoons butter (for toasting, optional)
- Fresh herbs such as thyme or rosemary (optional)
Cooking Instructions:
- Prepare the Ingredients: Gather all your ingredients and verify the turkey is sliced or shredded to your preference. If you opt to toast your bread, start by buttering one side of each slice.
- Toast the Bread: If desired, heat a skillet over medium heat and toast the buttered bread slices until golden brown on each side. Remove from the skillet and set aside.
- Assemble the Sandwiches: Spread a thin layer of mayonnaise on one side of each slice of bread. On half of the slices, layer the turkey evenly, followed by a spoonful of cranberry sauce. Add a slice of cheese if using, then top with greens and a few slices of red onion. Season with salt and pepper to taste.
- Top and Serve: Place the remaining bread slices on top, mayonnaise side down, to complete the sandwich. If you prefer a warm sandwich, return it to the skillet for a minute on each side to slightly melt the cheese and warm the turkey.
- Slice and Enjoy: Cut the sandwiches in half diagonally and serve immediately. These sandwiches pair beautifully with a light salad or a side of roasted vegetables for a complete meal.
Extra Tips: For added depth of flavor, consider using a flavored mayonnaise, like garlic or herb-infused. If you’re using leftover turkey, reheating it gently in a pan with a splash of broth can help maintain its moisture.
To keep the sandwiches fresh for serving later, store them in the refrigerator wrapped in parchment paper to prevent sogginess. Finally, feel free to experiment with different types of bread or cheese to tailor the sandwiches to your taste preferences.
Gingerbread Cupcakes

Gingerbread cupcakes are a delightful addition to any Christmas lunch, combining the warm, spicy flavors of gingerbread with the light, fluffy texture of a cupcake. Perfect for a festive dessert table or as a sweet treat to enjoy with a cup of hot cocoa, these cupcakes are guaranteed to bring cheer to your holiday celebrations.
Their aromatic blend of spices and rich molasses makes them a quintessential holiday dessert that’s both comforting and indulgent.
This recipe yields 12-16 cupcakes, making it the perfect quantity for a gathering of 4-6 people. Each bite delivers a burst of ginger, cinnamon, and cloves, while the cream cheese frosting adds a tangy sweetness that balances the spices perfectly. These cupcakes aren’t only delicious but also easy to make, assuring you have more time to enjoy the festivities with family and friends.
Ingredients:
- 1 ½ cups all-purpose flour
- 1 teaspoon baking soda
- 1 teaspoon ground ginger
- 1 teaspoon ground cinnamon
- ¼ teaspoon ground cloves
- ¼ teaspoon salt
- ½ cup unsalted butter, softened
- ½ cup brown sugar, packed
- 1 large egg
- ½ cup molasses
- ½ cup hot water
- 8 oz cream cheese, softened
- ½ cup unsalted butter, softened
- 3 cups powdered sugar
- 1 teaspoon vanilla extract
Cooking Instructions:
- Preheat the Oven: Begin by preheating your oven to 350°F (175°C). Line a muffin tin with cupcake liners to prepare for batter pouring.
- Mix Dry Ingredients: In a medium bowl, whisk together the flour, baking soda, ground ginger, cinnamon, cloves, and salt. This guarantees the spices are evenly distributed throughout the flour.
- Cream Butter and Sugar: In a large mixing bowl, cream together the softened butter and brown sugar until light and fluffy. This should take about 3-4 minutes using an electric mixer on medium speed.
- Add Egg and Molasses: Beat in the egg, followed by the molasses, mixing until fully combined. The mixture should be smooth and creamy.
- Combine Wet and Dry Ingredients: Gradually add the dry ingredients to the wet mixture, alternating with the hot water. Mix until just combined, being careful not to overmix.
- Fill and Bake: Spoon the batter into the prepared cupcake liners, filling each about two-thirds full. Bake in the preheated oven for 18-20 minutes, or until a toothpick inserted into the center of a cupcake comes out clean.
- Prepare the Frosting: While the cupcakes are cooling, beat the cream cheese and butter together until smooth. Gradually add the powdered sugar and vanilla extract, beating until the frosting is creamy and spreadable.
- Frost the Cupcakes: Once the cupcakes have cooled completely, frost them generously with the cream cheese frosting. Use a piping bag for a decorative touch or a knife for a rustic finish.
Extra Tips:
When measuring molasses, use a lightly greased measuring cup to prevent sticking and guarantee an accurate measurement.
If you prefer a stronger ginger flavor, consider adding a pinch of ground nutmeg or allspice to the batter.
For an added festive touch, top the frosted cupcakes with edible decorations like gingerbread men cookies, sprinkles, or a dusting of cinnamon.
Store any leftover cupcakes in an airtight container in the refrigerator for up to three days, allowing them to come to room temperature before serving.
Chocolate Peppermint Bark

Chocolate Peppermint Bark is a delightful and festive treat that perfectly captures the essence of the holiday season. This simple yet delicious dessert combines rich chocolate with the invigorating crunch of peppermint, making it a favorite for Christmas gatherings. Not only is it incredibly easy to prepare, but it also makes for a wonderful homemade gift that can be wrapped up and shared with loved ones.
This recipe for Chocolate Peppermint Bark is designed to serve 4-6 people, making it ideal for a small holiday party or family gathering. The layers of dark and white chocolate, adorned with crushed peppermint candies, create a visually appealing and flavorful treat that’s sure to be a hit. Follow the steps below to create this festive dessert that will add a sweet touch to your Christmas lunch.
Ingredients:
- 12 oz dark chocolate chips
- 12 oz white chocolate chips
- 1 teaspoon peppermint extract
- 1/2 cup crushed peppermint candies (or candy canes)
- 1/4 teaspoon sea salt
Cooking Instructions:
- Prepare a Baking Sheet: Line a baking sheet with parchment paper or a silicone baking mat. This will prevent the chocolate from sticking and make it easier to remove once set.
- Melt the Dark Chocolate: In a microwave-safe bowl, add the dark chocolate chips. Microwave in 30-second intervals, stirring in between, until the chocolate is completely melted and smooth. Alternatively, you can melt the chocolate using a double boiler on the stovetop.
- Spread the Dark Chocolate: Pour the melted dark chocolate onto the prepared baking sheet and spread it evenly with a spatula to about 1/4 inch thickness. Place the baking sheet in the refrigerator for about 15 minutes to let the chocolate firm up slightly.
- Melt the White Chocolate: While the dark chocolate is setting, melt the white chocolate chips in a similar manner—using either the microwave or a double boiler—until smooth.
- Add Peppermint Flavor: Stir the peppermint extract into the melted white chocolate, making sure it’s evenly incorporated.
- Spread the White Chocolate: Once the dark chocolate layer is slightly firm, remove the baking sheet from the refrigerator. Pour the melted white chocolate over the dark chocolate layer, spreading it evenly.
- Add Peppermint Topping: Immediately sprinkle the crushed peppermint candies and sea salt over the top of the white chocolate layer. Press down gently with your hands to guarantee the candies adhere to the chocolate.
- Set the Bark: Place the baking sheet back in the refrigerator for about 30 minutes, or until the chocolate is completely set and firm.
- Break into Pieces: Once set, remove the bark from the refrigerator. Use your hands to break it into irregular pieces. Serve immediately or store in an airtight container.
Extra Tips:
When making Chocolate Peppermint Bark, be sure to use high-quality chocolate for the best flavor and texture. If you prefer a thicker bark, you can double the amount of chocolate used.
Additionally, for a more sophisticated look, consider swirling the white and dark chocolates together slightly before adding the peppermint topping. Make sure to work quickly when spreading the layers and adding the toppings to avoid setting before you’re done.
Store the bark in a cool, dry place to maintain its freshness and crispness.
Eggnog Cheesecake Bites

Eggnog Cheesecake Bites are a delightful twist on the traditional cheesecake, perfectly suited for a festive Christmas lunch. These bite-sized treats combine the rich, creamy texture of classic cheesecake with the warm, spicy flavors of eggnog, making them a perfect addition to your holiday dessert spread.
Their small size makes them easy to serve and enjoy, allowing guests to indulge in a little taste of the holidays without the commitment of a whole slice of cheesecake.
These Eggnog Cheesecake Bites aren’t only delicious but also convenient to prepare ahead of time, freeing up your schedule for other holiday preparations. With a simple graham cracker crust and a creamy filling infused with eggnog and spices, these bites are sure to impress your guests with their delightful flavor and festive appearance.
Whether you’re hosting a large gathering or a cozy family lunch, these cheesecake bites are a must-try for your Christmas menu.
Ingredients (Serves 4-6 people):
- 1 cup graham cracker crumbs
- 2 tablespoons granulated sugar
- 4 tablespoons unsalted butter, melted
- 8 ounces cream cheese, softened
- 1/2 cup granulated sugar
- 1 tablespoon all-purpose flour
- 1/4 cup eggnog
- 1 large egg
- 1 teaspoon vanilla extract
- 1/2 teaspoon ground nutmeg
- Whipped cream, for topping (optional)
- Additional ground nutmeg, for garnish (optional)
Instructions:
- Prepare the Crust: Preheat your oven to 350°F (175°C). In a medium bowl, combine the graham cracker crumbs, 2 tablespoons of sugar, and melted butter. Mix until the crumbs are evenly coated with butter and the mixture resembles wet sand.
- Form the Crust: Line a mini muffin tin with paper liners. Spoon about a tablespoon of the crumb mixture into each liner, pressing it down firmly to form an even crust layer. Bake in the preheated oven for 5 minutes. Remove from the oven and set aside to cool while you prepare the filling.
- Make the Filling: In a large bowl, beat the softened cream cheese with an electric mixer until smooth. Add 1/2 cup sugar and flour, beating until well combined. Gradually add the eggnog, egg, vanilla extract, and nutmeg, mixing until the filling is smooth and creamy.
- Fill the Muffin Cups: Spoon the cream cheese mixture over the cooled crusts, filling each cup almost to the top. Tap the muffin tin gently on the counter to remove any air bubbles.
- Bake the Cheesecake Bites: Bake in the preheated oven for 15-18 minutes or until the edges are set and the centers still have a slight jiggle. Remove from the oven and let them cool in the pan for about 30 minutes. Transfer to the refrigerator to chill for at least 2 hours or until fully set.
- Serve: Before serving, top each cheesecake bite with a dollop of whipped cream and a sprinkle of ground nutmeg, if desired, for an extra festive touch.
Extra Tips: When making these Eggnog Cheesecake Bites, guarantee that your cream cheese is softened to room temperature for a smooth and creamy filling.
To prevent cracking, avoid overbaking the cheesecake bites; they should still have a slight jiggle in the center when you remove them from the oven. For a more pronounced eggnog flavor, consider adding a splash of rum extract along with the vanilla.
These bites can be made a day in advance and stored in the refrigerator, making them a convenient and stress-free dessert option for your Christmas festivities.
